Advanced actions
External Request
With external requests, you can call APIs from other third parties or your own server to request data, submit data and etc.
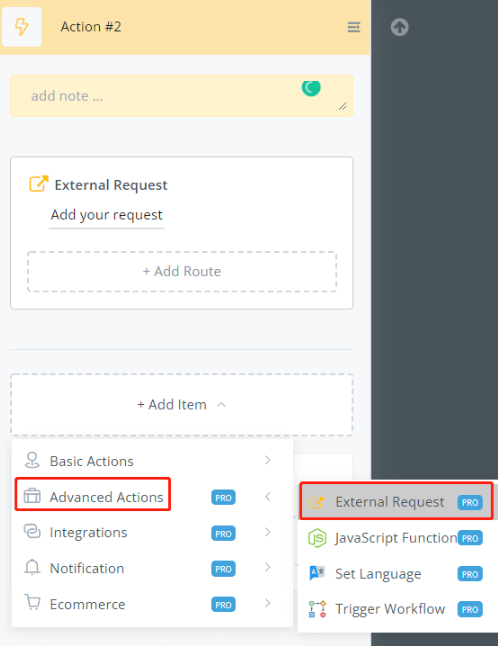
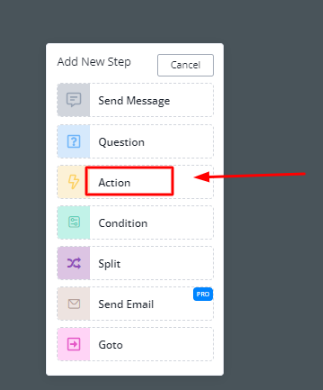
In an Action step, find “External Request” in “Advance Actions” and click “Add your request” then start editing it:
- choose a request type such as GET, POST, etc
- paste your request URL / endpoint
- adjust “URL parameters”, “Headers”, “Body” or “Authorization” section if needed. e.g. setup API key
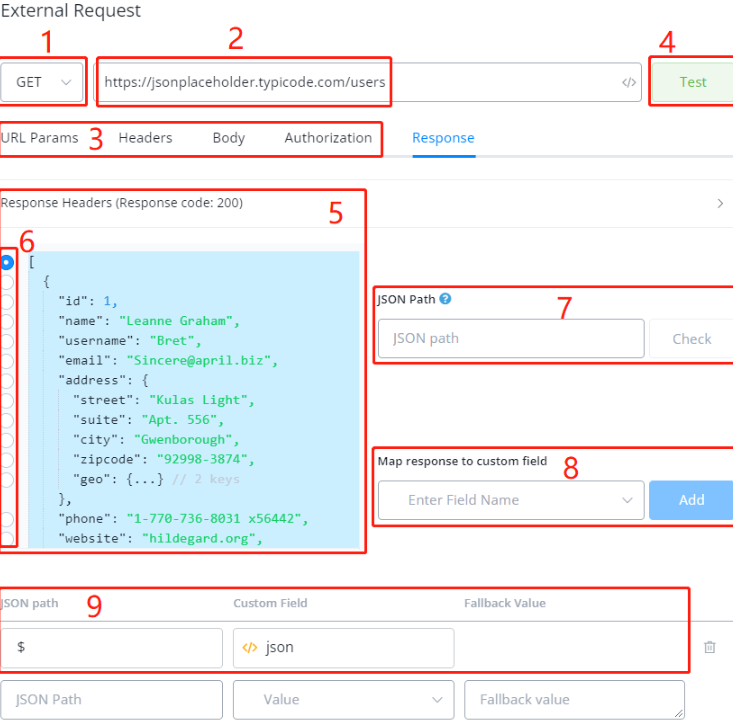
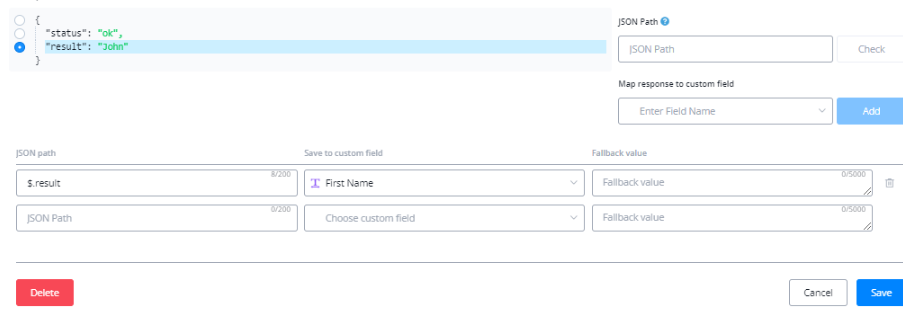
- click “Test” and area 5 will show in the “Response” section with a response code
- click on “Response Headers” to expand the header for more details and the received data is in blue
- choose which part of the data you need by clicking the circle on the left-side accordingly
- after clicking area 6, the JSON path for the selected data is automatically shown here. $ means the whole JSON.
- choose which custom field to store the data. You can create a new field here by typing in a field name and clicking it in the drop-down. Click the “Add” button to add to the mapping list
- finally, the mapping shows in area 9. Add as many mapping as needed and click “Save”.
💡 Testing Value - Make sure you provide testing data for any one of the fields/variables in the settings before you use the Test button.
URL Params
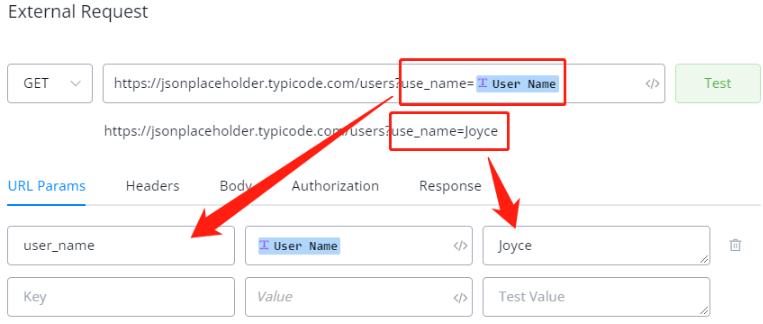
In the above screenshot, we can see that there is a URL parameter in the endpoint called “user_name”. Remember to copy the endpoint down and provide a testing value.
Alternatively, you can use the URL Params sections for the same result.
Headers
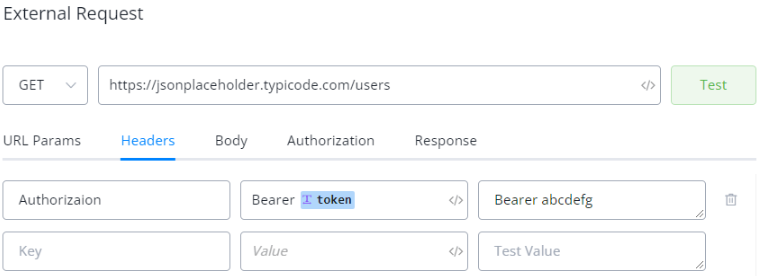
Same as URL Params, put your key name first, then insert the variable and provide a testing value.
Authorization
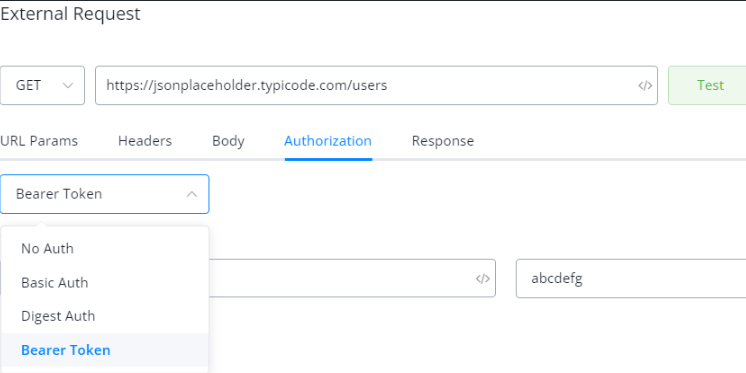
Alternatively, put the token in the Authorization section. It’s going to be less error-prone (sometimes people just forgot the “Bear ” in front of the token).
Moreover, for Basic Auth, simply put your username and password value and the system will do the base64 encoding for you.
Body
To include a file itself in the parameters, use multipart/form-data:
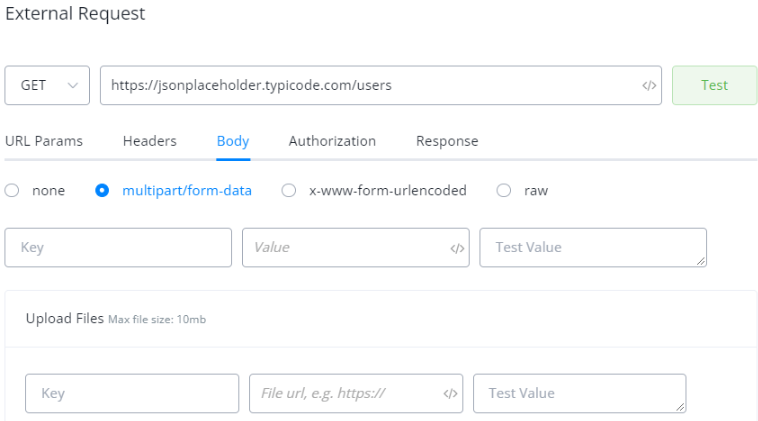
x-www-for-urlencoded works just like URL Params or Headers section.
Instead of listing all the payloads in x-www-form-urlencoded, you can also paste the example payload in raw JSON:
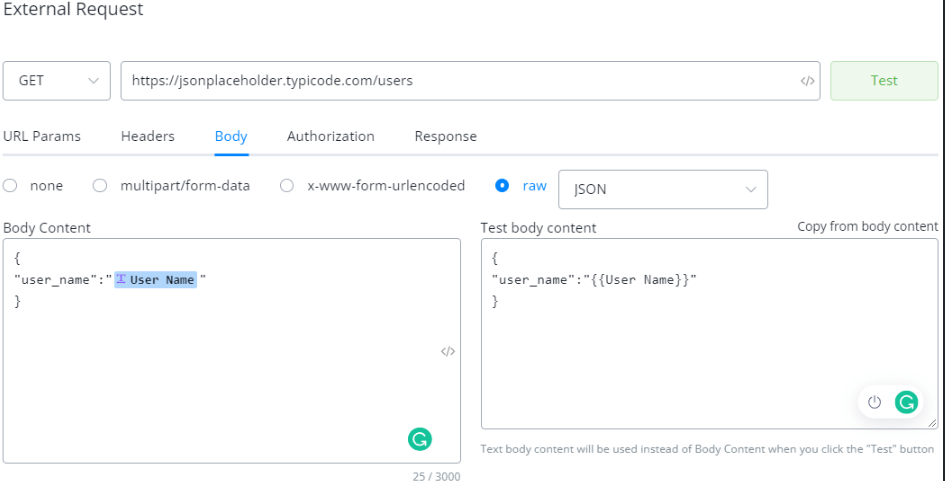
On the left-hand side, Body Content, paste or write your JSON first, when you insert a variable, the Test body content shows on the right side immediately. It’s to specify a testing JSON value.
Click on Copy from body content to copy the whole JSON structure. All the variables will be replaced by {{variable_name}}. Remove the placeholder and put your testing values.
Testing
Once you are ready, click on the Test button next to the URL endpoint or in the Response section.
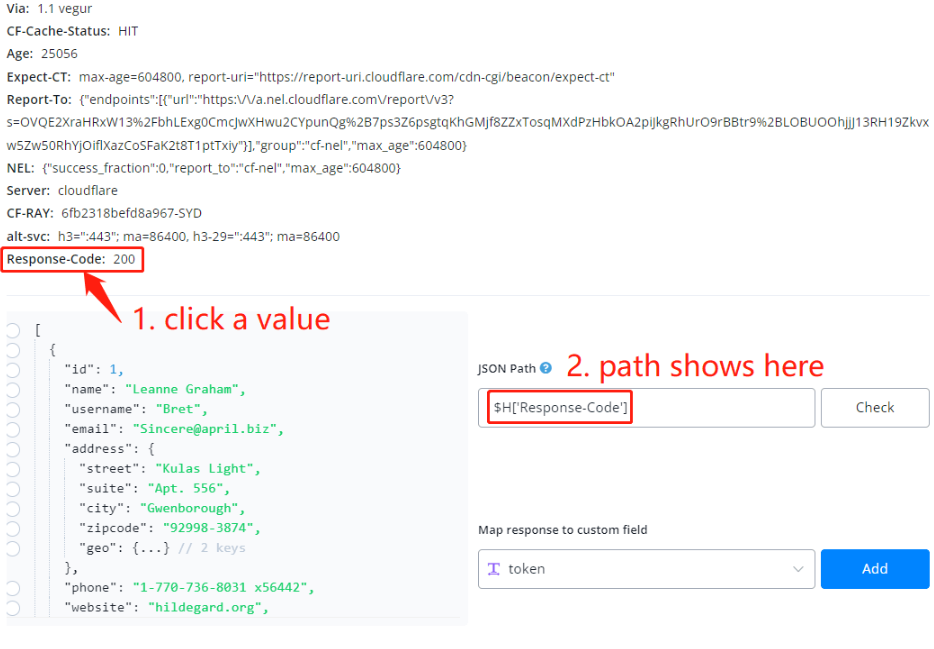
Besides the tips about how to map data above, you might also want to save the values in the response header for later use. Simply expand the header, click on a value in the header and the JSON path to it shows automatically there.
Smart Delay
documentation still in progress
JavaScript Function
Messagingme.app now allows its users to carry out complex flow logic using Javascript action. The users will be able to write javascript code to carry out various complex flows and formulae which are not natively supported by Messagingme.app yet.
Selecting Javascript Action Node
Create an Action node block, Click on Advanced Actions and select Javascript Function node.
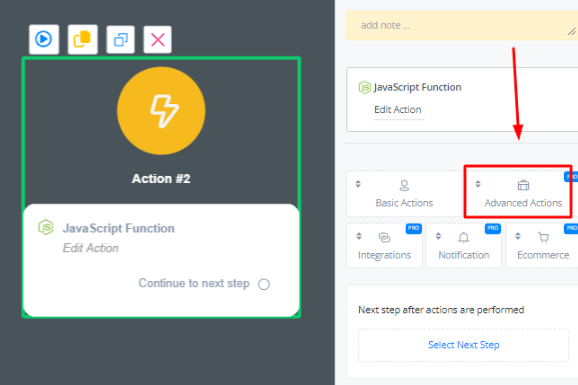
Javascript Function Node
A javascript function acts exactly like a function. All parameters are first parsed into the javascript block before they can be used. The top part of the action is used for input.

Parameters Name: Add the name of the variable you are parsing
Parameters Value: Add the userfield you want to parse into the javascript function
Test Value: Add a testing value which can be used here to run tests
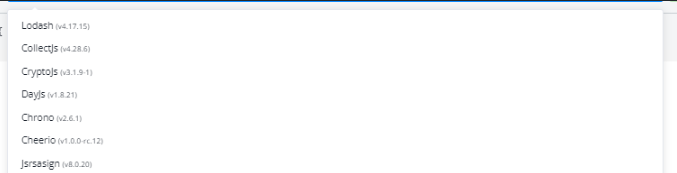
These javascript libraries extent the functionality of the native function block.
In the function block, you can write your javascript code.
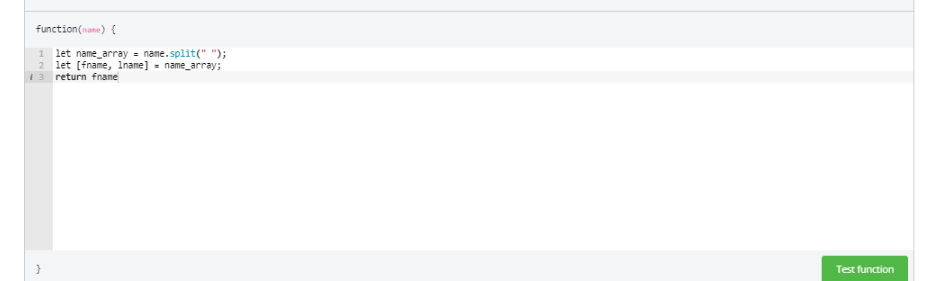
After writing the code, you will always have to return your value since the function block acts as a regular function.
Note: Native javascript methods such as console log that require a browser does not work with the Javascript Function node
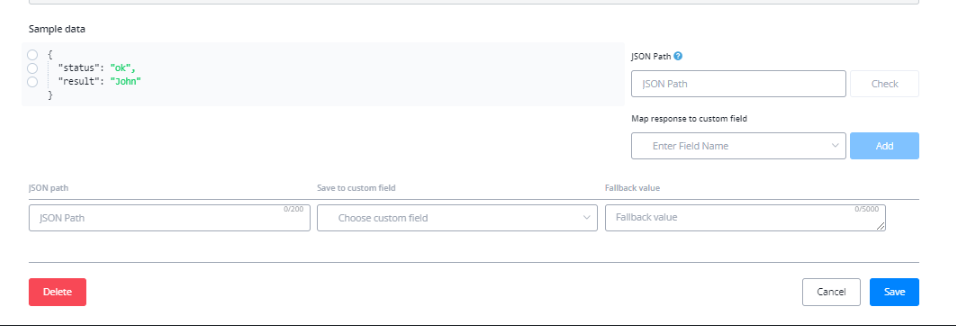
You can map the results of your code to update certain user fields.
Note: When handling JSONs, all JSONs have to be first parsed and then be able to used inside the code.
SSO Actions
Messagingme.app now allows its users to further expand on its SSO login with SSO actions. You will now be able to link, delink channels, and other actions which you were not be able to do previously using automations in flow builder.
Using SSO Actions
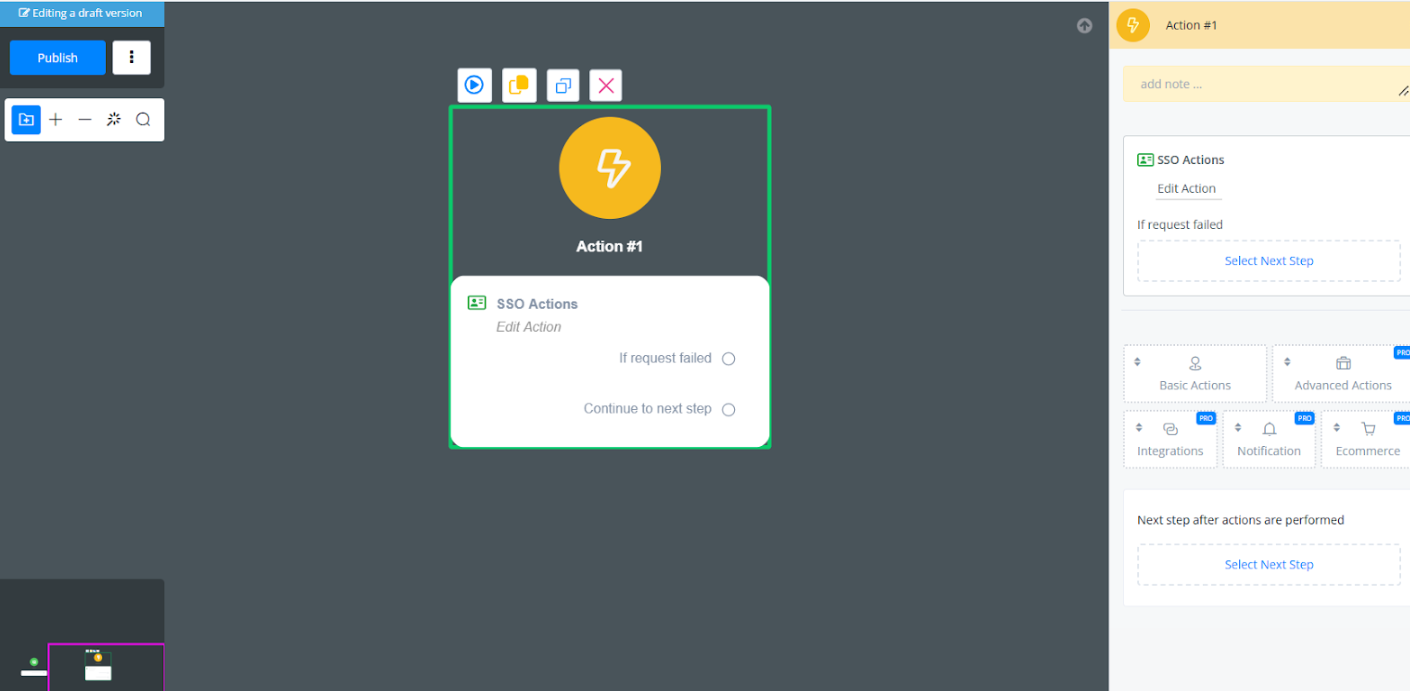
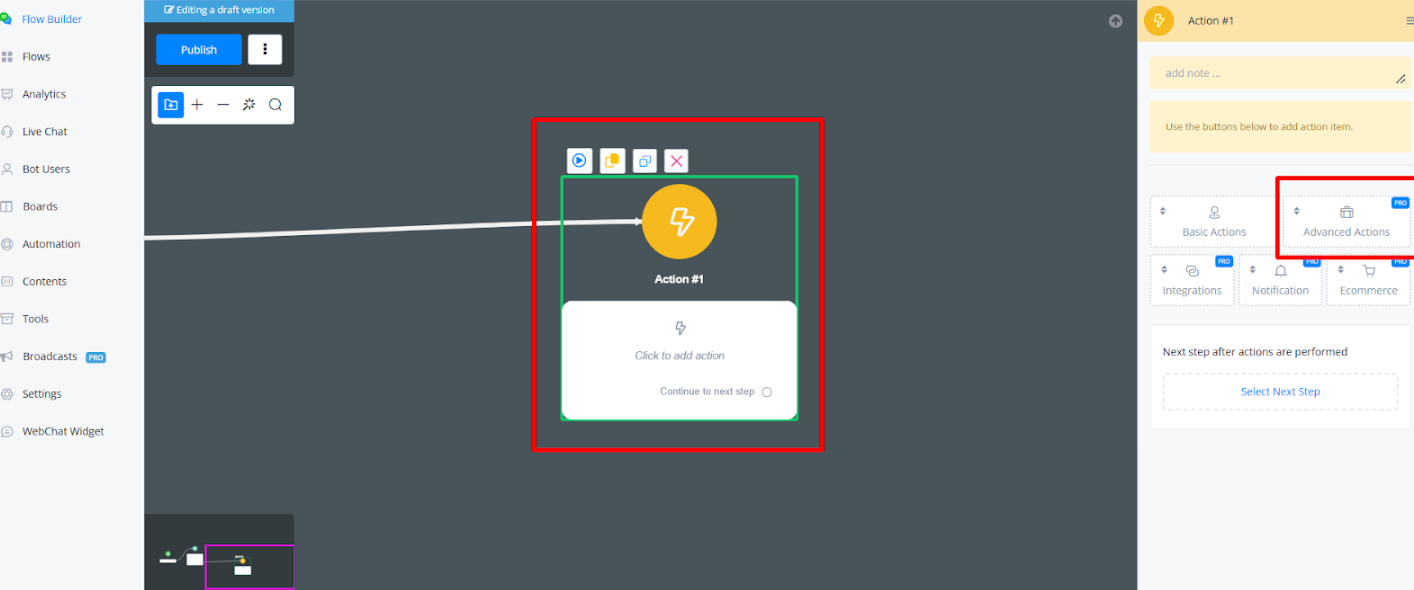
Inside the flowbuilder, right click and then select “Action” block
Click on “Advance Actions”
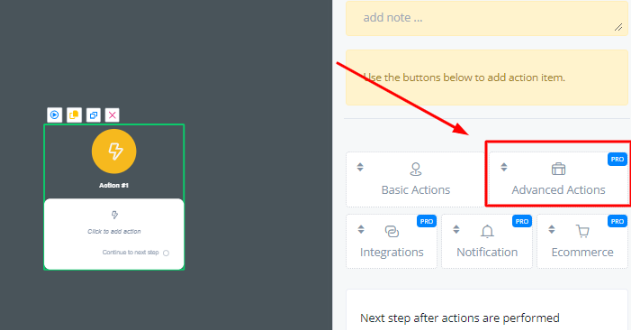
Scroll down and select “SSO Actions”
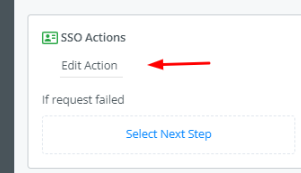
Click on “Edit Action” to start exploring different SSO actions.
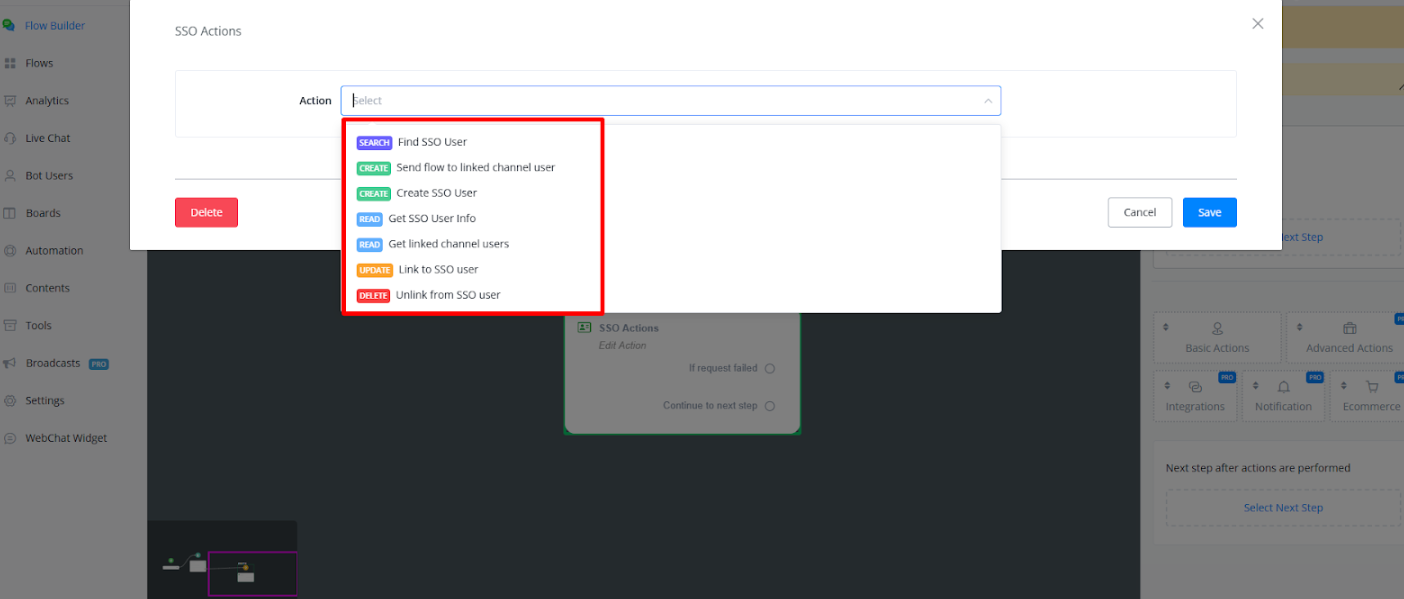
SSO Actions
Following SSO actions are currently available with Messgaingme.app.
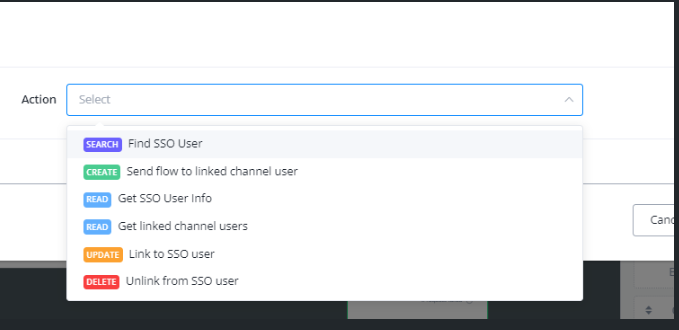
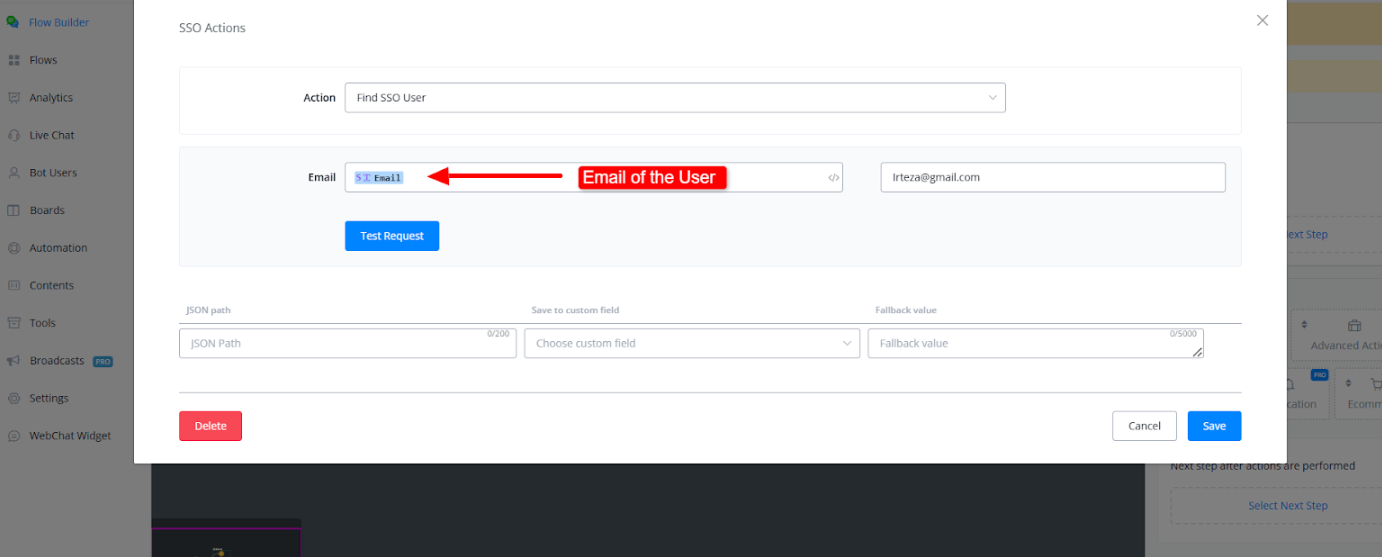
Find SSO User
This action is used to find SSO user using their attached email which they used to login using SSO.
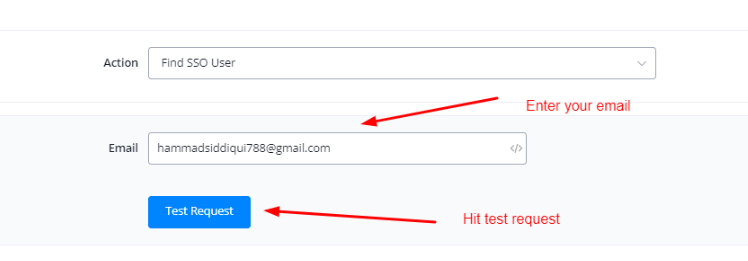
💡 SSO User NS and Bot User NS are two different entities, the former one is for the master user while the later one is for individual users of the respective channels that are linked with the user
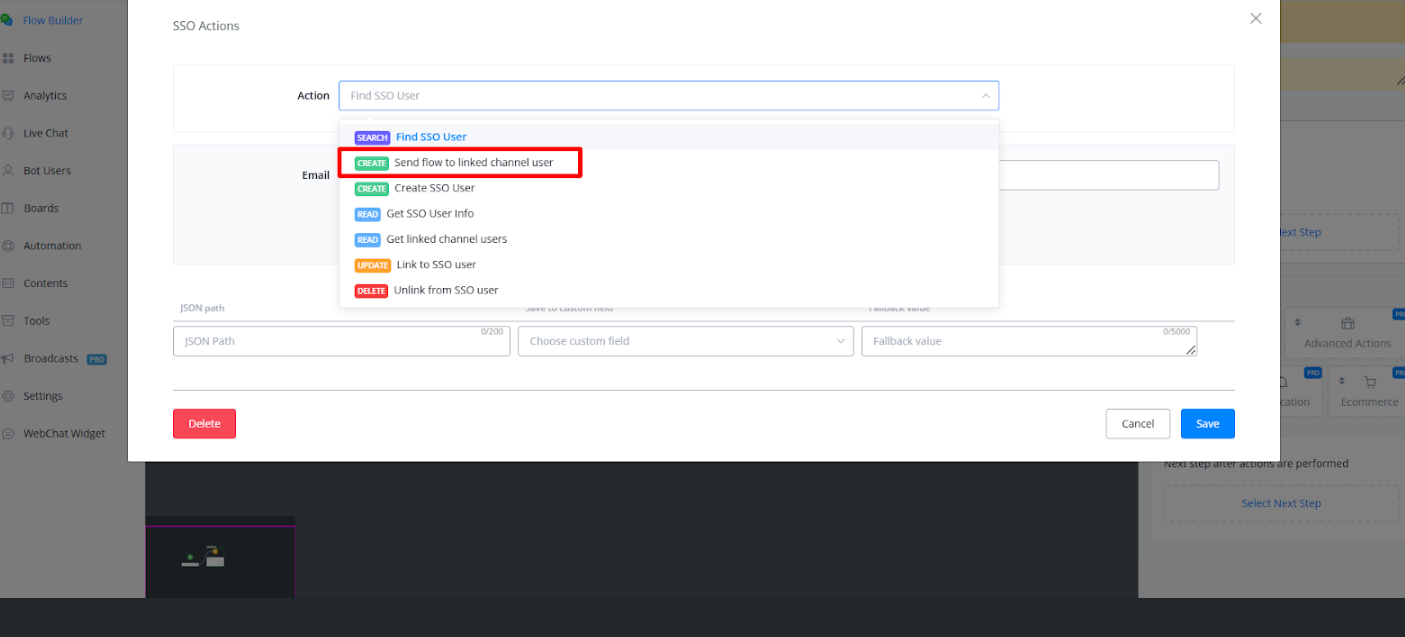
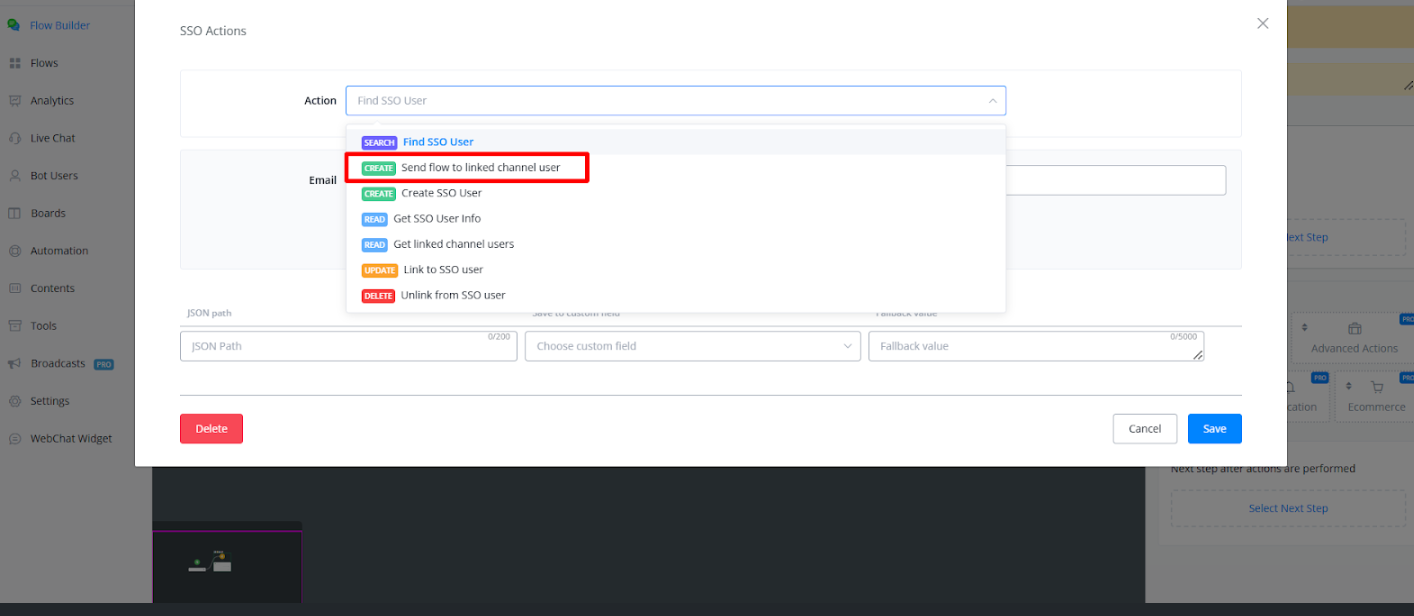
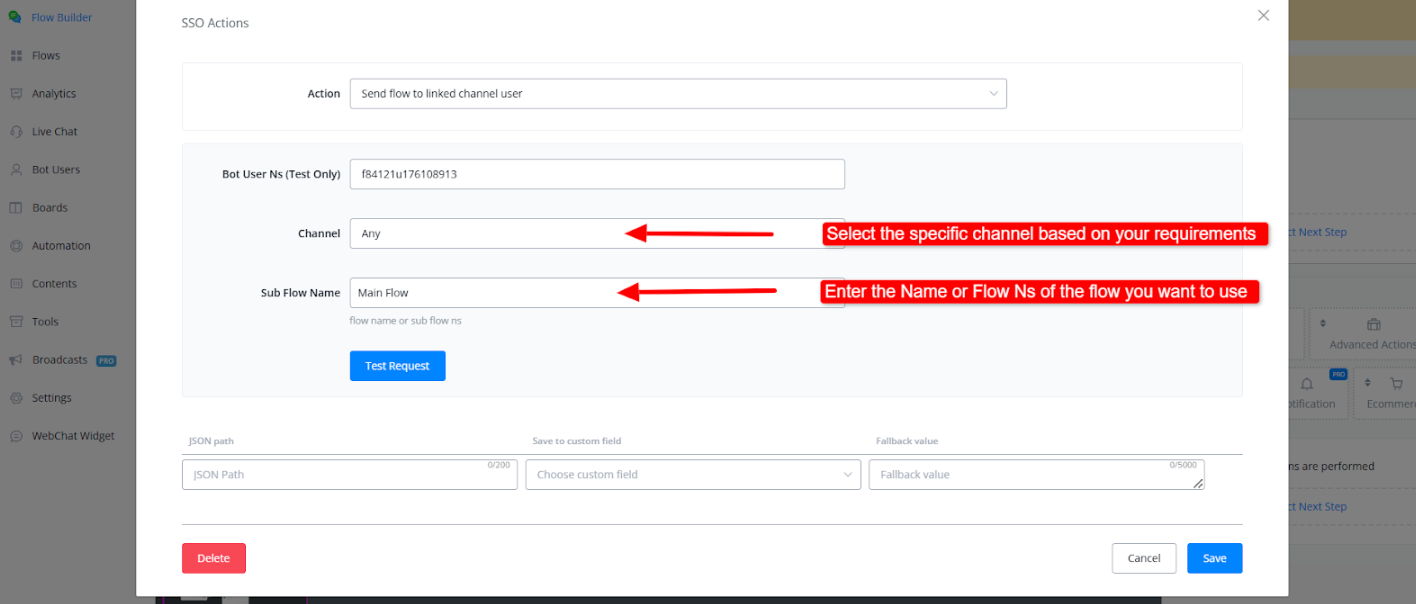
Send Flow To Linked Channel User
This flow is used to send a linked user a subflow in its linked Channel. For example, sending a flow to your linked whatsapp user from SSO user.
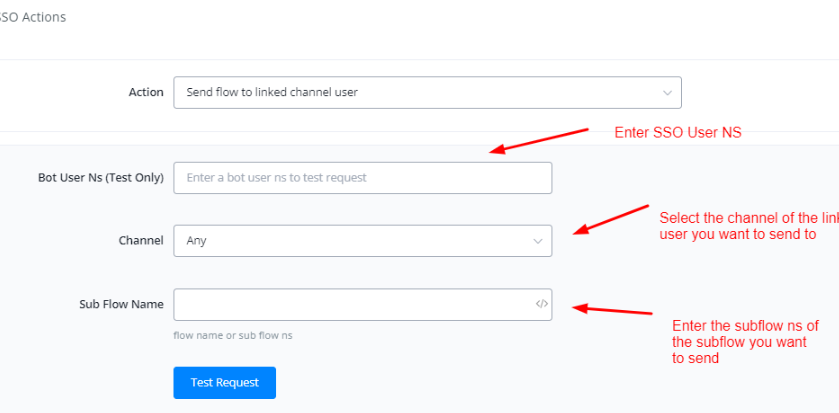
💡 All restrictions of channels such as 24 hour window for Meta channels still applies
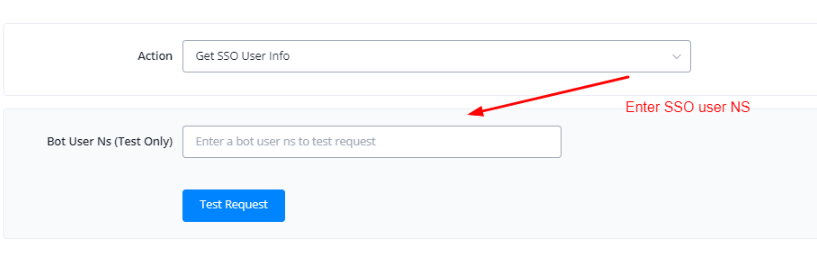
Get SSO User Info
This action is used to fetch user info for SSO master user.
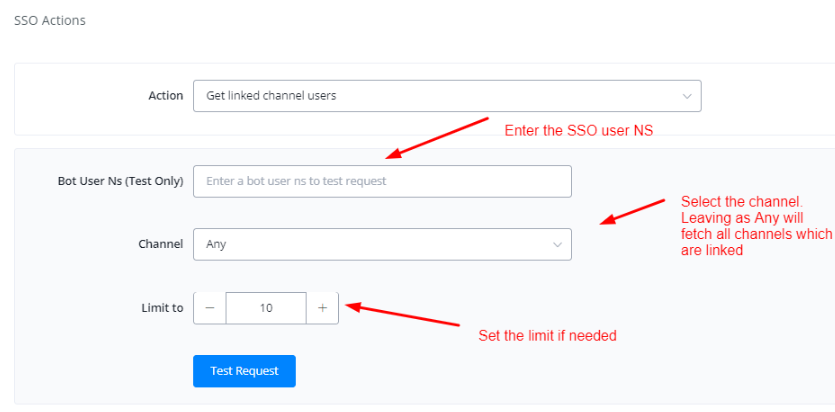
Get Linked Channel Users
This action is used to get information regarding all the linked channels using the SSO user NS.
Link To SSO User
This action is used to link and individual channel bot user to the SSO master user using SSO user NS.
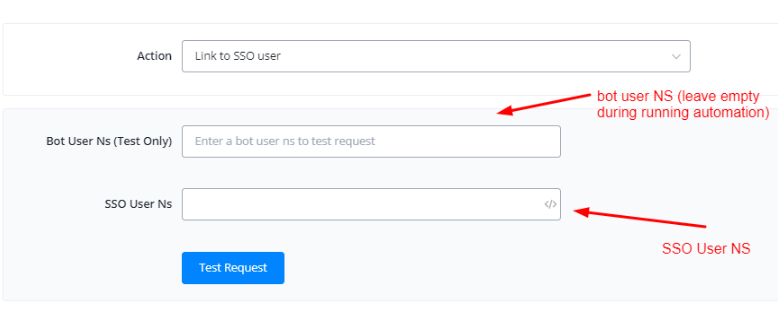
💡 This action can only be used inside the channel you want to delink from SSO user
SSO Actions
Create SSO User by Email
The newly added action enables the creation or linking of an SSO profile through an existing email, reducing the need for social media logins.
How to Use SSO Action
Go to the Flow builder, Select Action Node and choose Advanced Actions.
Then select SSO Actions
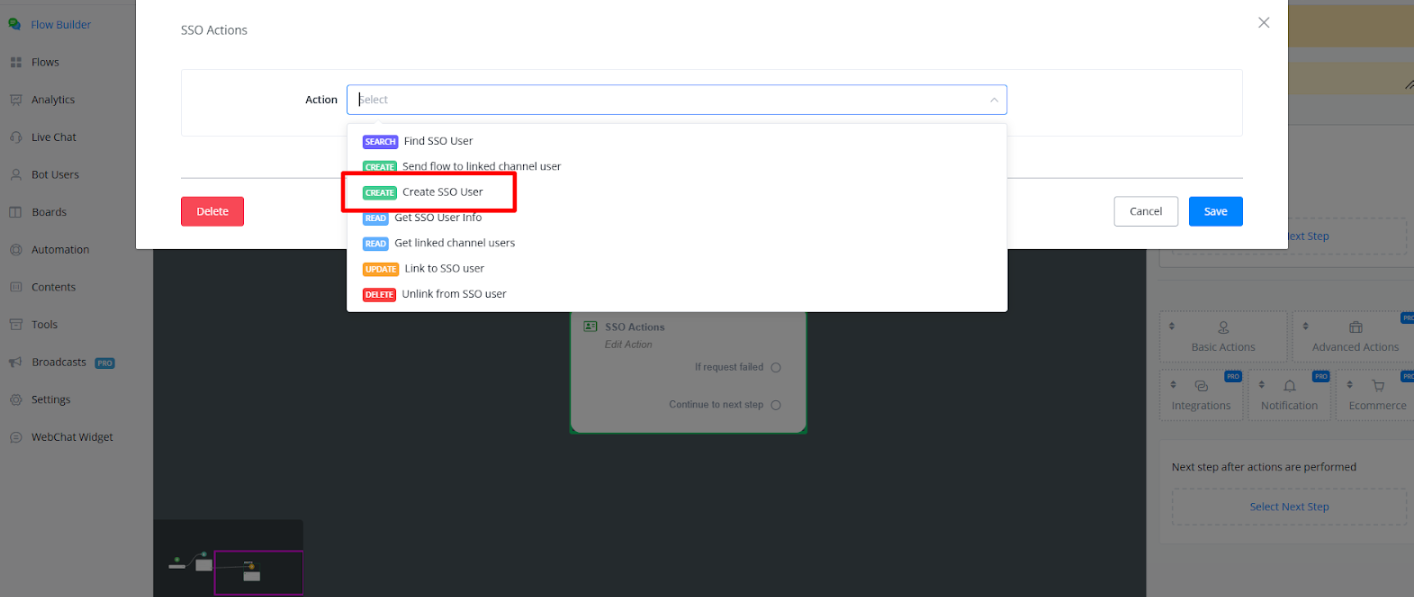
Here you have multiple actions to choose from.
Steps to Implement SSO via Email
Create SSO Profile Using Email
To create a new user you can select ‘Create SSO User**’**
The SSO channel will be based on user email
(Note: Ensure the email exists by adding a condition to check for it beforehand)
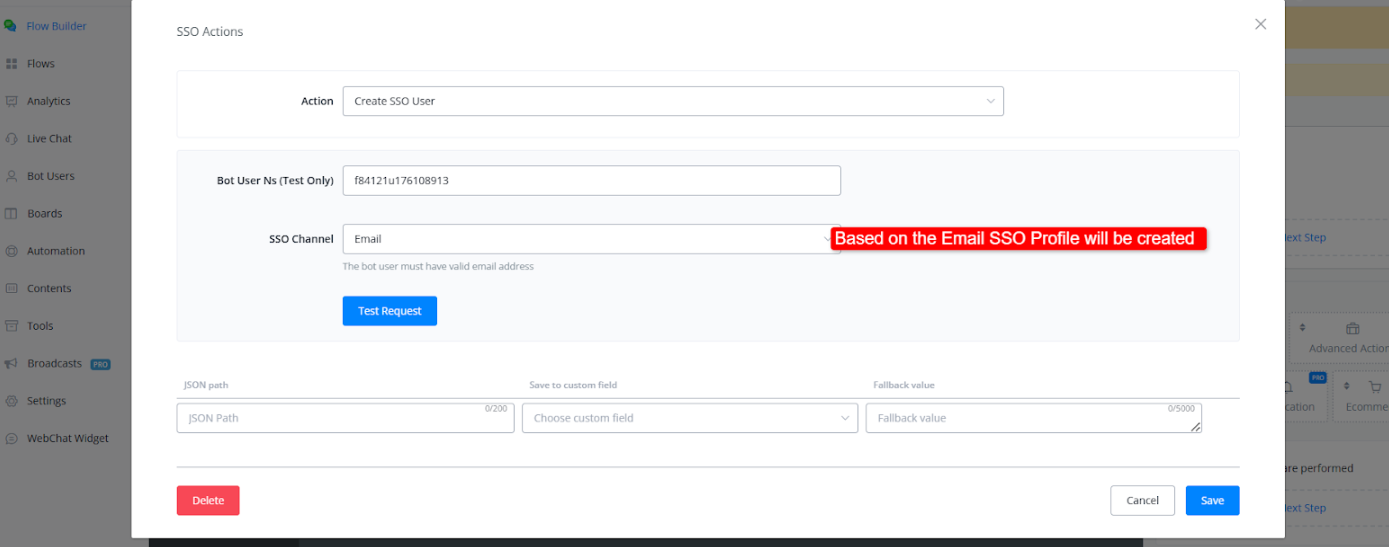
This setup ensures that users with the same email across different channels are recognized, avoiding repeated SSO login requests.
Find SSO Profile User
To Search SSO Profile user you can use an Action ‘Find SSO User’
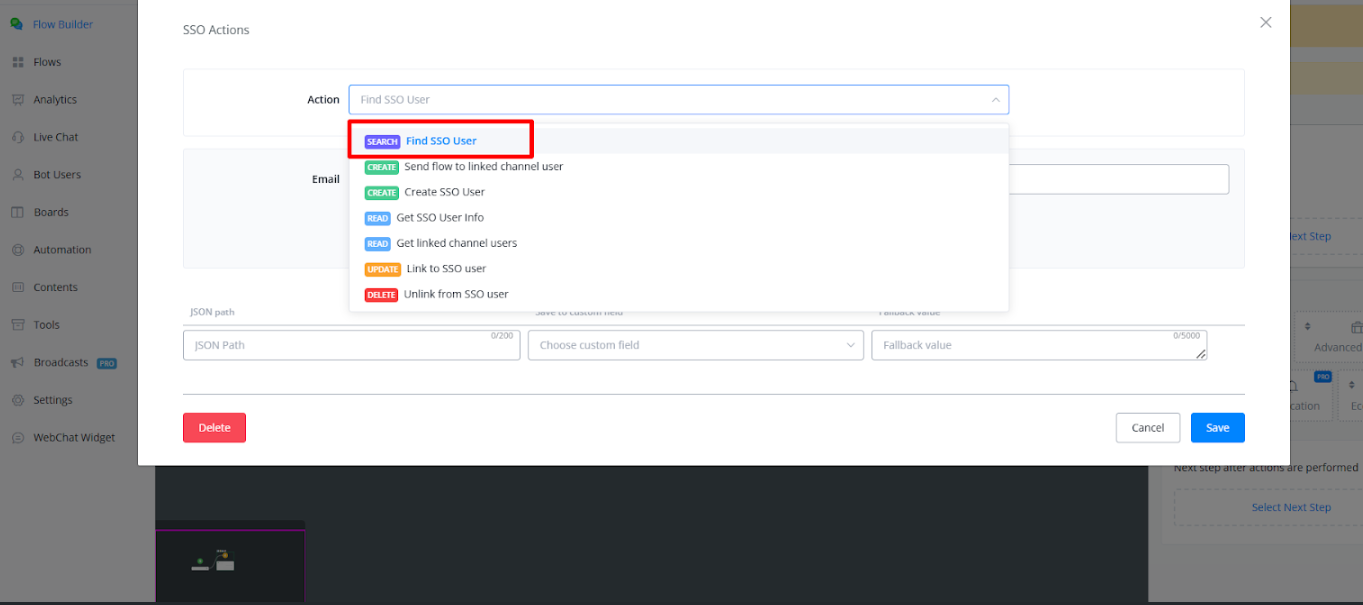
You can Search SSO Profile User through Email
Send Flow to SSO Profile User
You can also send a bot flow to SSO Profile user
You can also send the flow tailored to the specific channel.
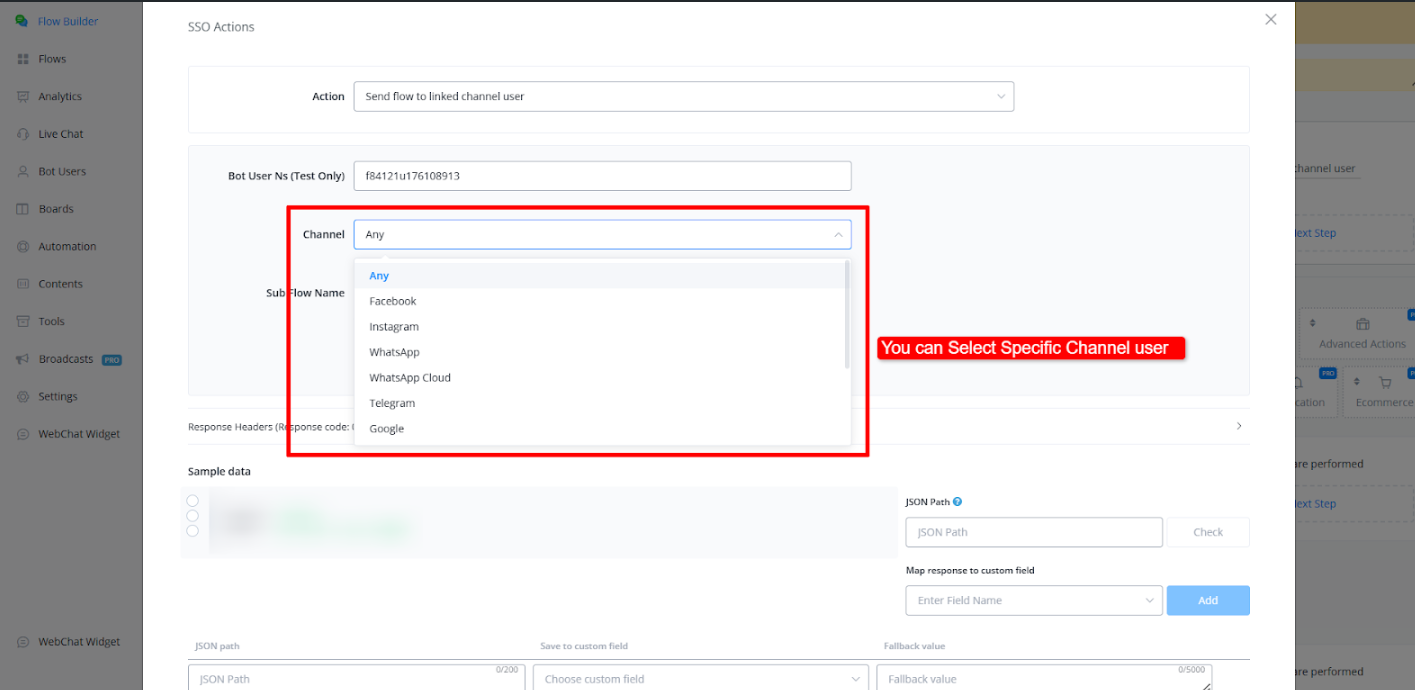
You can set the configuration and send the flow.
Similarly You can use other Actions as well according to your Requirements.
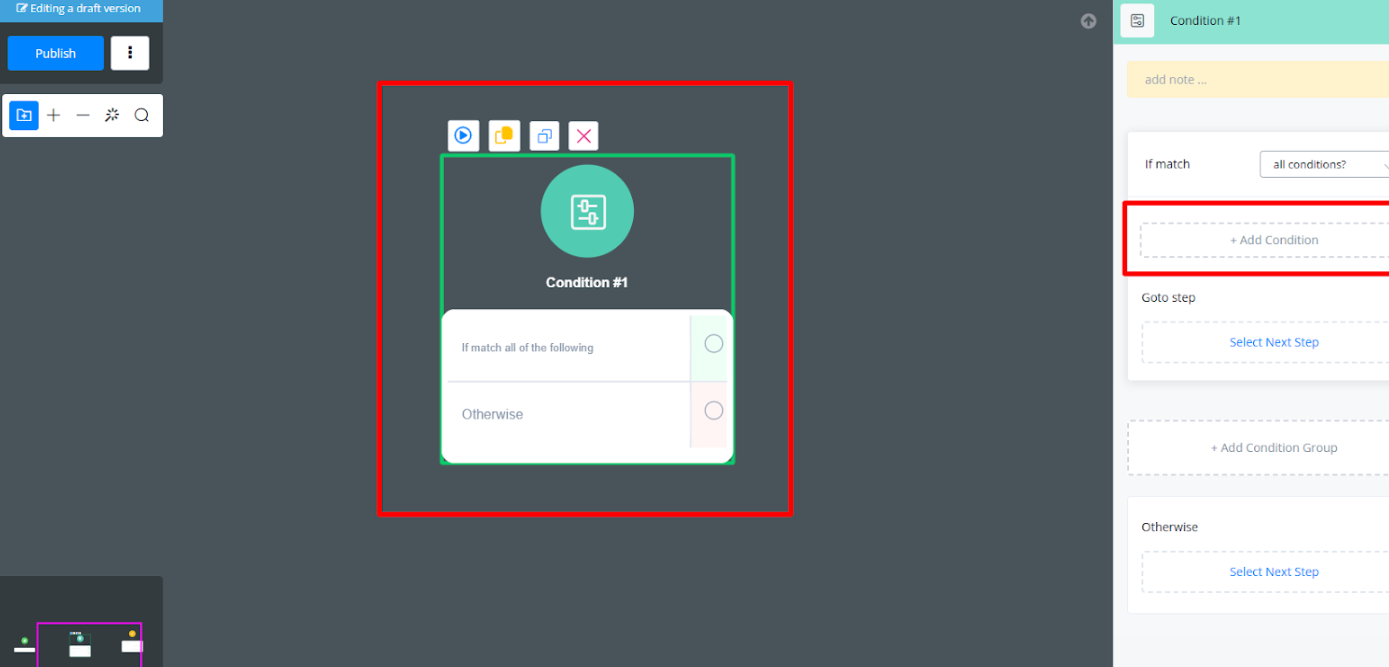
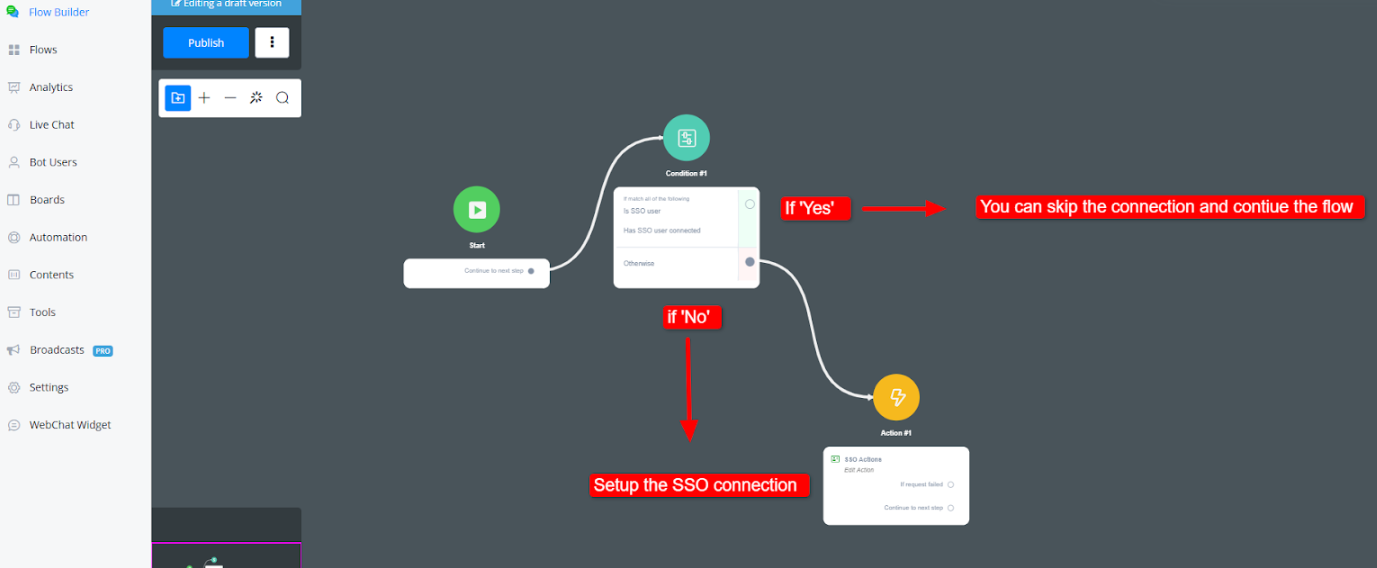
Check for Existing SSO Profile
You can also check if the user is Already a SSO Profile User
Select a condition node and choose add condition.
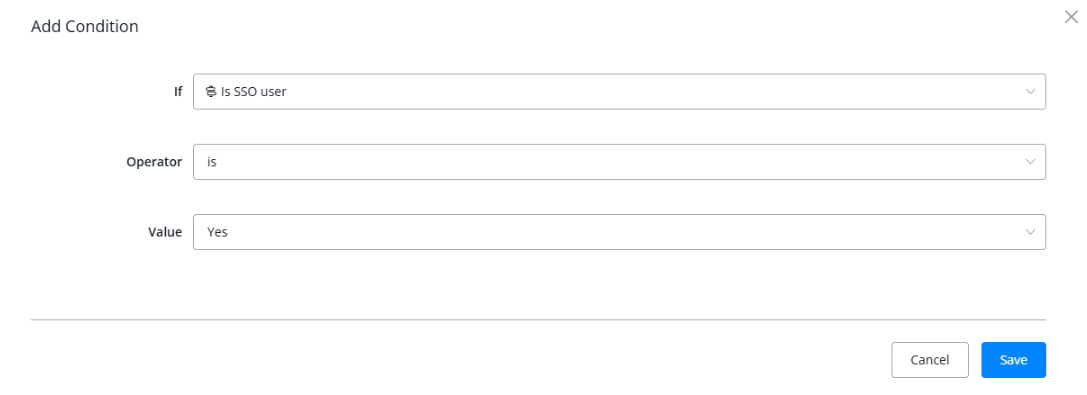
Now use a condition either “Is user SSO” or “Has SSO user connected” or you can use both of these conditions and check them if they both are true.
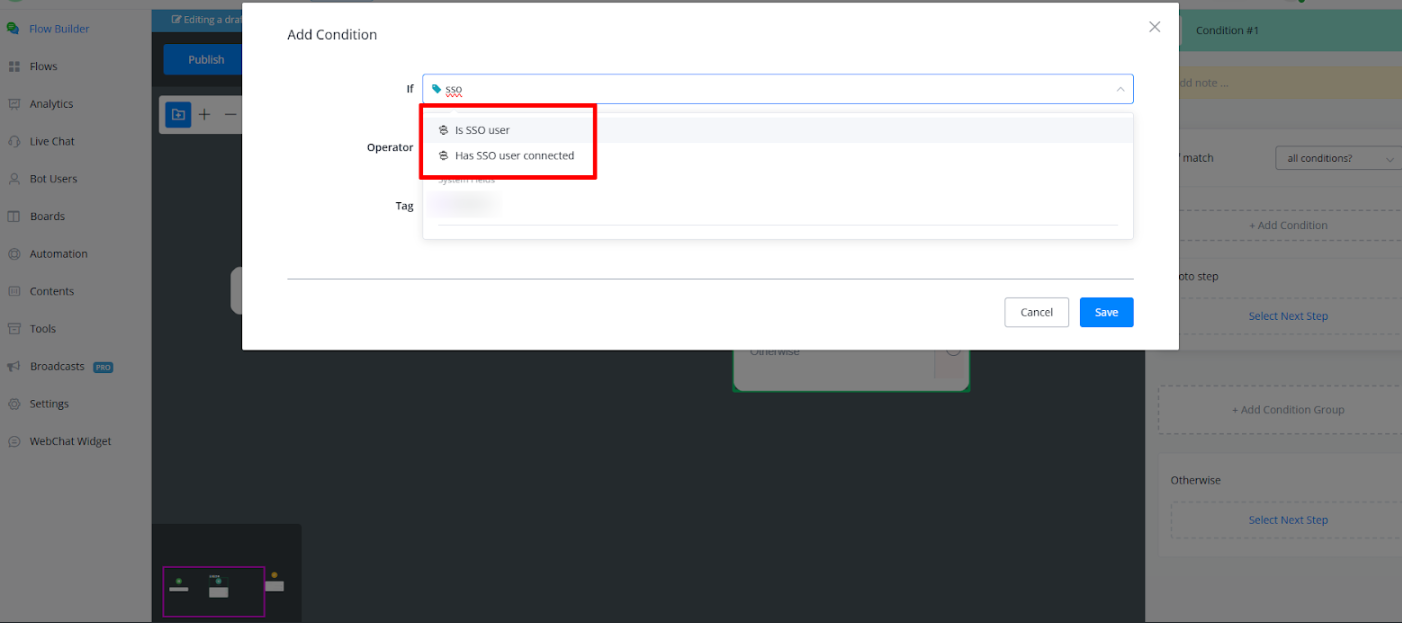
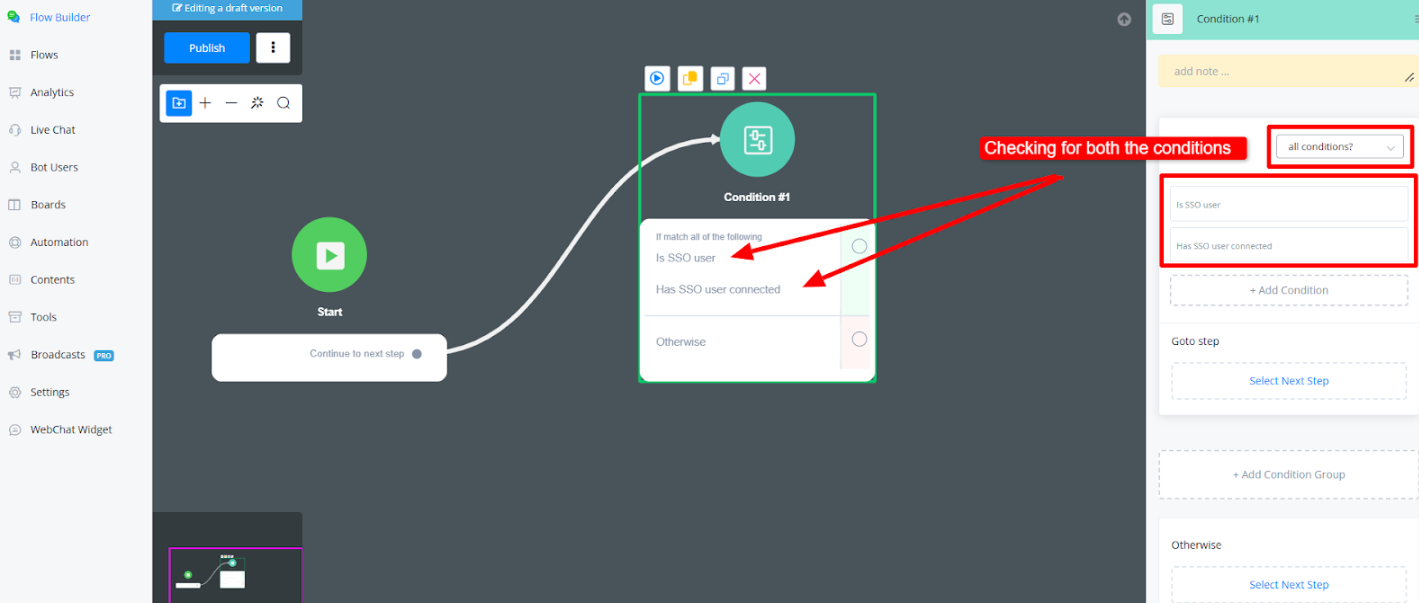
If the user has an existing SSO profile, proceed with the flow as usual. Otherwise, continue to the next step.
Benefits of SSO via Email
- User-Friendly: Reduces the need for Google or Facebook logins.
- Seamless Integration: Links existing emails to SSO profiles.
- Consistency Across Channels: Ensures a unified experience when users interact via different platforms.
Facebook Page API with Messagingme.app
This comprehensive guide clarifies the functionality of Messagingme.app’s Facebook Page Actions, empowering you to manage your Facebook page content directly through Messagingme.app.
Connecting with Facebook
- Connect your Facebook Business Manager account in Integrations
- Connect your Facebook account in the Facebook channel and link it to a bot
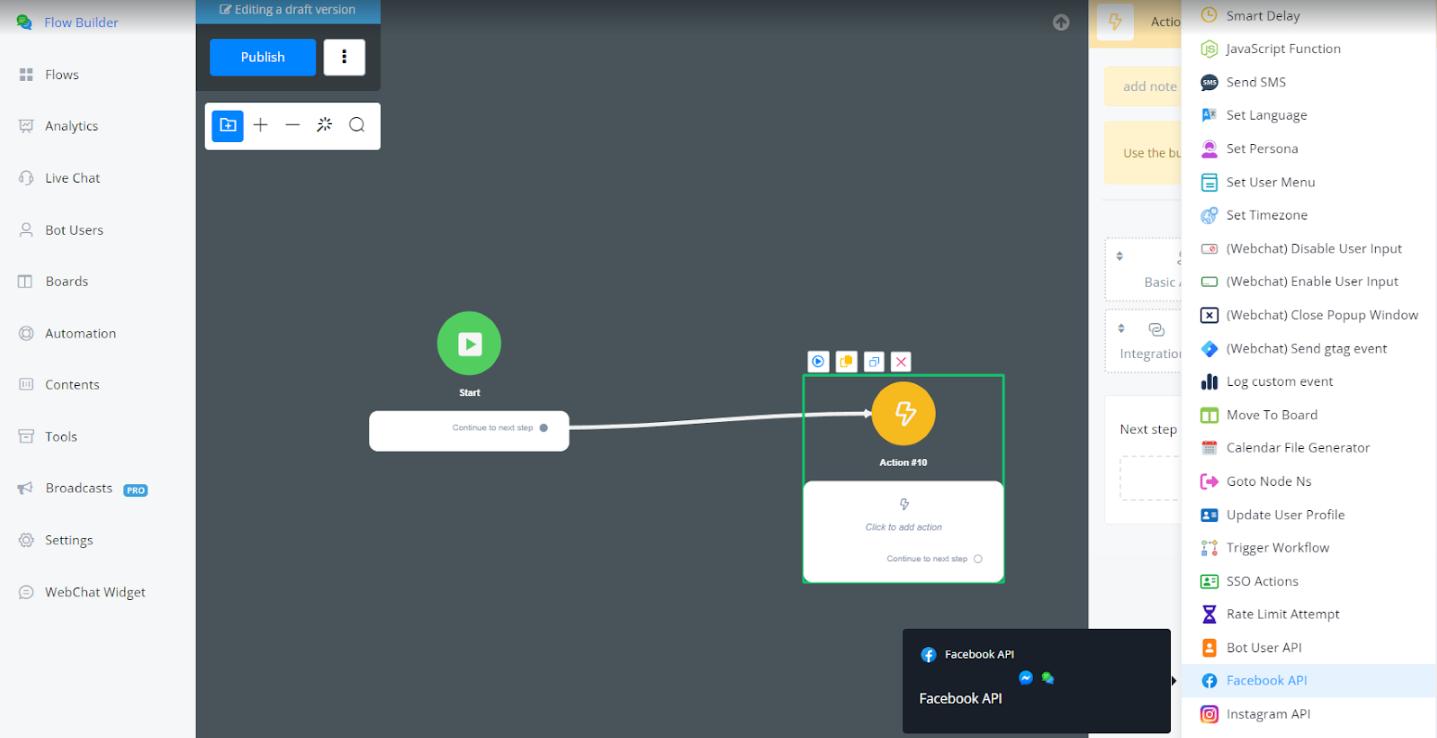
Inserting the Action Node into your flow
Insert an Action Node into your flow and go to Advanced Actions
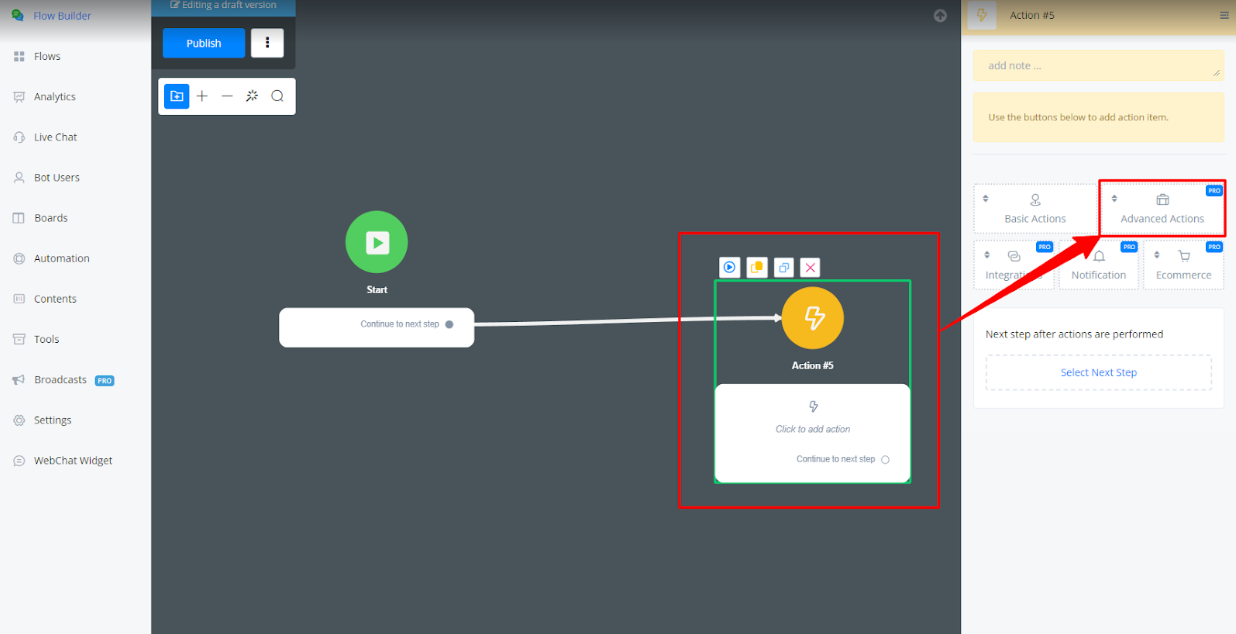
Select Facebook API
Facebook Page API Features through Messagingme.app’s Action Node
This guide clarifies the functionality of Facebook Page API Actions on Messagingme.app Platform, providing a clear understanding of each action’s purpose.
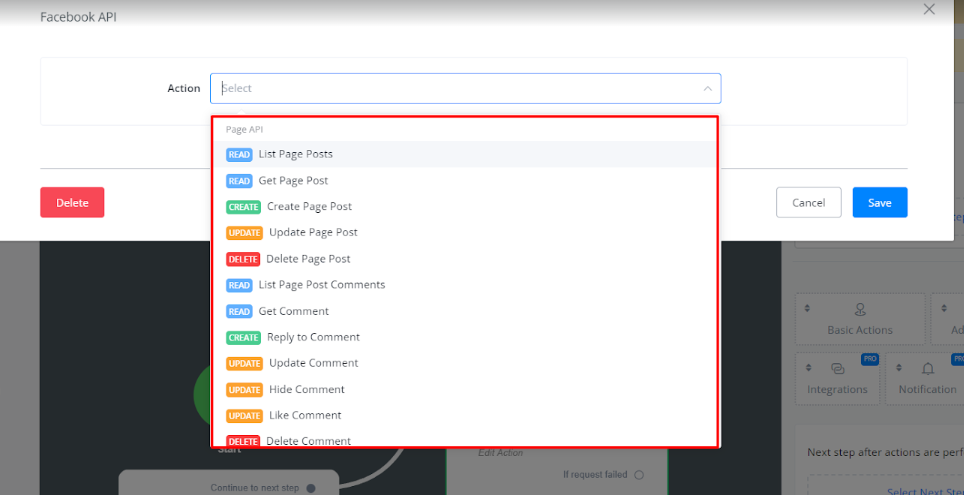
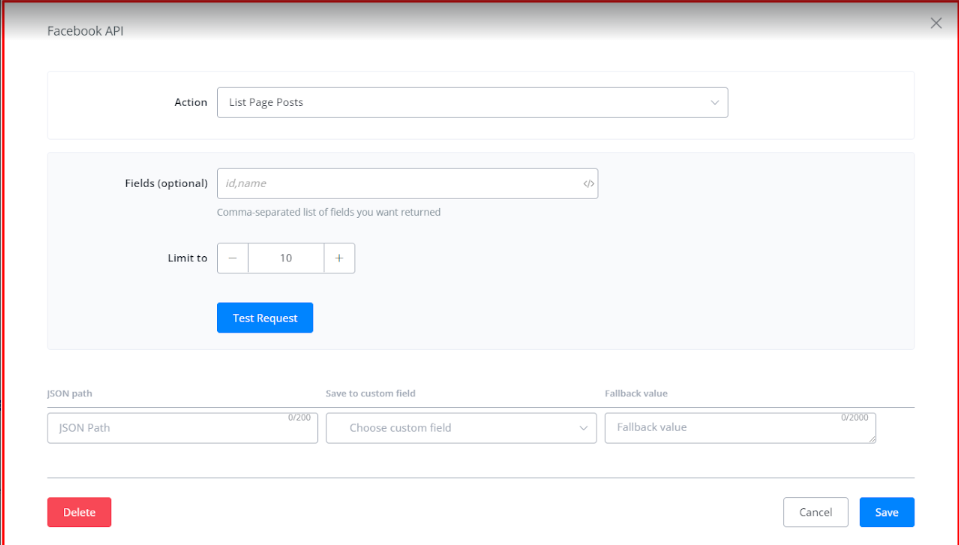
List Page Posts:
• Obtain a list of posts currently published on your Facebook page.
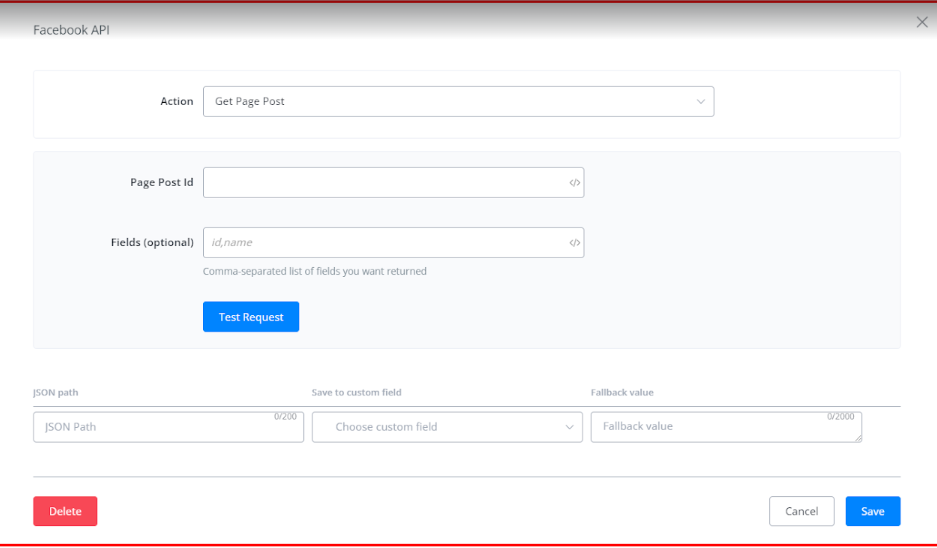
Get Page Post:
• Obtain a specific Facebook page post details.
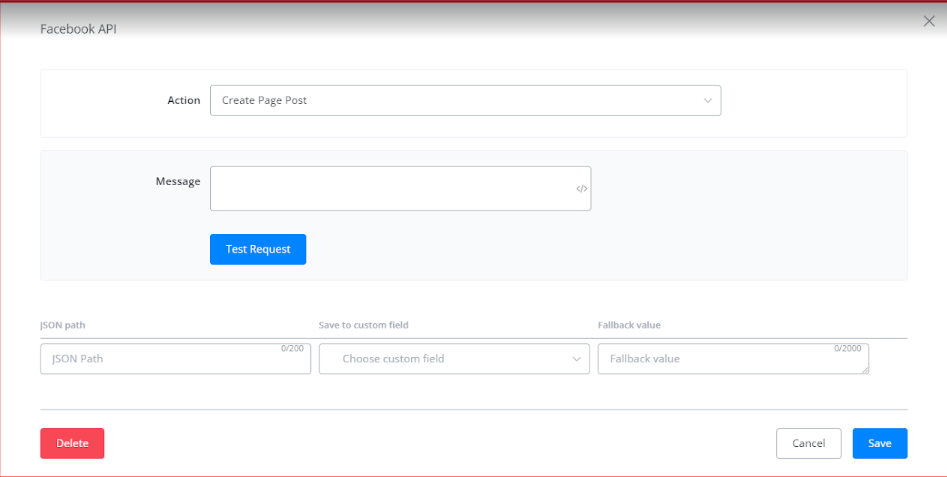
Create Page Post:
• Publish new content to your Facebook page directly from Messagingme.app.
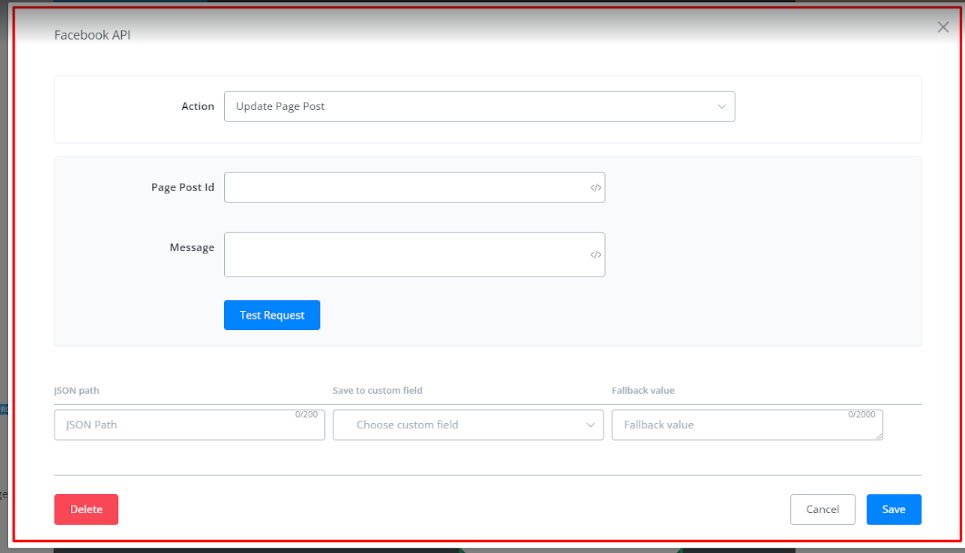
Update Page Post:
• Update an existing post from your Facebook Page.
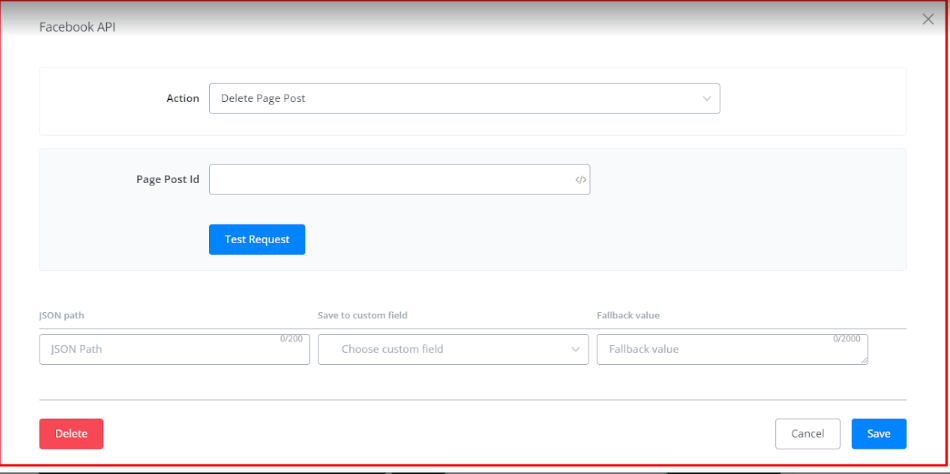
Delete Page Post:
• Delete an existing post from your Facebook page.
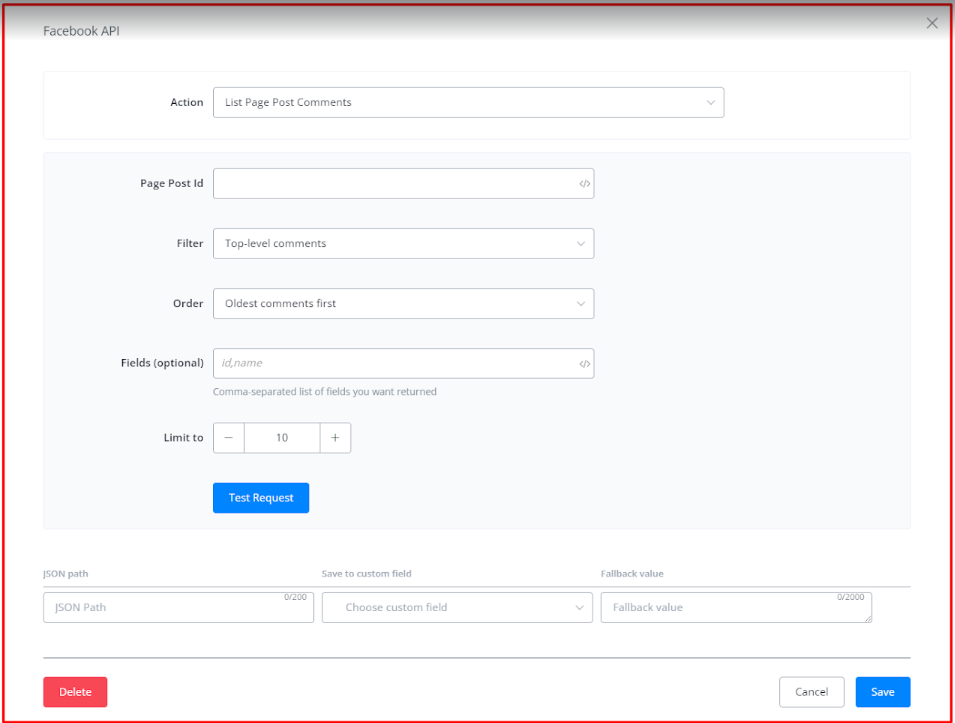
List Page Post Comments:
• Retrieves a list of comments for a specific post on your Facebook page.
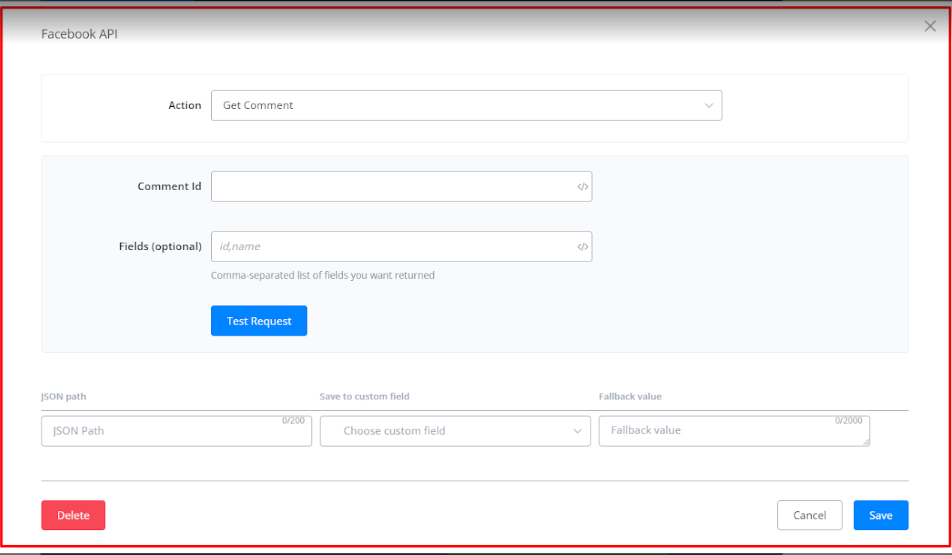
Get Comment:
• Get details of a specific comment from your Facebook Page.
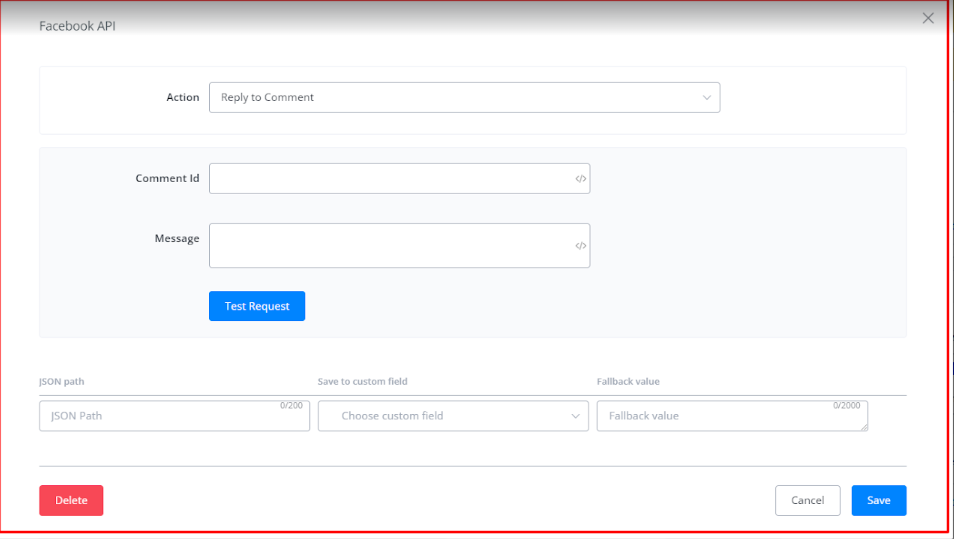
Reply to Comment:
• Reply to a comment on a post on your Facebook page.
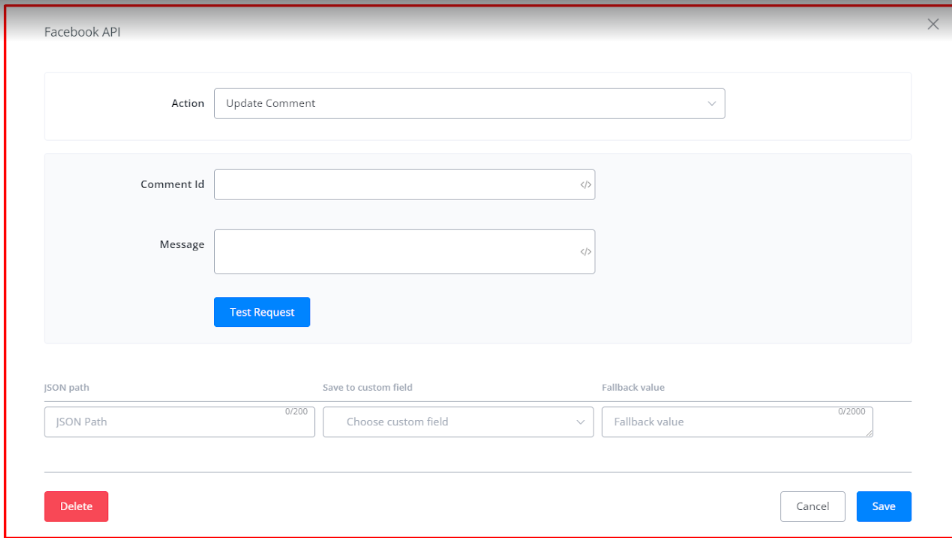
Update Comment:
• Edit an existing comment left on your Facebook page post.
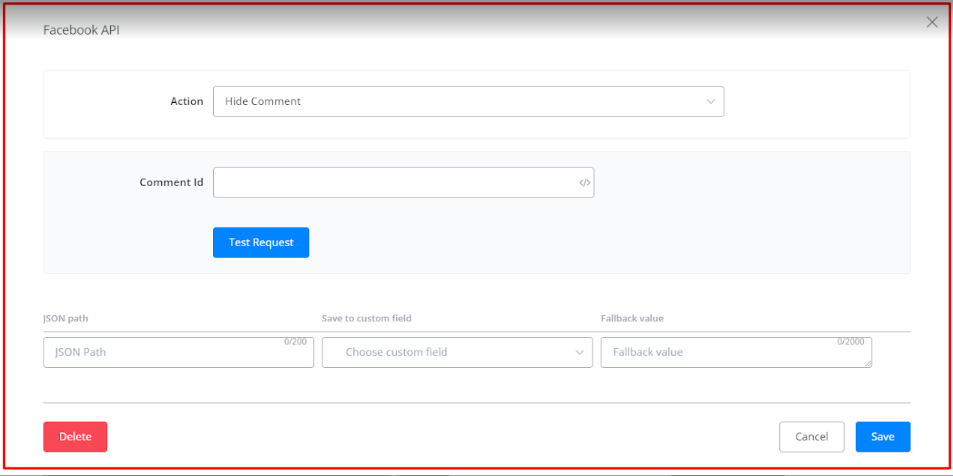
Hide Comment:
• Hide a comment on an post on your Facebook page.
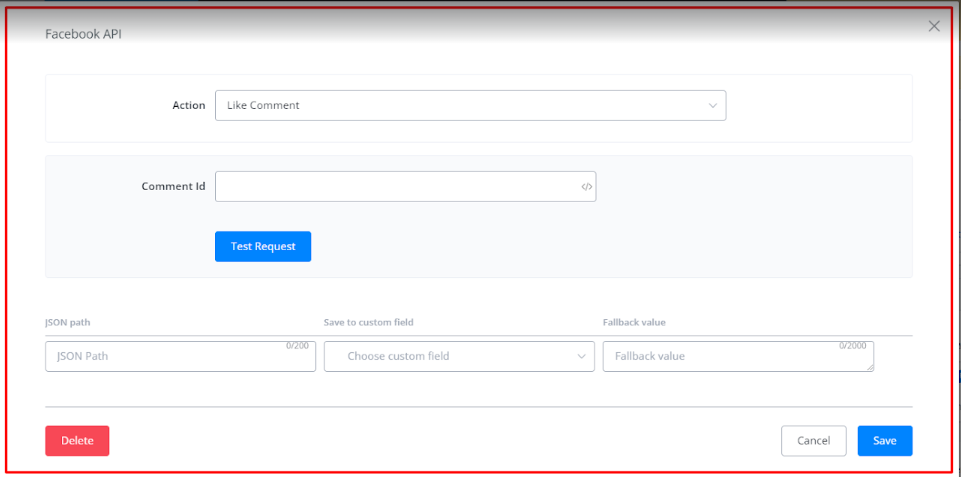
Like Comment:
• Like a comment on an post on your Facebook page.
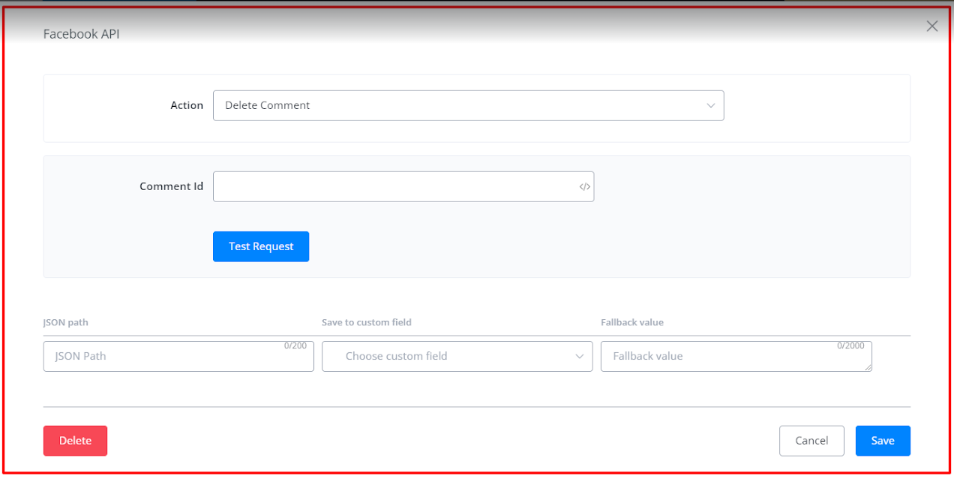
Delete Comment:
• Deletes a comment on an post on your Facebook page.
Page API
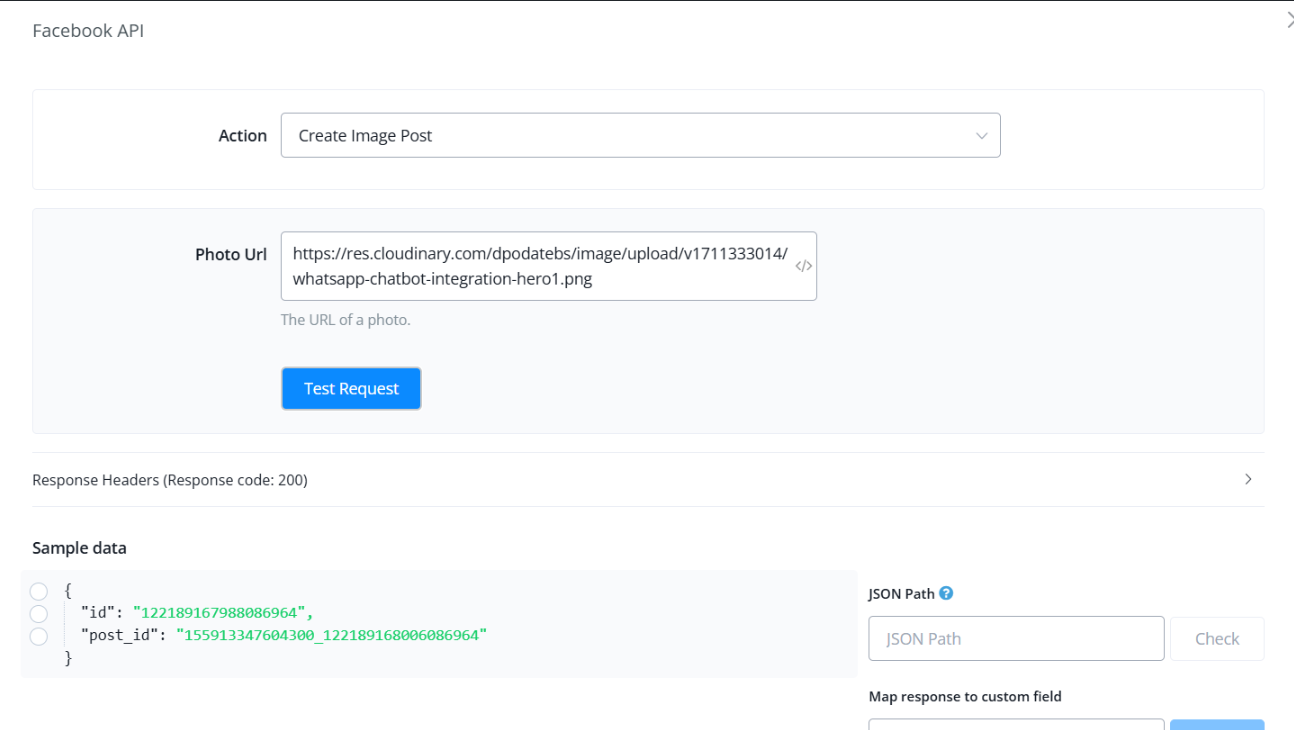
Create Image Post
Create an image post on your Facebook page. Enter the Photo URL in the placeholder to upload and post an image.
Facebook Page Ads
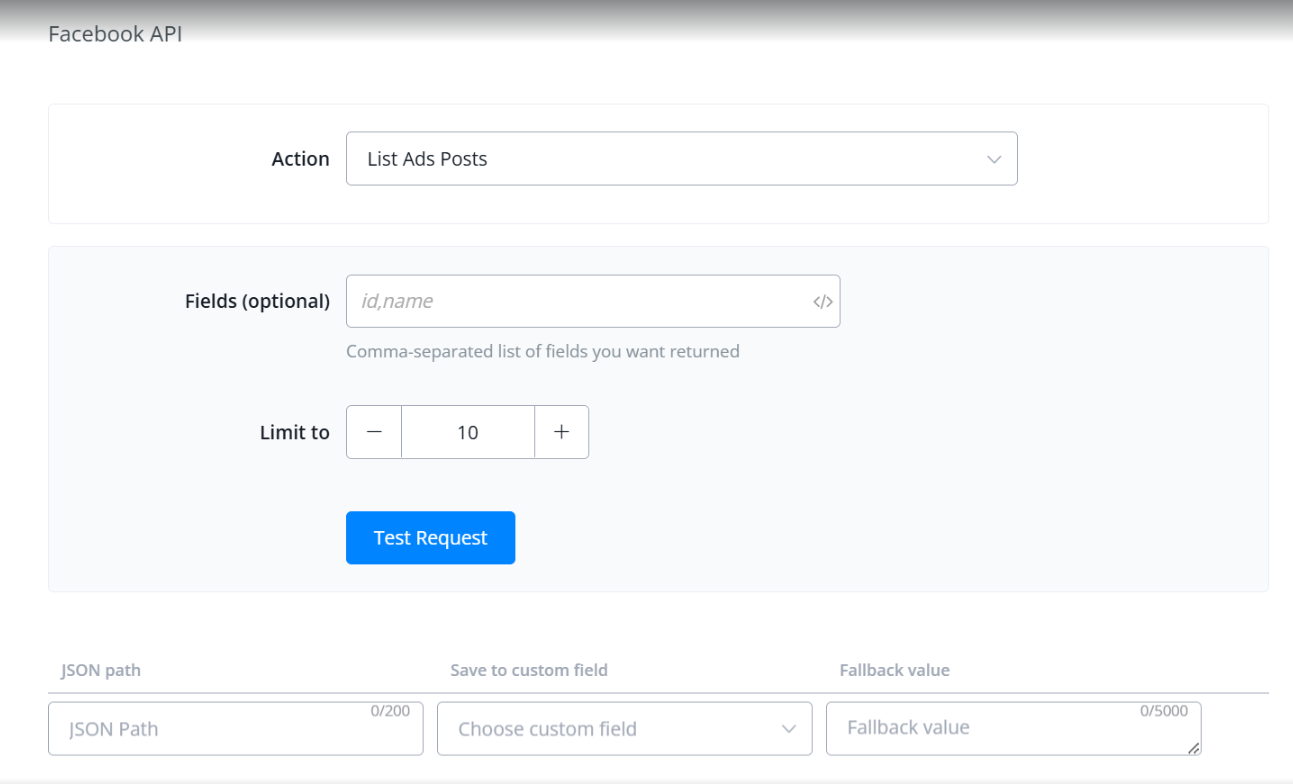
List Ads Posts
Retrieve a list of all ads posts. To find something specific, search by the ad ID or name.
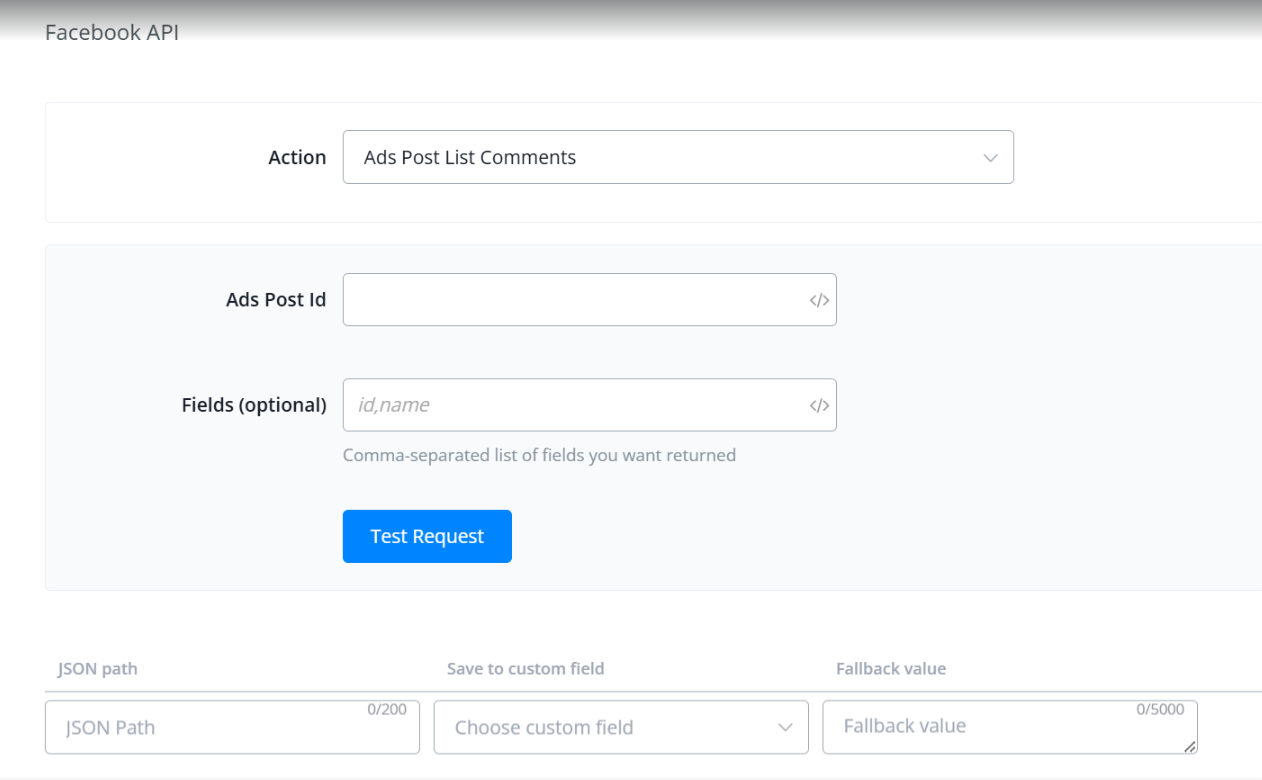
Ads Post List Comments
Get a list of all comments on a specific ad post. Provide the ad post ID to retrieve its comments.
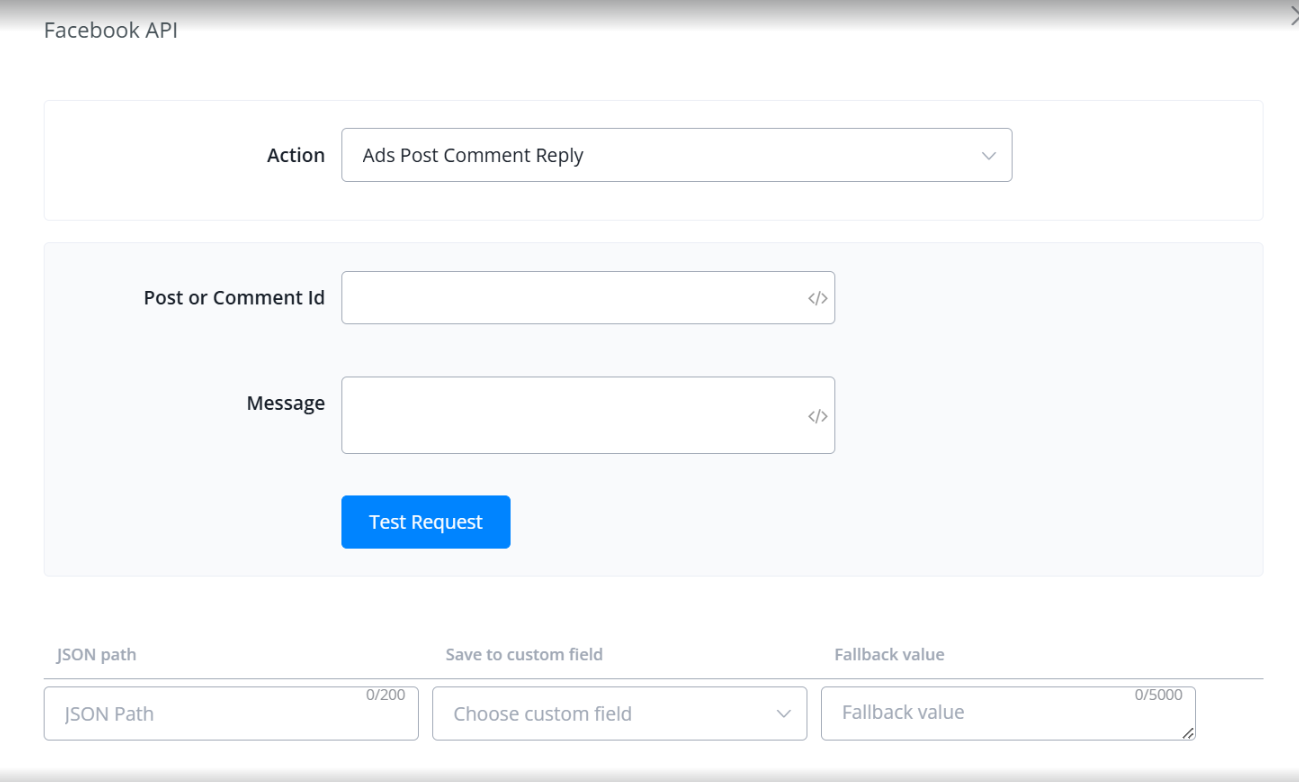
Ads Post Comment Reply
Reply to a comment on your ad post or add a new comment to the post.
- To reply, provide the comment ID and your message.
- To add a new comment, provide the post ID and your message.
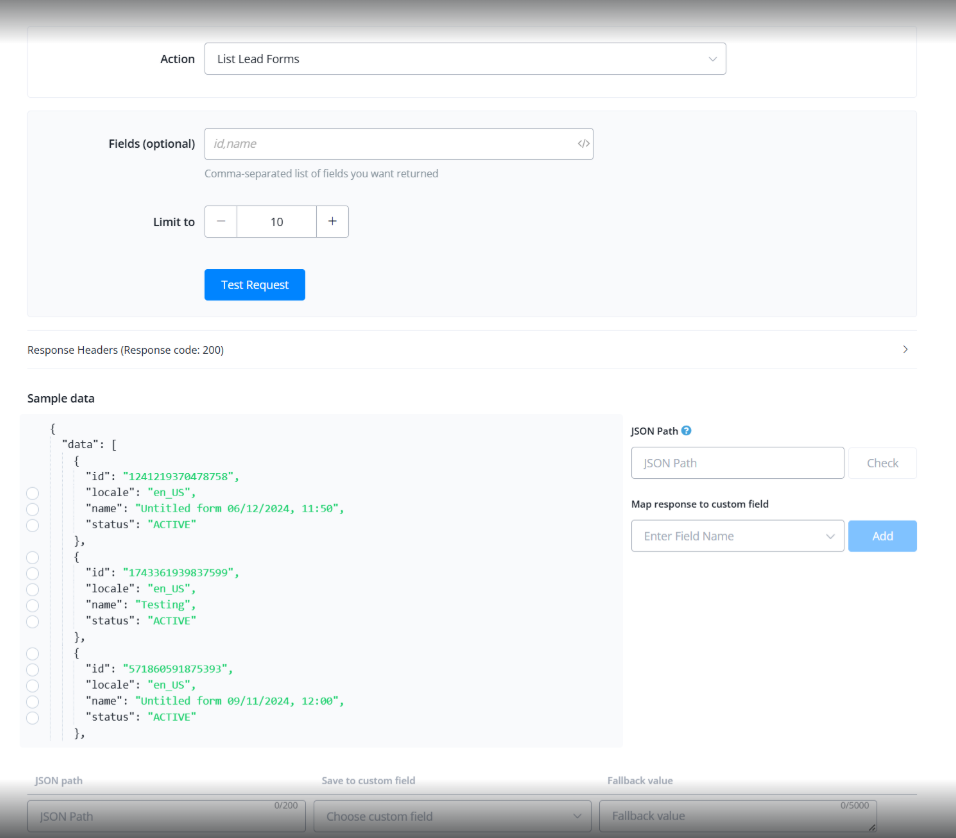
List Lead Forms
Retrieve a list of all lead forms linked to your page.
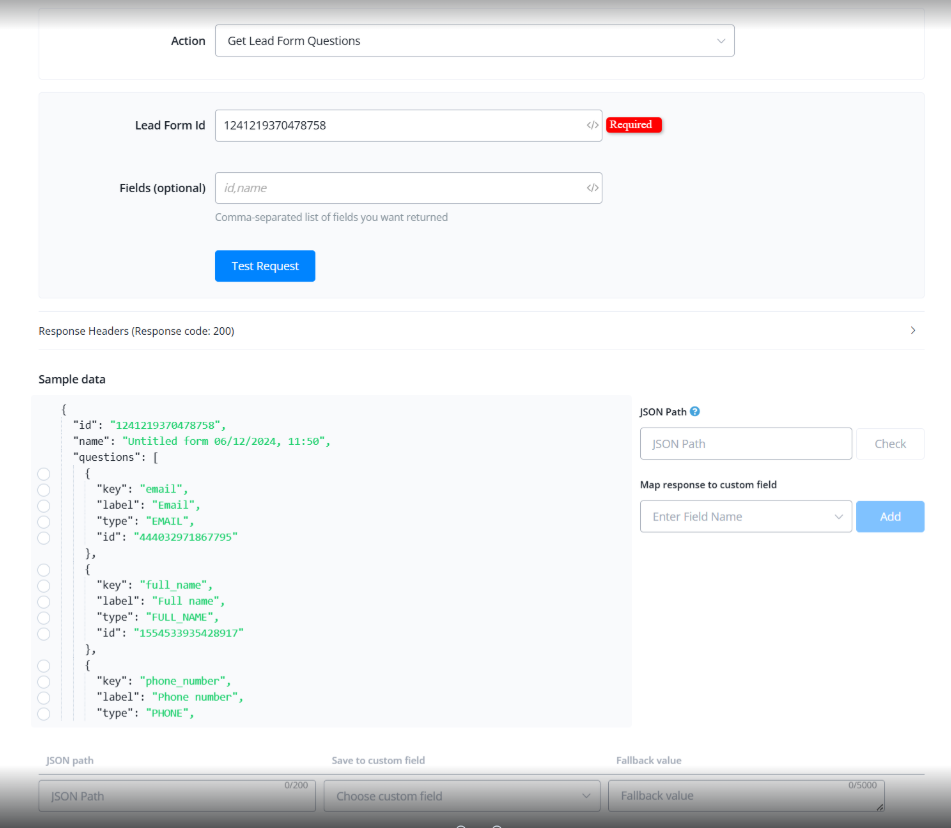
Get Lead Form Questions
View the questions in a lead form. Provide the lead form ID to get the list of questions.
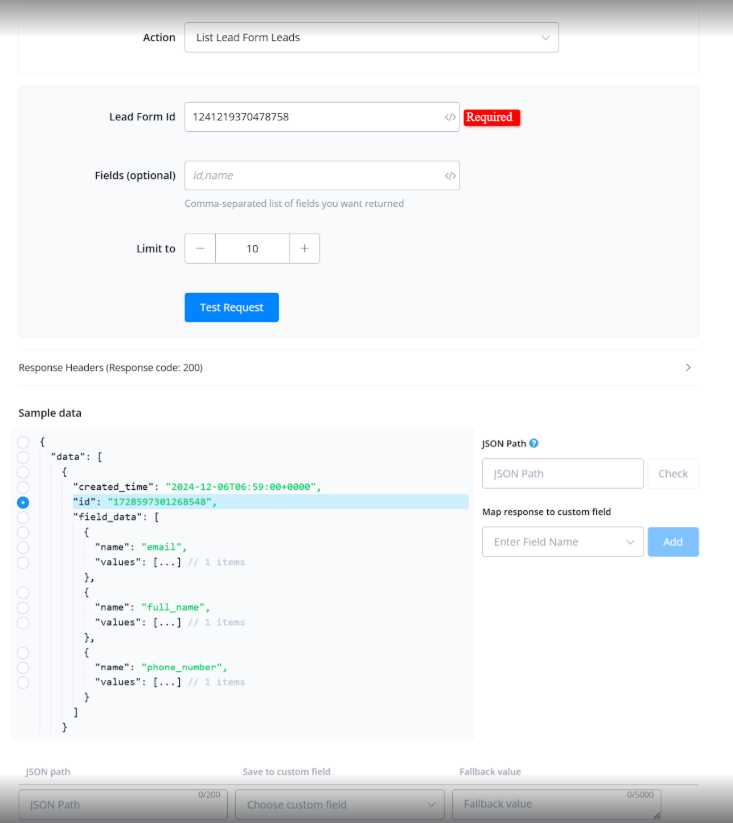
List Lead Form Leads
Retrieve a list of all leads from a specific lead form. Provide the lead form ID to get the leads.
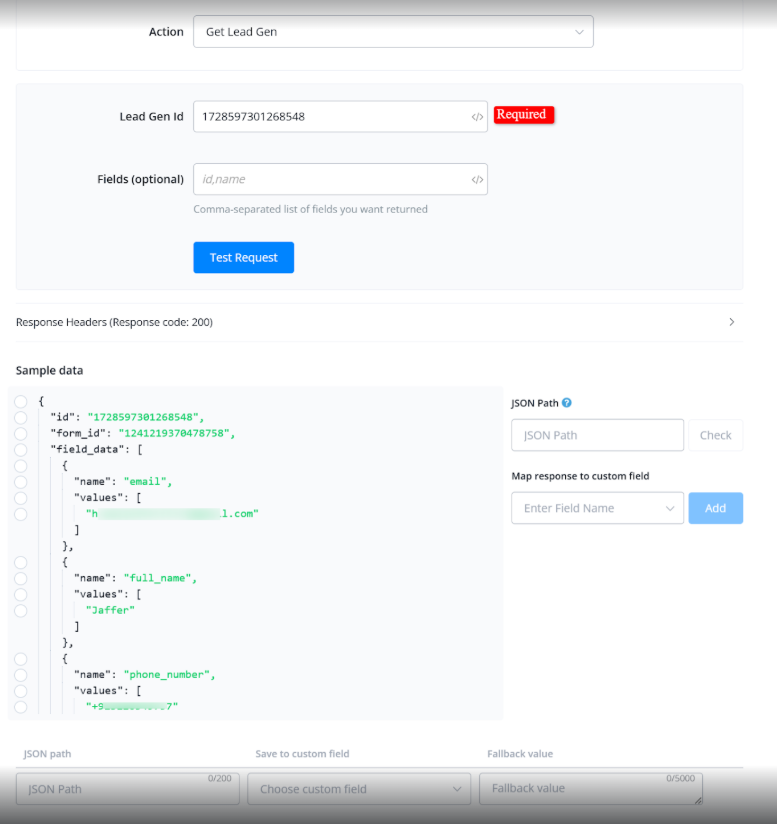
Get Lead Gen
Get the details of a specific lead. Provide the lead generation ID.
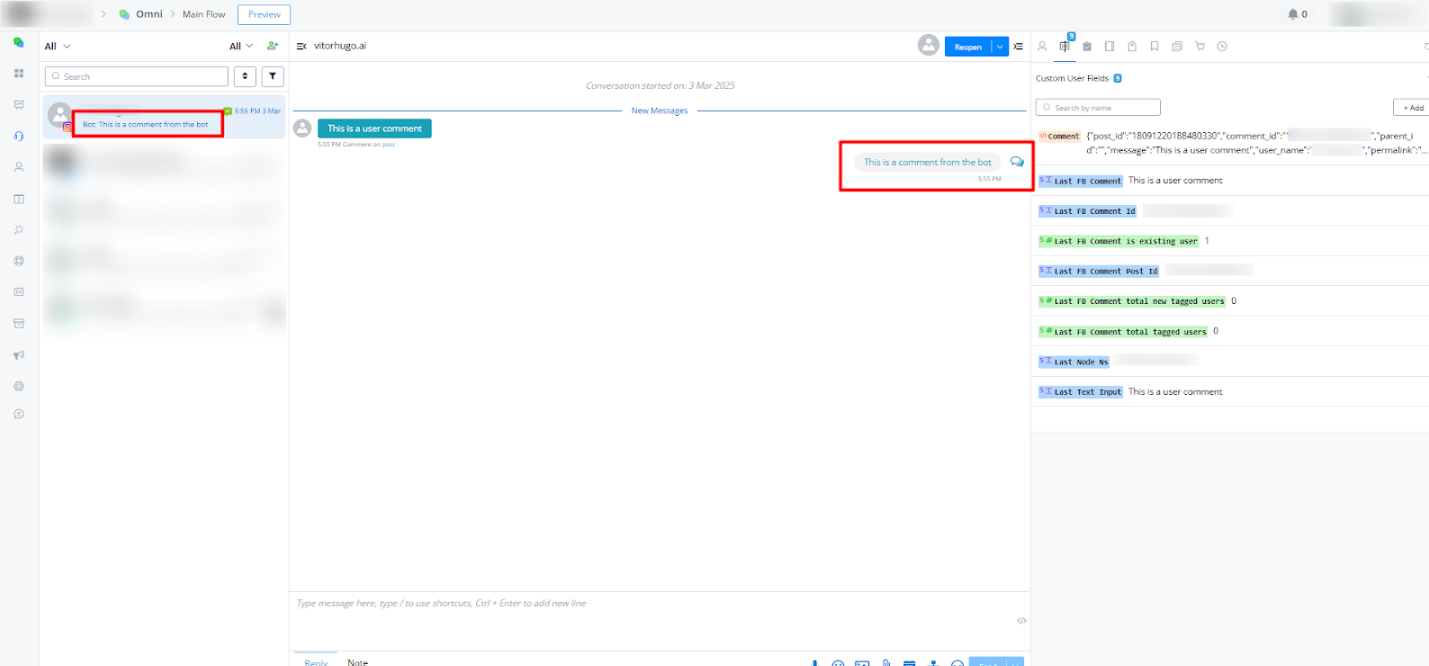
Reply to Comment on Facebook
This action allows you to reply to a comment on a Facebook post. Additionally, it includes an option to save the comment reply as a bot message, making it visible in the chat history.
Parameters/Fields:
- comment_id: Comment ID (required).
- message: Message of the comment reply (required).
- Save as Bot Message: When enabled, the comment will be added to the chat history but not trigger previous training.
Step-by-Step Guide
Step 1: Configure the Reply to Comment Action
- Open the flow editor and add an Action node.
- Select Facebook API > Reply to Comment.
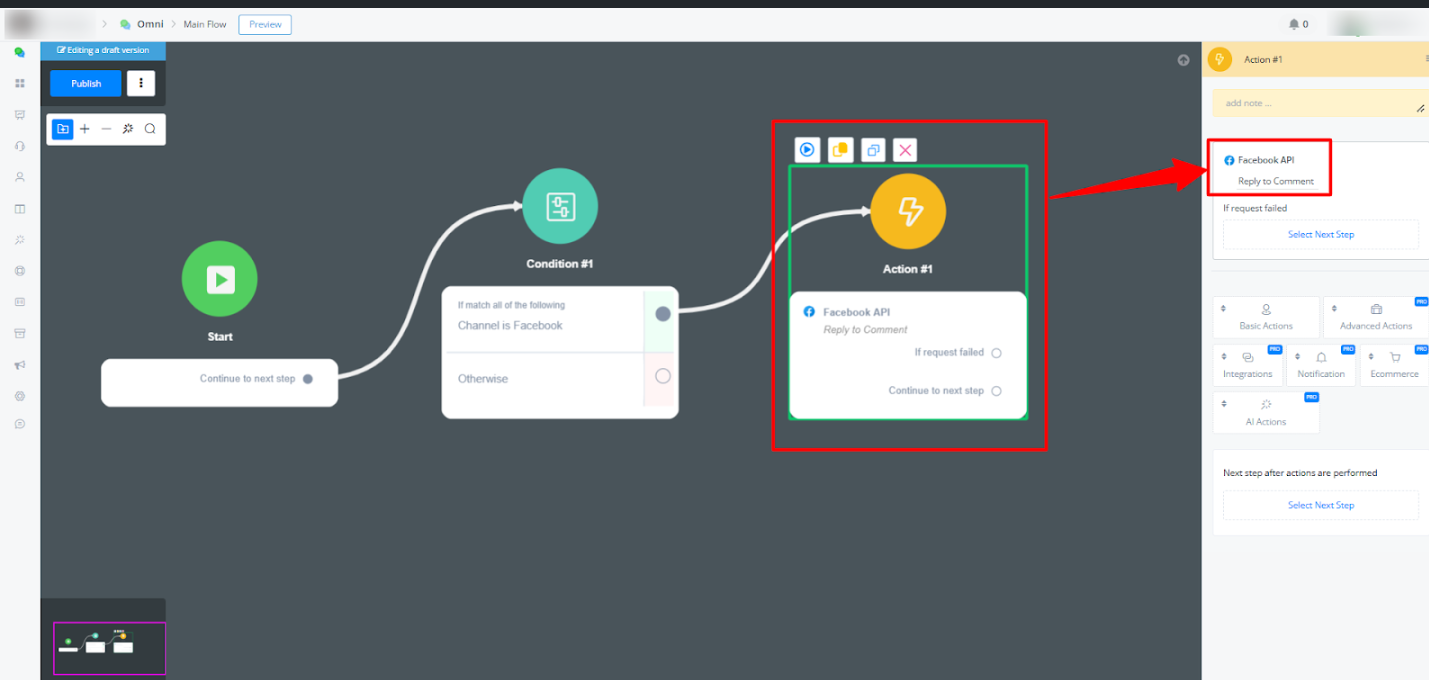
- Connect the flow with your Comment Keyword Automation.
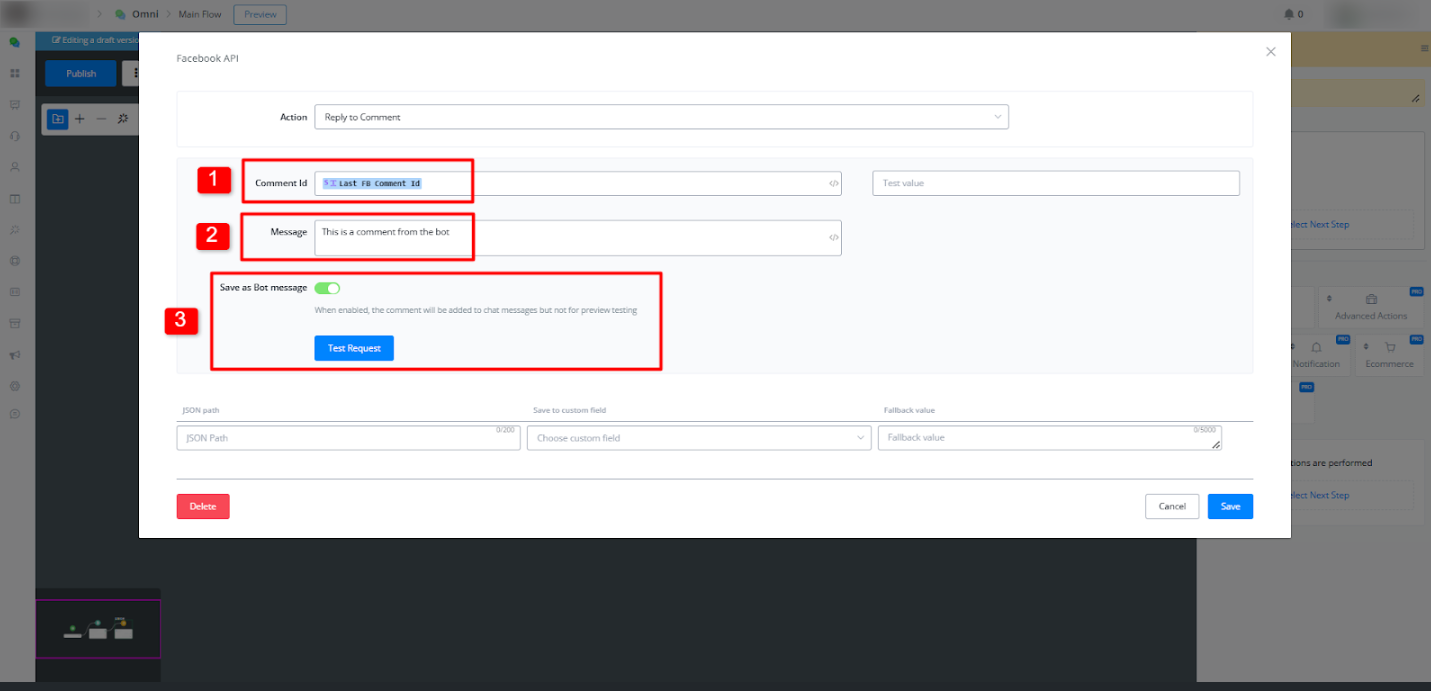
Step 2: Set Up the Parameters
- In the action settings, enter the Comment ID of the comment you want to reply to.
- Type the Message that will be sent as a reply.
- Enable Save as Bot Message if you want the reply to appear in the chat history.
Step 3: View the Reply in Chat History
- After executing the action, the reply will be visible in the chat history.
- If Save as Bot Message was enabled, the reply will be logged but won’t retrigger previous messages.
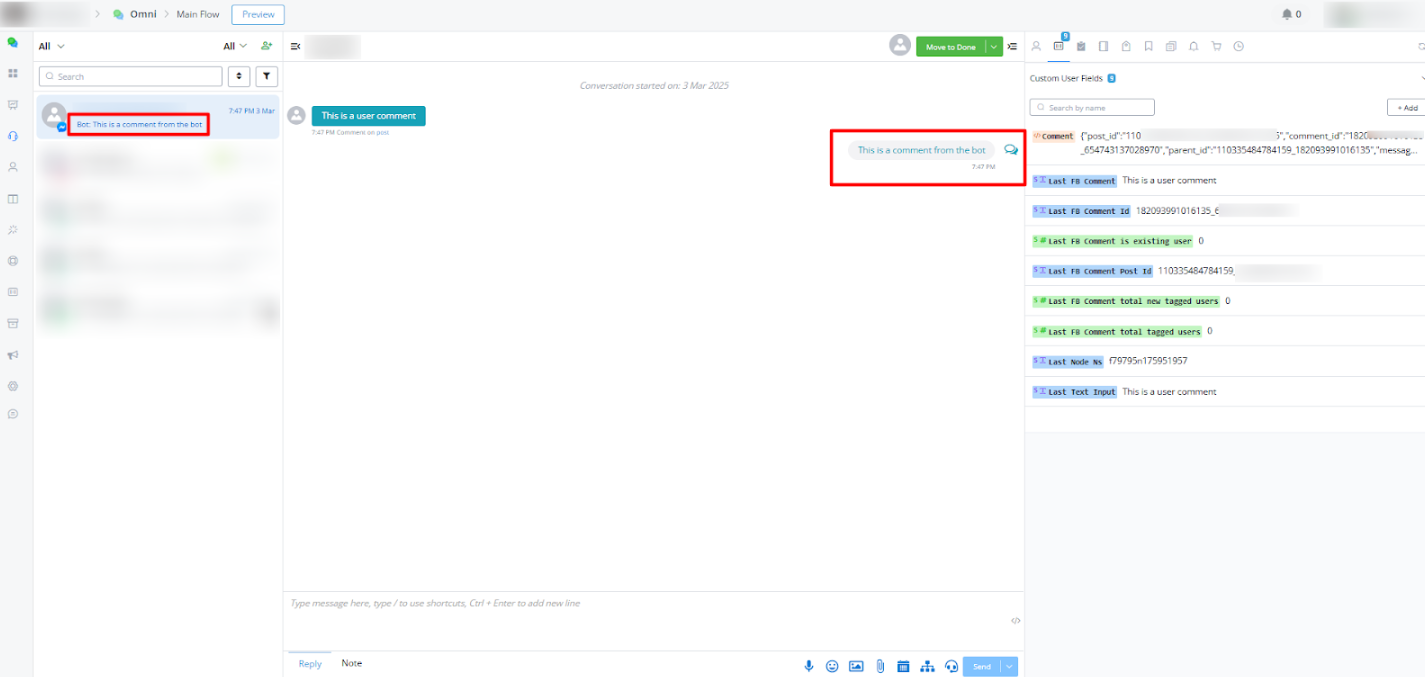
This ensures that bot-generated replies to Instagram comments are logged within the chat history for better visibility and tracking.
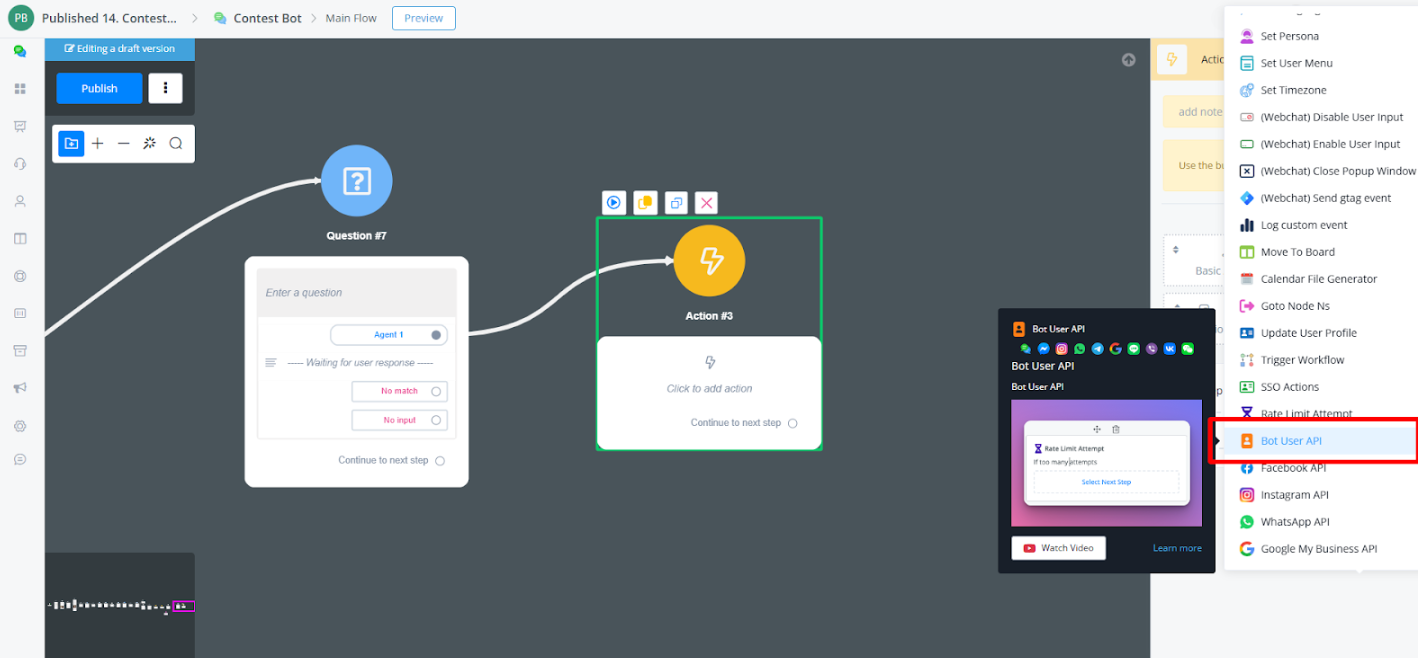
Bot user API
Accessing bot user information or using Messagingme.app API through coding can be difficult for many users. But with our simple method, you can use API endpoints effortlessly, no coding required.
Accessing API Endpoints
Navigate to the Flow Builder. Select an action block and choose “Advanced actions.” Explore the “Bot User API” options.
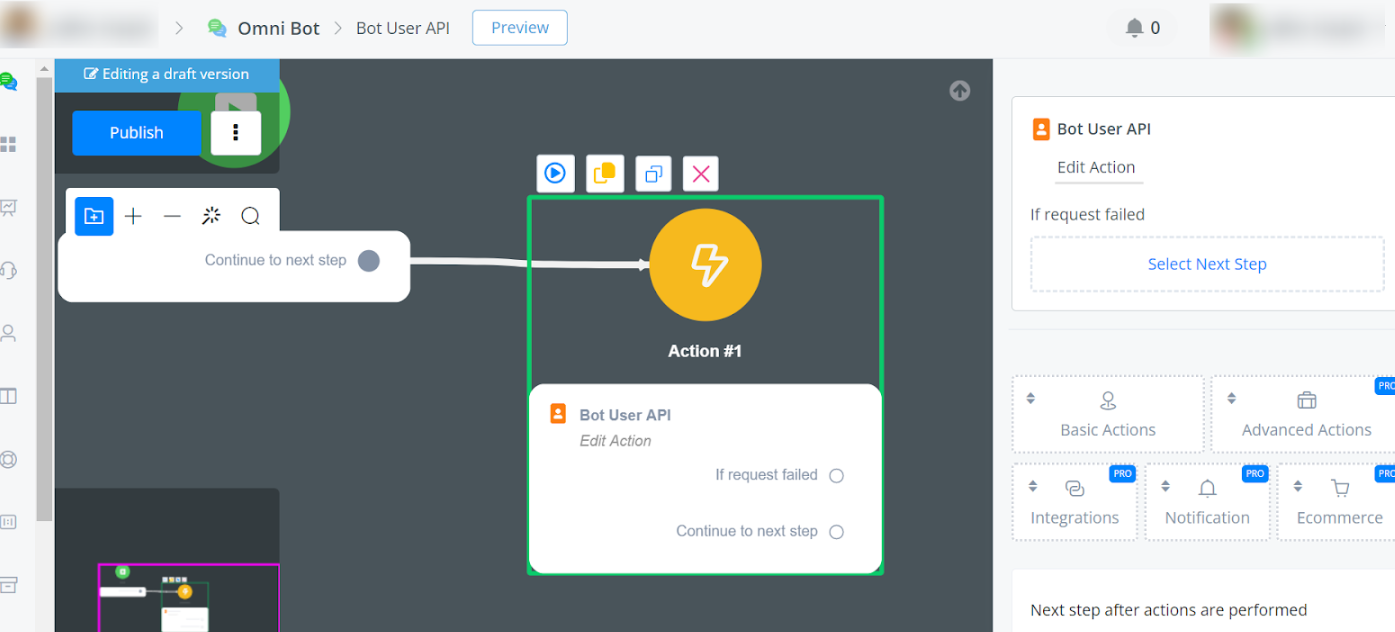
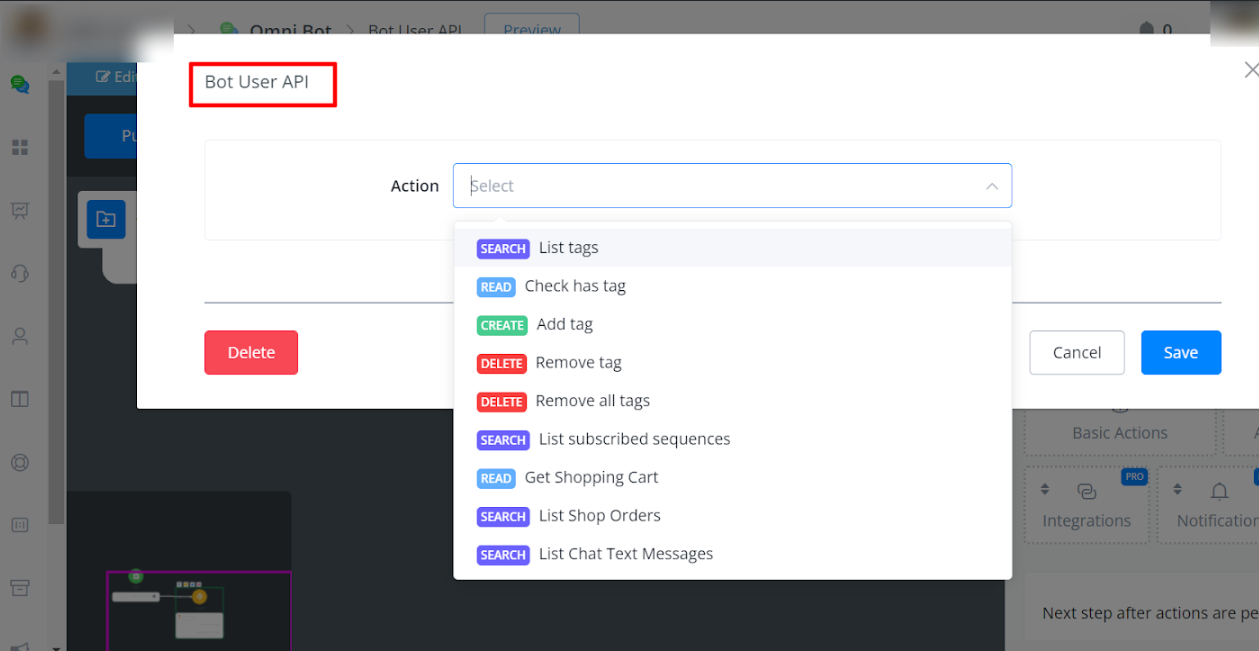
Available Actions
- List all tags
- Check if the user has a certain tag
- Add or remove tags
- List subscribed sequences
- Retrieve shopping cart details
- List shop orders
- List chat text messages
List Tags
For testing purposes, you can retrieve the list of all tags using the User_NS. For permanent storage, you can utilise the Username, First Name, and Last Name system fields.

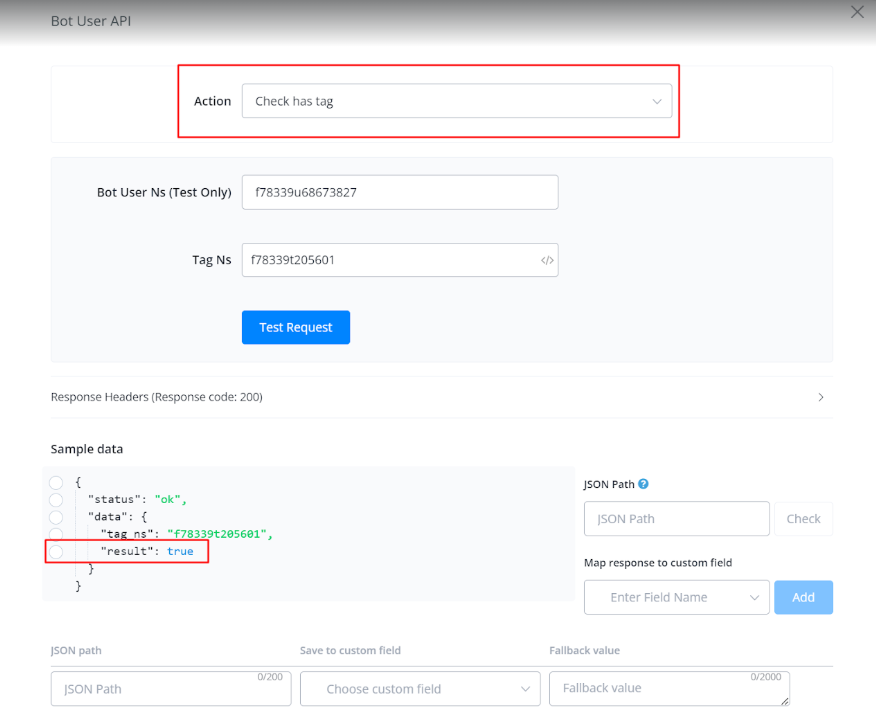
Check has Tag
You can check whether a user has a tag or not by entering the User NS and Tag Ns.
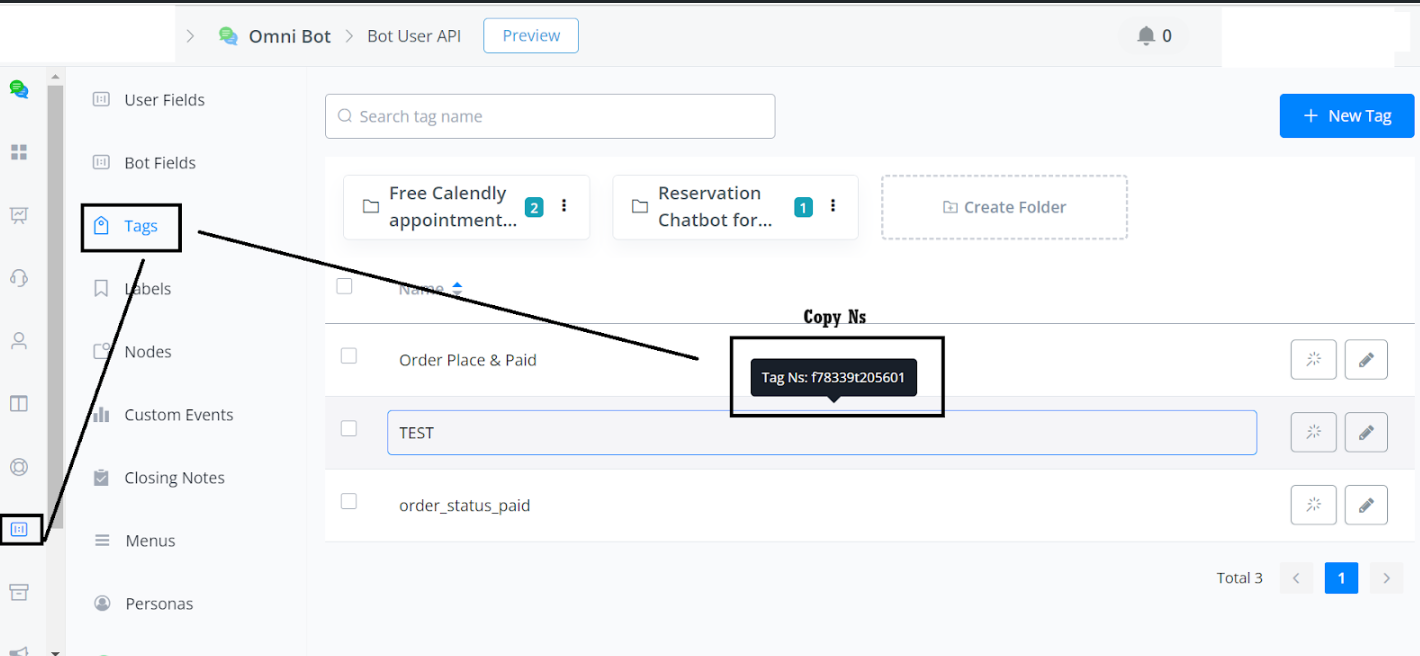
Where to Find Tag Ns:
Navigate to Contents -> Tag -> Move the Cursor to the Tag you will see the Tag Ns.
Add Tag
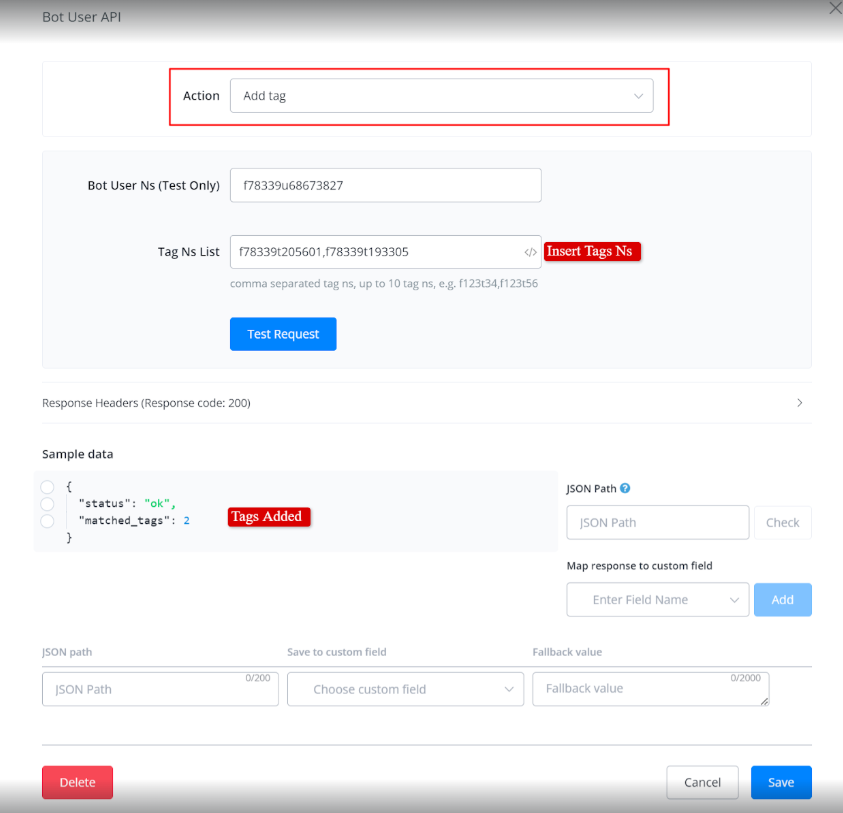
Remove Tags
The process for removing tags is similar to adding tags. Simply insert the Tag NS to remove the tags.
Remove All tags
It’s also the same. You don’t need to input any value; it will automatically remove all the tags from the user.
List Subscribed Sequences
By inserting the user’s username or first name, you can retrieve the list of subscribed sequences for testing purposes.
List of Cart Items
You will receive a list of all items currently in the cart.
List Shop Order
You will receive a list of all Orders placed by the user.
List Chat Messages
You can access the chat history of the last 50 messages. You have the option to include agent messages, and bot messages, and choose the format (default, text, or text with time) according to your preference.
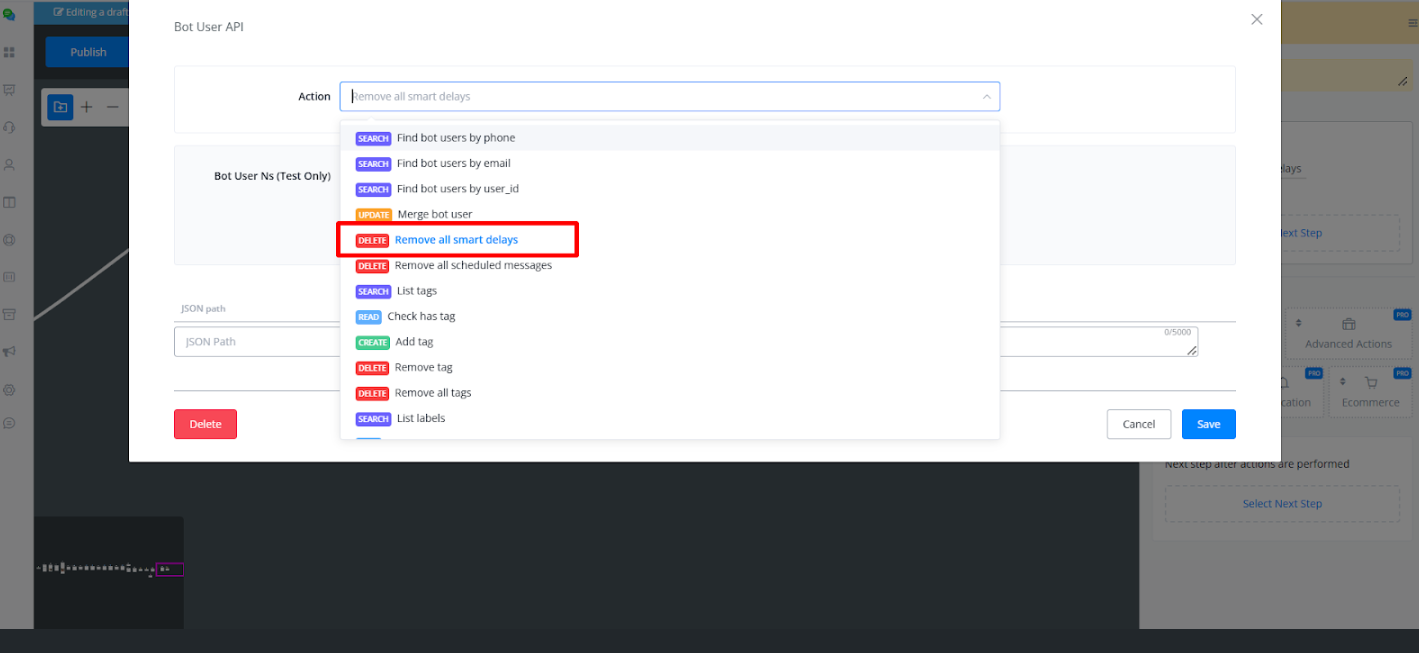
Remove All Smart Delays
Description
The Remove All Smart Delays action clears all smart delay actions associated with a specific bot user. This feature is useful for instantly removing any queued delays, allowing for immediate bot responses.
How to Remove All Smart Delays
Go to the Flow, Select Action Node and choose Advance Action. Then select the Bot User API option
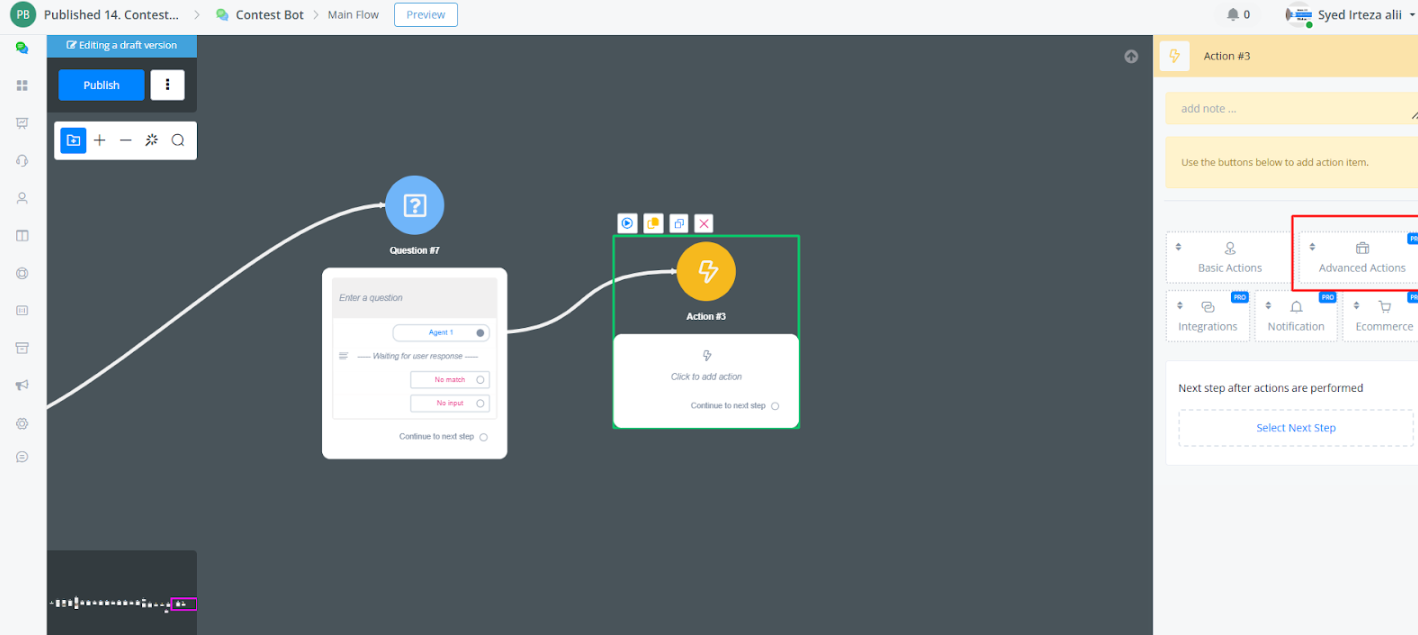
Now Select the option Remove All Smart Delays action.
Now you have to add User NS of the User you want to remove all smart delays or You can use a System Fields which contains User Ns.
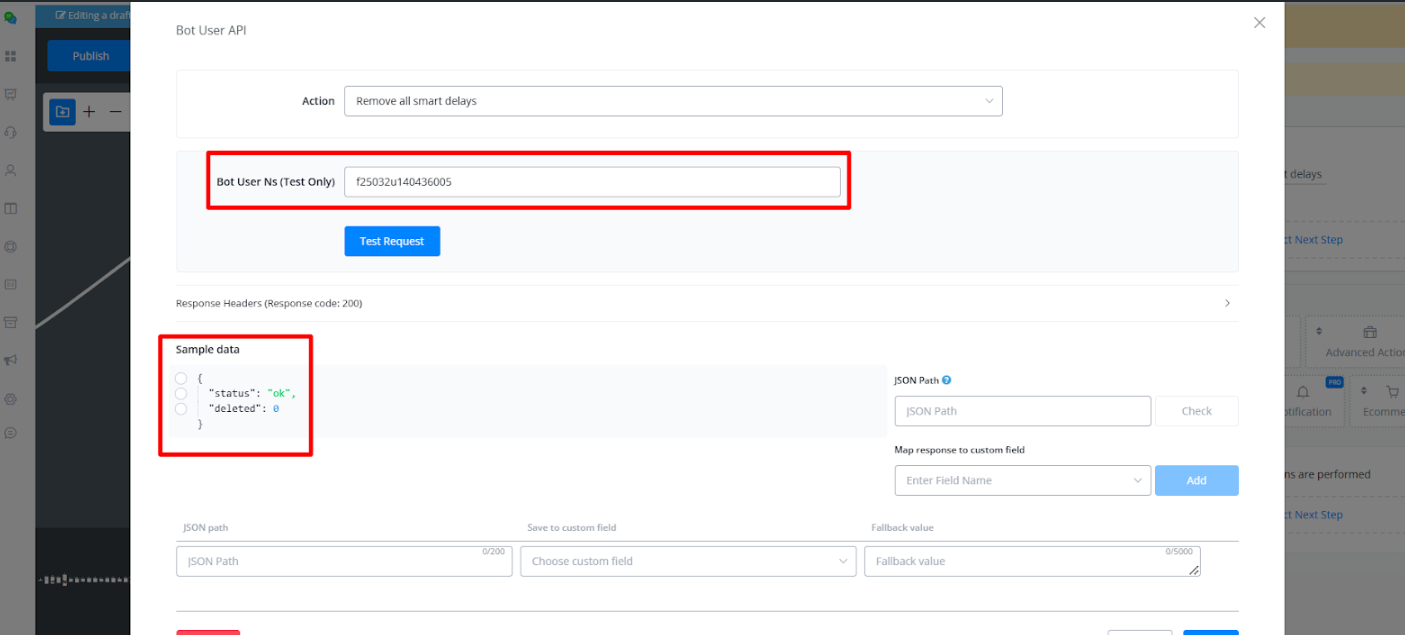
In the Sample Data you will see status: “ok” and delete: “0” which means all smart delay have been removed Successfully.
Use Cases
- Instant Reset: Instantly remove all pending delays for a user to improve response times.
Response
- Success: Returns a
200 OKstatus with a message confirming all smart delays have been removed.
Error: Returns an appropriate error code if the user Ns is not found or if the request fails.
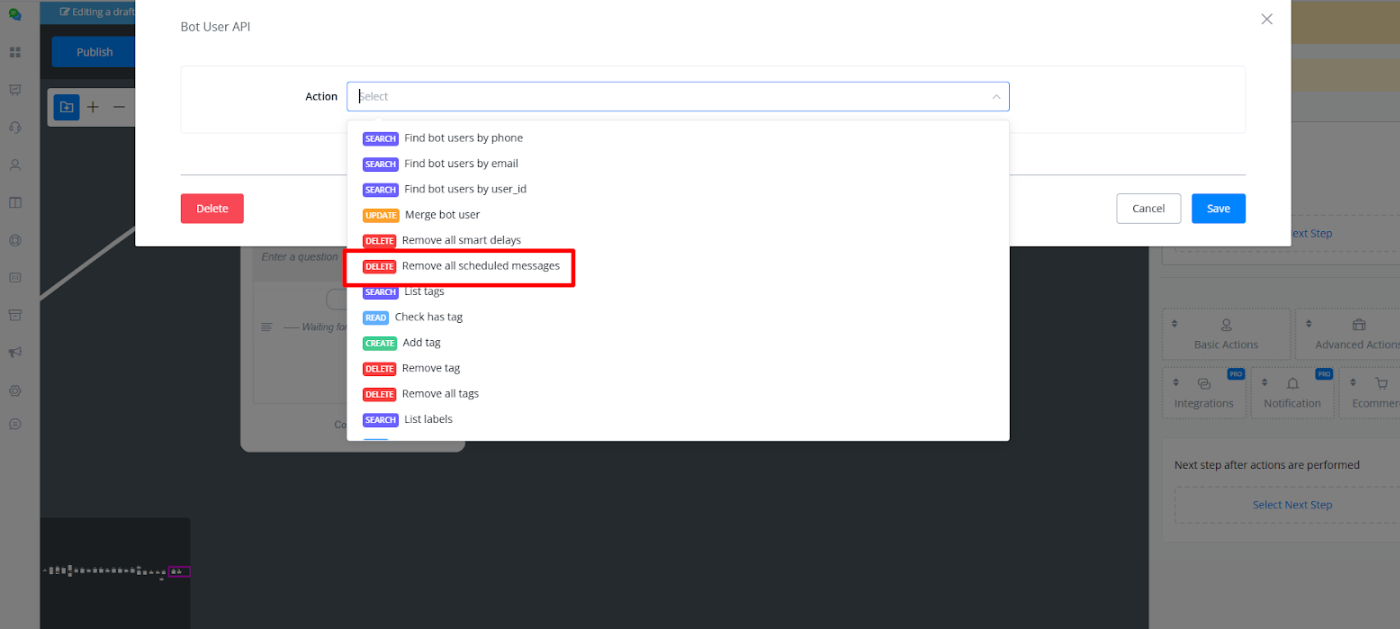
Remove All Scheduled Messages
Description
The Remove All Scheduled Messages action allows for the deletion of all scheduled messages queued for a particular bot user. This action ensures that no further scheduled messages are sent to the user, enabling quick modifications in user interaction plans.
How to Remove All Scheduled Messages
Go to the Flow, Select Action Node and choose Advance Action. Then select the Bot User API option.
Now Select the option Remove All Scheduled Messages action
Now you have to add UserNS of the User you want to remove all Scheduled Messages.
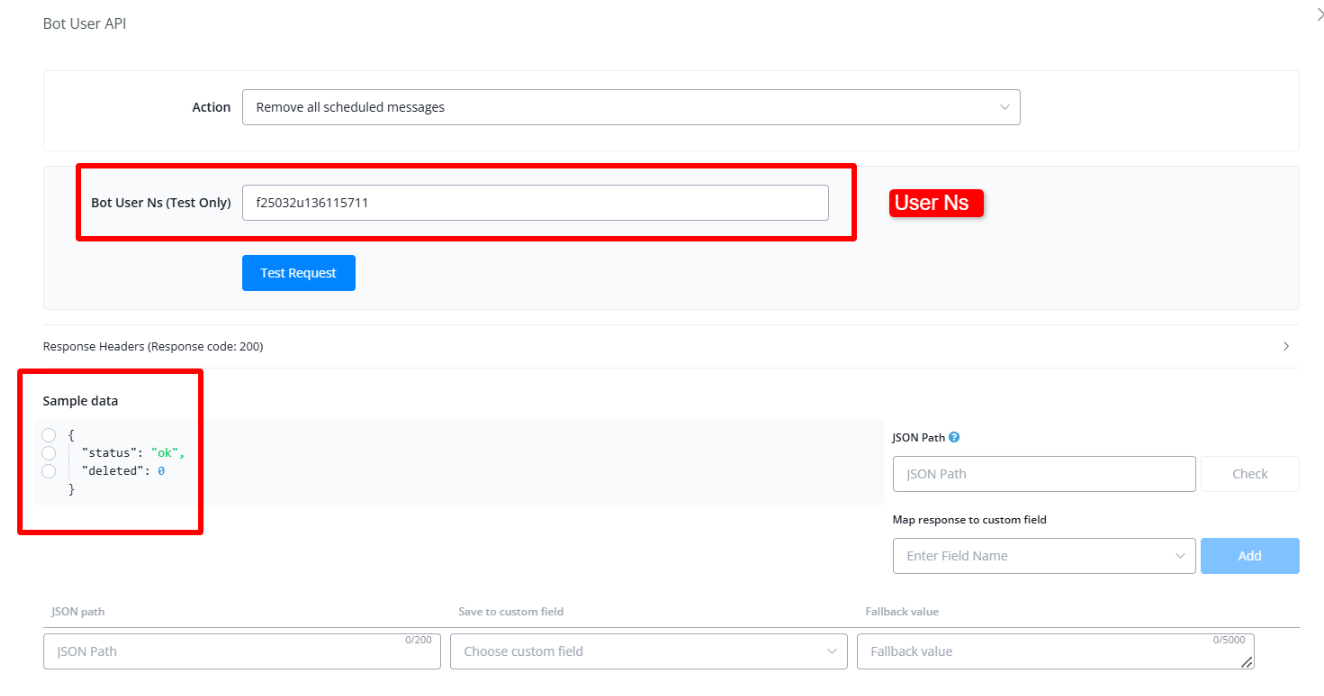
In the Sample Data you will see status: “ok” and delete: “0” which means all Scheduled Messages have been removed Successfully
Use Cases
- Bulk Message Removal: Quickly clear all pending messages to prevent redundant or outdated information from being sent.
- Precise Flow Adjustment: Modify scheduled messaging plans by removing all queued messages for immediate updates to user interaction.
Response
- Success: Returns a
200 OKstatus with a message confirming all scheduled messages have been removed. - Error: Returns an appropriate error code if the user Ns is not found or if the request fails.
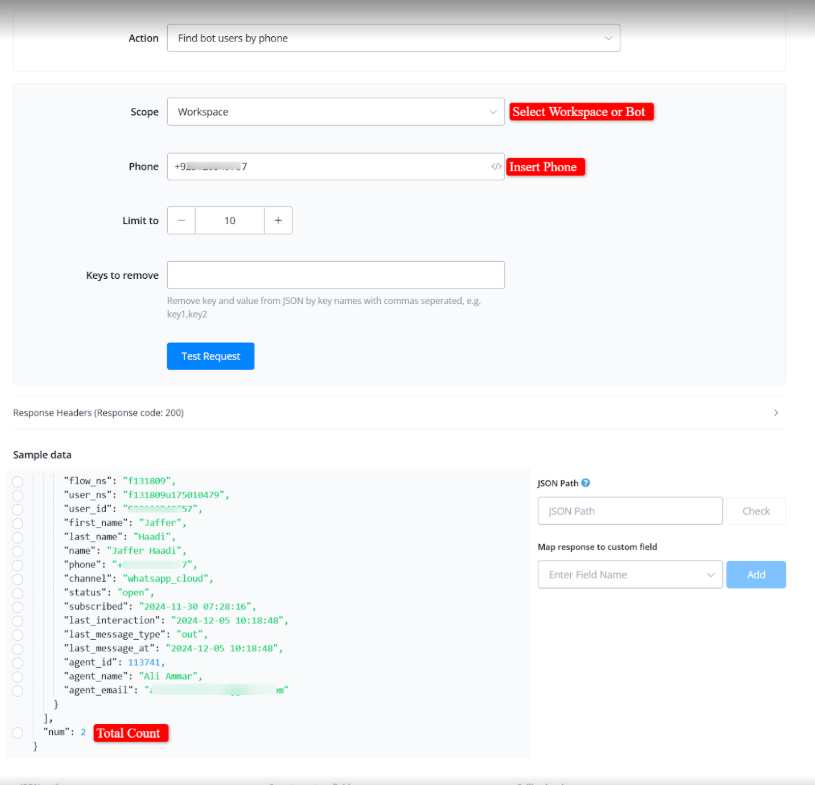
Find Bot Users by Phone
Search users via bot or workspace. Input the user’s phone number to locate their profile.
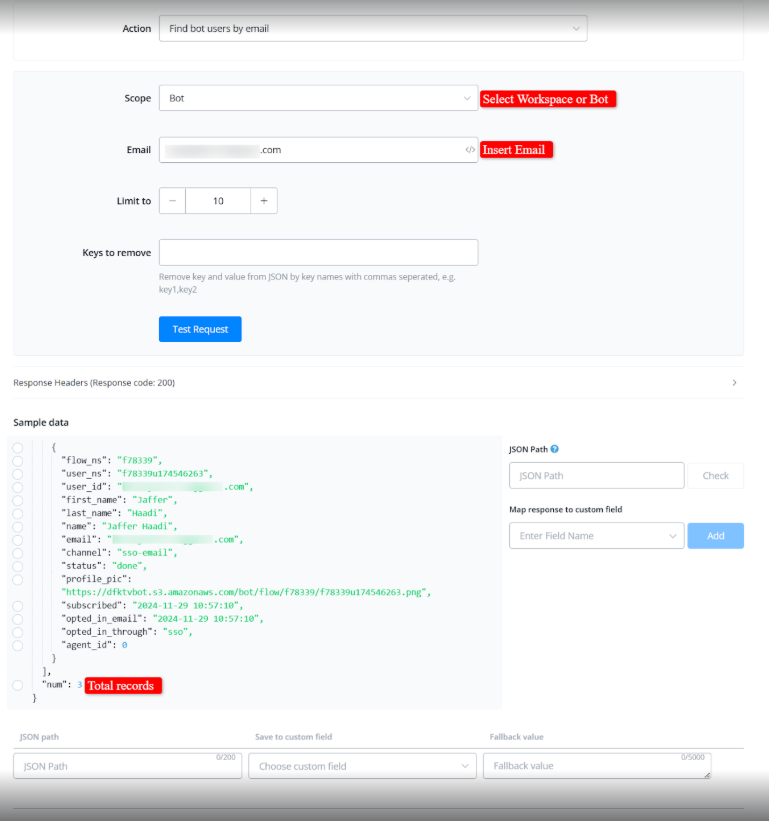
Find Bot Users by Email
Search users via bot or workspace using their email address.
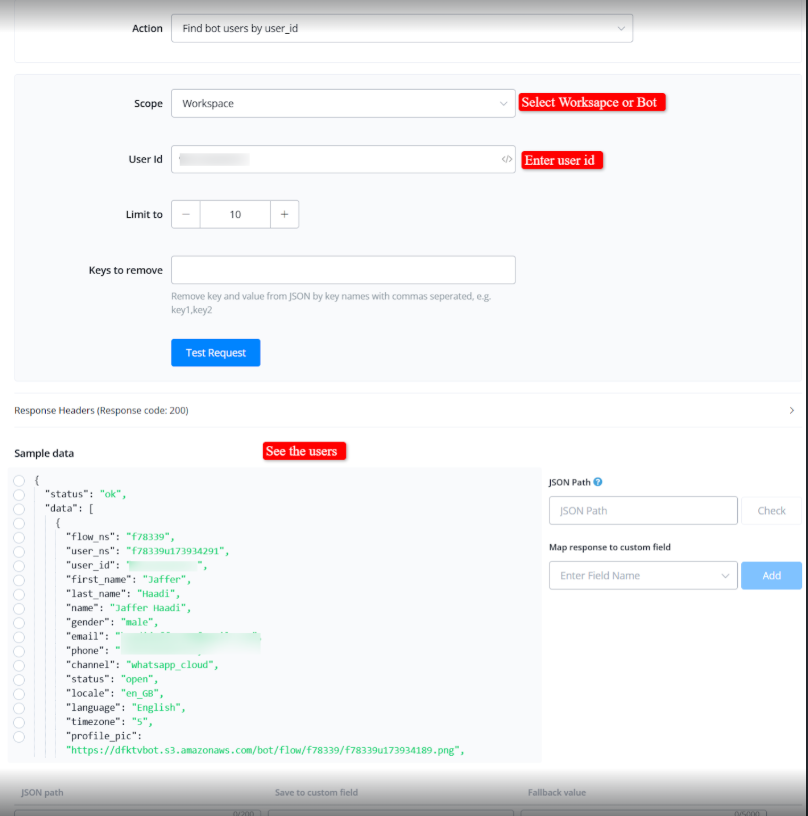
Find Bot Users by User ID
Locate a user across the bot or workspace using their unique user ID.
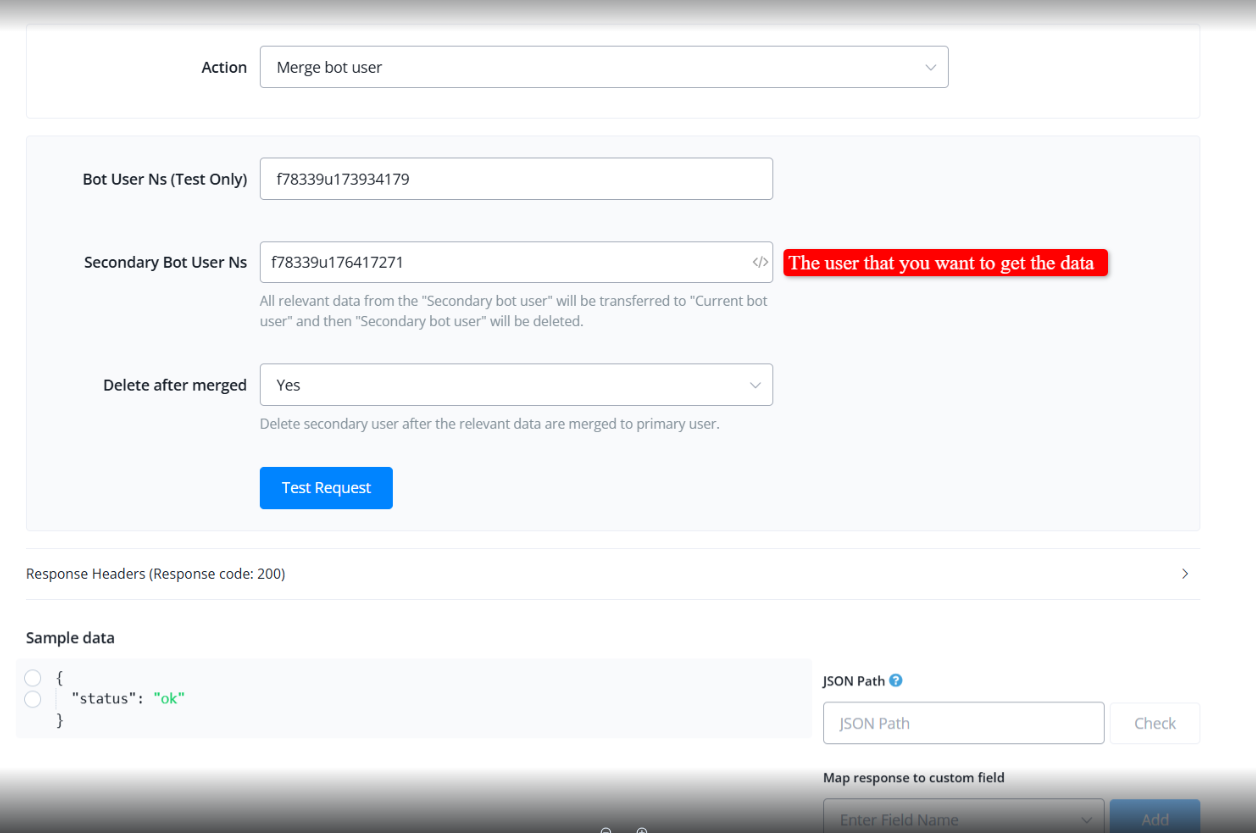
Merge Bot User
Merge a secondary bot user into a primary (current) bot user.
- All relevant data from the secondary user will be transferred to the primary user.
- You can delete the secondary user after merging or retain their profile.
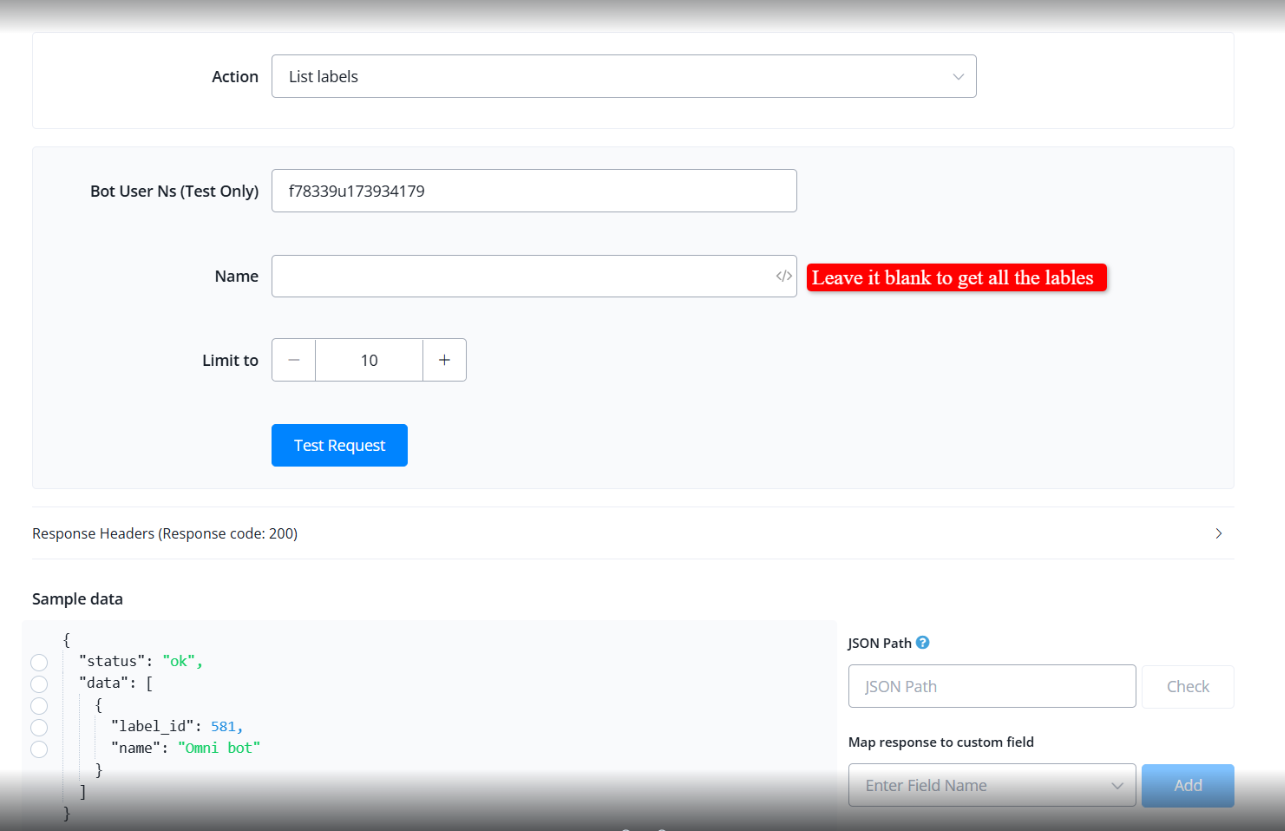
List Labels
Retrieve all labels assigned to a specific user.
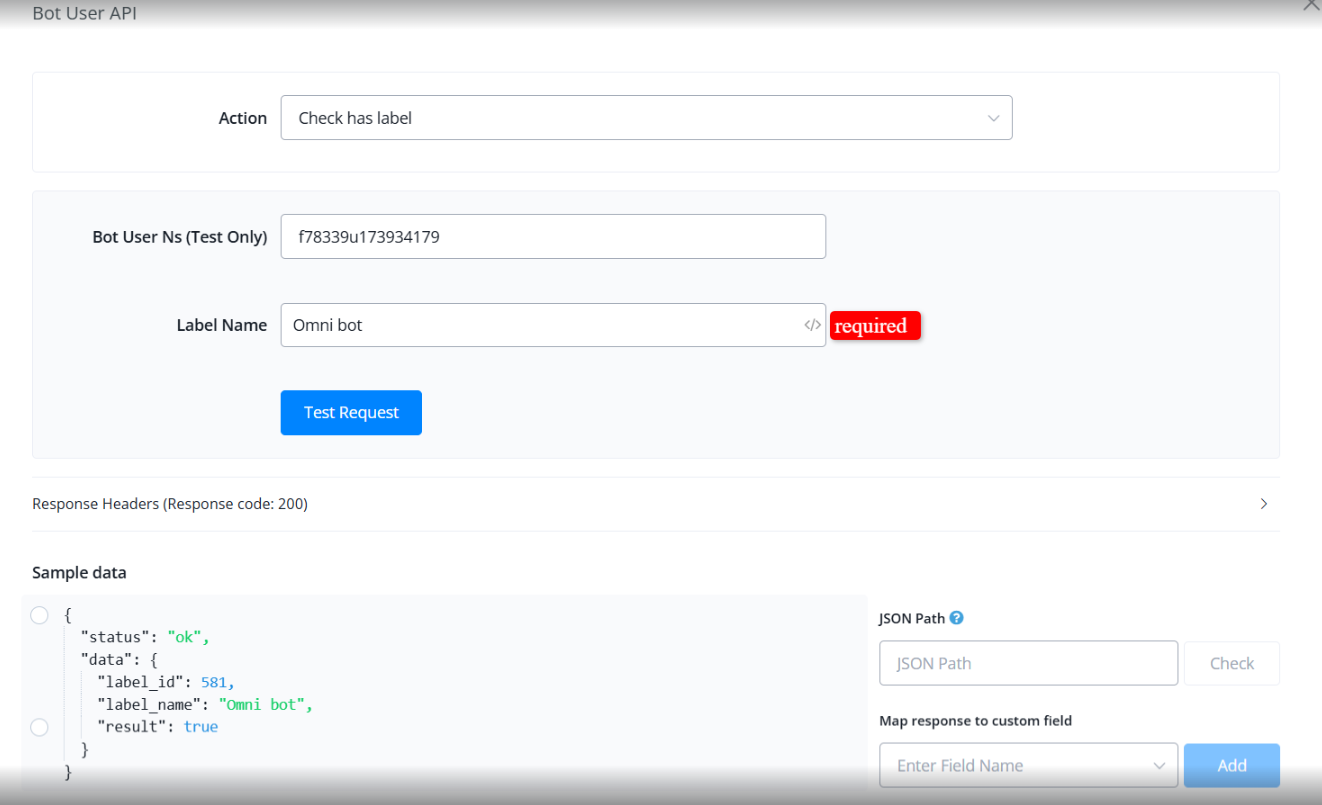
Check Has Label
Check whether a specific label is assigned to a user. Enter the label name to verify if it is associated with the user.
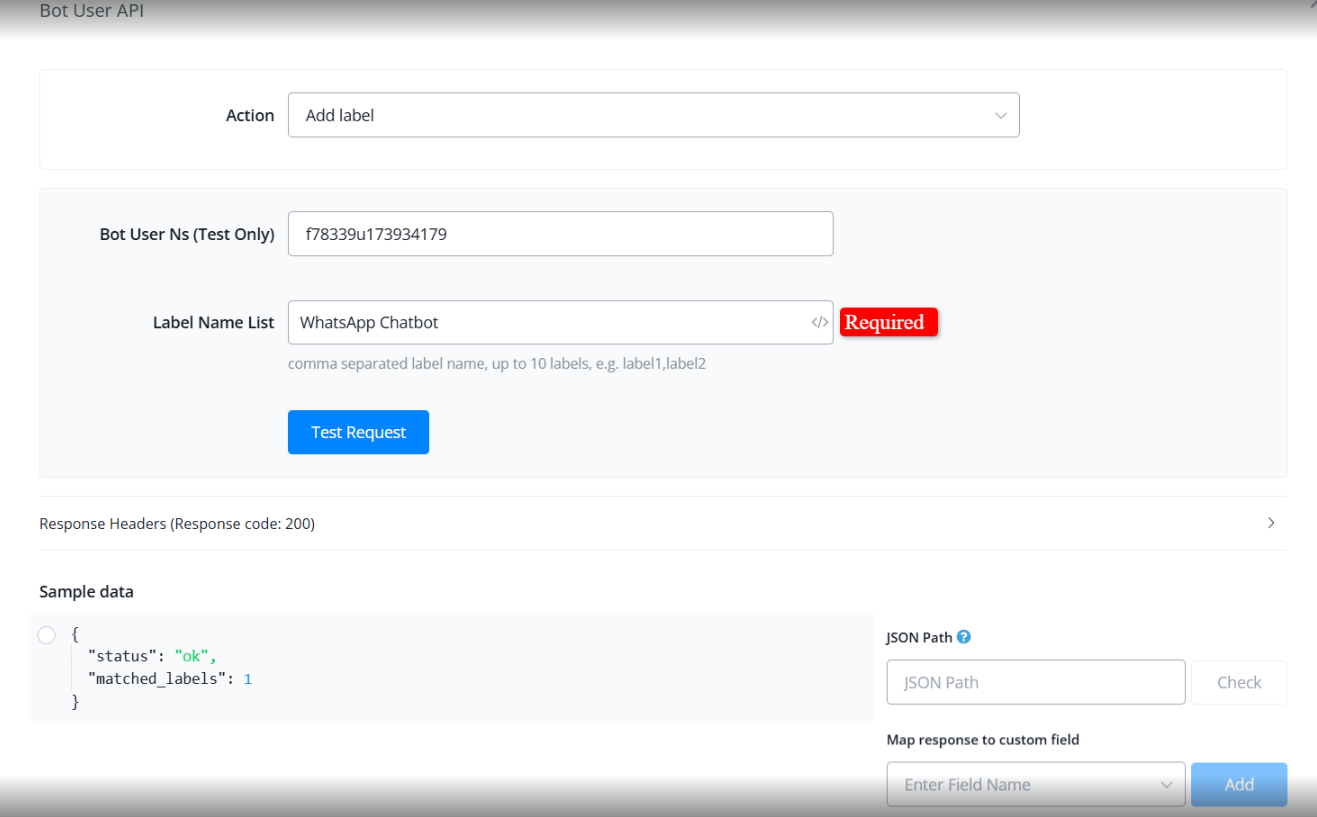
Add Label
Provide the label name and assign it to the target user.
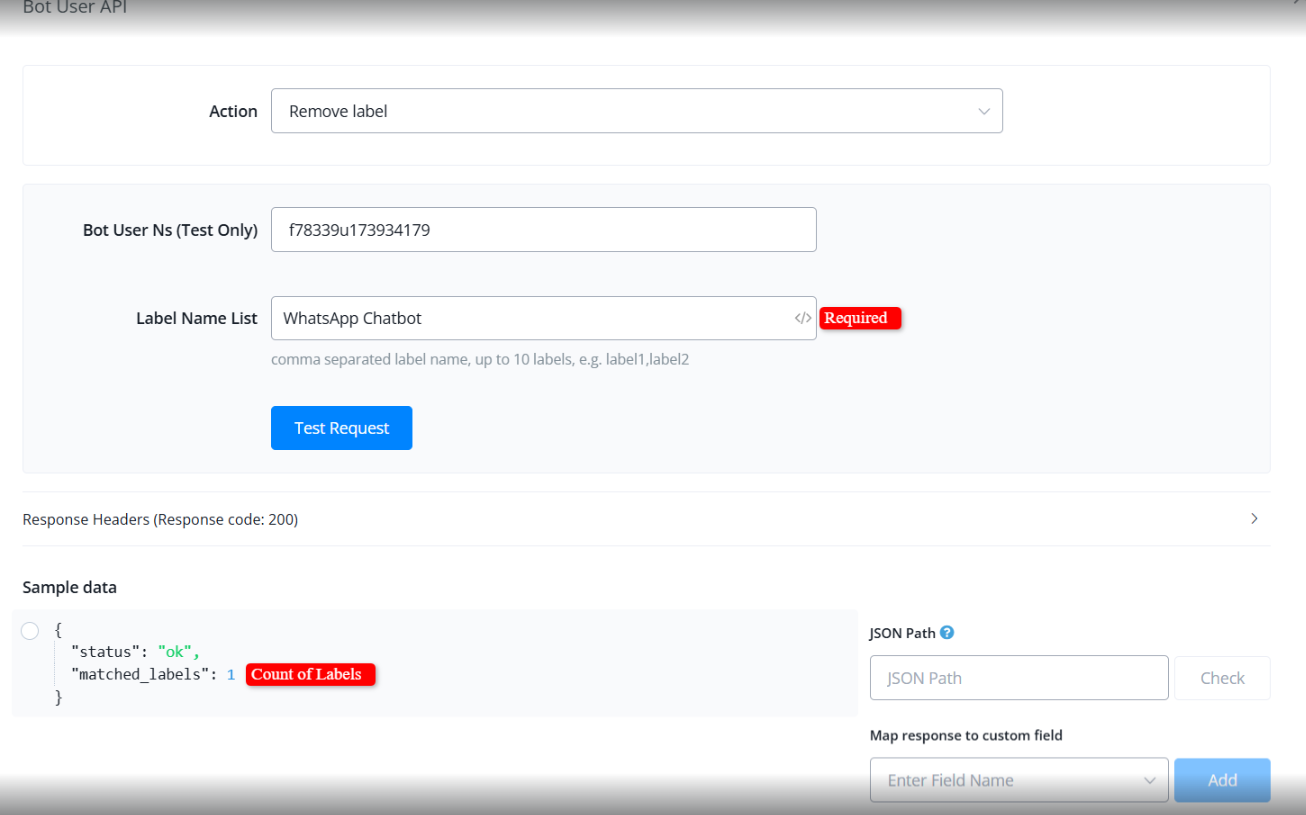
Remove Label
Remove a specific label from a user. Input the label name to disassociate it from the user.
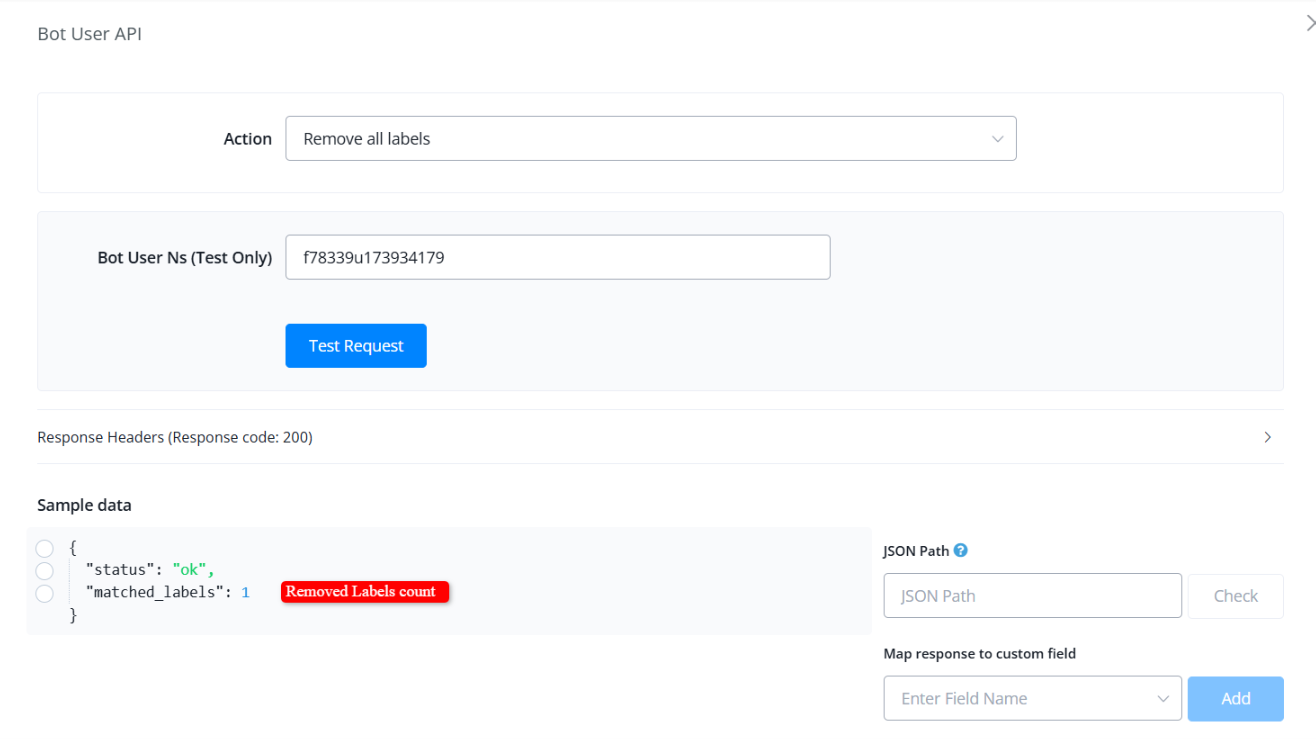
Remove All Labels
Remove all labels assigned to a user.
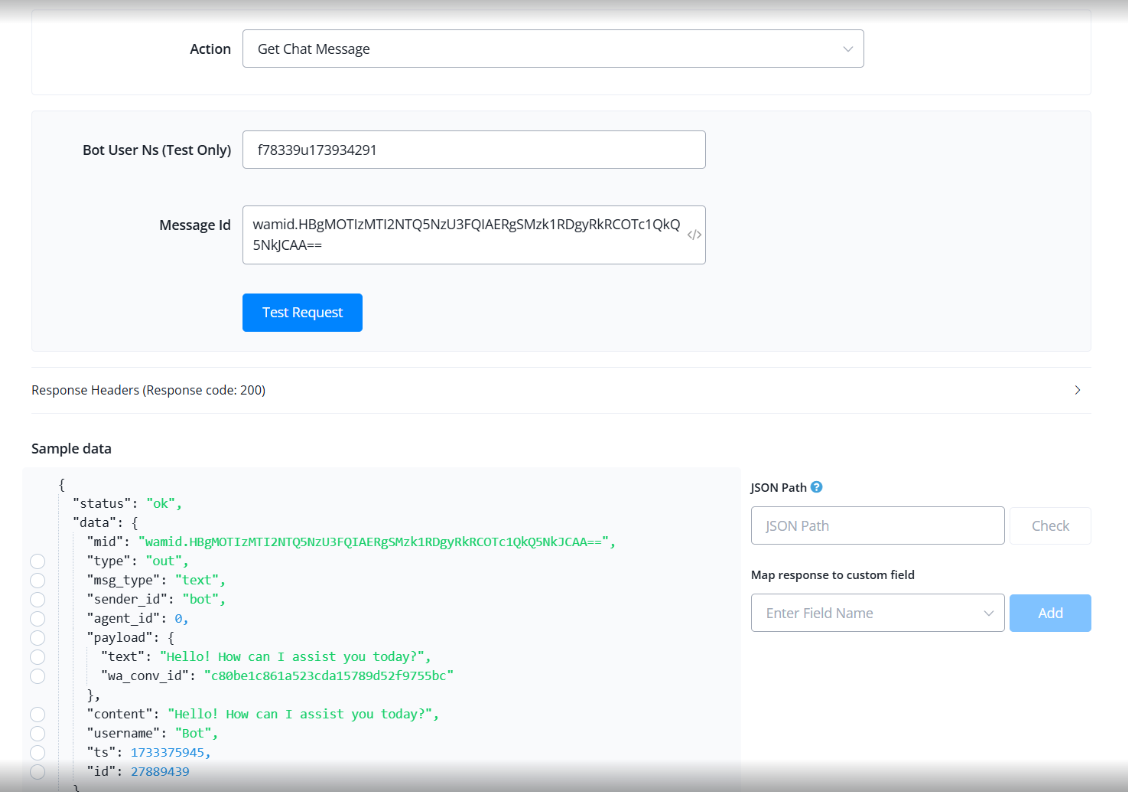
Get Chat Message
Retrieve a specific chat message using its message ID (MID).
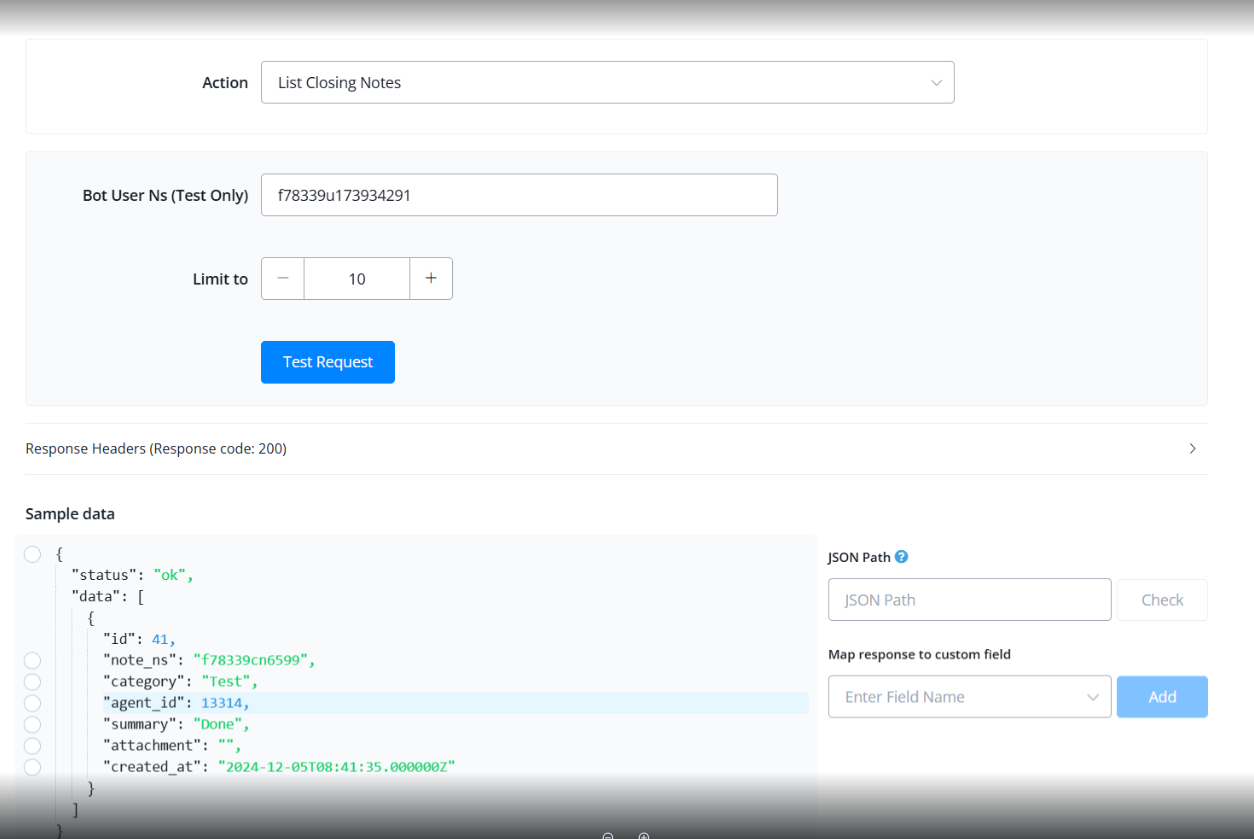
List Closing Notes
Retrieve all closing notes associated with a user.
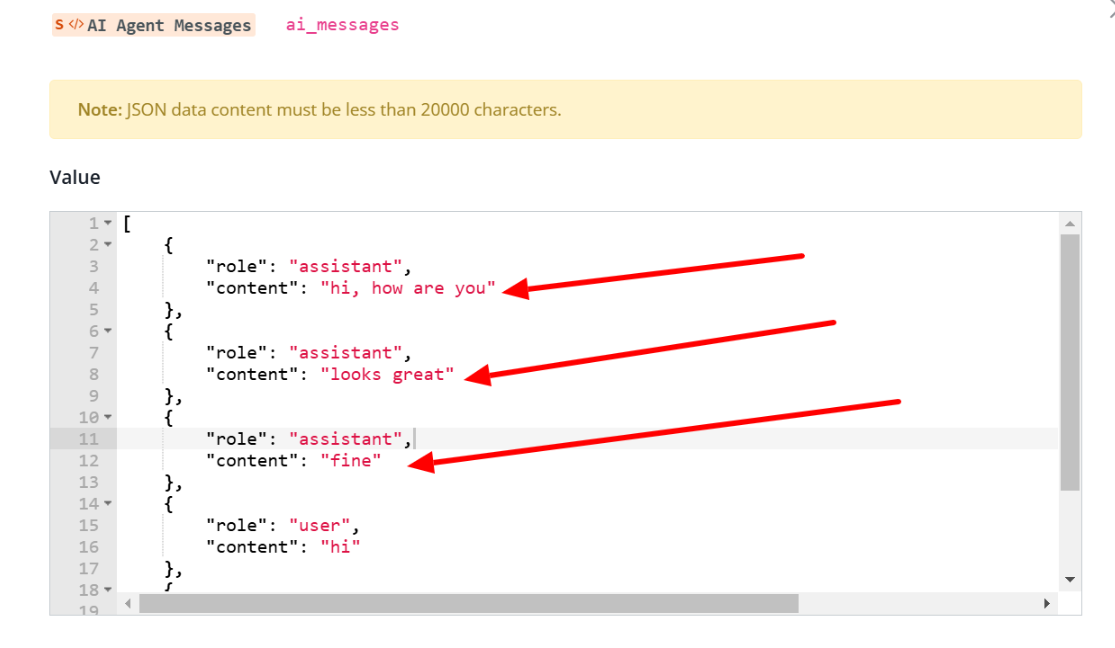
Append Assistant Message to AI Agent Messages
Whenever an AI response is generated outside the AI agent, they do not automatically get stored in the AI agent’s message history. To address this, a new action has been added under the Bot User API section, allowing developers to manually insert these responses into the AI message history. Use the new Append Assistant Message to AI Agent Messages action to add it to the relevant chat history.
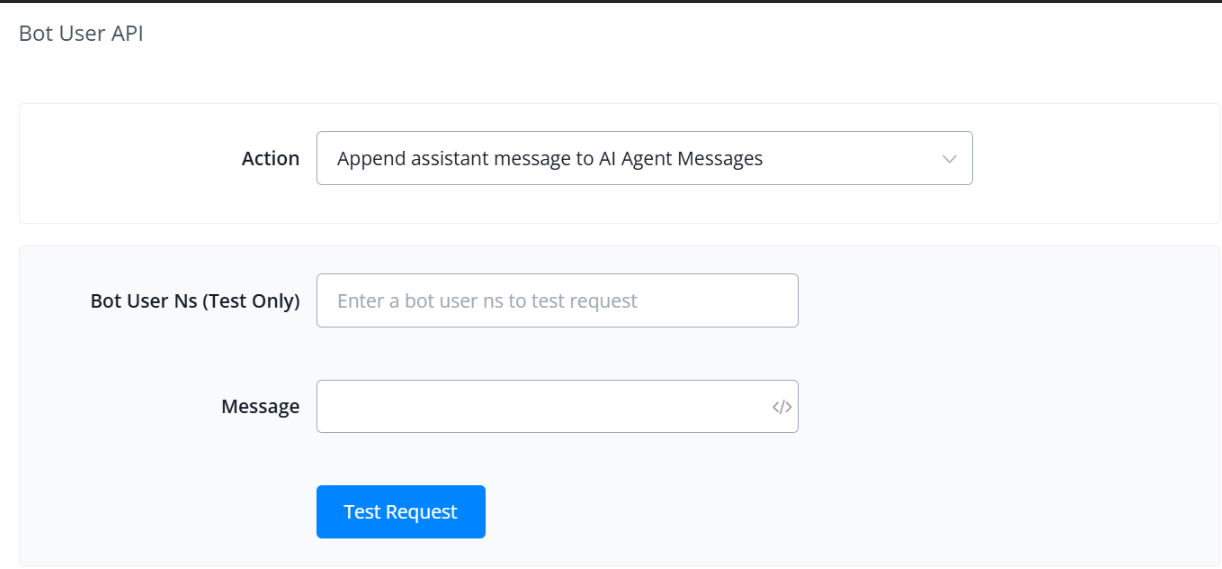
Here you can see how it looks as an example:
Instagram API Action
This document provides comprehensive details on the available actions in the Messagingme.app Instagram integration, enabling you to automate tasks, interact with your followers, and efficiently manage your account.
Prerequisites
- Messagingme.app account
- Instagram Business account
Configuring the Integration in Messagingme.app
Log in to your https://Messagingme.app account.
Access “Settings” and then “Channels”.
Click on “Add Channel” and select “Instagram”.
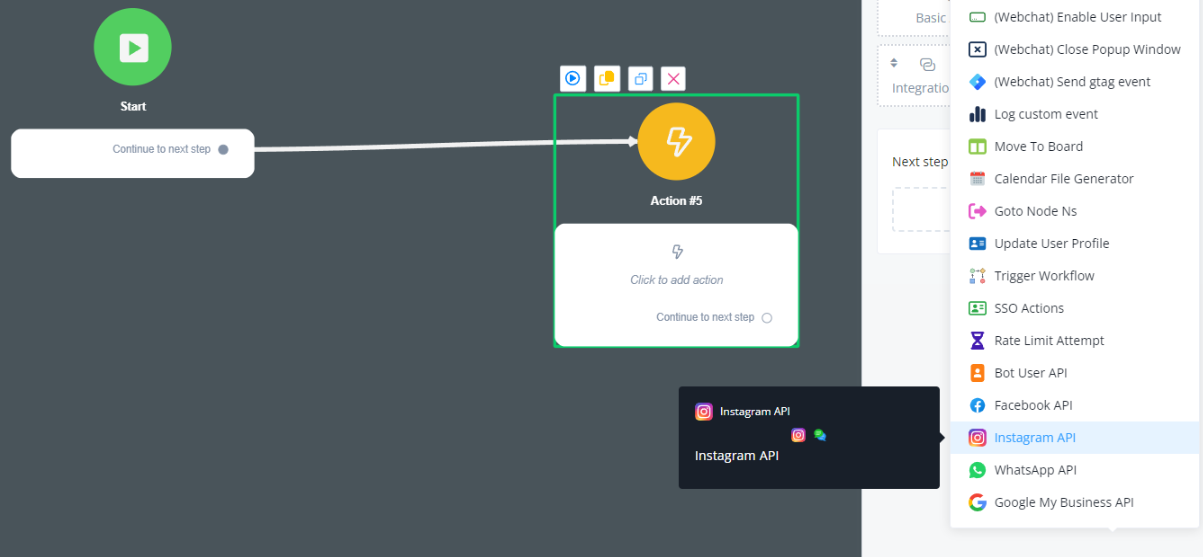
Inserting the Action Node into your flow
Insert an Action Node into your flow and go to Advanced Actions

Select Instagram API
Available Actions
https://Messagingme.app offers a variety of actions to automate tasks and interact with Instagram.
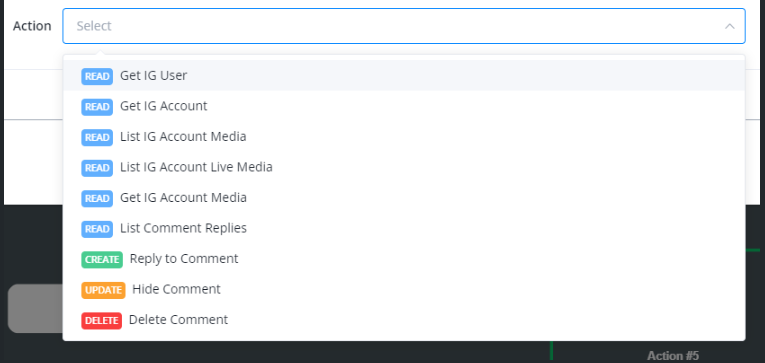
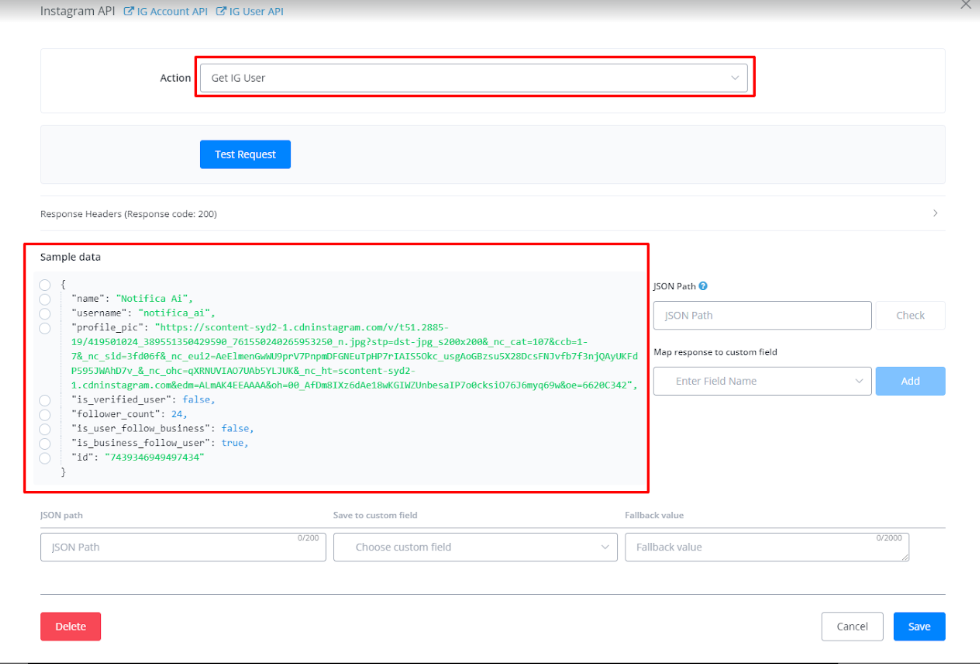
1. Get Instagram User
- Description: Retrieves information about a specific Instagram user.
- Response:
- name: User’s name.
- username: Instagram username.
- profile_pic: URL of the profile picture.
- is_verified_user: Indicates if the user is verified.
- follower_count: Number of followers.
- is_user_follow_business: Indicates if the user follows the business account.
- is_business_follow_user: Indicates if the business account follows the user.
- id: Instagram account ID.
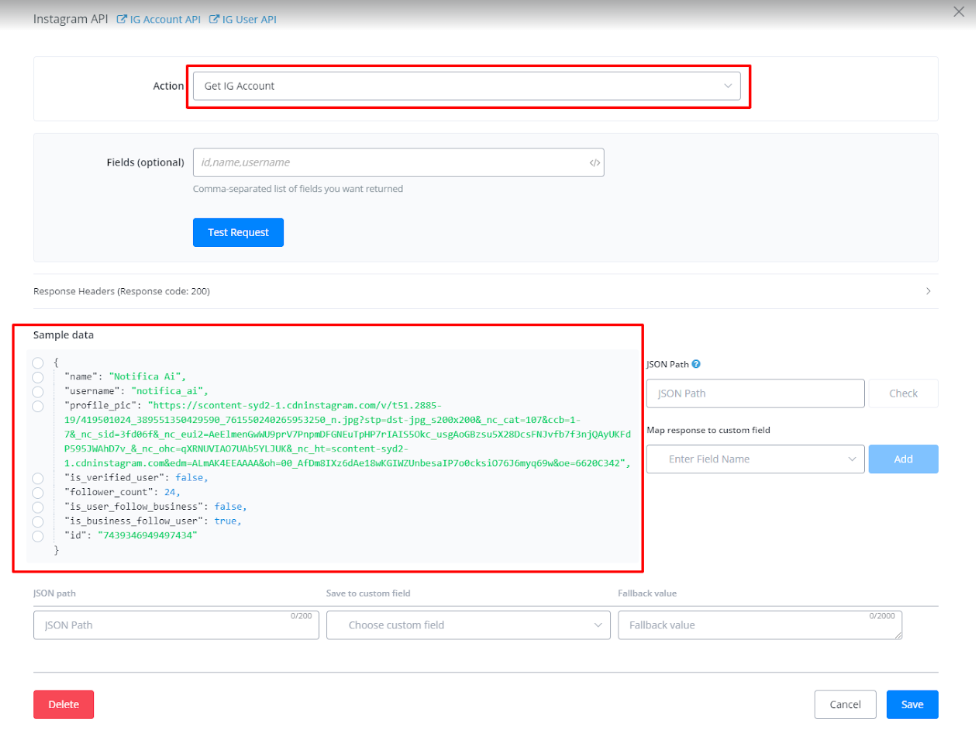
2. Get Instagram Account
- Description: Retrieves information about an Instagram account.
- Parameters/Fields:
- fields (optional): Comma-separated list of fields to return (e.g., media_count,followers_count).
- Response:
- id: Instagram account ID.
- username: Instagram username.
- name: Instagram account name.
- media_count: Number of media posts.
- follows_count: Number of users followed by the account.
- followers_count: Number of followers of the account.
- profile_picture_url: URL of the profile picture.
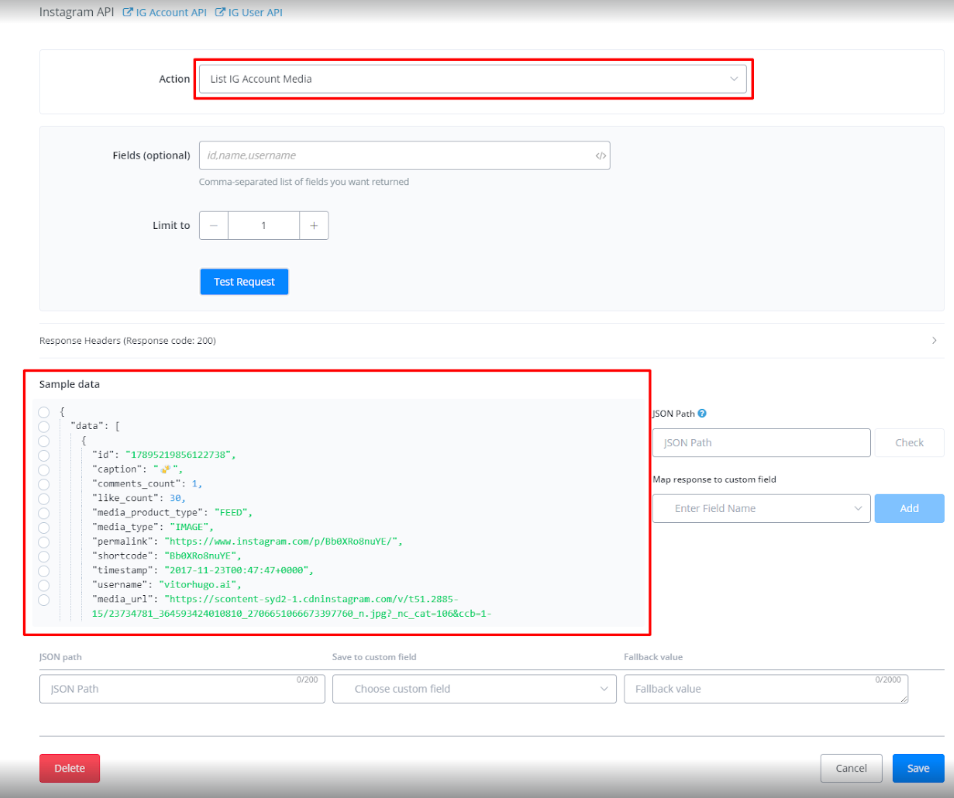
3. List Instagram Account Media
- Description: Retrieves a list of media posts from an Instagram account.
- Parameters/Fields:
- fields (optional): Comma-separated list of fields to return (e.g., media_url,like_count).
- limit: Limit the number of media posts to return.
- Response:
- data: List of media posts. Each media post includes information such as:
- id: Media post ID.
- caption: Post caption.
- comments_count: Number of comments.
- like_count: Number of likes.
- media_product_type: Type of media (e.g., FEED).
- media_type: Media type (e.g., IMAGE).
- permalink: Permanent URL of the post.
- shortcode: Shortcode of the post.
- timestamp: Post timestamp.
- username: Instagram username.
- media_url: Media URL.
- paging: Pagination information to retrieve more media posts.
4. List Live Media from Instagram Account
- Description: Retrieves information about live media (live broadcasts) from an Instagram account.
- Parameters/Fields ::
- fields (optional): Comma-separated list of fields to return (e.g., media_url,like_count).
- Response:
- id: Live media ID.
- media_url: URL of the live broadcast.
- viewer_count: Number of viewers of the live broadcast.
- comments_count: Number of comments on the live broadcast.
- like_count: Number of likes on the live broadcast.
- timestamp: Live timestamp.
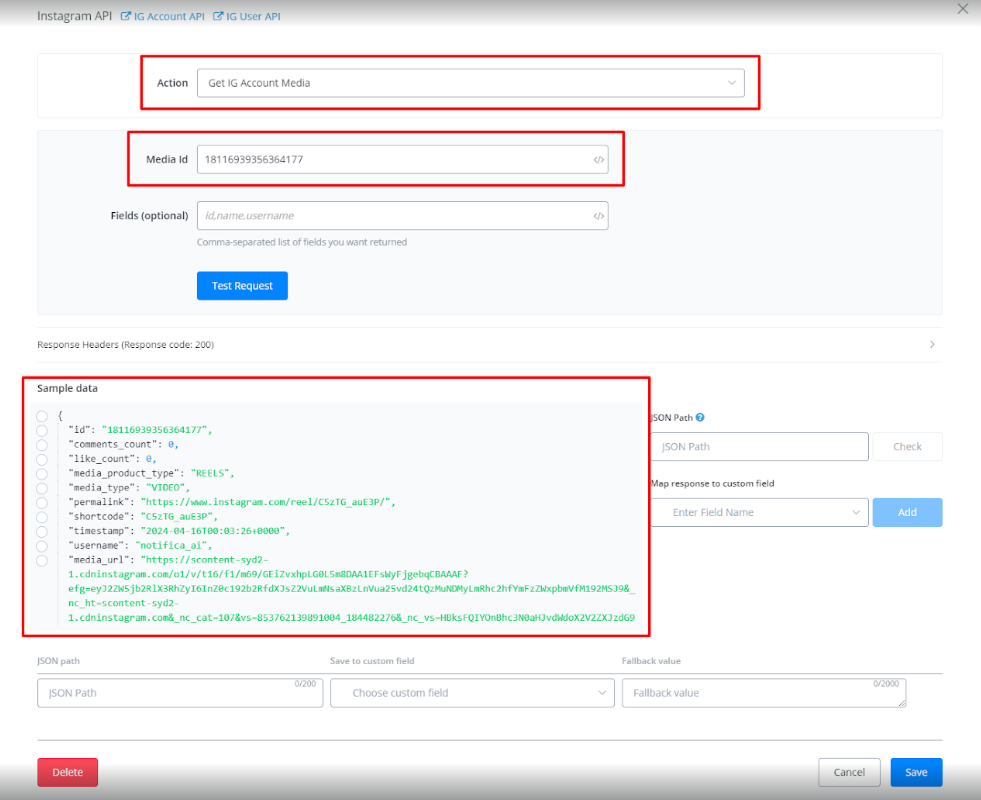
5. Get Instagram Media Details
- Description: Retrieves detailed information about a specific media post from an Instagram account.
- Parameters/Fields:
- id: Media post ID (required).
- fields (optional): Comma-separated list of fields to return (e.g., comments_count,like_count).
- Response:
- Detailed information of the media post, including:
- id: Media post ID.
- caption: Post caption.
- comments_count: Number of comments.
- like_count: Number of likes.
- media_product_type: Type of media (e.g., FEED).
- media_type: Media type (e.g., IMAGE).
- permalink: Permanent URL of the post.
- shortcode: Shortcode of the post.
- timestamp: Post timestamp.
- username: Instagram username.
- media_url: Media URL.
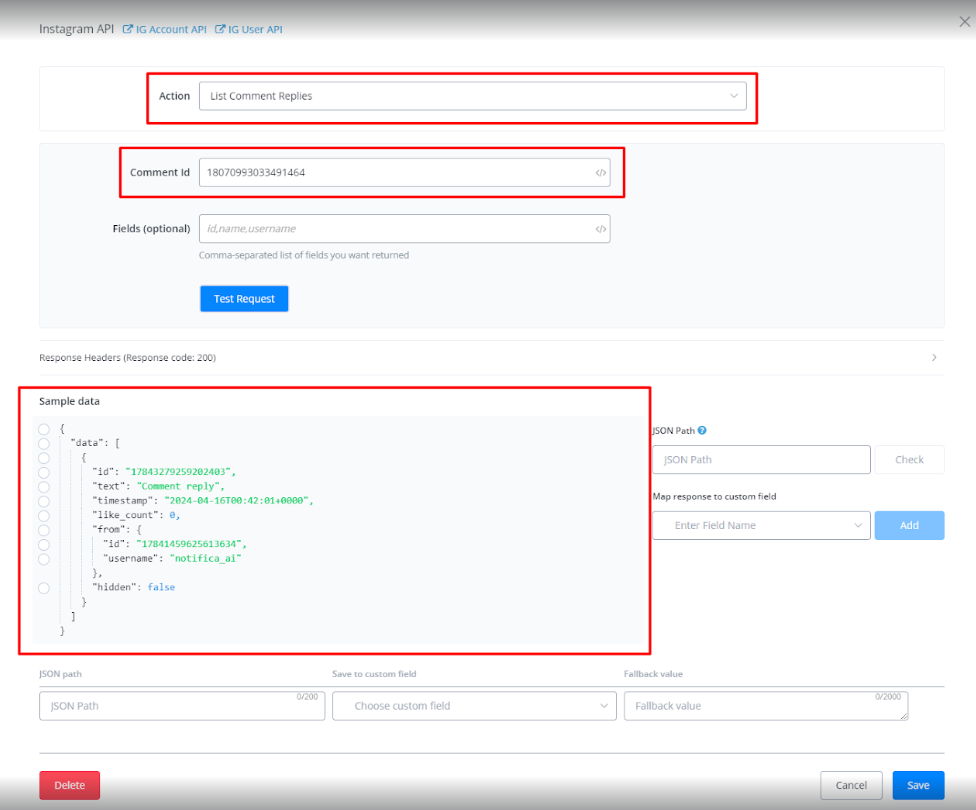
6. List Comment Replies on Instagram
- Description: Retrieves a list of comment replies for a specific comment on an Instagram post.
- Parameters/Fields:
- comment_id: Comment ID (required).
- fields (optional): Comma-separated list of fields to return (e.g., time_stamp,text).
- Response:
- id: Comment reply ID.
- text: Text of the comment reply.
- time_stamp: Timestamp of the comment reply.
- like_count: Number of likes.
- from: Information about the user who replied to the comment (includes id, username).
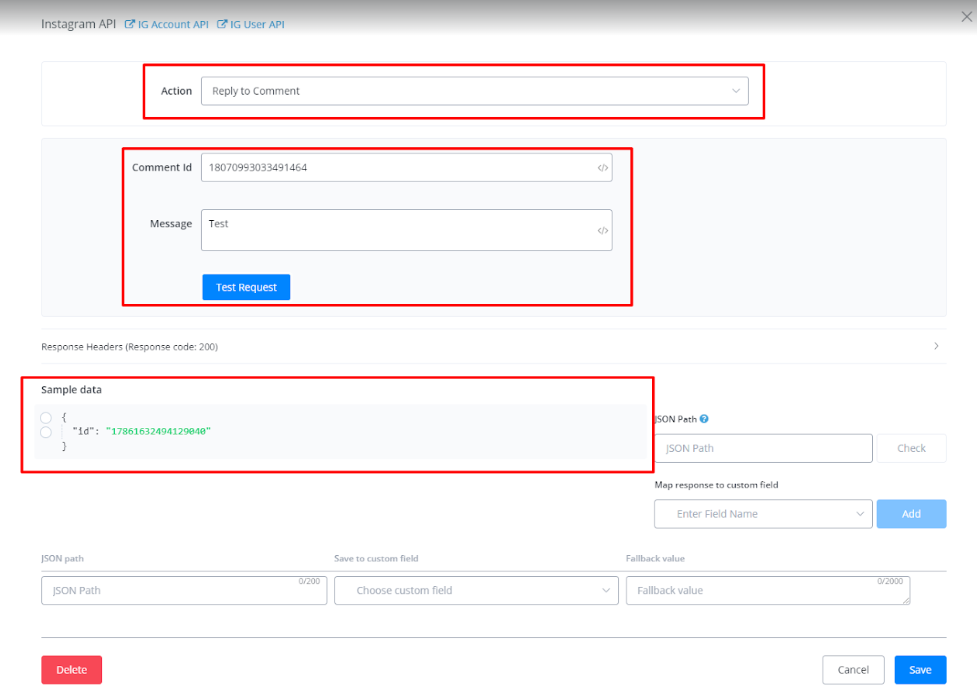
7. Reply to Comment on Instagram
- Description: Replies to a comment on an Instagram post.
- Parameters/Fields:
- comment_id: Comment ID (required).
- message: Message of the comment reply (required).
- Response:
- id: Comment reply ID.
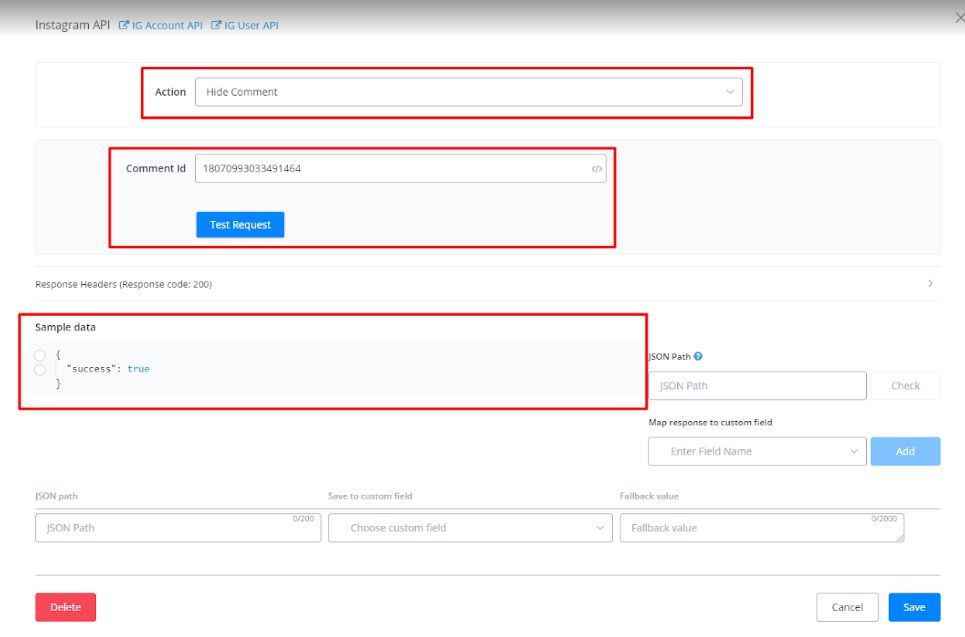
8. Hide Comment on Instagram
- Description: Hides a comment on an Instagram post.
- Parameters/Fields:
- comment_id: Comment ID (required).
- Response:
- Success or error message.
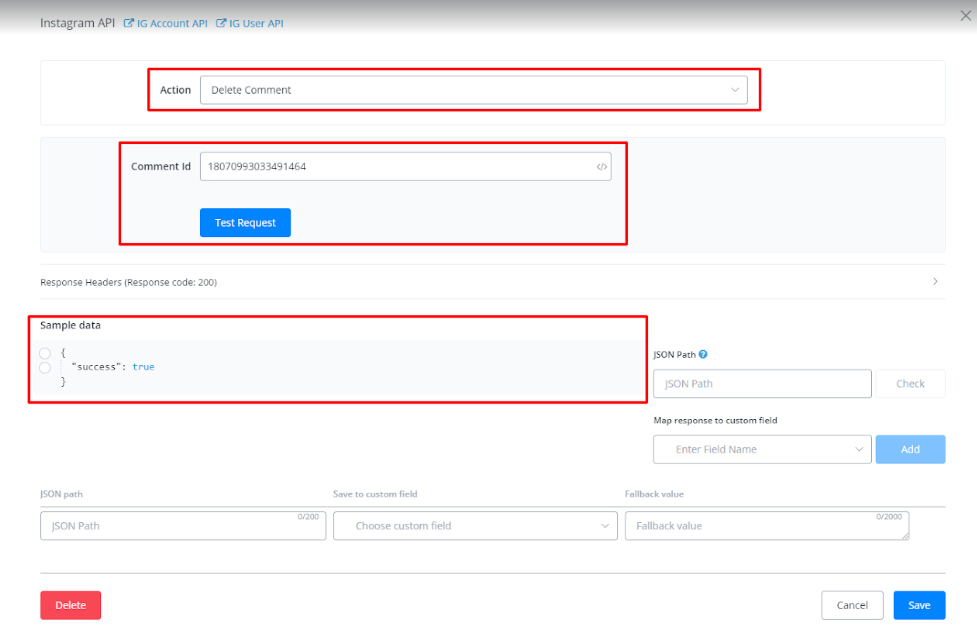
9. Delete Comment on Instagram
- Description: Deletes a comment on an Instagram post.
- Parameters/Fields:
- comment_id: Comment ID (required).
- Response:
- Success or error message.
Reply to Comment on Instagram
This action allows you to reply to a comment on an Instagram post. Additionally, it includes an option to save the comment reply as a bot message, making it visible in the chat history.
Parameters/Fields
- comment_id: Comment ID (required).
- message: Message of the comment reply (required).
- Save as Bot Message: When enabled, the comment will be added to chat messages but not for previous training.
Step-by-Step Guide
Step 1: Adding the Reply to Comment Action
- Navigate to the flow editor and select the Instagram API.
- Choose the “Reply to Comment” action.
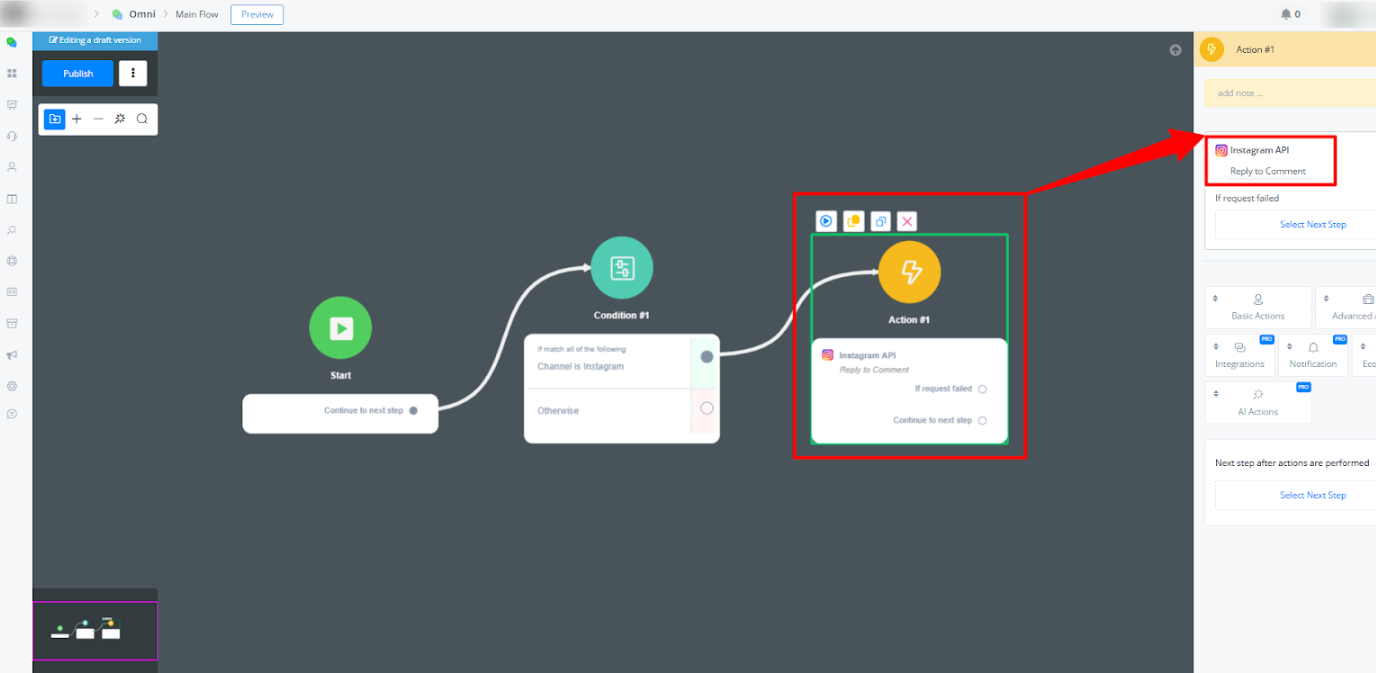
3.Connect the flow with your Comment Keyword Automation
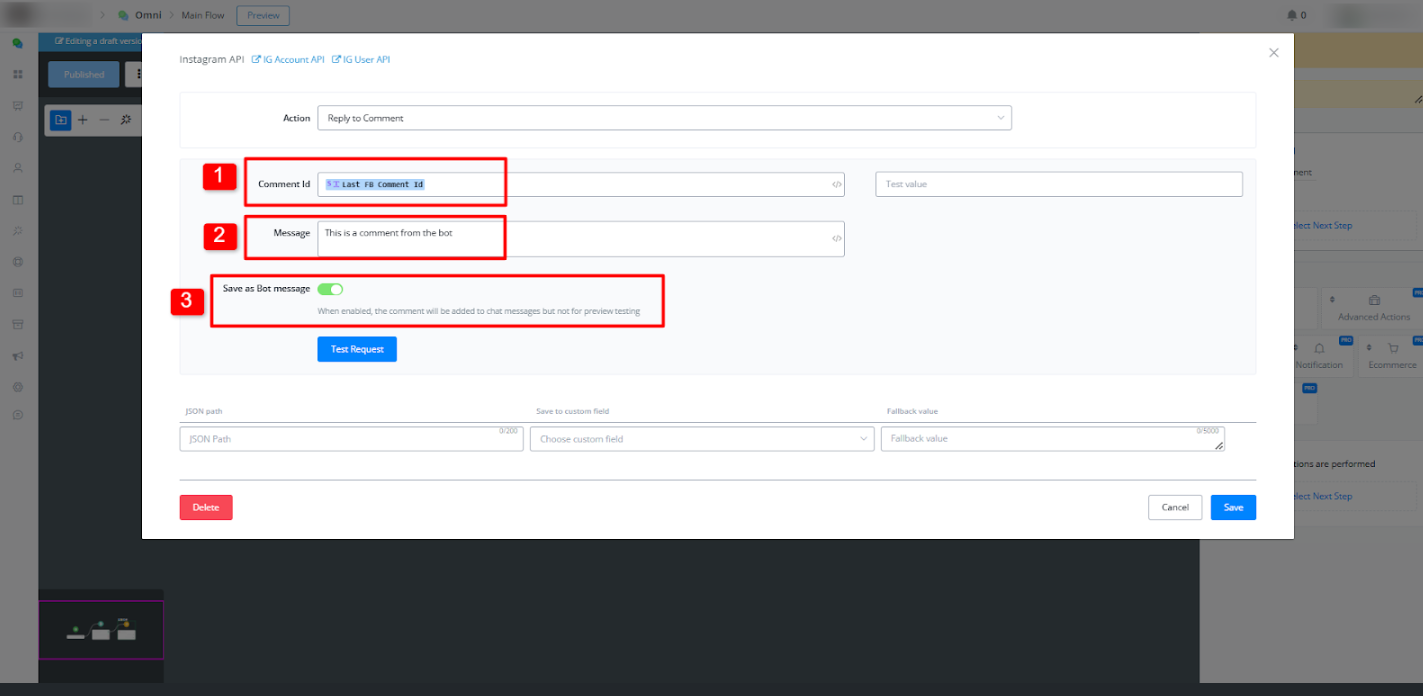
Step 2: Configuring the Action
- In the action settings, enter the Comment ID.
- Input the Message that will be sent as a reply.
- Enable the “Save as Bot Message” option if you want the reply to appear in chat history.
(Refer to Image 2: Action Configuration Panel)
Step 2: Configuring the Action
- In the action settings, enter the Comment ID.
- Input the Message that will be sent as a reply.
- Enable the “Save as Bot Message” option if you want the reply to appear in chat history.
(Refer to Image 2: Action Configuration Panel)
Step 3: Viewing the Comment in Chat History
- Once the bot replies, navigate to the chat history.
- The bot’s reply will be displayed in the conversation thread.
- This allows for better tracking and reference of bot responses.
This ensures that bot-generated replies to Instagram comments are logged within the chat history for better visibility and tracking.
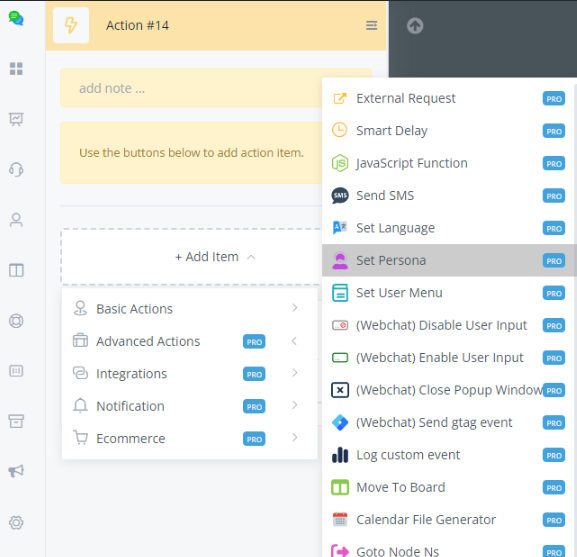
Set Persona
Setting a persona is basically allowing your chatbot to have different characters. Imagine having talking to a different person for your billing flow, another for the sales, then another for support. This allows a lot more personalization in your chatbot.
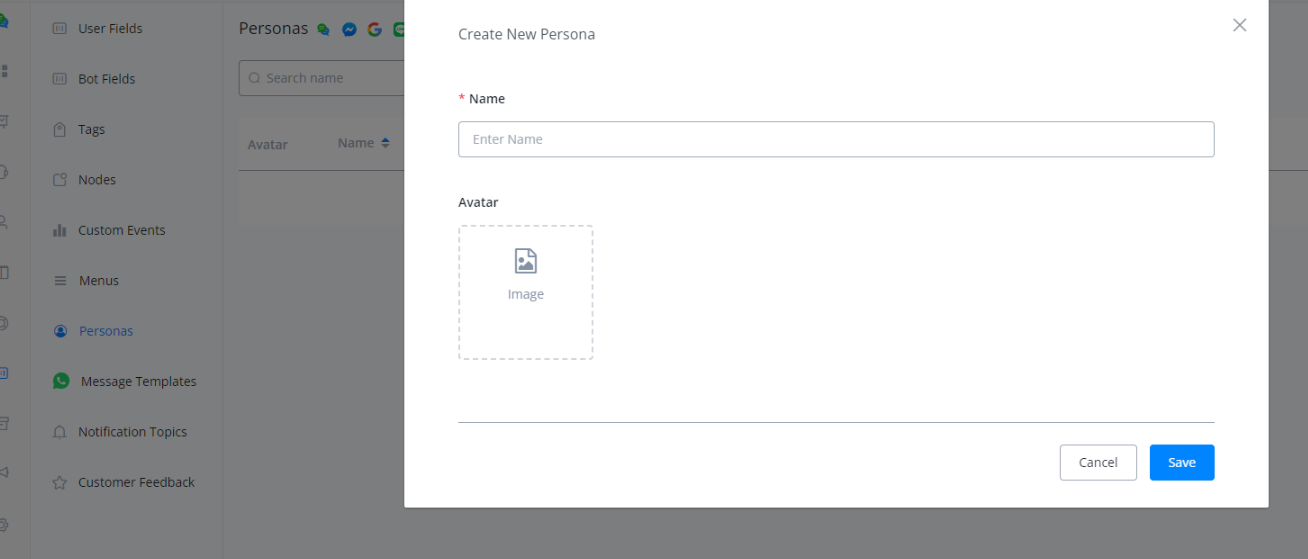
Step 1
Go to Contents > Personas > Click “+New Persona” then enter a name and an avatar (optional).

Step 2
Set it up on your flow builder
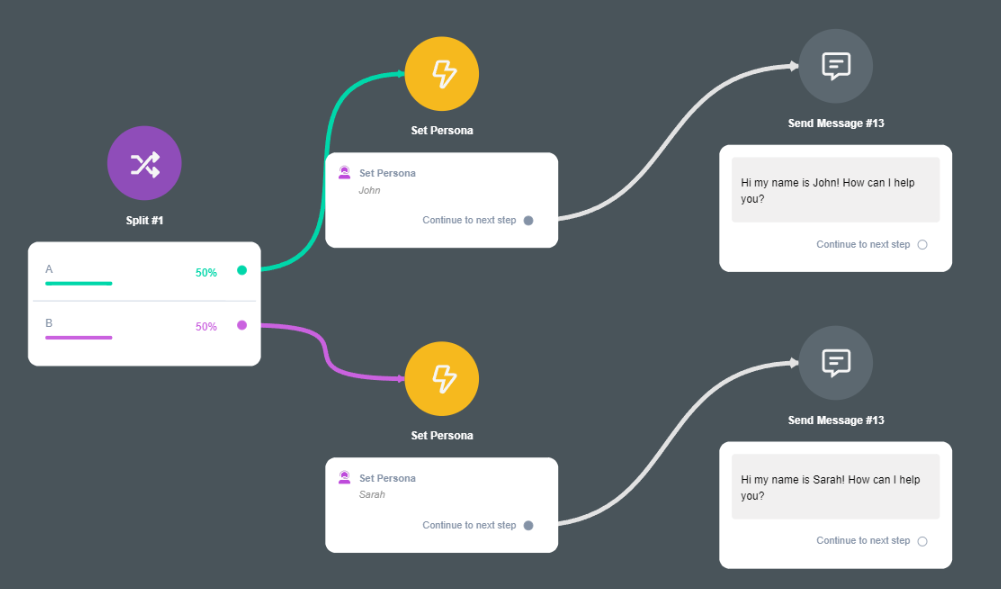
Result
If you noticed, the avatar has changed and your conversation is handled by the persona “Sarah”.

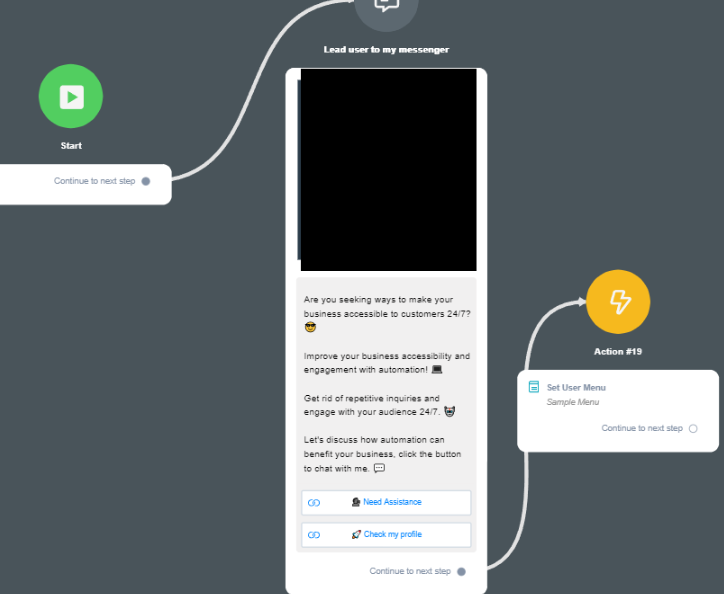
Set User Menu
Set User Menu is a good way to provide shortcuts to your chatbot. So instead of having the user go through each flow, we can use this function to have the user go straight to whatever flow they want to go.
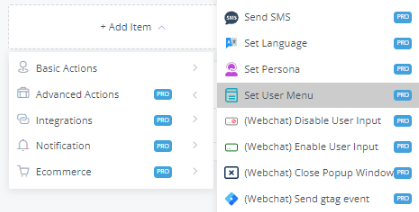
How do you set this up?
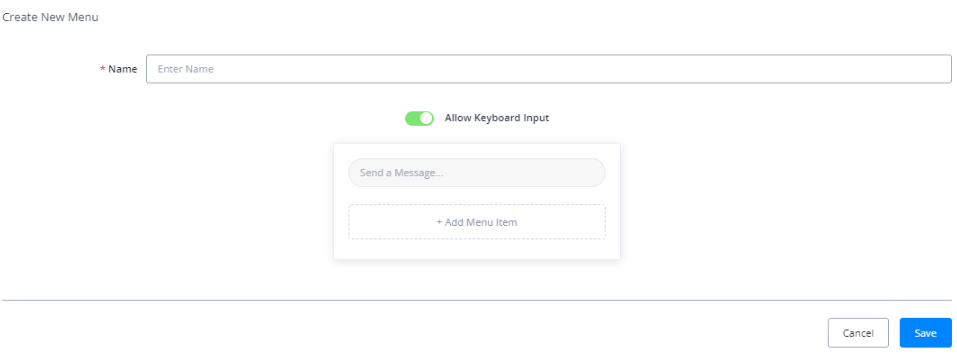
Go to Contents >> Menus >> + New Menu

Create your Menu name and click “+Add Menu Item”
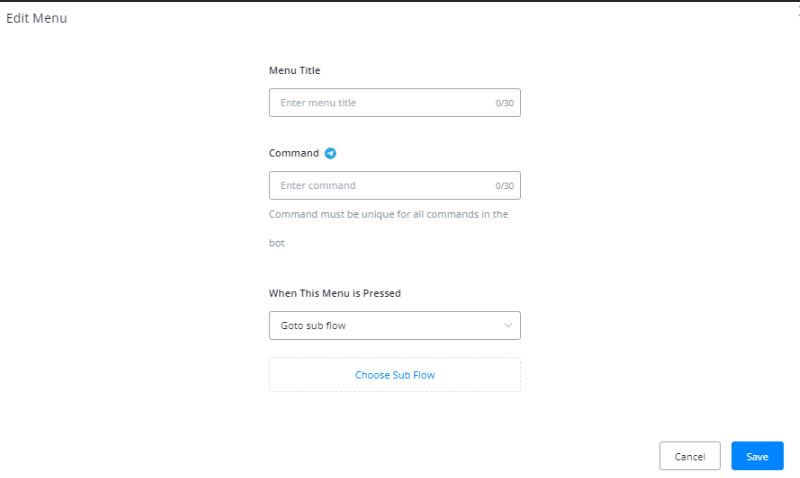
Add your menu title and make sure to choose a subflow then click Save. This is where your user will be sent once the menu is pressed.
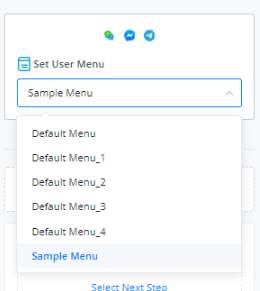
Back at your flow, choose the menu you want to appear.
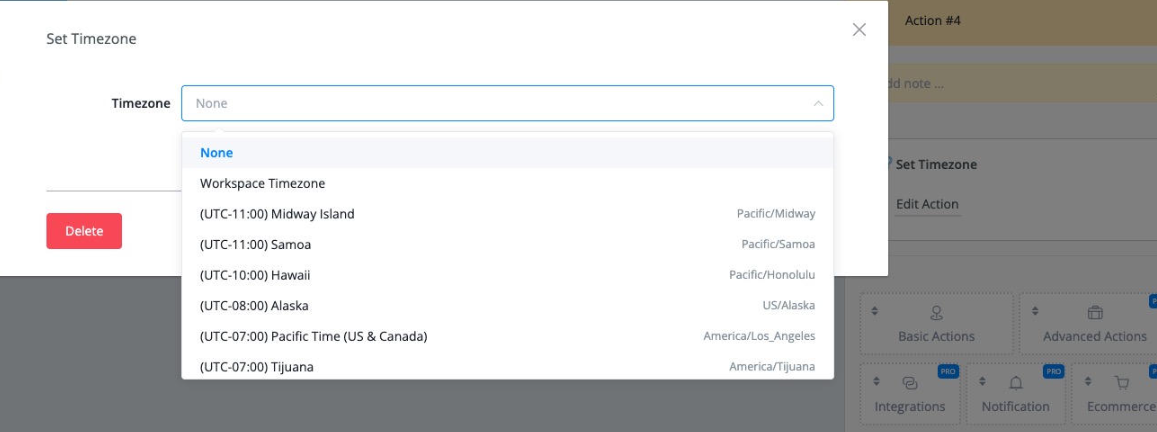
Set Timezone
You can set up the user timezone by using this action.
Log Custom Event
Messagingme.app now allows its users to track various events that happen within the bot automations and let users visualize these event via analytics in form of custom events and custom reports.
You will now be able to track custom events of your choosing and then make collaborative analytical reports out of them, giving you more insight of data and provide you with metric on which to track the performance of your bot and automations.
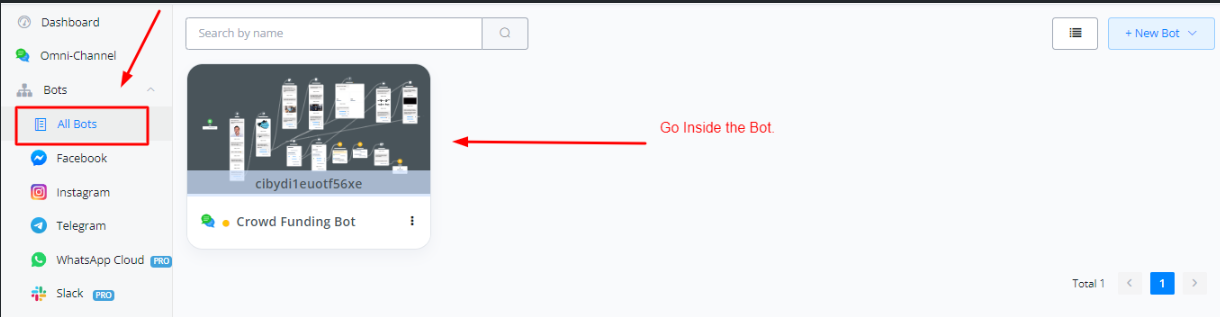
Creating and Using Custom Events In Messagingme.app
On your dashboard, click on the bot and go inside the flow builder.
Inside the flow builder, select Content tab, and then select custom events.
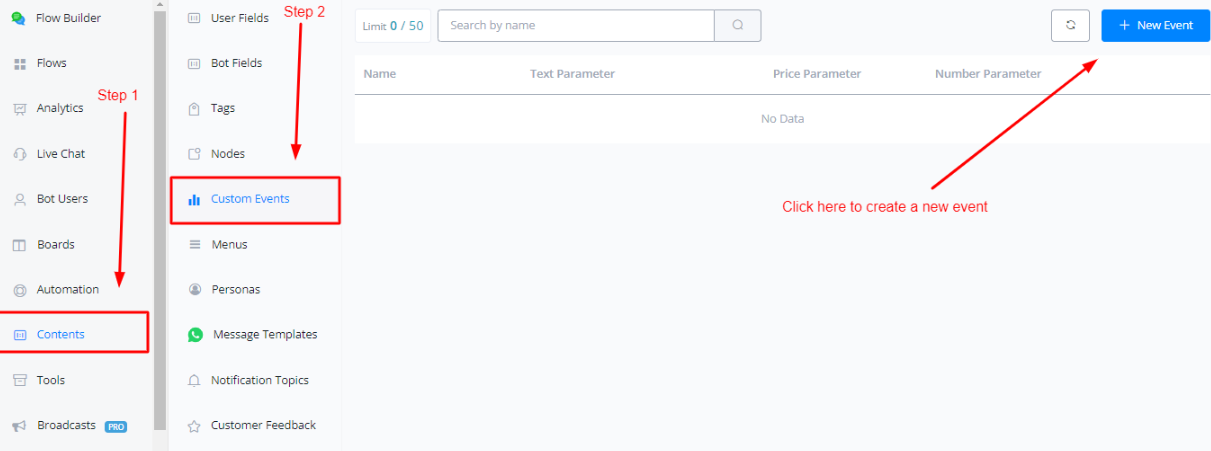
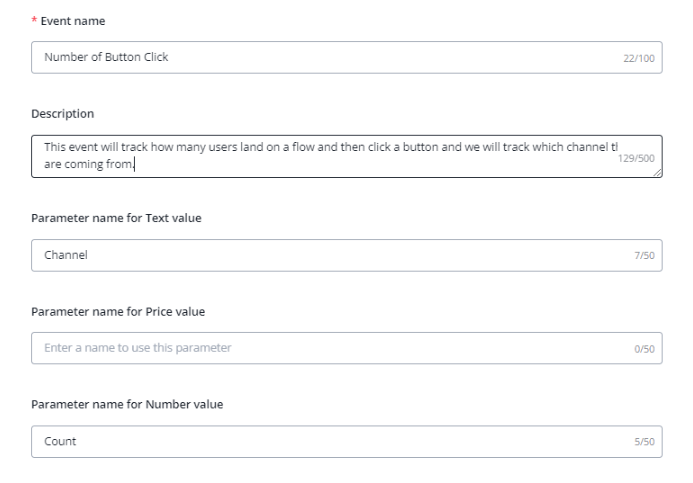
When creating a new event, following parameters you have to provide.
Event Name : This is used to naming that custom event
Event Description : This is used for describing what the custom event do and track.
Parameter Names : These are the name of the parameters you want to track for, for example product, sales category, name of the person etc

💡 You don’t have to fill each of the parameter in order for the event to work but you need to be able to provide at least one parameter for tracking
After creating an event, Go inside your flowbuilder and add the “Custom Event” action from Action block to start integrating the event and tracking it.
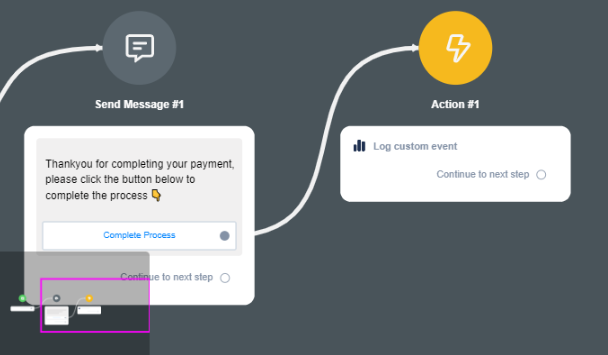
Click on Edit action and start setting up the event.
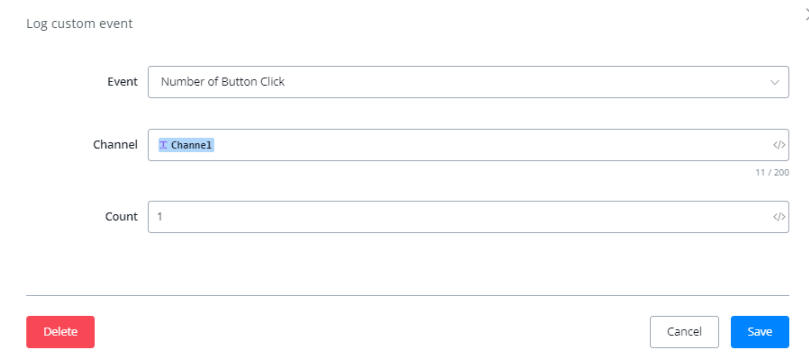
Here the event will track the Channel from which the users are coming and then the count will add one count to the total number of event happening.
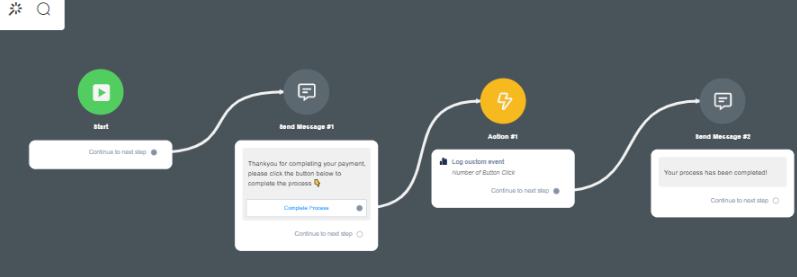
The event is now ready to be tracked.
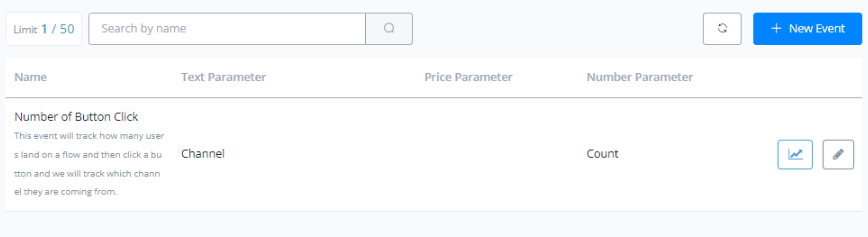
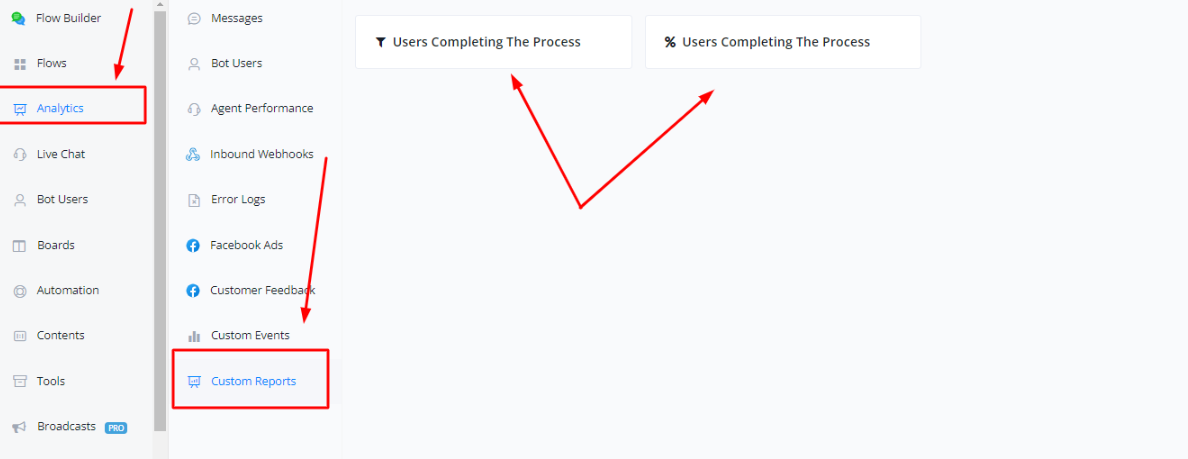
Visualizing Analytics For Custom Events
Click on the analytics tab, select custom events to view the analytics for that particular event.
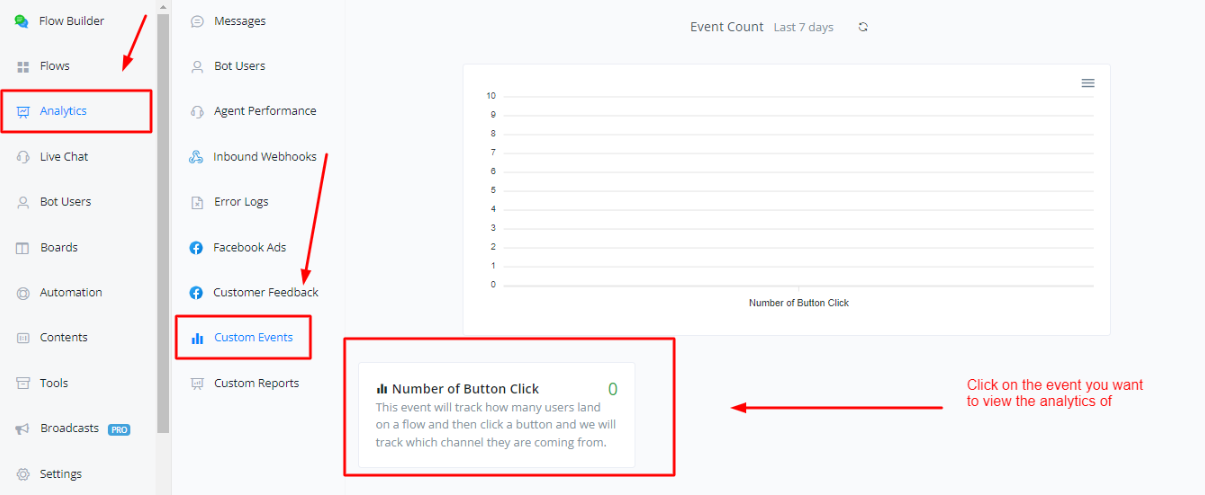
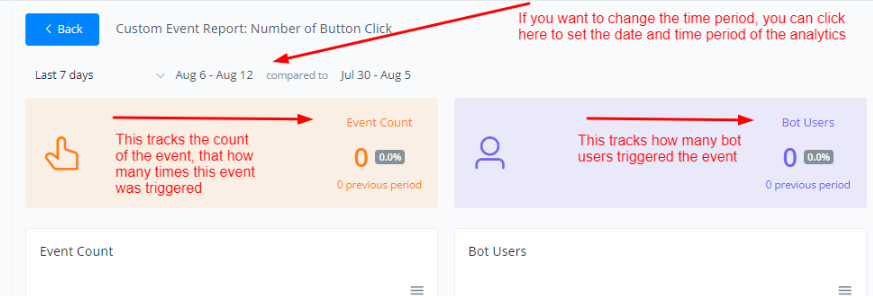
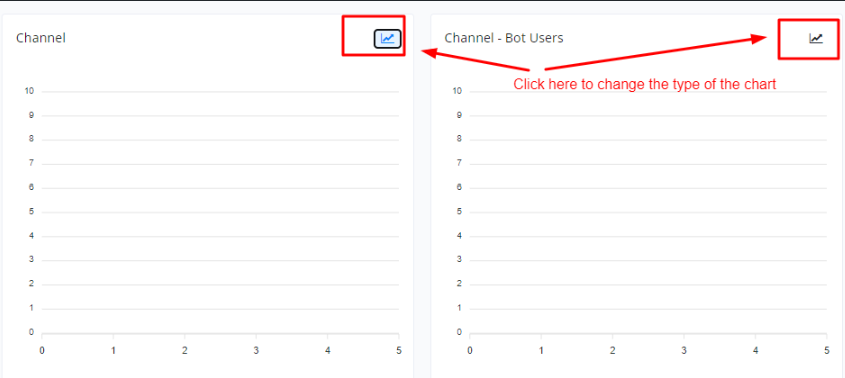
Click on the event to further view the analytics of that particular event.
Creating and Using Custom Reports In Messagingme.app
In order to create a custom report, click on the tools tab and select custom reporting.
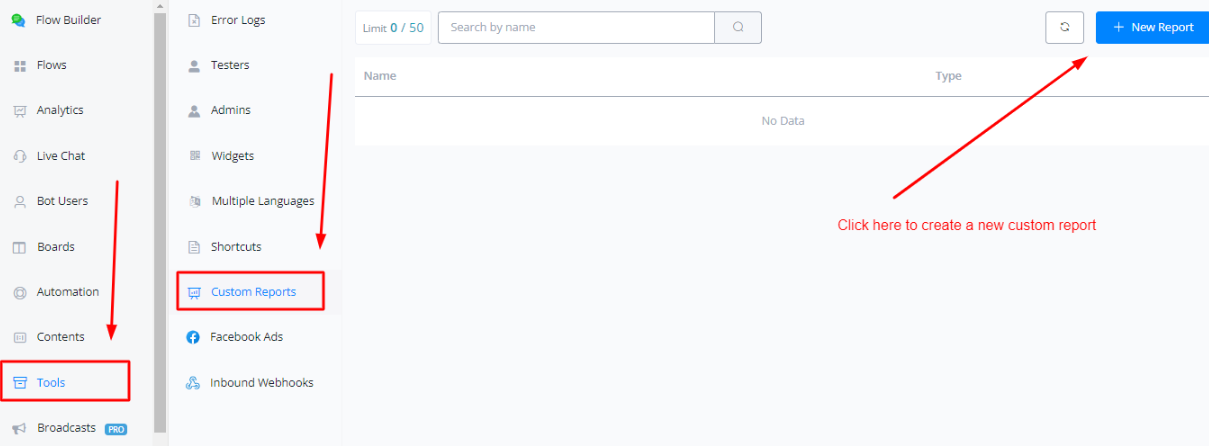
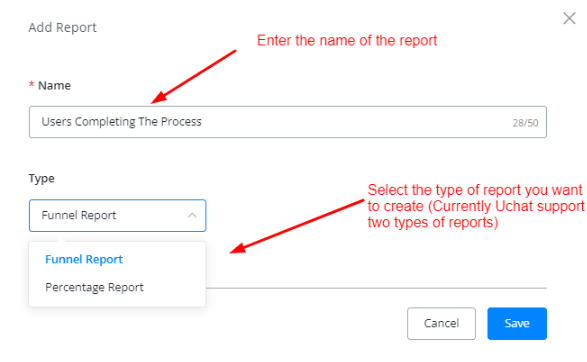
Enter the name of the report and the type of the report.
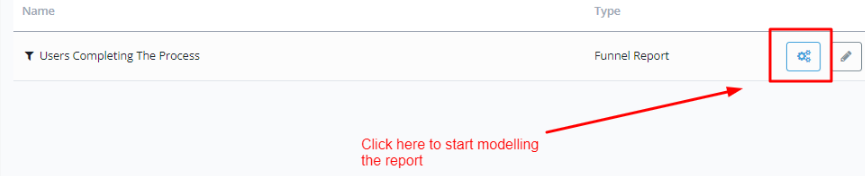
Click on the gear icon to start modelling your reports.
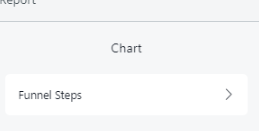
Modelling Funnel Report
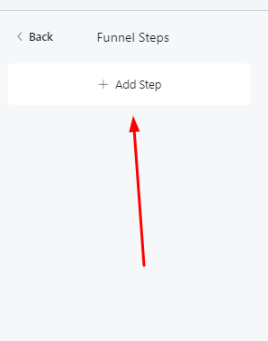
Click on the “Funnel Steps” to start adding custom events to your report
Click on “Add step”
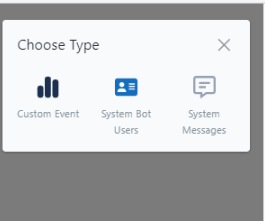
Select which type of event do you want to track
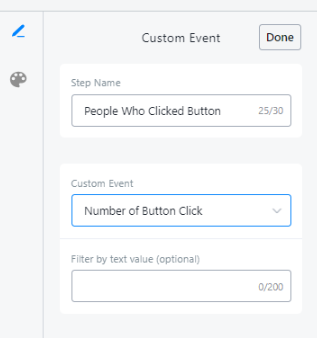
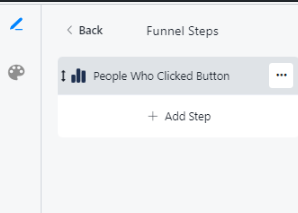
After adding the event, click on the three dots icon to start customizing it.
Set up the proper events you want to track in this event. Click on the Done button
You can add more steps to your funnel report, if you want to build a collaborative report or comparison report on multiple events and track the performance on multiple fronts.
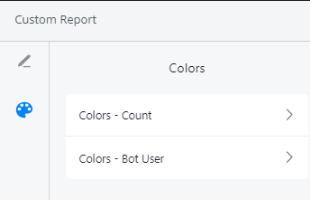
If you want to change the colors of the trendline graphs and bar charts, click on the palette icon on the tope left corner and then choose the chart you want to change the color of.
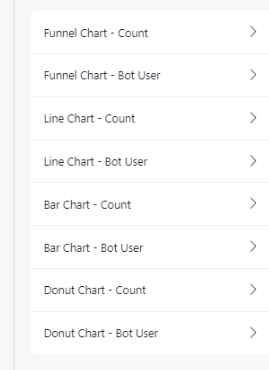
You can also edit the graphs and charts themselves, changing their labels, axes, enabling or disabling them to show on the report itself or not
Modelling Percentage Report
In percentage reports, you can compare two events and find out how they perform w.r.t to each other.
In order to add the events, click on Field A and Field B.
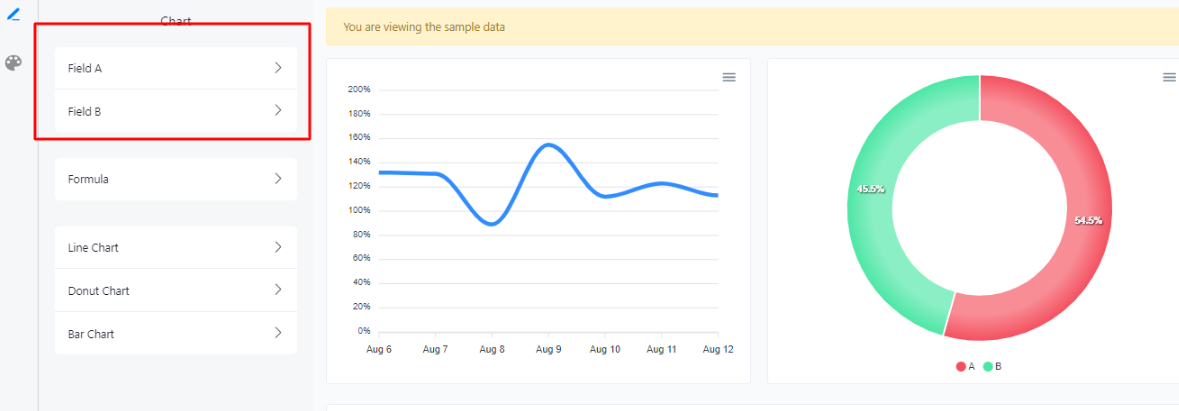
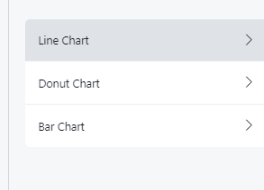
In order to edit the charts and graphs, click here to modify them as per your needs.
Formulae
Percentage reports allow you to add formulae to calculate the percentage and proper event.
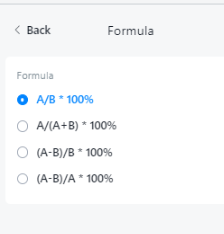
Formula #1
This formula compares the two fields and calculate the relative percentage between them. For example
- Field A can be No of students in Class A and Field B can be the total number of students in a school, this formula will help you calculate the percentage of students of Class A compared with total student population of the school
- Field A can be can be the no of sales of product A and field B can be the total number of sales, this formula will help you calculate the percentage of sales of product A.
Formula #2
This formula compares the two fields and just like the formula 1 give the relative percentage. Here Field A and Field B can be the two parts. The denominator here gives the sum of the constituents.
Field A can be the no of users passing through Flow A. Field B can be the no of users passing through Flow B. This formula will gives us how many people passed through which flow, This is import for A/B testing
Formula #3 & 4
This formulae compares the two fields and give a value which is not directly derived. For example consider a marketing SMS campaign. We can track the total number of the people targetted and the people replied to be put in DNC or Do not Contact list. Using this formula we can derive the actual number of people that responded back to the campaign or the actual response rate.
Visualizing Analytics For Custom Reports
In order to visualize the custom reports, you can click on the analytics tab and select custom reports
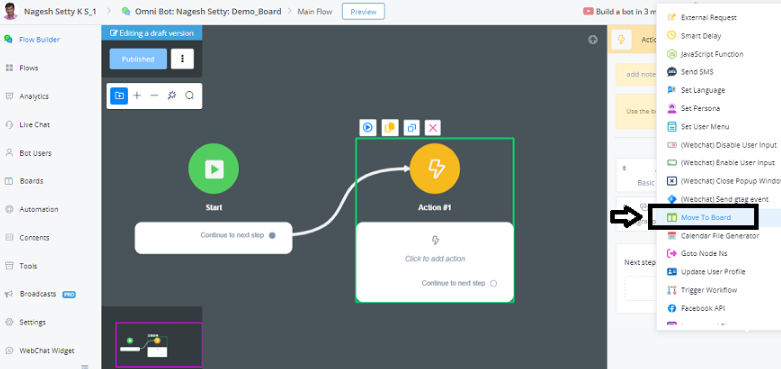
Move to board
We are just creating the Action Block and adding the Board function to it to test its functionality.
In the Action Block -> go to Advanced Actions -> Move to Board function
Next step -> Click on Edit Action in the Board Function.
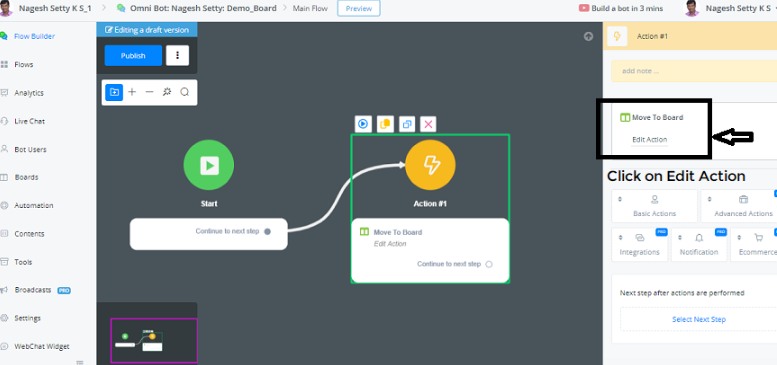
You need to select the Topic to position the User at the end of a Process.
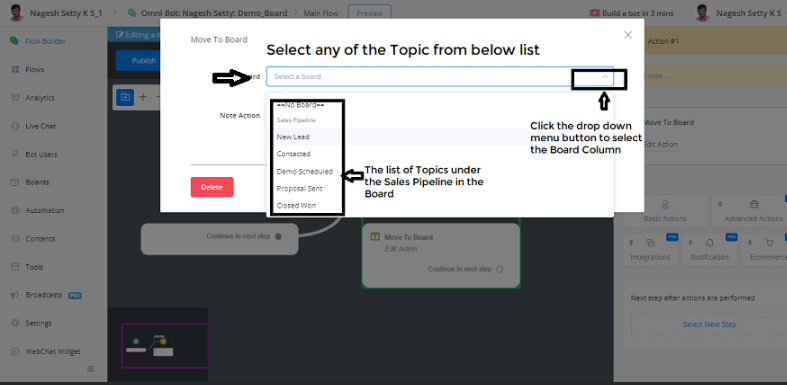
Now let’s say, we are getting the user to the platform for the first time, so we are selecting the Topic New Lead.
You can also add a Note to the Action taken out of the 3 Options provided in the drop-down menu:
- No Change
- Update Note
- Clear Note
Now let’s select Update Note under the Note Action. and Info under Note Type
Since we are adding the User as New Lead, let the note be as - {{First Name}} is our new Sales Lead
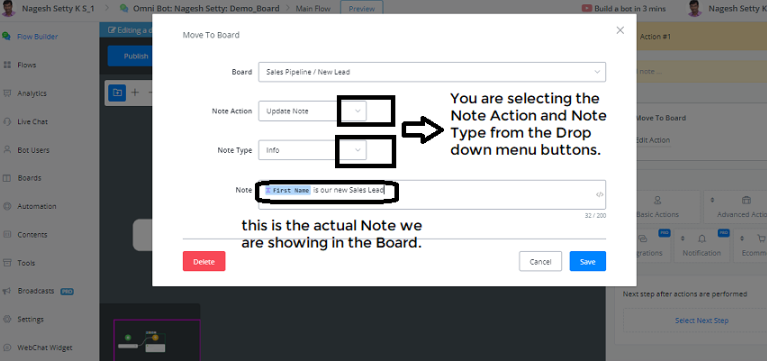
Now we can save the above Note Details in the Board.
Now let’s preview this Action Block with Board Function on the Pop-up Web Page.
We don’t see any action on the Web Page, as we are testing only the Action Block.
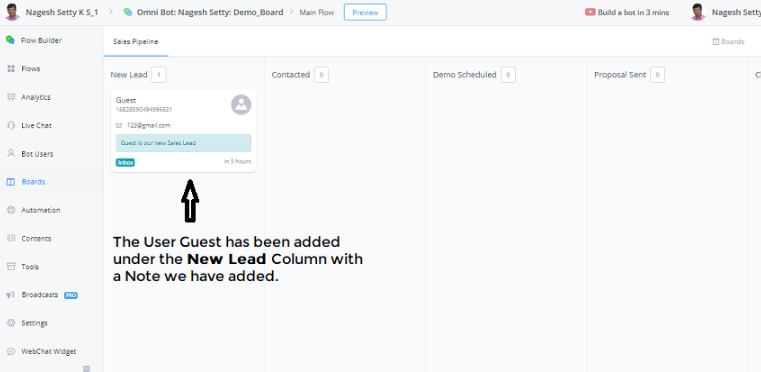
Now we close the testing Web page and open the Board and refresh the Page, you can see the Magic:
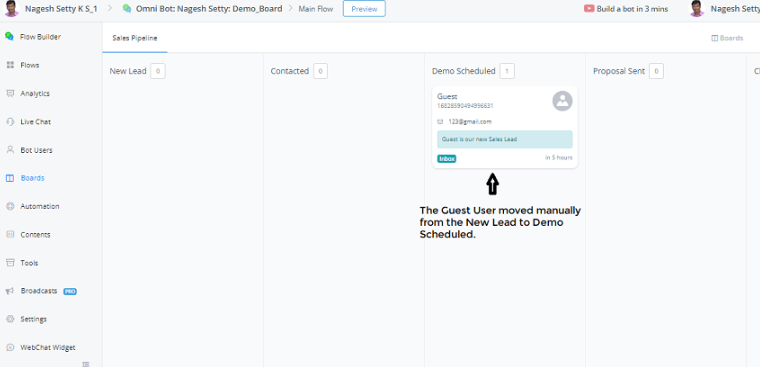
Under the New Leads Column in the Board, the Guest user has been added. Also you can see the Note: Guest is our New Sales Lead.
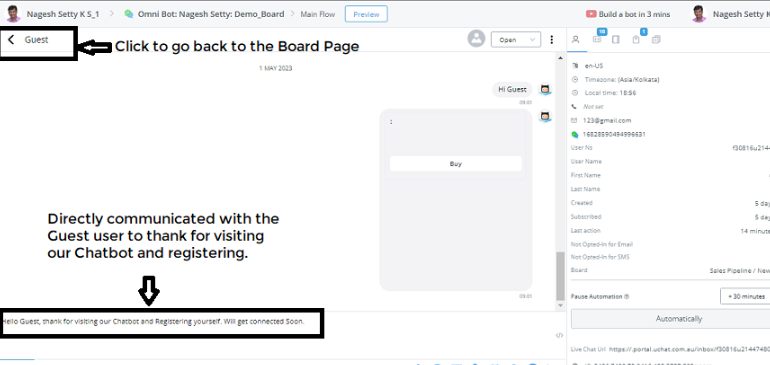
Now, You can have a look inside by clicking on the Guest User and you will be able to directly communicate with this User from within the Messagingme.appPlatform.
Now you can also drag them to the several stages manually from left to right and right to left.
We can also do Automation, where each time a user takes a certain action, you can move to the required Board. You can move them through all stages of the Board.
Now we have manually moved the Guest User from New Lead to Demo Scheduled.
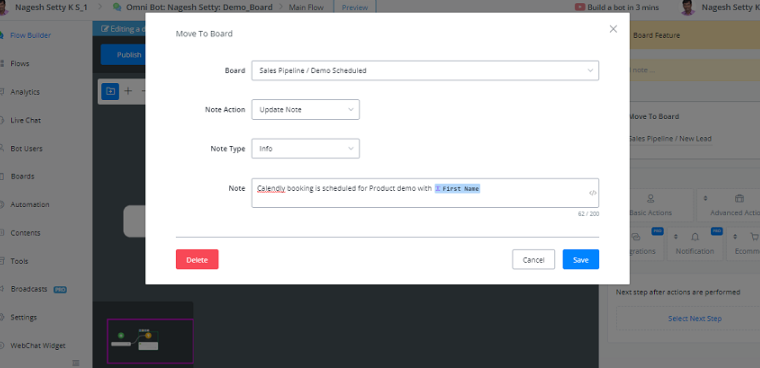
For example, when we want to do Automation on this, if a Product demo has been scheduled with the Guest User, using the Calendly integration, we can also call an Action with the Board Function, where the following activity is done:
- Topic or Stage - Sales Pipeline / Demo_Scheduled is selected.
- Note Action: Update Note
- Note Type: Info
- Topic: Calendly booking is scheduled for Product demo with {{First Name}}
In this way, the Board parameters can be set when a Calendly Appointment is done.
Calendar File Generator
In this tutorial, we will learn how you can generate ICS files to enable users to add meetings directly to their calendars, whether on desktop, mobile, iOS, or Android devices.
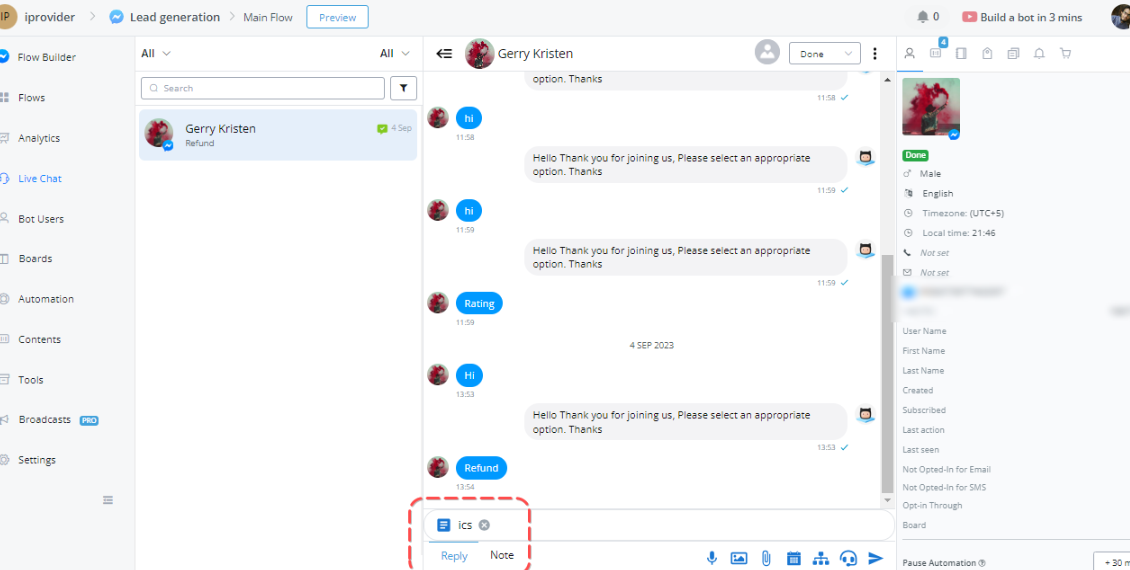
Generating Calendar Files in Live Chat:
One powerful use case for calendar integration is enabling live chat agents to generate appointments within chat conversations. By utilizing the calendar file generator, agents can seamlessly create a meeting event that users can add to their calendars. Here’s how it works:
Within the live chat conversation, locate the “Calendar File Generator” option at the bottom.
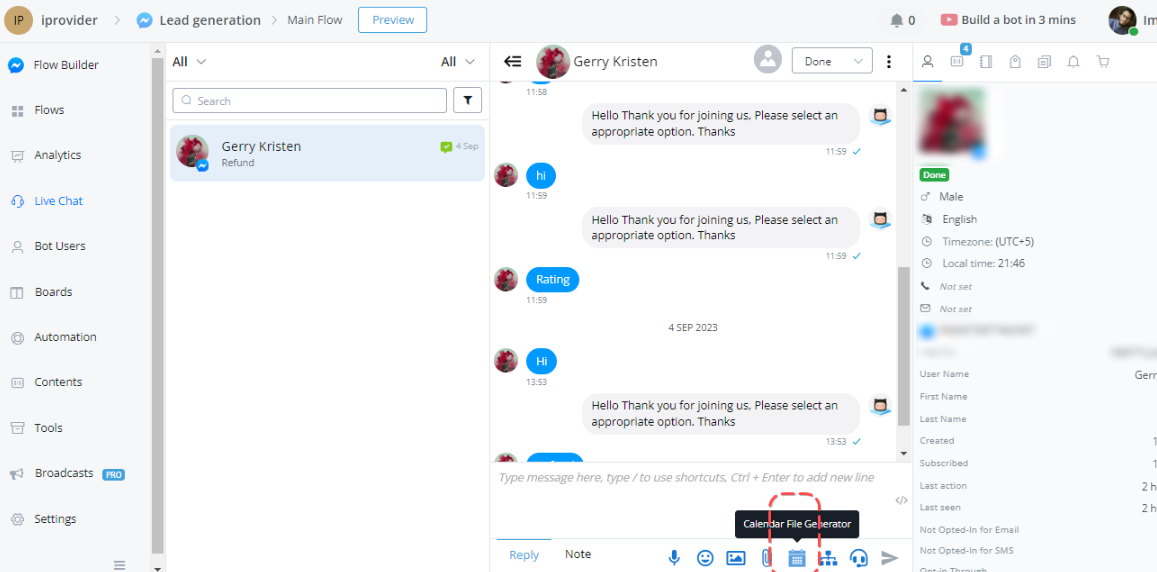
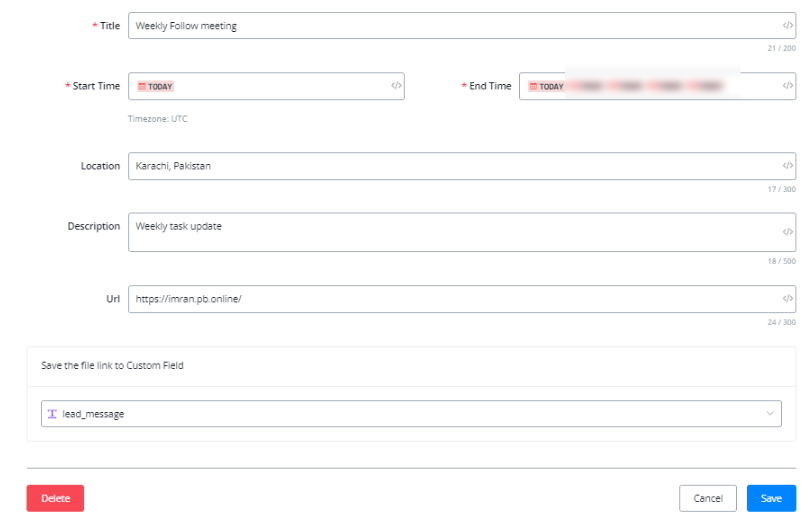
Click on it to open a new window where you can customize the meeting details.
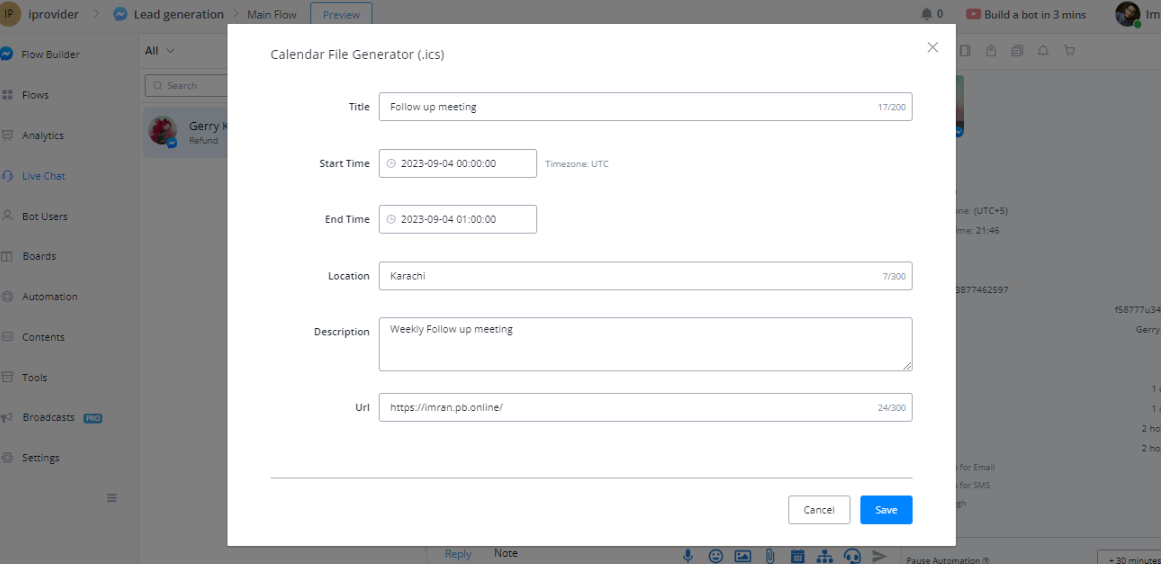
- Provide a name for the meeting, such as “Follow-up meeting”
- Set the start and end dates and times for the meeting.
- Specify the location, whether it’s a physical address or a virtual meeting platform like Zoom.
- Add a description, such as “Weekly Follow-up meeting.”
- Optionally, include a URL related to the meeting, like your website.
- Save the generated ICS file, which will appear in the lower-left corner of the live chat conversation.
When you’re ready, send the file to the user, who can download and add it to their calendar.
Adding the Meeting to Calendars:
Once the user receives the ICS file, they can seamlessly add the meeting to their calendars. Here’s a step-by-step guide:
When the user opens the file, it will open a browser tab displaying an overview of the meeting details.
- They will see the meeting information, including the meeting name, date, time, and description.
- To add it to their calendar, they can click the “Add to Calendar” option.
- They will be prompted to choose a calendar application or service (e.g., Google Calendar).
- Once selected, the event will be added to their calendar, allowing them to access all the details and even set reminders.
Calendar Integration in Flows:
Calendar integration is not limited to live chat conversations. You can also incorporate it into flows for further automation. Here’s how to use it within a flow:
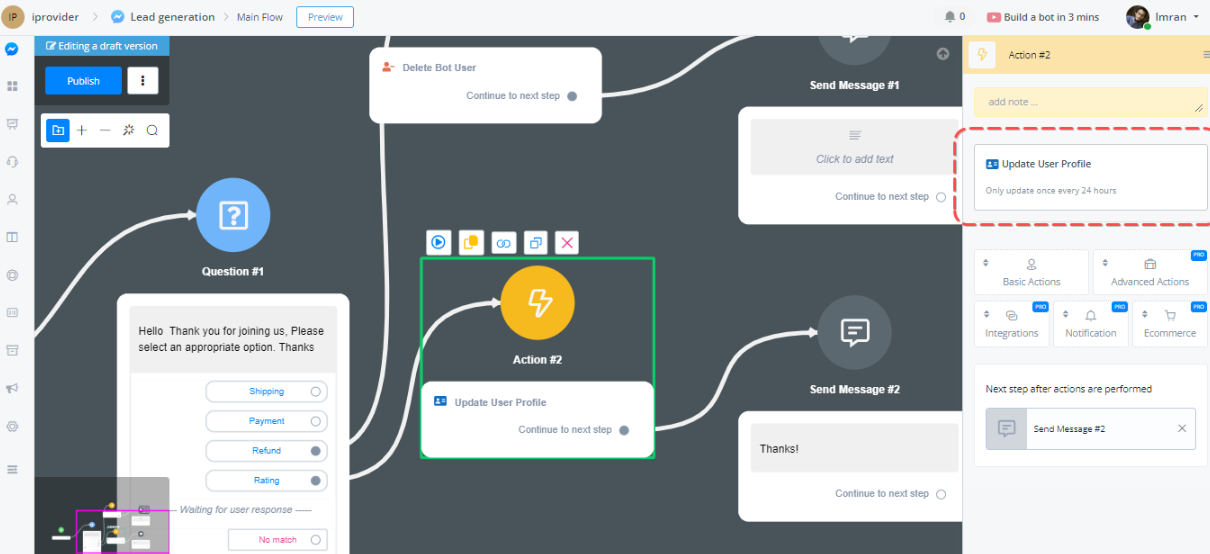
- In the flow, add an action block and select “Advanced Actions.”
- Choose the “Calendar File Generator” option and edit the action.
- Customize the meeting details as required, including dynamic variables for start and end times.
- Save the meeting link to a custom field for future use.
- Display the meeting link within a text block or use a button to provide easy access.
Send the link to users via SMS, email, or any preferred communication channel.
When users click the link, they can add the meeting to their calendars, just like in the live chat scenario.
Update user profile
This option is utilised to update user data from the source organization, in many cases where we need to update a user profile, along with other information can be updated in the 24-hour time frame.
This will pull the most recent user’s profile image, and also update the user’s timezone.
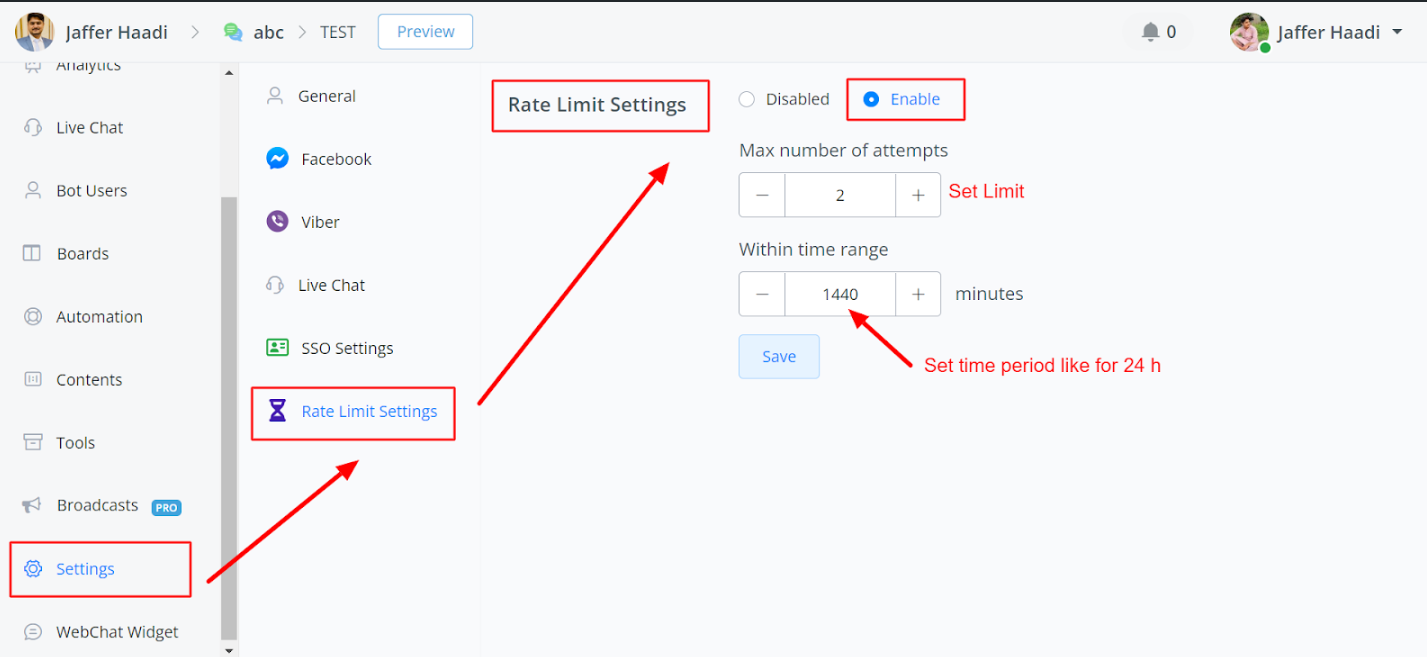
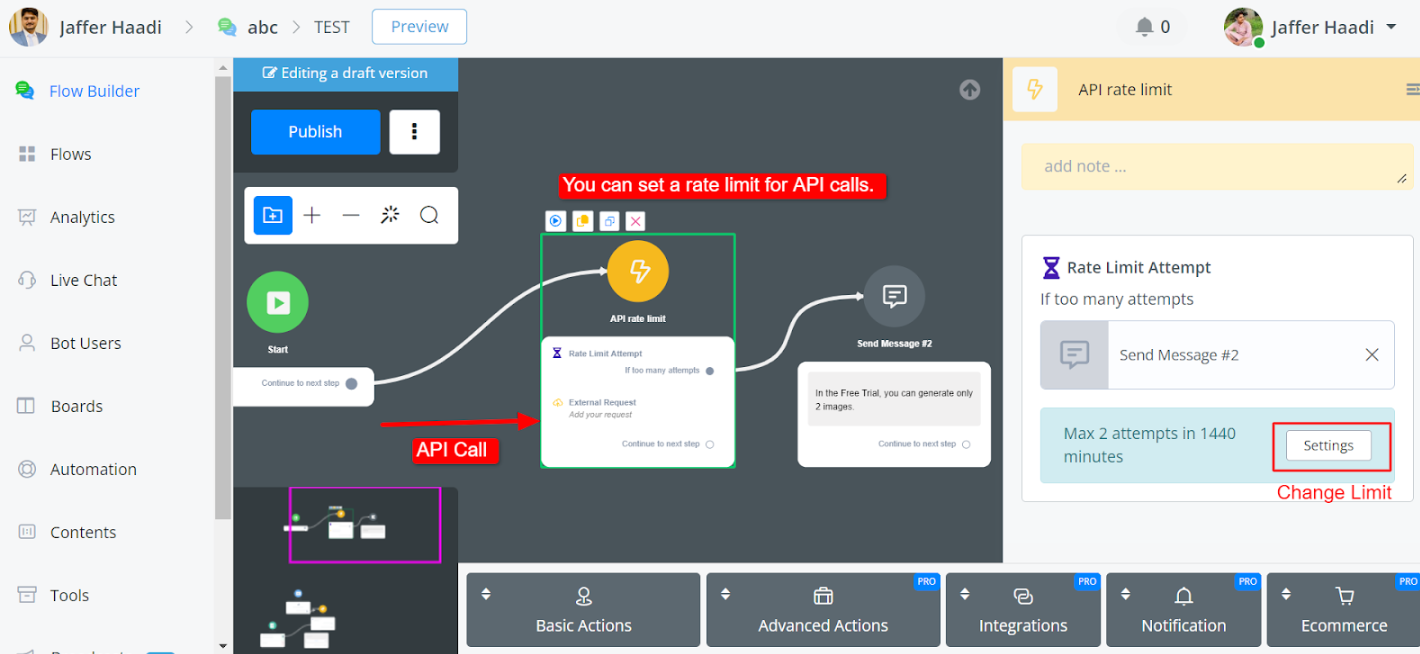
Rate limit Setting
Rate Limit is a valuable addition to the chatbot system, providing administrators with a streamlined approach to managing user interactions.
Use Cases for Rate Limit
Limiting API Calls:
Ensures compliance with third-party platform restrictions.
Controls the number of API calls per user within a specified time frame.
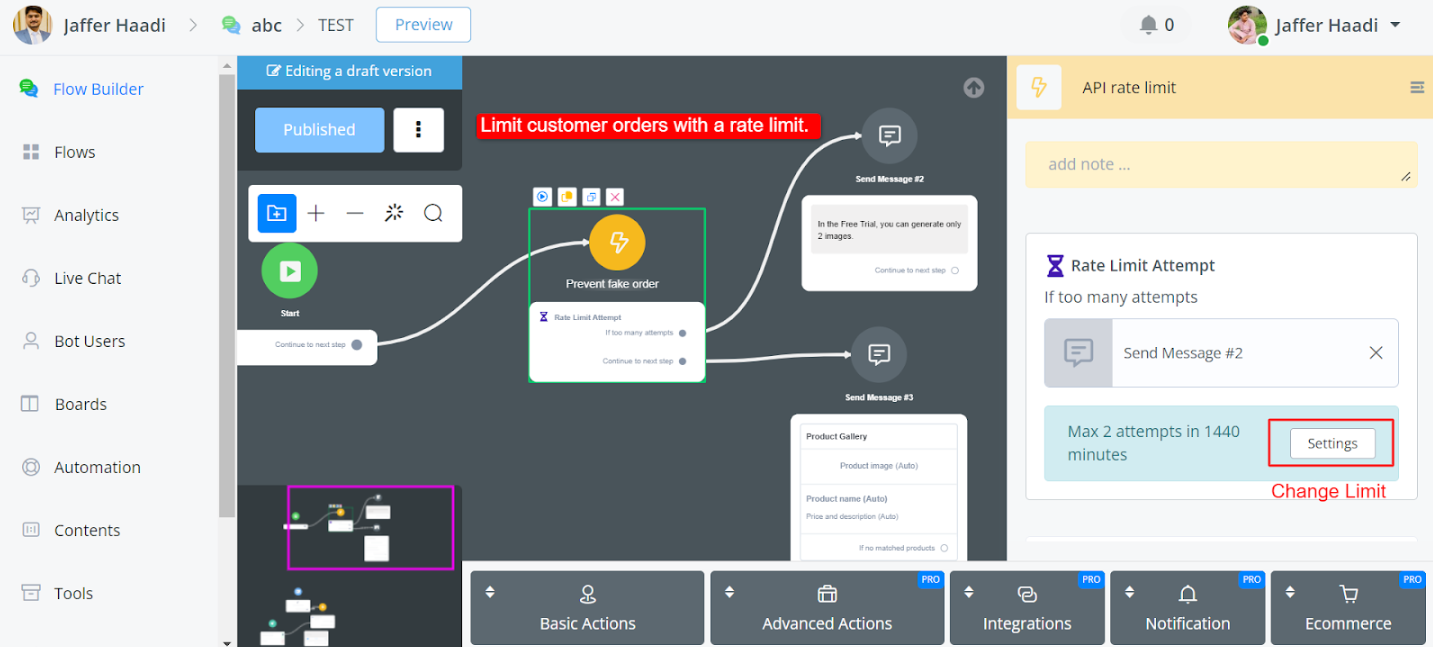
Preventing Fake Orders
Helps to mitigate fraudulent orders in e-commerce settings.
Restricts the number of orders a user can place within a specific time frame.
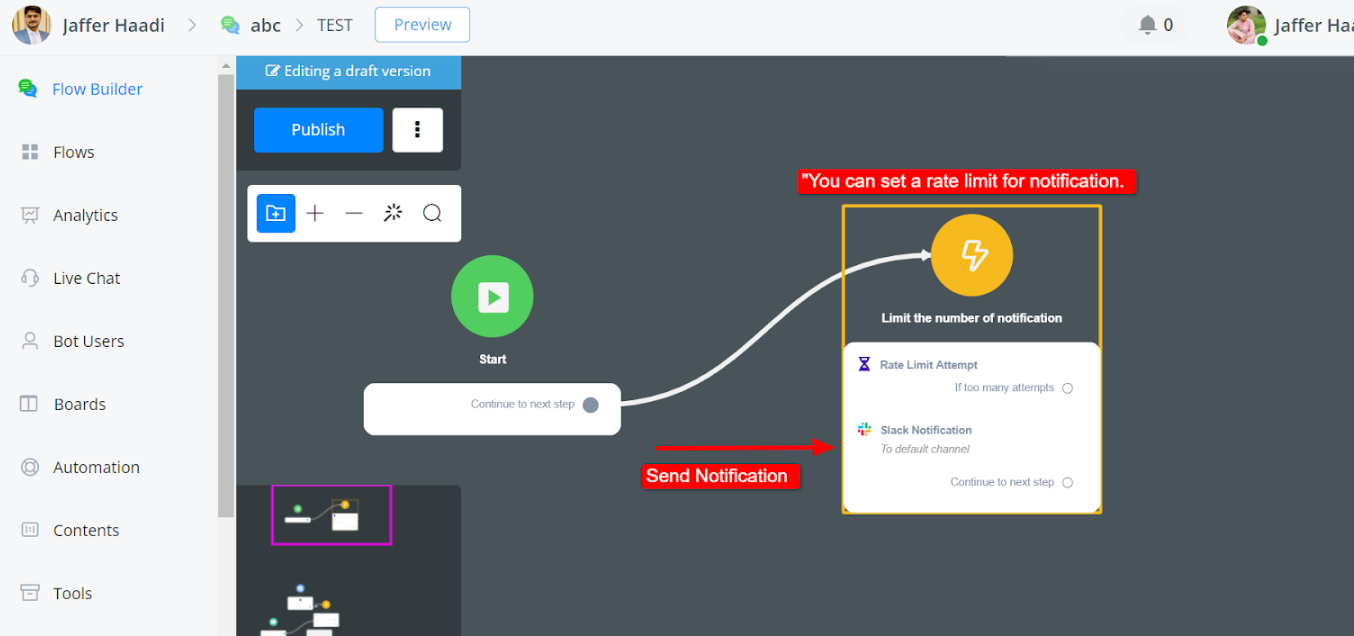
Controlling Notifications
Manages the frequency of notifications sent to users.
Ensures users are not overwhelmed with excessive notifications, particularly in e-commerce order
In summary, Rate Limit is a valuable addition to the chatbot system, providing administrators with a streamlined approach to managing user interactions while ensuring compliance with external platform restrictions and preventing abuse of system resources.