Basic actions
Add & Remove Tag
Tags would help you to identify and segregate your chat information for an informed decision.
Let’s Assume you have a flow of asking users whether they are interested in a trip to Europe or Asia. Then we will tag the users accordingly.
We will cover the following action in the Tags options.
- How to Create a Tag.
- Use Tags in flow.
- Watch Tags on Live Chat
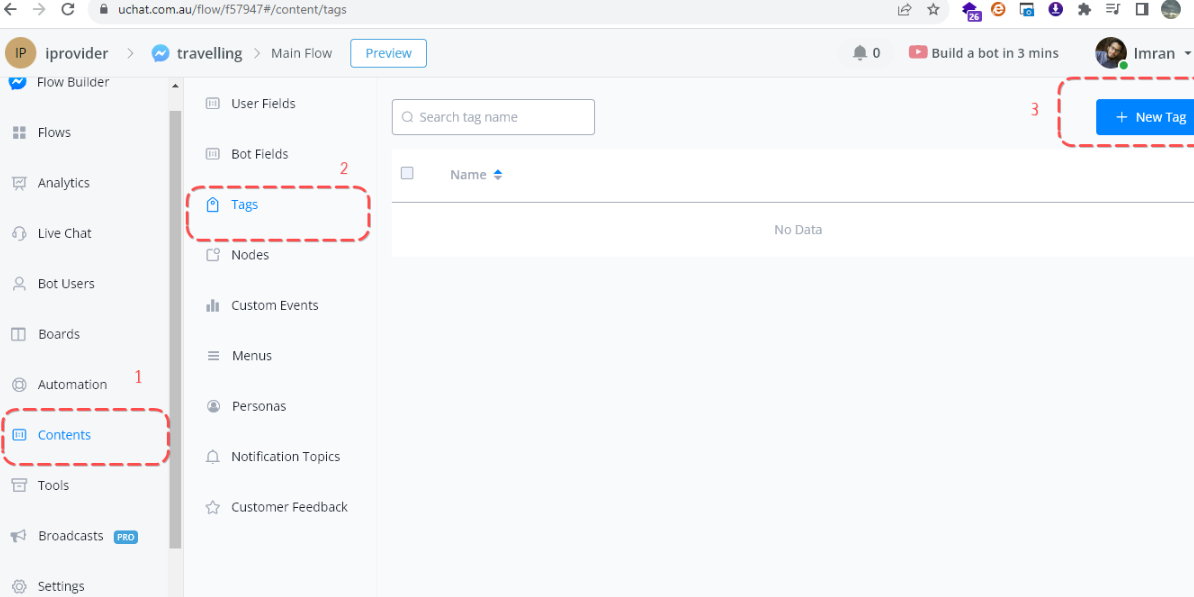
How to Create a Tag
Click on Contents and here select the Tags option, In order to create or delete any tag we will use this window. Now choose the new Tag button.
Now create an asia_lead tag for those users who select Asia for the tour option. The same goes for the Europ lead as well.
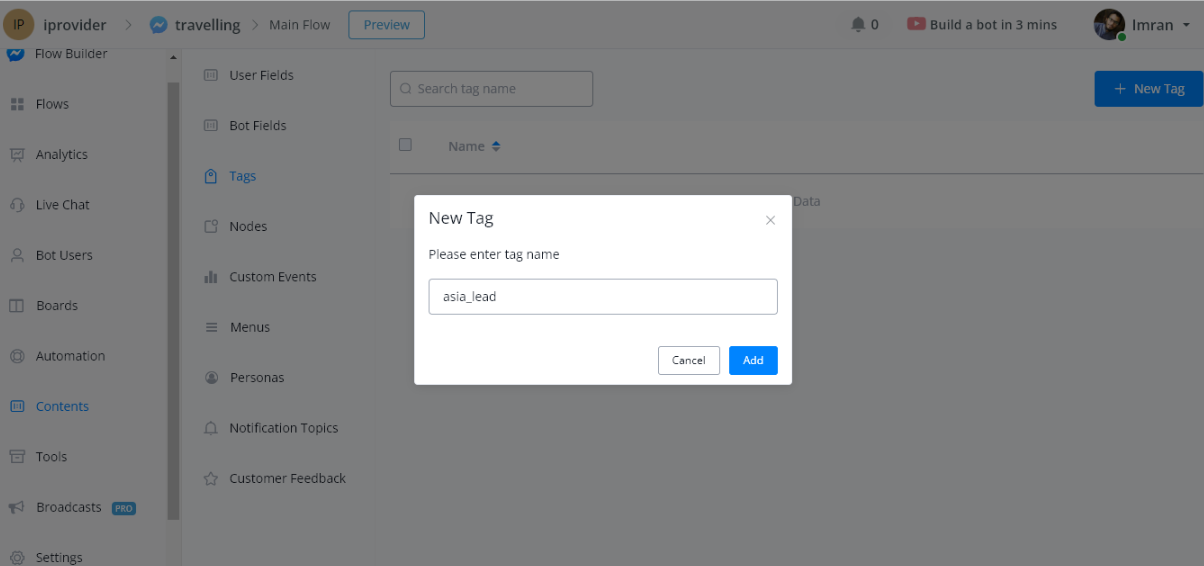
These Tags can be deleted from the rightmost option of the Grid.

Use Tags in flow
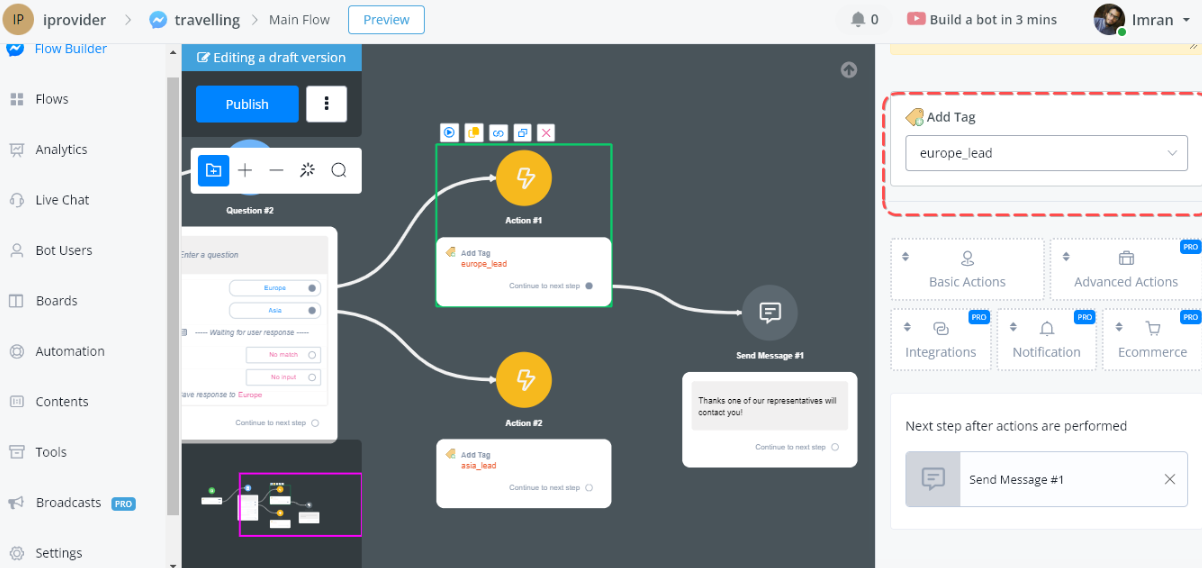
Go to the Flow choose Basic Action and select Add Tag option.
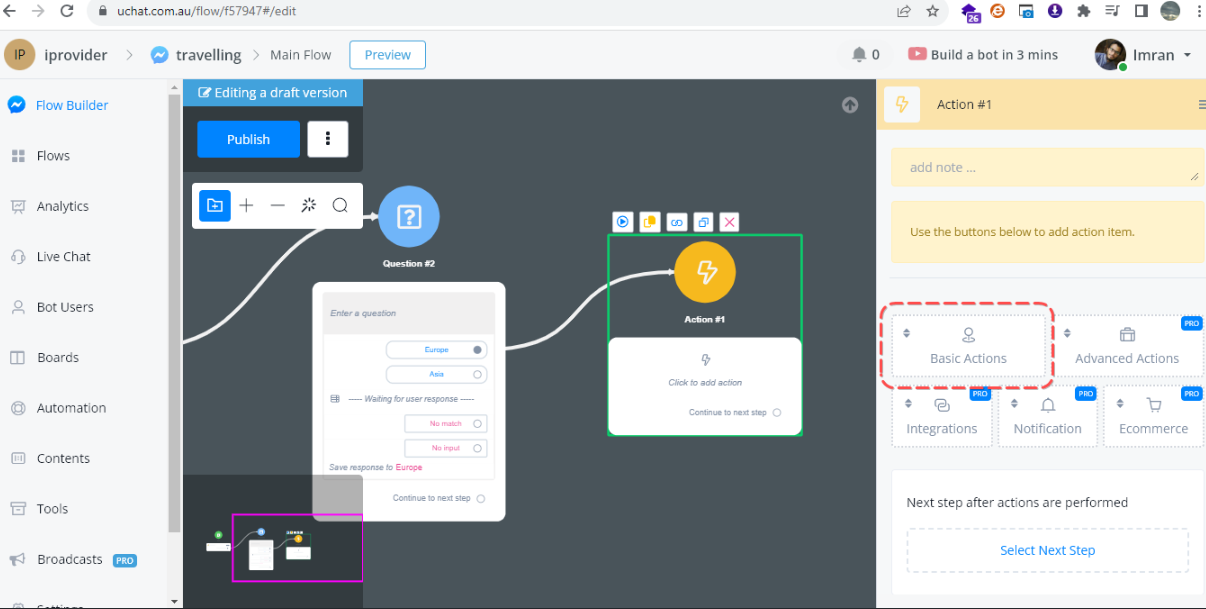
Here select the appropriate tag for all the users who select Europ as a holiday destination and the same goes for Asia destinations.
Watch Tags on Live Chat
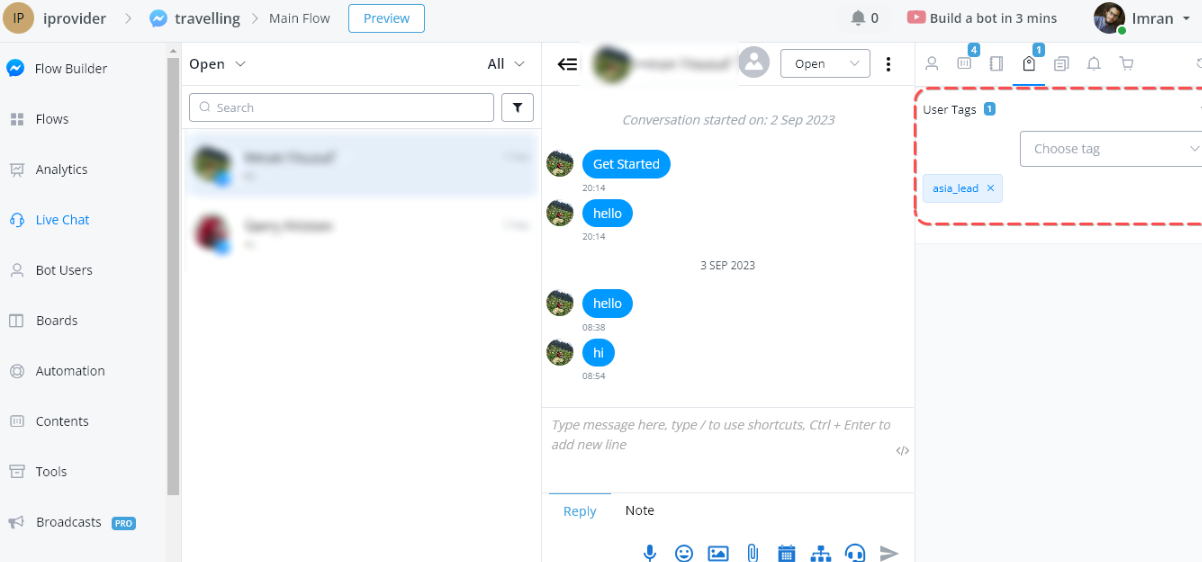
Now Run this flow and check its impact on the Live Chat section.
Here Chat agent can see the user Tags, as well as manually add or delete the tags according to the situation.
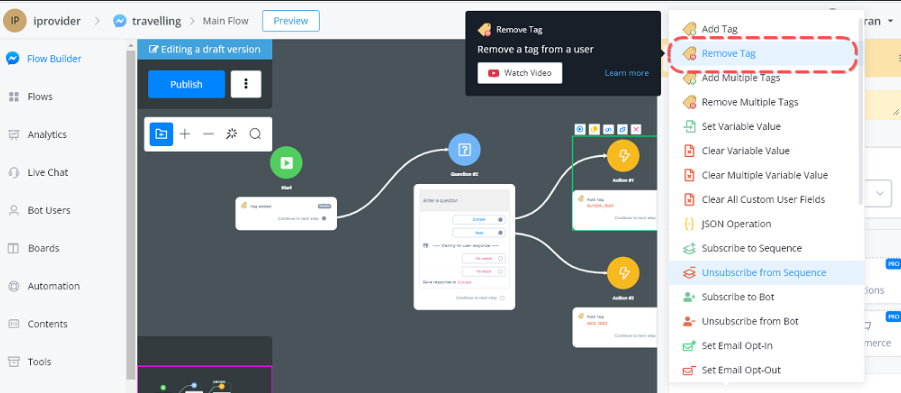
Remove Tag
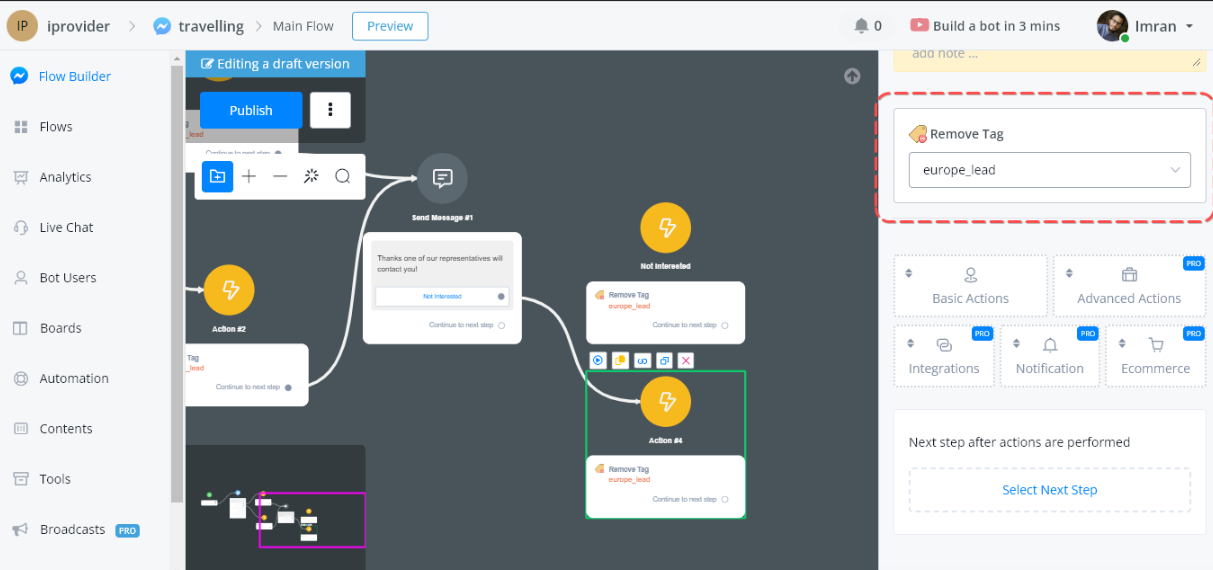
Remove Tags can be utilized via the Basic Action option. Let’s assume a scenario where the user is not interested in contacting a chat representative.
What we did we add a primary action and by selecting a Button we will trigger this action which will remove the tags that we previously selected in our chat.
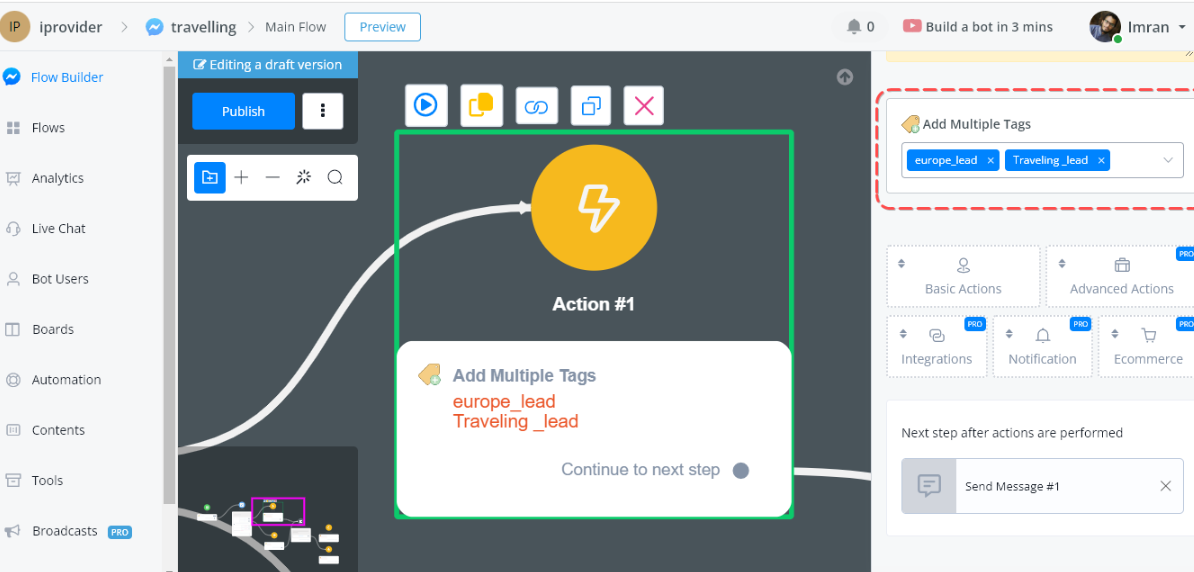
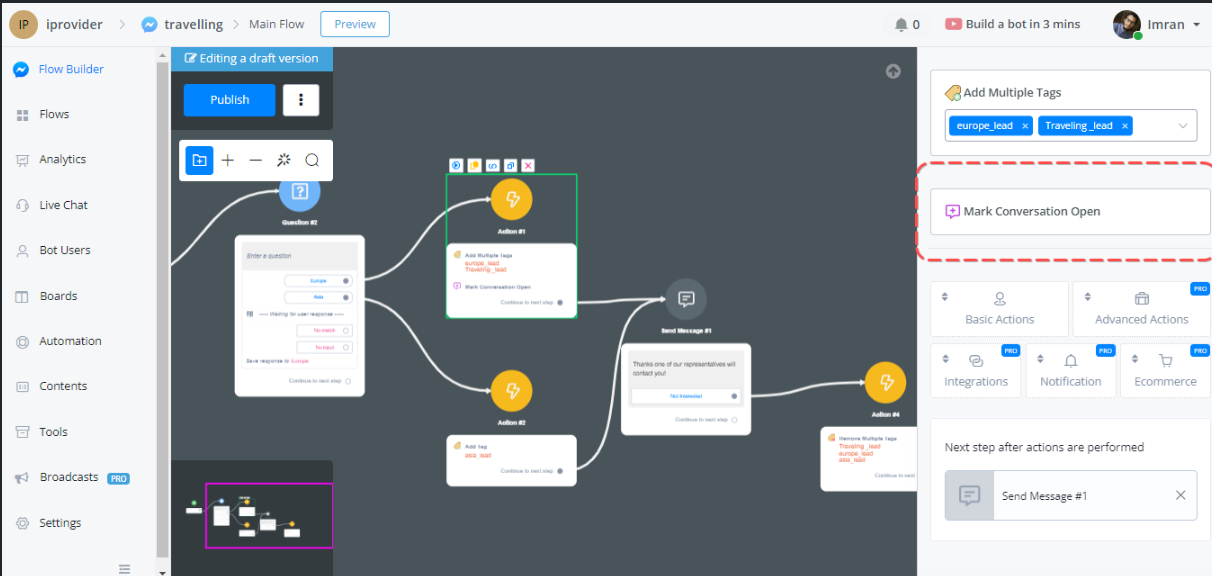
Add Multiple Tags
This option allows the chat builder to add multiple tags in one go, So Whenever a user adds a destination of Europe/Asia we will add more than one tag. Just go to the basic option and select the “Add Multiple Tags” option.
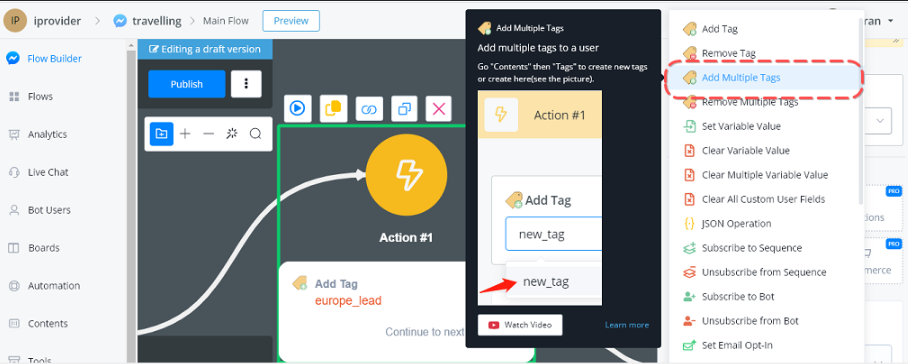
Here you can select the already created Tags from the Contents section.
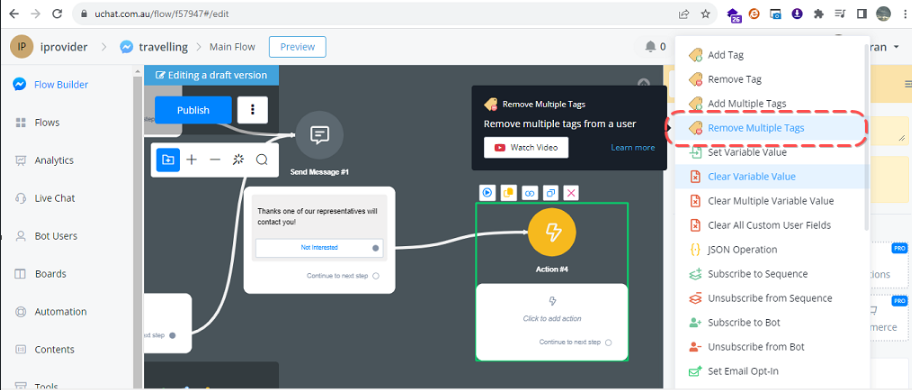
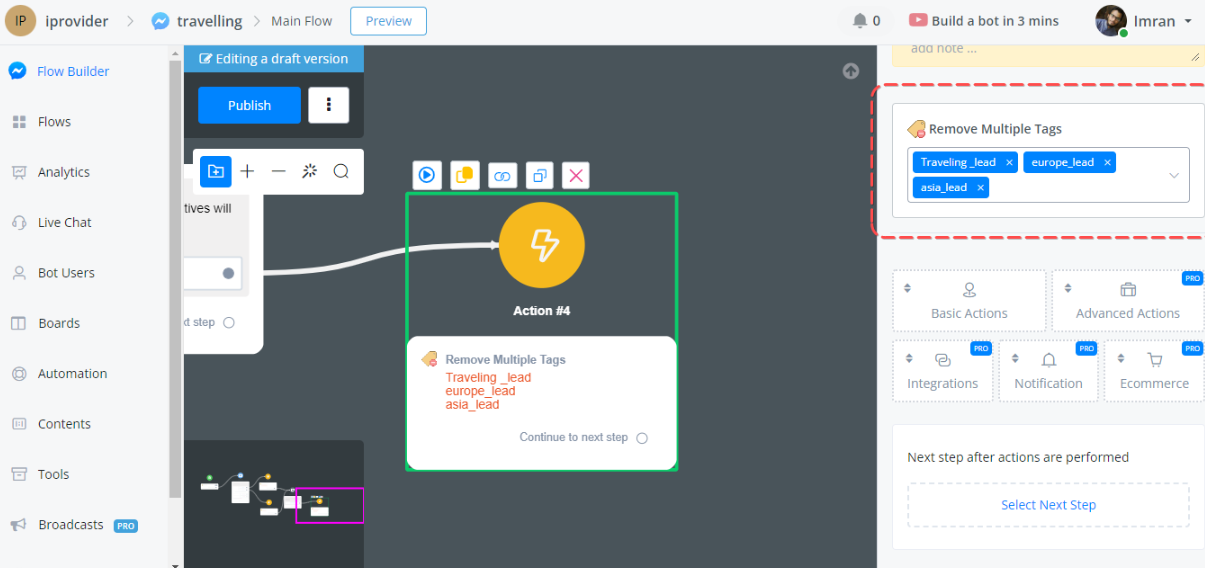
Remove Multiple Tags
This option allows the chat builder to remove multiple tags in one go, So Whenever the user adds a destination of Europe/Asia, but at the end of the chat if he presses the button not interested in the chat. We will remove the tags from the Remove Multiple Tags option.
JSON Operation
JSON is also a type of variable. It is used to store and manage a series of variables including normal varialbe and JSON variable.
For example, this is a JSON storing a customer’s detail:

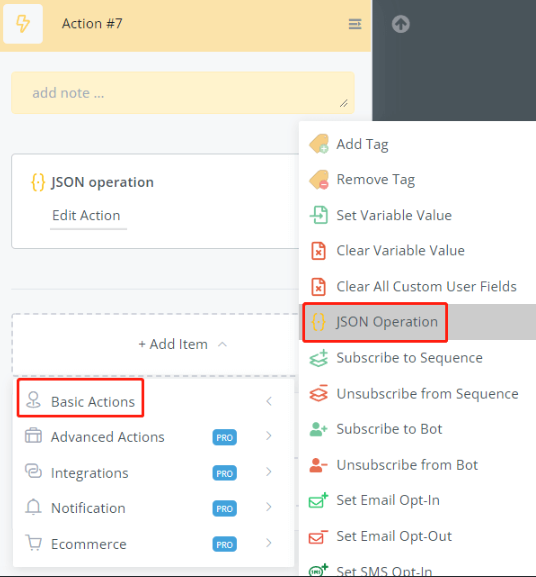
The “JSON Operation” is sitting in the “Basic Actions” list of the Action step.
💡 TIP - Various examples have been already embedded in the operation. Select an operation and use the “Examples” button to explore it!
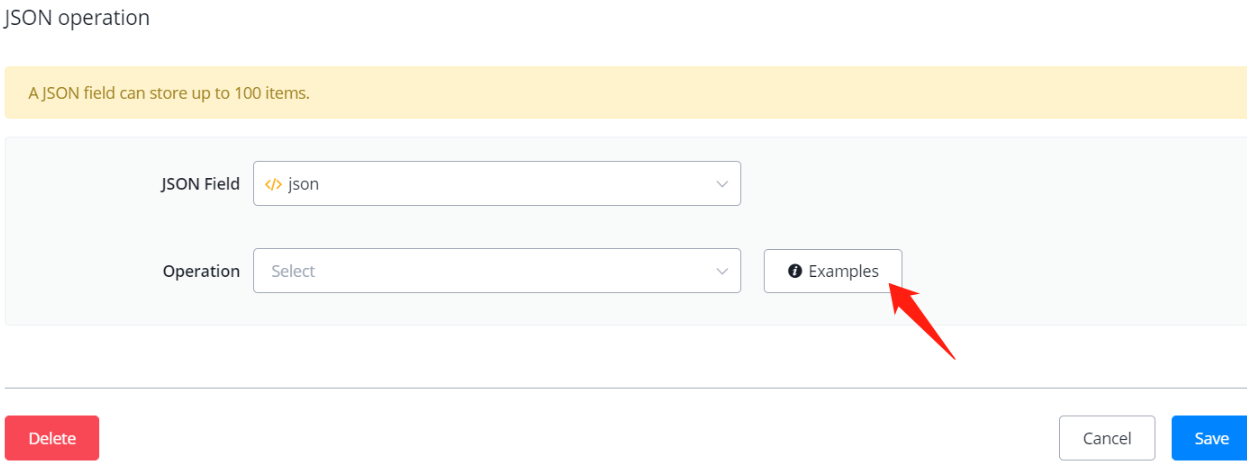
For example, how to insert an item to a JSON variable:

Set Variable Value
This action allows you to store a value inside a variable or a custom field. This is very useful when you want to collect data from your users.
The Different Types of Value
Once you click on the set custom field action, you’ll be able to choose which custom field needs some to update in terms of value.

You can either put in some data or even another custom field as a value as well.

Should you need to create a new custom field, just type in the name and choose the type of custom field you’d like to create.
Variable Operations
Messagingme.app provides you with various built-in operations for variable modification.
There are 6 types of variable in Messagingme.app:
| Type | Storage | Example | Operation |
|---|---|---|---|
| Text | letters, words, sentences… | Hi, Messagingme.app. | cutting, change case, encode, decode… |
| Number | number | 123.45 | + - x ÷, mod, power, log, root, round… |
| Boolean | either “yes” or “no” | yes | assign |
| Date | date | 2021-03-30 | format, add months/weeks/days |
| DateTime | date and time | 2021-03-30 16:52:00 | format, add months/weeks/days/hours/minutes |
| JSON | a series of variables | {“name”:“jack”, “age”:“10”} | load, get, update, remove, count, sum, average, sort, shuffle, reverse… |
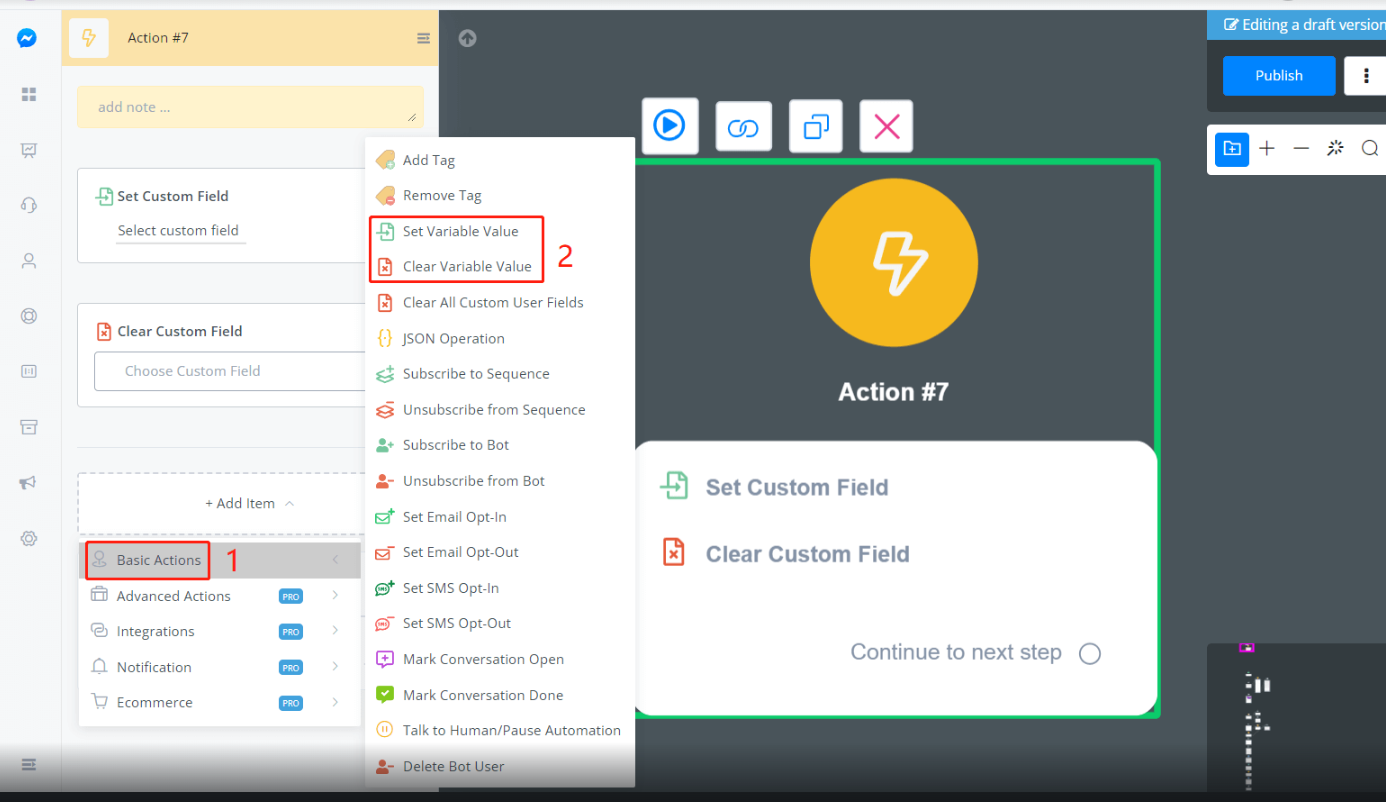
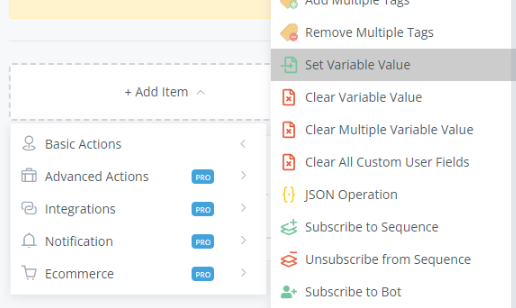
Click “Basic Actions” in the Action step and here are the “Set Variable Value” and “Clear Variable Value”.
Clear Custom Field / Clear JSON
To clear text, number, boolean, date, datetime variable, please use the Clear Custom Field action.
To clear JSON variable, please use the Remove All Items operation in the JSON Operation.
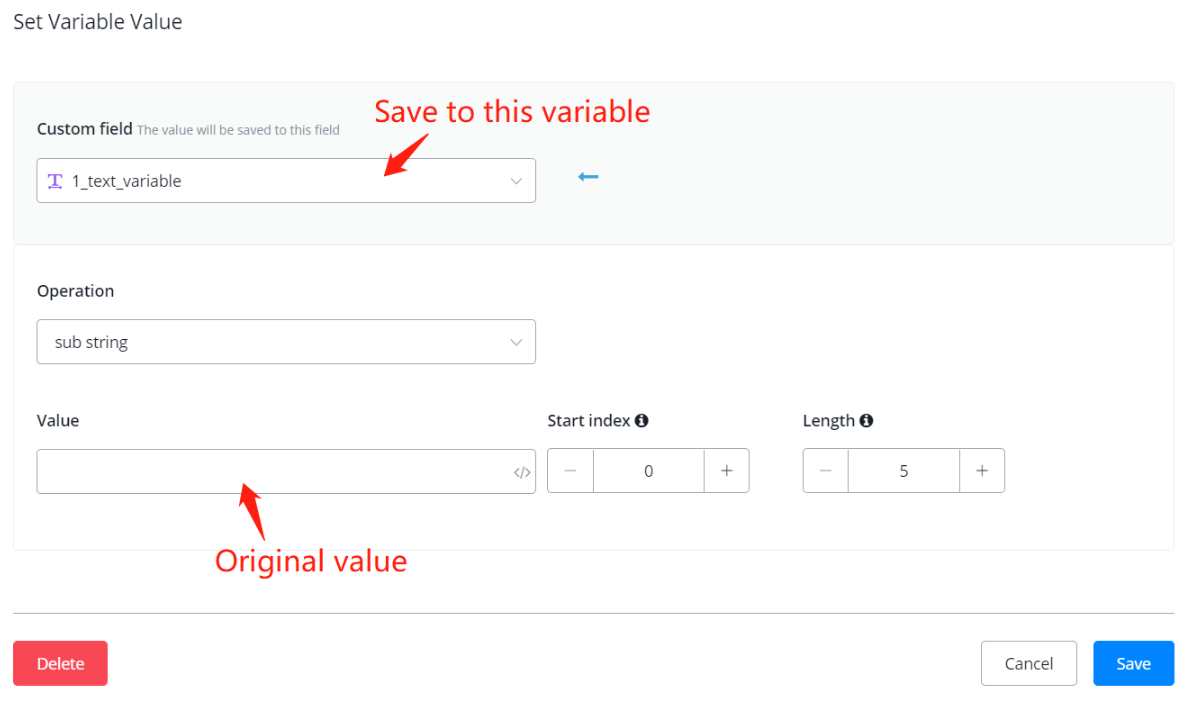
input value
“input value” operation is used to assign value to a variable. This operation works for any variable type.
💡 TIP - “input value” for text variable can be used to connect several text variables. See the below picture for where to put original value and operated value.
Math Formula
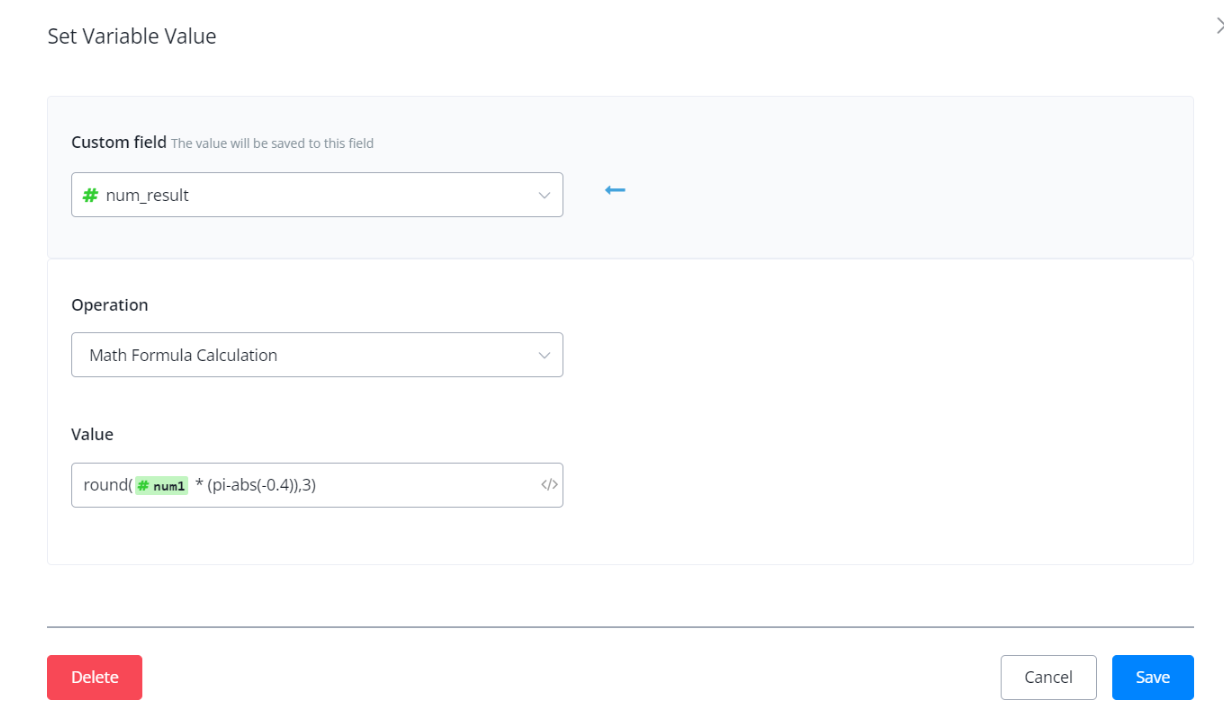
With this operation, you can now do formula calculation directly in the Action Step - “Set Variable Value” and Condition Step - “Value”.
Math operations and function supported:
+, -, *, e, pi, PI, abs(), min(), max(), ceil(), floor(), log(), pow(), round(), sqrt(), sin(), cos(), tan()
Please note that If the formula is invalid, the system will return 0 to number variable and empty to text variable.
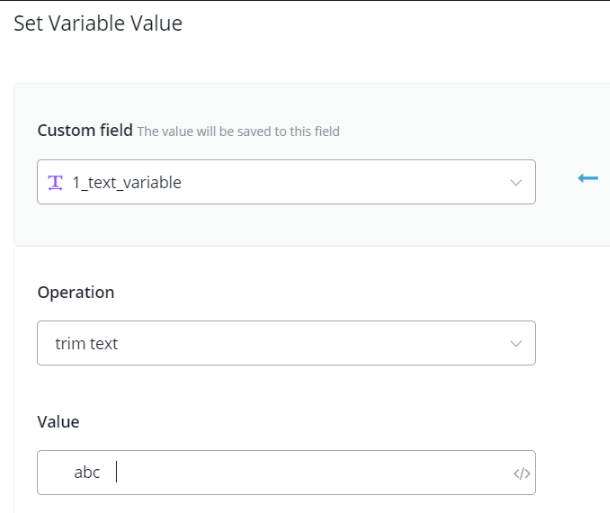
Set Text Variable
trim text
sub string
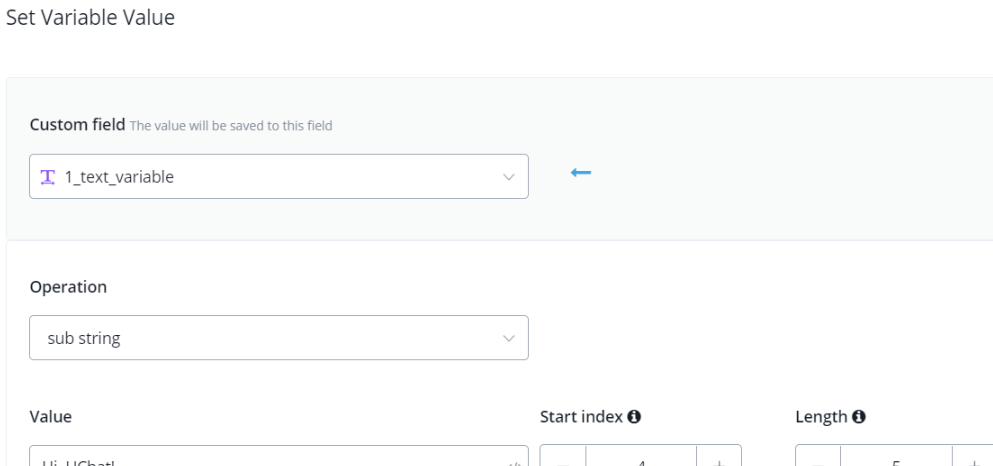
💡 Note - Index starts from 0. Every character counts including space and punctuation.
replace string / replace string case sensitive
to lower / upper case

generate random text
| Description | e.g. Before | e.g. After |
|---|---|---|
| as the name | ”code: XXXX-####-xxxx" | "code: UBWT-3657-lkzb” |
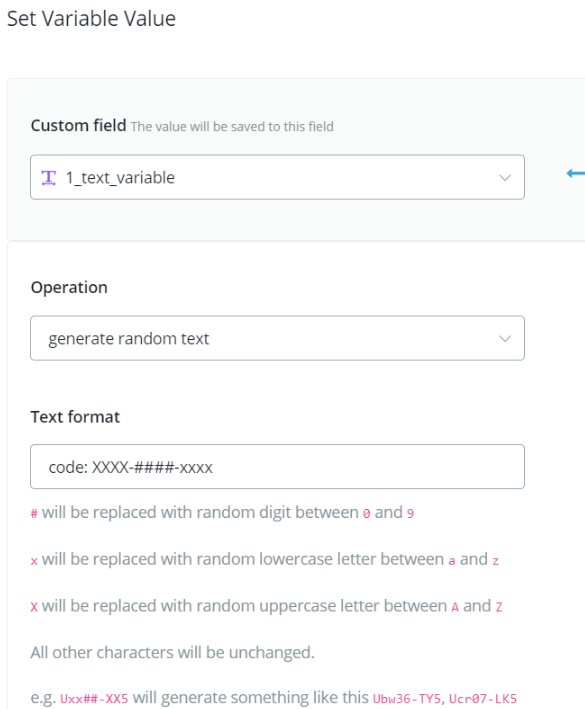
This feature is useful when you need to generate one-time verification code or reference code.
url encode / decode
| Type | e.g. Before | e.g. After |
|---|---|---|
| encode | ”Hi, Messagingme.app!" | "Hi%2C%20Messagingme.app!“ |
| decode | ”Hi%2C%MM!" | "Hi, MM!“ |
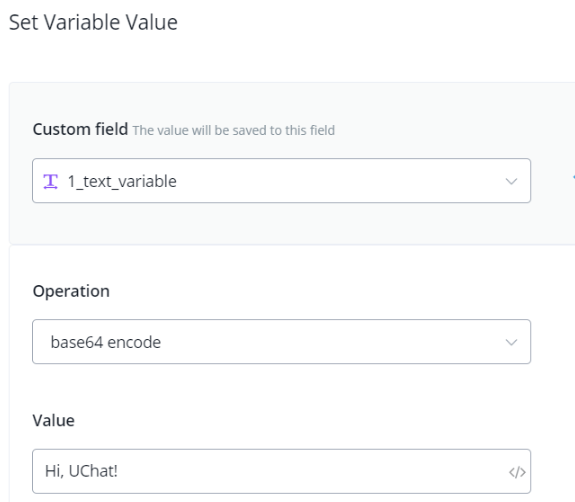
base64 encode / decode
| Description | e.g. Before | e.g. After |
|---|---|---|
| encode | ”Hi, MM!" | "SGksIFVDaGF0IQ==“ |
| decode | ”SGksIFVDaGF0IQ==" | "Hi, MM!” |
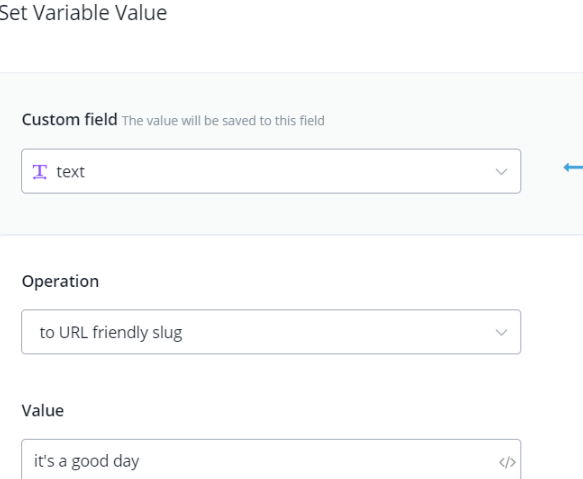
to URL friendly slug
| Description | e.g. Before | e.g. After |
|---|---|---|
| replace spaces with hyphens and remove the rest signs | ”it’s a good day" | "its-a-good-day” |
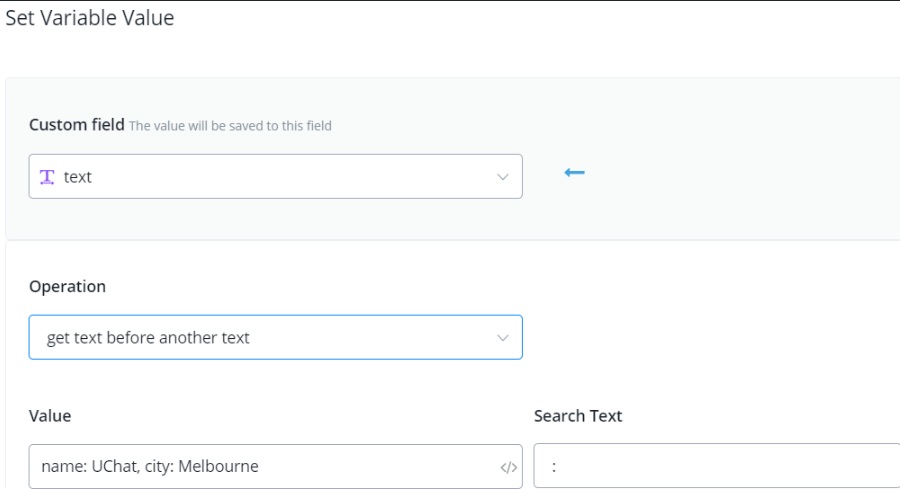
get text before/after
Description: get part of the text.
| Type | e.g. Before | e.g. After |
|---|---|---|
| get text before another text | name: MM, city: Dubai | name |
| get text before last occur of another text | name: MM, city: Dubai | name: MM, city |
| get text after another text | name: MM, city: Dubai | MM, city: Dubai |
| get text after last occur of another text | name: MM, city: Dubai | Dubai |
Set Number Variable
get text length
| Description | e.g. Before | e.g. After |
|---|---|---|
| as the name | 500.59 | 6 |

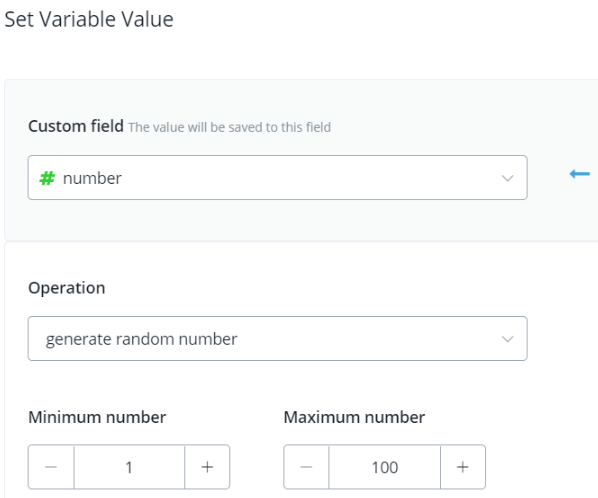
generate random number
| Description | e.g. Before | e.g. After |
|---|---|---|
| as the name | n/a | 56 |
add / subtract / multiply / divide / modulus / power / natural logarithm / square root
| Description | e.g. Before | e.g. After |
|---|---|---|
| as the name | 7 | 8 |
TIP - in “natural logarithm”, when you are calculating log2(8) = ? put 8 as “Value” and 2 as “Number”.
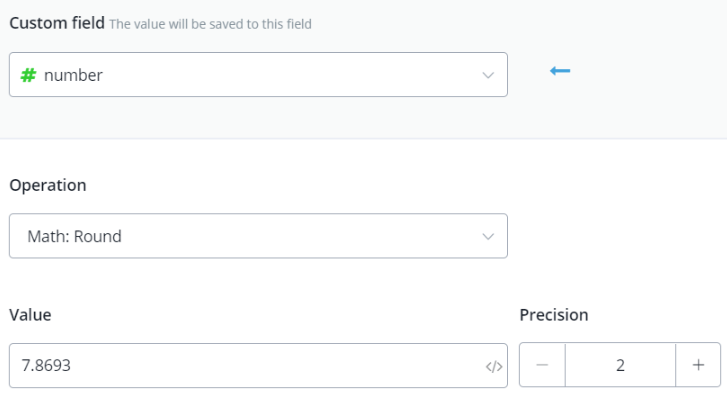
round
| Description | e.g. Before | e.g. After |
|---|---|---|
| as the name | 7.8693 | 7.87 |
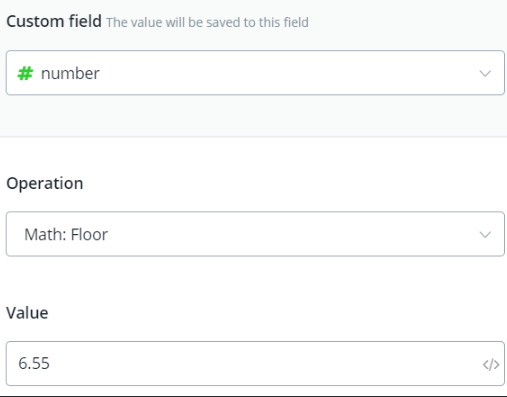
floor / ceil
Description: get approximate integer.
| Type | e.g. Before | e.g. After |
|---|---|---|
| floor | 6.55 | 6 |
| ceil | 6.55 | 7 |
Set DateTime Variable
from formatted text
| Description | e.g. Before | e.g. After |
|---|---|---|
| get DataTime value from formatted text | 00:00:00 30th Aug, 2020 | 2020-08-30 00:00:00 |

add minutes / hours / days / weeks / months
| Description | e.g. Before | e.g. After |
|---|---|---|
| as the name | 2021-01-01 00:00:00 | 2021-01-01 00:01:00 |
Clear Variable Value
Clear Variable Value
This function allows the user to literally clear a value of a single custom field.
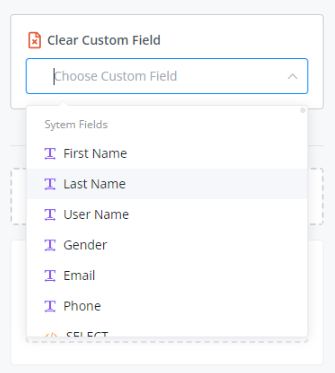
You just have to choose a specific custom field you want to clear out.
Clear Multiple Variable Value
This action allows the user to clear multiple custom field values.
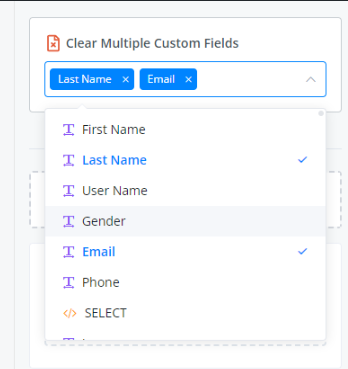
Make sure to choose all custom fields whose values you want to clear out.
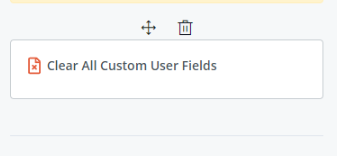
Clear All Custom User Fields
If you are looking for a way to clear all custom field values of a user, use this action.
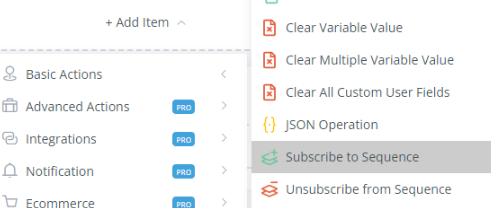
Subscribe/Unsubscribe to sequence
Subscribe to Sequence
Sequence automatically sends a list of messages to users. This is a good way to provide more value through scheduled messages.
First you will have to set up your sequence by going to Automation, click Sequence, then + New Sequence.
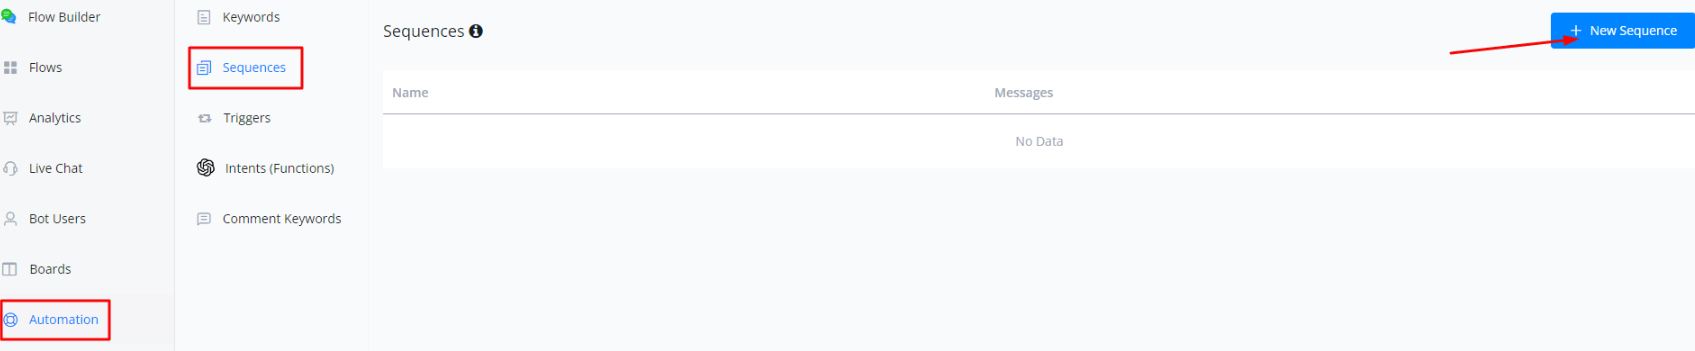
Label your sequence and choose a flow and a time interval as to when it would be delivered. Don’t forget to click SAVE.
💡 Please do note of the message-sending limitations of the channel you are using.
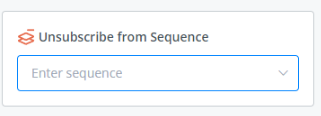
Unsubscribe from Sequence
This literally unsubscribes a user from a sequence.
Subscribe and Unsubscribe to Bot
Users can subscribe to or unsubscribe from the bot via the Flow Builder or Live Chat. You can also set triggers for both actions.
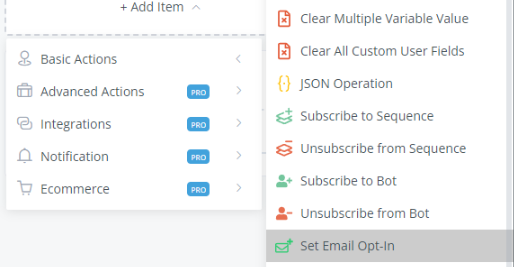
From Flow Builder
In Flow Builder, you’ll find the subscribe and unsubscribe options under Action Step → Basic Actions.
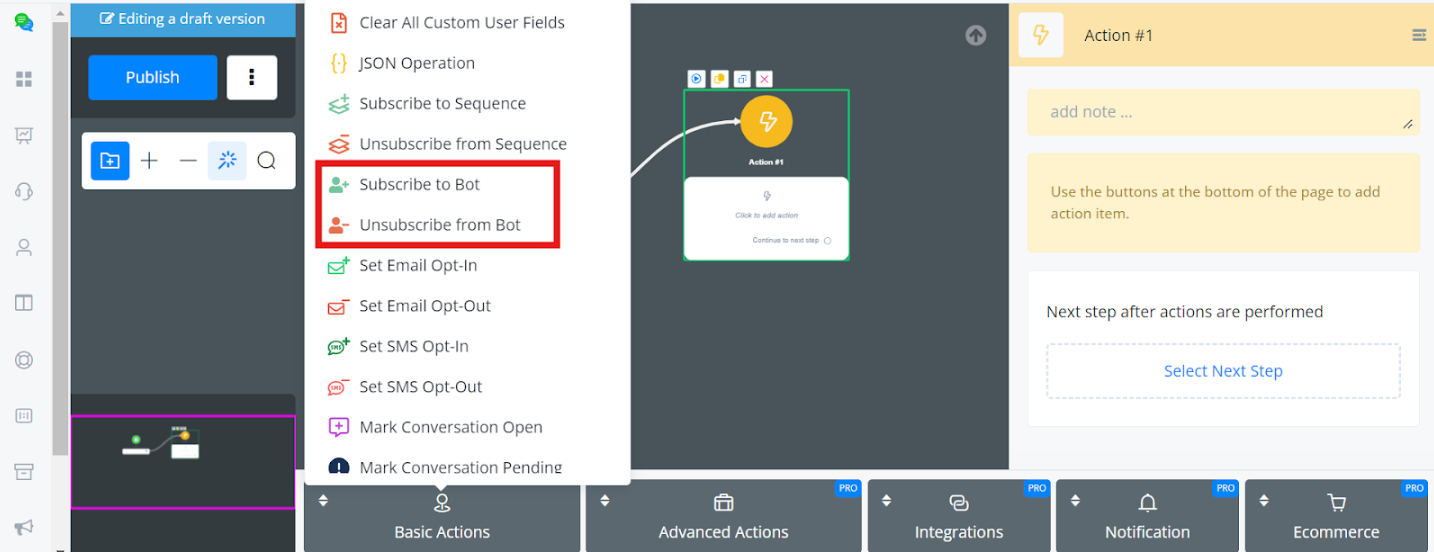
- Subscribe: When a user subscribes to a bot, they will start receiving automated responses from the bot.
- Unsubscribe: When a user is unsubscribed, they will no longer receive automated responses from the bot. Messages from the user will still be visible in Live Chat, but agents won’t be able to send replies to that user.
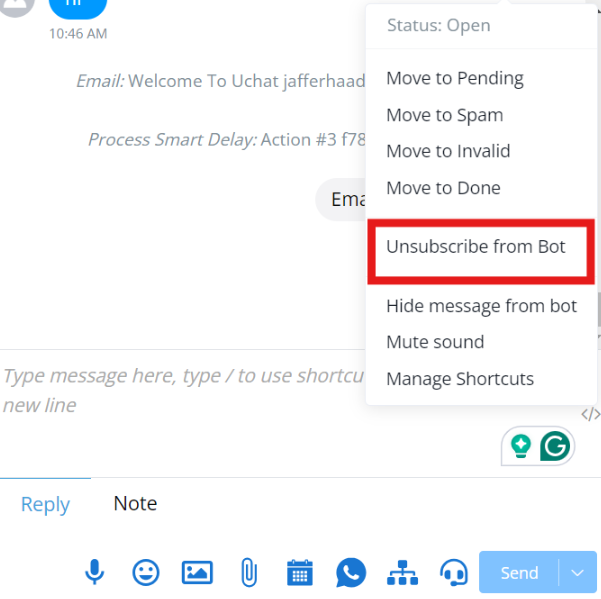
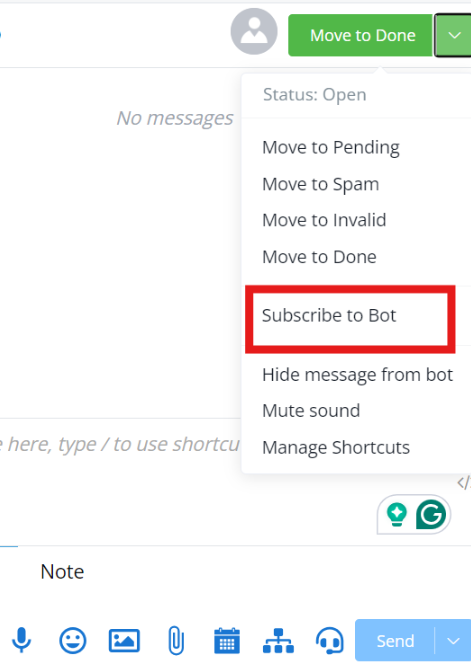
From Live Chat:
Users can also subscribe or unsubscribe directly from Live Chat.
If the user is already subscribed, only the Unsubscribe option will be available.
When unsubscribed, you will not be able to send any messages, even from Live Chat, and an error will be displayed indicating that the user is unsubscribed from the bot.
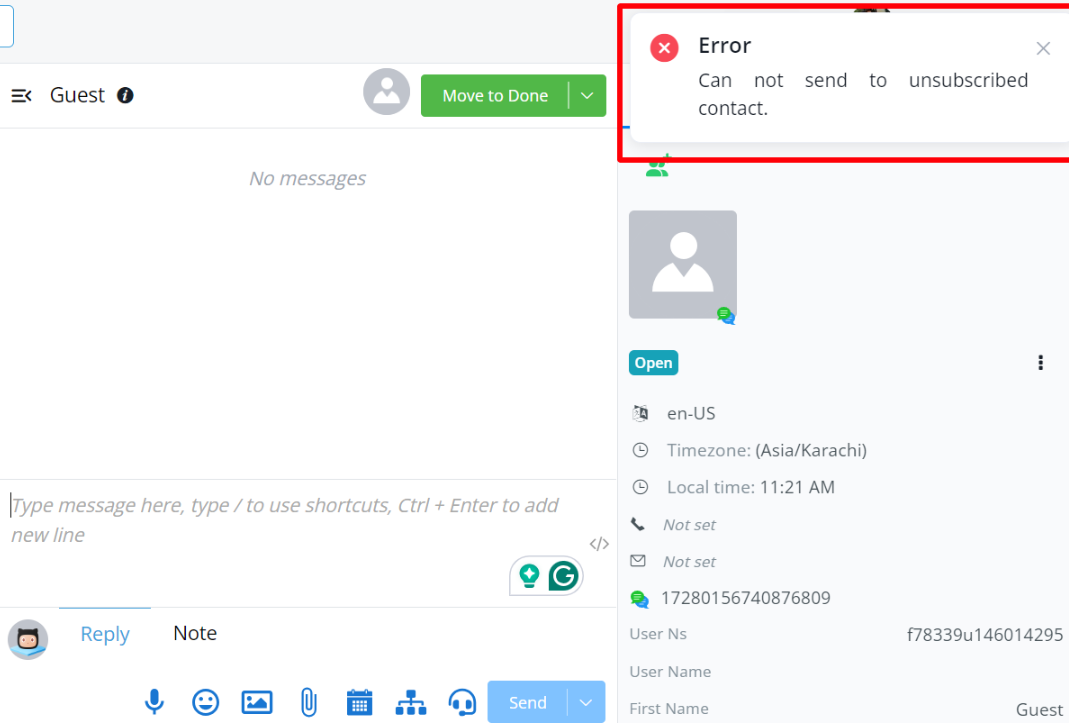
However, you can subscribe the user again directly from Live Chat.
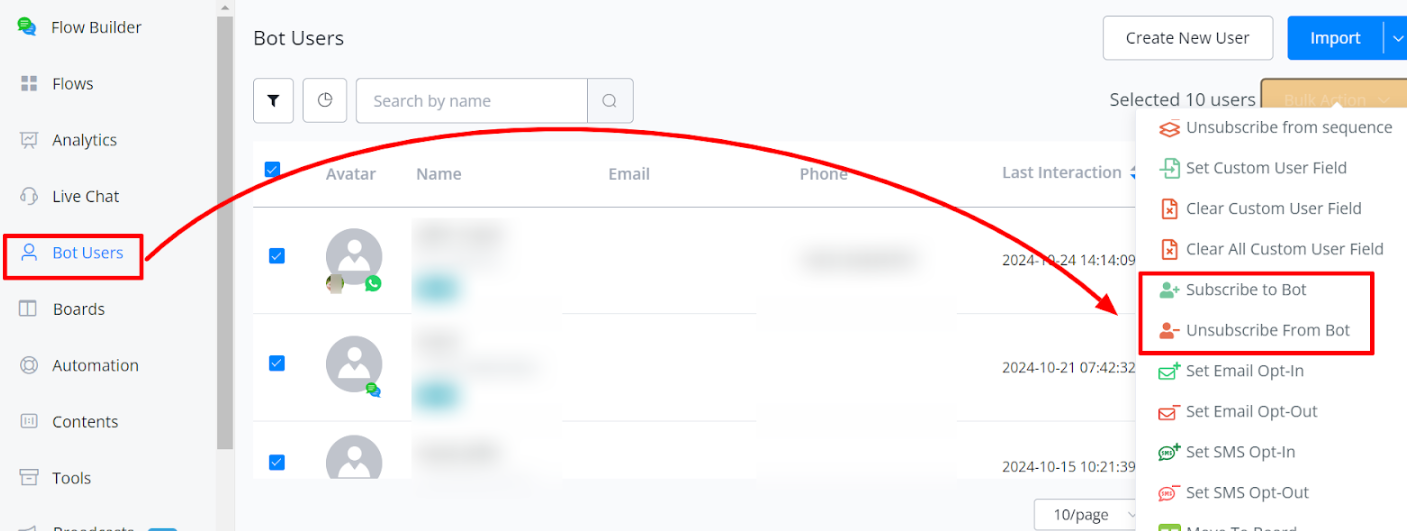
From Bot Users:
You can also subscribe or unsubscribe users through the Bot Users section. This action can be performed for:
- Individual Users: Select and apply the action to a specific user.
- Bulk Users: You can perform subscription or unsubscription actions for multiple users at once
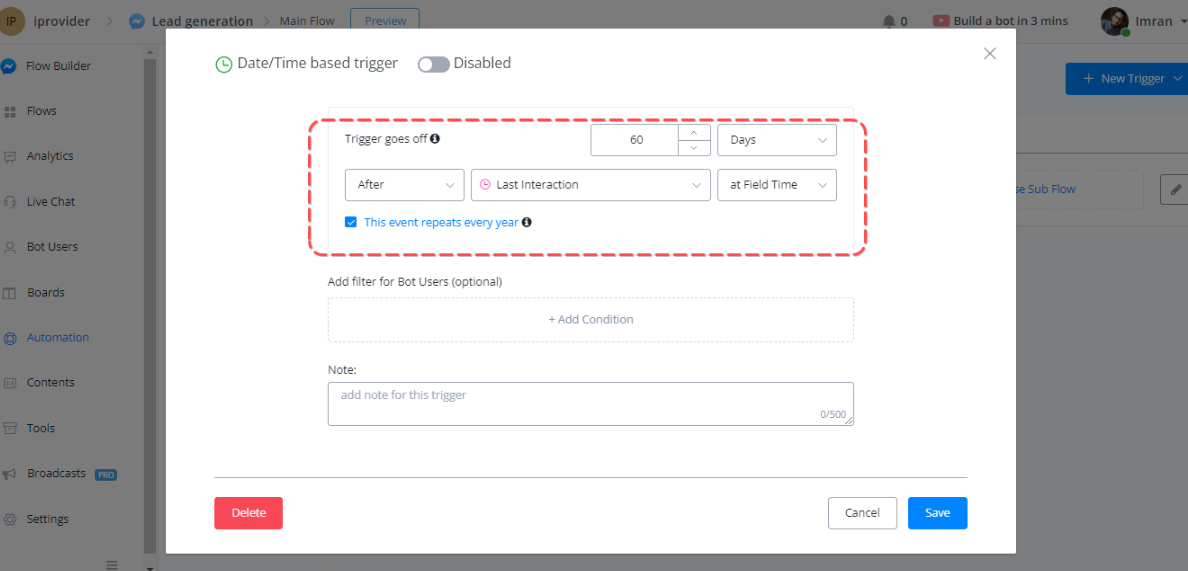
Triggers:
You can set triggers for when a user subscribes or unsubscribes from the bot.
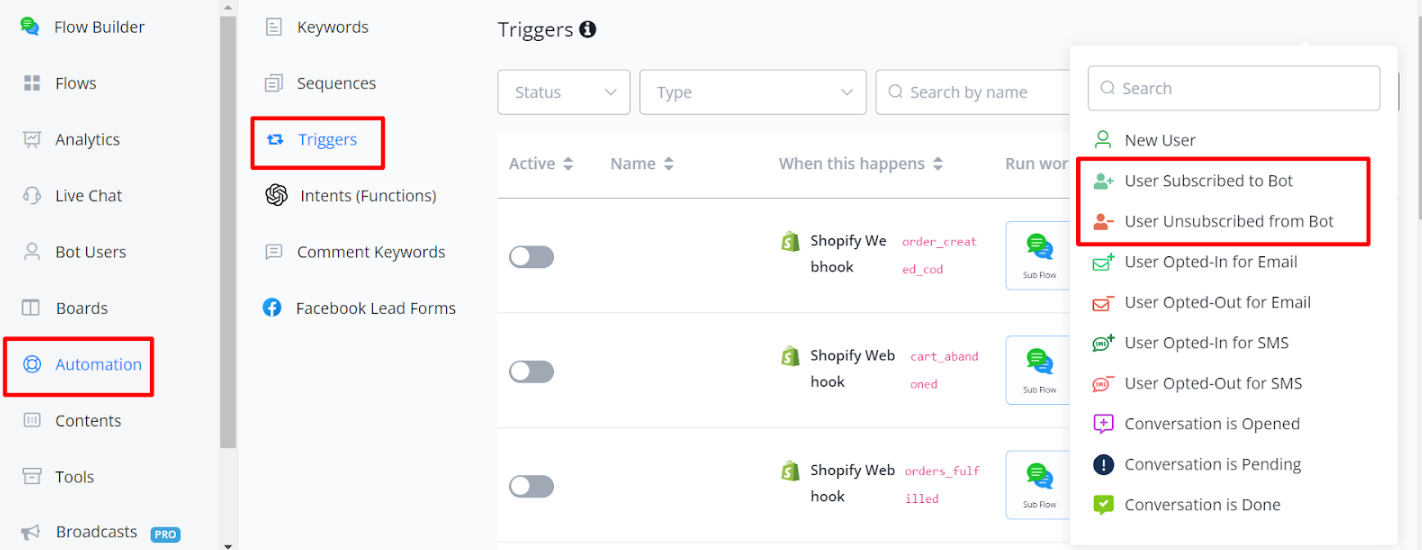
Note: When a user sends a message to your bot for the first time, they are automatically subscribed. If a trigger is set on the subscription, this could result in duplication during the first message exchange.
Unsubscribed Users: Once a user is unsubscribed, messages cannot be sent via the flow. However, you can still:
- Send an email, Use an action node to add tags, Update the Custom User Field (CUF) value, and run an external request.

Set Email Opt-in & Opt-Out
Setting Email Opt-ins
This feature allows you to send emails to users. Action must be placed before an email node.
Setting Email Opt-outs
This feature is useful when you want to prevent a user from receiving an email. This is very good when you do email blasts.
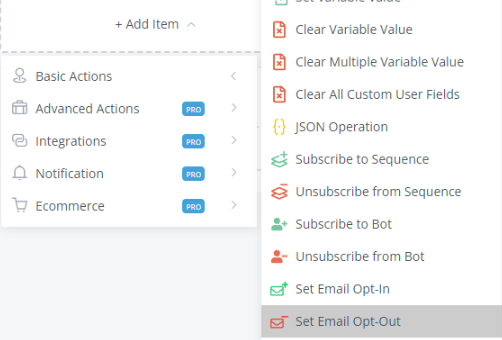
💡 The email or SMS will not send out if the user isn’t opt-on for SMS & Email.
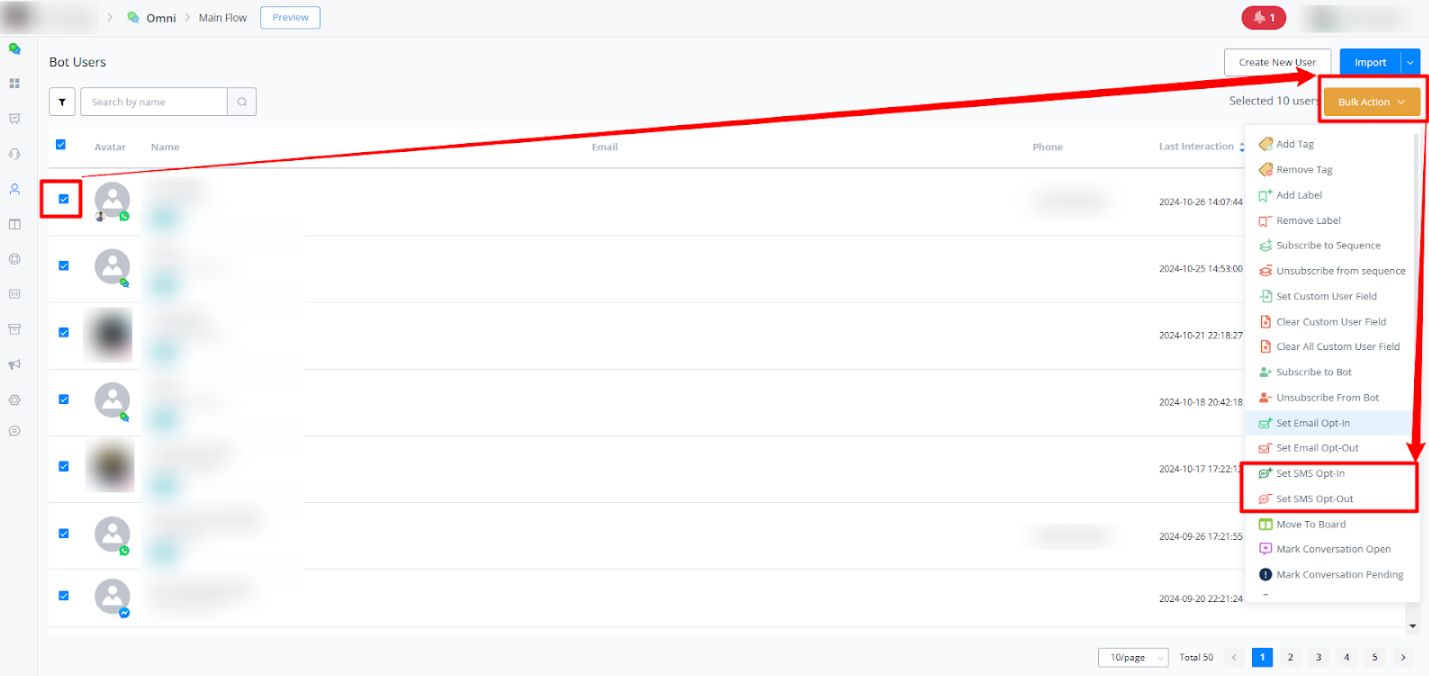
Bulk Actions
To configure Email Opt-in or Opt-out for users in bulk, follow these steps:
- Navigate to Bot -> Bot Users.
- Select the user(s) by checking the box next to their name.
- Click on Bulk Action in the upper right corner.
- Choose Set Email Opt-In or Set Email Opt-Out as needed.
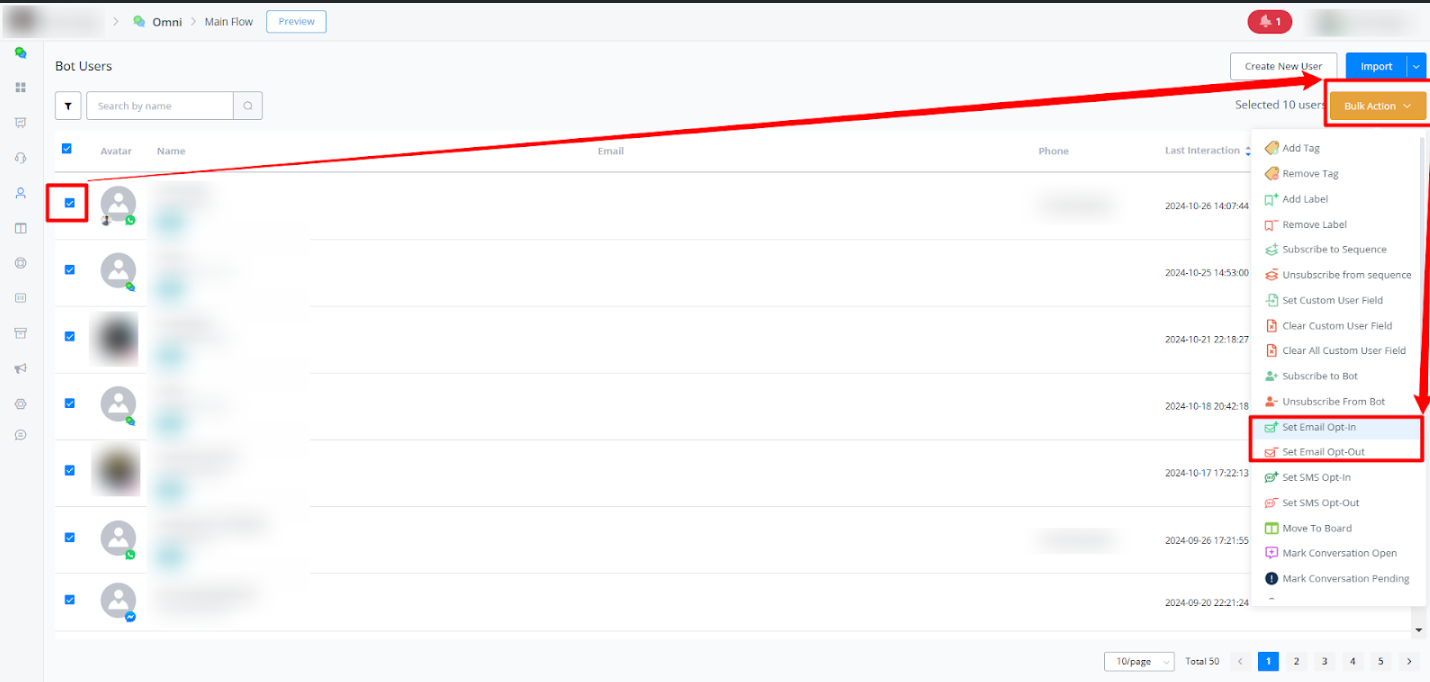
This action ensures that the user is either subscribed or unsubscribed to receive email communications. If the user is not opted in, the system will not send emails to them.
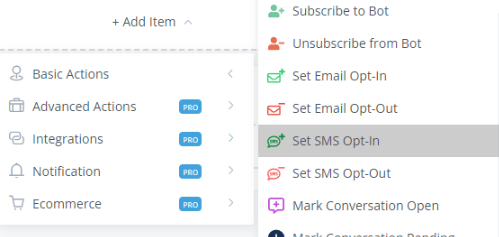
Set SMS Opt-in & Opt-Out
Set SMS Opt-in
If you need to send an SMS to a user using the chatbot, be sure to set up this action before the Send SMS node.
Set SMS Opt-out
To make sure a user doesn’t receive any SMS from the bot, use this action.
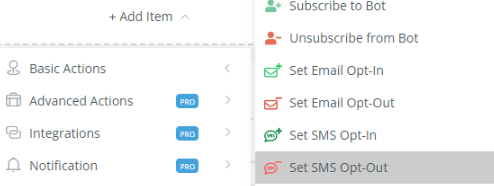
💡 The email or SMS will not send out if the user isn’t opt-on for SMS & Email.
Bulk Action
To configure SMS Opt-in or Opt-out for users in bulk, follow these steps:
- Go to Bot -> Bot Users.
- Check the box next to the user(s) you want to configure.
- Click on Bulk Action.
- Select Set SMS Opt-In or Set SMS Opt-Out.
This configuration will include or exclude the user from SMS notifications sent by the bot. If SMS Opt-in is not enabled, the system will avoid sending SMS to that user.
Mark Conversation Open/Pending/Spam/Done/Invalid
Mark Conversation Open
This option can be utilized when you open the conversation in any situation, Please note that by default all the conversations would be Open unless we don’t set up any function inside it.
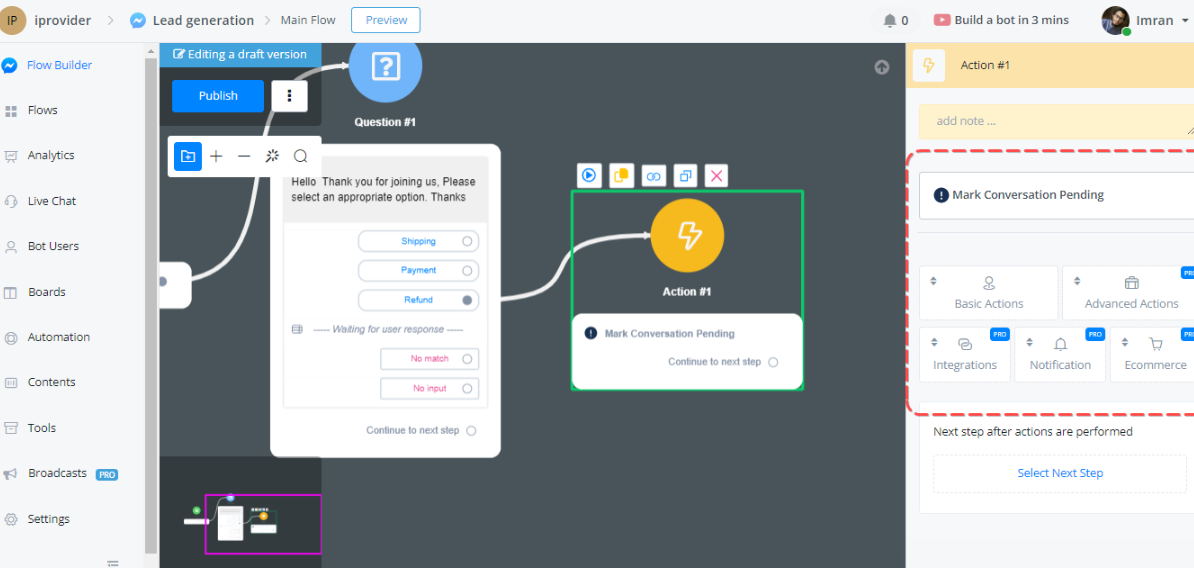
Mark Conversation Pending
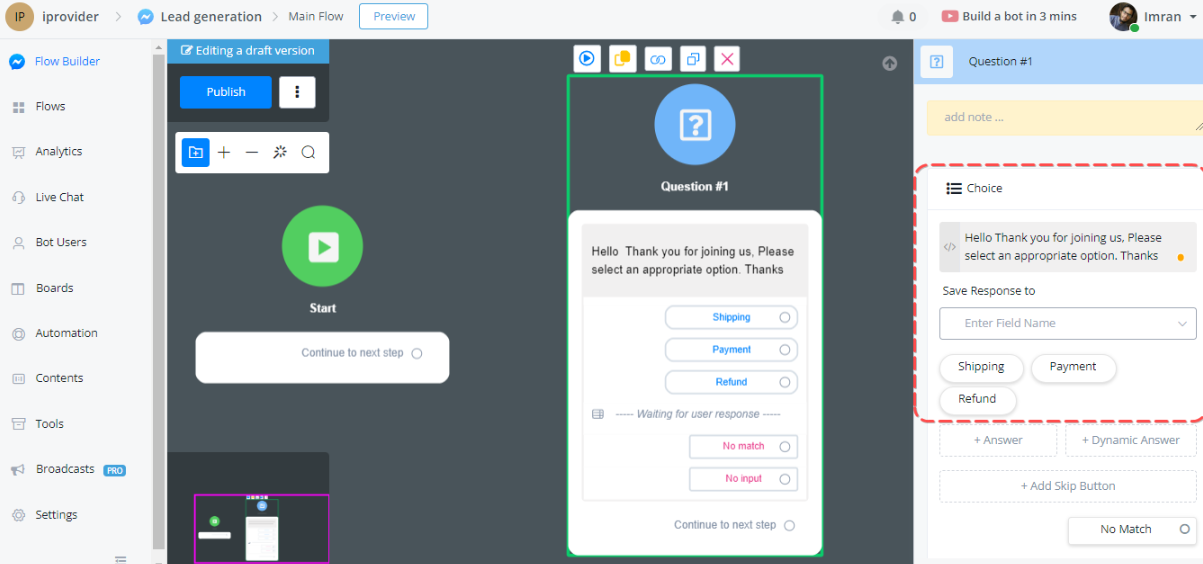
This option will automatically set the status of the chat as Pending, A use case might be like if a Shop has three categories.
- Shipping
- Payment
- Refund
So if the user selects Refund, the bot will mark this chat status as Pending for emphasizing this chat information to the chat agent.
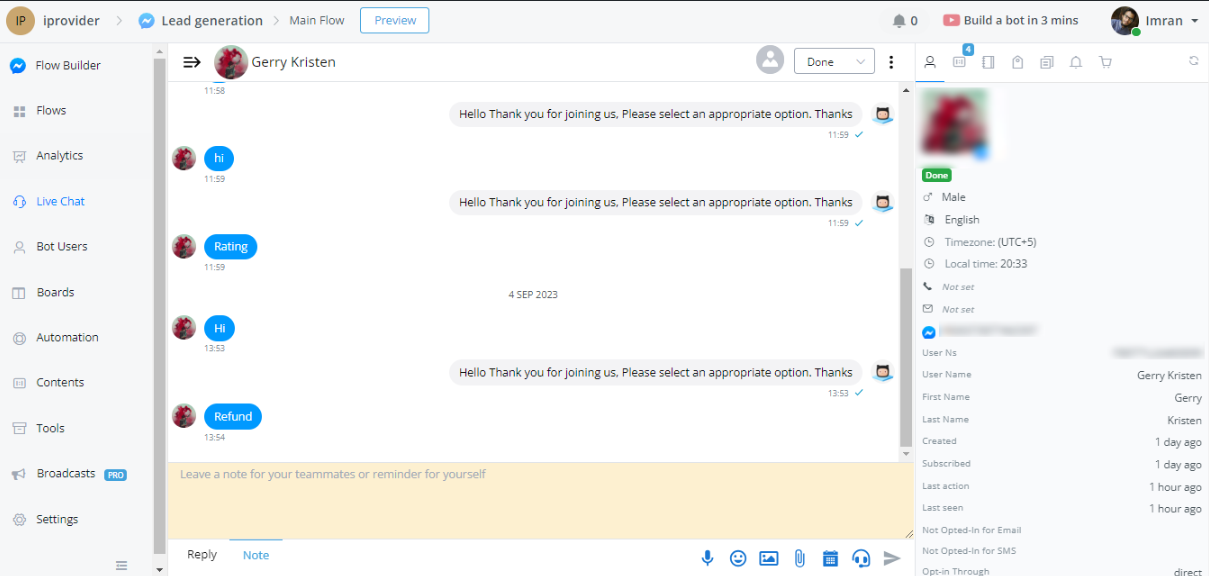
Watch on the Live chat Screen:
Here you can see that the chat status is set to Pending status when the user selects the Refund option in the chat section.
Mark Conversation Spam
Chat can be marked spam, We need to ensure that the chatbot provides accurate and reliable information, while building bot we can mark users’ chat to Spam to avoid distraction.
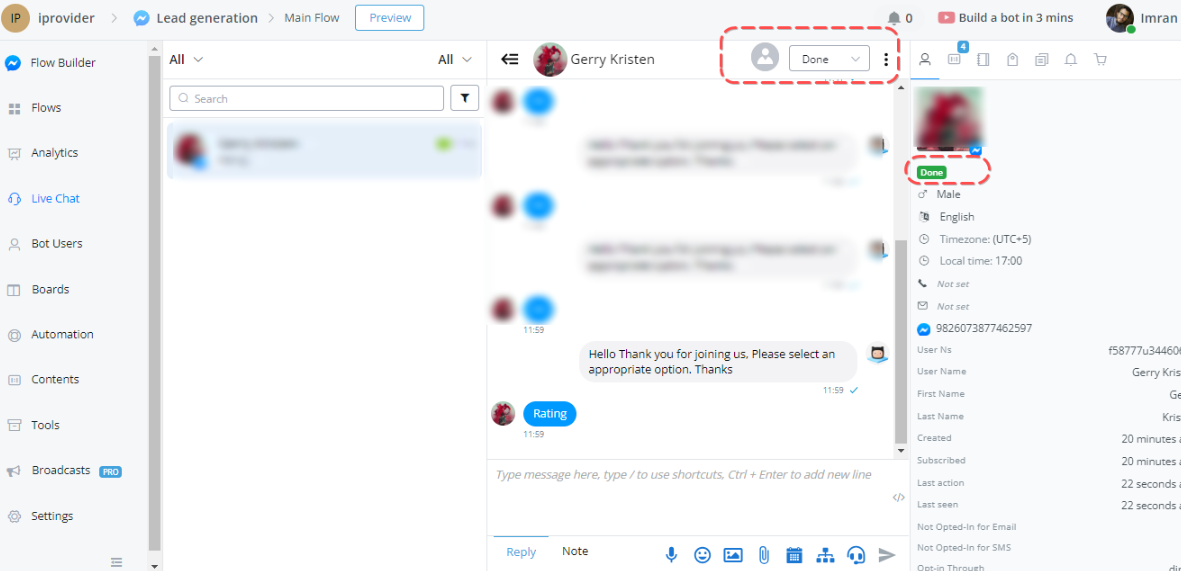
Mark Conversation Done
Chat can be marked done on certain cases, What if your flow has success and the user got what he desired? You can set this in a particular action set Done. So in that way, your Chat Agent will not opt for the Done status chat.
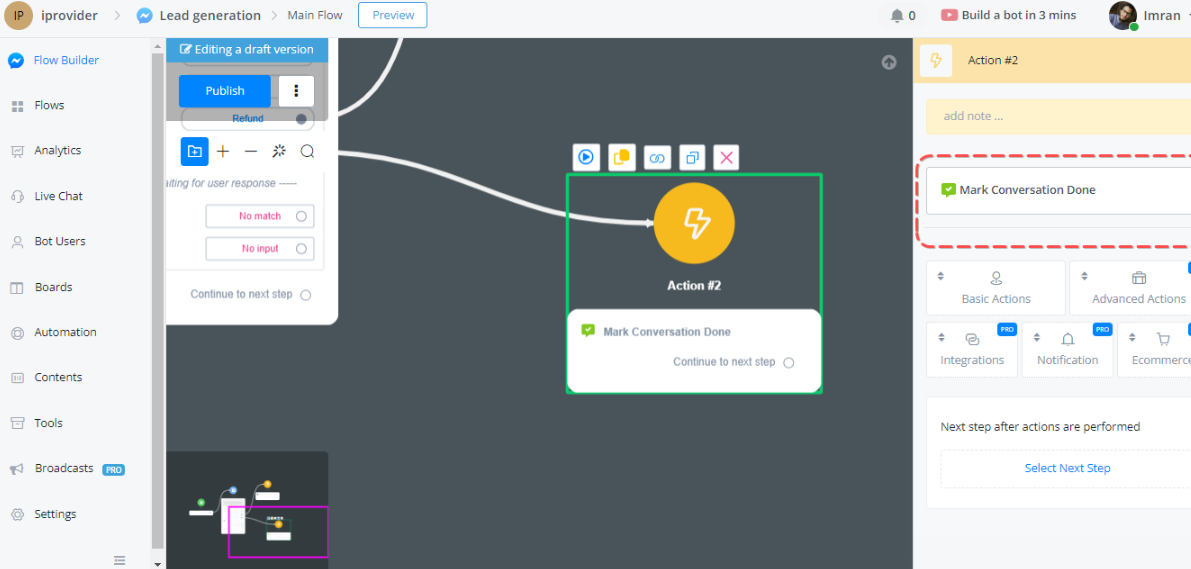
So Let’s say Whenever the user selects the Rating option we will mark the conversation status Done.
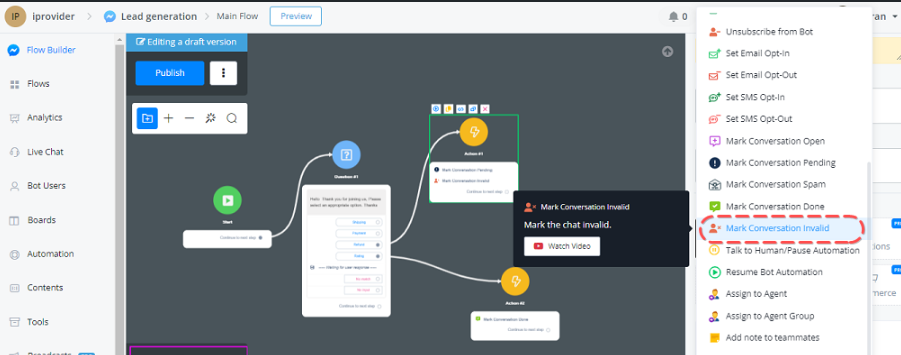
Mark Conversation Invalid
A conversation can be marked invalid based on certain criteria, a lead that is not fulfilling the business case of an agent/bot may marked invalid.
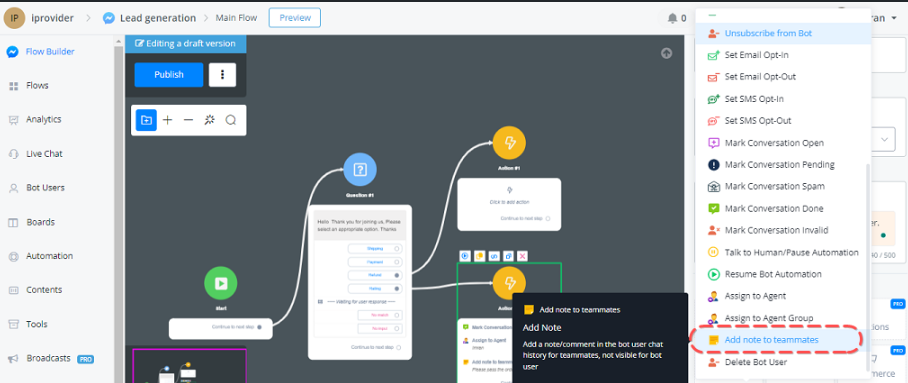
Add note to teammates
A note to teammates can be used as a reminder, Just in case in the below case whenever the User selects the Refund option the agent will receive the notes from the bot about the instruction/caution. Note these notes will not be visible to bot users.
Live Chat Screen
The note can be seen on the Live Chat screen plus an agent also make some notes by clicking on the bottom of the screen on Note.
Delete Bot User
A new feature that allows you to set a user limit for your chatbot and automatically delete excessive users. This update streamlines the process of managing and maintaining your chatbot’s user base.
Method 1: Action Step
The first method involves using an action step within your chatbot flow. Simply locate the “Delete Bot User” action step under the Basic Actions category. When the flow reaches this step, it will automatically delete the user, ensuring that subsequent messages or conditions are not processed.

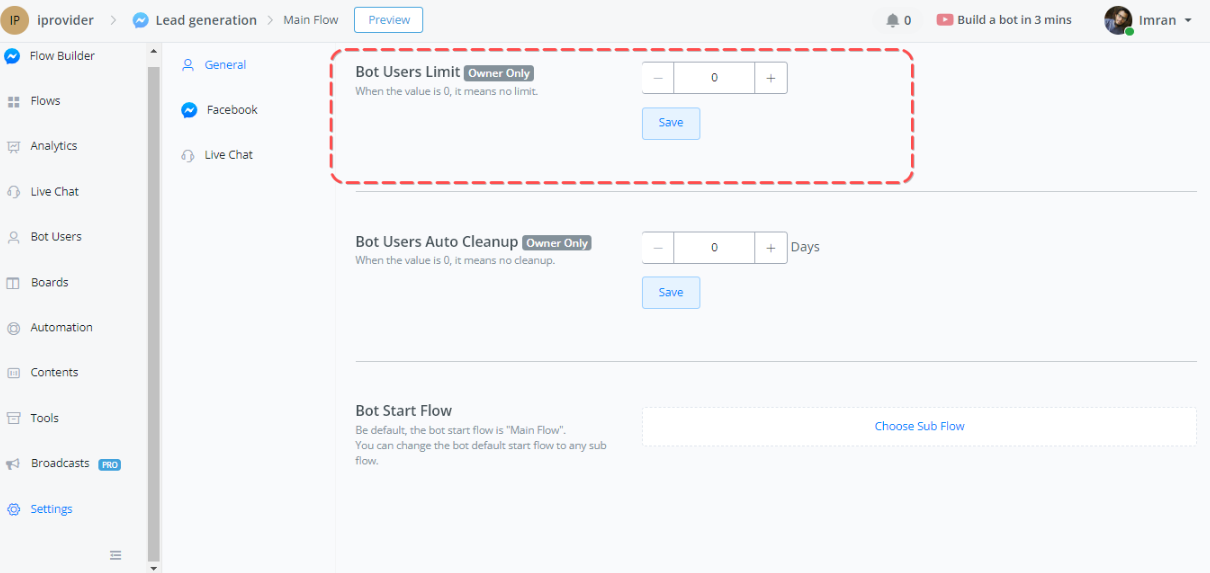
Method 2: Set Bot User Limits
Another way to automatically delete users is by setting bot user limits in the Messagingme.app settings. Under the General section, you’ll find the “Bot User Limit” option. By specifying a value greater than zero, the system will periodically check the total number of users and delete the oldest users if the limit is exceeded.
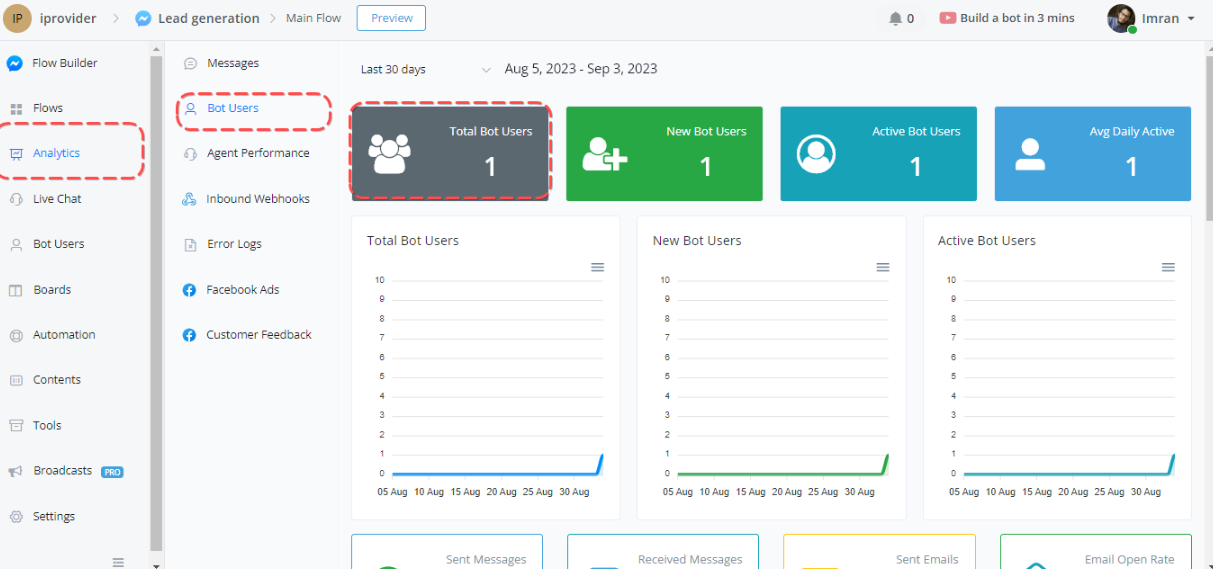
Monitoring User Count:
To keep track of the number of users, head over to the Analytics section. Here, you’ll find insights into the total number of bot users. This information will help you determine the appropriate user limit for your chatbot.
Additional Options:
Assign to agent/agent group
Assign to Agent & Assign to Agent Group
You can streamline chat management by assigning interactions directly to specific agents or agent groups within the flow. Here’s how:
- Navigate to the Action Node:
- Go to the Action node in your flow editor.
- Select the basic action options available for chat management.

Assign to Agent
Assigning to an Individual Agent:
- From the list of agents, select the specific agent you want to handle the chat.
- This ensures the chat is directed to the chosen agent, allowing for personalized and efficient user support.

Assigning to an Agent Group:
- Select an agent group from your list of agent groups.
- This allows the chat to be handled by any available agent within the group,
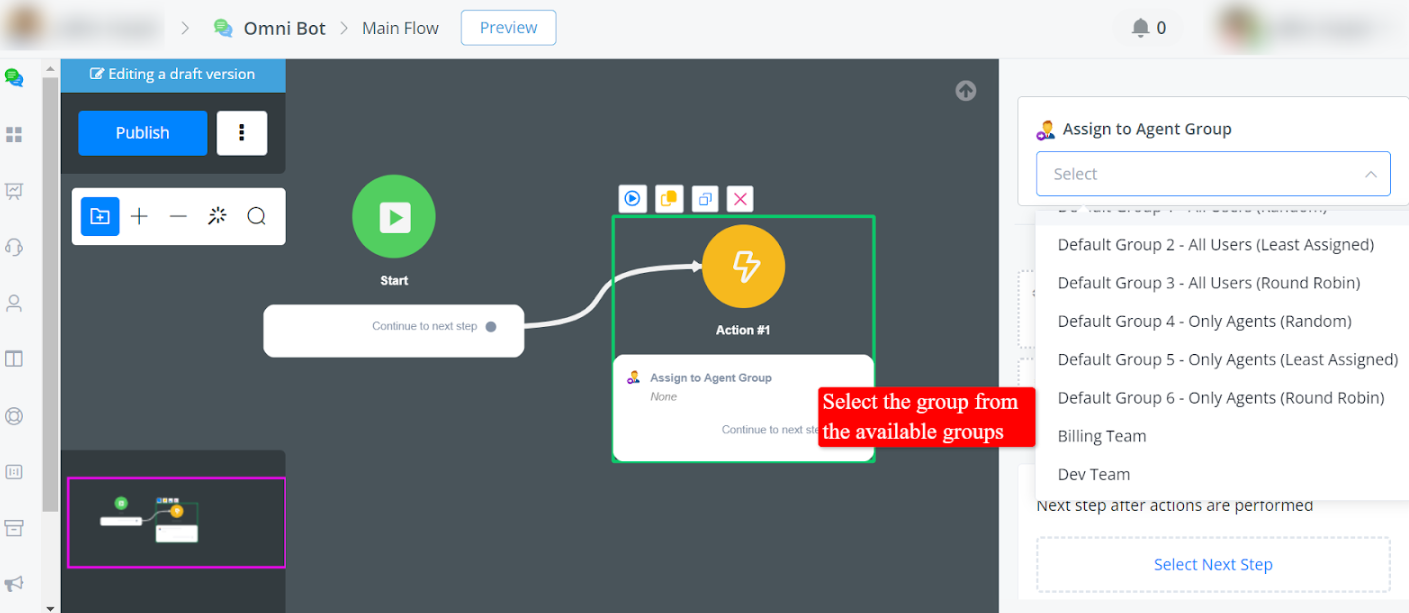
In the agent group, we have some default groups,
Default Agent Groups
Default Group 1 - All Users (Random)
This group includes all workspace members, such as the Owner, Admin, members, and agents. Tasks or chats are assigned randomly to any member of this group.
Useful when you want to distribute tasks without considering the current workload or specific roles.
Default Group 2 - All Users (Least Assigned)
This group includes all workspace members. Tasks or chats are assigned to the member with the fewest assignments, balancing the workload evenly.
Ideal for ensuring an even distribution of tasks across all users in the workspace.
Default Group 3 - All Users (Round Robin)
This group includes all workspace members. Tasks or chats are assigned in circular order, ensuring each member gets a turn sequentially.
Suitable for evenly distributing tasks predictably and fairly.
Default Group 4 - Only Agents (Random)
This group includes only the agents in the workspace. Tasks or chats are assigned randomly to any agent in this group.
Useful when you want to distribute tasks among agents without considering their current workload.
Default Group 5 - Only Agents (Least Assigned)
This group includes only the agents in the workspace. Tasks or chats are assigned to the agent with the fewest assignments, balancing the workload evenly.
Ideal for ensuring an even distribution of tasks, specifically among agents.
Default Group 6 - Only Agents (Round Robin)
This group includes only the agents in the workspace. Tasks or chats are assigned in circular order, ensuring each agent gets a turn sequentially.
Suitable for evenly distributing tasks among agents predictably and fairly.
Resume Bot Automation
If a bot stops responding, user messages can go unanswered unless an agent intervenes. To prevent this, we’ve implemented several ways to resume bot automation seamlessly. Let’s explore these methods in detail.
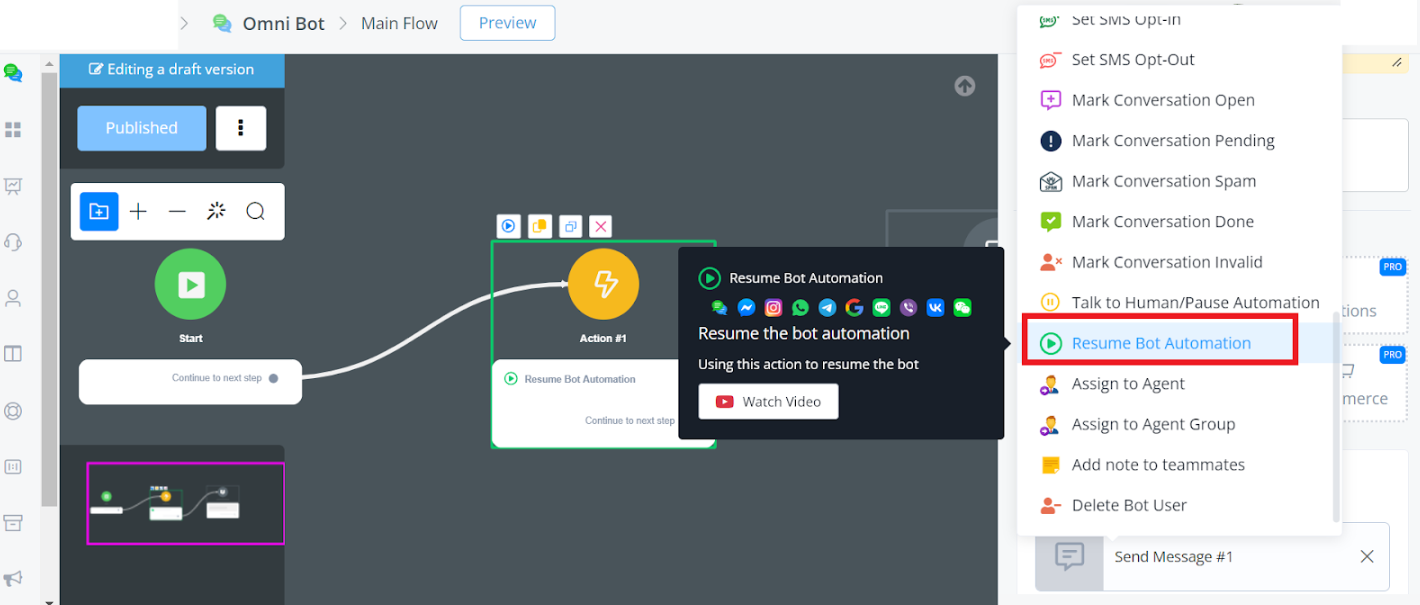
Basic Action Resume Bot
Simple and Effective
You can resume automation at any point in your flow using the action node. Here’s how:
- Navigate to the Action Node: Find the point in your flow where automation needs to resume.
- Select Basic Actions -> Resume Automation: This will instantly reactivate the bot, allowing it to continue its tasks and respond to users.
This straightforward method ensures the bot gets back on track without missing a beat.
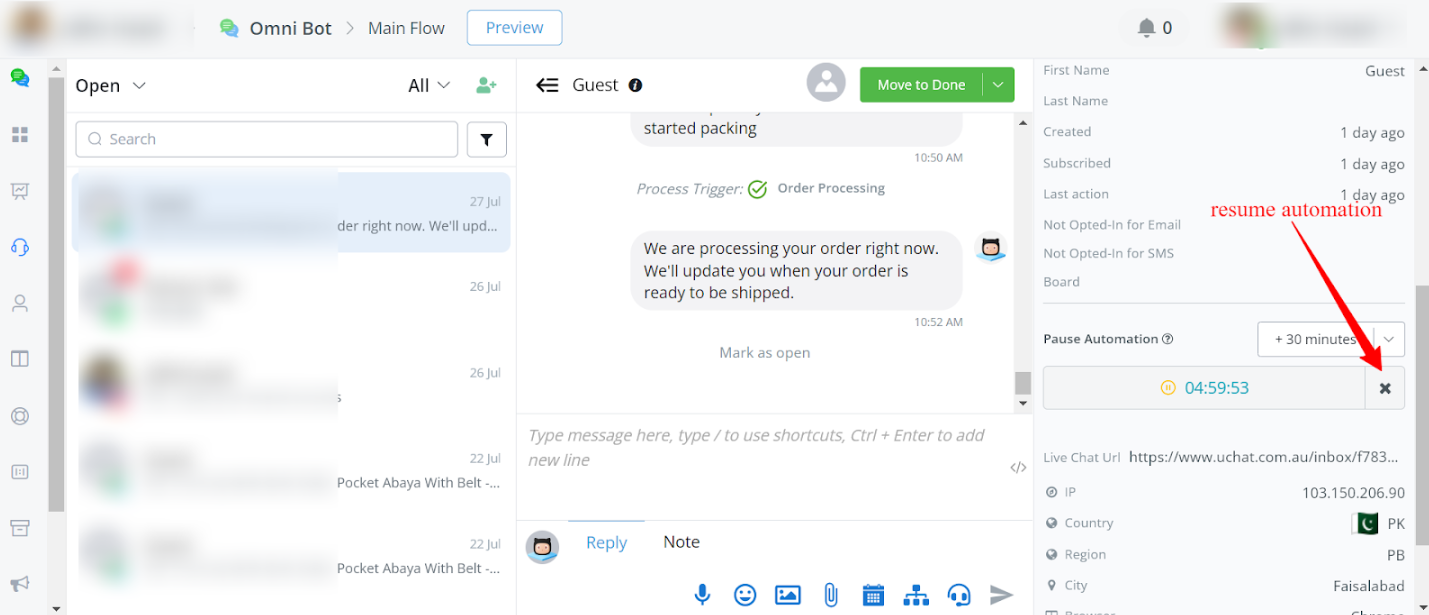
Resume in Live Chat
In live chat, agents often work within a timed framework. To ensure automation resumes smoothly:
- Monitor the Timer: A timer usually manages the duration of agent responses.
- Click the ‘X’ Sign: This action closes the timer and resumes the bot’s automation.
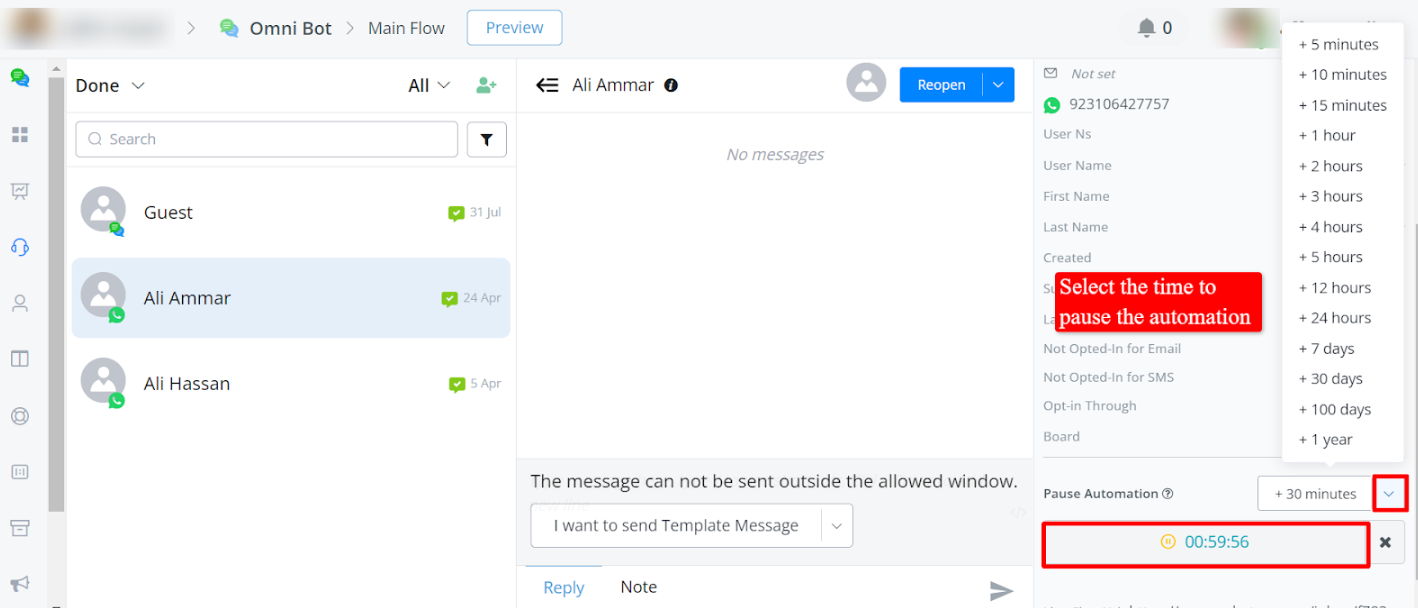
Talk to human/Pause automation
This doc will guide you on how to allow users to talk with your agent and pause automation when needed.
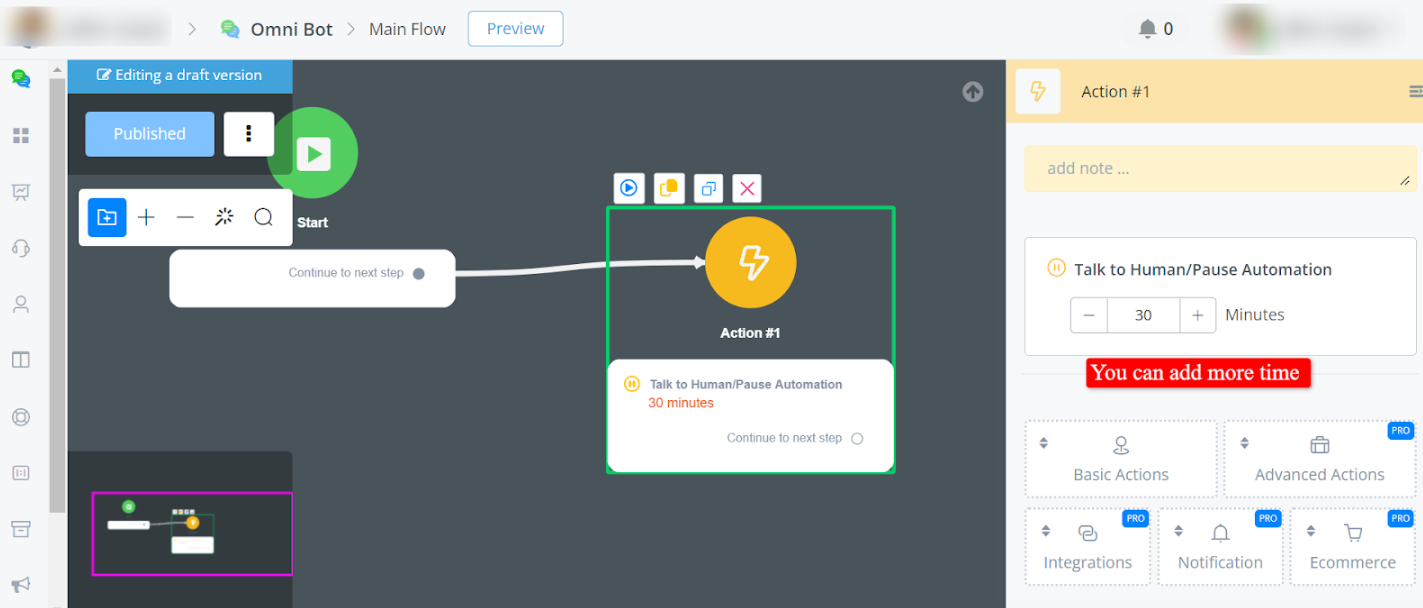
Talk to Human & Pause Automation in the Flow
- Pause Automation in the Flow:
- At any point in the flow, you can provide users the option to talk to a human agent.
- This feature pauses the automation temporarily, allowing real-time human interaction.
- In Action node -> Basic actions -> Talk to Human/Pause Automation
- Adding Pause from Live Chat:
- You can also initiate a pause directly from the live chat interface.