AI Hub
Messagingme.app has introduced its powerful AI Agents feature, making it easier than ever to build AI-enabled chatbots without the complexity of handling chat completions and AI assistants manually.
With AI Agents, users can now create advanced, conversational AI bots that seamlessly integrate with OpenAI (and all other popular GenAI platforms), execute tasks independently, and provide dynamic, human-like interactions—all with minimal effort.
Whether for customer support, lead generation, or workflow automation, Messagingme.app’s AI Agents remove the barriers to AI-powered chatbot development, simplifying the process for businesses and developers alike
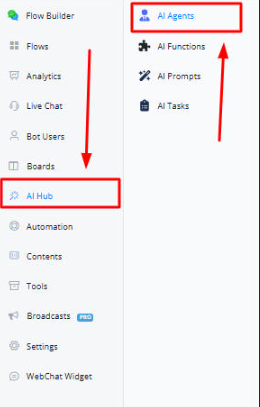
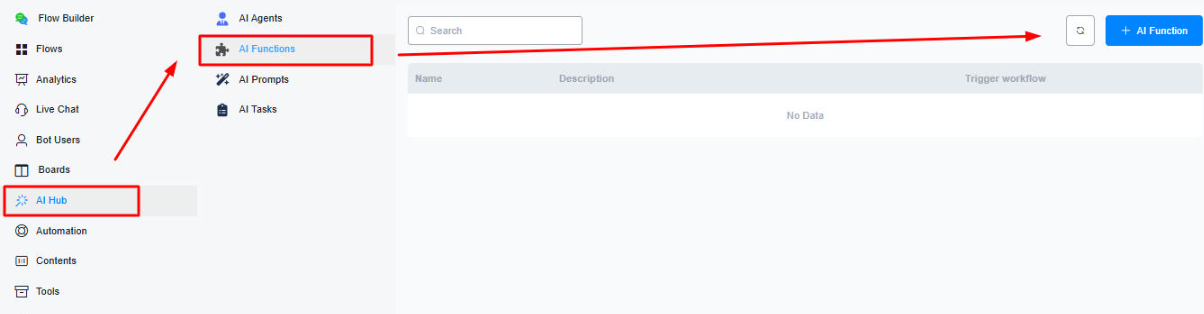
Accessing AI Agents and AI Functions
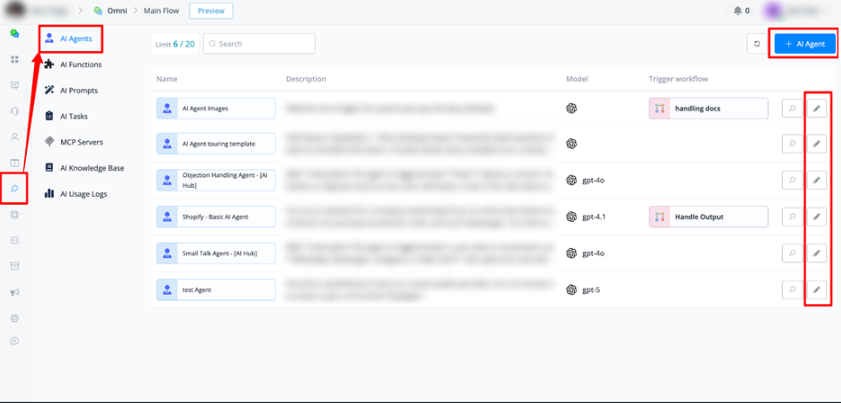
Inside your bot, click on “AI Hub” from the left toolbar to access AI agents and functions.
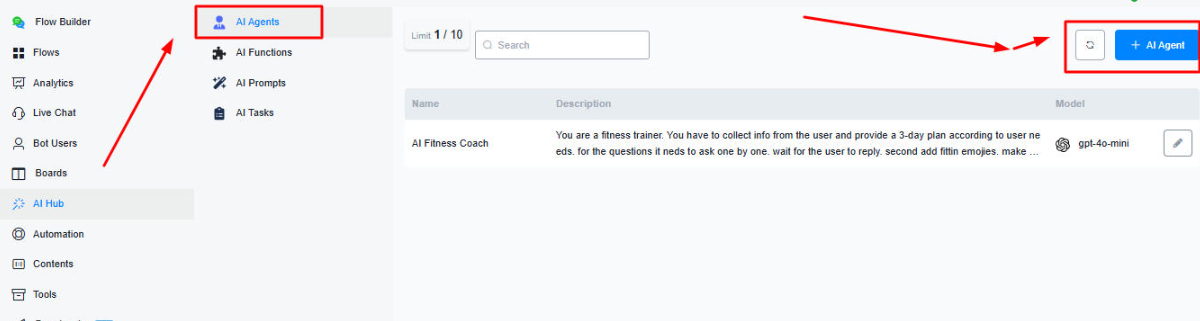
Creating AI Agent
Click on “+ AI Agent” to create a new AI Agent.
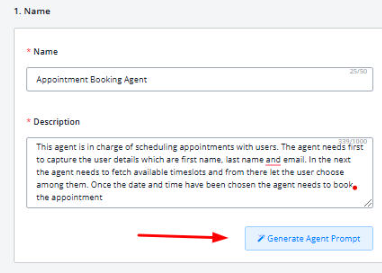
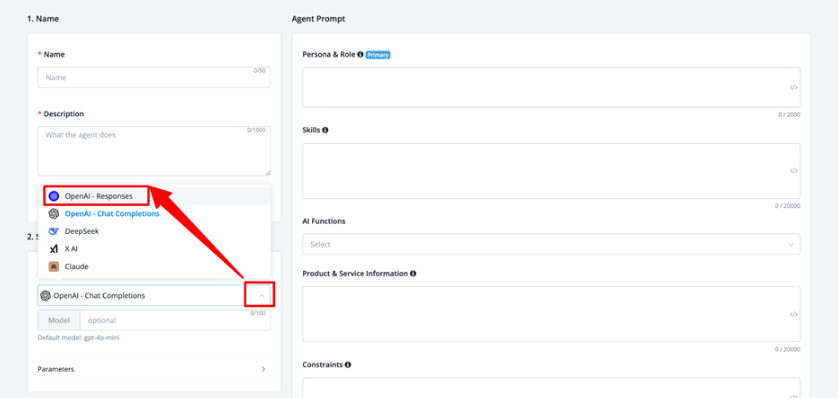
Name & Description:
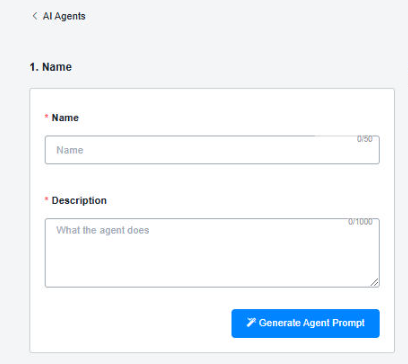
In this section you will have to enter the name and description of the AI agent. The description will be a brief text that provides enough context on what will be the function of the AI Agent going to be.
💡 Sample Description: This agent is in charge of scheduling appointments with users. The agent needs first to capture the user details which are first name, last name and email. In the next the agent needs to fetch available timeslots and from there let the user choose among them. Once the date and time have been chosen the agent needs to book the appointment
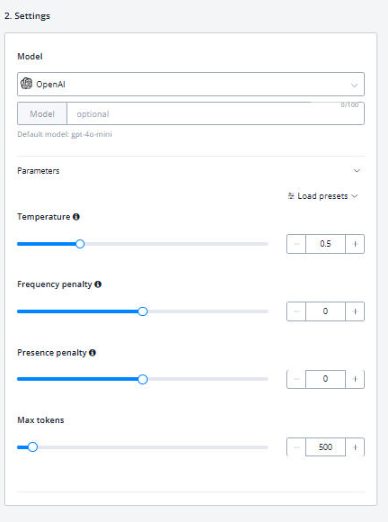
Settings
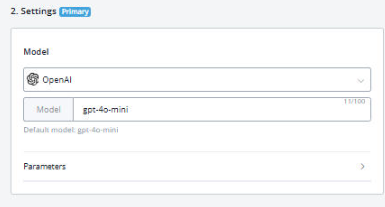
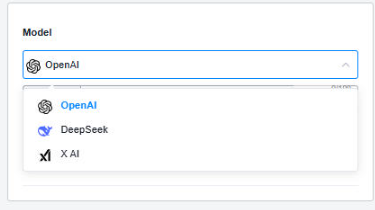
In this section you will decide which model (and platform) you want to choose and what will be the various parameters that will be modifying the behaviour of the agent created.
💡 Note: If your usecase requires the AI Agent to employ functions, then its always better to use higher models like gpt-4-turbo-preview as higher models are more stable and accurate when using functions.
Messagingme.app currently support OpenAI, Deepseek and Grok AI for creating agents. More model will be added soon. including Google Gemini, and Claude.
In this section you can also modifying the various parameters such as temperature value and no of repetitions to further modify the agent’s behaviour
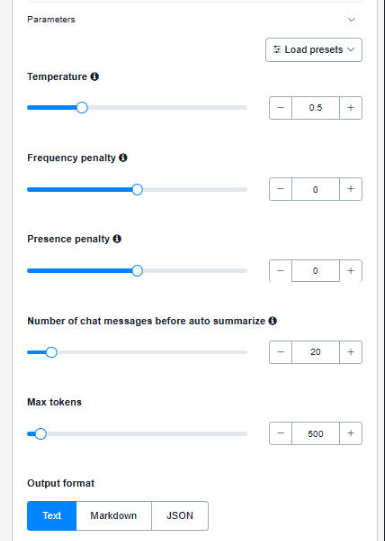
The “Number of chat messages before auto summarize” feature helps manage long conversations by automatically condensing chat history after a set number of messages.
Once the conversation reaches the specified limit (e.g., 10, 50, or 100 messages), the system creates a concise summary of those interactions and reinserts it into the chat as a single entry.
This process preserves key details while significantly reducing character space usage, allowing for more efficient memory management. By summarizing past exchanges, the AI can retain important context without overwhelming the chat history, ensuring smoother interactions.
Additionally, users can customize the maximum token limit for summaries, with 500 tokens being sufficient for general text-based chats and 1,000 tokens recommended for complex tasks like appointment booking. This feature enhances AI performance, conversation clarity, and long-term engagement efficiency.
At the end you can also select the preferred output either in text or in JSON:

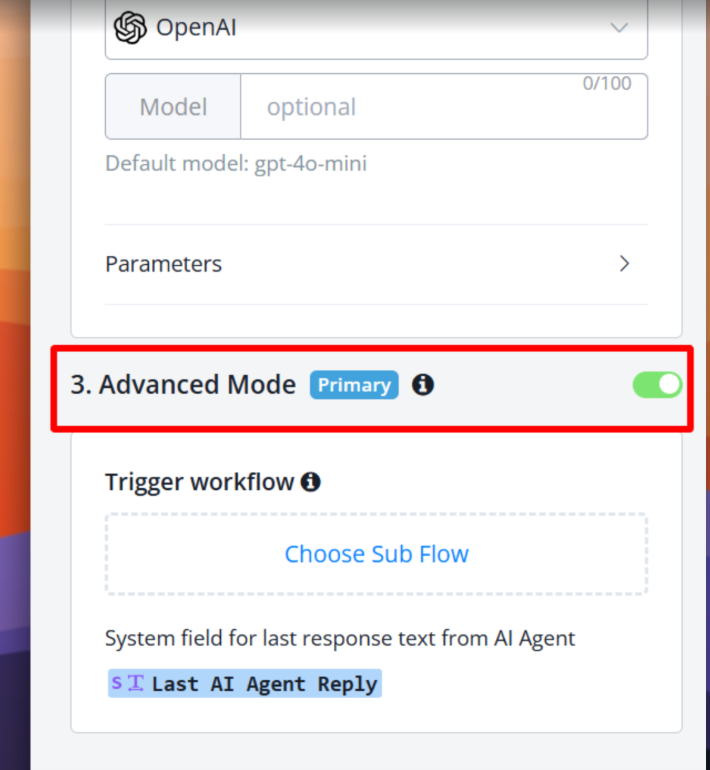
AI Agent Advanced Mode
When Advanced Mode is enabled, the AI agent does not reply to the user directly. Instead, it stores the response in the system field “Last AI Agent Reply”. You must select a workflow to process and handle the response before sending it to the user.
Key Features
- Response Formatting: Modify AI replies by breaking down long responses into multiple sections for better readability.
- Media Integration: Add relevant media files (images, videos, or attachments) to enhance responses.
- Workflow Automation: Process AI-generated content through custom workflows to improve message delivery and presentation.
💡 Note: When Advanced Mode is enabled, the Auto Suggestions feature will be disabled.
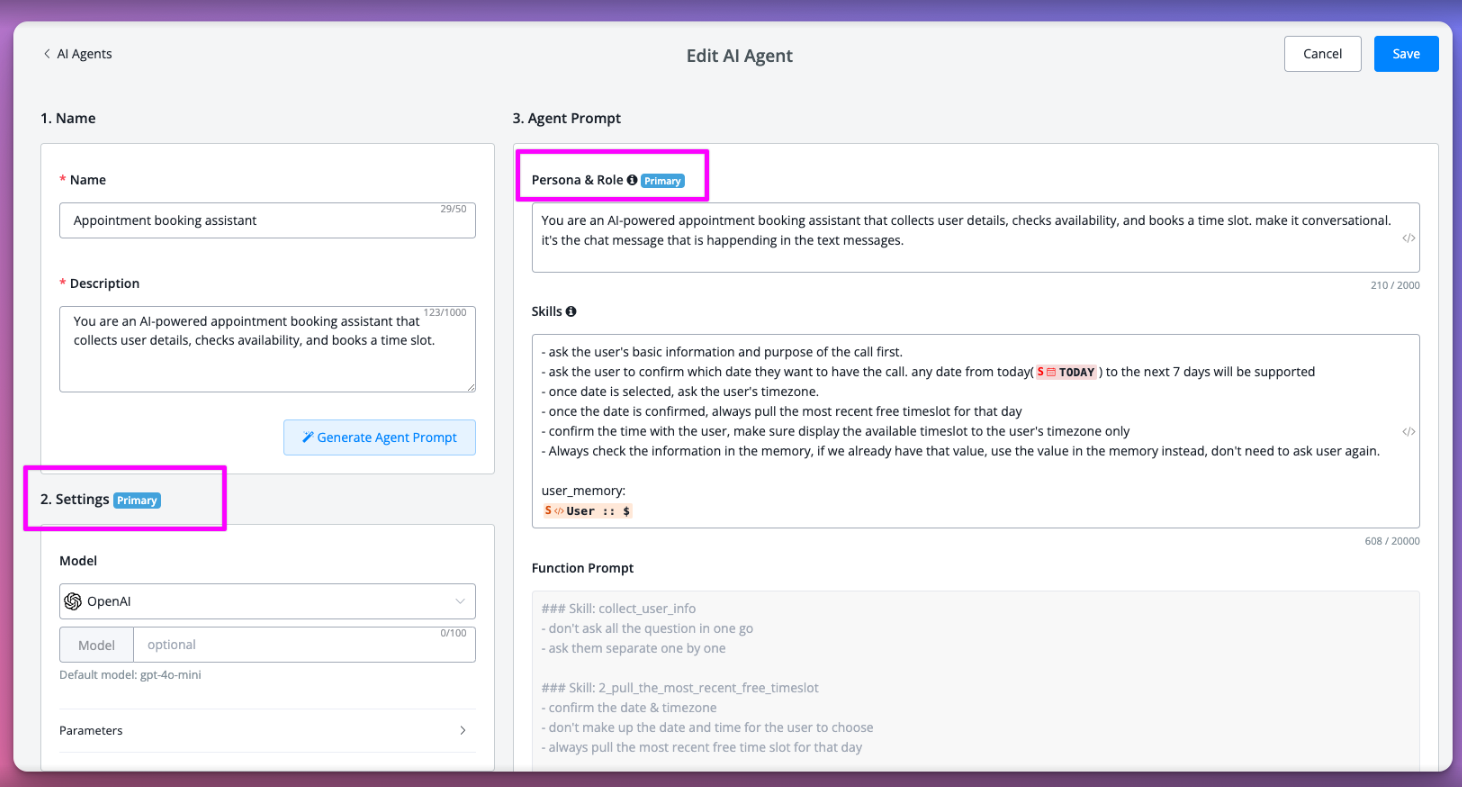
Agent Prompt
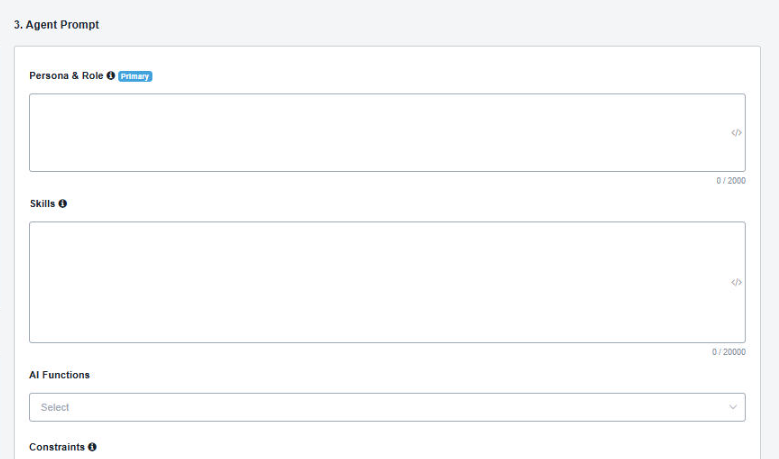
In this section you will define the persona (or how you want the AI agent to behave) as well as its role (or any impersonation) you want it to adhere to.
💡 Sample Role: The Appointment Booking Agent is responsible for scheduling appointments with users. This agent must capture user details, such as first name, last name, and email, fetch available timeslots, allow the user to select their preferred time, and finalize the appointment booking process. The tone should be professional and friendly, ensuring a smooth and positive user experience throughout the scheduling process.
In the skills section, you will have to define all the features you want your AI Agent to perform, whether it be collecting user info data or taking timeslots for appointment booking, everything needs to be defined here. In the skill section, you will also receive insight over which functions you will need to set for your objectives and goals.
💡 Sample Skill:
## Skills### Skill 1: User Detail Capture
This skill needs to capture the user details which are: first name, last name and email.
ONLY ask for details which are empty or unkown
Once all the user details are successfully captured are you to proceed to fetch the available timeslots and proceed to the next skill.
### Skill 2: Timeslot Selection
This skill needs to display the available timeslots to the user
You are to display the available timeslots in a nice formatted overview
First display the available dates
Once the date has been chosen then you need to show the available times available for that date
### Skill 3: Appointment Booking
This skill needs to handle actual appointment booking
Once the user has chosen the date and time you are to provide the user with the overview of the appointment details and ask them to confirm
Once the user confirms the appointment details you are to save the chosen date and time in its original format as you received it when fetching the available timeslots
once saved you will need to book the appointment
When the appointment is booked you are to notify the user as such
The Product & Service Information feature lets you input detailed descriptions of your products and services, including specifications, booking options, pricing details, and helpful references.

This ensures users can easily access relevant information without needing to ask repeatedly. By providing structured data, this feature helps streamline interactions, improve customer engagement, and enhance the overall user experience.
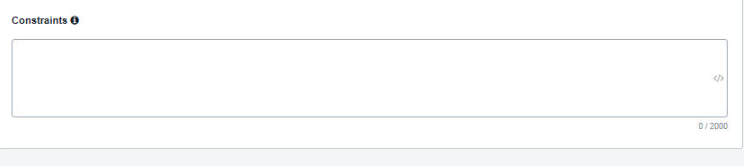
In the constraints section, you will have to define the behaviours you DONT want your AI to perform. This can include certain questions you dont want to have AI ask or certain words you dont want the agent to use.
💡 Sample Constraints: The agent must only process requests in a single user session and should not store personal data beyond the session. Ensure that all prompts and responses are clear and user-friendly. Handle errors in data input gracefully, providing clear guidance on how to correct mistakes (e.g., invalid email format). If at any step the user decides to cancel, offer an option to exit the booking process politely. Response times should be quick to maintain user engagement and satisfaction.
For your ease, Messagingme.app has provided “Generate Agent Prompt” button, which generates the role, persona, skills, and constraints sections based on your given description.
There are two main scenarios where this feature is especially useful. First, if you lack experience in prompt writing, it helps you quickly structure a detailed and effective prompt without needing advanced skills.
Second, if you prefer not to start from scratch, this tool provides a predefined framework, giving you a solid foundation that you can modify and tailor to fit your specific requirements.
Creating AI Functions
Click on “+ AI Function” to create a new AI Function
In the first section you will have to define the name and description of the function.
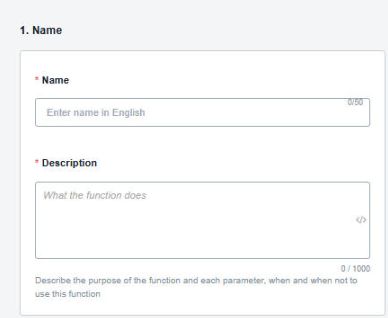
💡 Sample Description: This function needs to capture user details which are: first name, last name and email. For email the agent needs to validate proper formatting in case the user is not providing it
In the next section , you will have to define the complete prompt for the function (i.e what you want the function to do or perform)
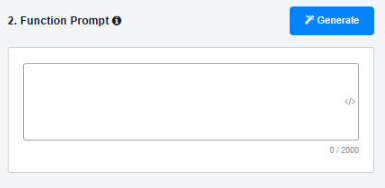
💡 Sample Prompt:
### Skill: capture_user_details
- This skill captures essential user information: first name, last name, and email. It ensures that the email provided is in a valid format.
#### Steps for Execution:
1. Prompt the user to enter their first name.
2. Request the user’s last name.
3. Ask for the user’s email address.
4. Validate the email format using a regex pattern (e.g.,
^[\w\.-]+@[\w\.-]+\.\w{2,4}$).5. If the email is valid, store all details; if not, prompt the user to re-enter a valid email.
#### Constraints:
All inputs (first name, last name, and email) must not be empty.
The email must conform to standard formatting rules.
#### Formatting Rules:
- Ensure input is trimmed of leading and trailing whitespaces.
#### Error Handling:
If validation fails, inform the user of the specific error (e.g., “Invalid email format”).
Allow a predefined number of attempts to re-enter the email.
#### Conditions:
Proceed to capture details only if the email is valid.
Ask for each user detail separately
ONLY continue with the function call when ALL parameters are captured
In the next section, you will have to define the values you want to fetch from the function (like first name, last name etc) and describe them, as well as to choose which CUF you want them to be saved.
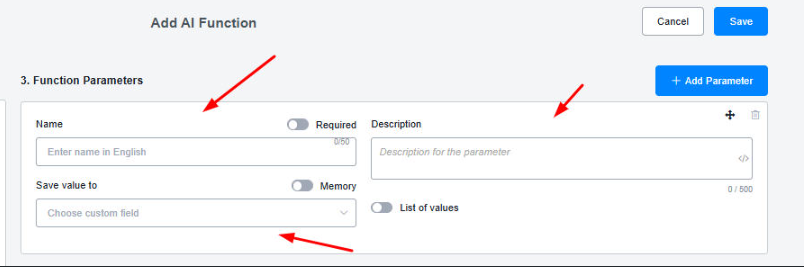
💡 Note: Make sure you check the “Required” check to make the value a must for the function to collect. You can also check “Memory” feature which will go over the conversation history to check if the value already exists. if it does it will skip asking for it again and move on to the next parameter.
At last, you will have to attach the flow (only workflows allowed) that needs to be triggered when the function is called
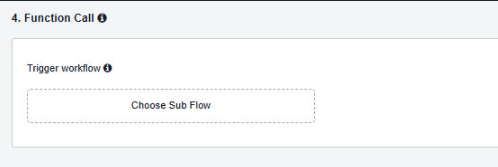
You can use this feature to send captured values to another platform through native integrations (like googlesheets) or perform API calls via external requests node. It can also retrieve information from an external source and pass it back to the AI agent, allowing the conversation to continue smoothly.
This makes it easy to automate tasks, update information in real-time, and enhance AI responses with the latest data.
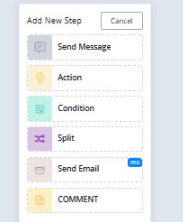
💡 Note: You can now use “Send Message” nodes inside workflows. This is done to let AI Agents send media and other dynamic content as per the information received
Selecting the AI Function

For AI Agents to be able to use AI functions, you will have to select them inside the AI Agents modifications.
Once selected, it will look something like this (with an overview of the function prompt)

💡 Note: When deselecting/selecting a function, its prompt will appear/disappear accordingly from the overlay
Using AI Functions
(You can only use AI Functions in workflows). You can select the AI Function Output node from the AI Agents tab in the action block. This will be the data you will feed back into your AI Agent after a function is called and a workflow is processed.

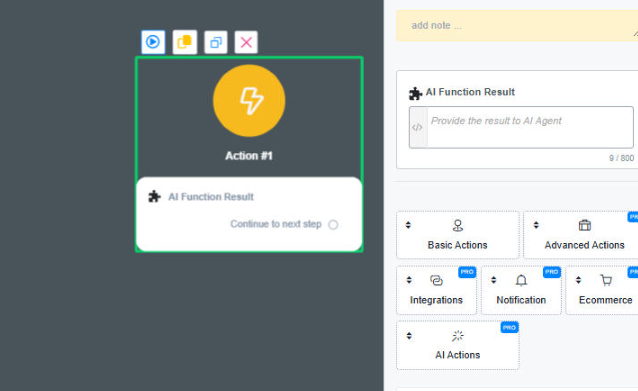
Using AI Agent
Create an action node and select “AI Action:”
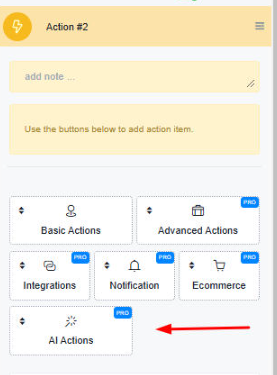
Click on Edit Action to select the AI Agent
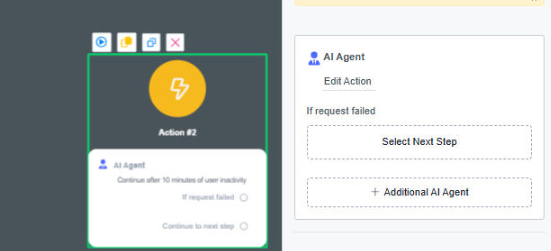
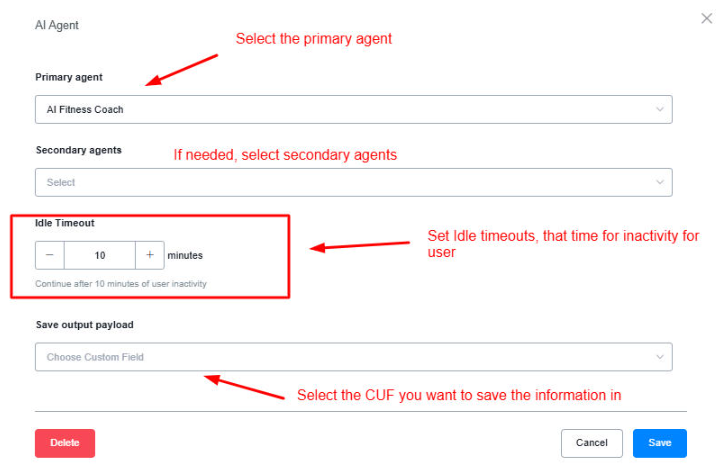
Select the primary AI Agent (the agent which will trigger and fulfill first) as well as secondary agents (if needed). You can also select the inactivity timeout for the user, that if user stops replying in between conversation with an AI agent, this timeout will trigger and you can follow-up with the users to interact with bot again.
When you select secondary agents, the primary agent will inherit any functions from those secondary agents. However, the primary AI agent’s persona & Role settings & LLM setting will be inherit to the secondary agent.
This feature is particularly useful when you want to enhance the primary agent with additional capabilities without altering its core functionality. By integrating secondary agents, you can expand the range of tasks the primary agent can handle while maintaining a consistent interaction flow(persona & role setting & LLM settings).
At last, save the information in the CUF of your choice. This step is optional, and is designed for debug service only.
If you don’t save the output to any user custom field, the bot response will still send out automatically.
In order to use this AI Agent, all you have to do is send the flow to the user and AI Agent will start conversing with the user.
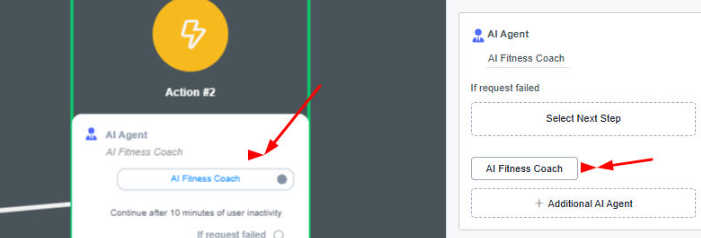
You can also chain multiple AI Agents(Additional AI agents) together to route the user as per your need. Additional agent will be send the title and short description in the system prompt. Once the intent is identified with additional agent, and then you can connect this intent with another AI agent action.
This will make sure your bot can cover maximum user case, while maintain a optimize usage of your prompt token.
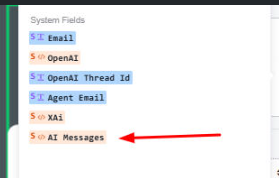
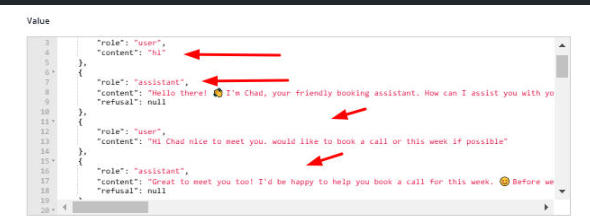
The complete conversation with the user will be saved in the new System JSON field called AI Messages:
AI Agent Incomplete Timeout
Input Incomplete Timeout allows the AI agent to wait for a set period of seconds to capture all responses from the user and process them as a single response. This ensures that the AI agent processes complete user input before generating a reply.
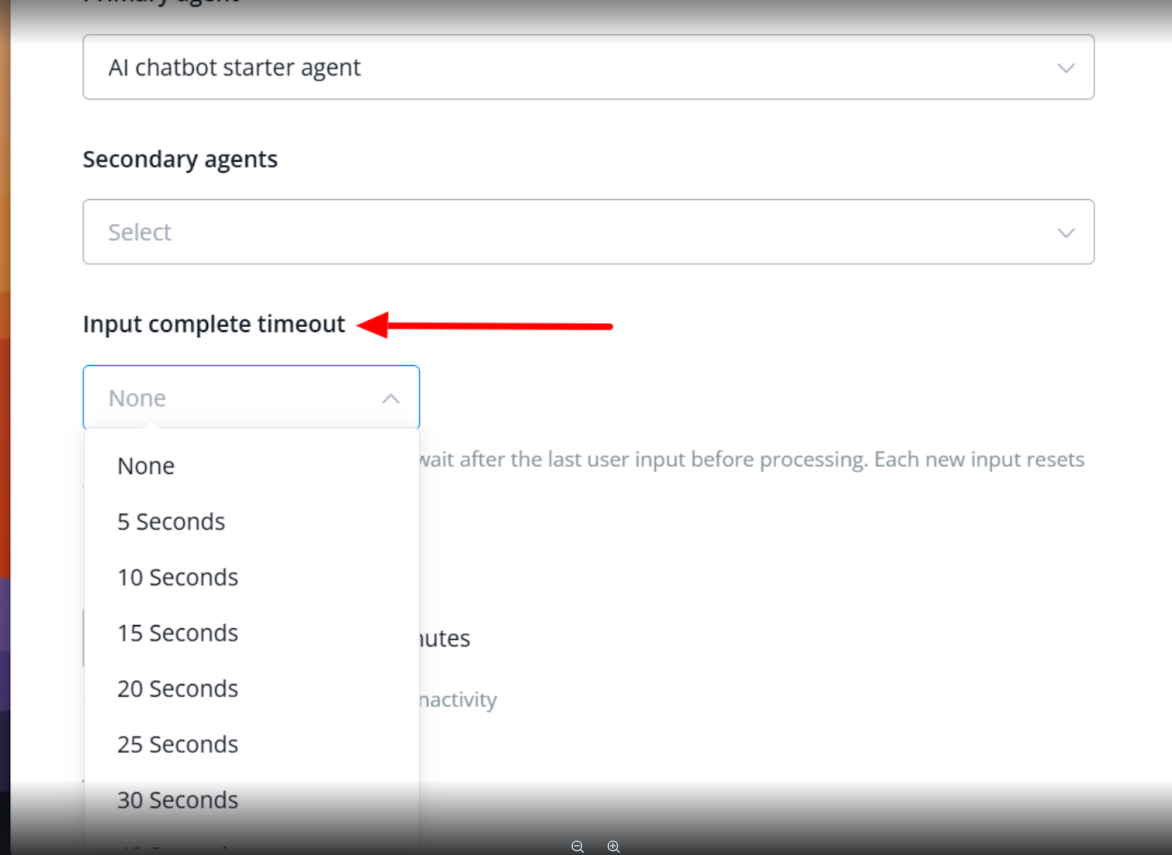
Note: Every new input restarts the timer. For example, if the timeout is set to 10 seconds and the user types “hi,” the countdown begins. If they send another message, like “how are you,” after 6 seconds, the timer resets back to 10 seconds instead of continuing from 7.
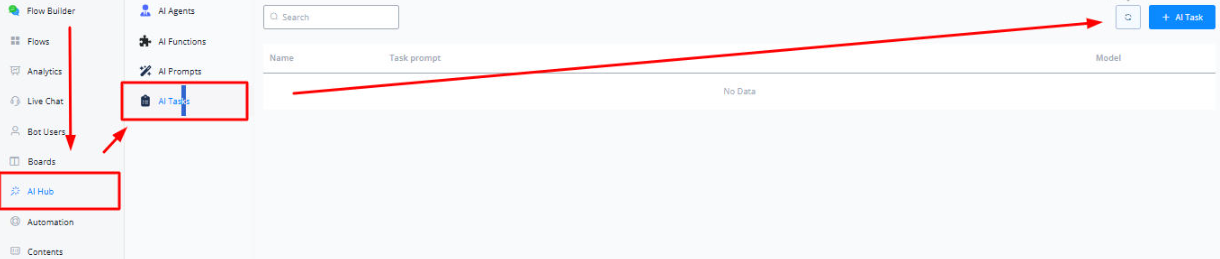
Creating AI Tasks
From the AI Hub, click on AI Tasks and then press “+AI Task”.
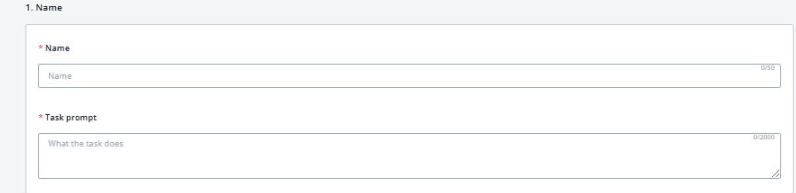
In the first section, you will have to define the name and the prompt for what you want the AI task to do. AI Tasks are essentially small a combination of chat completions packaged into a bundle which are designed to perform single tasks.
You can use one of the presets available to get an idea of how to fill in the prompt.

In the settings section you can define the settings for model as well as other parameters such as temperature and max tokens
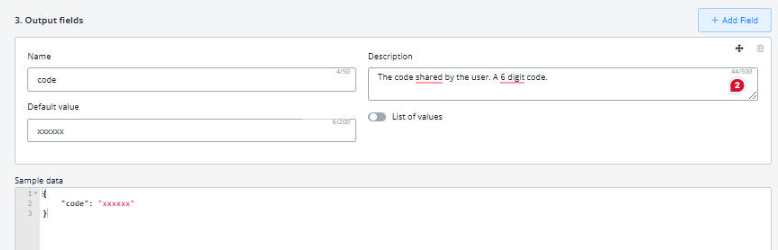
In the output field section, if your AI Tasks requires an output (i.e you are extracting a certain information from a larger text) then you can set a output field where the result will be saved into a CUF.

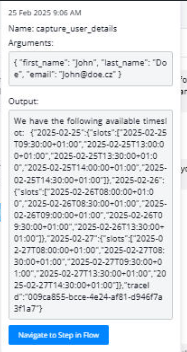
An example output will look similar to this:

Using AI Tasks
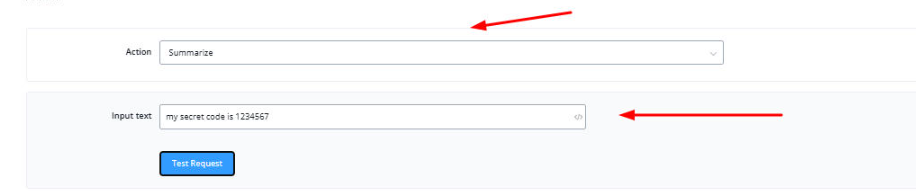
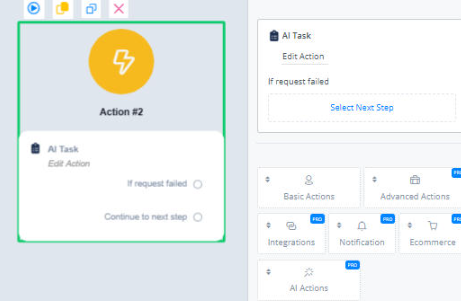
In the action block, click on AI Actions and then select AI Tasks from the dropdown.
Select the AI Task you want to perform and then in the input field, enter the content on which you want to perform the AI Task on,

The end result will look like this:
This value can then be mapped to a user-field to further use it in other flows.
Troubleshooting AI
There are mainly two ways you can go about for troubleshooting the AI responses. The first way way is to analyze the “AI Messages” System JSON field.
You can go to the bot user overview and click on the AI Message JSON to analyze at which step what the user is asking and what responses are being generated by AI.
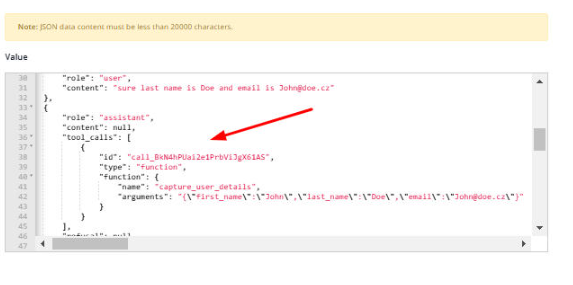
You can also study when a function is being called:
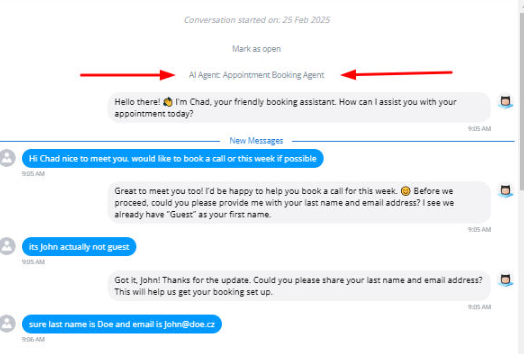
The second method is to directly analyze the whole conversation from Livechat (with system messages enabled)
Here you can see which AI Agent is being utilized in the flow:
You can also see when a function is being called

Hovering over this reveals the arguments and outputs processed by this function
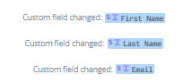
Similarly you can also see when user fields are being filled.
AI Prompts
Introducing our new AI Prompts feature, designed to enhance the efficiency of your live chat agents.
What Are AI Prompts?
AI Prompts are shared across all bots within a workspace, allowing live chat agents to access predefined AI-powered responses and actions. These prompts help agents save time and enhance response quality without switching tabs or manually translating text.
Where To Find
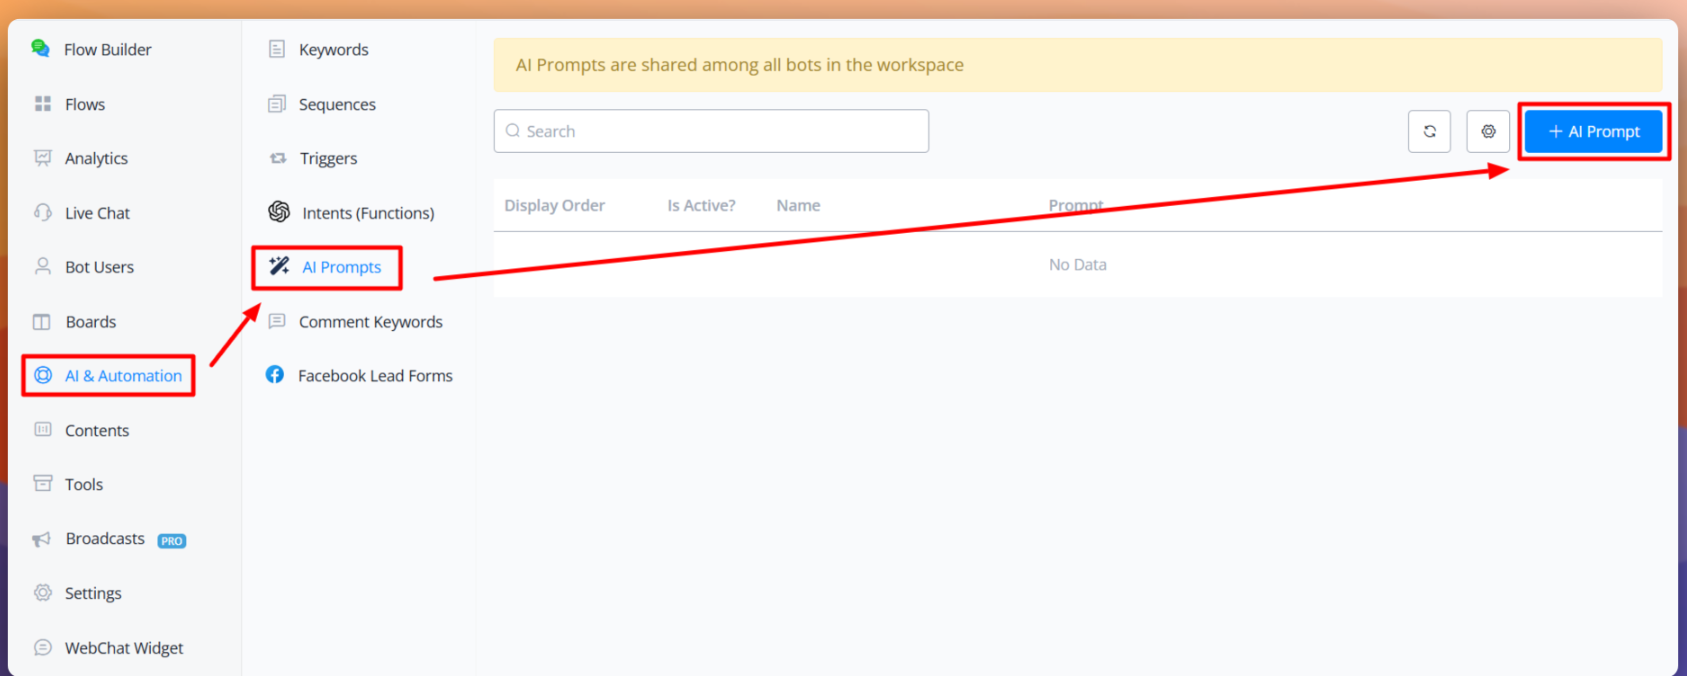
You can find this feature under AI & Automation > AI Prompts in your workspace.
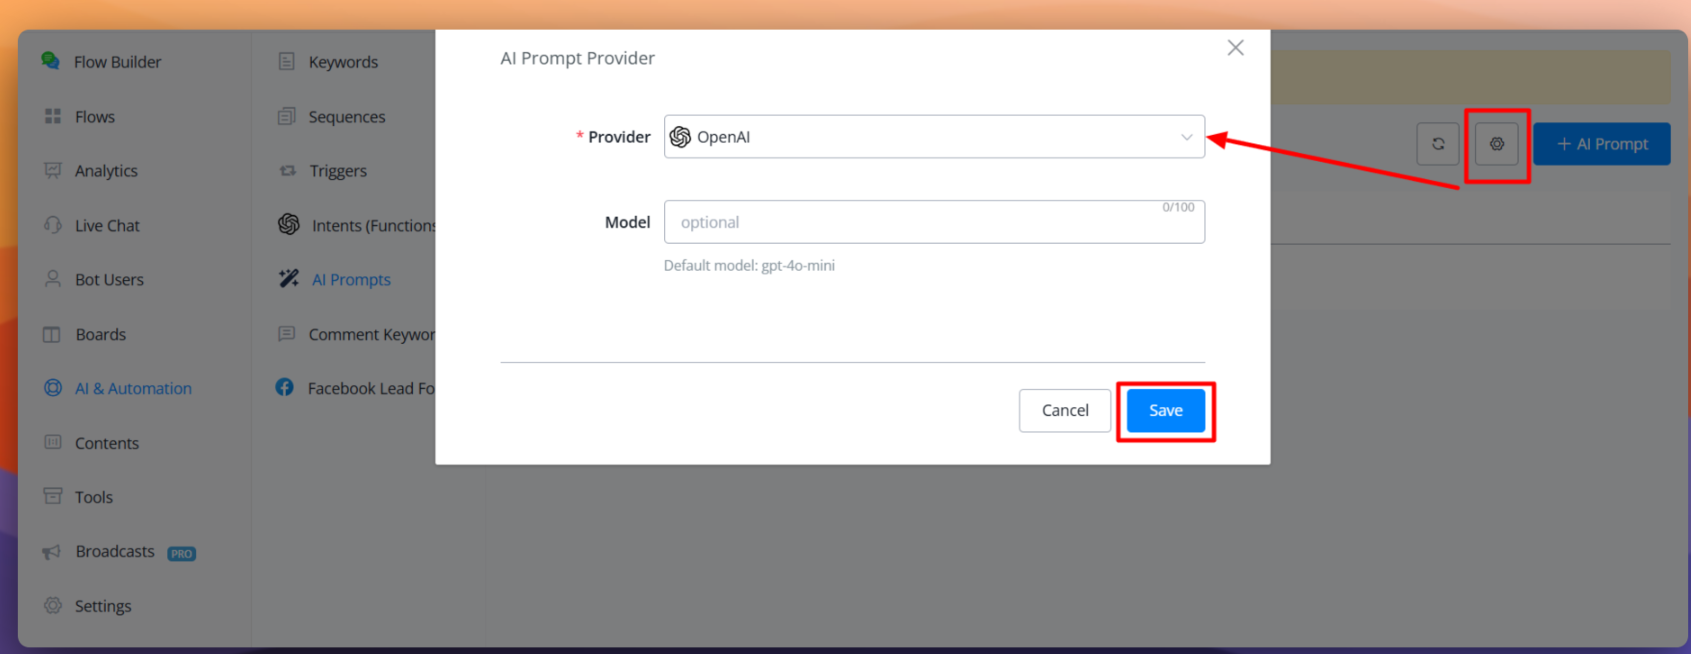
Select AI Provider
Click the gear icon to access the settings. Select your preferred AI provider and the relevant model:
- OpenAI
- Deep Seek
- X AI
- Gemini
- Claude
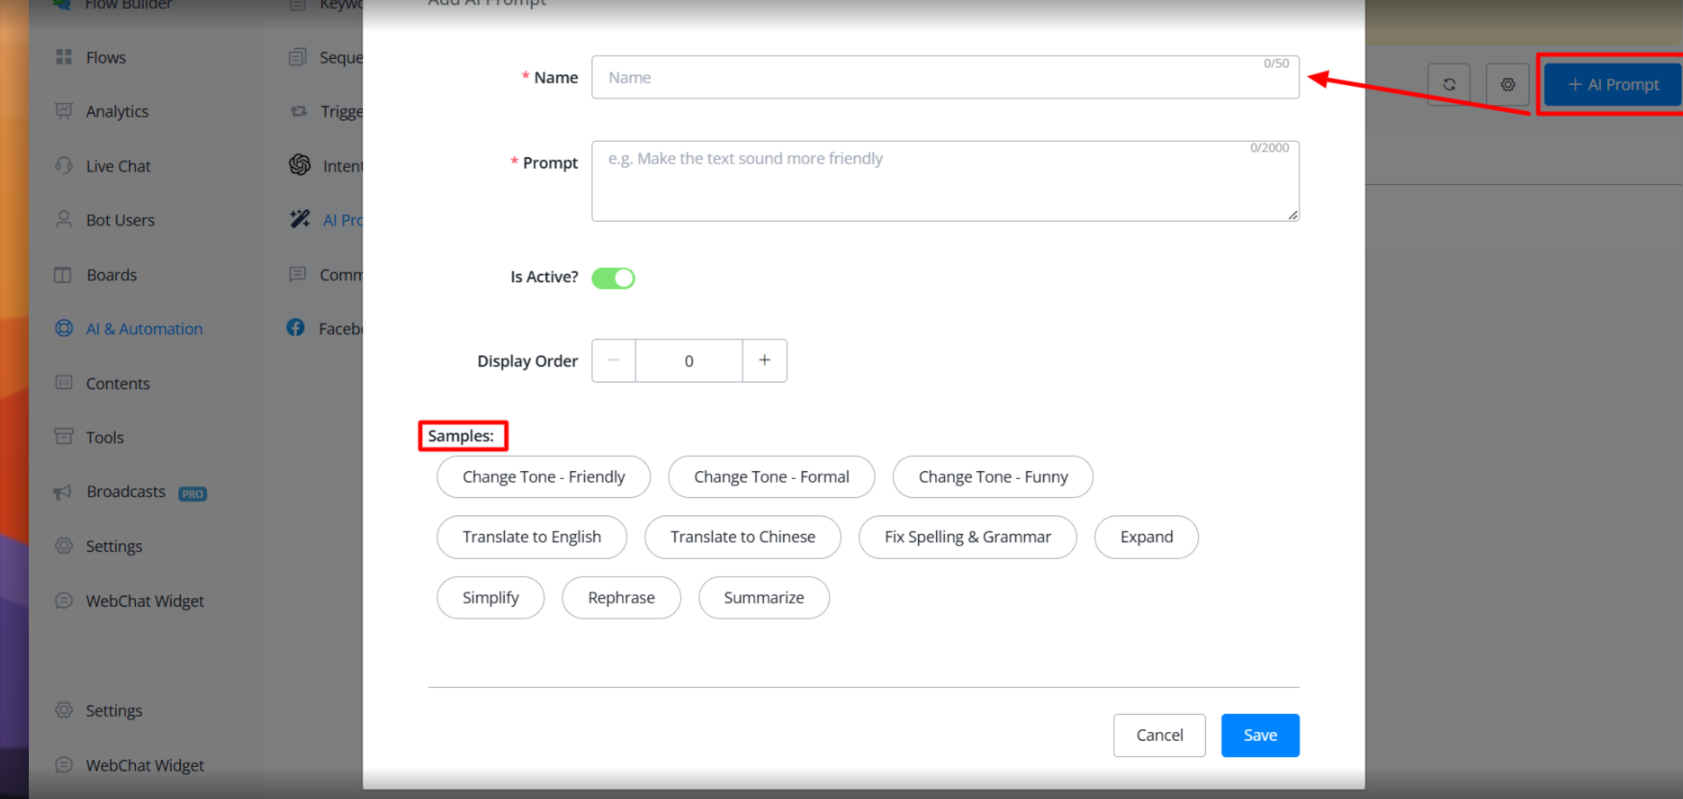
Creating New Prompts
To create a new prompt click the ”+ AI Prompt” button. Provide a name for your prompt and enter the prompt content then set the active status and adjust the display order as needed
We’ve included several pre-built samples for common scenarios:
- Tone adjustment (Friendly, Formal, Funny)
- Language translation (English, Chinese)
- Other customizable use cases
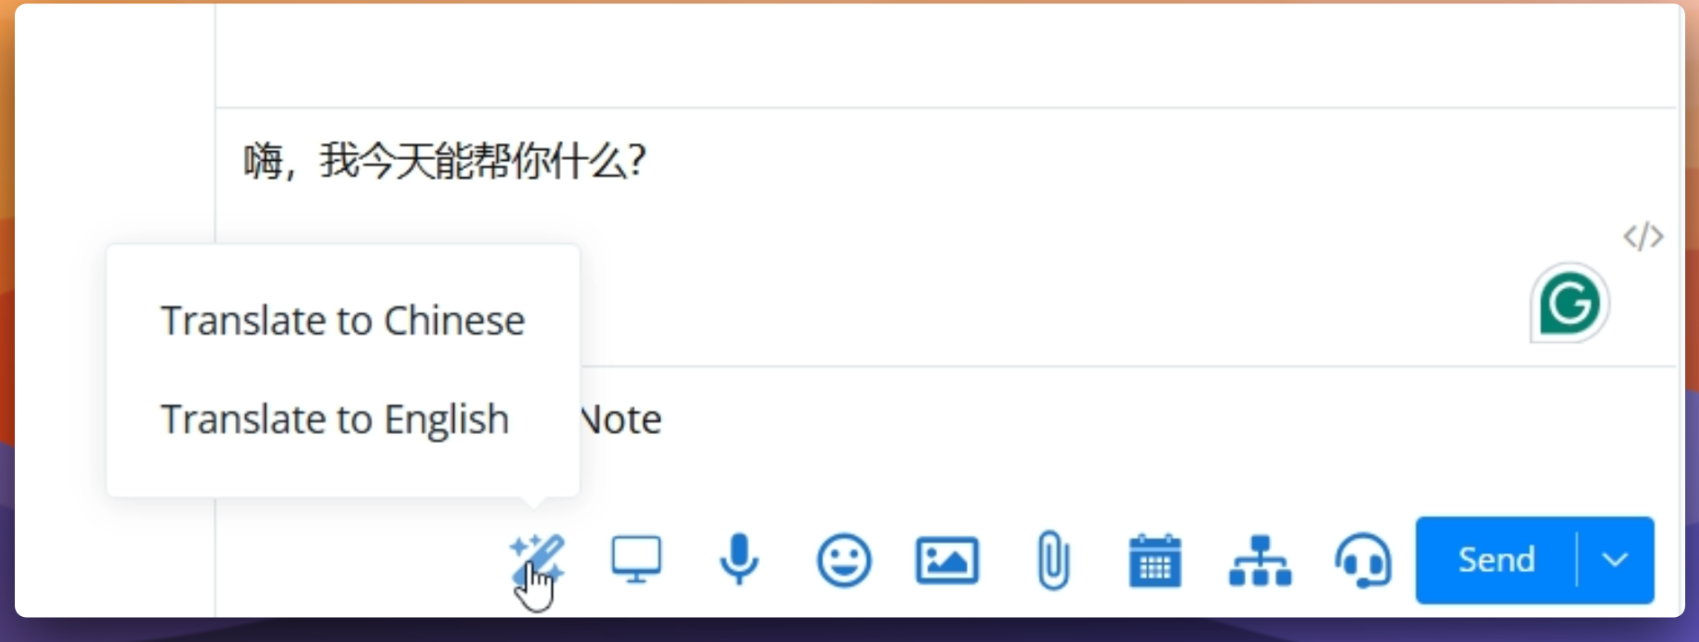
Using AI Prompts in Live Chat
Type your message in the chat window, hover over the AI prompt icon, select your desired prompt then wait a few seconds for the AI to process and you will receive the transformed text.
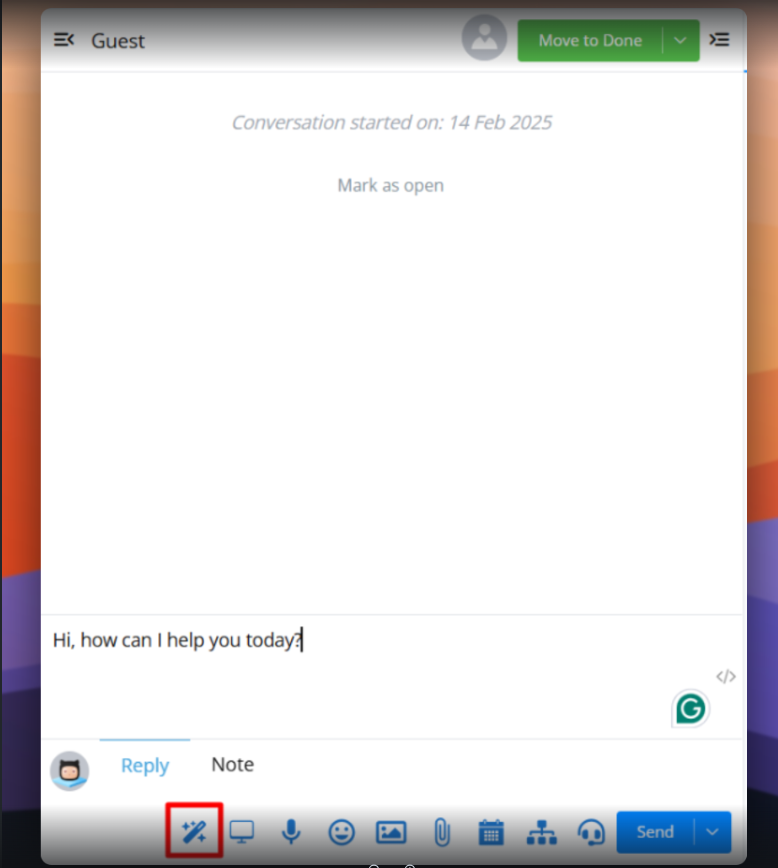
Example: Translating “Hi, how can I help you today?” to Chinese can be done with just a few clicks, eliminating the need to switch between tabs or use external translation tools.
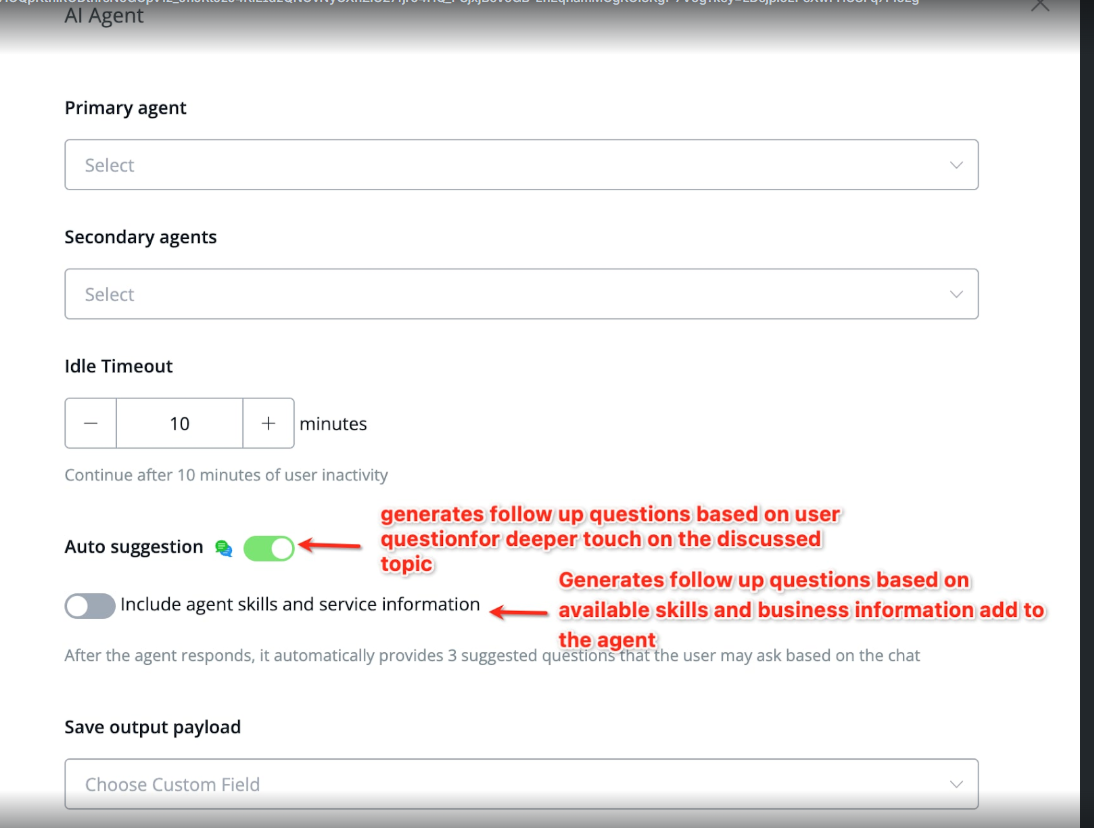
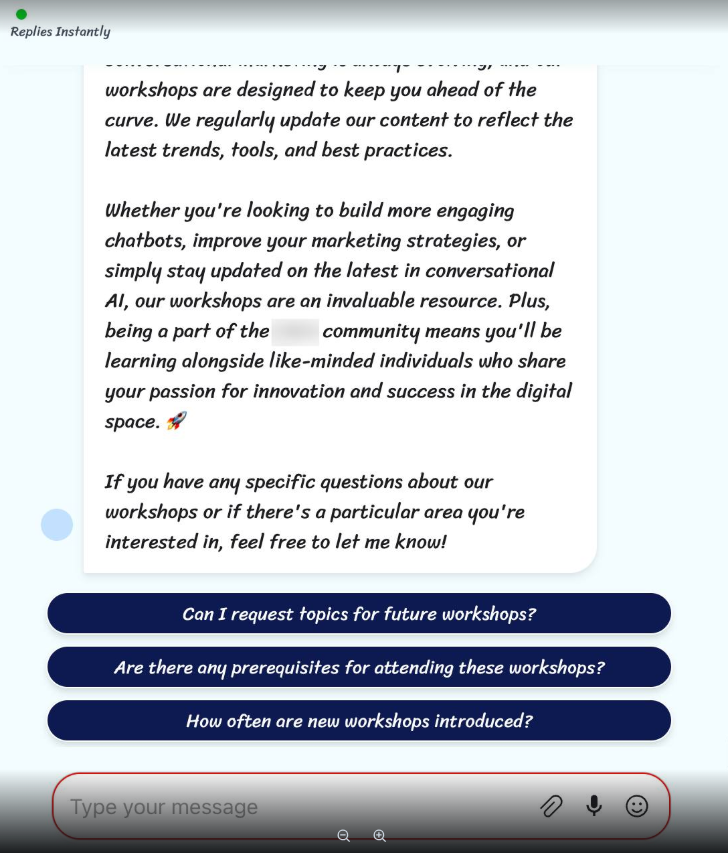
Auto Suggestions
The AI agent on the webchat channel now has the ability to suggest follow-up questions based on user interactions.
There are two settings available:
-
Auto suggestion
- Generates follow-up questions solely based on the user’s query.
- May not always include all relevant AI agent knowledge, as it focuses only on the user’s input.
-
Include Agent Skills & Service Information
- Enhances follow-up suggestions by incorporating the agent’s predefined skills and business-related data.
- Ensures that suggested questions align with the AI agent’s expertise and available business information.
Introduction to MCP Servers
MCP stands for Model Context Protocol, a new feature in the AI Hub that simplifies connecting AI to external tools—no need for complex API endpoint setups.
Key Benefits
- Simplifies integrations with platforms like Shopify, Stripe, Intercom, HubSpot, and more.
- Works with natural language queries.
- Enables access to external tools directly inside your model prompts.
- Cuts down setup time from hours to minutes.
Where To Find
On the left-hand menu, click on the AI Hub, and there you will see the MCP Servers
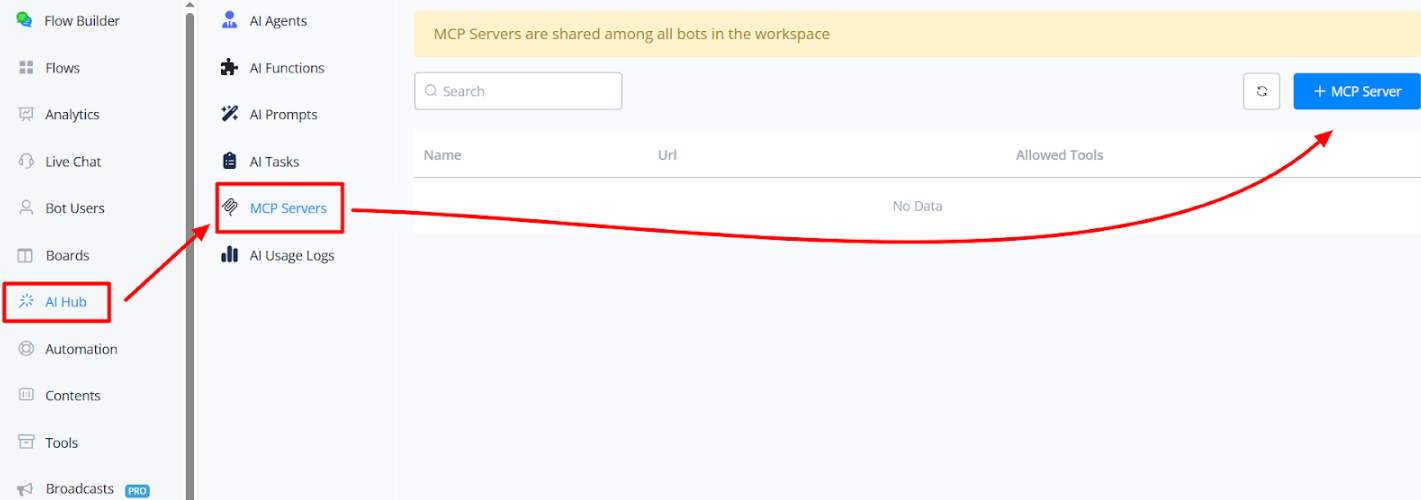
How to Integrate with MCP Server
- You can connect any custom MCP server, even self-hosted.
- You can connect with OpenAI, Anthropic, etc
- Follow the same process: Name > URL > Optional Auth >Select Tools > Save > Use in flows.
Example: Connecting Shopify
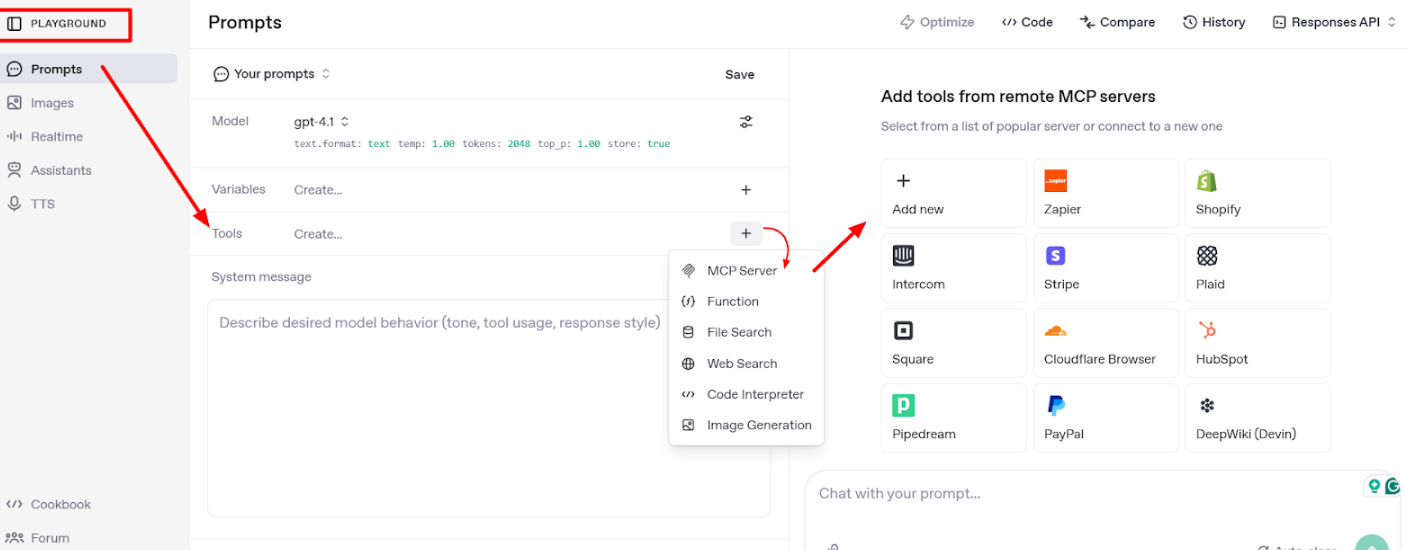
Step -1
- Navigate to OpenAI Playground → Tools → Add MCP Server.
From here, you can integrate various tools like Shopify, Stripe, Intercom, HubSpot, and more, then copy the generated URL for use in your integration
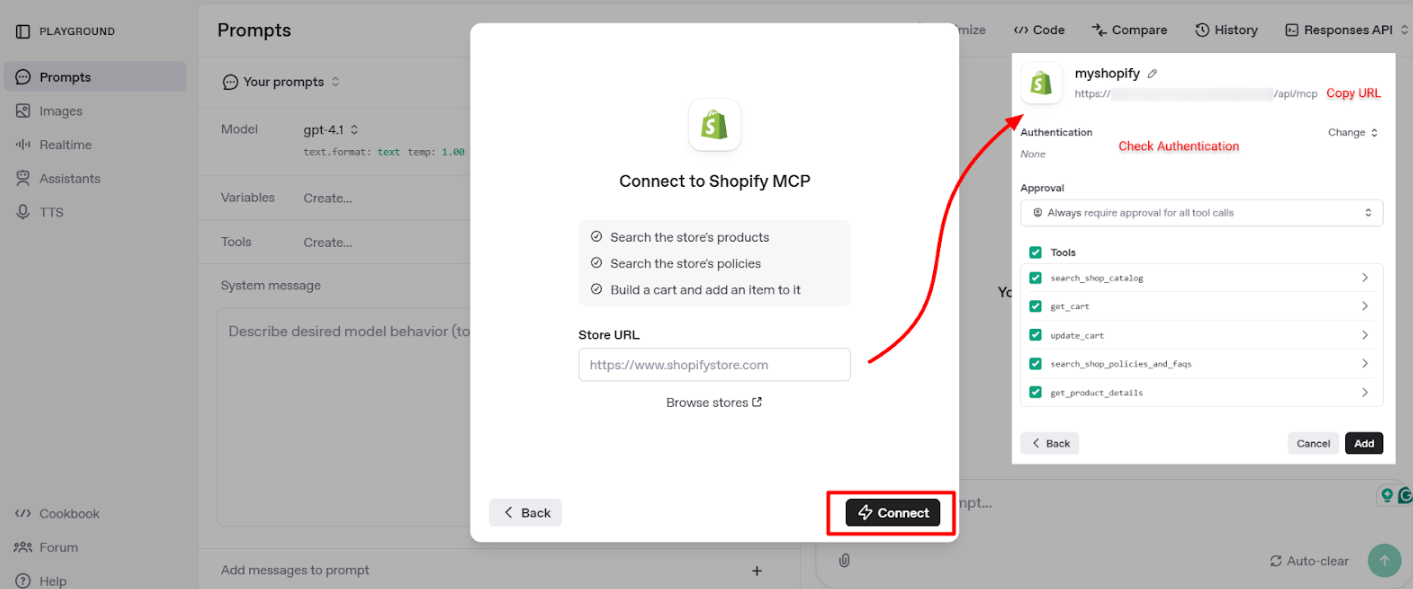
OpenAI Dashboard
Enter your store URL to generate the MCP server URL, view any required authentication, and see the list of available tools.
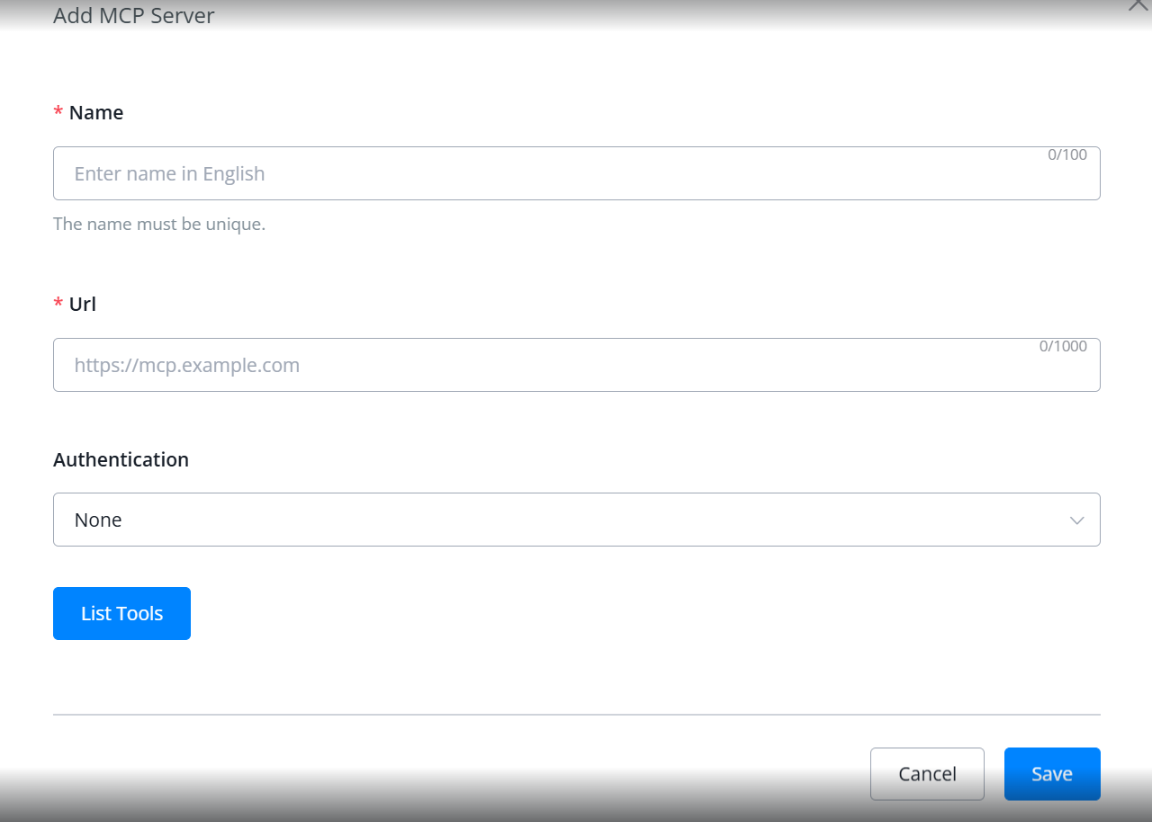
Step -2
Add A Server
To add a server, simply enter the name, URL, and any required authentication details.
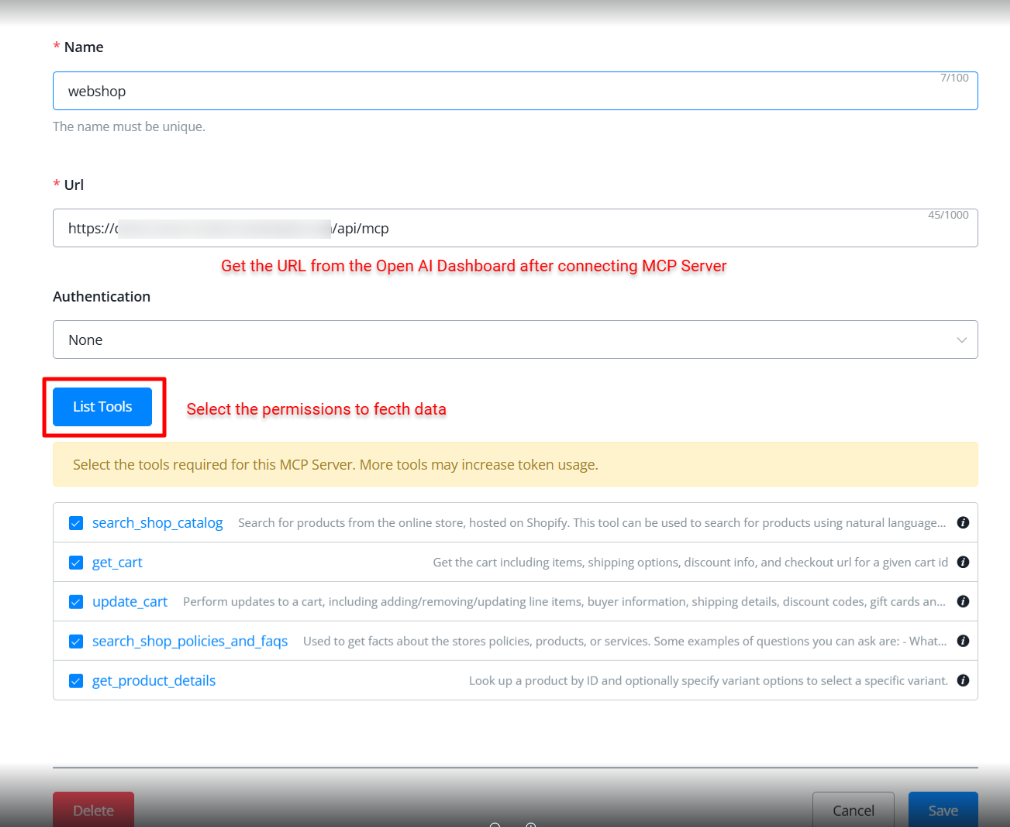
How to use inside Flow Builder
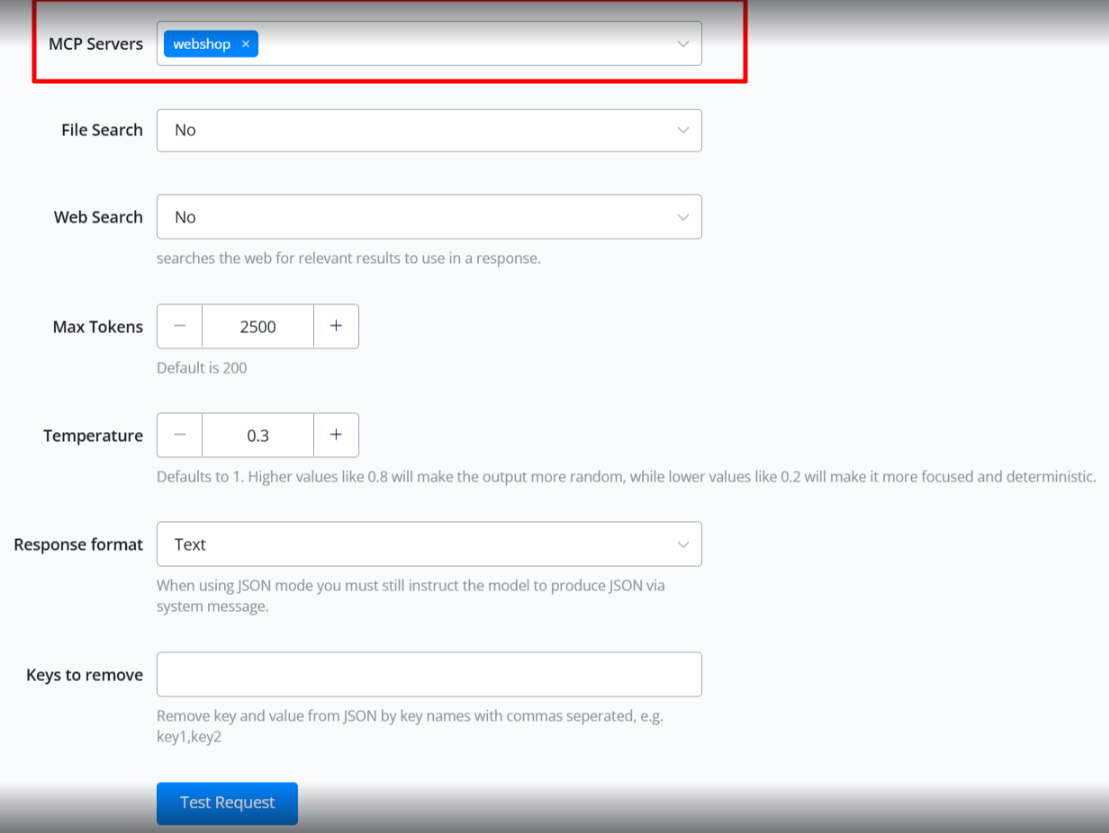
- Go to Flow Builder. → Add an Action block. → Under Integrations, select OpenAI.
- Choose “Create Model Response” → Update model to: GPT-4.1-Mini
- (Recommended due to better compatibility with MCP tools. Avoid GPT-4o-mini/4o)
- Select MCP Servers, set tokens, and temperature
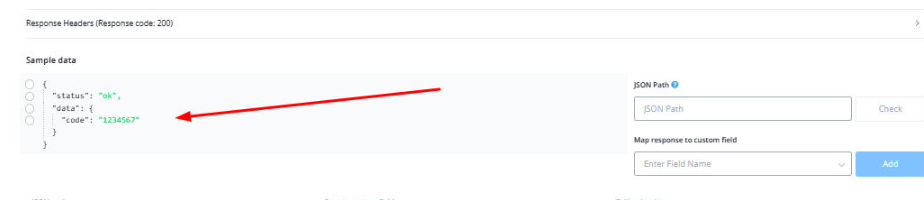
Sample Data
In the sample response, you’ll receive a data list. Identify and select the correct path, highlighted in the example, as it leads to the desired results. Extract the data from that path and store it in a variable.
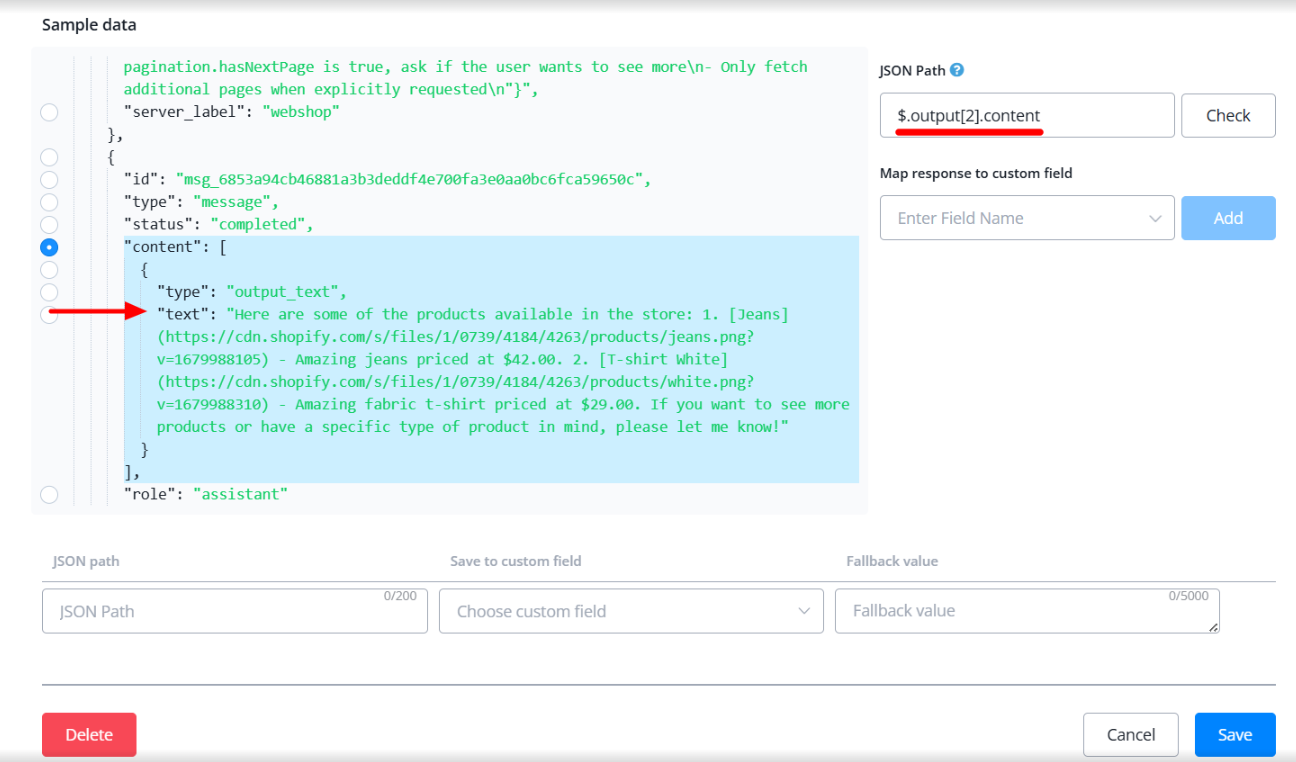
Beginner and advanced users can both benefit. Users can also host their own MCP servers for custom integrations.
Use cases are endless: CRM, billing, search, data lookup, and beyond.
AI Agents with Web-Search, MCP Servers, and Knowledge Base
Overview
AI Agents introduces major improvements that make it easier to build more powerful and reliable agents. With native support for AI Knowledge Base, MCP servers, and Web Search, you no longer need complicated workarounds or manual functions.
1. Setting Up the AI Knowledge Base
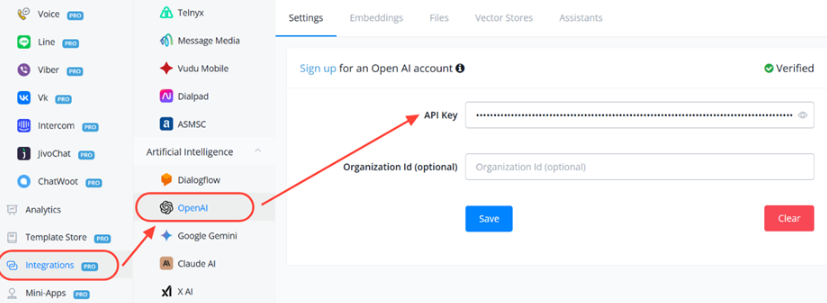
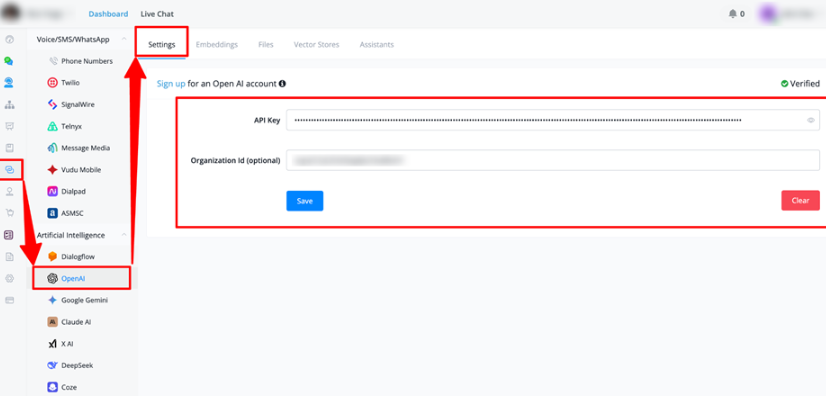
Enable OpenAI Provider
Make sure the OpenAI provider is connected in your workspace. This is required to create and connect vector stores and files. Go to Integrations > OpenAI
-
Preparing Files for Vector Stores
Files must have valid extensions:
.pdf,.xls,.doc, etc. Without proper extensions, the system cannot read or index them. Invalid files will cause errors or be rejected. You can upload the Files from your computer or enter the file URL.
-
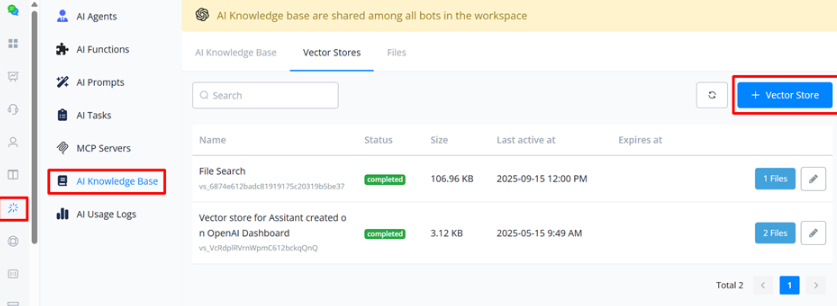
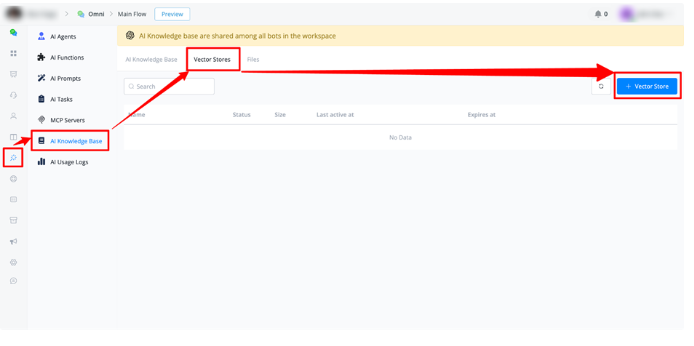
Creating a Vector Store
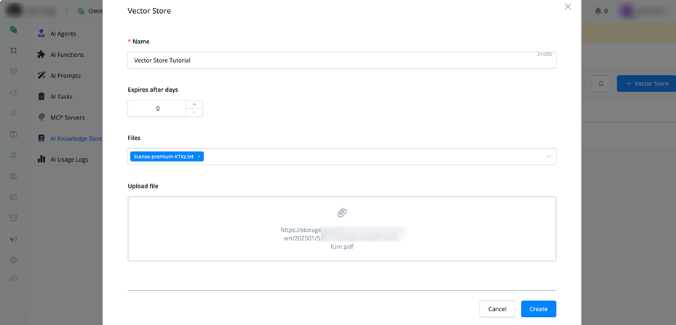
Go to the Vector Store section. Create a Vector store and assign a name and set an expiry date (optional, for temporary stores, 0 for no expiry date).
Select the files you have already uploaded in the File section.
-
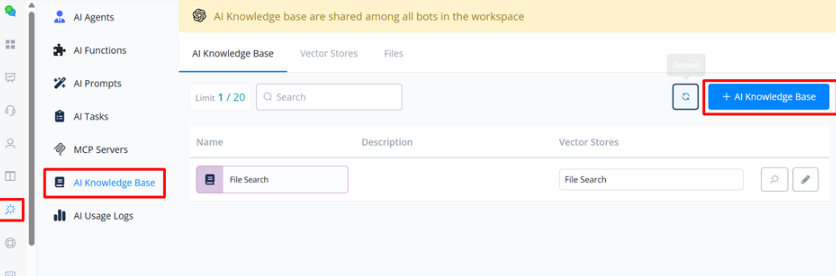
Building the Knowledge Base
After creating a vector store, create a Knowledge Base. Enter the name, description (optional), and select the associated Vector Stores. Once this is created, you can access it for the AI Agents
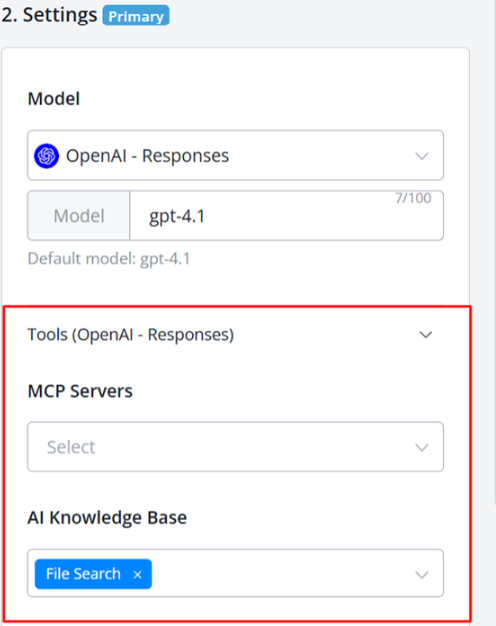
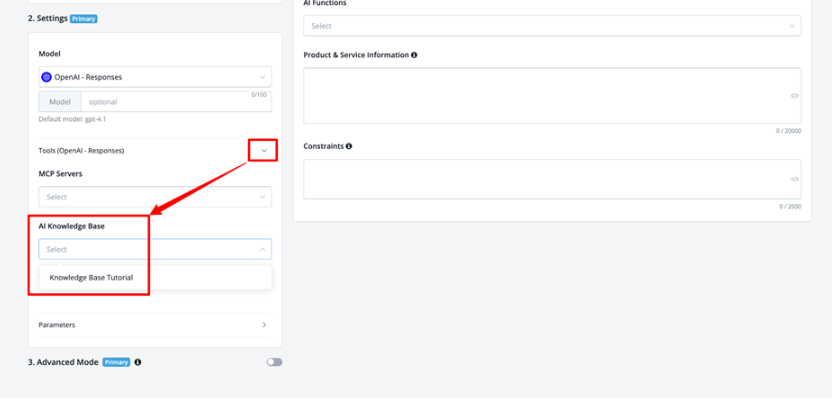
2. Setting Up OpenAI Responses Model Inside an AI Agent
-
Setting It Up
Inside an AI Agent, go to Settings → Models. Select OpenAI - Responses. Choose the desired model. Default is gpt-4.1
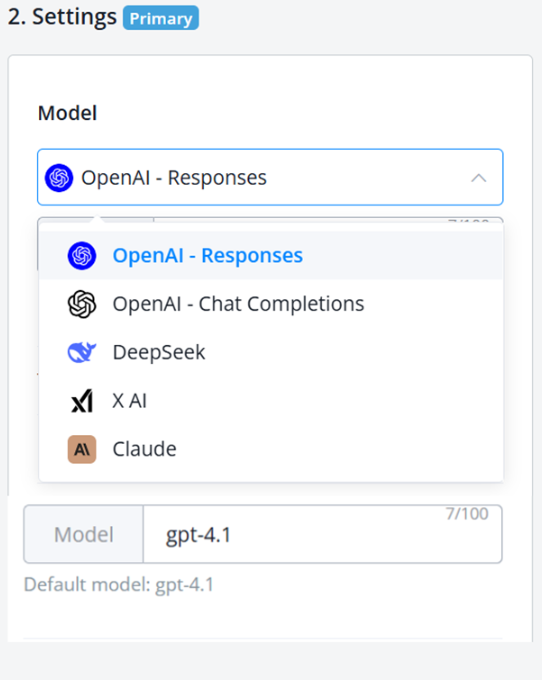
- Using Tools with OpenAI Responses
You can now directly connect to the MCP Servers & Knowledge Base to the AI Agent. There is no need to trigger separate AI functions or actions related to them. This will reduce errors and complexity.
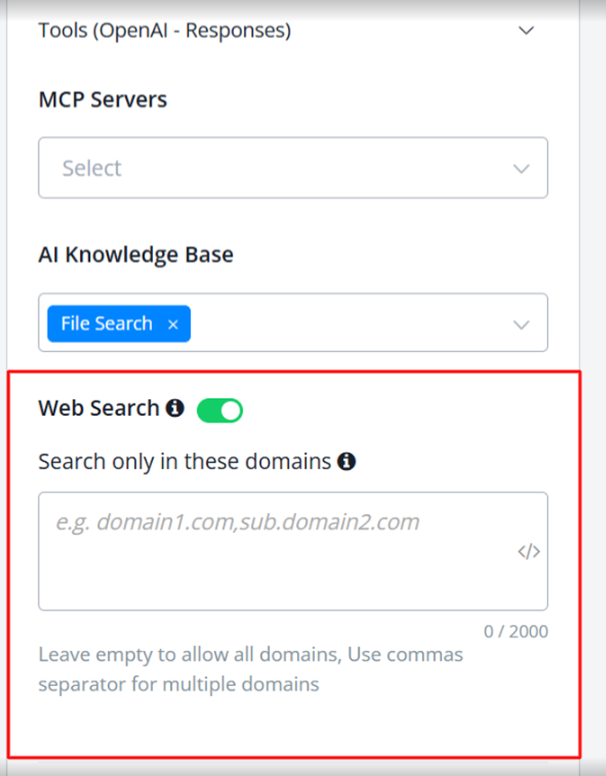
- Web Search Integration
Enabling Web Search allows you to search from the website directly inside the AI Agent. It’s useful if you don’t have MCP servers or a knowledge base. AI agents can fetch answers directly from the web.
- Restricting Domains
- Format:
domain.com, sub.domain.com(comma separated). - Exclude
https://orhttp://. - Example:
google.com, app.google.com
- Format:
Limitations by Model For Web Search
- GPT-4.1-mini and GPT-4.1-nano: Web search is supported, but domain restriction is not supported.
- GPT-4.1 (default model): Web search with domain restriction supported.
Notes on GPT-5 Usage (Not Recommended)
- GPT-5 performs deep reasoning, leading to slower response times and increased timeout errors.
- Requires more tokens due to extended reasoning. Recommended minimum 2,000 tokens per reply. Note: Higher token usage = higher cost.
- Use GPT-5 only for advanced reasoning tasks. Keep simpler tasks on lighter models for efficiency
AI Hub - Knowledge Base
A Knowledge Base in Messagingme.app is a centralized repository of information that enables AI agents and automation flows to access your business-specific data to provide more accurate and contextualized responses to users.
Knowledge Base Structure
A Knowledge Base consists of two main components:
- Vector Store: The main container that groups and organizes multiple related files
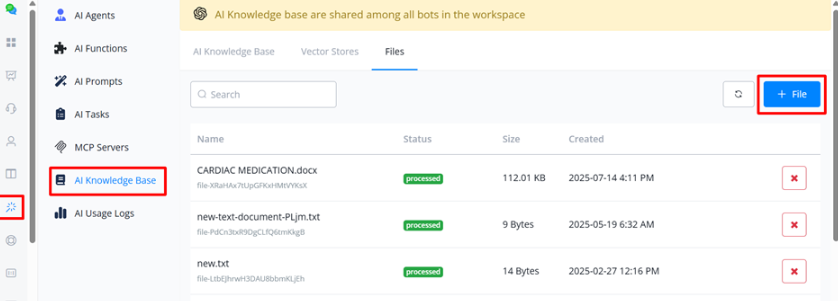
- Files: Individual documents containing your business information (PDFs, text documents, etc.)
Important: Knowledge Bases are shared among all bots in the workspace, enabling efficient information reuse.
How to Create a Knowledge Base
Prerequisites
- Connect your OpenAI API Key at:
Workspace → Integrations → Artificial Intelligence → OpenAI
Step-by-Step Guide
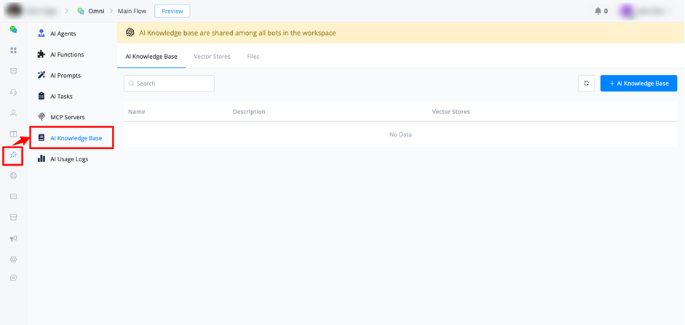
- Access AI Hub
- Enter any chatbot
- Navigate to AI Hub → Knowledge Base
- Create a Vector Store
- Click “Create New Vector Store”
- Setting Up the Vector Store
- Define a name (e.g., “Business Info”)
- Set expiration (optional - 0 = no expiration)
- Upload files directly or select existing files
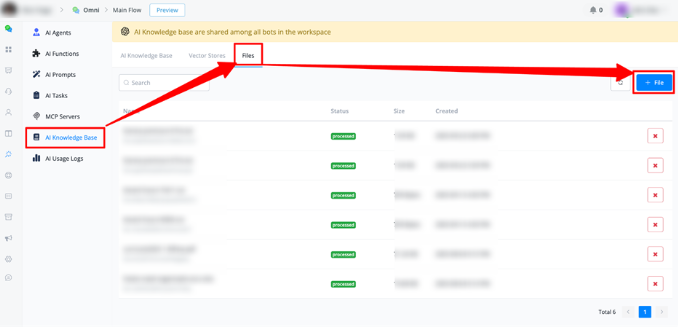
- Add Files
- Click “Files” to add more files
- Create the Knowledge Base
- Click the ”+” button
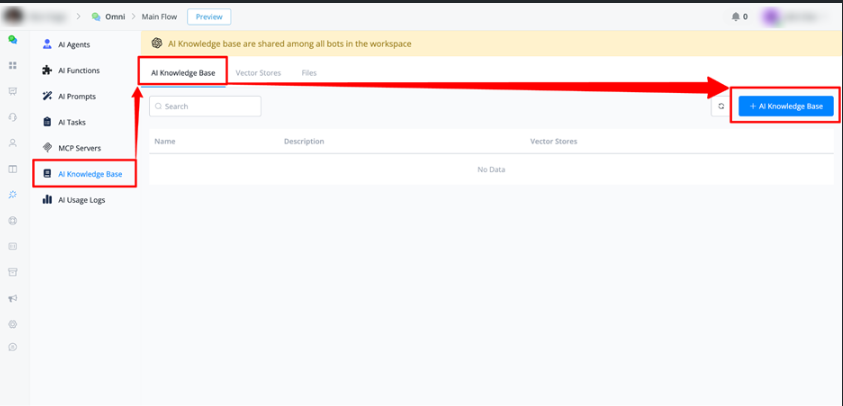
- Name your Knowledge Base
- Add description (optional)
- Select the created Vector Store
- Save settings

Where to Use Knowledge Base
1. AI Agents
Location: AI Hub → AI Agents
→ Model Responses → OpenAI Responses
Configuration:
- Enable “Knowledge Base” option
- Select desired Knowledge Base from dropdown
- AI Agent will automatically query these files to answer user question
How it Works: Whenever the AI Agent needs references to create responses about your business, it will automatically access the files in the selected Knowledge Base.
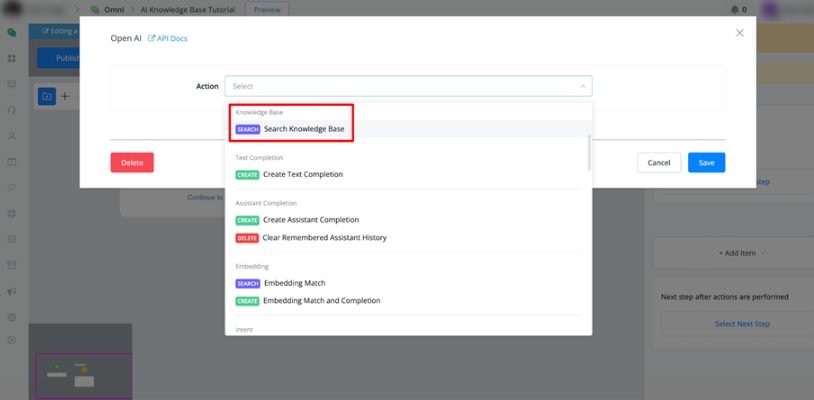
2. Flow Builder
Location: Flow Builder → Actions → Integrations → OpenAI
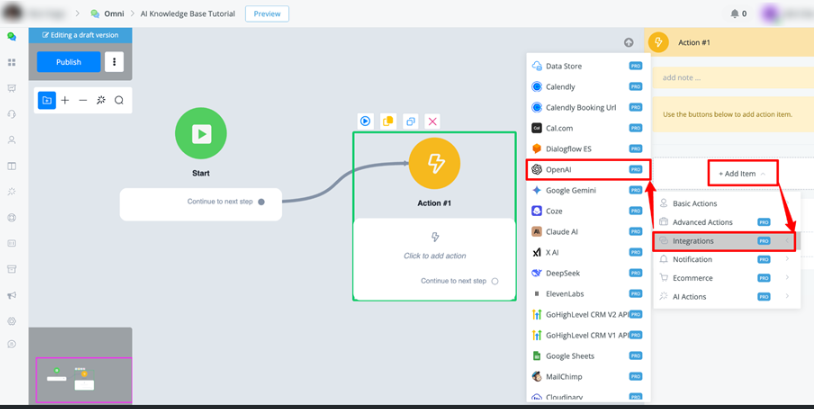
→ Search Knowledge Base
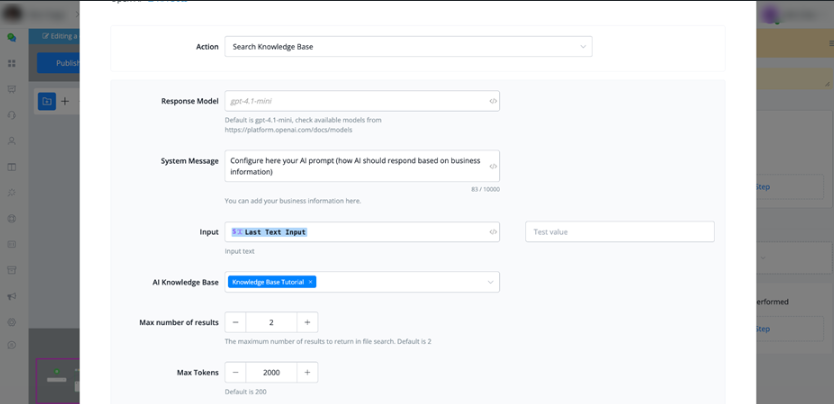
Available Settings:
- Model Response: Select the response model
- System Message: Configure AI prompt (how AI should respond based on business information)
- User Input: Usually uses the last user text input
- Knowledge Base: Select the knowledge base
- Max Number of Results: Number of results returned (default: 2)
- Max Tokens: Minimum 1,000 tokens recommended for complete responses
- Remove Key Values: Option to remove specific parameters from payload (useful to stay within 20,000 character limit for JSON fields)
Advantages of Creating a Knowledge Base
1. Accurate and Consistent Responses
- AI provides exact information about your business, products, and services
- Eliminates generic or inaccurate responses
- Maintains consistency in shared information
2. Centralized Management
- Update information in one place
- Changes automatically reflect across all workspace bots
- Simplifies maintenance and version control
3. Time Savings
- Eliminates need to train each bot individually
- Efficient content reuse across multiple bots
- Reduces setup time for new agents
4. Scalability
- Easily add new files as your business grows
- Organize information in different Vector Stores by category
- Support for multiple knowledge bases for different contexts
5. Enhanced User Experience
- More relevant and detailed responses
- Reduction in unanswered questions
- More efficient and personalized support
6. Integration Flexibility
- Use in AI Agents for automatic responses
- Integrate into complex flows in Flow Builder
- Combine with other actions and integrations
Best Practices
- File Organization
- Keep related files in the same Vector Store
- Use descriptive names for easy identification
- Regularly update information
- Token Configuration
- For Knowledge Base searches, use minimum 1,000 tokens
- Adjust according to response complexity needs
- Monitoring
- Check file processing status
- Use “Sync” to refresh view after changes
- Test responses after configuration