Automation
Keywords
With “Keyword”, your users can easily jump to sub flows by typing in keywords rather than being lost in menus or buttons.
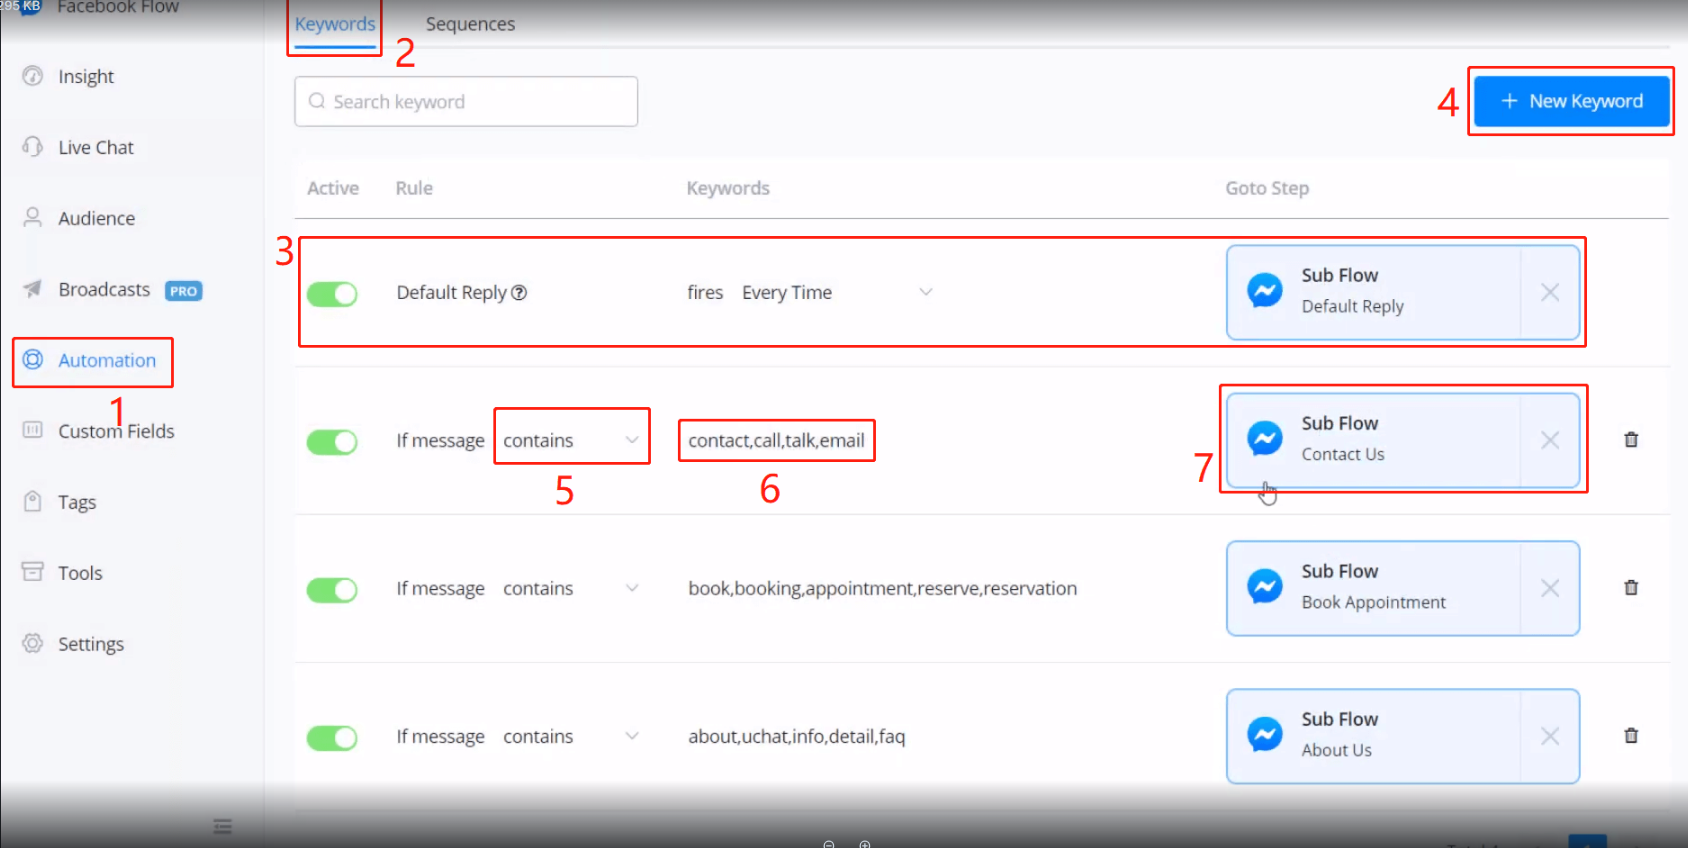
- go “Automation” from the sidebar
- click “Keywords”
- for “default reply”, see explaination below
- click ”+ New Keyword”
- choose a condition from “is”, “contains” or “starts with”
- put one or more than one keyword, separated by only commas, no space allowed
- choose a sub flow to send
Default Reply
“Default Reply” is sent when the bot doesn’t know what to reply. When the active button is off or no sub flow was chosen for “Default Reply”, the main flow will be sent.
💡 TIP - So when you build and test flows, you can reply anything to quickly re-start the conversation.
You can also adjust the frequency to send “Default Reply”. Its default value is set to fire “Every Time”.
Advanced Default Reply
- Want to have a smarter bot?
- Want to reply a sentence rather than a sub flow?
- Want your bot to understand more human languages rather than just keywords?
Sequences
Use sequences to automatically send follow up / delay messages to customers. You can send multiple messages with different delays.
Create Sequence

Follow steps 1 to 3 and you will see this:
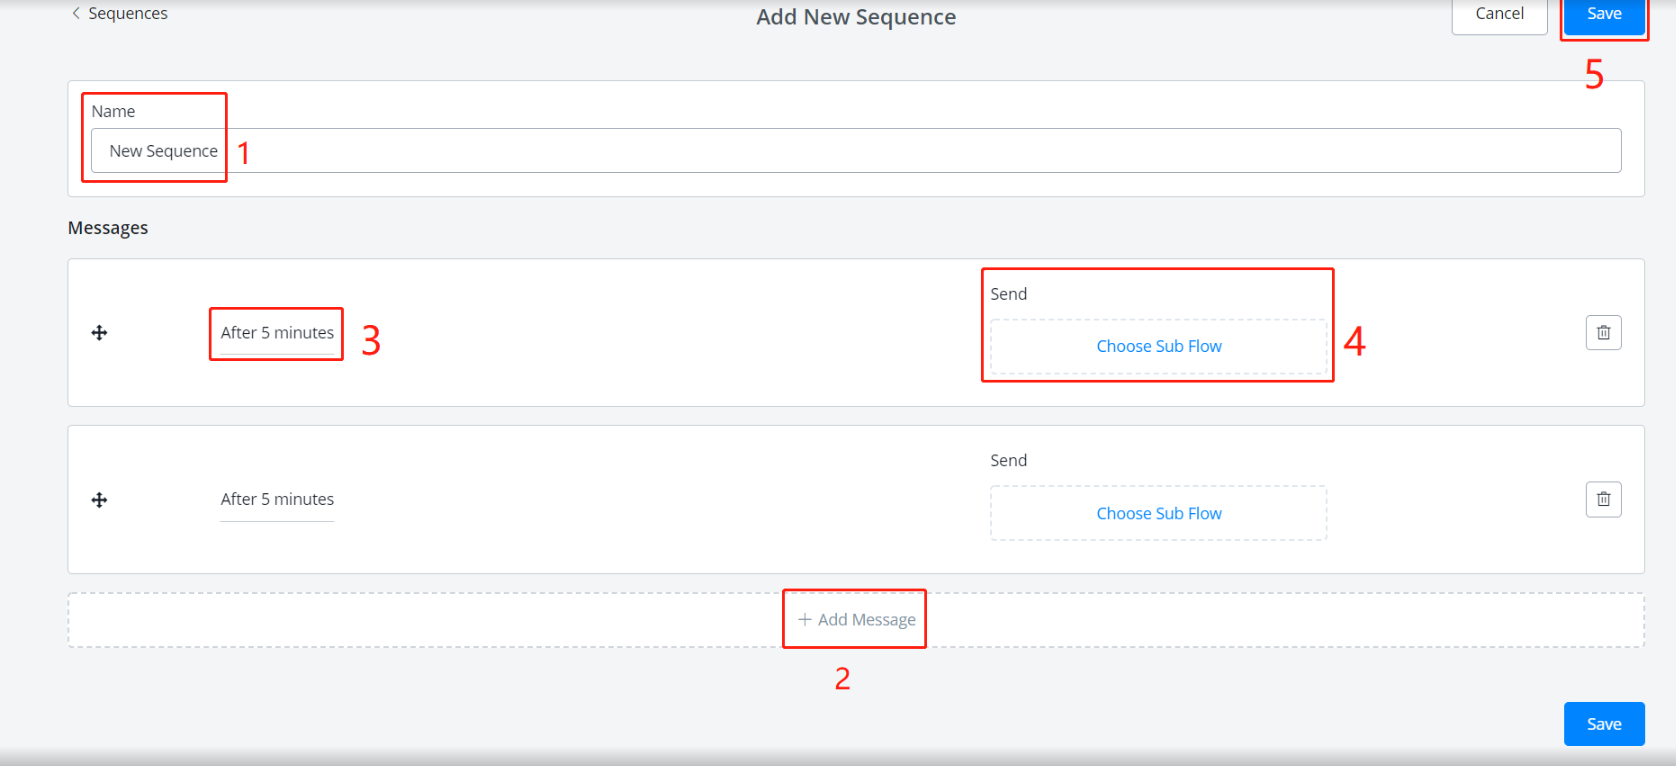
5 steps to create a sequence:
- give a sequence name
- click “Add Message”
- edit the settings (see Message Settings below)
- choose the sub flow to send
- repeat steps 2-4 to add more messages then click “Save”
Message Settings
This is how does the setting window look like:
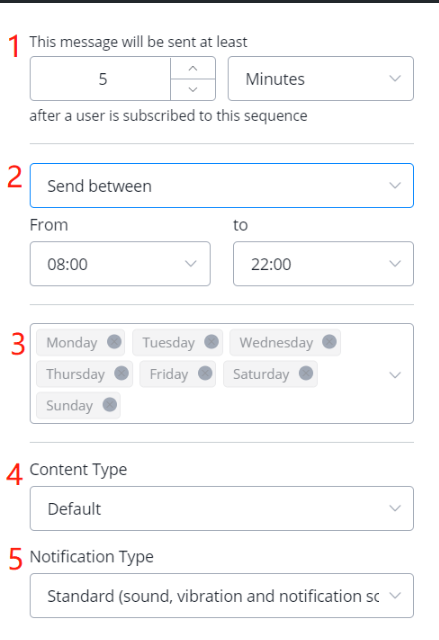
1. The countdown to send the message
- Messages are sent by order.
- For the first message, the countdown begins when users subscribed to the sequence.
- For other messages, the countdown begins when the previous message is sent.
2. Send anytime or between a time range
- For “send anytime”, the message will be sent immediately at the end of the countdown.
- For “send between”, if the countdown ends outside the time range, the message will be kept until the next available time.
- Remember to check the timezone issue below.
e.g. You don’t want to bother users at night so you set a message to send between 9 am and 6 pm. If there is a message that should be sent at 8 pm, the system will hold the message until 9 am tomorrow.
This can affect the next message because the countdown of the next message begins when the previous one is sent.
3. Send on which days of the week
- Similarly, if you don’t want to bother users at weekend, deselect Saturday and Sunday. See the example in the “send between” above.
- Remember to check the timezone issue below.
4. Choose corresponding content type (IMPORTANT)
- See “Content Type” introduction below.
- If you are not sure about which type you should use, keep it default. Although the message might not be sent due to the 24 hours rule, the system will at least help you avoid being banned by Facebook.
5. Pick a notification type
About Timezone
If a channel has a timezone in the user’s profile like Facebook, when the system check “send between time range” and “send on Monday to Sunday” settings, it’s based on users’ timezone first. If the user doesn’t have a timezone or the channel doesn’t support timezone in user profiles, then it’s based on the timezone of your workspace.
Content Type
Any message sent over 24 hours after a subscriber’s last interaction must have a content type that matches its purpose (in accordance with Facebook Policy- Message Tags
Messages with type “Other” or without a content type will NOT be delivered to subscribers who interacted with you via Messenger more than 24 hours ago.
Note - Sending messages that do not match the assigned content type may result in your page being suspended or banned by Facebook.
Default / Other
Can contain promotions and it will only send to users who interacted with your bot in the last 24 hours.
Confirmed Event Update
Send the user reminders or updates for an event they have registered for (e.g., RSVP’ed, purchased tickets). This tag may be used for upcoming events and events in progress.
Post Purchased Update
Notify the user of an update on a recent purchase such as confirmation of transactions(invoice, receipt) and notifications of shipment status(product in-transit, shipped, delivered, delayed).
Account Update
Notify the user of a non-recurring change to their application or account.
Send Multiple Messages
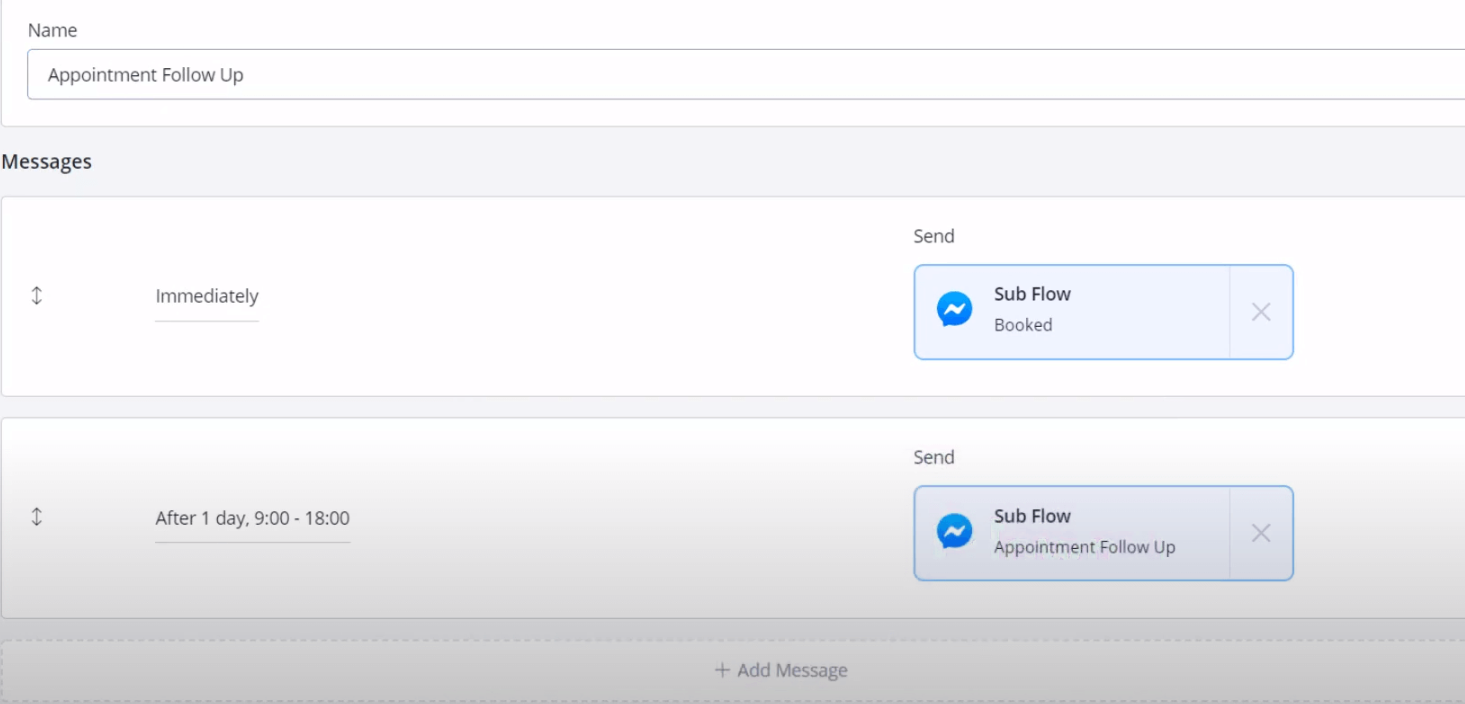
When you send more than 1 message in your sequence, note that all the messages are sent in order.
In the above screenshot, for example, the “Booked” sub flow will be sent “Immediately” once the user subscribes to this “Appointment Follow Up” sequence. Because the first message begins the count down once the user subscribes.
The next message begins the count down once the previous is sent. Thus, the “Appointment Follow Up” sub flow will be sent 1 day after the “Booked” sub flow is sent.
Send Sub Flow
Make some sub flows to send specifically for your sequences. Please note that each Send Message step has its own “Message Tag”. The tag is set to “Other” by default.
Let’s say, now it is over 24 hours since the user last interacted with your bot. You choose a non-default content type for a message in your sequence. This setting automatically changes the message tag of the first Send Message step in the sub flow you send.
Later, if the user responds, you are then able to send messages normally with the “default” content type. So, usually, you won’t need to change any message tag in your sub flow.
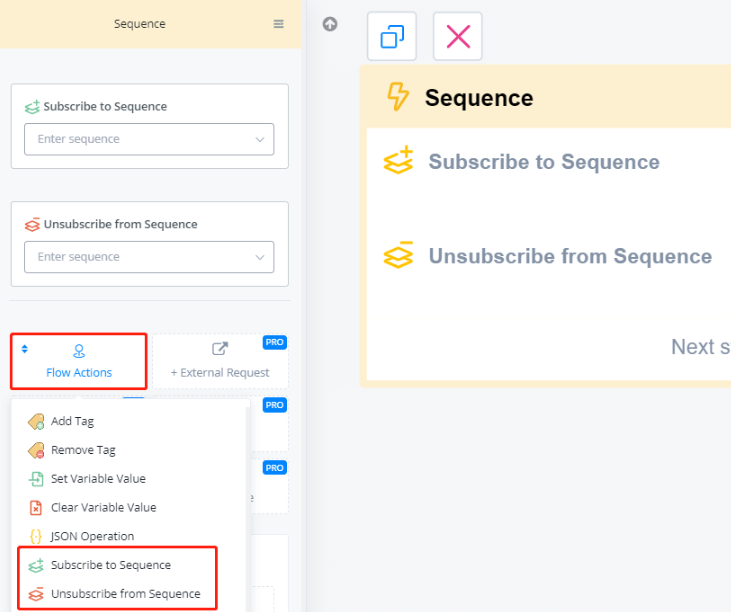
Subscribe / Unsubscribe Sequence
Go “Flow Actions”, and you can find the 2 sequence operations.
There are a couple of examples to use sequence, such as
- “Event Follow Up” - send confirm message immediately once user registers and follow-up message as reminder or helper
- “Get Feedback” - ask for feedback like 2 hours after the user talked to your bot
- “Send Coupon” - send coupons when user put something in the cart but doesn’t make an order for a long time
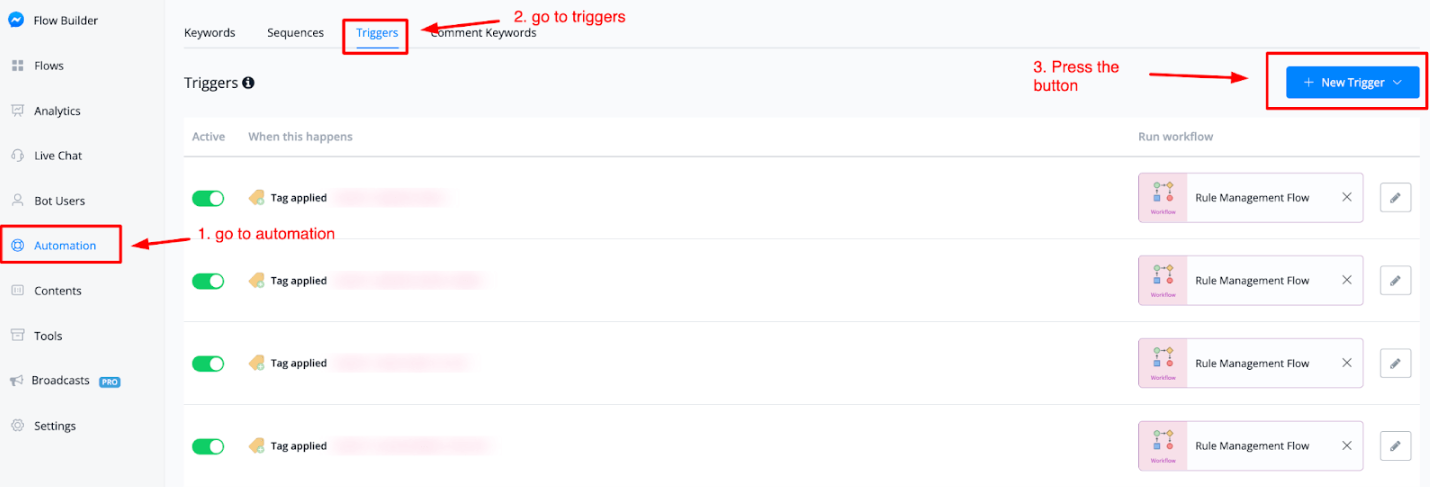
Triggers
Triggers can help you automate certain processes in the chatbot. For example, when a user has opted-in for email you might want to sync this data with a CRM or Google Sheet.
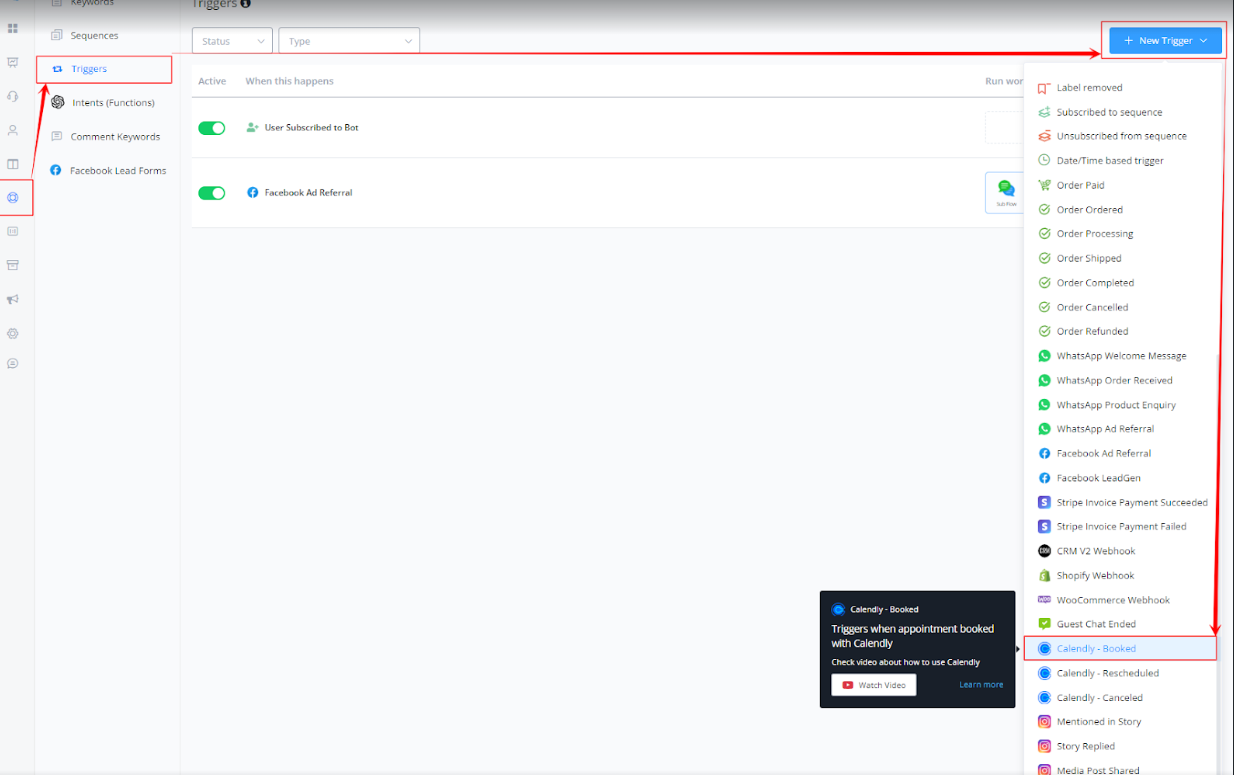
To get to the trigger section you need to go to the left-hand menu and select Automation then choose Triggers. From here you will be able to create a new trigger by pressing the blue button on the top right named + New trigger.
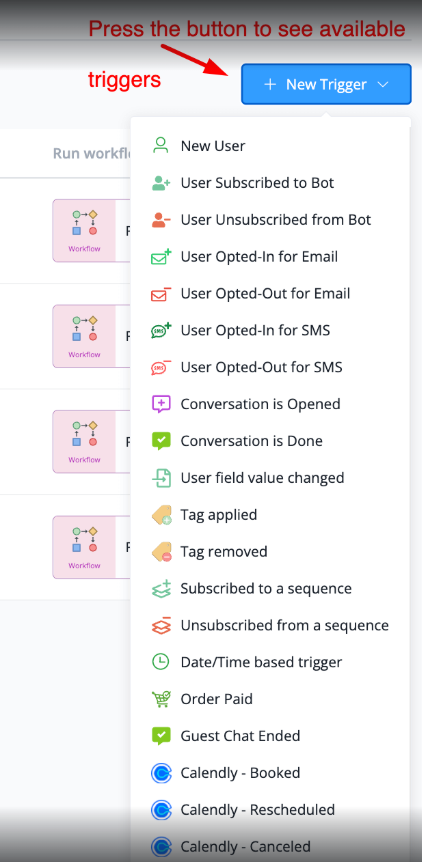
Once pressed you will get to see the available triggers you can choose from;
How to create a new trigger
Let’s take an example of a trigger when someone pays for order inside your chatbot. Press the blue button + New trigger then select the trigger named as such: Order Paid
From here a new pop-up window will open where you can set up the details of your trigger.

You will be able to enable or disable the trigger, set up a condition if you need the bot user to match a certain filter before the trigger is activated, and you can add a note that will explain more about this trigger.
Great if you are working with a team or creating a template and need to clarify things.
Once done press the bottom right button named Save and you are now halfway done setting up your trigger.
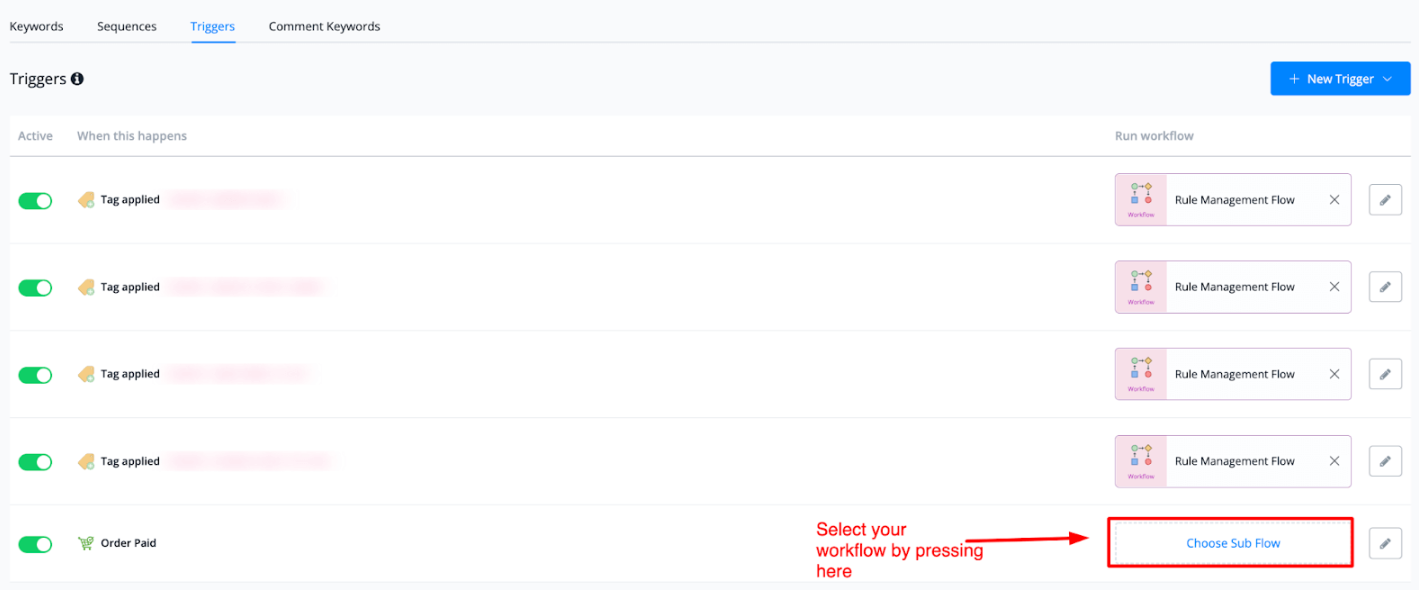
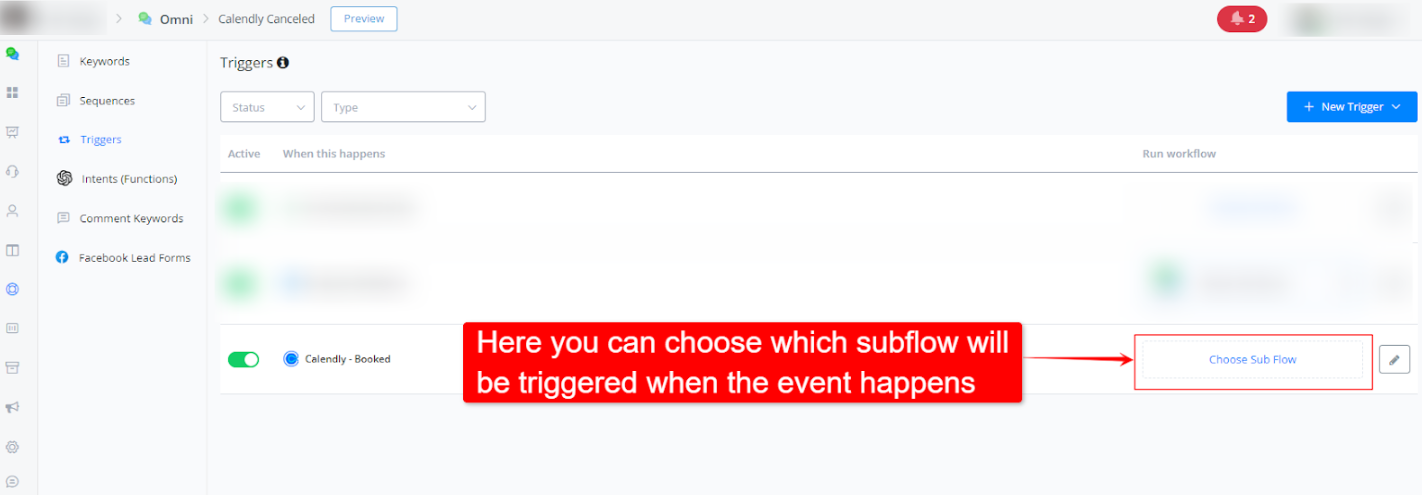
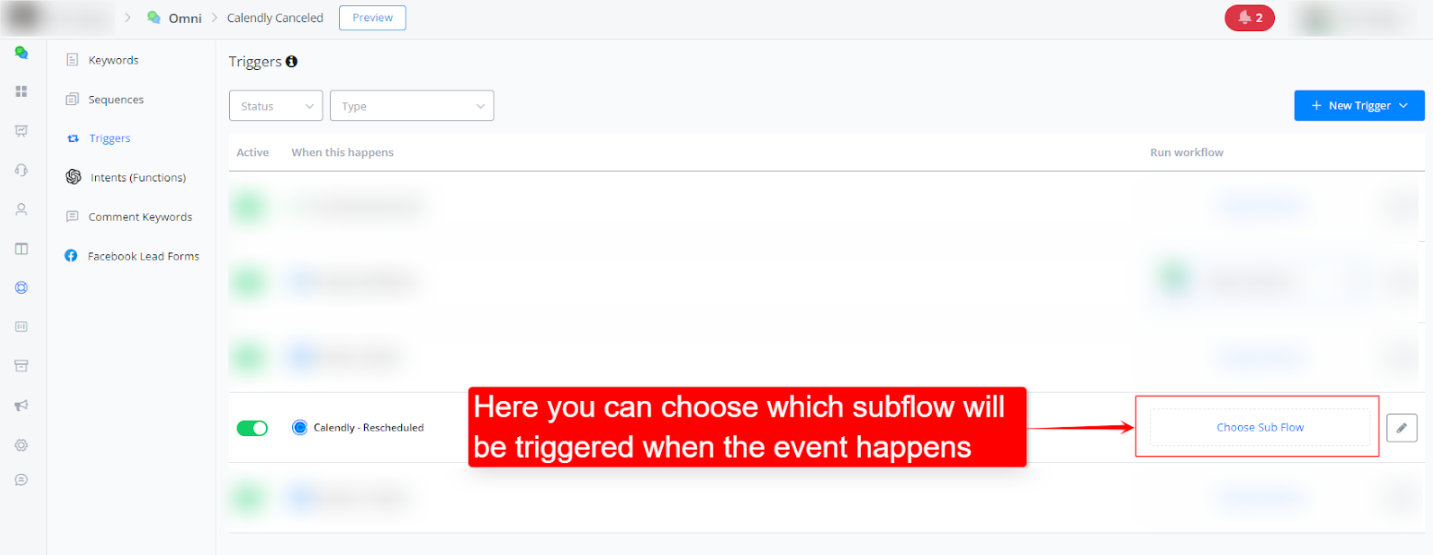
Selecting your Sub Flow
Now that the trigger has been created we will be needing to add an action to it. You can do this by pressing the Choose Sub Flow space to the right of that trigger.
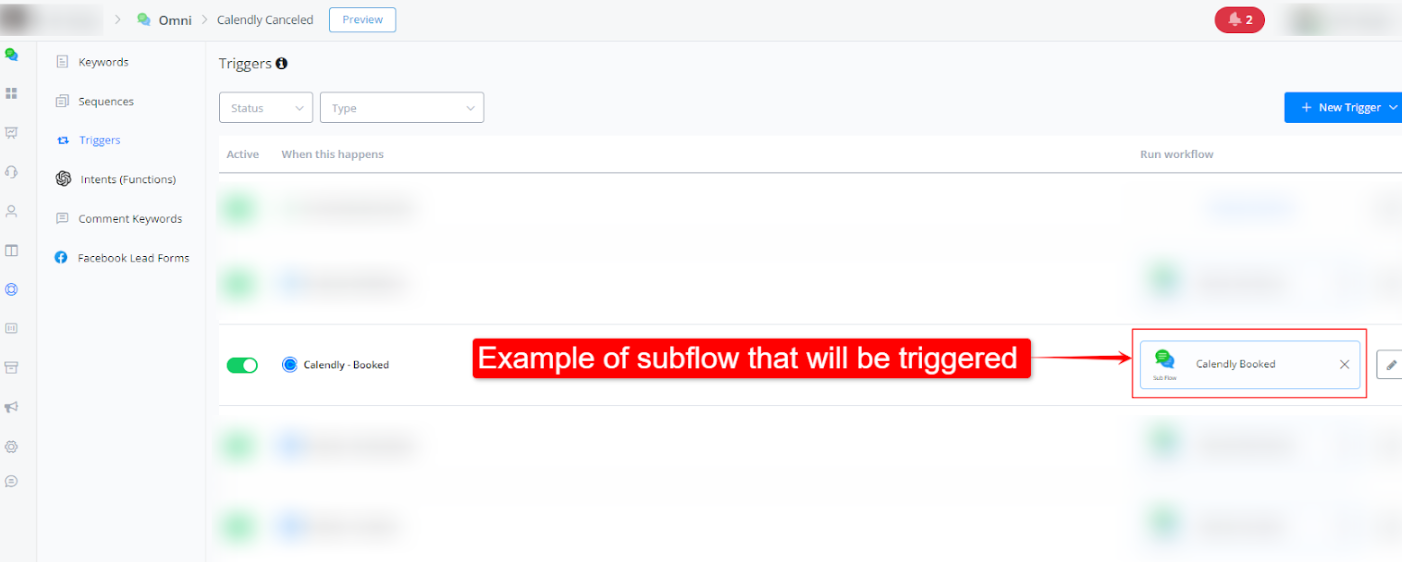
Once done it will open up a pop-up window for you where you can select your desired flow to be connected once this trigger has been activated.
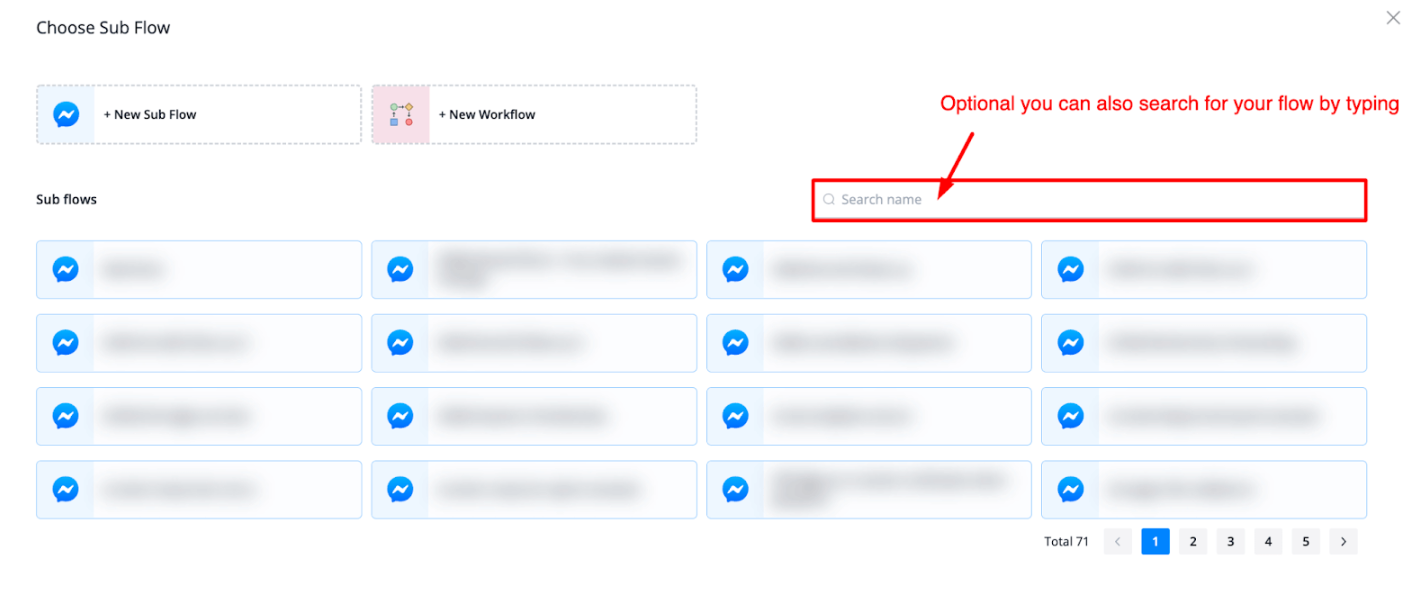
You can also type to find your flow more easily if you prefer. Once you found your flow just select it and it will return you to the Trigger overview.
From here you have a few options when it comes to managing the triggers.
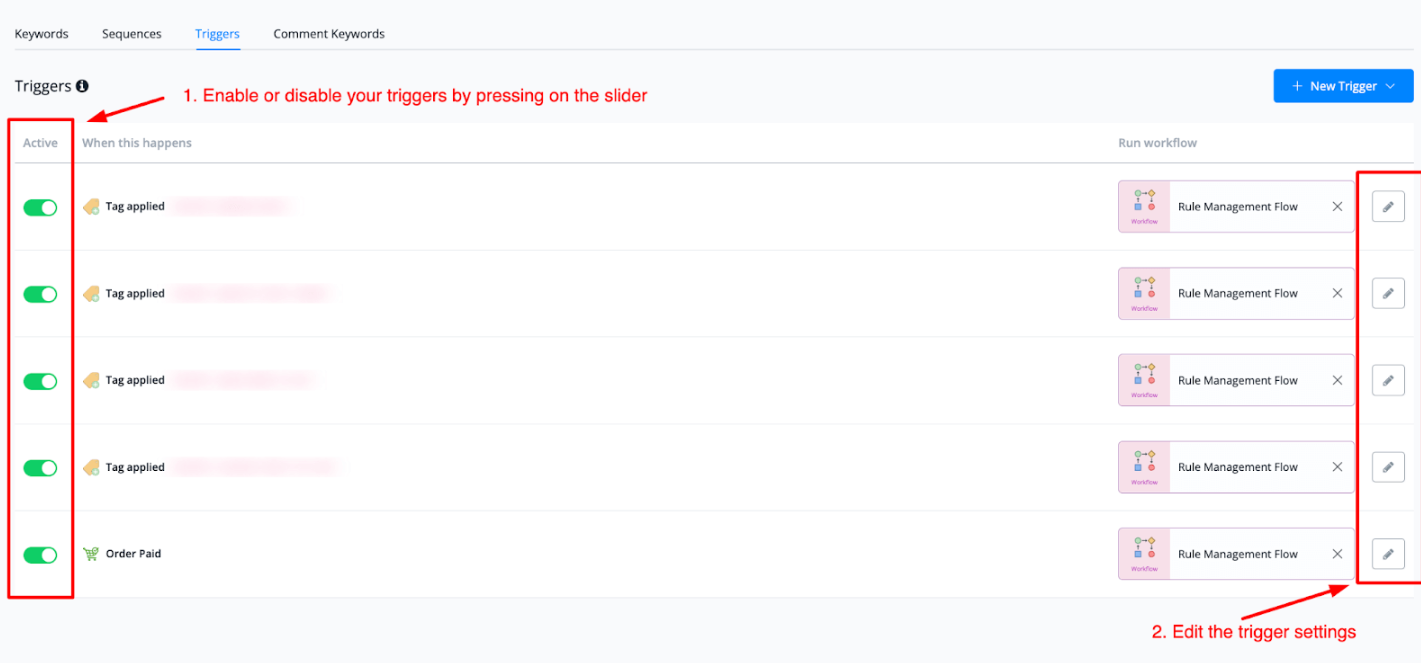
Managing your Triggers
You have two options if you want to manage your triggers:
- You can enable or disable them by pressing the slider on the left of the actual trigger
- You can edit the trigger settings. Inside of here you also have the option to delete the trigger entirely
Triggers
Here is a list of triggers and how to use it:
New user
This Trigger is used when a new bot user enters the bot. This will not work when a user is created manually.
User Subscribed to Bot
This trigger happens when a Bot_User has subscribed to the bot.
User Unsubscribed from Bot
This trigger happens when a Bot_User has unsubscribed to the bot.
User Opted-in for Email
This trigger happens when a Bot_User has Opted-in for Email either manually or by flow
User Opted-out for Email
This trigger happens when a Bot_User has Opted-out for Email either manually or by flow.
User Opted-in for SMS
This trigger happens when a Bot_User has Opted-in for SMS either manually or by flow
User Opted-out for SMS
This trigger happens when a Bot_User has Opted-out for SMS either manually or by flow
Conversation is Open
This trigger happens when a Bot_User conversation is moved to the Open folder in livechat
Conversation is Pending
This trigger happens when a Bot_user conversation is moved to the Pending folder in livechat
Conversation is Done
This trigger conversation is moved to the Done folder in livechat
Conversation is Invalid
This trigger conversation is moved to the Invalid folder in livechat
Chat assigned to an agent
This triggers when Bot_user is assigned to the Agent either manually or by flow
User field value changed
This triggers when a certain specified userfield value is changed for a bot user
Moved to board
You can find more detail about this trigger in the documentation
Error logged
Tag Added
This triggers when Tag added to Bot_user
Tag Removed
This triggers when Tag applied to Bot_user is removed.
Label Added
You can find more detail about this trigger in dedicated section
Label Removed
You can find more detail about this trigger in dedicated section
Subscribed to sequence
This triggers when Bot_user is subscribed to sequence
Unsubscribed from sequence
This triggers a sub-flow, when Bot_user is unsubscribed from sequence.
Date/Time based trigger
This is a checklist that serves as a guide when using date and datetime triggers to avoid confusion.
General Guidelines
- For both date and date time triggers, make sure that the date or time assigned is always in future. Past dates and times fails the trigger from starting. This is the default behaviour of the platform.
- For Channels where timezone is provided by default (webchat, Facebook, Instagram etc) the timezone of the bot user is used for date time triggers.
- For Channels where timezone is NOT provided by default, the timezone of the workspace is used for the date time triggers.
- Messagingme.app will treat all date and date time userfields in UTC time as default, hence if timezone is not provided, the system assumes its in UTC time and then offsets as per the timezone of the user or the workspace,
Date Trigger
- Make sure the format of the date when saved inside the date field is UTC standardized. An example of UTC format for date is “YYYY-MM-DD”. Other formats include:
DD-MM-YYYY
MM-DD-YYYY
DD/MM/YYYY
- Localized date formats will always cause issues as they are not recognized by the system and will create offsets not synced with the actual time.
Date Time Trigger
-
Make sure the format of the date time when saved inside the date time field is UTC format. The defacto standard format for date time is “YYYY-MM-DDThh:mm:ss+Z”
here:
YYYY represents the year
MM represents the month
DD represents the day
T represents the separation between date and time
hh represents the hour
mm represents the minutes
ss represents the seconds
Z represents the timezone (Such as +05:00 or -02:00)
Order Paid
You can find more detail about this trigger in dedicated section
Order Processing
You can find more detail about this trigger in dedicated section
Order Shipped
You can find more detail about this trigger in dedicated section
Order Completed
You can find more detail about this trigger in dedicated section
Order Cancelled
You can find more detail about this trigger in dedicated section
Order Refunded
You can find more detail about this trigger in dedicated section
WhatsApp Welcome Message
You can find more detail about this trigger in dedicated section
WhatsApp Order Received
You can find more detail about this trigger in dedicated section
WhatsApp Product Enquiry
You can find more detail about this trigger in dedicated section
WhatsApp Ad Referral
You can find more detail about this trigger in dedicated section
Facebook Ad Referral
You can find more detail about this trigger in dedicated section
Facebook LeadGen
You can find more detail about this trigger in dedicated section
Stripe Invoice Payment Succeeded
You can find more detail about this trigger in dedicated section
Stripe Invoice Payment Failed
You can find more detail about this trigger in dedicated section
CRM V2 Webhook
You can find more detail about this trigger in dedicated section
Shopify Webhook
You can find more detail about this trigger in dedicated section
Woocommerce Webhook
You can find more detail about this trigger in dedicated section
Guest Chat Ended
This triggers a subflow, when the Guest Bot_user ends his conversation, This is helpful for webchat channel for deleting guest users
Calendly - Booked
In this documentation you will learn how to connect your Calendly account to Messagingme.app and then learn how to use the Calendly canceled trigger.
Step-by-Step Guide to Integrating Calendly with Messagingme.app
Step 1: Navigate to the Integration Section
- Go to your Messagingme.app dashboard.
- On the left-hand side menu, under the “Integrations” section, click on Calendly.
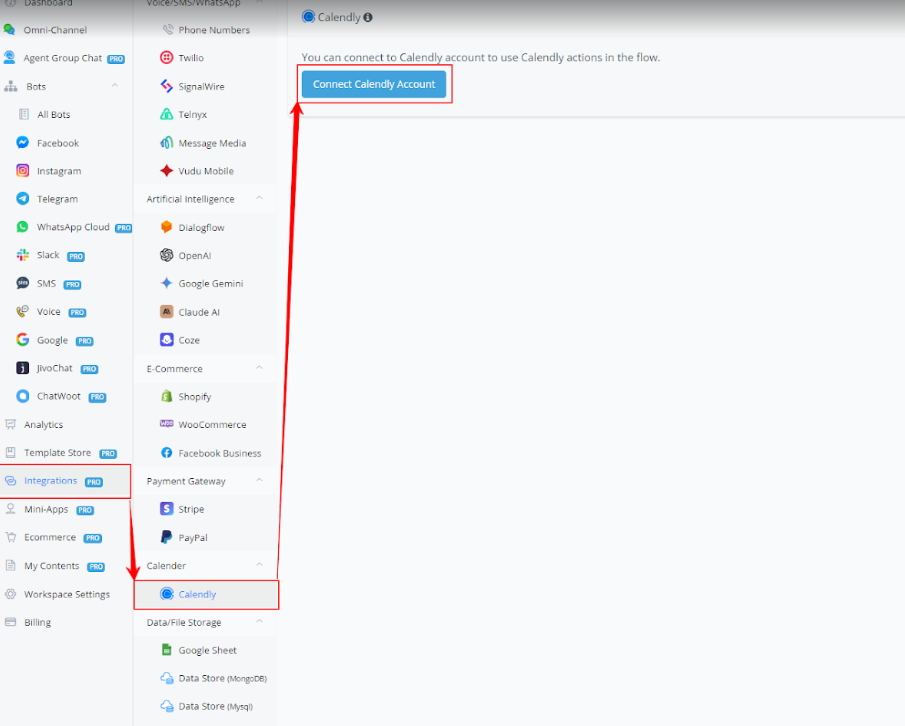
Step 2: Connect Your Calendly Account
- Click the Connect Calendly Account button.
- This will open a new window where you’ll be prompted to log into your Calendly account.
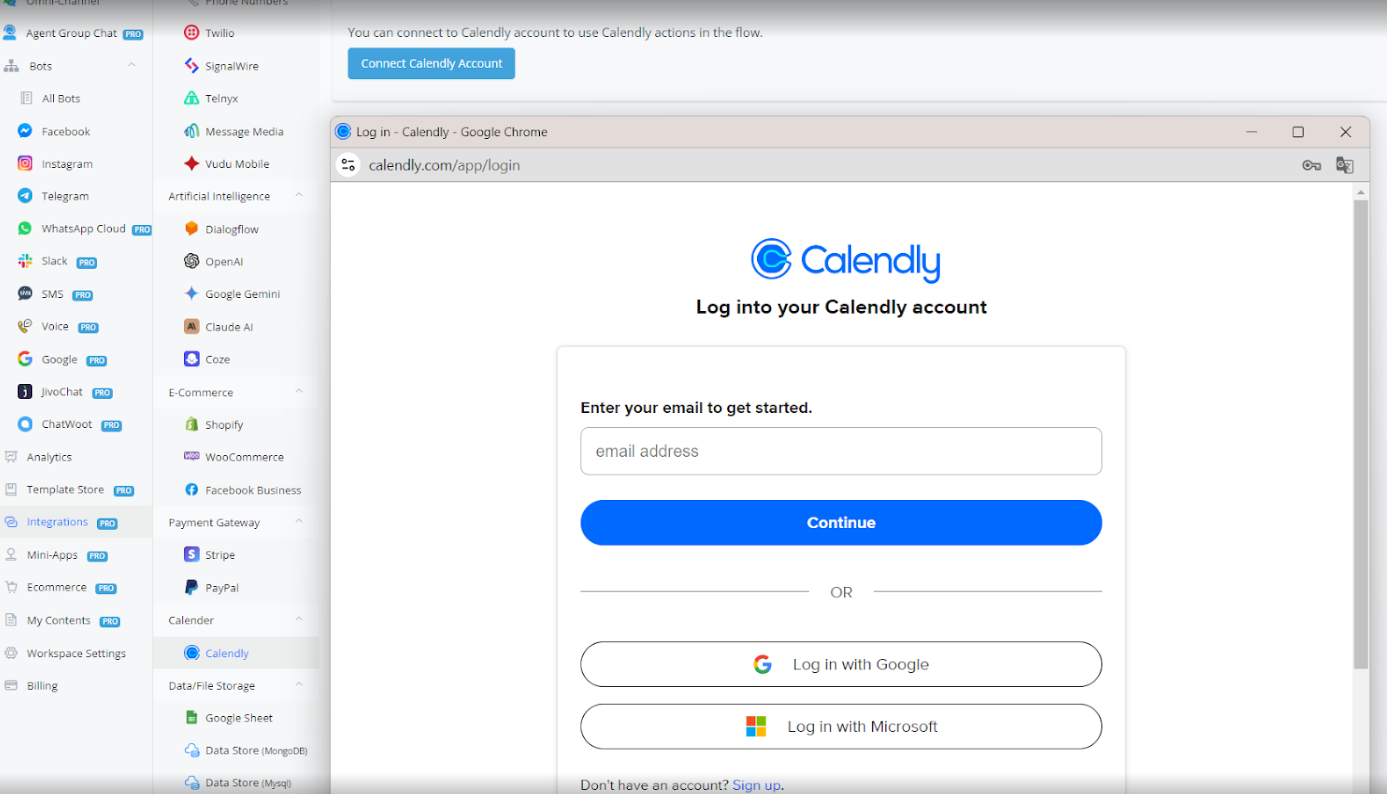
Step 3: Log Into Your Calendly Account
- Enter your email address and click Continue.
- Alternatively, you can log in using your Google or Microsoft account.
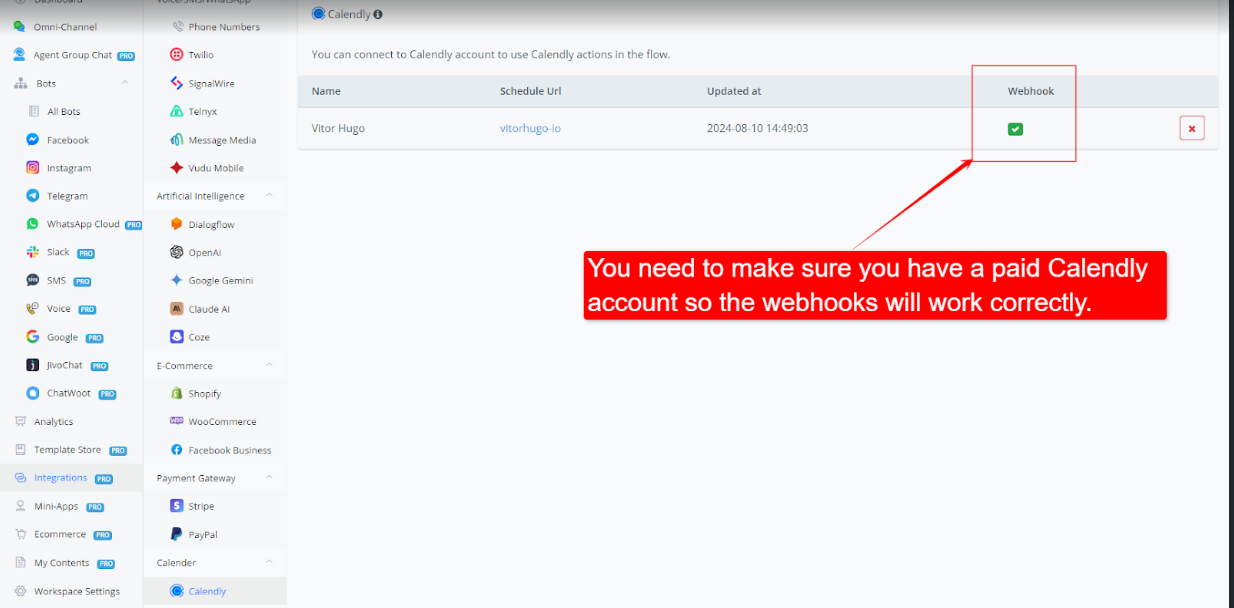
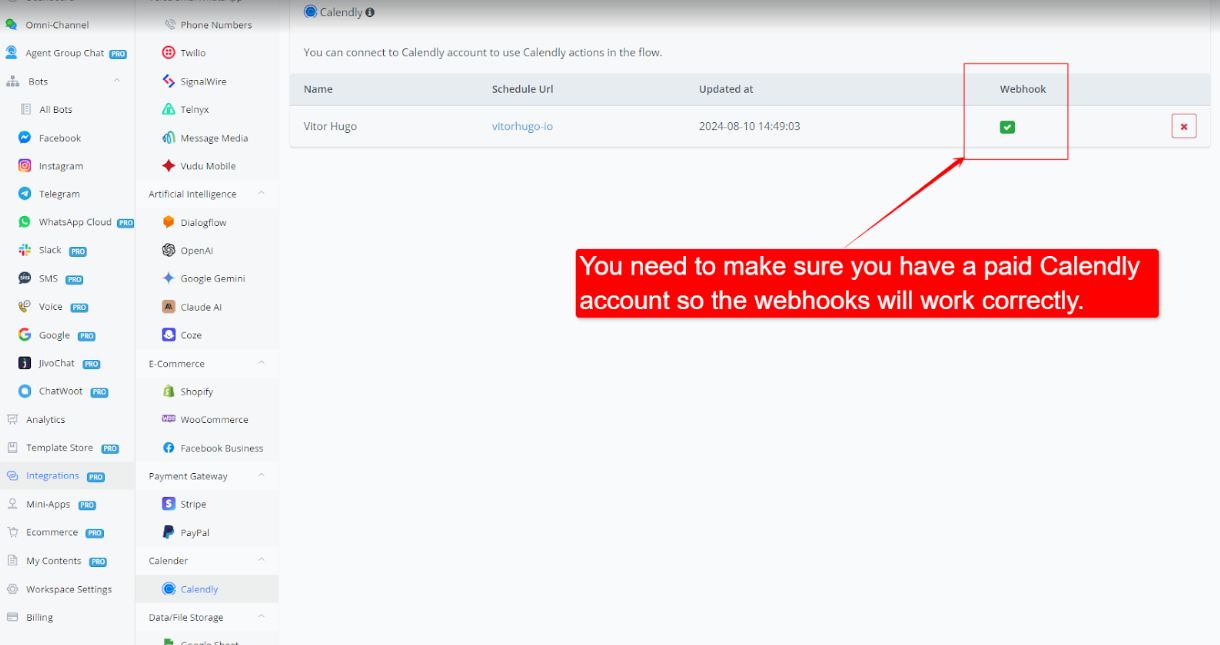
Step 4: Verify Connection and Webhook Status
- Once connected, you will see your Calendly account listed with your schedule URL and the webhook status.
- Important: You need to ensure that you have a paid Calendly account for the webhooks to work correctly.
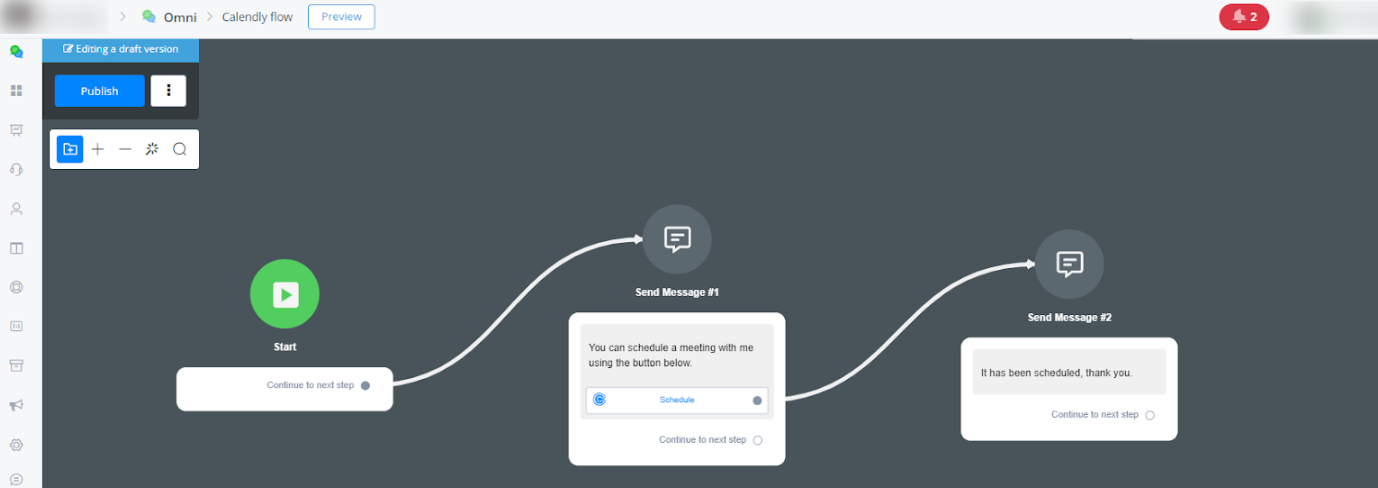
Step-by-Step Guide to use the Calendly Booked Trigger in Messagingme.app
Step 1: Accessing the Trigger Menu
- Navigate to your desired chatbot within Messagingme.app. On the left panel, go to Triggers under the Automation section, then click + New Trigger and select Calendly Booked.
Step 2: Set up your trigger:
- Define the conditions under which the trigger will activate. For example, you can choose to trigger this event when a specific event type is scheduled.
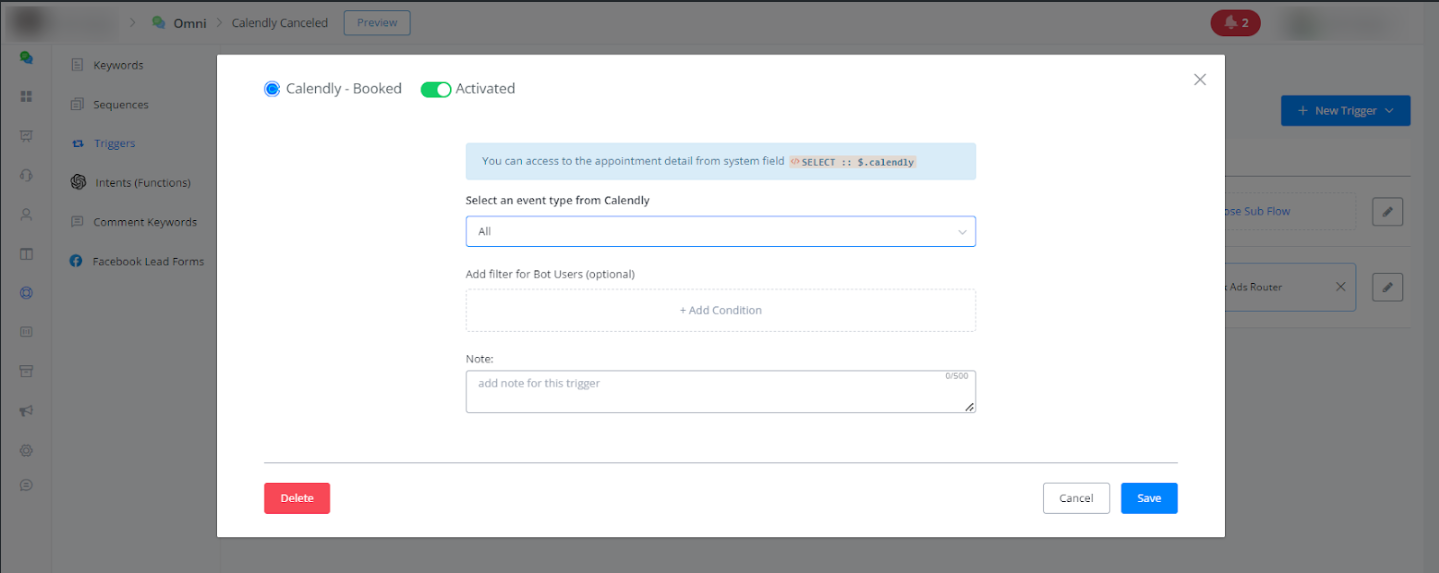
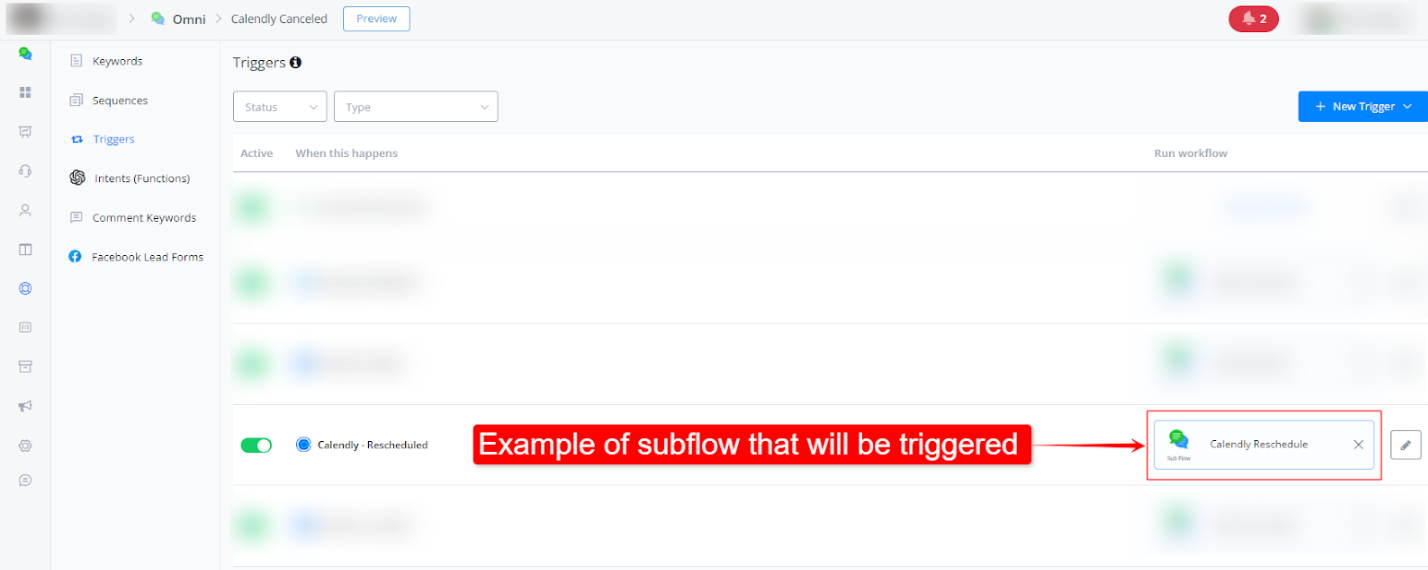
Step 3: Configure the trigger’s action:
- In this section, you can set up actions that will be taken when the event is triggered.
- For example, you might want to send a notification to a team member through a subflow or trigger a flow with an automatic response to the user who scheduled.
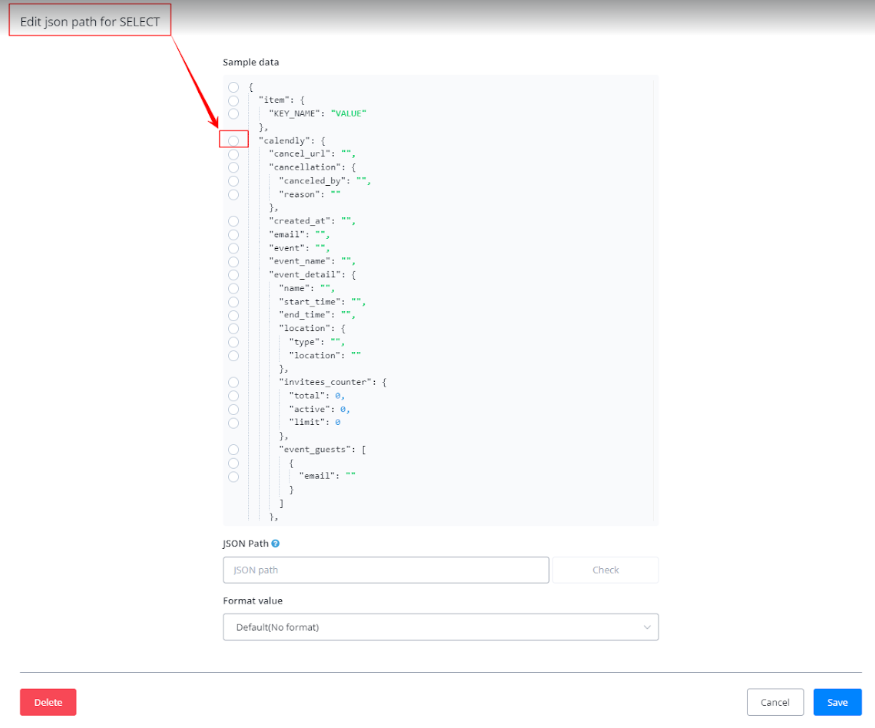
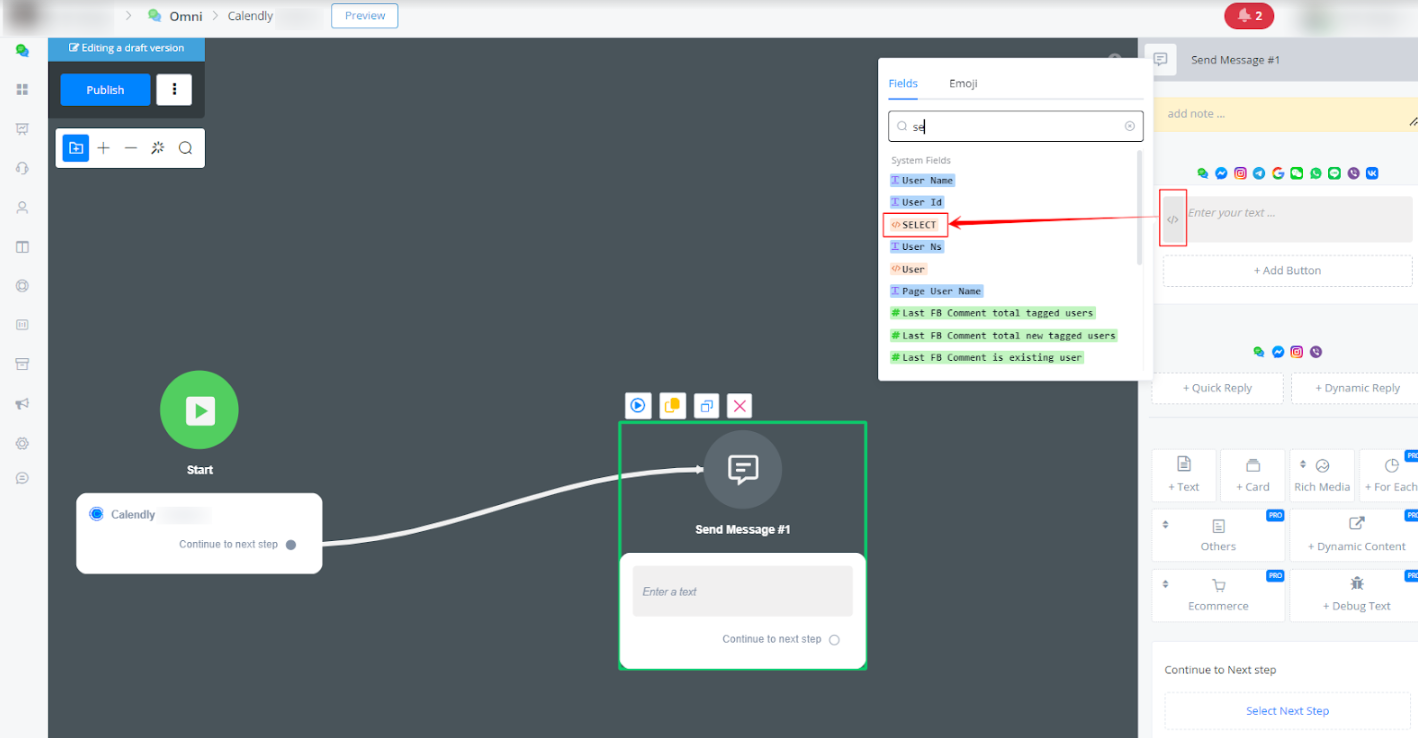
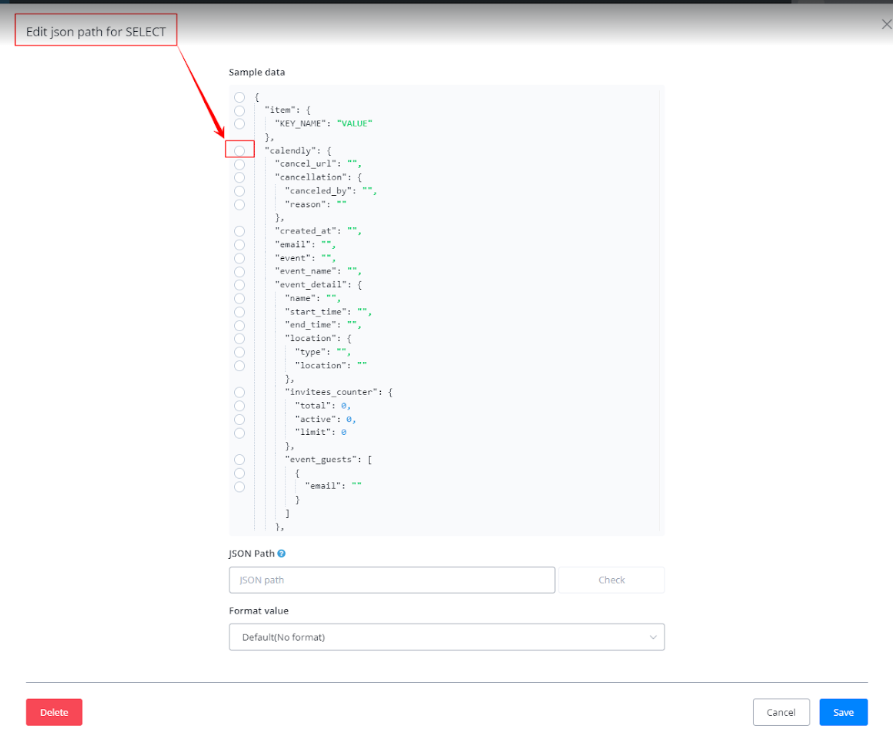
Use the JSON SELECT function (optional):
- Within your workflow, you can use the JSON SELECT function to map variables and data as required.
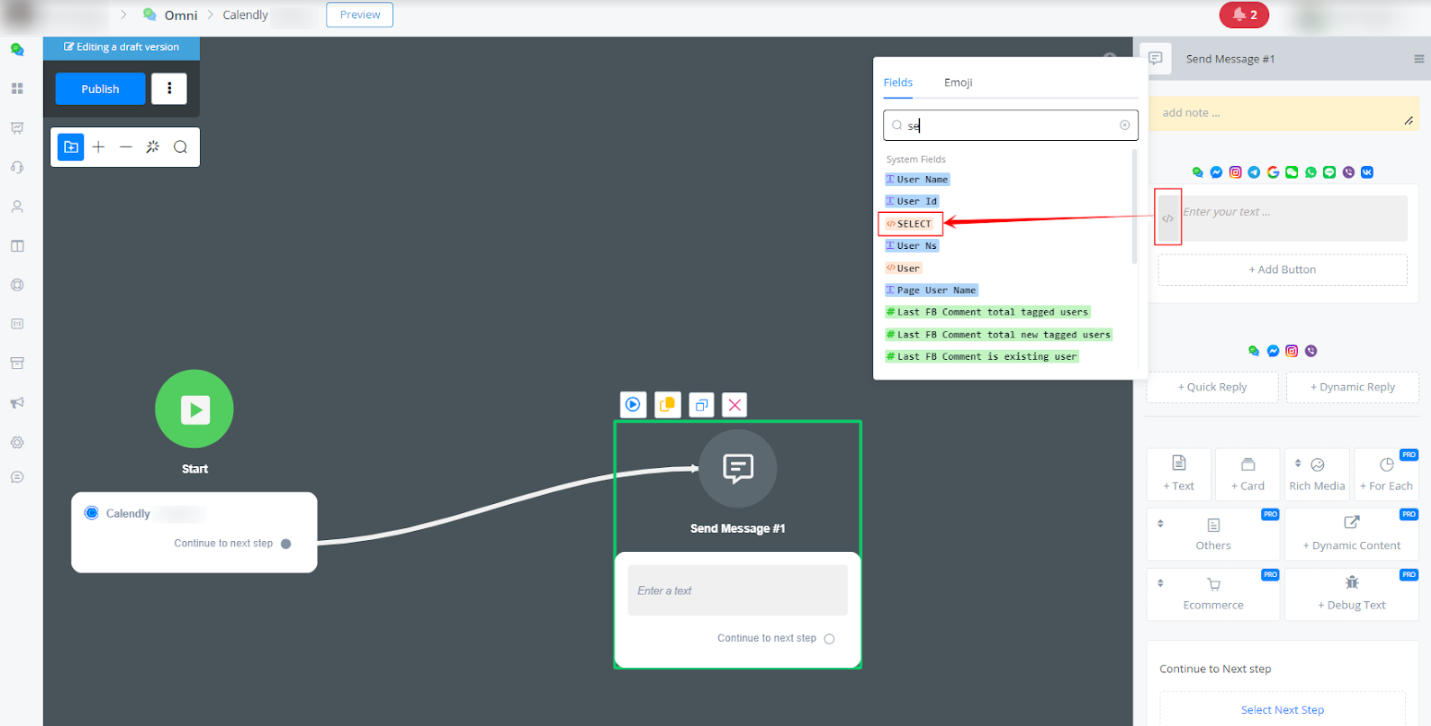
• Customize the mapping according to the needs of your specific automation.
Calendly - Rescheduled
Step-by-Step Guide to Integrating Calendly with Messgaingme.app
Step 1: Navigate to the Integration Section
- Go to your Messagingme.appp dashboard.
- On the left-hand side menu, under the “Integrations” section, click on Calendly.
Step 2: Connect Your Calendly Account
- Click the Connect Calendly Account button.
- This will open a new window where you’ll be prompted to log into your Calendly account.
Step 3: Log Into Your Calendly Account
- Enter your email address and click Continue.
- Alternatively, you can log in using your Google or Microsoft account.
Step 4: Verify Connection and Webhook Status
- Once connected, you will see your Calendly account listed with your schedule URL and the webhook status.
- Important: You need to ensure that you have a paid Calendly account for the webhooks to work correctly.
Step-by-Step Guide to use the Calendly Reschedule Trigger in Messagingme.app
Step 1: Accessing the Trigger Menu
Navigate to your desired chatbot within Messagingme.app. On the left panel, go to Triggers under the Automation section, then click + New Trigger and select Calendly Rescheduled.
Step 2: Set up your trigger:
- Define the conditions under which the trigger will activate. For example, you can choose to trigger this event when a specific event type is rescheduled.
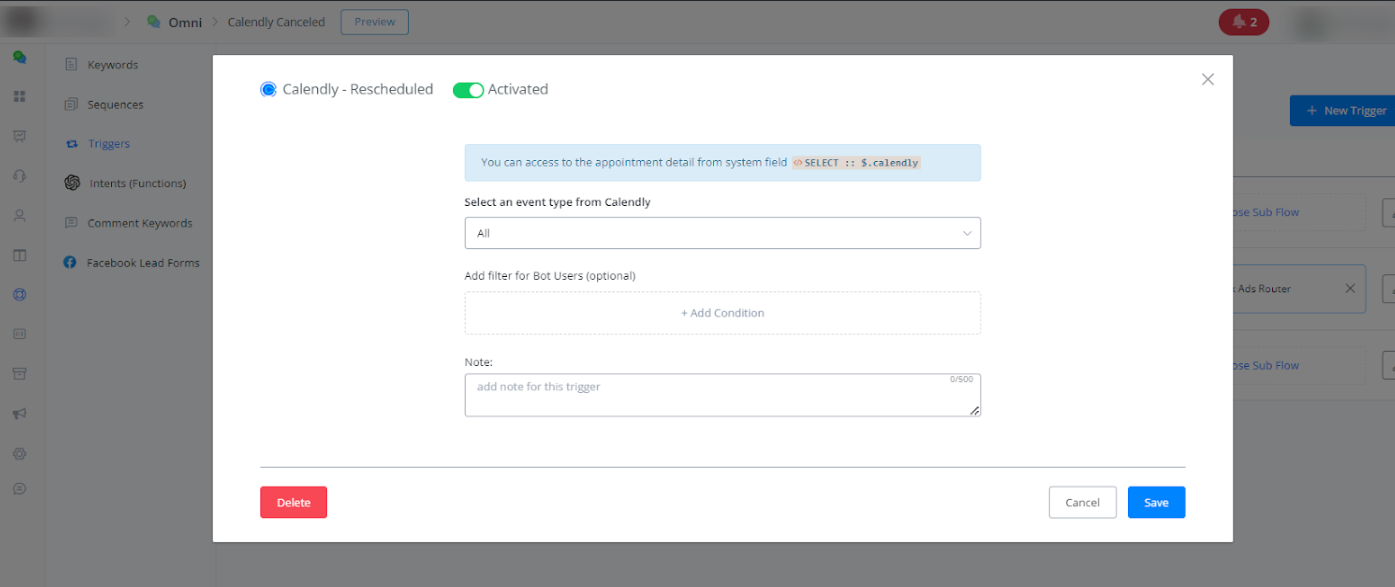
Step 3: Configure the trigger’s action:
- In this section, you can set up actions that will be taken when the event is triggered.
- For example, you might want to send a notification to a team member through a subflow or trigger a flow with an automatic response to the user who rescheduled.
- Within your workflow, you can use the JSON SELECT function to map variables and data as required.
• Customize the mapping according to the needs of your specific automation.
Calendly - Cancelled
see section resecheduled
Mentioned in Story
This docs covers how to set up and use Instagram story reply and mention triggers within Messagingme.app to automate responses and engage with users effectively.
Key Points
Setting Up Story Reply Trigger:
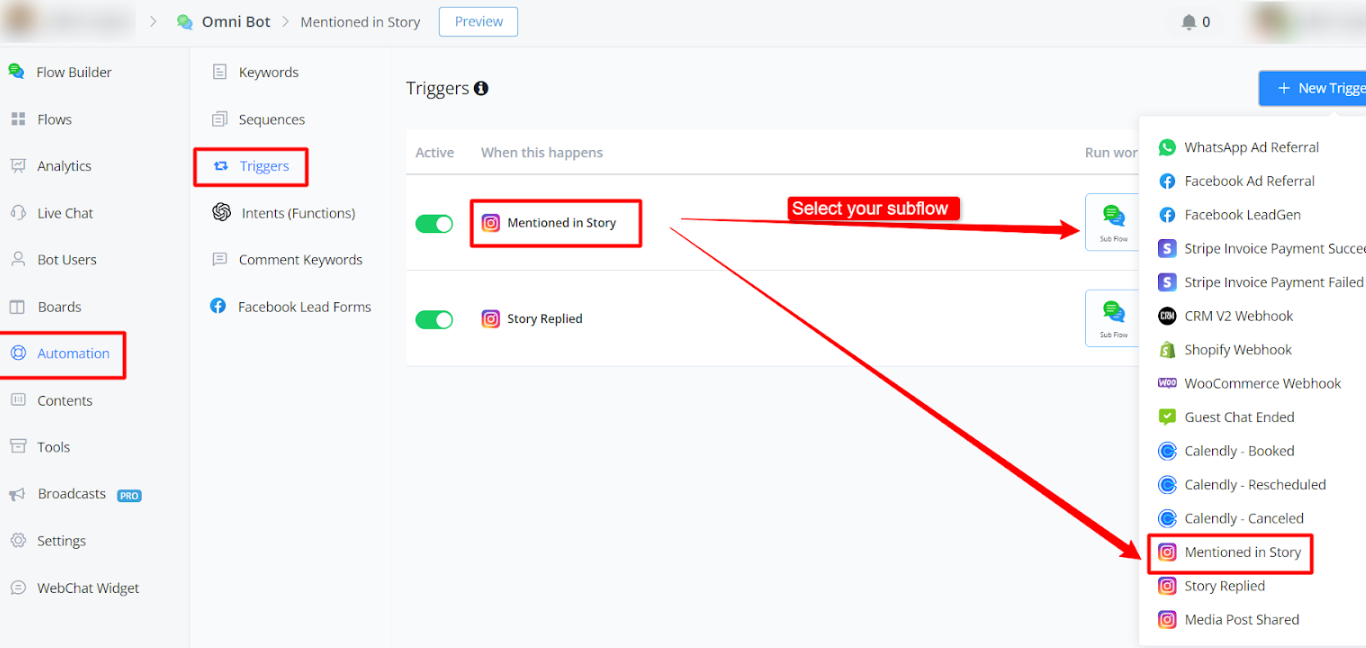
Navigate to Triggers in your automation settings.
Select Story Replied from the new triggers list.
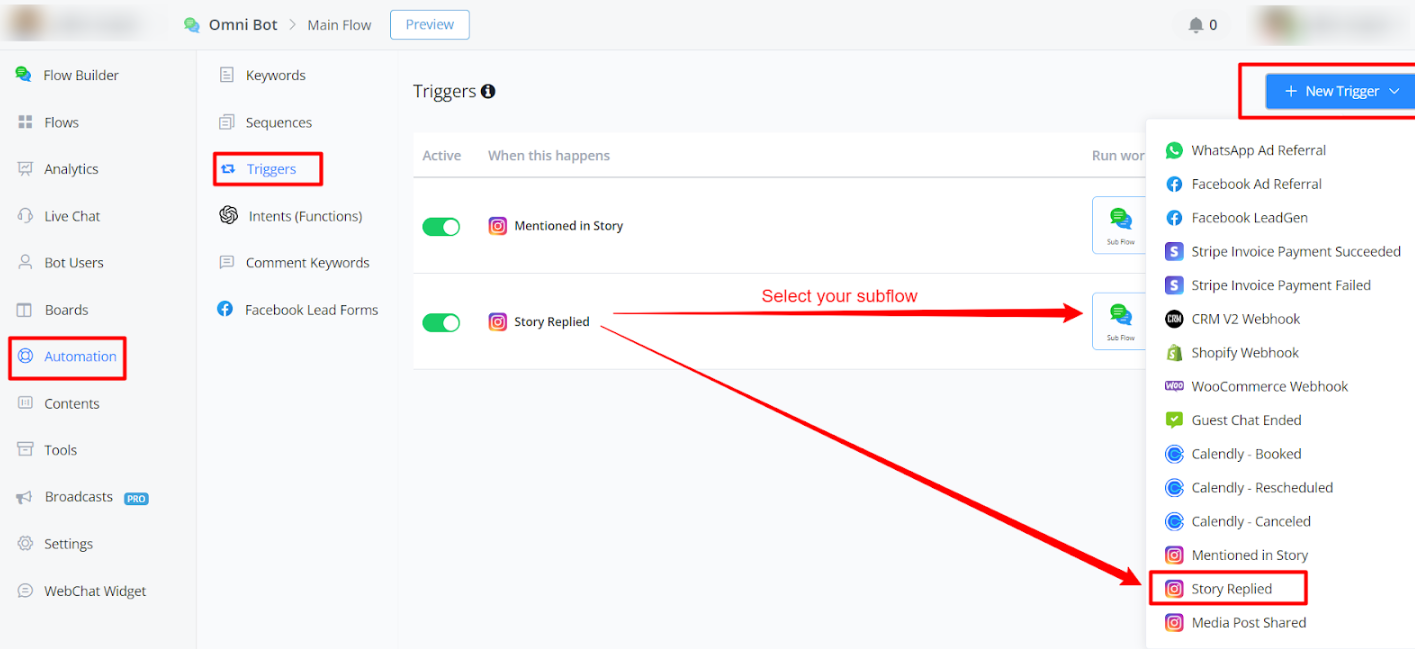
- Map elements such as Story ID, URL, and message.
- Use filters to customize responses, e.g., avoid triggering for users already in your membership

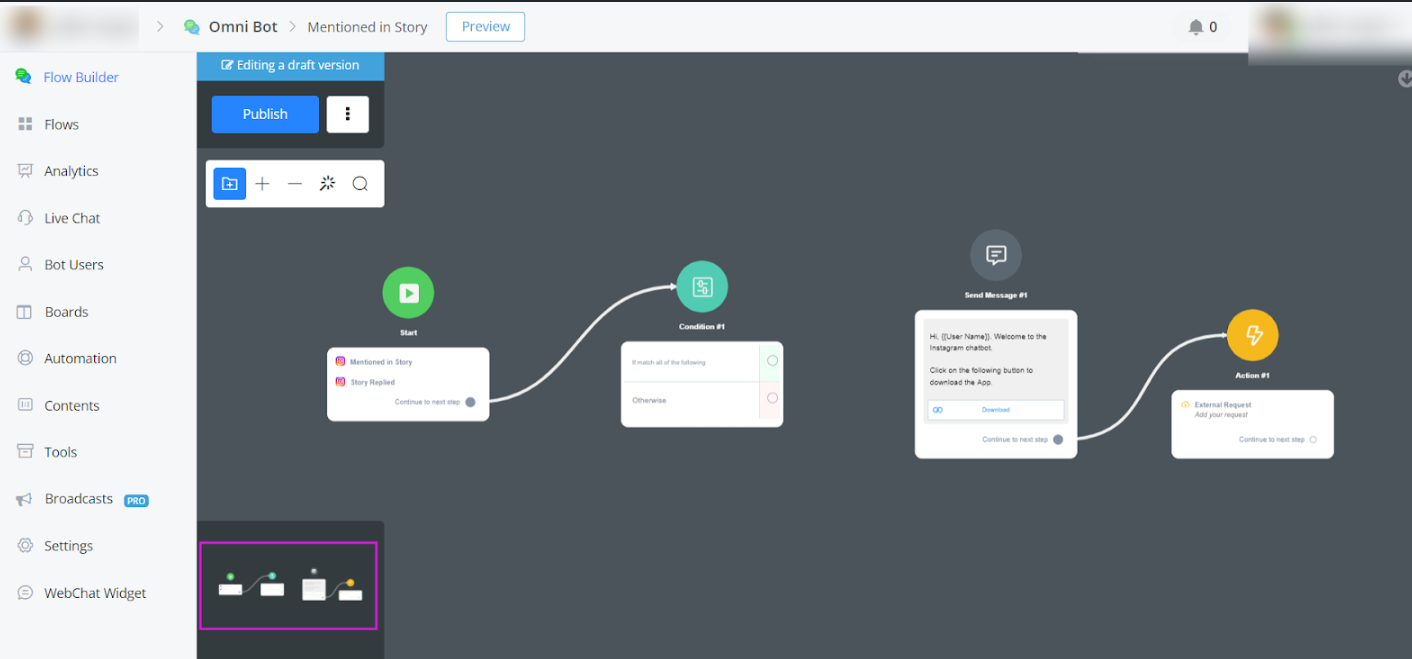
Creating Flows for Replies:
- Create a flow named, e.g., “Mentioned in Story.”
- Set the starting trigger to Story Replied.
- Customize responses by thanking the user and offering a chatbot starter package.
- Use conditions to send specific responses based on Story ID or message content.
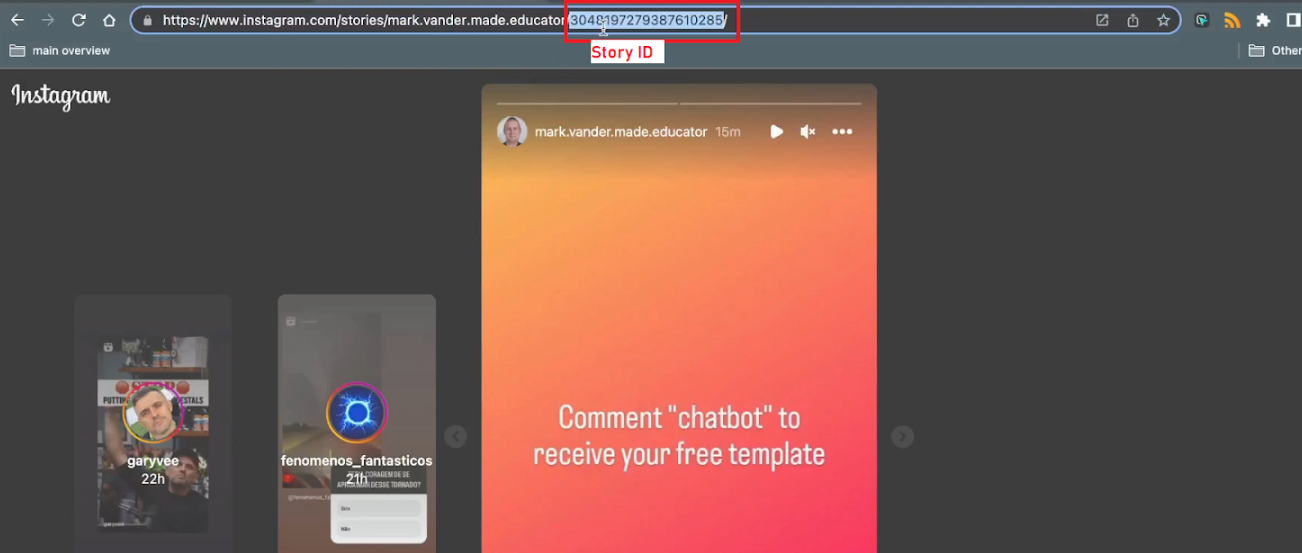
Where to get Story ID
Open your post on the browser and copy the ID from the URL.
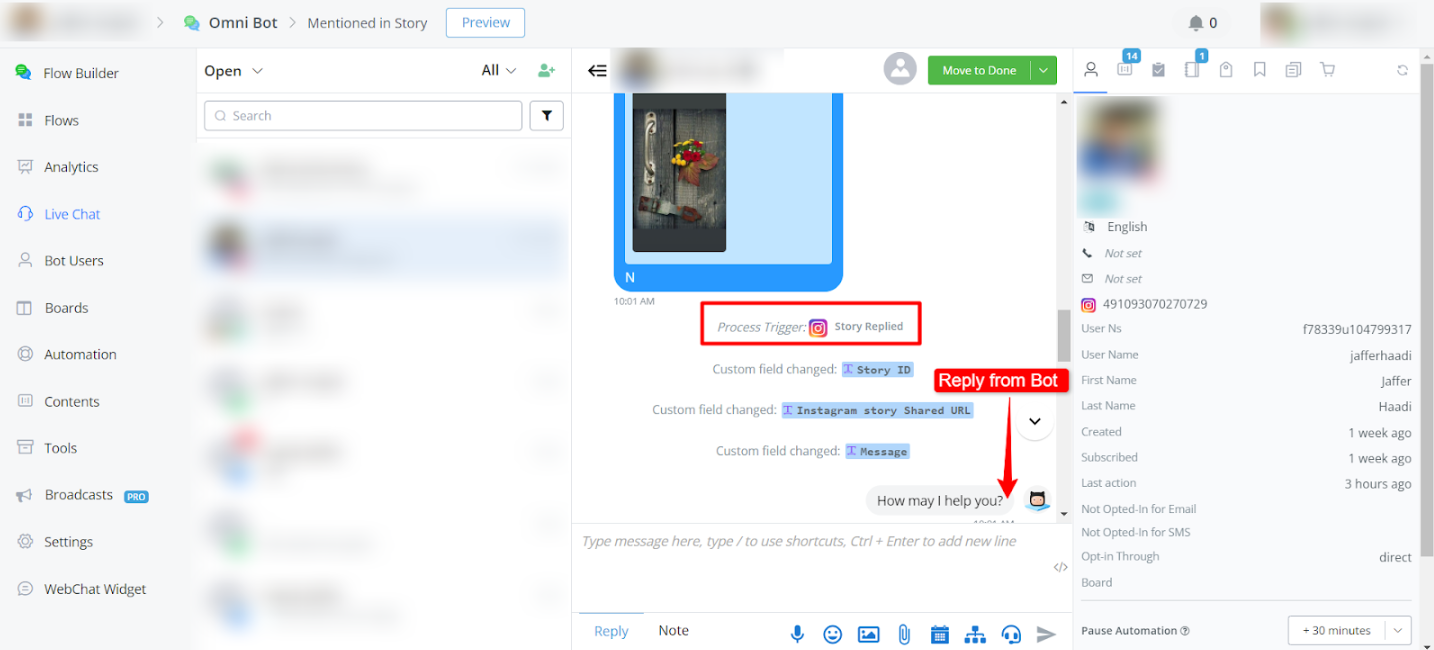
Here is an example of Live chat when someone replies on story
Automations with Story Mentions:
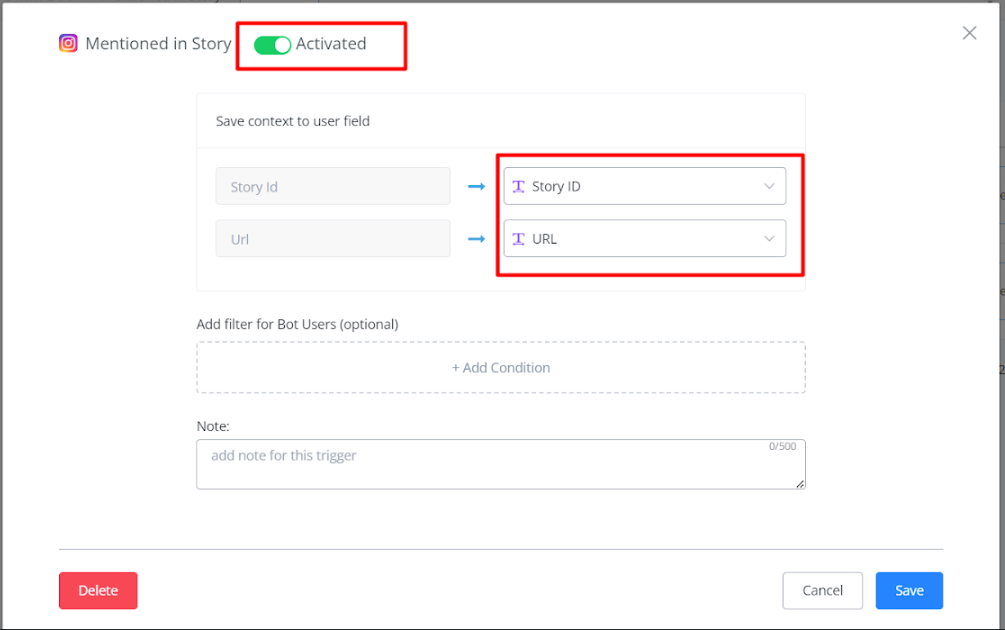
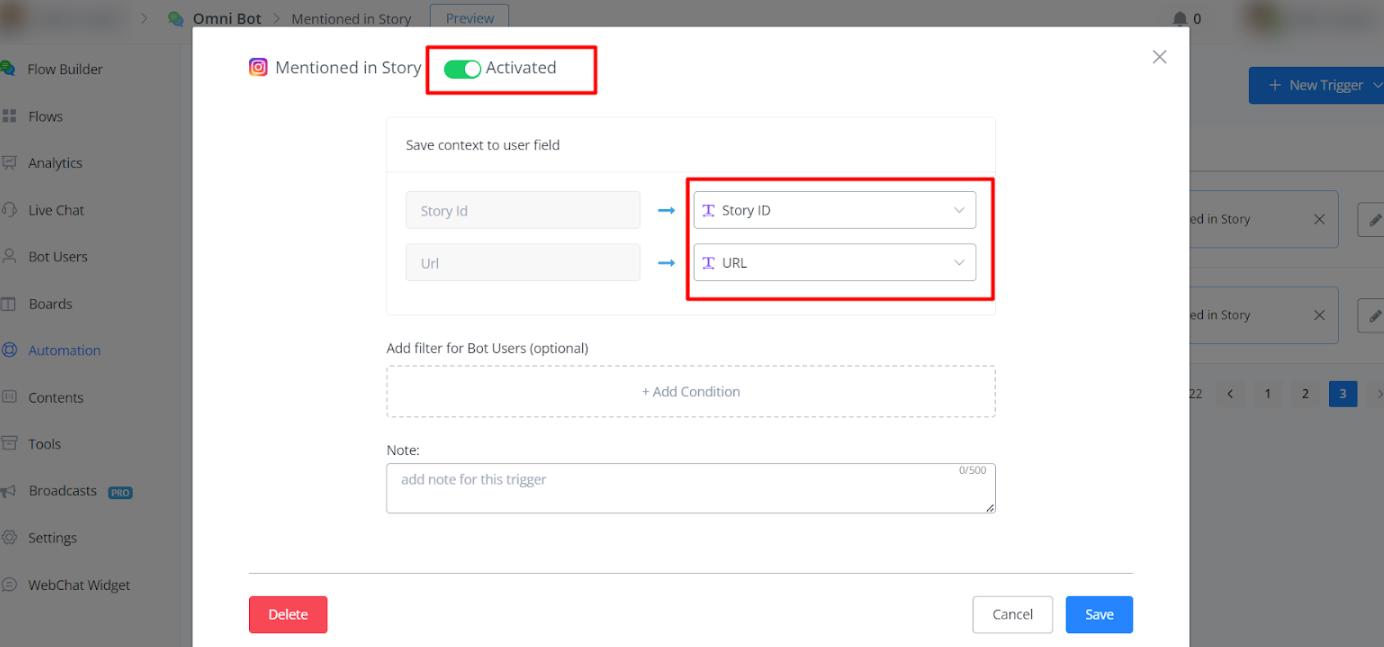
- Set up a trigger for Mentioned in Story.
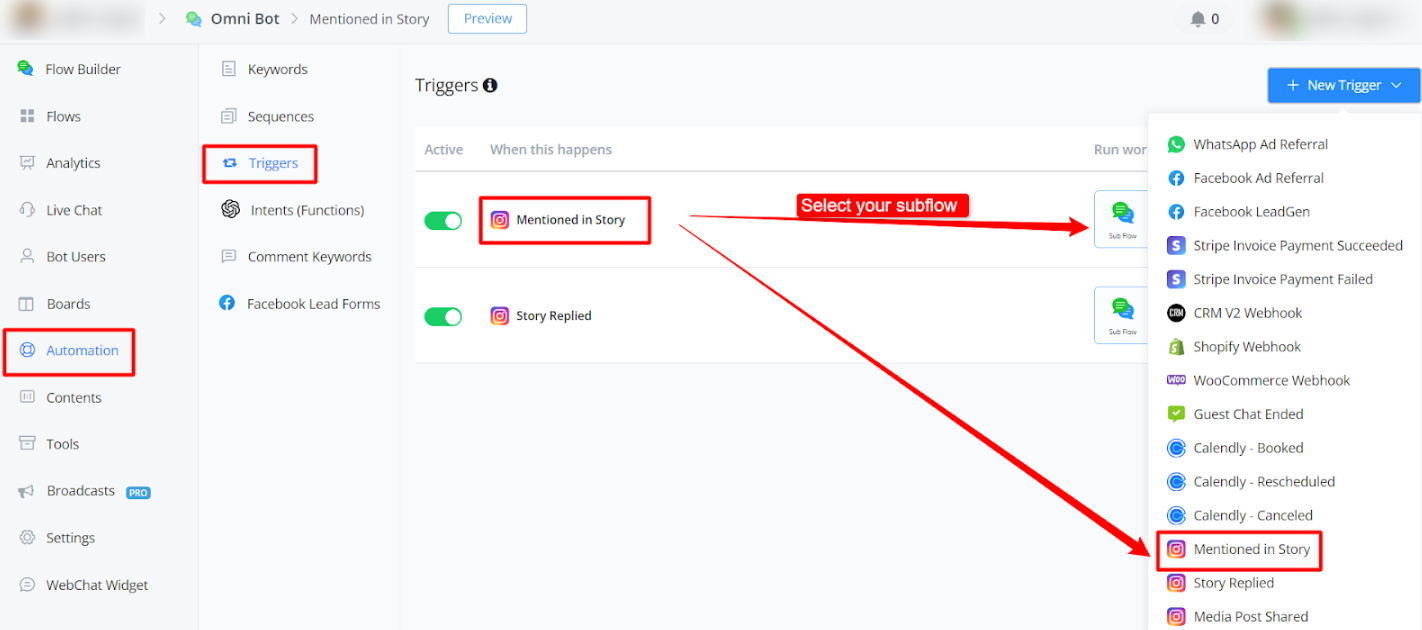
- Map relevant data like Story ID and URL.
- Create automated responses to acknowledge and thank the user for mentioning your page.
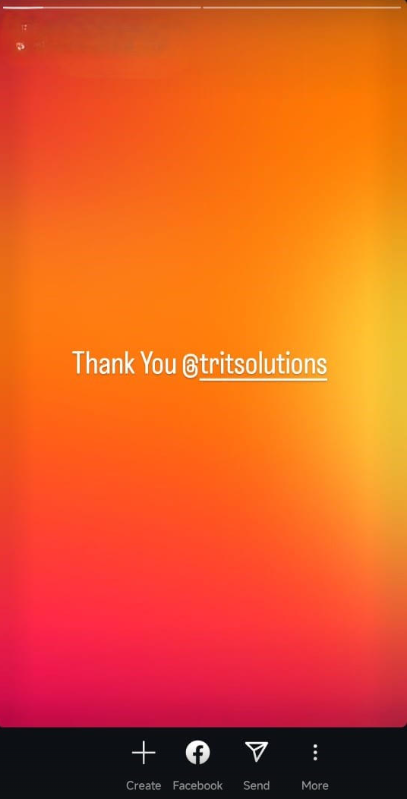
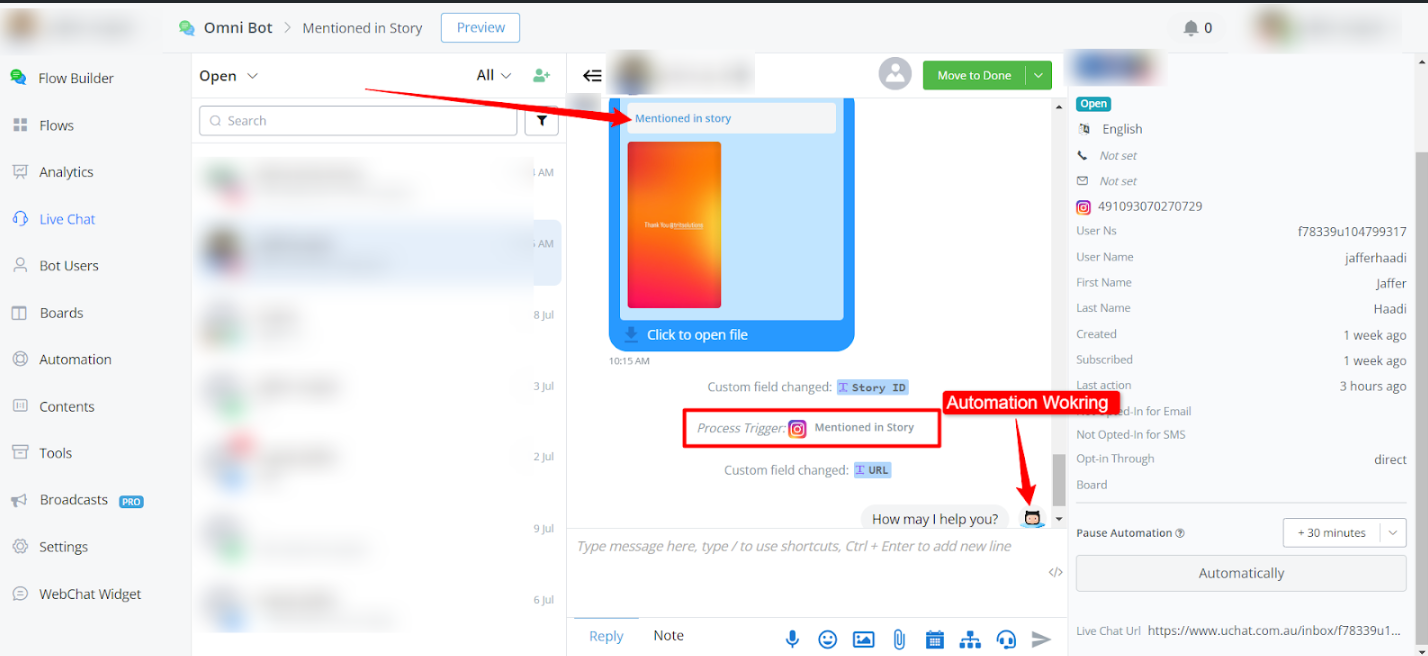
Example: This trigger will work when someone mentions you in his story.
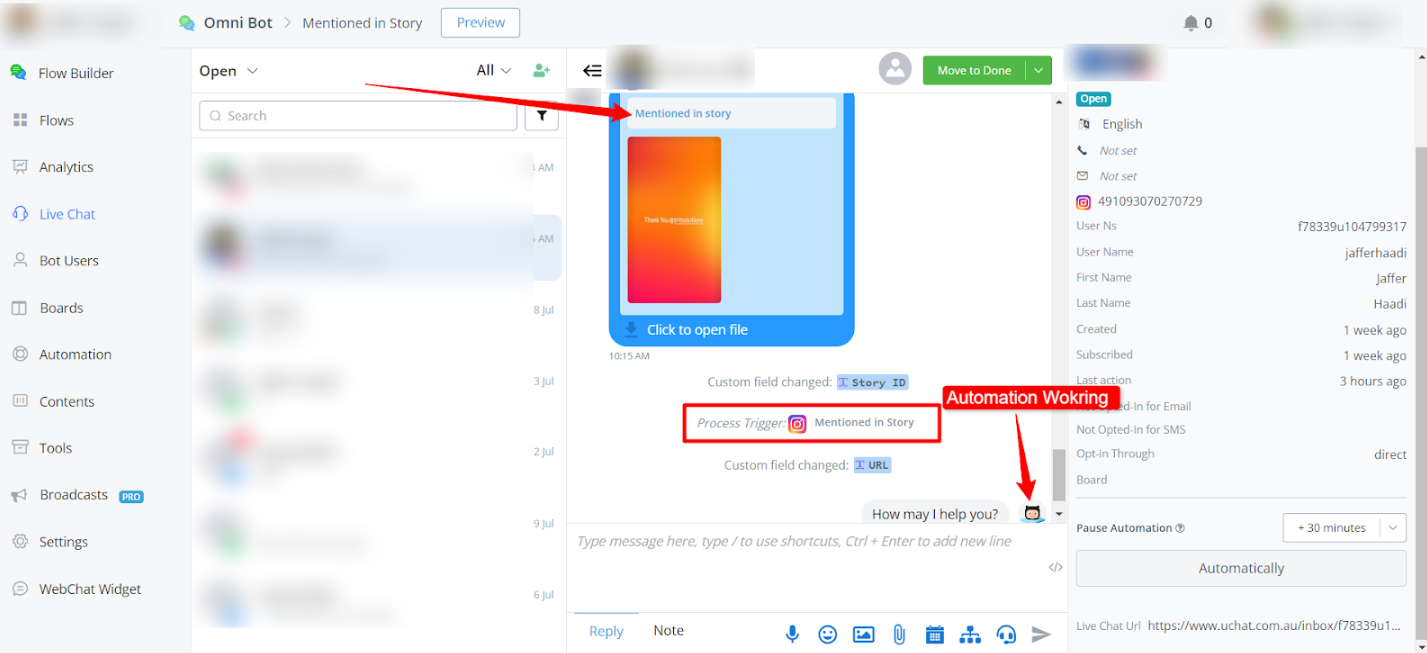
Here is the Live Chat Preview:
Customizing Responses:
- Utilize automation flexibility to handle different story interactions and mentions.
This doc provides a comprehensive guide on leveraging Instagram story interactions to enhance user engagement through automated responses. Use these triggers and flows to streamline your interactions and reward your audience effectively.
Story Replied
You can find more detail about this trigger in dedicated section
Media Post Shared
Automations with Story Mentions:
- Set up a trigger for Mentioned in Story.
- Map relevant data like Story ID and URL.
- Create automated responses to acknowledge and thank the user for mentioning your page.
Example: This trigger will work when someone mentions you in his story.

Here is the Live Chat Preview:
Customizing Responses:
- Utilize automation flexibility to handle different story interactions and mentions.
This doc provides a comprehensive guide on leveraging Instagram story interactions to enhance user engagement through automated responses. Use these triggers and flows to streamline your interactions and reward your audience effectively.
Error Logged Trigger
The Error Logged Trigger allows you to automate tasks and receive notifications when specific errors occur in the platform.
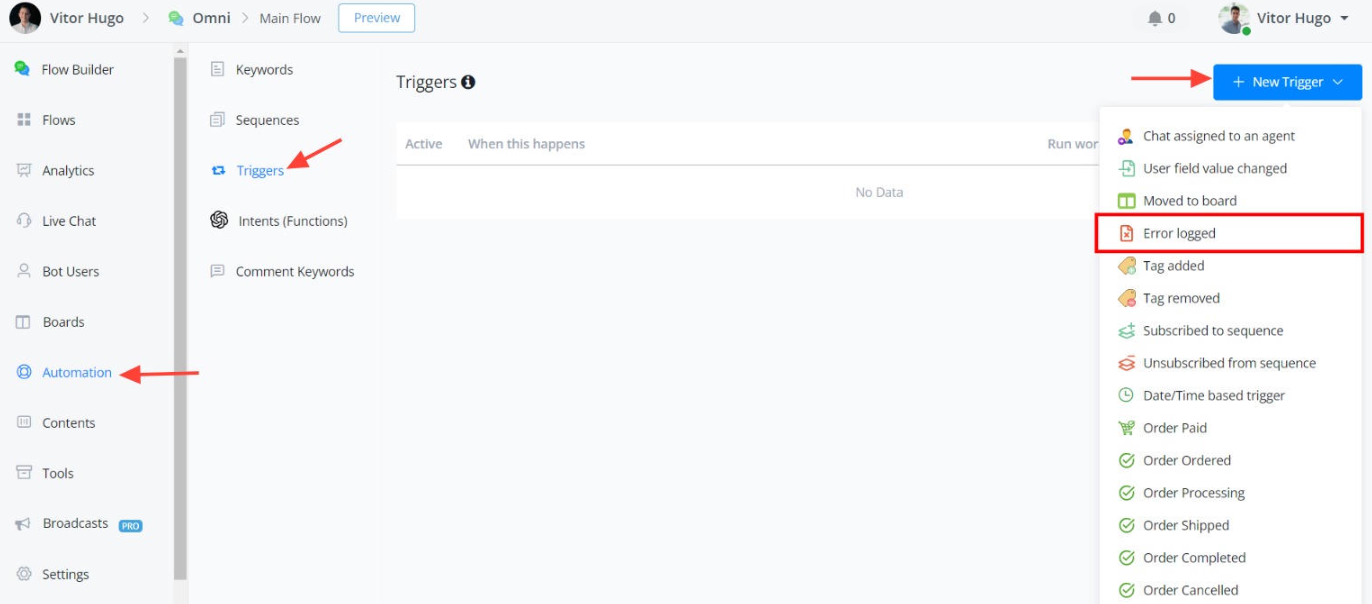
Configuration
- Navigate to Automations > New Trigger.
- Select “Error Logged”.
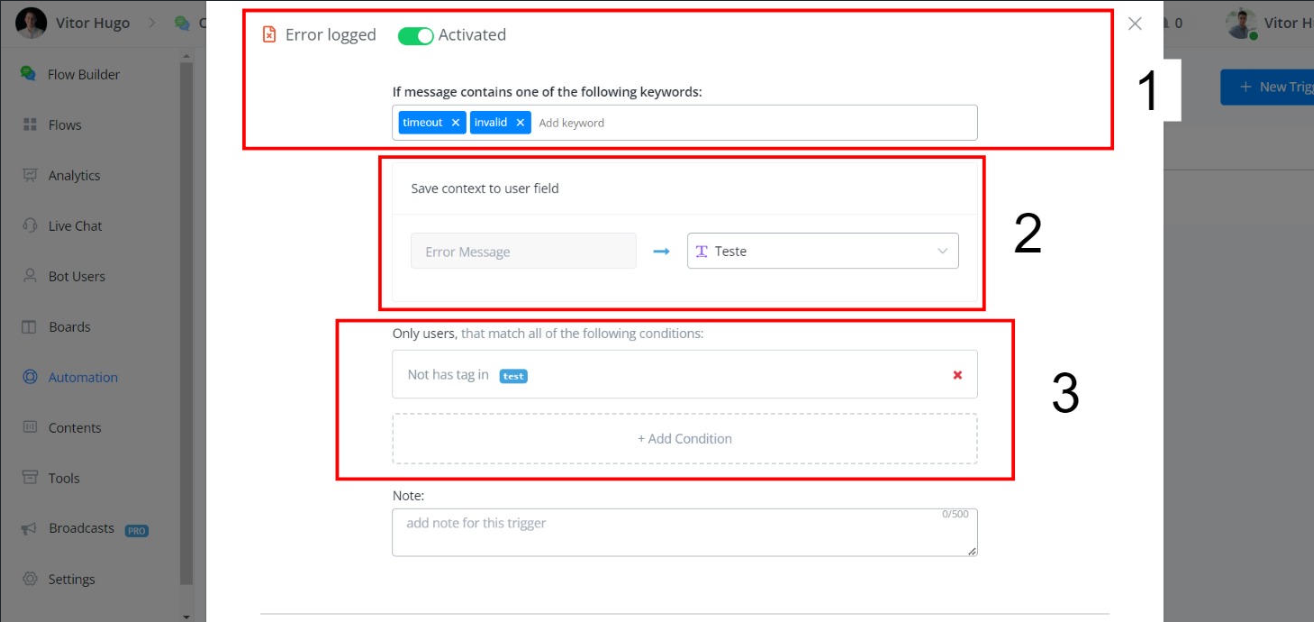
Trigger Conditions
1)Error Message Contains: Specify keywords to capture specific errors.
2)Custom Fields: Save error message to a custom field for future reference.
3)Optional: Filter bot users by conditions.
Rate Limiting
To prevent excessive trigger activations, implement a rate limit within your workflow
Benefits
Minimizes unnecessary notifications and automations.
Maintains platform stability and performance.
Facilitates identification of critical errors.
Notification Options
Admin Notification: Build you flow for alerts administrators when the trigger is activated.
Fallback Automation: Executes a pre-defined workflow in response to the error.
Conclusion
The Error Logged Trigger is a powerful tool for error management. By configuring it with appropriate rate limiting and notification options, you can ensure efficient and effective error handling in your workflows.
💡 The platform does not automatically apply a global rate limit for the Error Logged Trigger. Implementing a rate limit within your workflow is crucial to avoid overloading the system and ensure accurate error identification.
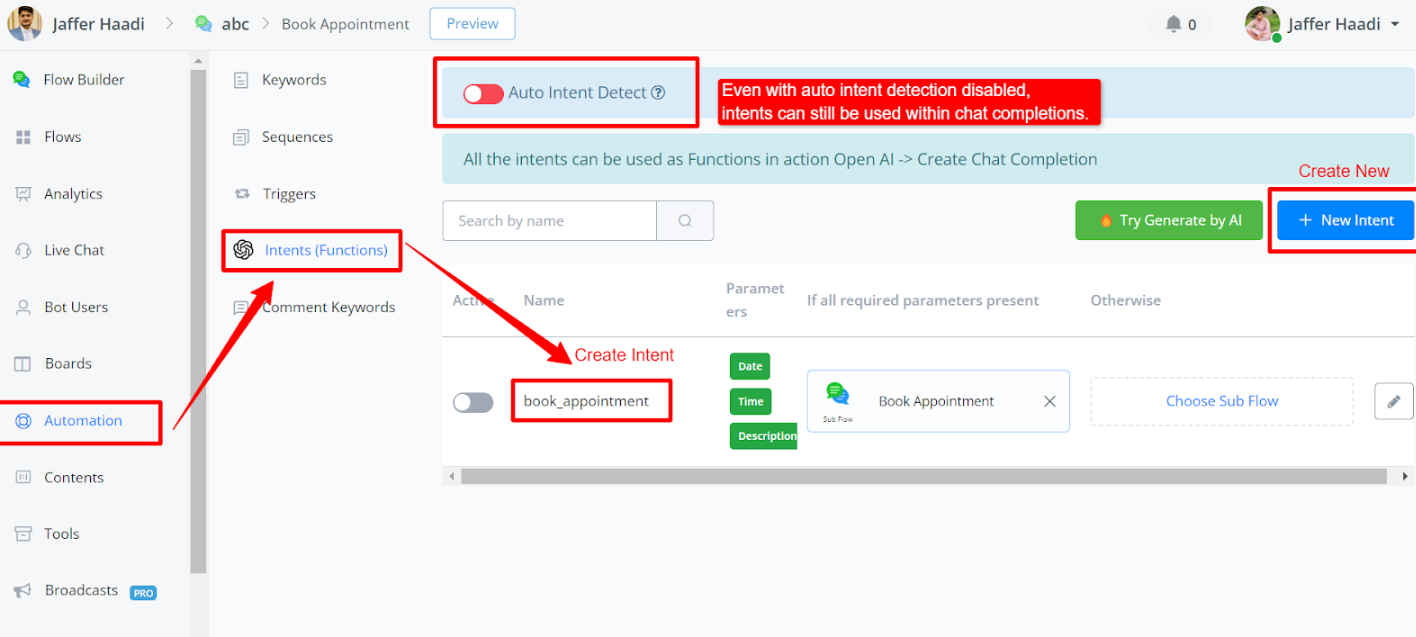
Intents(Functions)
For Intents, you have to create an Intent inside automations.
Workflow Example
A sample workflow is demonstrated.
The initial step involves clearing chat history, crucial for looping through the completion until all parameters are captured.
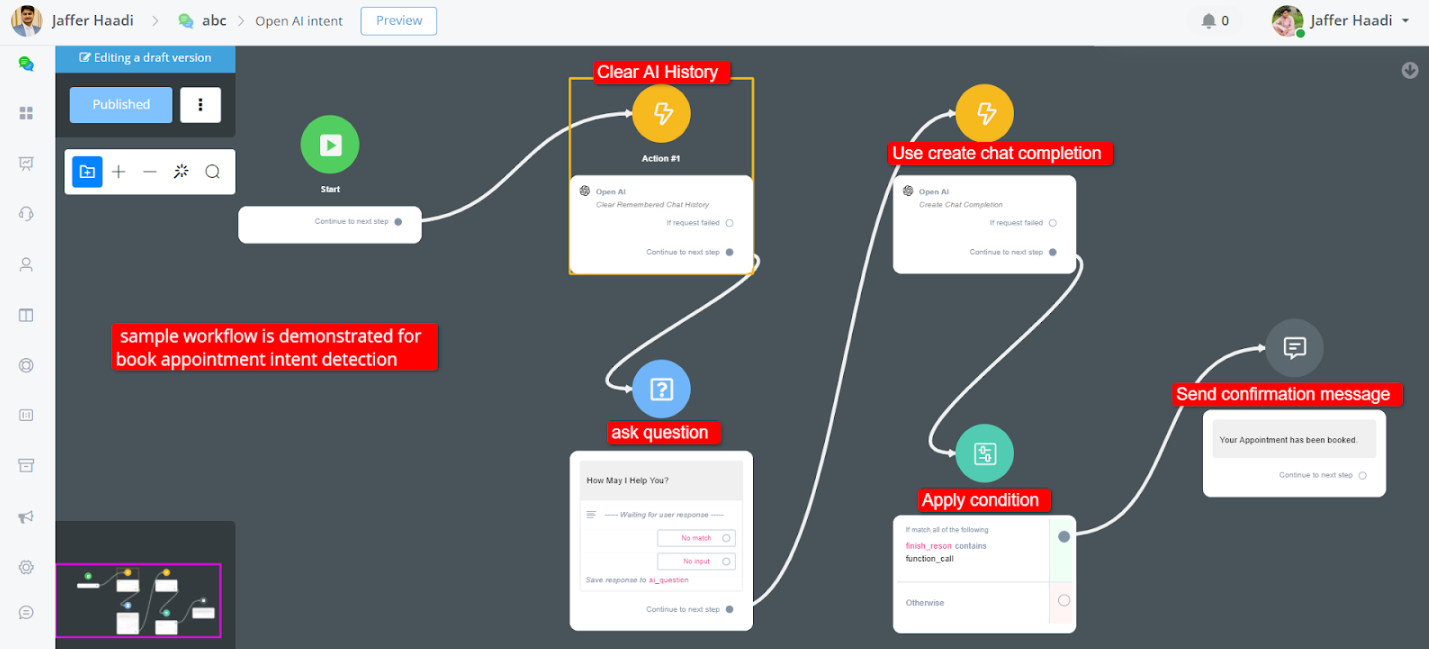
• A simple system message prompts the user to ensure all parameters are captured before finishing the function call.
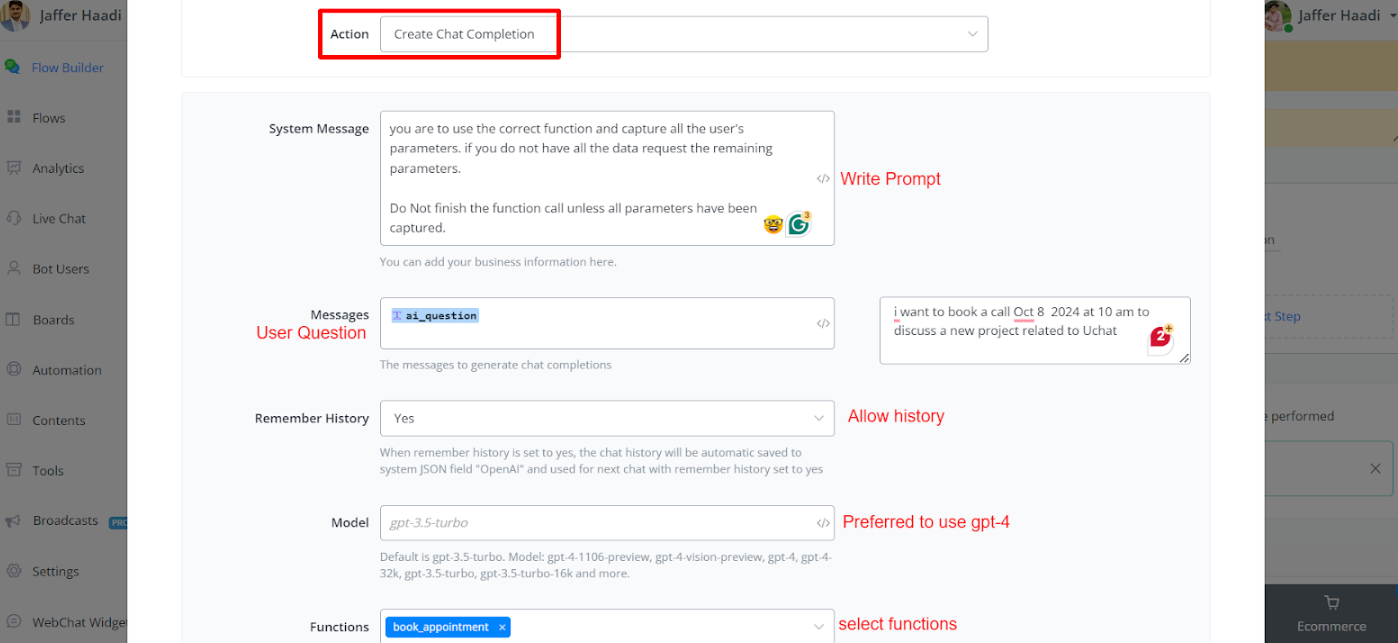
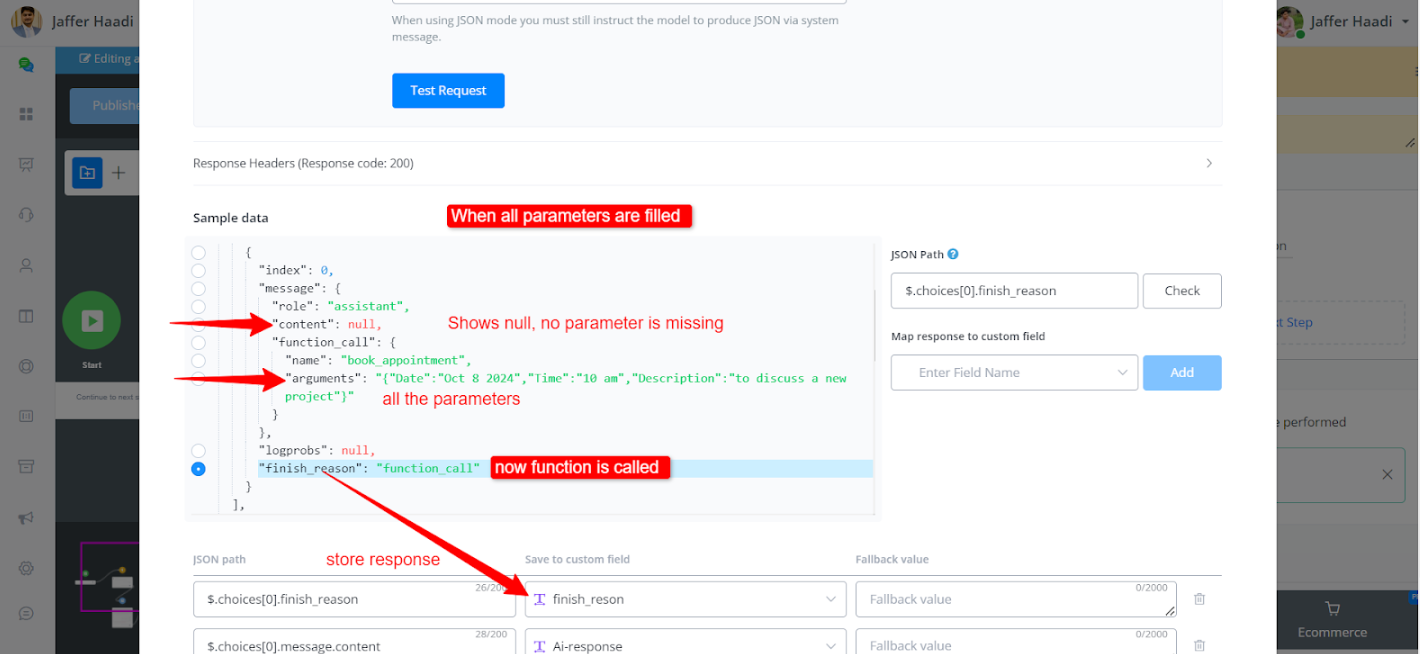
Output Handling
Output handling involves checking the chat finish reason. Customization options include setting up intents and mapping parameters. It’s essential to test thoroughly to ensure all parameters are correctly captured. Redirecting users back to the chat completion may be necessary if parameters are missing.
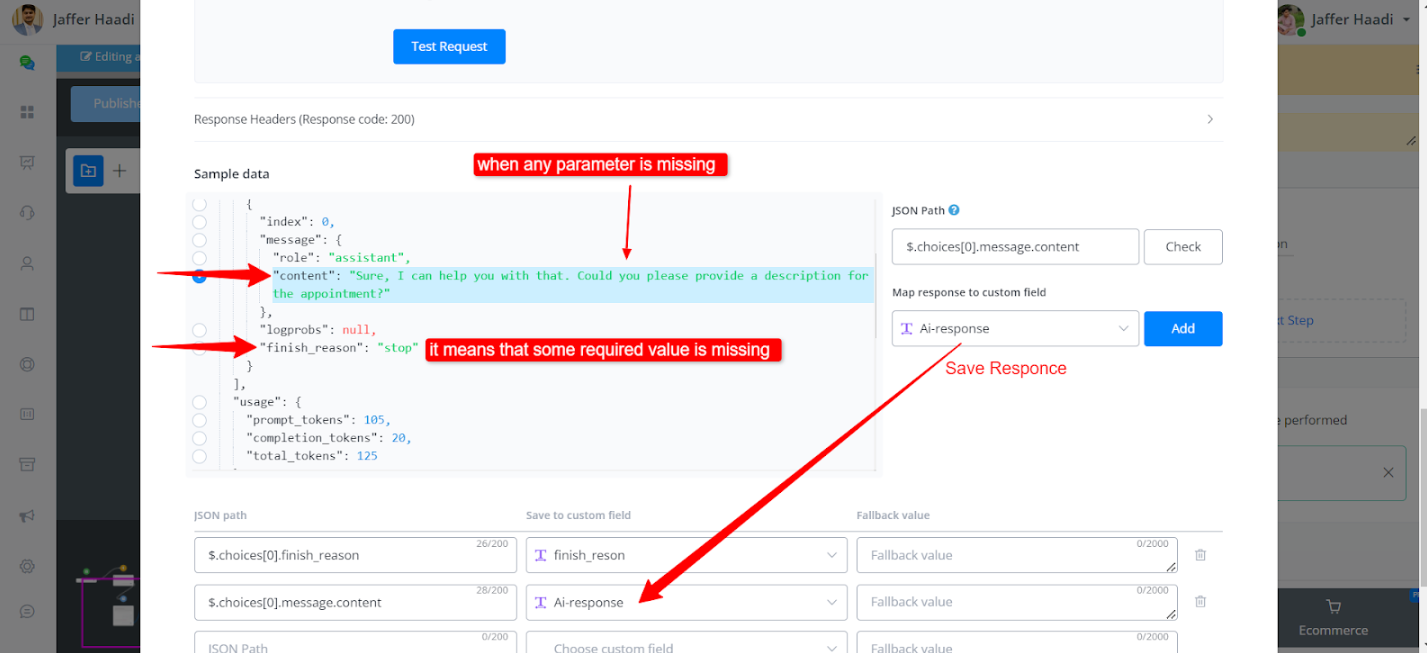
• If the reason is a function call, it indicates all parameters are captured, enabling direct output to the user.
The discussed method isn’t limited to appointment bookings but can be extended to various intents.
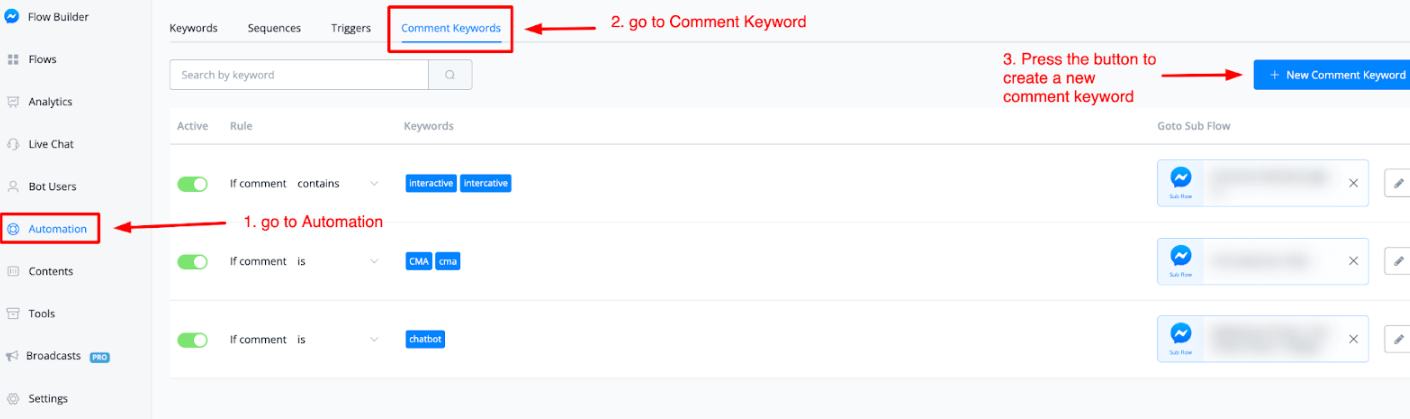
Comment Keywords
A very important and great feature inside of Messagingme.app is the ability to let the chatbot comment, like and send a person a pm when that person responds to on a post on your Facebook and or Instagram page.
You can find this if you go to the left-hand menu and press Automation then select the Comment Keyword tab.
From here you will have a blue button in the top right corner name + New Comment Keyword.
How to create a Comment Keyword Automation
Once you have pressed the blue button + New Comment Keyword then a pop-up window will open up. From here you will be able to set up your comment keyword trigger.

If we follow along with the image above we have 6 steps to take.
During step 1 you will be able to select any of your Facebook or Instagram page posts depending on which channel you are in.
With step 2 you are able to type in your keywords and determine the condition on when it needs to be triggered. By default, it is on contains, but you have the following options to choose from:
“If comment: Is Contains Starts with Is anything One of the following keywords”
Do note that if you select Is anything the ability to type in your keywords will be disabled.
On step 3 you will be able to create variations with which the chatbot will be able to reply to users who comment on your Page posts.
Advised is to at least add 5 variations to avoid the algorithm marking the replies as spam.
With step 4 you will be able to add the flow that will be triggered when the chatbot will send the pm to the commenter.
NOTE: make sure that your initial message contains only 1 text message with a button. As this counts as a user opt-in the user first needs to interact with this message before becoming a subscriber to your chatbot.
Inside of step 5 you are able to set up a delay for when the chatbot should reply and send a pm to the user.
This will make it more human-like experience-wise. But it is totally optional.
In the final step, you will be able to match any of the settings to your liking.
Once done press the blue button on the top right or bottom name Save and your comment keyword will now be shown in the main overview
How to using AI to automatically reply your Facebook Ads Comments
Introduction
A New Feature has been introduced, where the user comments on your dark post or ads, you can give a Like as well as reply to these User Comments under the comment keyword trigger.
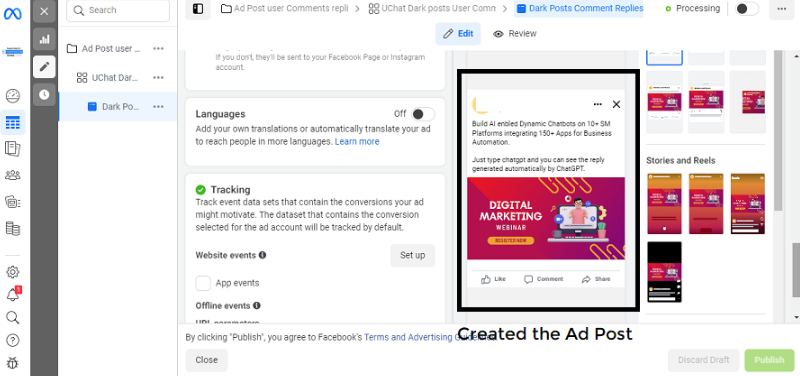
Create FB Ad Post
Let’s create a Ad Post in Ads Manager.
Creating A Comment Keyword Trigger
Automations -> Comment Keywords -> Create New Comment Keyword
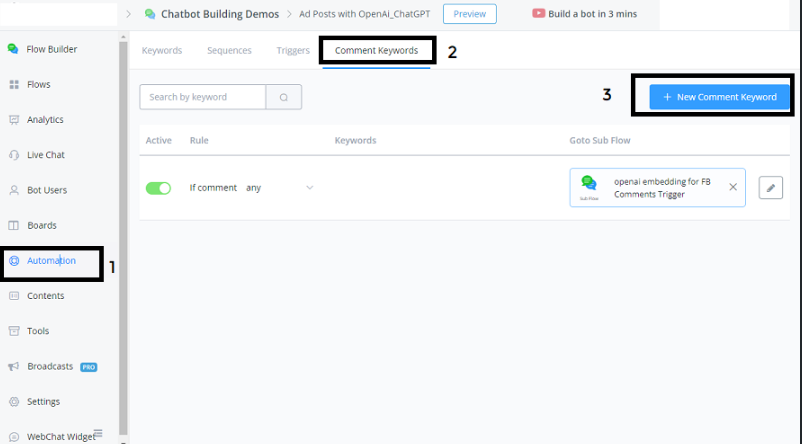
Once we click on New Comment Keyword, we can set up this function to trigger our FB Ad Post User Comments.
Let’s set up the required parameters:
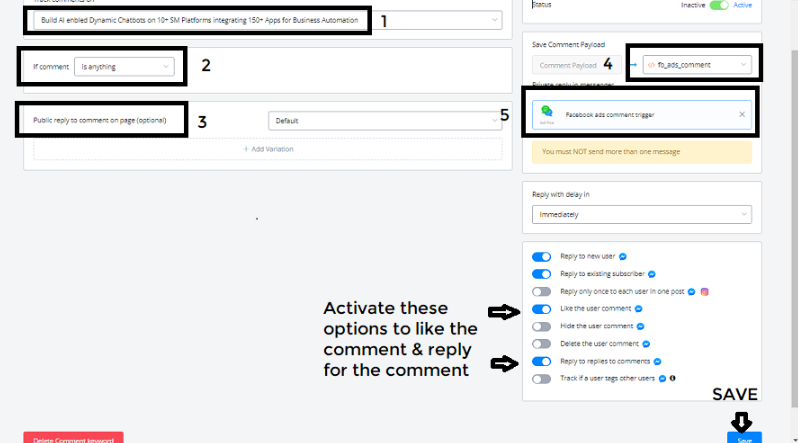
- We are selecting the FB Ads Post, for which we need to reply for the Ads Post User Comments and give likes.
- Comment is Anything, (need to trigger for types of Comments)
- Public - Not used
Status set to Active
- Save Comment Payload (the Comment information along with the User ID & other details are stored in this JSON Variable for further data retrieving.
- Private Reply in Messenger - (selecting the Subflow, which executes when the Comment Trigger happens.
Following Options are turned Active
- Reply to new User
- Reply to existing Subscriber
- Like the User Comments
- Reply to replies to Comments
Integration With Facebook Ads Manager
Integration -> Others -> Facebook Ads
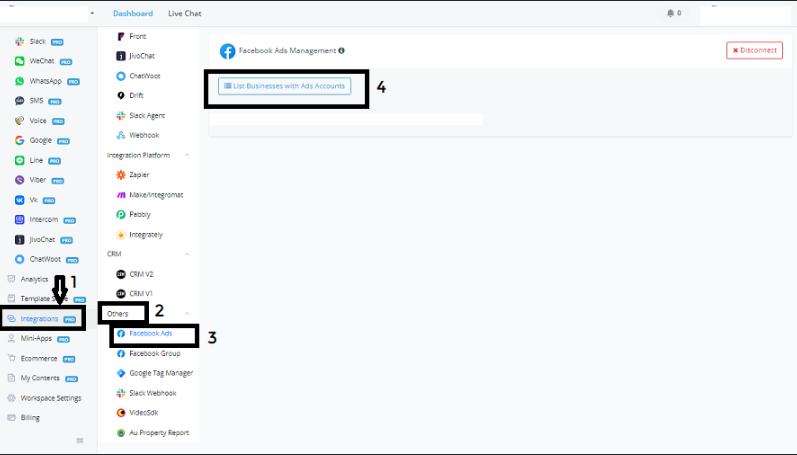
Here you are linking your Ads Account Manager along with your FB account Page
Creating the Comment Trigger Flow
Lets go to the Subflow which we have name as Facebook ads comment trigger
Let me explain the concept in building this SubFlow:
- Create a Condition block - to differentiate between the Keyword comment chatgpt and general questions asked about your Business / Services
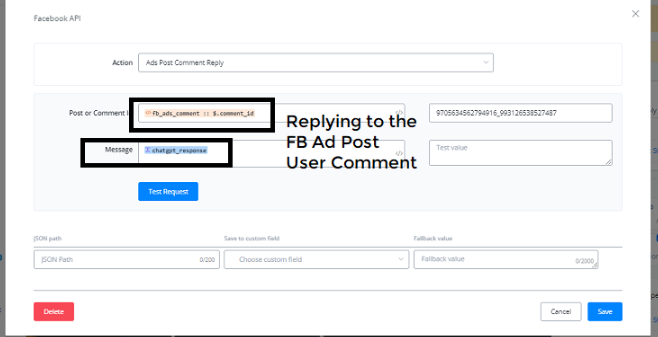
- Once the Comment is chapgpt, we are triggering an Action Block where we are calling the Facebook API for Ads Post Comment Reply Action Function.
- In this Action Function, we are retrieving and Mapping the Post or Comment ID from the JSON Variable declared in the Comment Trigger Automation.
- Next we are sending a PM Message to the User on their Messenger.Channel.
- In case the Comment is not chatgpt, we are diverting to another Action Block with OpenAI Integration, where we are doing an Embedding Match with the User’s Comment to check the comment is related to our Business / services we offer and retrieving the related Openai_embed_text.
- Incase the Embed Score is >0.8, we are triggering an Action Block by Integration of OpenAI Create Chat Completion Action.
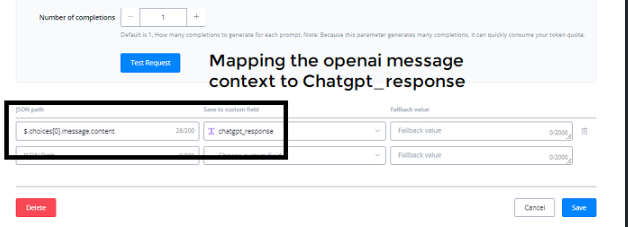
- Here we are creating a new variation of the Mapped output of Openai_embed_text, and sending the OpenAI variation reply to the FB Ad Post User’s Comment.
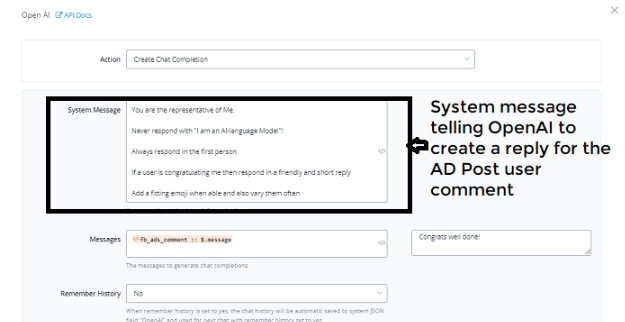
- In case the Embed Score is <0.8, the FB Ad Post comment collected in the JSON Variable to be sent to the Action block with OpenAI - Create Chat Completion with a new System Message to OpenAI to answer or greet accordingly if the message is a greeting message.

Condition Block -> Json Variable - “fb_ads_comment match value with chatgpt”
Action Block -> Facebook API -> Ads Post Comment Reply Action
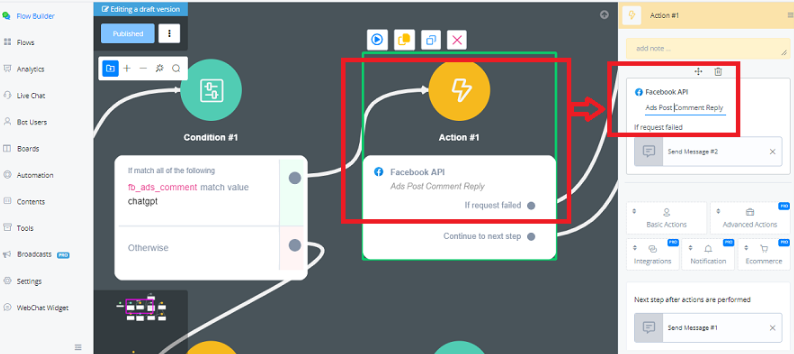
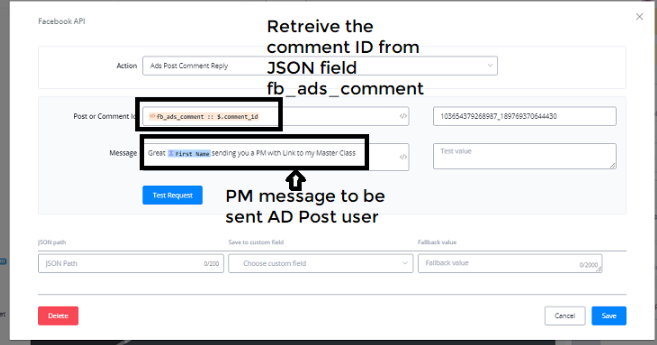
Message Block -> Sending a PM message on Messenger to the Ad Post User Comment
Action Block -> Integration with OpenAI - Embedding Match
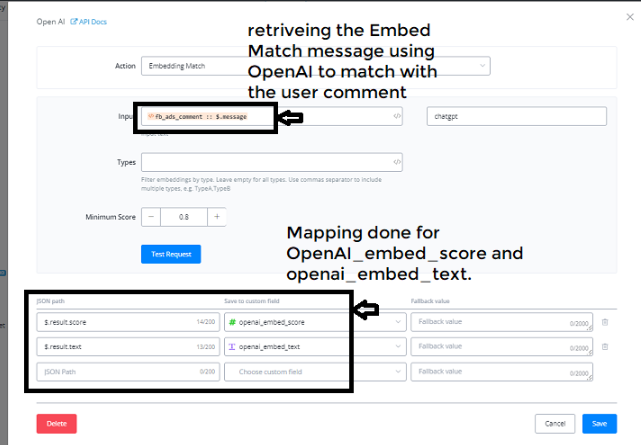
Condition Block -> Check openai_embed_score is greater than or equal to 0.8
Action Block -> Integration with OpenAI - Create Chat Completion function
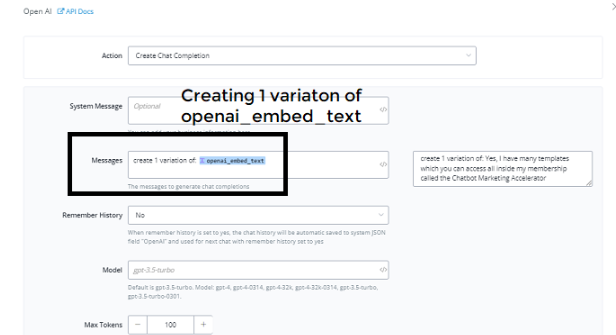
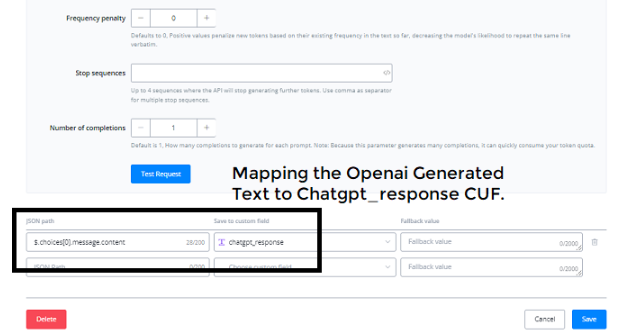
Action Block -> Integration with OpenAI - Create Chat Completion function
Note: As the page was big, split into two - up and below images includes one page.
Action Block -> Advanced Actions -> Facebook API
End Result as seen on the FB Ad Post Comments

In conclusion, managing comments for your ad posts with OpenAI and ChatGPT is a simple process. By following these steps, you can automate your comment responses and save time. Make sure to customize your replies and settings to your liking, and you’ll be on your way to managing comments effectively.
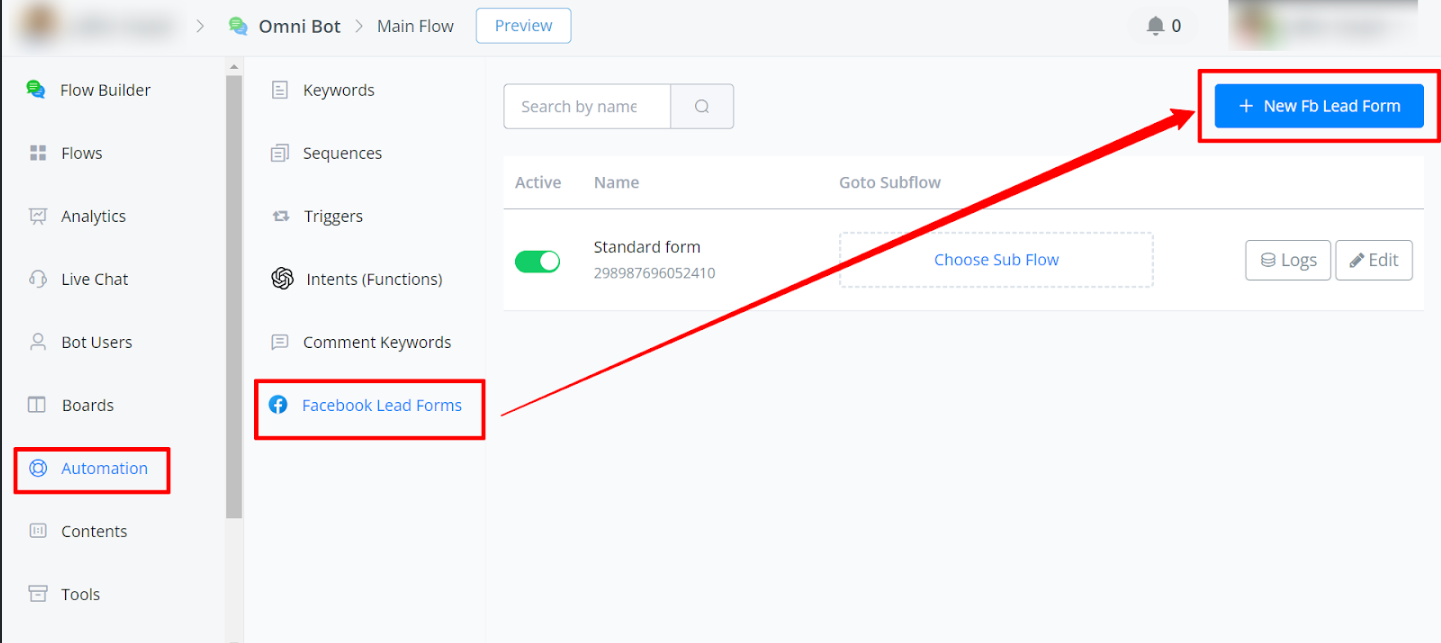
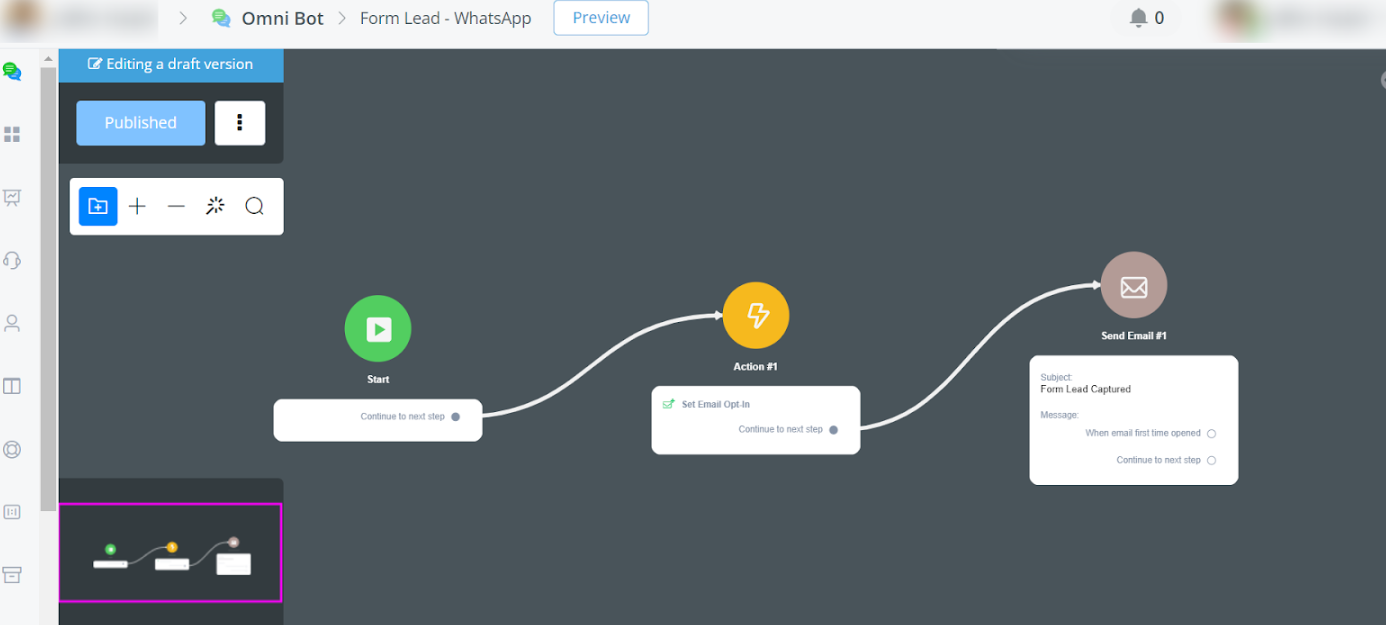
Facebook Lead Forms
Overview of Facebook Lead Forms
Facebook lead forms offer a fantastic way to collect user information such as name, phone number, and email, with fields prefilled for user convenience. This simplifies the process, requiring users only to submit the leads, kickstarting your automation.
How to set up lead from trigger
- Connect your Facebook pages in the Omni channel

Set up instant form leads automation
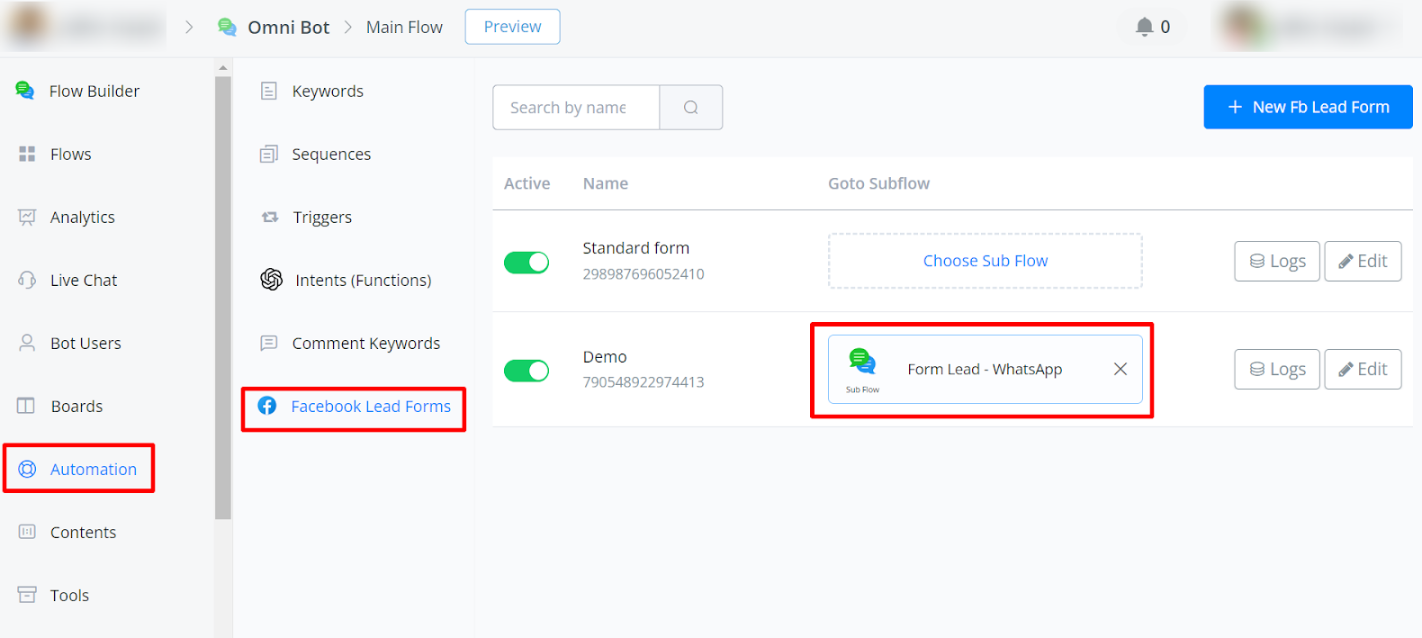
Under Automation-> Facebook Lead Forms
SMS, Email & WhatsApp Automation
We’ll explore three key automation channels: WhatsApp, Email, and SMS, each offering unique benefits for engaging with leads.
Trigger WhatsApp Template Message:
- Connect Whatsapp to the Omni Channel
- Trigger a Template Message to start the conversation
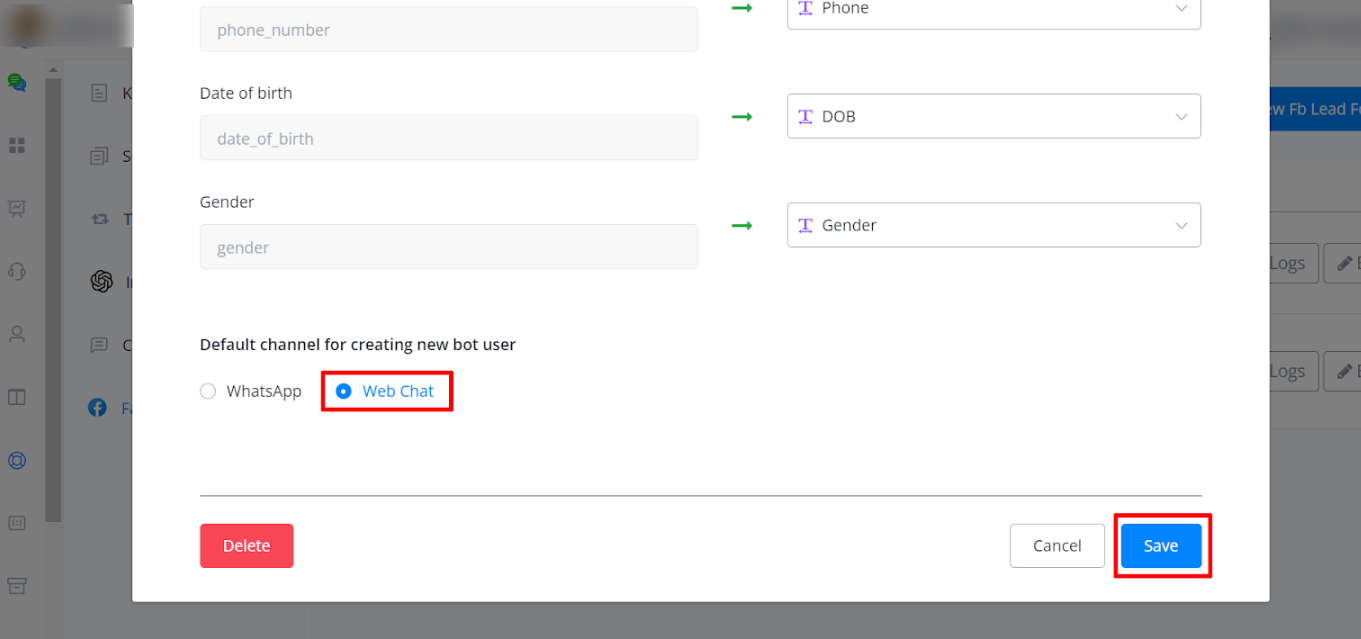
- When you are adding a New form select Default channel for creating a new bot user WhatsApp
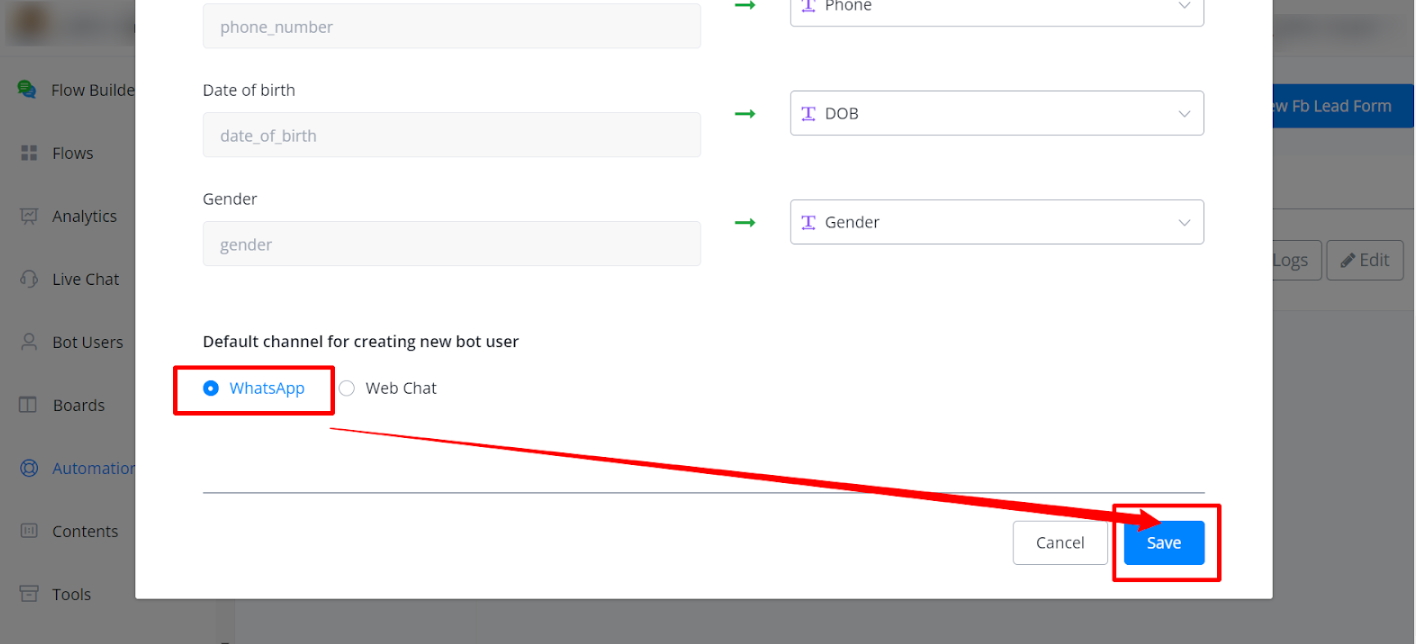
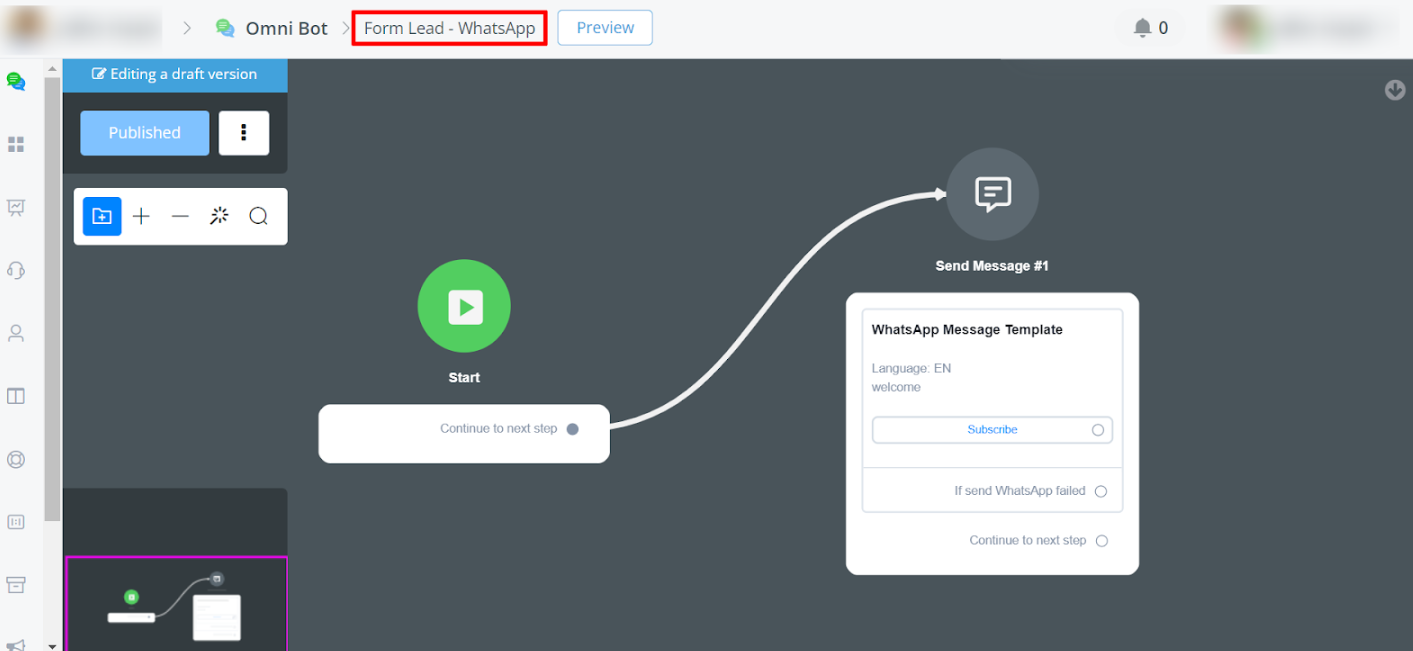
Now select your subflow to send a WhatsApp template message.
Set up your flow by adding a template message.
Trigger SMS Message
Send SMS action
For SMS select select Default channel for creating a new bot user Webchat
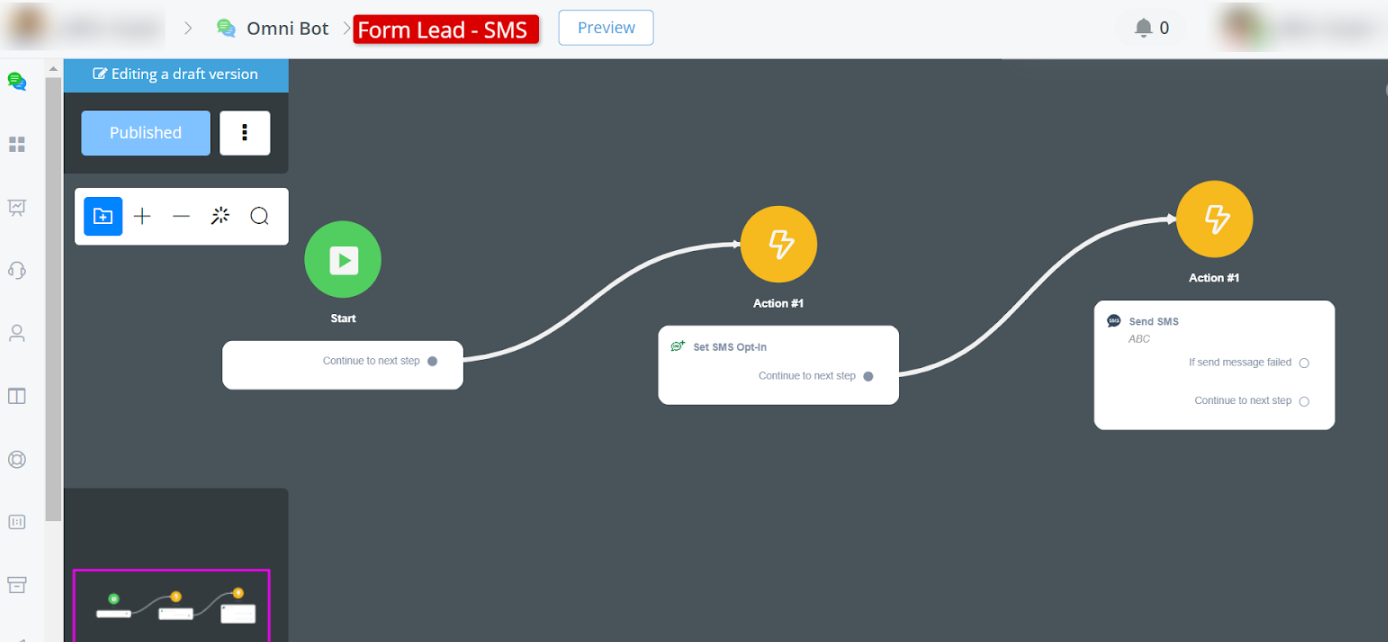
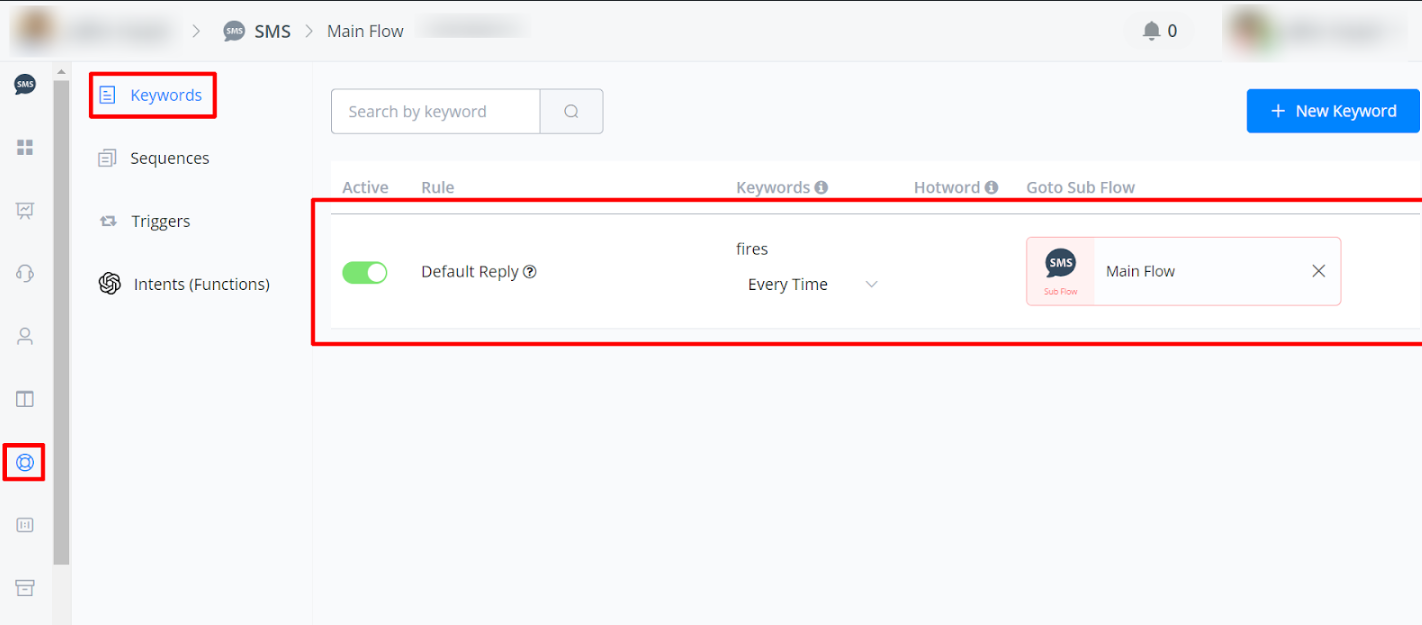
Set up SMS Bot and ensure your default reply is configured.
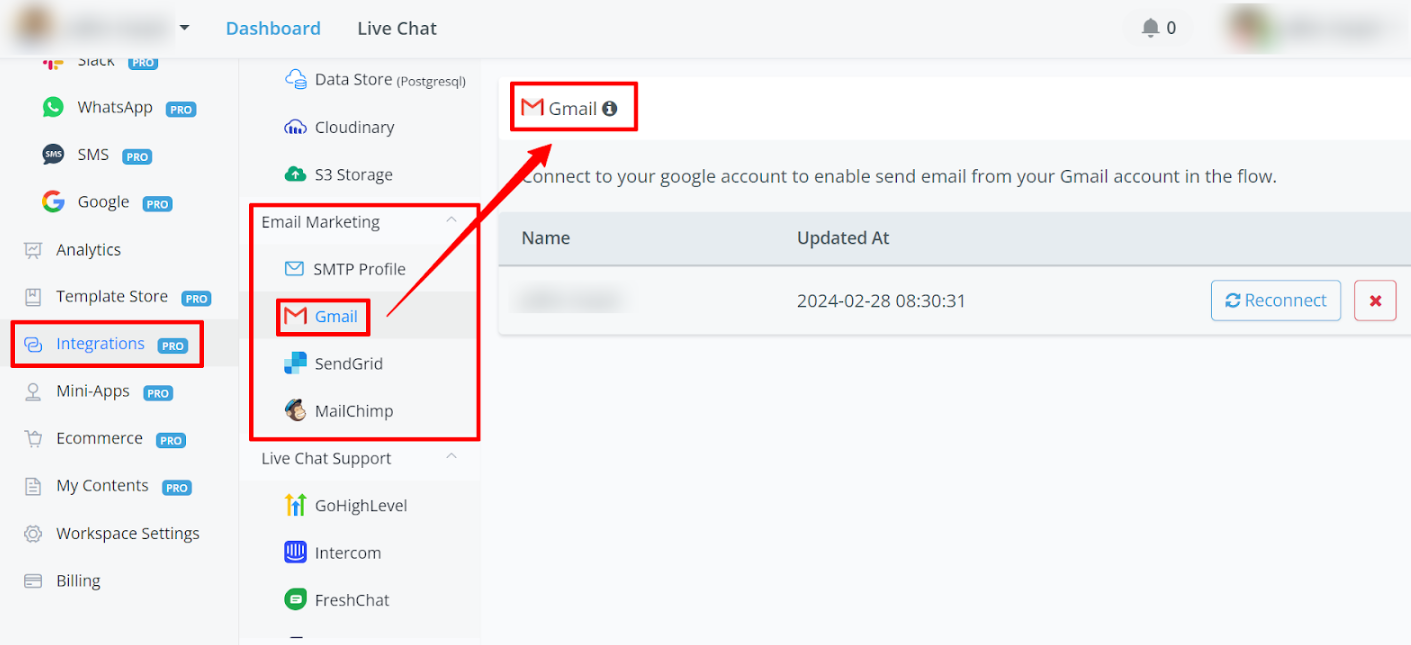
Trigger Email Automation
Set up Email Integration within the Integrations section. You’ll find multiple options to choose from for the Email Channel.
-For email select Default channel for creating a new bot user Webchat
- Make sure the user is opt-in for Email or use the “mark email as opt-in” action
Revision Implementation Steps:
- Connect your Facebook pages to the Omni Channel.
- Create instant forms and link them to your Facebook pages.
- Utilize the Facebook List Form settings to automate processes.
- Customize flows to trigger actions based on user interactions.
- Connect with various channels such as WhatsApp, SMS, and Email.
- Use advanced integrations like Open AI to enhance automation capabilities.
How to get the traffic source for the instant form ads
In this article, you will learn how to get the traffic source(campaign name & ad set name) for the instant form leads.
This is the common problem for advertisers. Because in most cases, you might connect the same instant form to multiple campaigns or adsets.
When you received the leads, you will need to find out which campaign or which adset the leads is coming from.
Sample instant form payload
For example, this is the sample instant form lead payload, you can find the details below
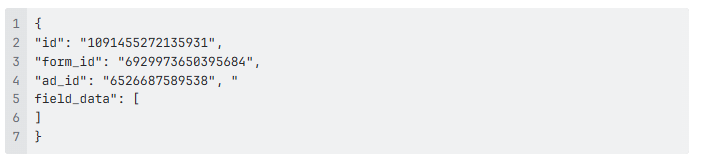
And the lead_gen ID is 1091455272135931, and the ad_id is 6526687589538
We will use the ad_id to get more information for the campaign in the next step.
Get the campaign name & ad set name for the leads
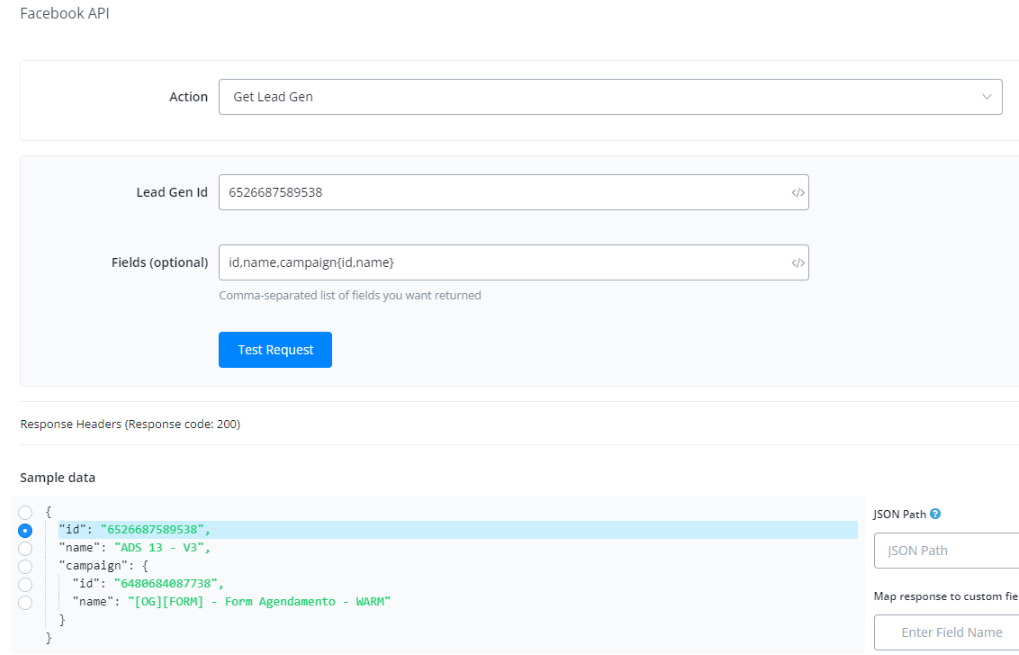
You can go to “Action” → “Advanced Action” → Facebook API → “Get Lead Gen” Action.
And then you place the ad_id in the lead Gen ID, and then write “id,name,campaign{id,name}” in the fields(optional), you can pull the details adset name & campaign name in the response as per screenshot below.
If you want to pull more parameters, you can reference the link below to pull more traffic source information
Graph API Reference v24.0: Ad - Documentation - Meta for Developers