Content
User Fields
User fields can be used to store data you collect from your bot users throughout the conversations you have with them.
It will help you segment the users inside of a flow and allows you to create more customized funnels that will help you convert.
Creating a user field
There are two ways to create a user field. We will explain both steps in this documentation.
Create User field in tab overview
To find the user field overview press Contents from the left-hand menu and then select the User fields tab.

From here you will come to your user fields overview where you can manage all of your user fields you create.
To create a new user field press the blue button in the top right corner named + New User Field.
From here a new pop up window will appear where you will be able to set up your new user field.
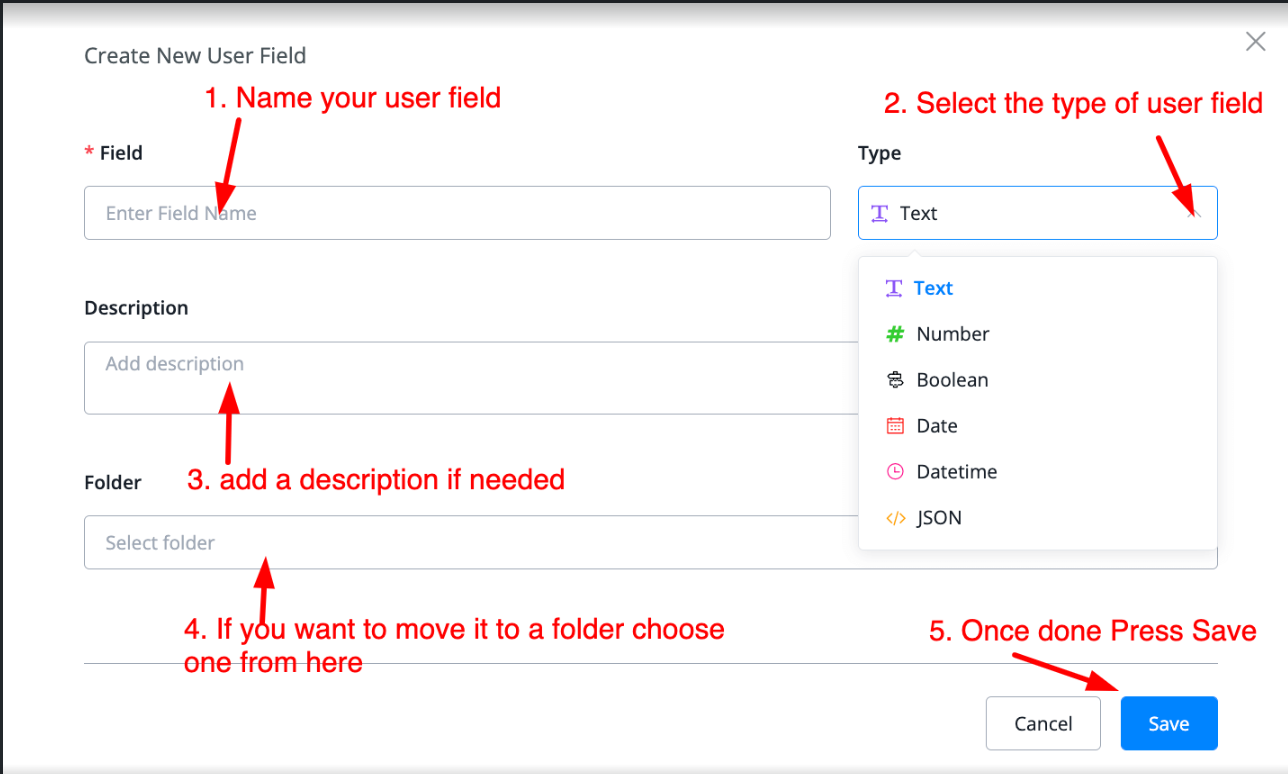
Just name your new user field. The next step is to select what kind of user field you like to create. Currently, we have the following available for you:
- Text
- Number
- Boolean
- Date
- Datetime
- JSON
These fields allow you to set up all kinds of options inside your chatbot including saving data from bot users or API calls as an array.
You can also add a description if you like and or want to clarify what the function is. Below the description, you will be able to select whether or not you want to move it into one of the folders you might have created to keep user fields more structured and easy to find.
Once you are done just press the blue button in the bottom right named Save and your user field will be created.
💡 For the date time user custom fields, by default, it’s empty. If you are using the default value in the condition node, it will output the “Now” time. If you are using it in the output text, it will show empty value.
Create user field inside flow builder
Another way to create a user field is by doing so directly inside the flow builder. This has the huge advantage that you can create user fields on the fly and not have to go to the user fields overview tab first.
Just go to any flow and from here you can create user fields anywhere you need to use them.
You will be able to create them inside of:
- Question blocks
- Action blocks -› set custom variable
- External request -› response tab
Let’s take an example of a question block. We are wanting to store the response to the question inside of a new user field.

Just start typing a new user field name. The next step is to press the same name below your typed one to create the user field on the spot.
You will then be asked which type of user field you would like to create. Depending on where you are or what kind of question you get to see different kinds of options.
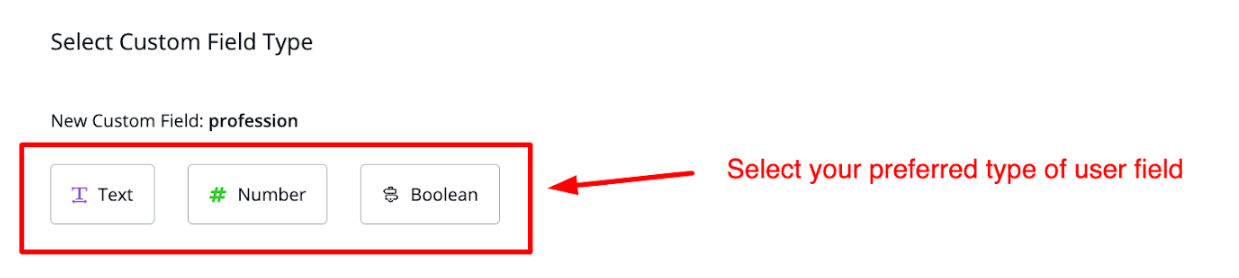
In this case, since it is a regular question block we get to see;
- Text
- Number
- Boolean
Were you to ask for a date/time type of question you would get to see that type of custom field only.
Managing your user fields
To manage all your user fields you can do so at the main user fields overview tab.

You can create folders to keep your user field overview more structured and let you allow to find your user fields more easily.
And you can manage any user field directly from this tab overview by pressing the pencil icon to the right of any user field.
Bot Fields
Similar to user fields you can also create bot fields. The main difference is with user fields you store data to segment and share with that specific bot user, and bot fields allow you to store data and show them all equally among all bot users.
The value does not change. Think of information such as opening hours, or contact details for the business.
Creating a bot field
You can create a bot field by going to the bot field overview tab.
You can do so by pressing Contents from the left-hand menu and from there press the tab called Bot Fields.
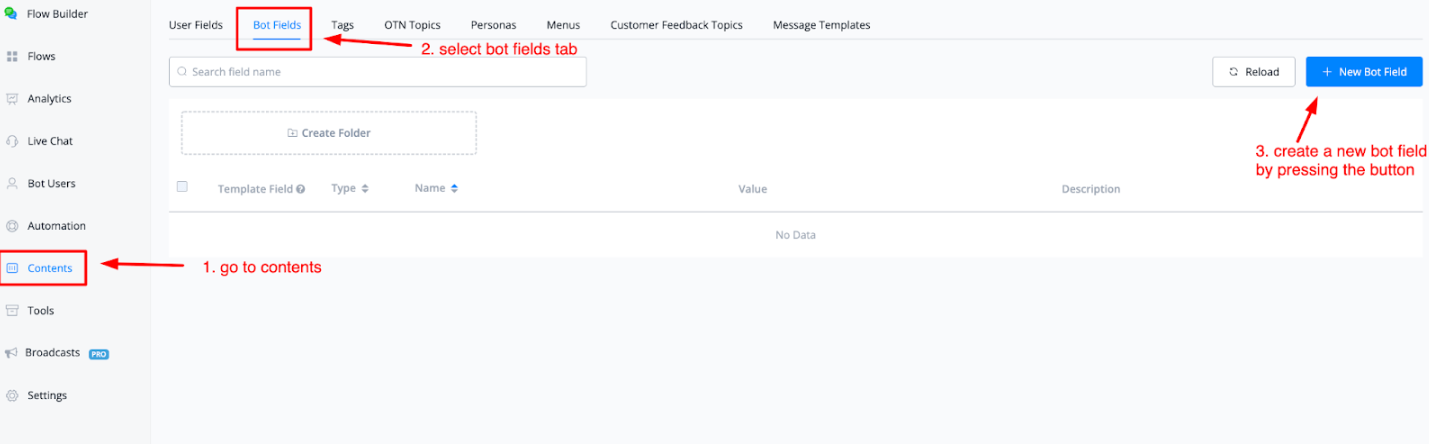
If you want to create a new bot field just press the button in the top right corner named + New Bot Field.
From here a pop-up window will appear where you can create your bot field.
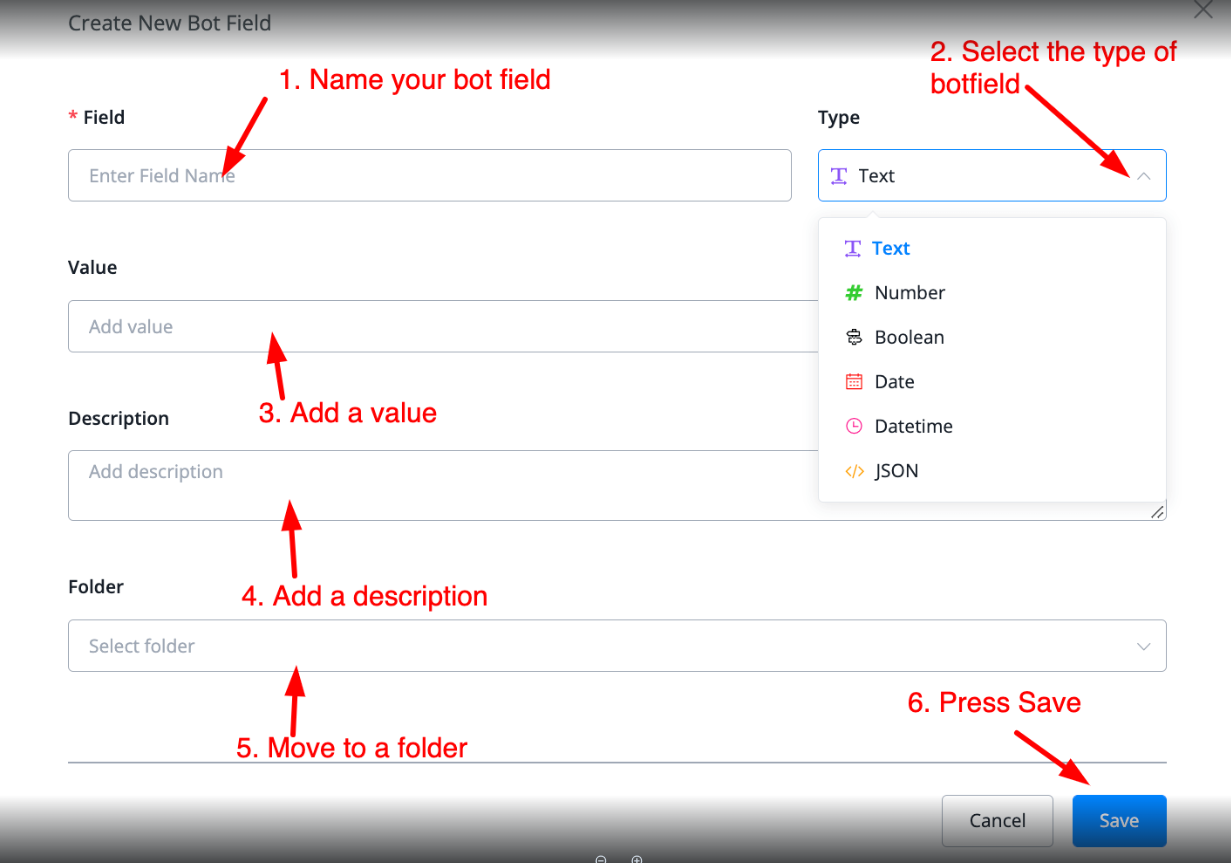
After naming your new bot field you can select the type of field you would like it to have.
Currently, we have the following ones available for you;
- Text
- Number
- Boolean
- Date
- Datetime
- JSON
After selecting the type you can start adding the value to this bot field. If you like a description can also be added same as the folder you want to move it to.
After everything is filled in just press the button in the bottom-right corner named Save to create the bot field.
Managing your bot fields
After you created the bot field you are able to manage it from the main overview.
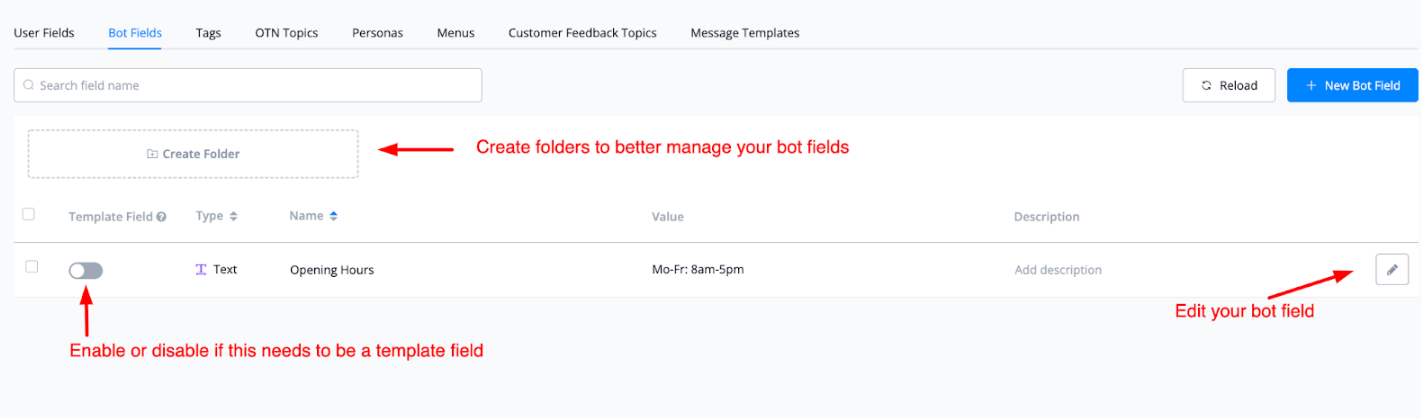
You can create folders to better keep track of your bot fields. You can also enable or disable the template field option.
Lastly, you are able to edit the bot field itself by pressing the pencil icon to the right of any bot field.
Tags
Tag a user by user’s type, situation, status, etc for better management.
Create Tag
In your workspace, go “Tags” from the left sidebar.
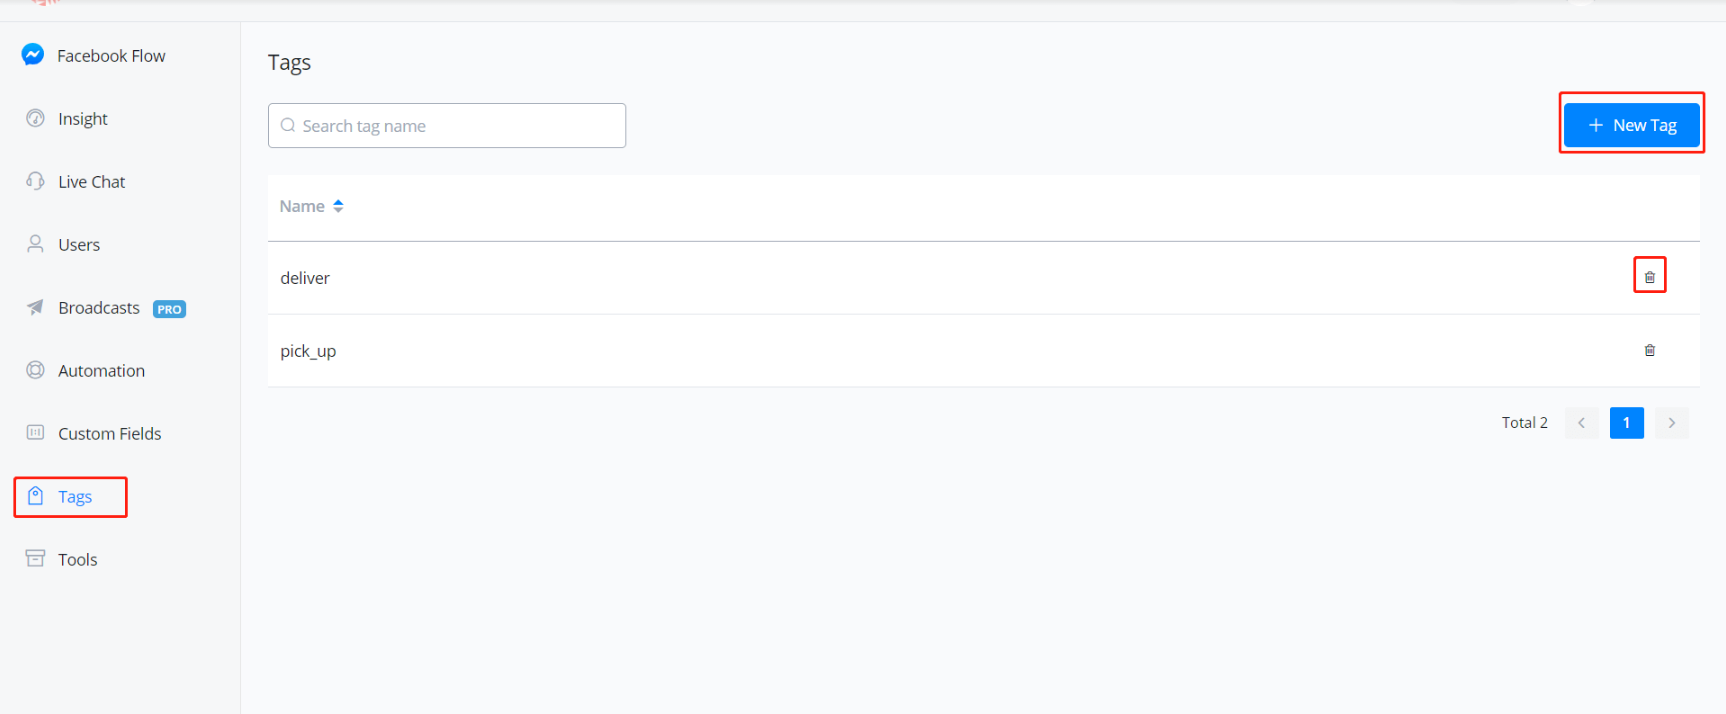
Here is where you manage your tags.
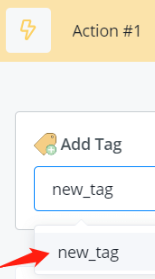
TIP - You can also create tag by just typing in a new tag name and click it wherever you add tag.
Add / Remove Tag
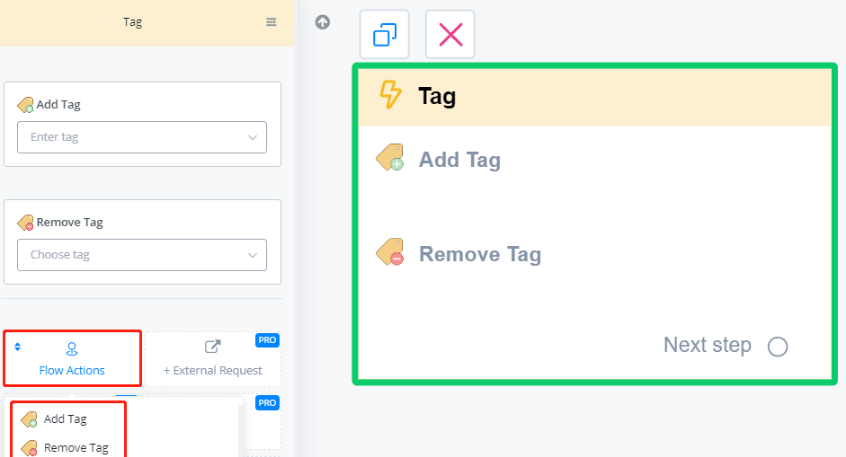
In the Action step, click “Flow Actions”, then you can see “Add Tag” and “Remove Tag” options.
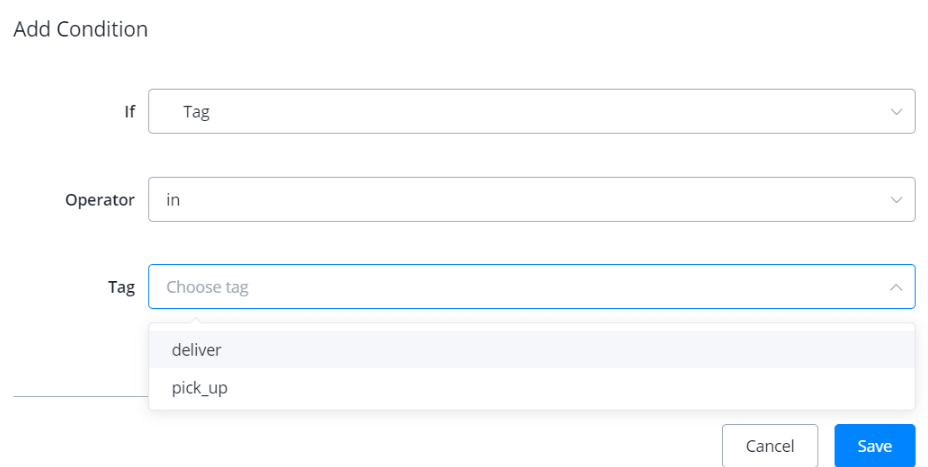
Use Tag in Condition Step
Use condition step to help you guide users with different tags to different steps.
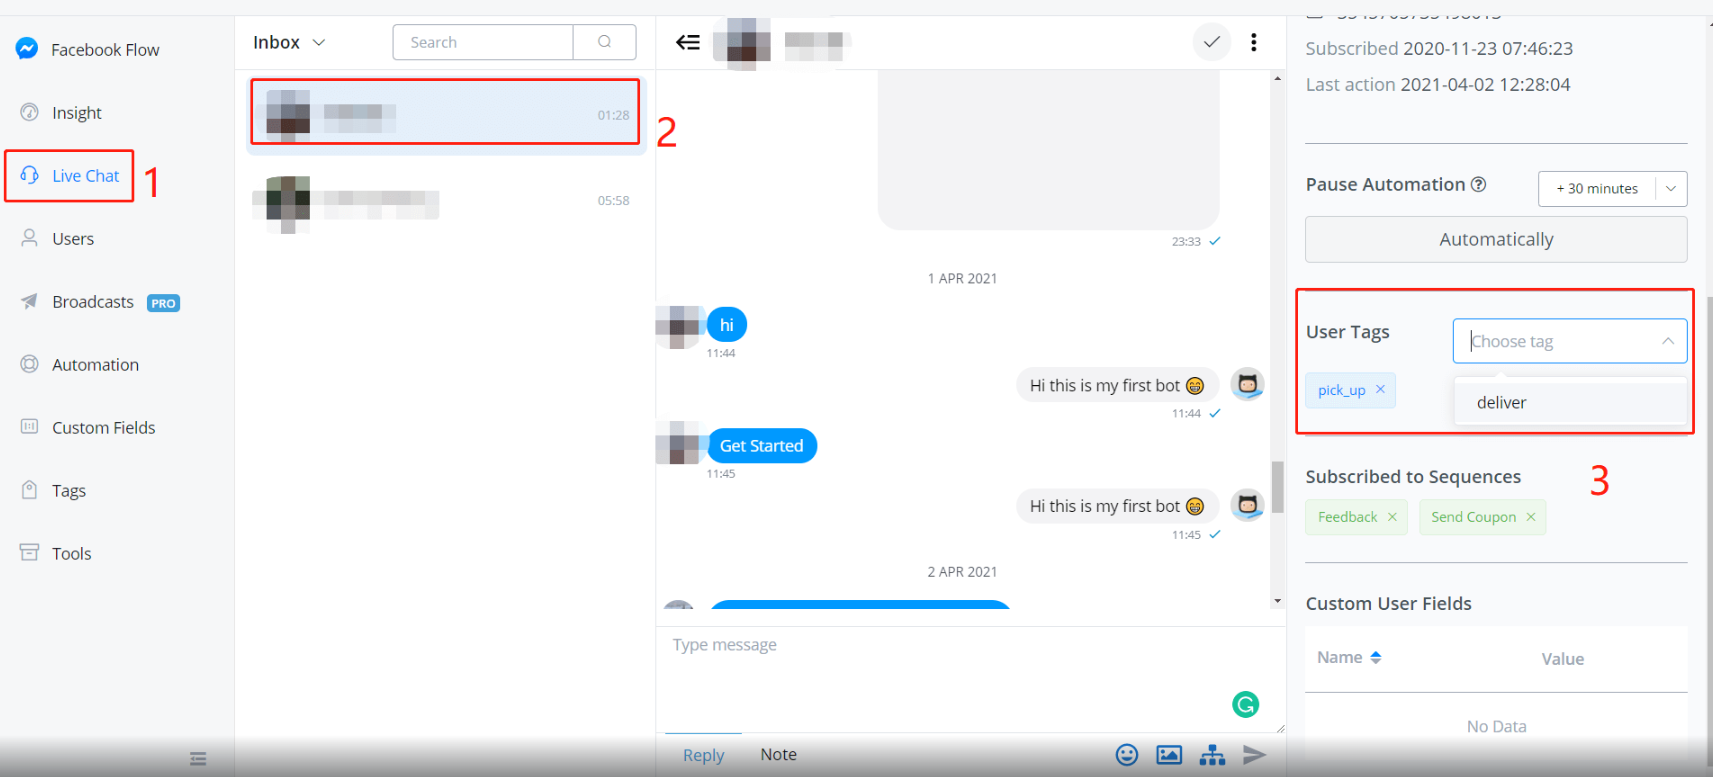
Use Tag in Live Chat
You can also manually add / remove / check tag for each user in “Live Chat” from the left sidebar.
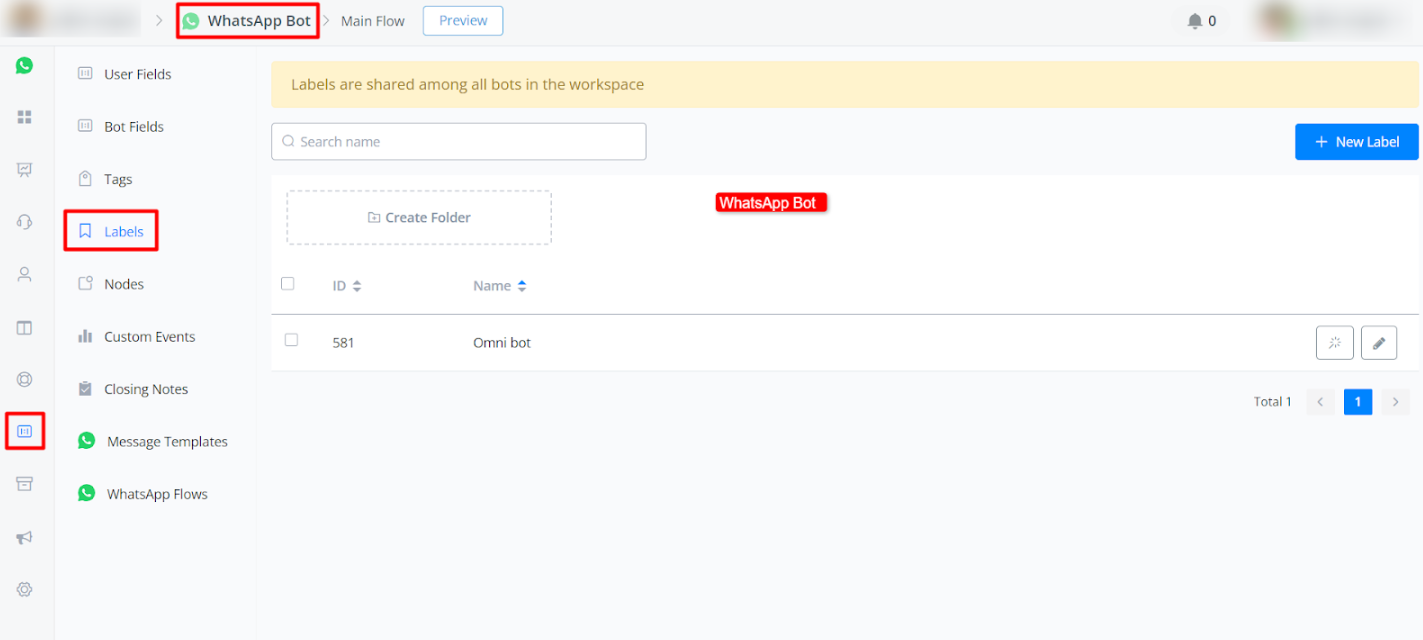
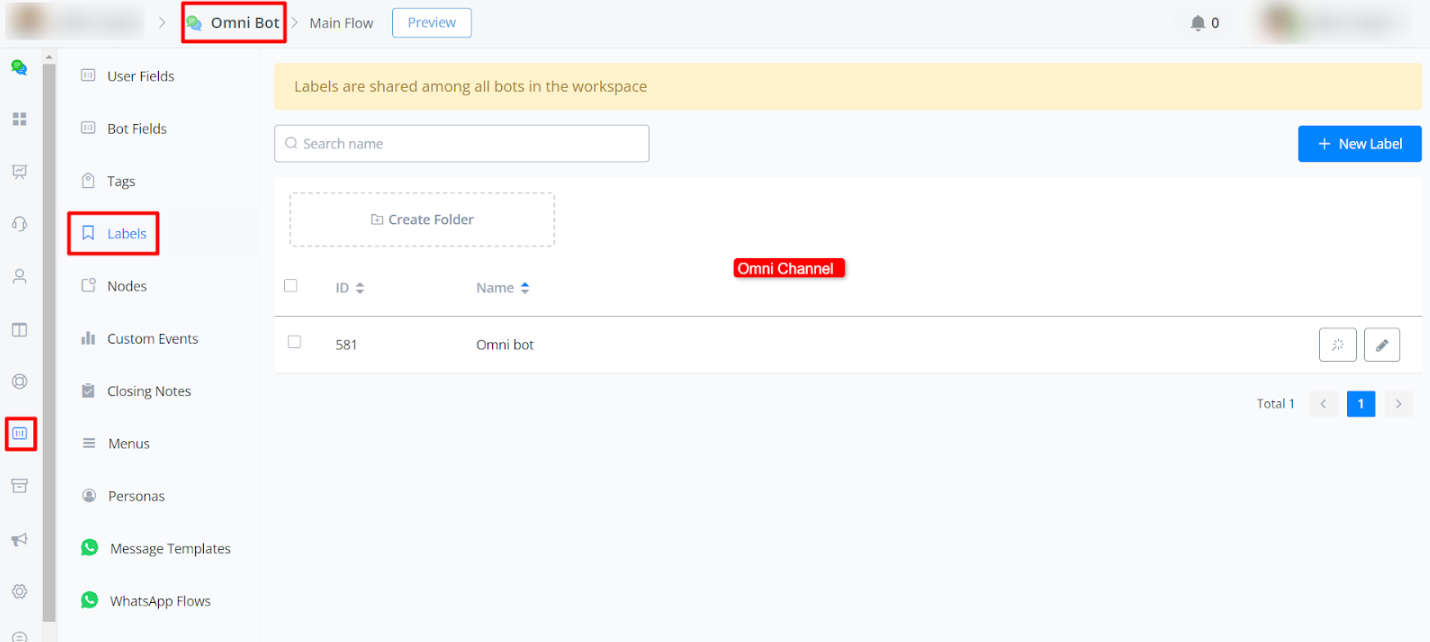
Labels
Labels function similarly to tags, however they can be accessed across different bots in the same workspace.
💡 This is extremely helpful if you have purchased the “Global Contacts” Paid add-on.
How to use Labels
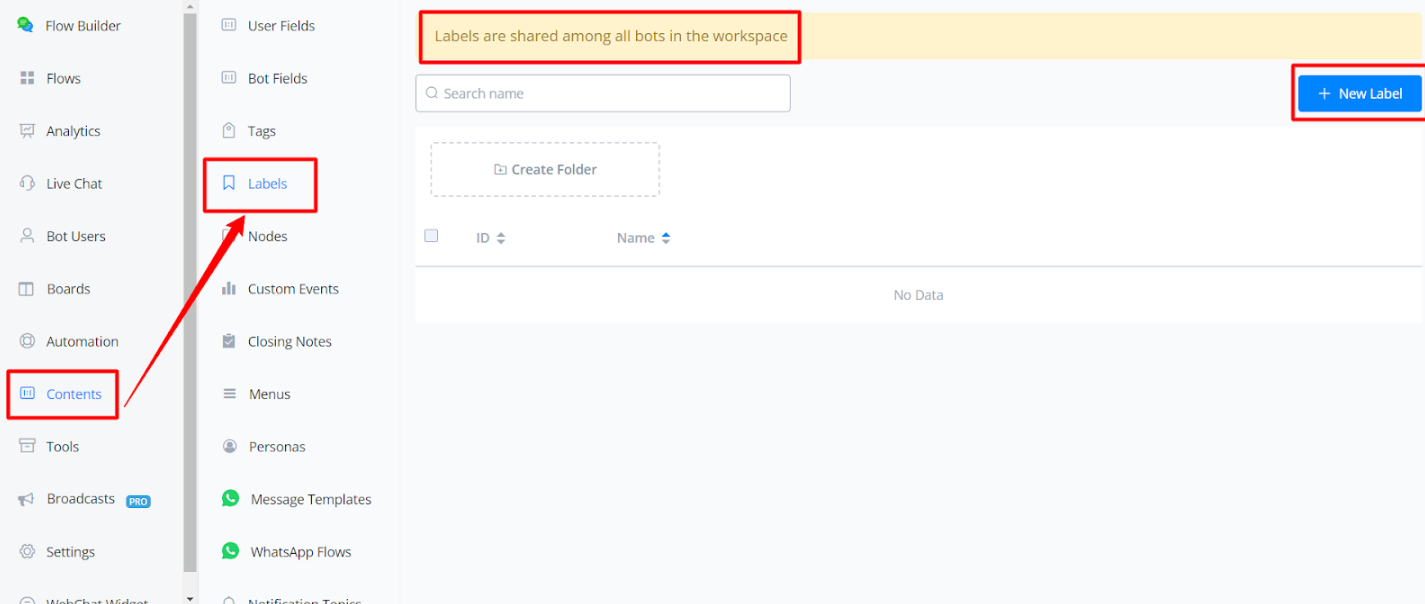
Where can you find it: Under Content, you can see the labels
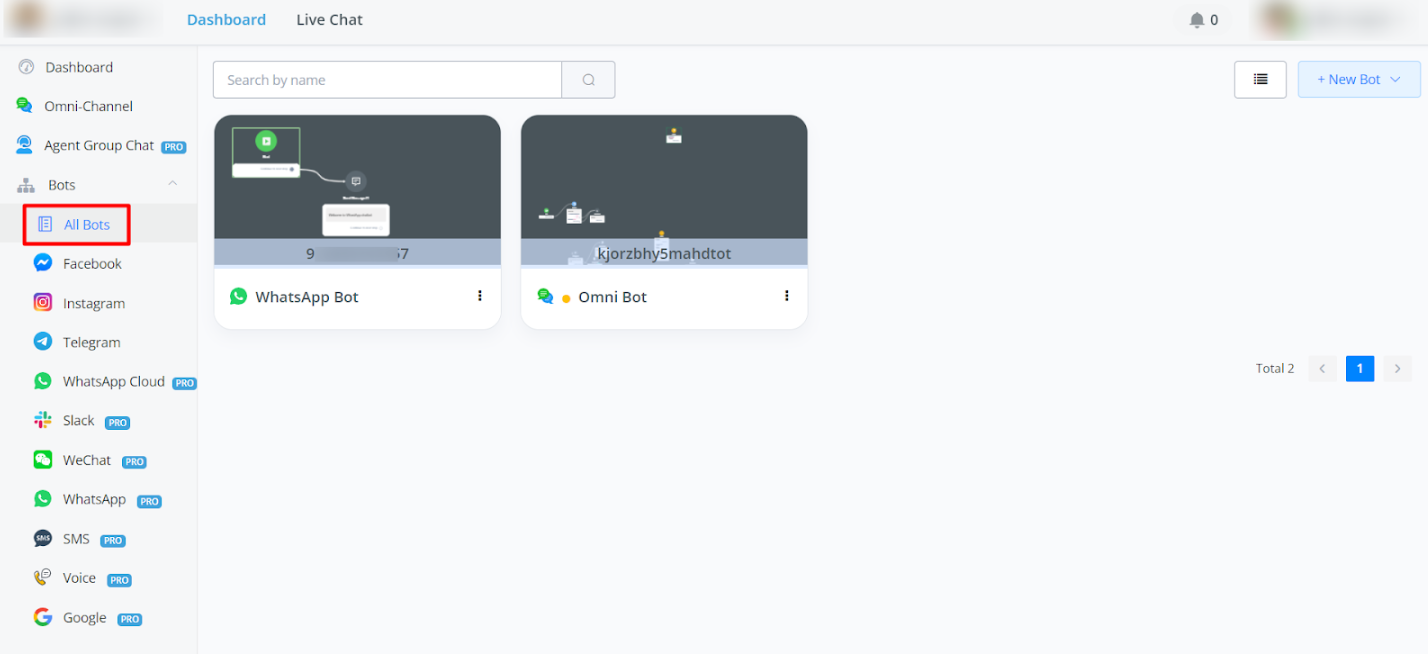
To explain how labels work, we have two bots in the same workspace. One of them is Whatsapp Bot, while the other is Omni Channel.
When you create a label, you can access it in all bots that share the same workspace.
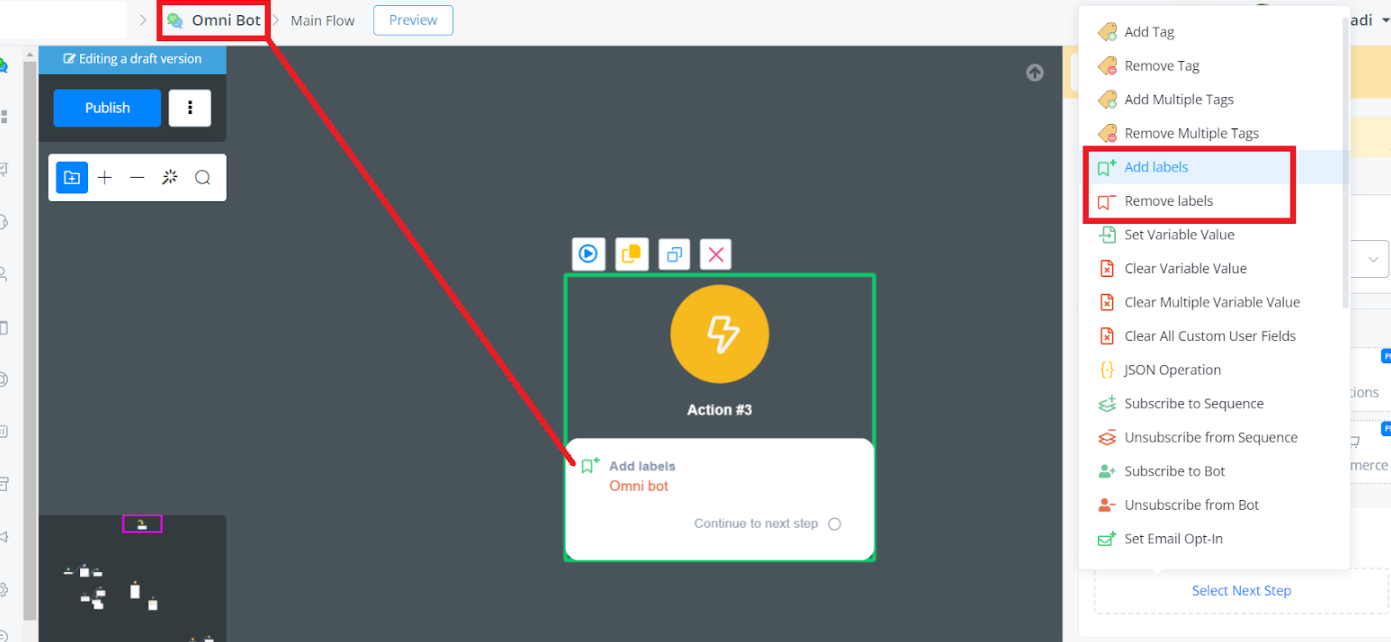
How you can use in sub-flows:
In action node -> basic action -> add and remove label.
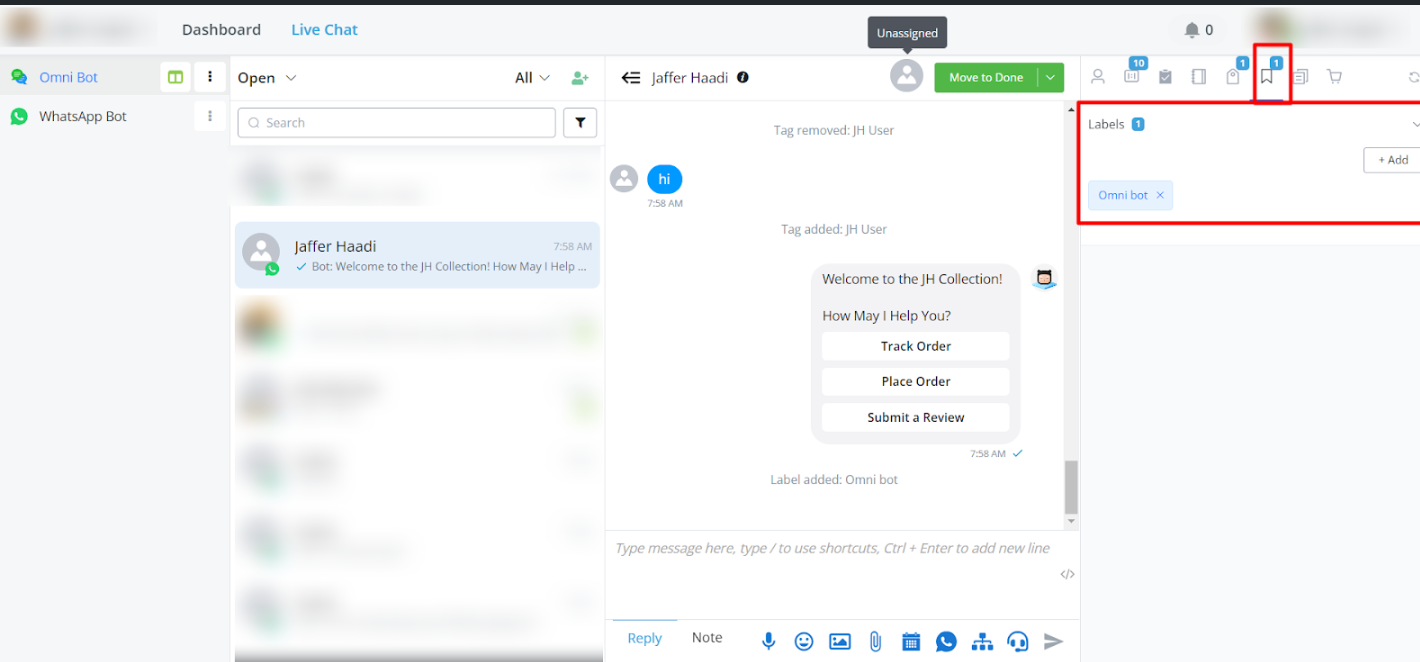
You may now view these labels in Live Chat.
How to use the Labels in the “Global Contacts” Add-on
Purchase Global Contacts Add-on
You can purchase the add-on at one time cost. You can find the add-on from your “Whitelabel Settings” → Partner Settings → Custom Addon → Global Contacts.
Once the add-on is purchased, you can click “settings”, it will show you where you can find this settings.
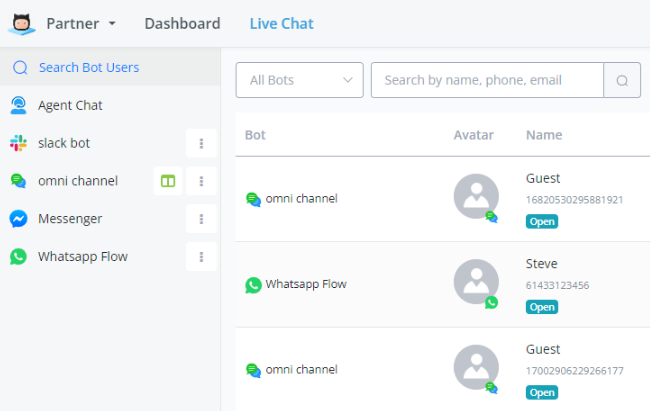
It’s located in the “Live Chat” at the top navigation bar, and you can find the “Search Bot Users” from the left side.
How to use workspace labels in Global Contacts
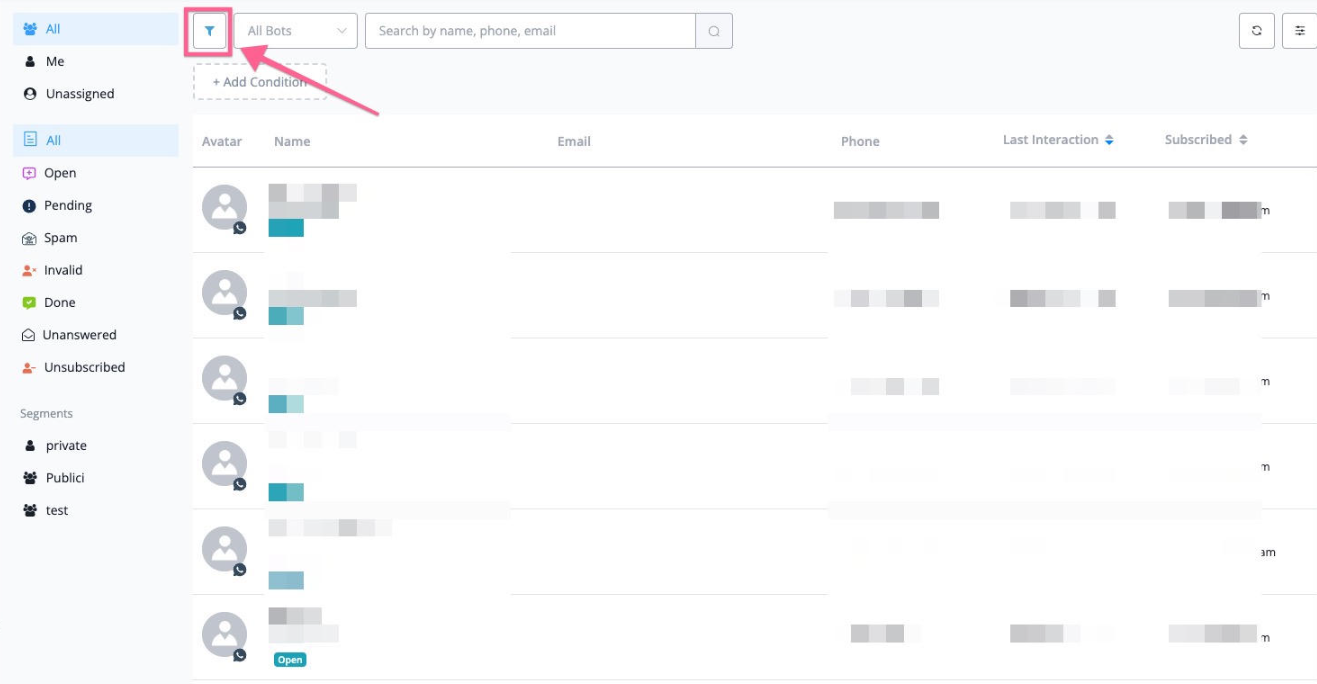
The workspace label is shared across different bots in the same workspace. so if you have added the same label in different bot, it’s possible for you to filter out all the bot user that meet your segment requirement.
In the global contacts, you can click the “filter” icon, and then build and share the segment based on the workspace labels.
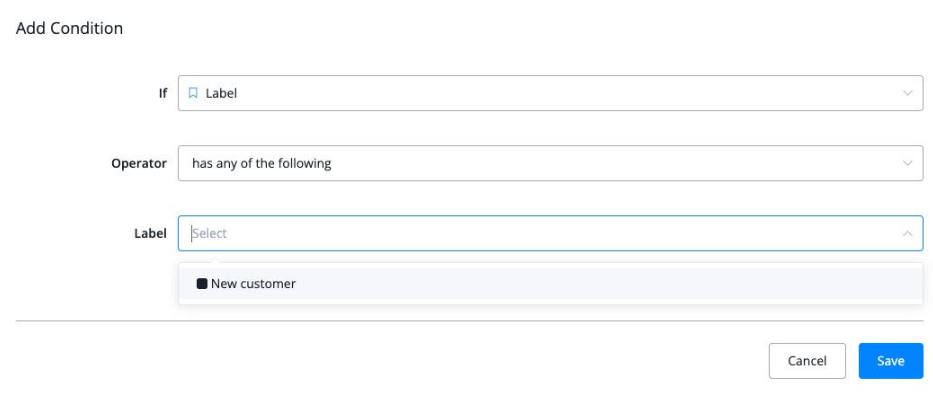
For example, we have created “new customer” label, and it’s shared across all the bots in the same workspace, and you can create the filter like the screenshot below
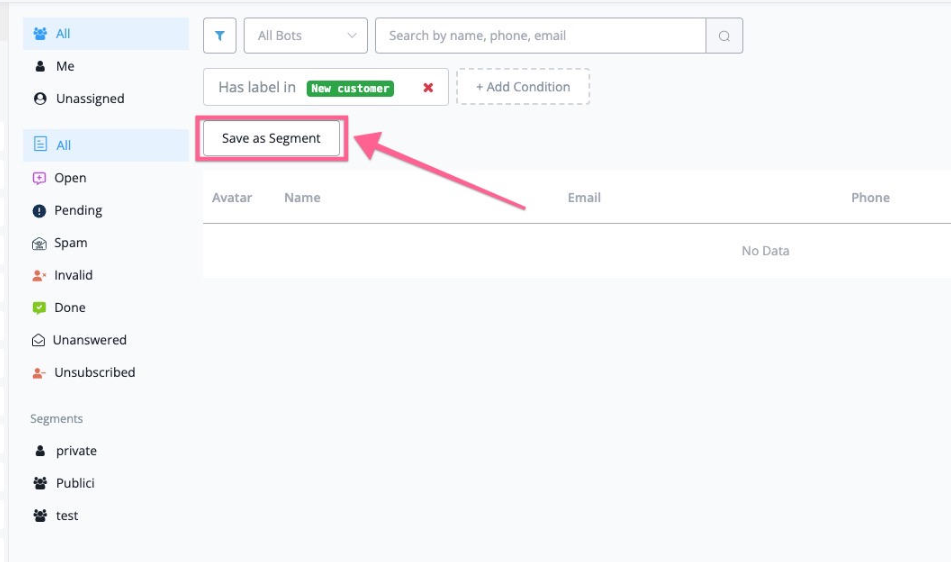
Once it’s saved, you can save this as public or private segment, and then your team can access these contacts easily from the left sidebar.
Nodes
We’ll guide you through the powerful node feature in Messagingme.app. This feature allows you to efficiently manage and interact with the nodes in your workspace, making your workflow smoother and more organised.
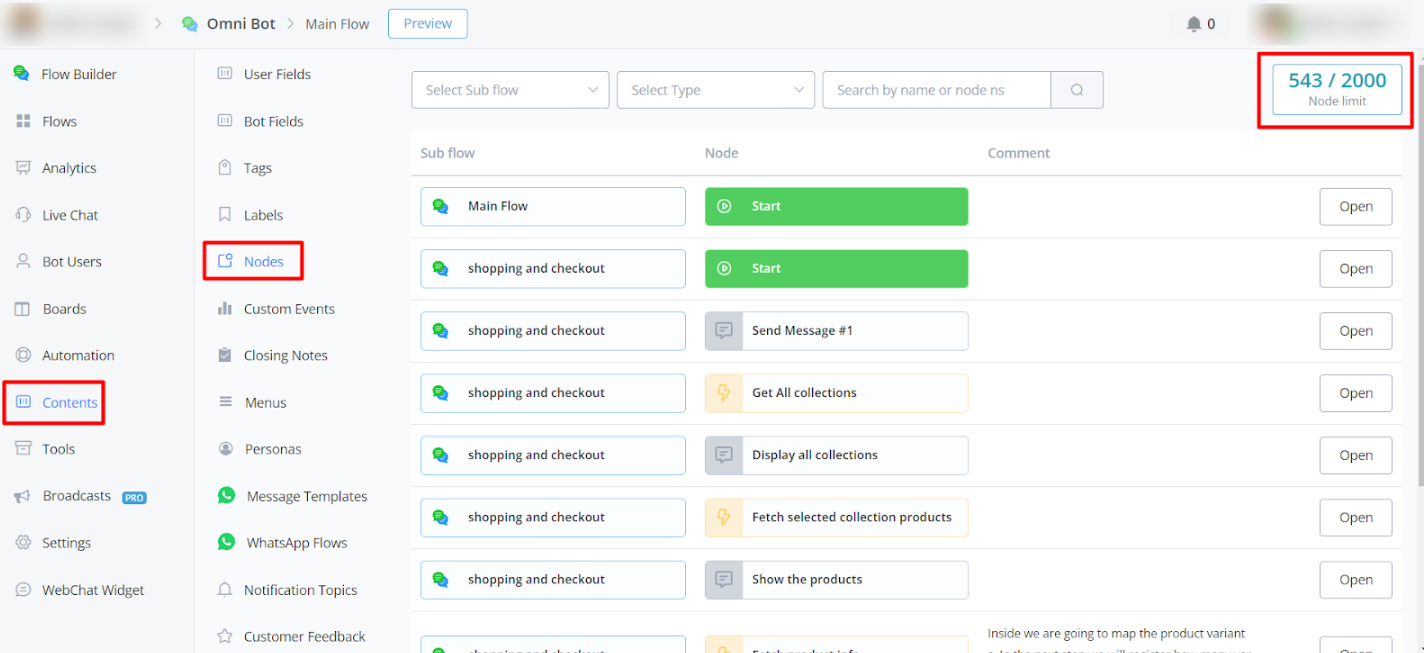
Navigating and Filtering Nodes
Selecting Flows
To start, users can select flows within their bot. This selection will dynamically display all the nodes in the chosen flow, giving you a comprehensive view of the workflow.
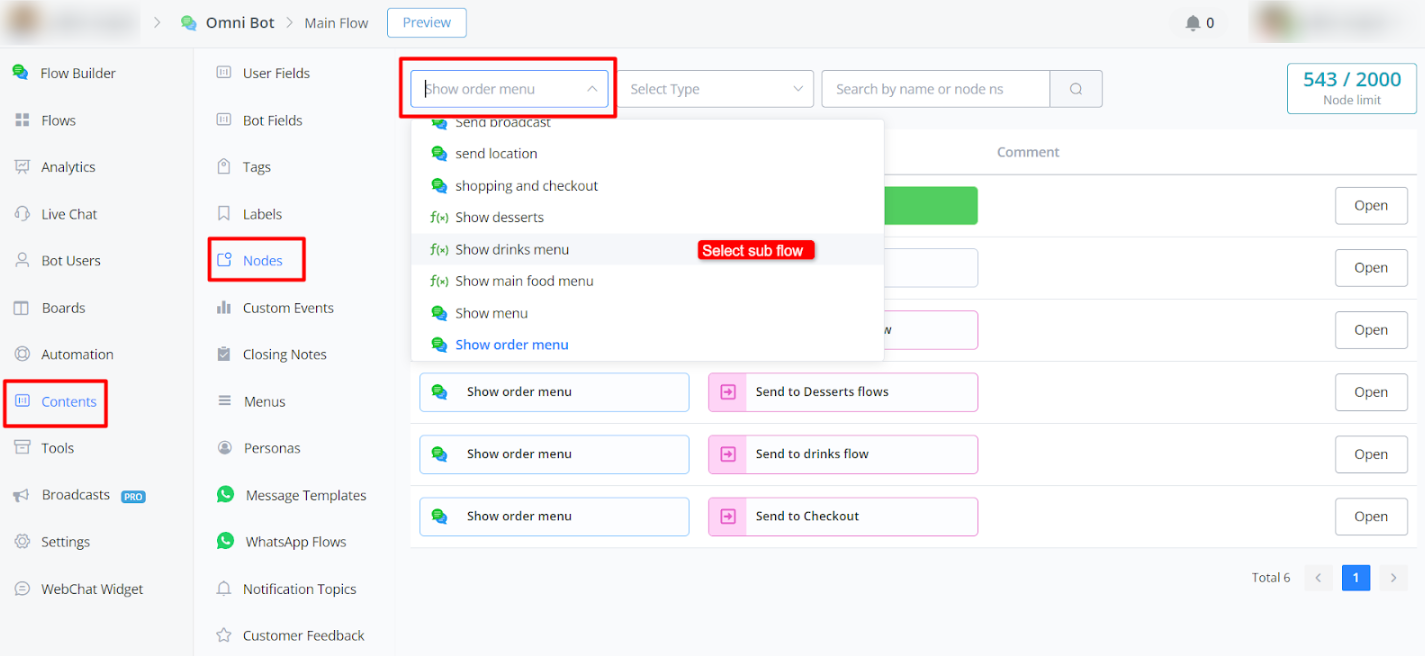
Filtering Nodes
Users can filter nodes by different types, making it easier to locate specific nodes based on their functionality. Additionally, you can search for nodes by their name, streamlining the process of finding exactly what you need.

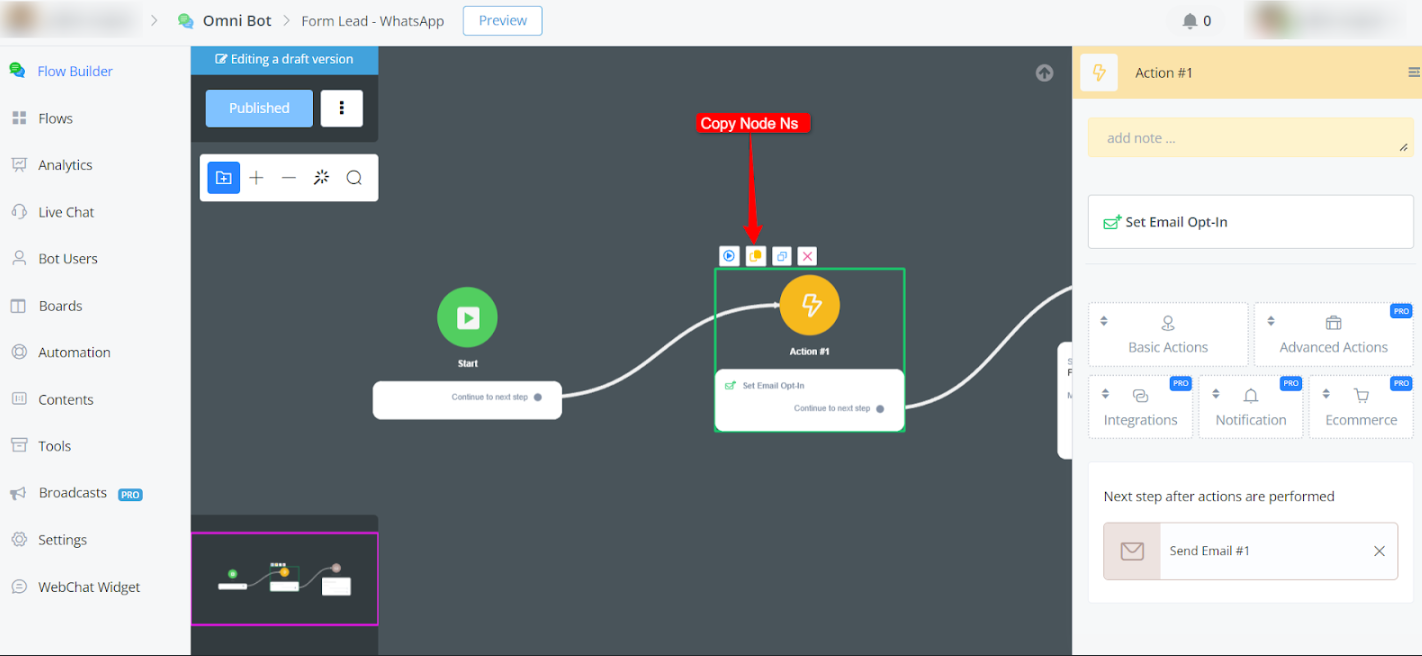
Using Node NS
Finding the Node NS
To get the Node NS, follow these steps:
- Go to the Flow Builder.
- Click on one of the nodes.
- Look for a list icon; this will copy the Node NS.
Searching with Node NSs
Once you have the Node NS, you can search for it directly in the node feature. This makes it quick and easy to jump to specific nodes without manually navigating through the entire flow.
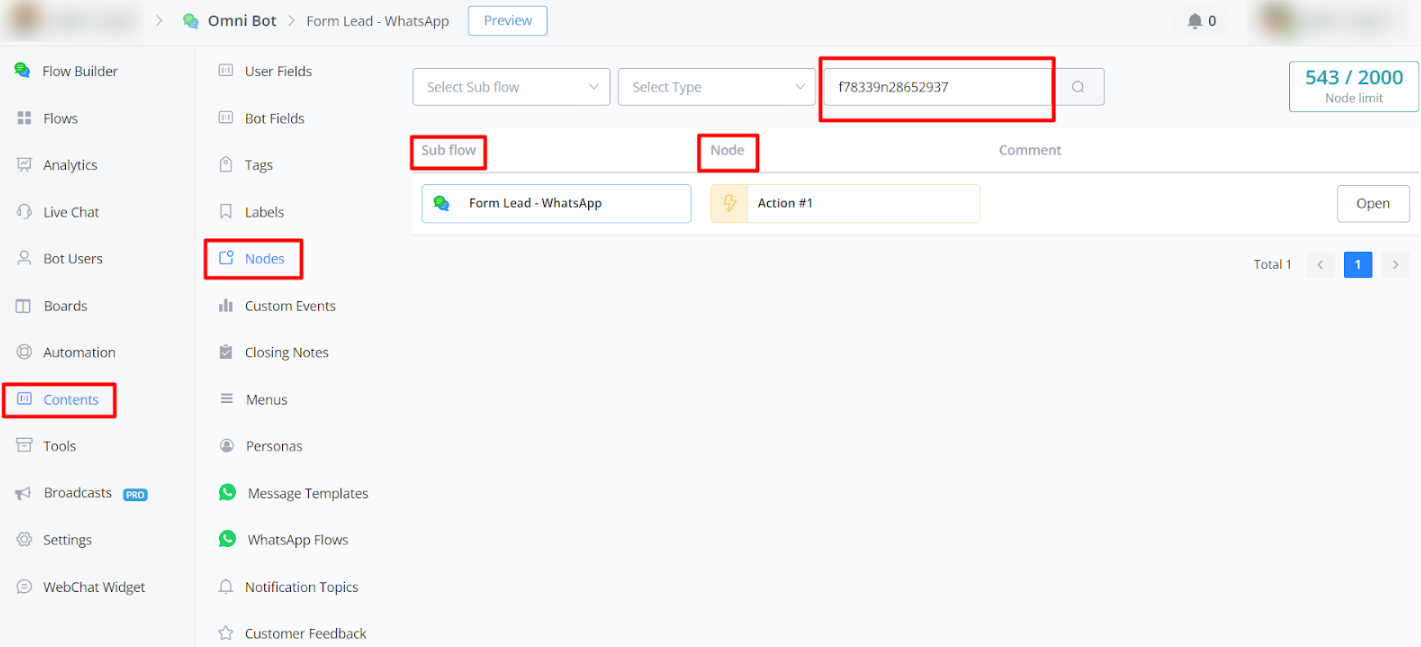
Opening Specific Nodes
You also have the option to directly open certain nodes using their Node NS. This feature takes you straight to the node, saving you time and effort.
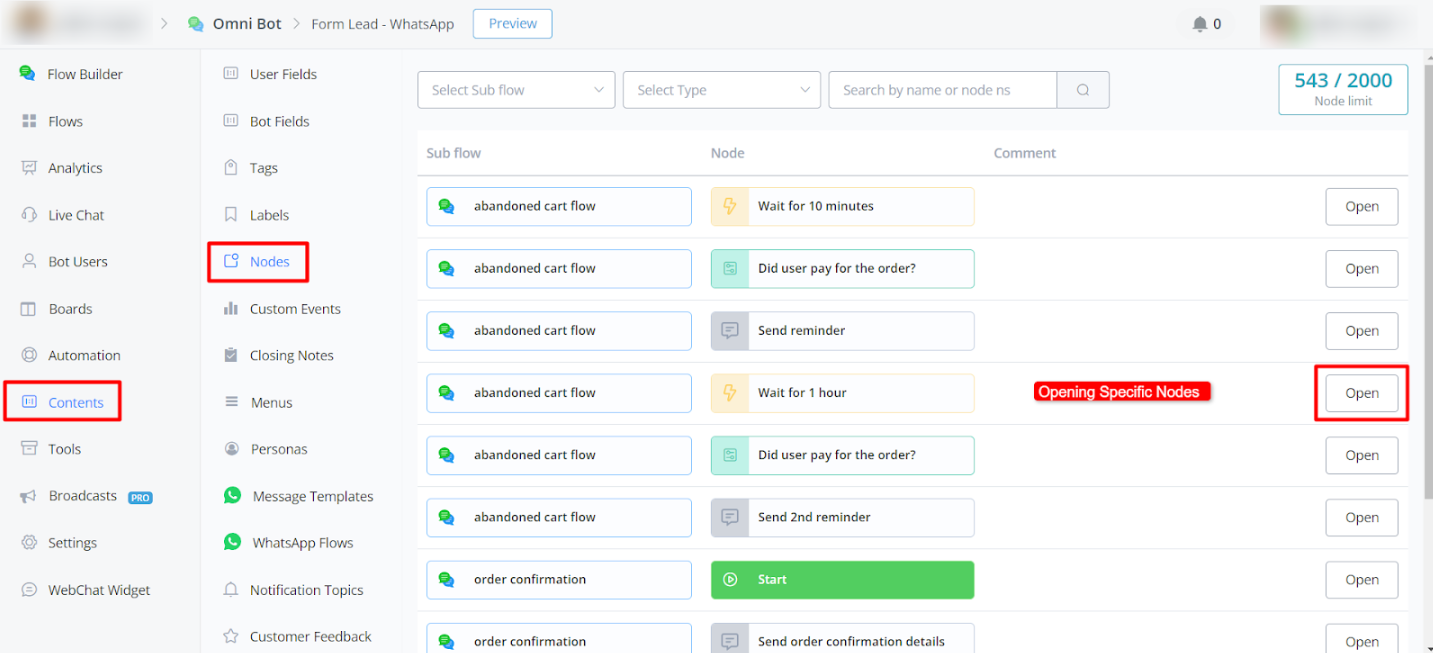
Managing Node Limits
Node Limitations
Messagingme.app has a limit of 2000 nodes per workspace. If you exceed this limit, you may need to purchase additional nodes.
Purchasing Additional Nodes
For every 1000 extra nodes, the cost is $20 per month. If you require more than 2000 nodes, please reach out to Messagingme.app support for assistance.
Performance Considerations
Exceeding the 2000-node limit can impact the performance and speed of your bot. We recommend optimising your nodes and deleting any flows that are no longer in use to free up space and maintain optimal performance.
Custom Events
Messagingme.app now allows its users to track various events that happen within the bot automations and let users visualize these event via analytics in form of custom events and custom reports.
Creating and Using Custom Events In Messagingme.app
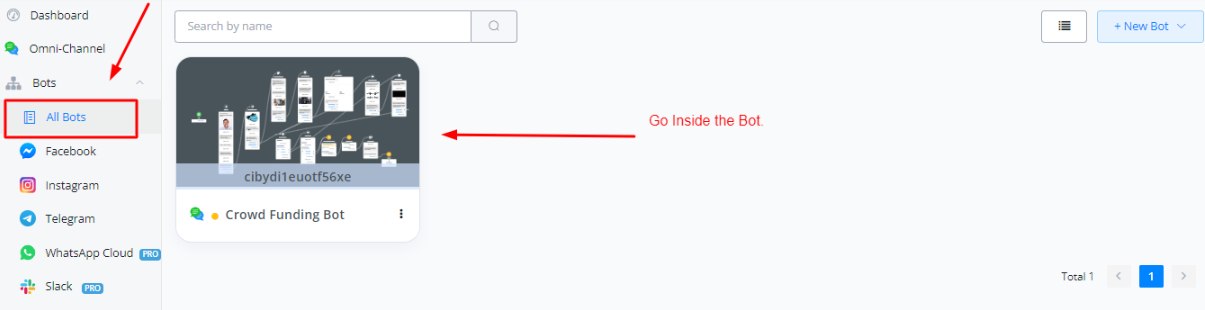
On your dashboard, click on the bot and go inside the flow builder.
Inside the flow builder, select Content tab, and then select custom events.
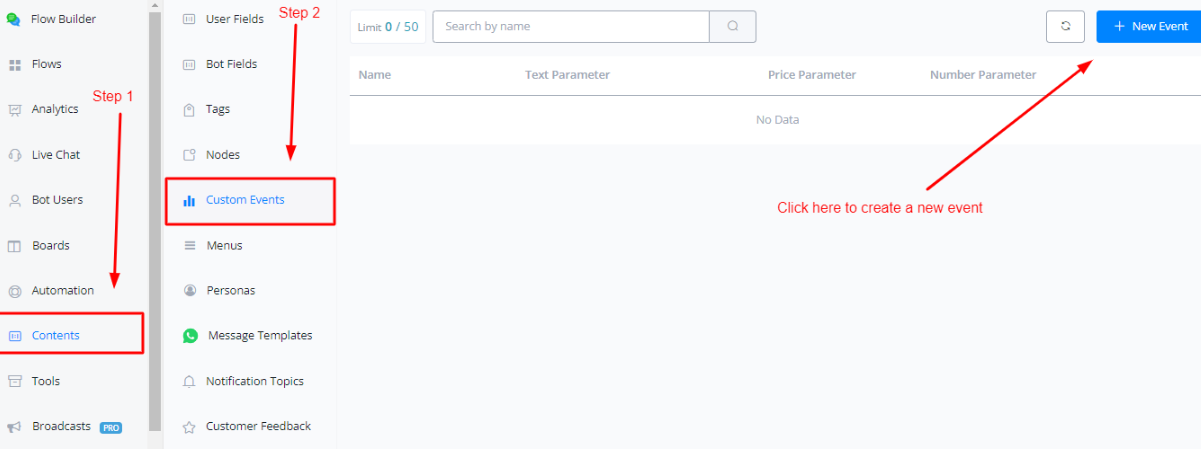
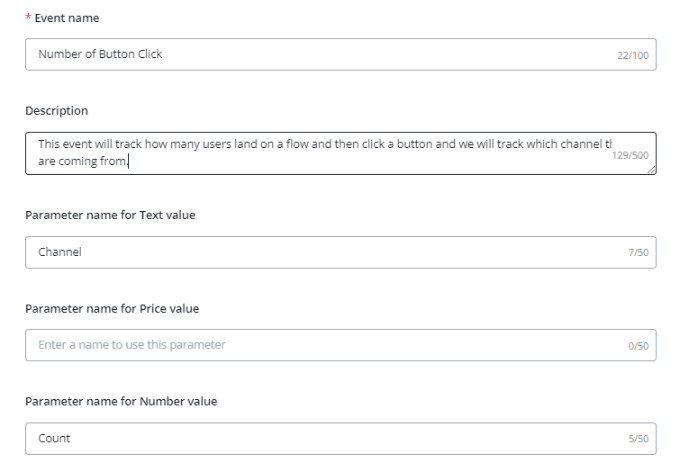
When creating a new event, following parameters you have to provide.
Event Name : This is used to naming that custom event
Event Description : This is used for describing what the custom event do and track.
Parameter Names : These are the name of the parameters you want to track for, for example product, sales category, name of the person etc
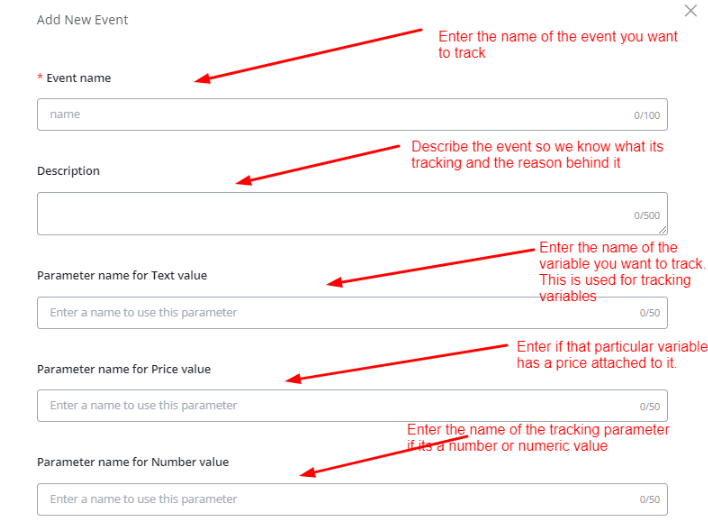
💡 You dont have to fill each of the parameter in order for the event to work but you need to be able to provide atleast one parameter for tracking
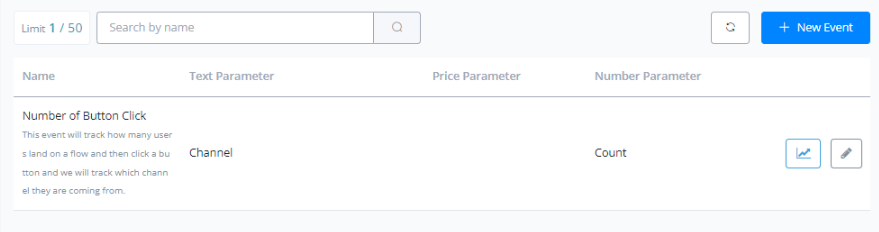
After creating an event, Go inside your flowbuilder and add the “Custom Event” action from Action block to start integrating the event and tracking it.
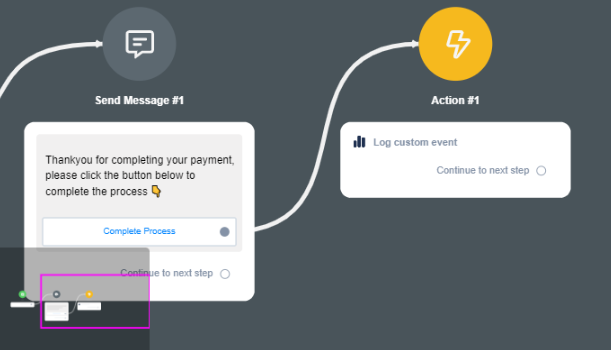
Click on Edit action and start setting up the event.
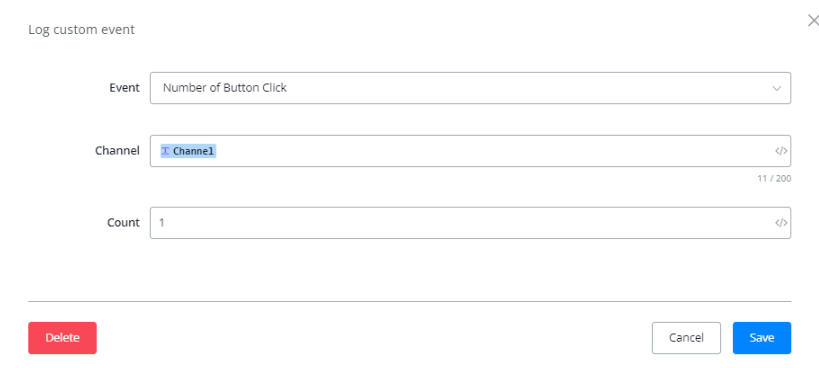
Here the event will track the Channel from which the users are coming and then the count will add one count to the total number of event happening.
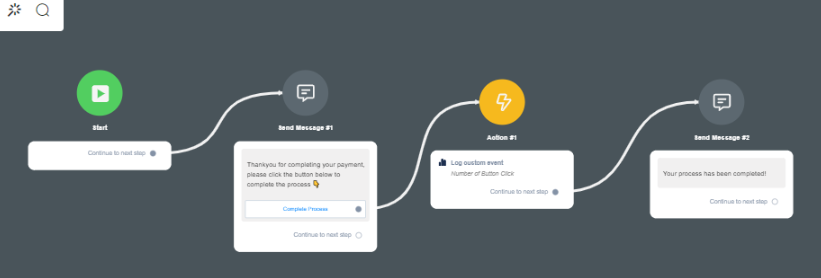
The event is now ready to be tracked.
Visualizing Analytics For Custom Events
Click on the analytics tab, select custom events to view the analytics for that particular event.

Click on the event to further view the analytics of that particular event.

Closing Notes
Messagingme.app now allows its users to extend the livechat functionalities using Closing Notes. Closing notes allows live agents to provide more context for when a conversation is closed or moved to done.
Creating Closing Notes
Inside the bot, click on “Contents” and then “Closing Notes”.
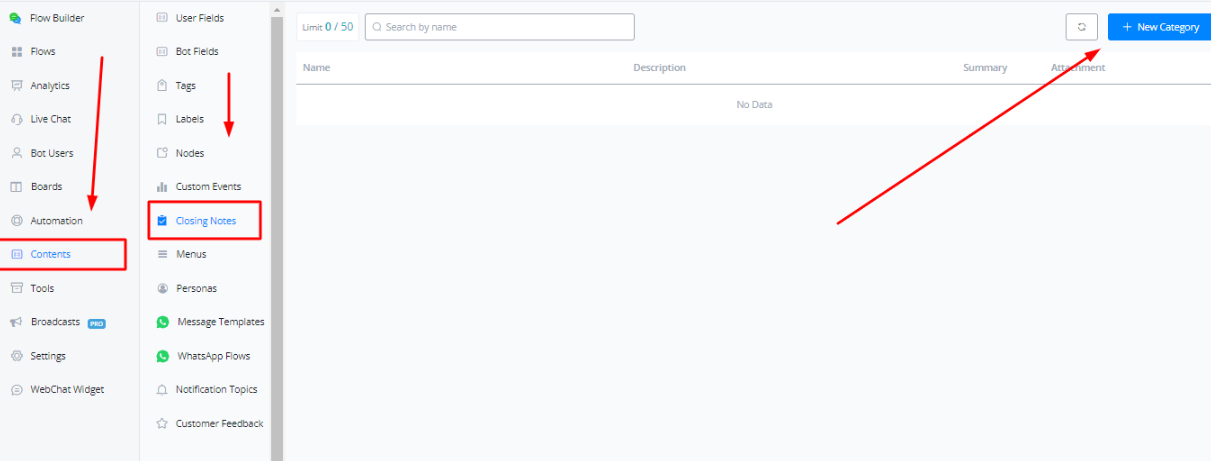
Click on “+ New Category”
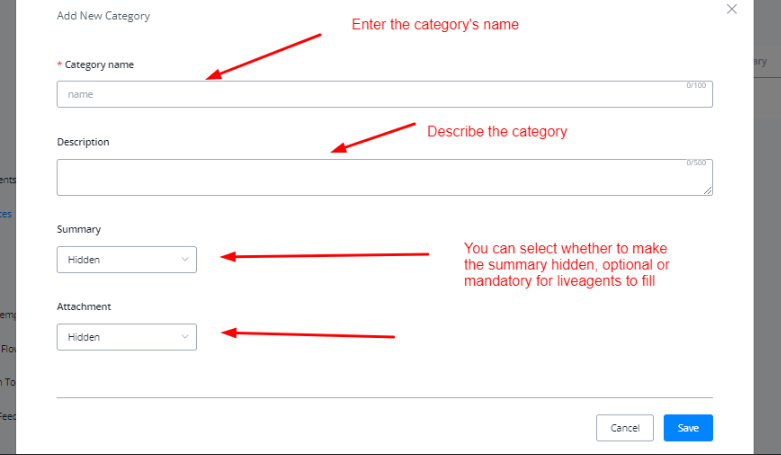
Click on Save to create a new category.

Enabling Closing Notes
Go to the Settings tab and click on Livechat settings. Enable the closing notes.
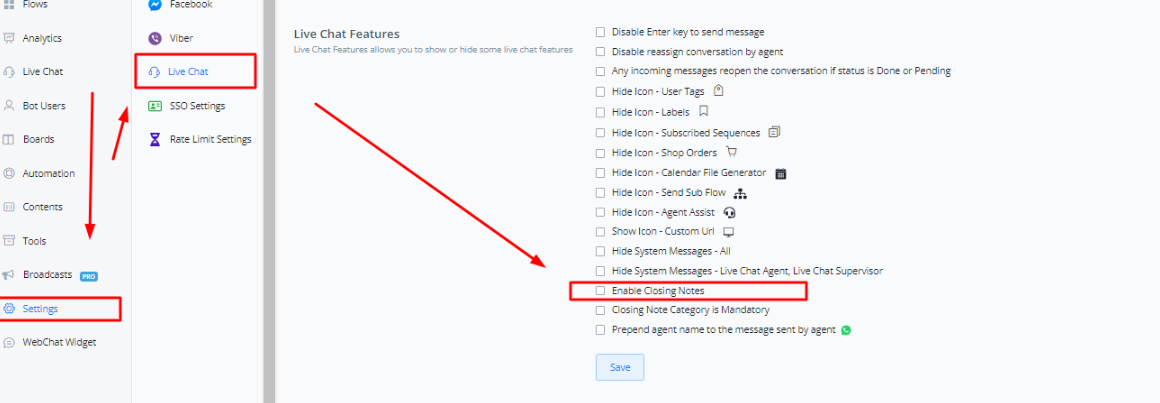
Once done, click on Save and you will be able to use closing notes.
Using Closing Notes
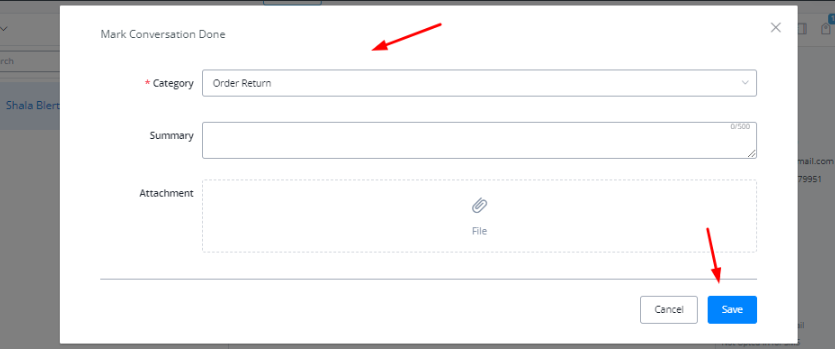
Closing notes can be used when moving a conversation to “Done”. When moving a user to done, if closing notes are enabled, the live agent will be prompted to enter the closing note.
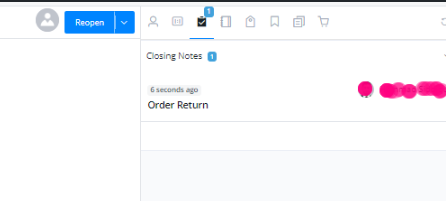
The closing note can also be observed from the bot user overview.
Closing Note Trigger
Once a closing note has been applied, it can be used as a trigger to run automations.
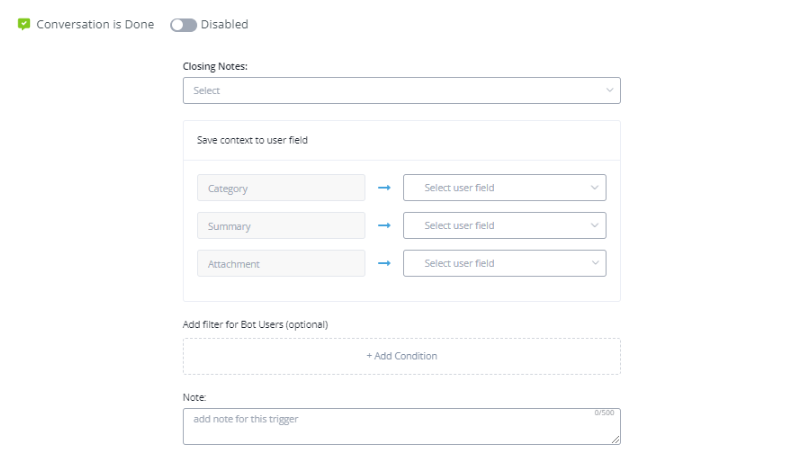
This trigger is useful for notifications, analytics and other bot user related automations.
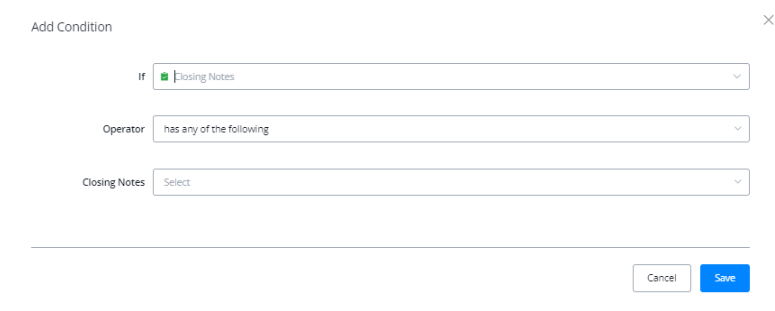
Closing Note In Condition Node
You can segregate users based on closing notes in a condition node as well.
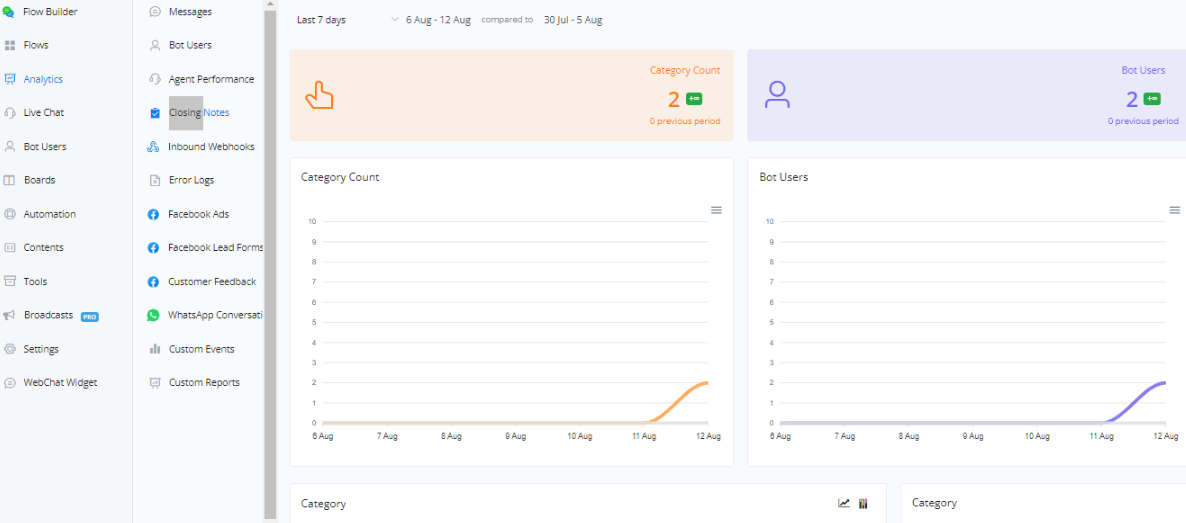
Closing Note Analytics
You can access closing note analytics by going to the analytics tab.
User Menus
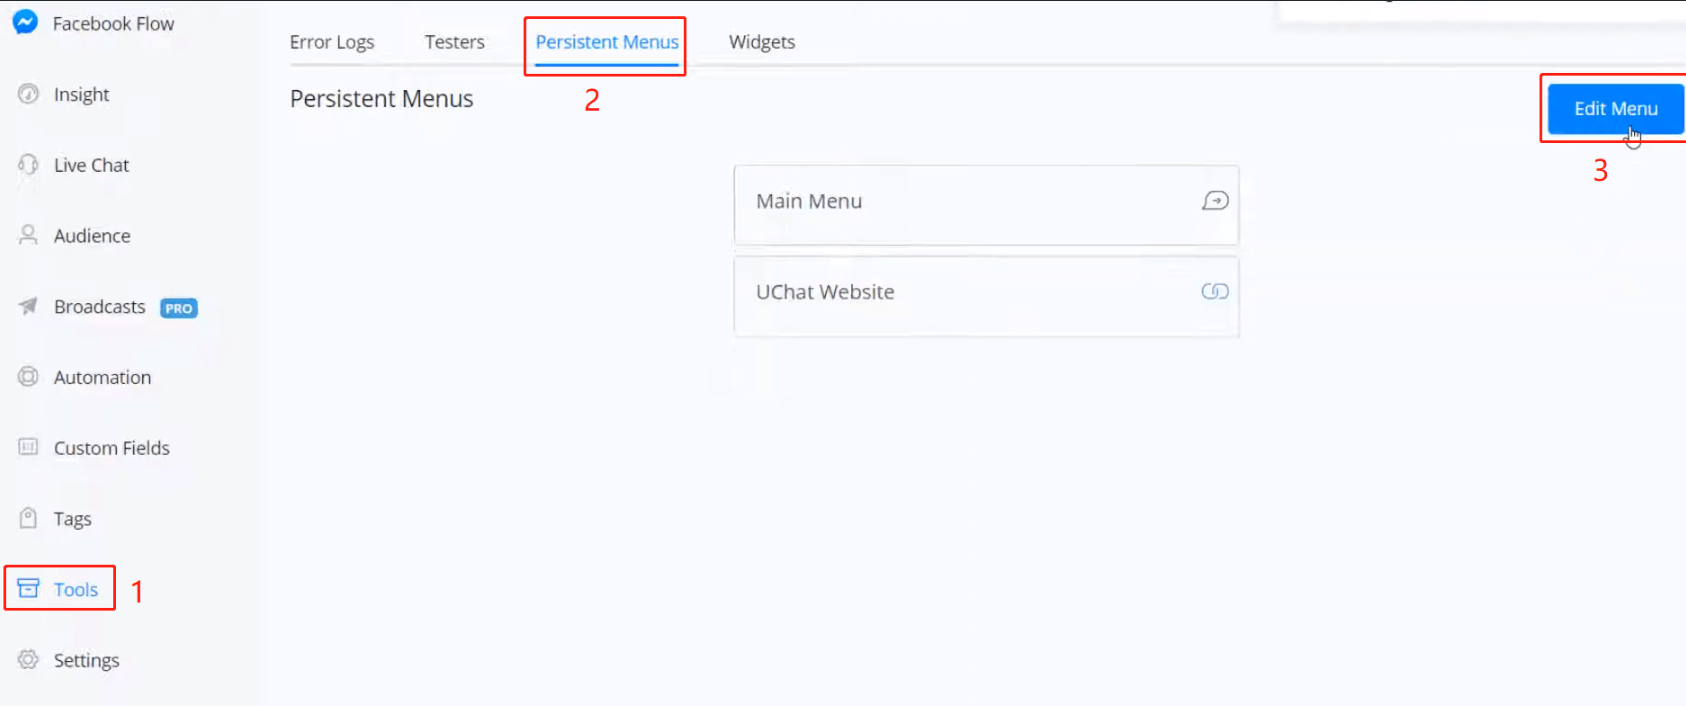
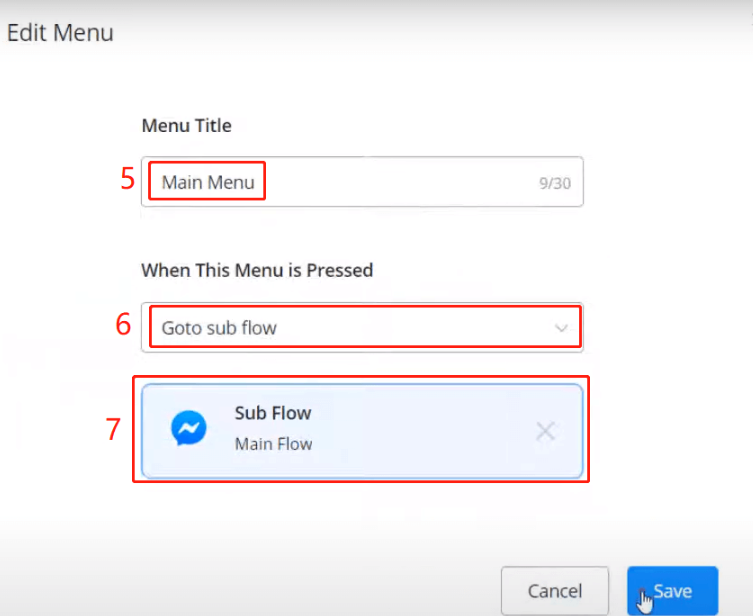
For Facebook bots, you can have a persistent menu with 3 buttons at most. To setup:
- go “Tools” from the left sidebar
- click “Persistent Menus”
- “Edit Menu”
- ”+ Add Menu”
- give menu title
- select a menu type, “Goto sub flow”, “Open website” or “Open checkout page”
- choose a sub flow or name a website address
Personas
Personas will help you to make your chatbot come over as more human. It allows you to set up a personal profile with profile pictures so people are more inclined to talk with the chatbot since they feel it is a more personal experience.
Creating and managing your Personas
To create a new persona you can go to Contents from the left-hand menu, then to the Personas tab.
From here you will have the main overview of all the personas you have created inside the chatbot.

If you want to create a new persona you can do so by pressing the top right button named + New Persona.
From there a pop-up window will appear where you can set it all up.
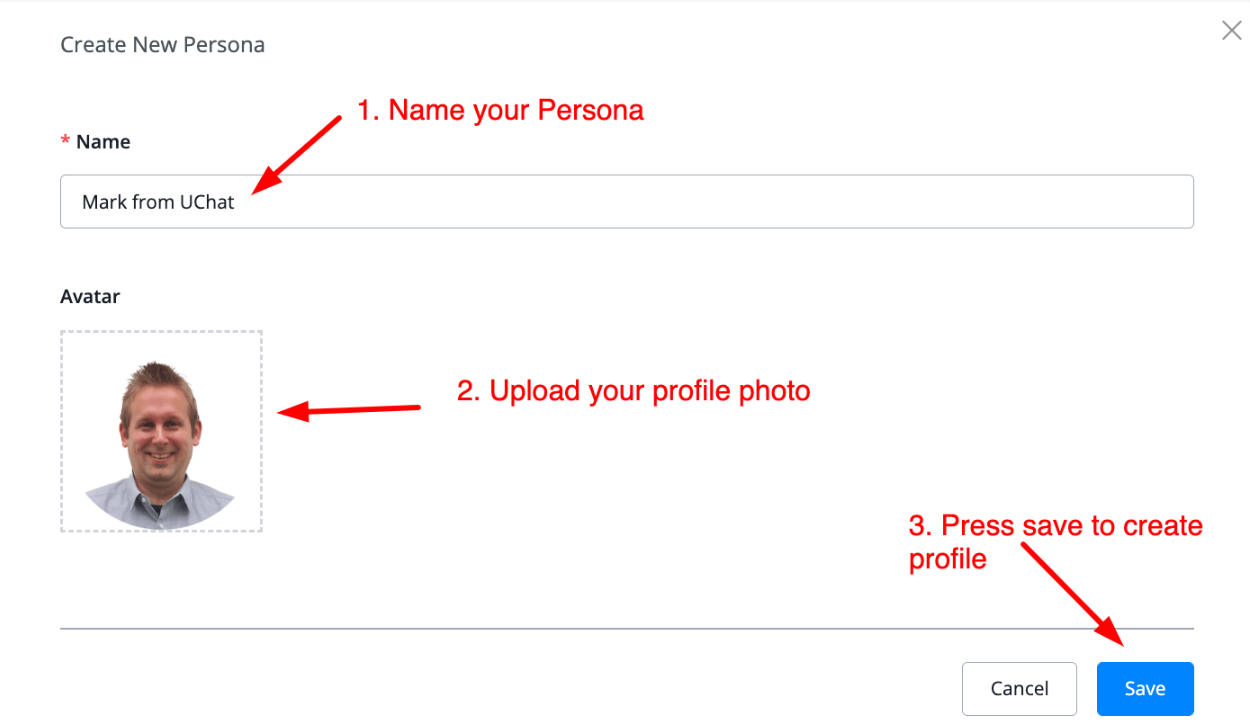
Once created the persona will be available for you inside the main overview.
From here you can also manage your persona inside that main overview. You only have to press the pencil icon to be able to edit.

How to use Personas
You can use personas by setting them inside your flows.
Just go to a flow and create an action block. From here select Advanced actions, then Set persona.
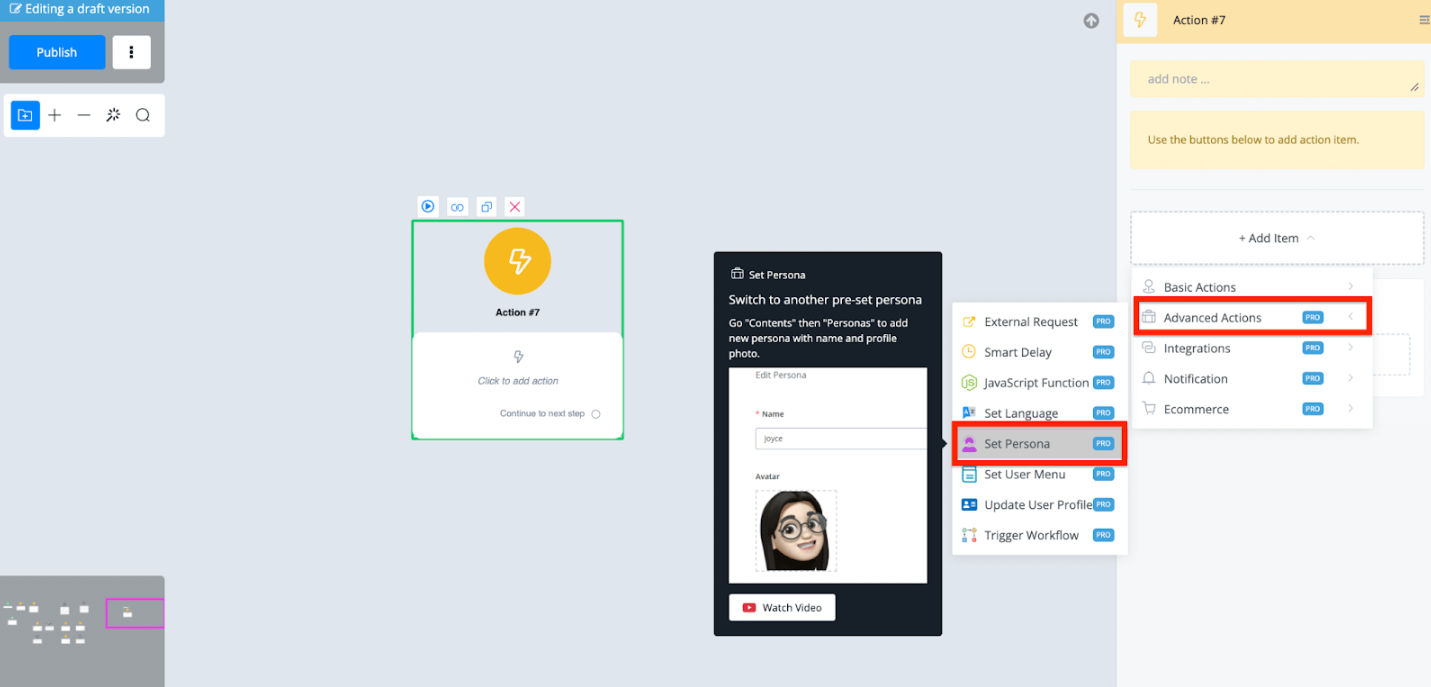
From here you can select any kind of persona you have created previously and the chatbot will then continue the conversation with that user with that profile.
Using personas is a good way to increase engagement and conversions as well. Female personas often do very well with men so you could start your flow by checking with a condition which gender the user is and then set the persona accordingly.
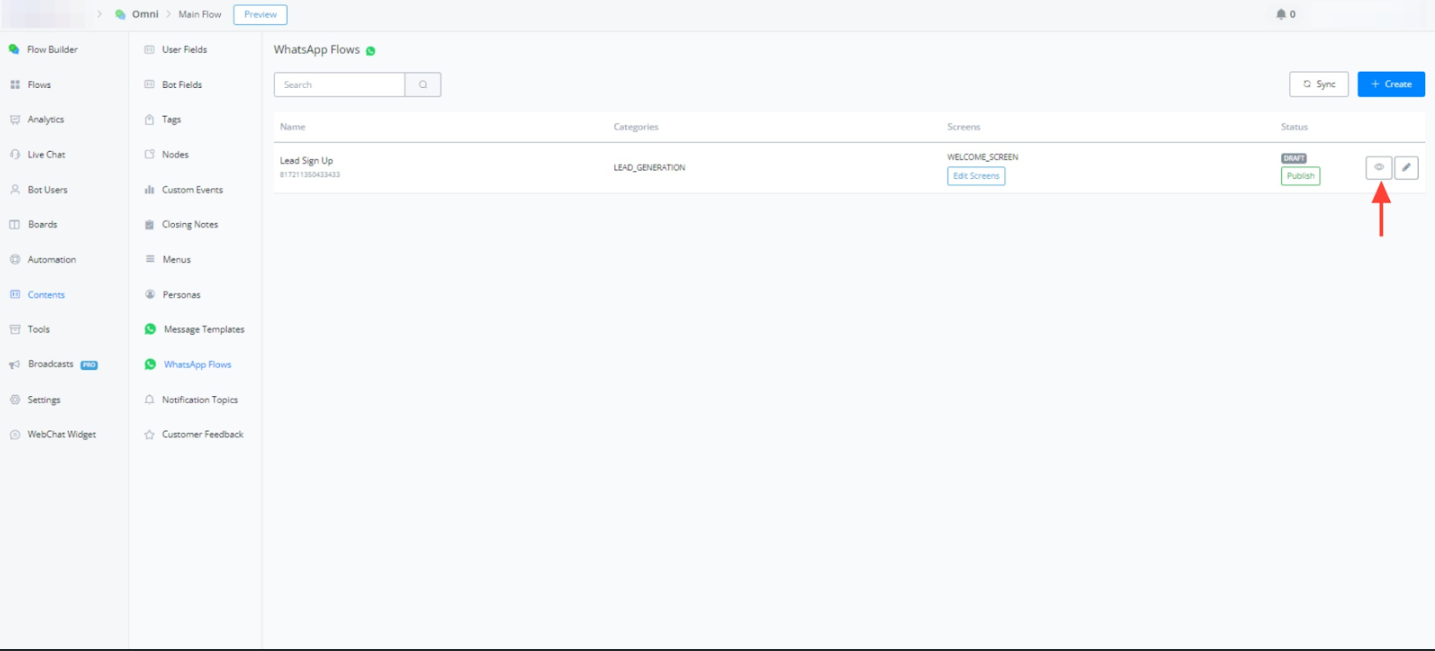
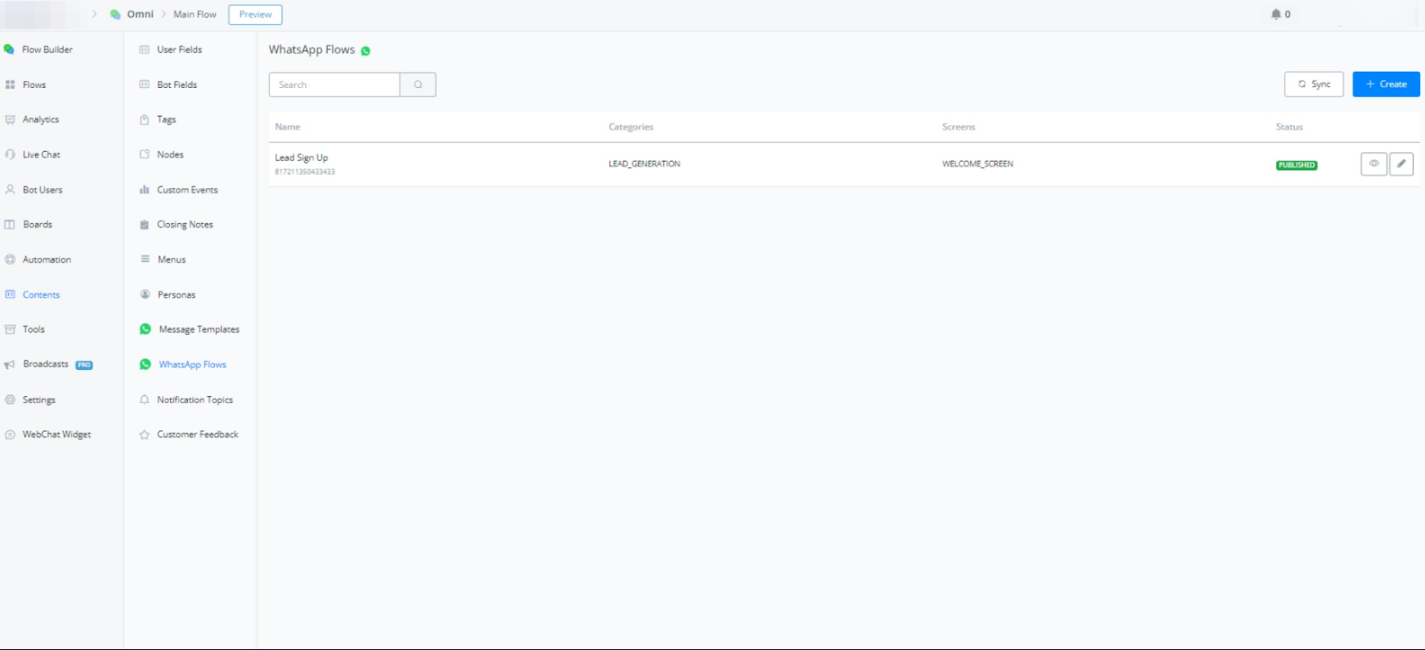
WhatsApp Flows
WhatsApp Flows is a feature currently under development that enables you to create automated chat sequences specifically for WhatsApp interactions. These flows guide users through predefined steps, improve response efficiency, and enhance customer engagement.
Accessing WhatsApp Flows
- Navigate to the “Chatbot” section within your Messagingme workspace.
- Select “Content” from the available options.
- Under “Content,” locate and click on “WhatsApp Flow.”
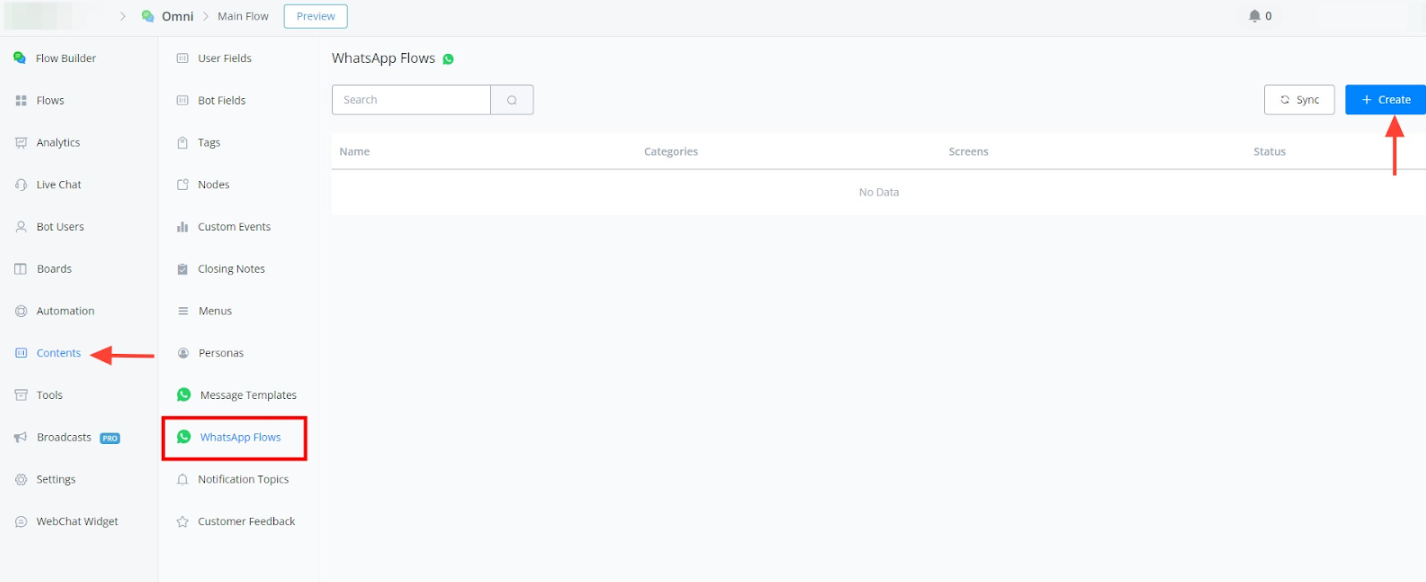
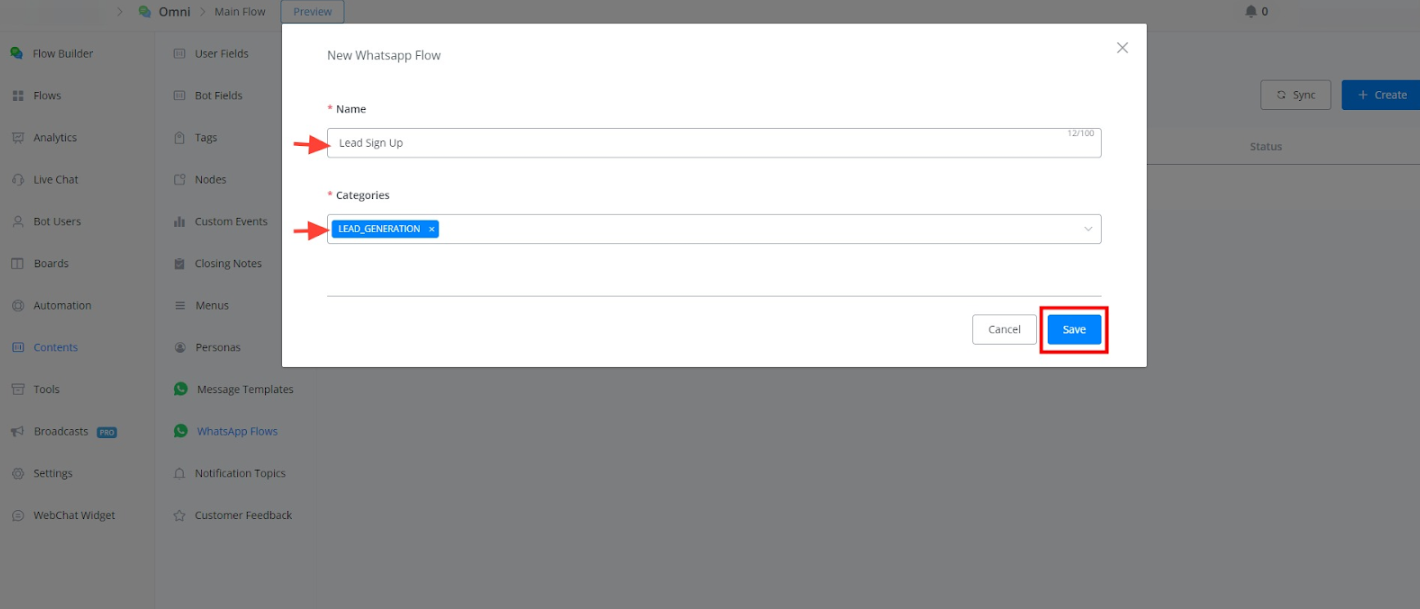
Creating a New WhatsApp Flow
- Click on “Create Flow” to initiate the creation process.
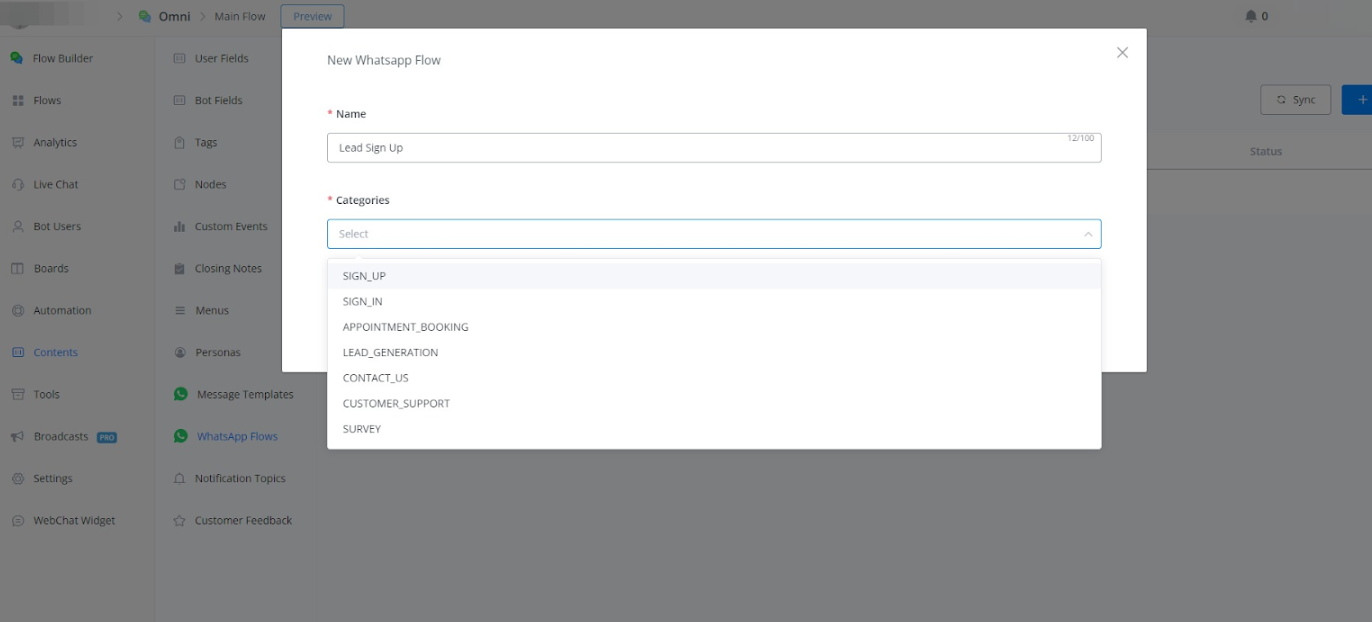
- Provide a name for your flow (e.g., “Lead Signup”).
- Choose a category that best describes your flow’s purpose (e.g., “Lead Generation”).
- Click “Create” to confirm and proceed.
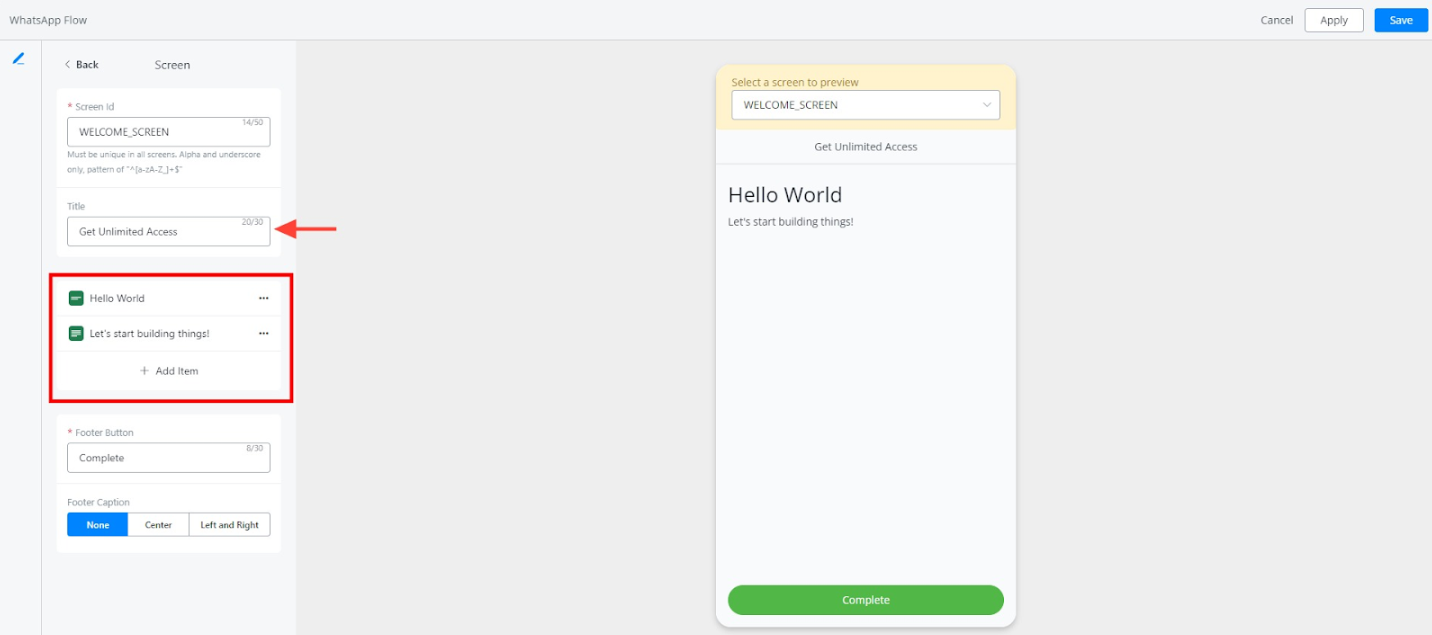
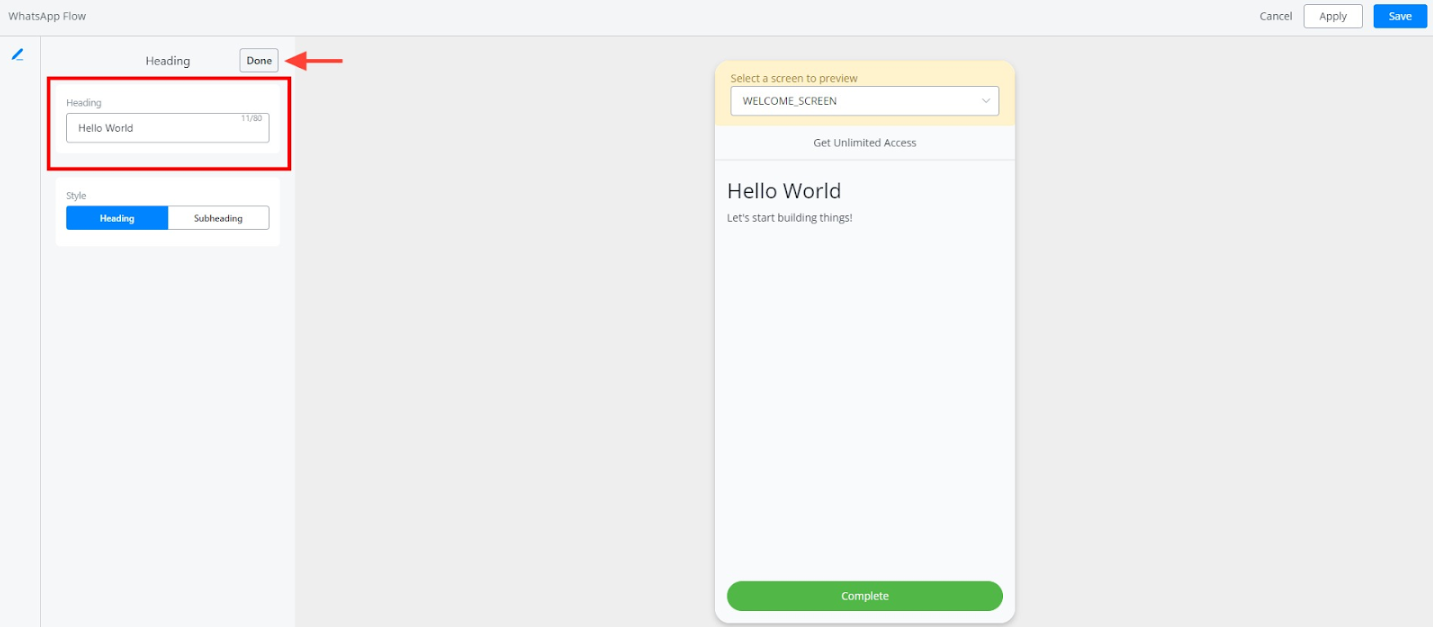
Customizing Your WhatsApp Flow
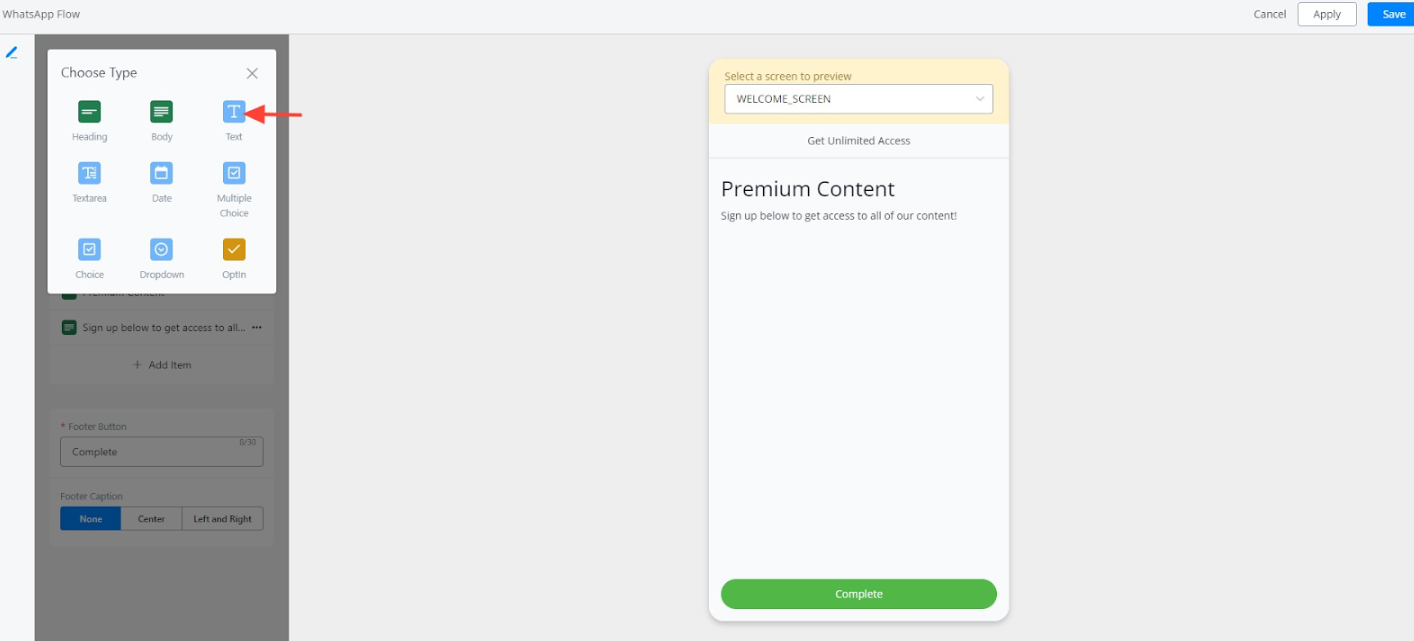
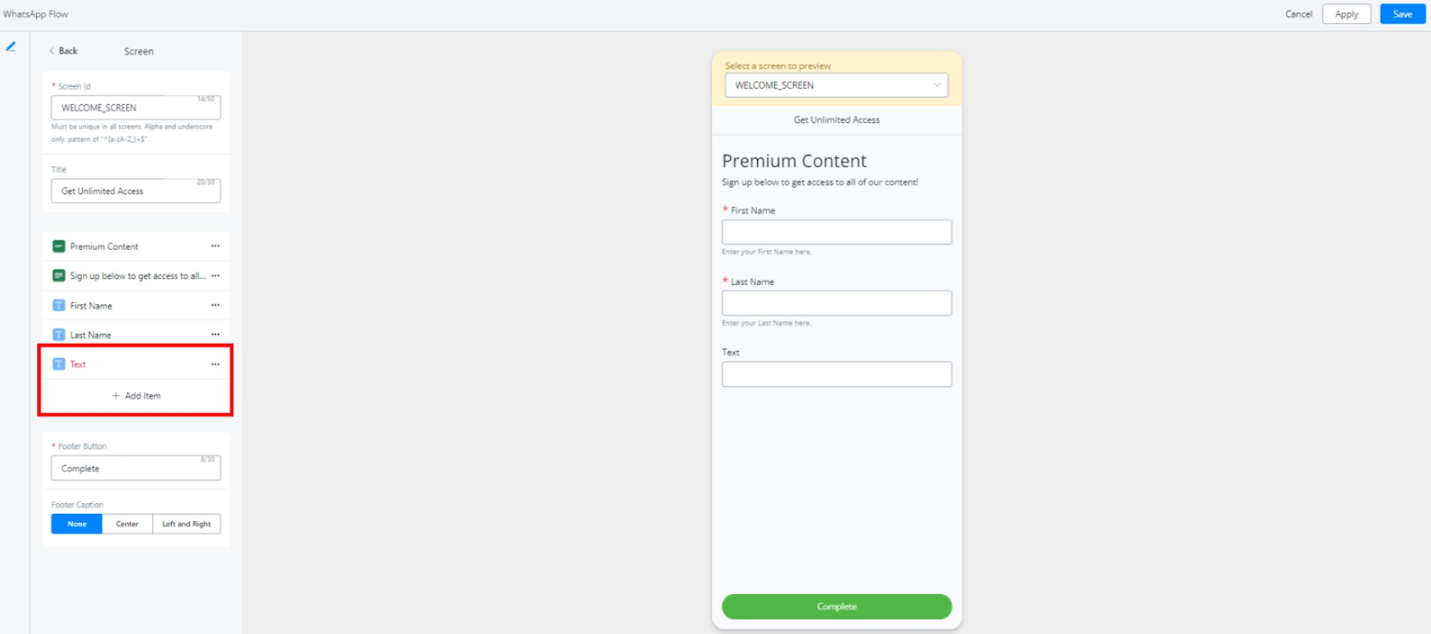
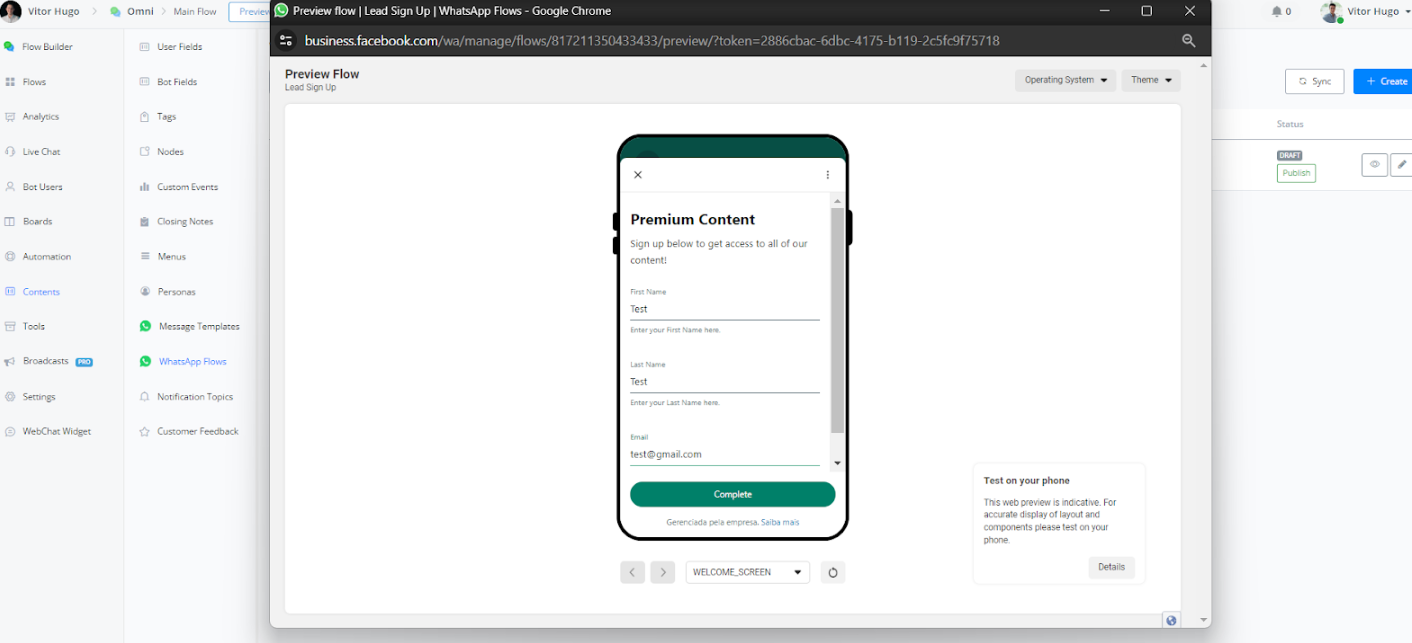
- Welcome Screen: Edit the text, heading, and content displayed on the initial screen that greets users.
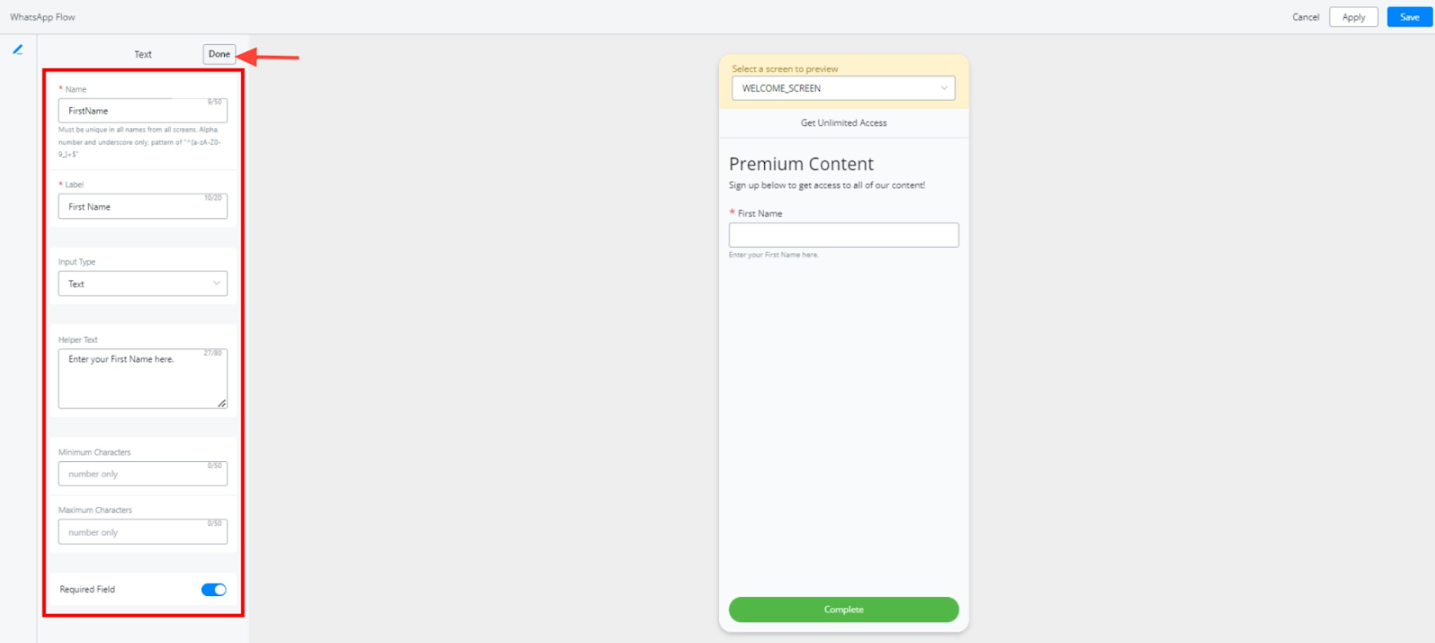
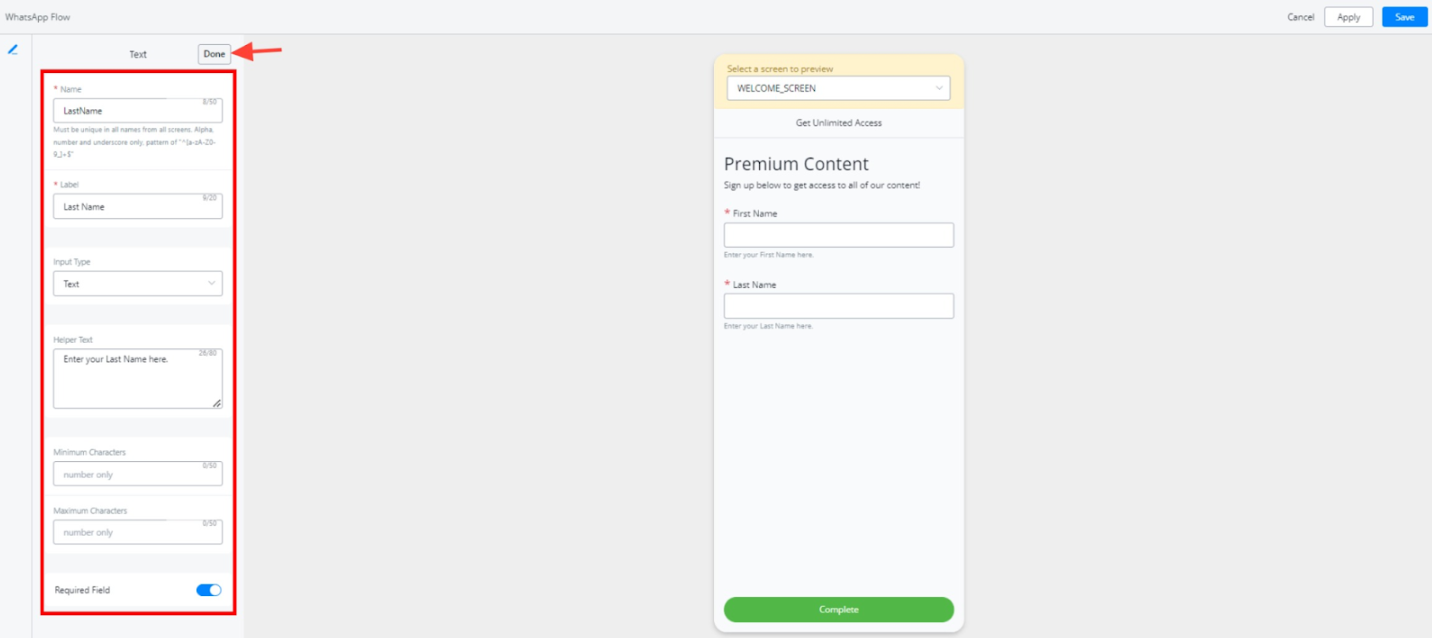
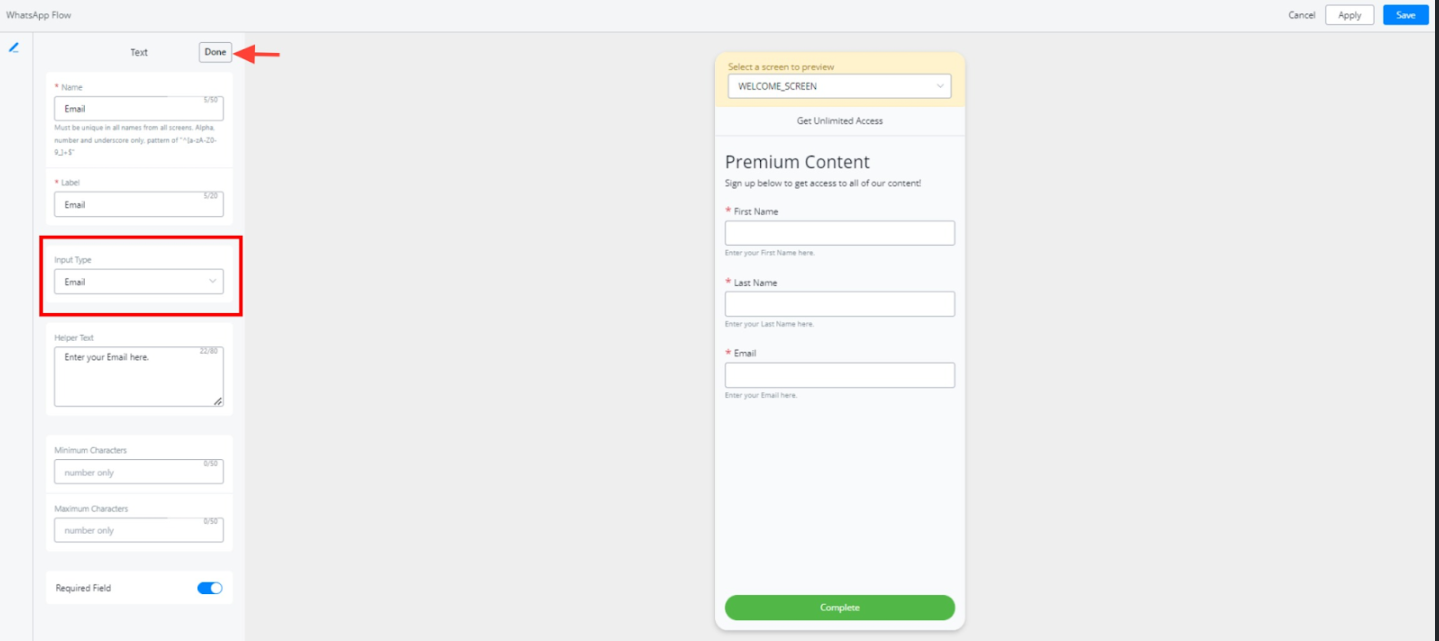
- Adding Interactive Elements: Utilize the editor to incorporate interactive elements like text capture fields (name, email, etc.) with desired input types (text, number, etc.) and optional requirements.
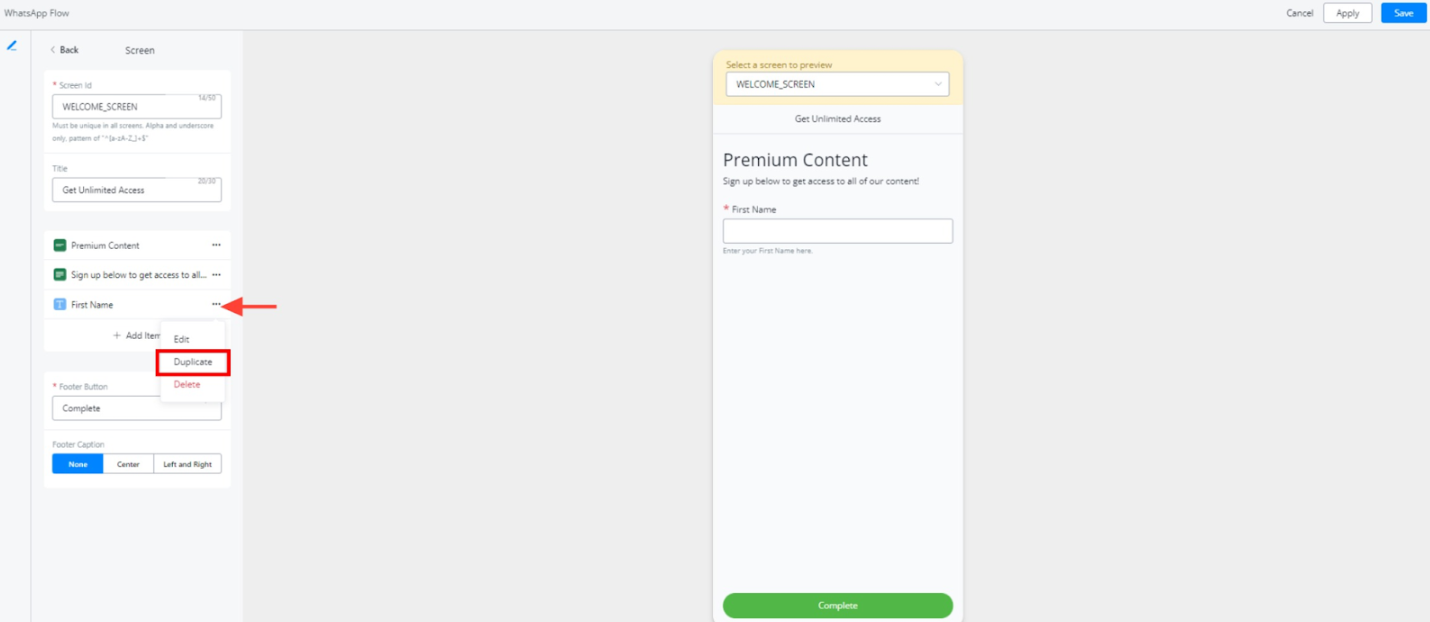
- Building a Multi-Screen Flow: Construct a flow with multiple screens by adding new screens and guiding users through a sequence of interactions.
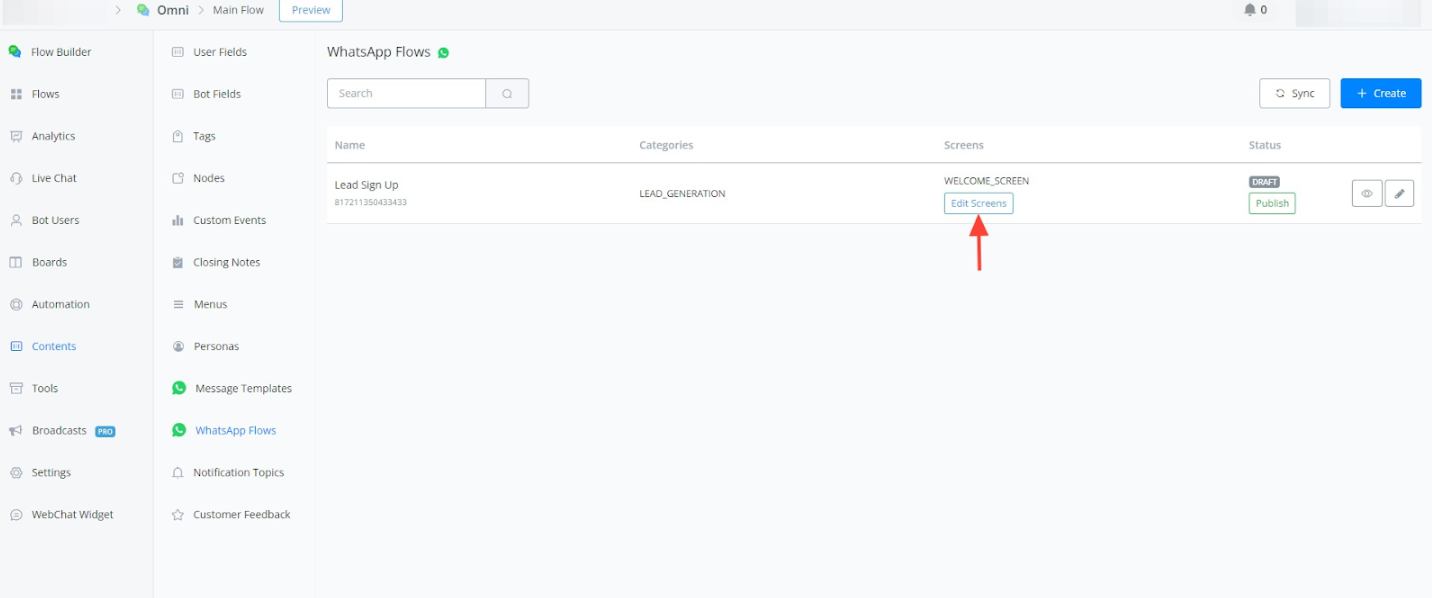

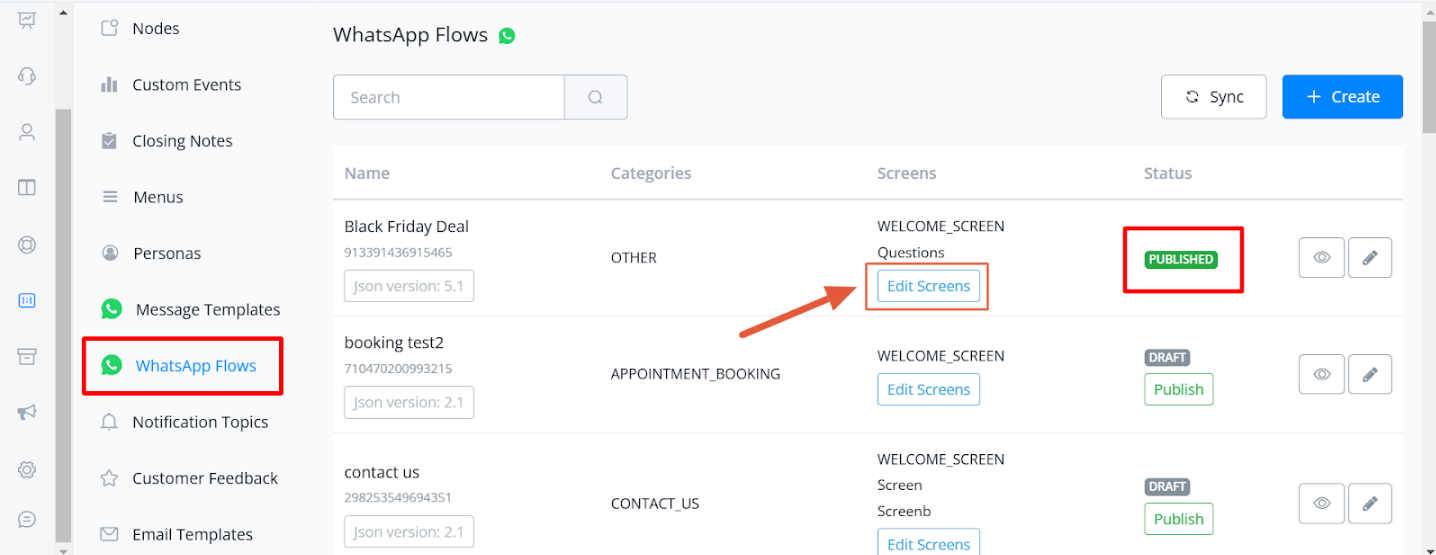
Allow to edit the screens for published WhatsApp flow
You can now update the screens of your published WhatsApp flows directly from the dashboard!
With the new “Edit Screens” option, making changes is smoother than ever, there is no need to unpublish or interrupt your live workflows.
This feature helps you stay agile and make real-time improvements effortlessly.
Testing and Previewing Your Flow
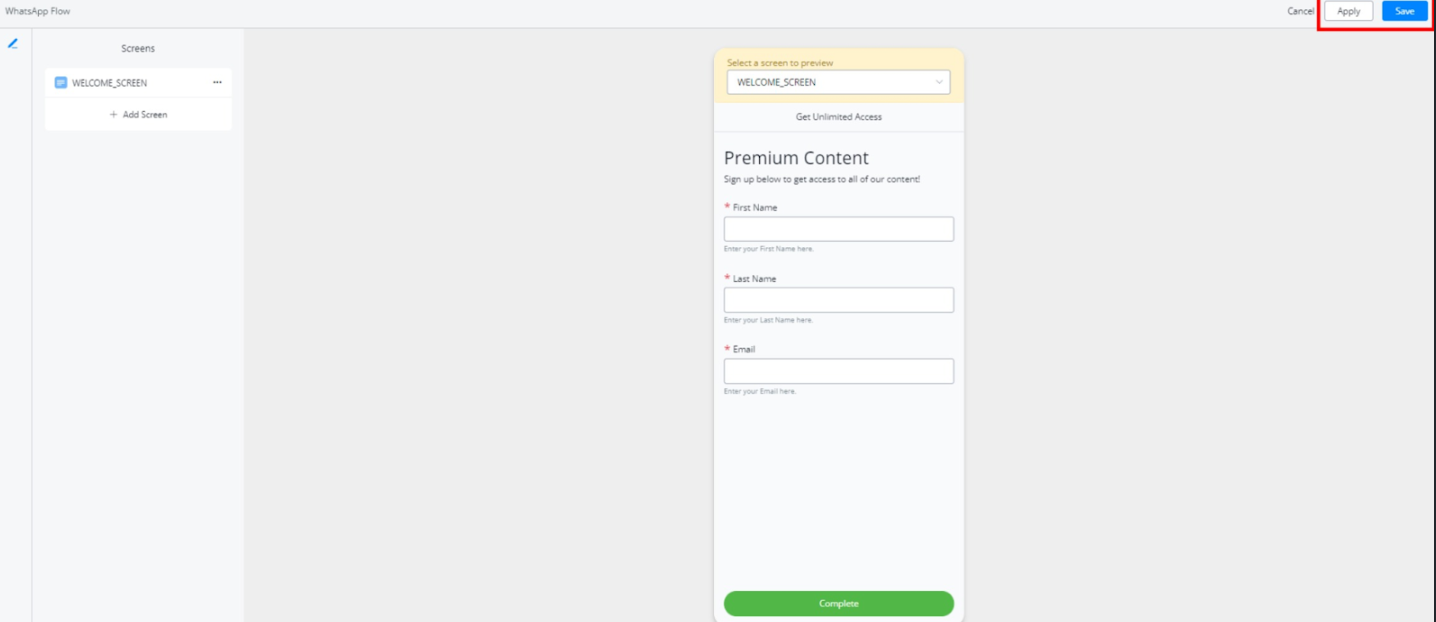
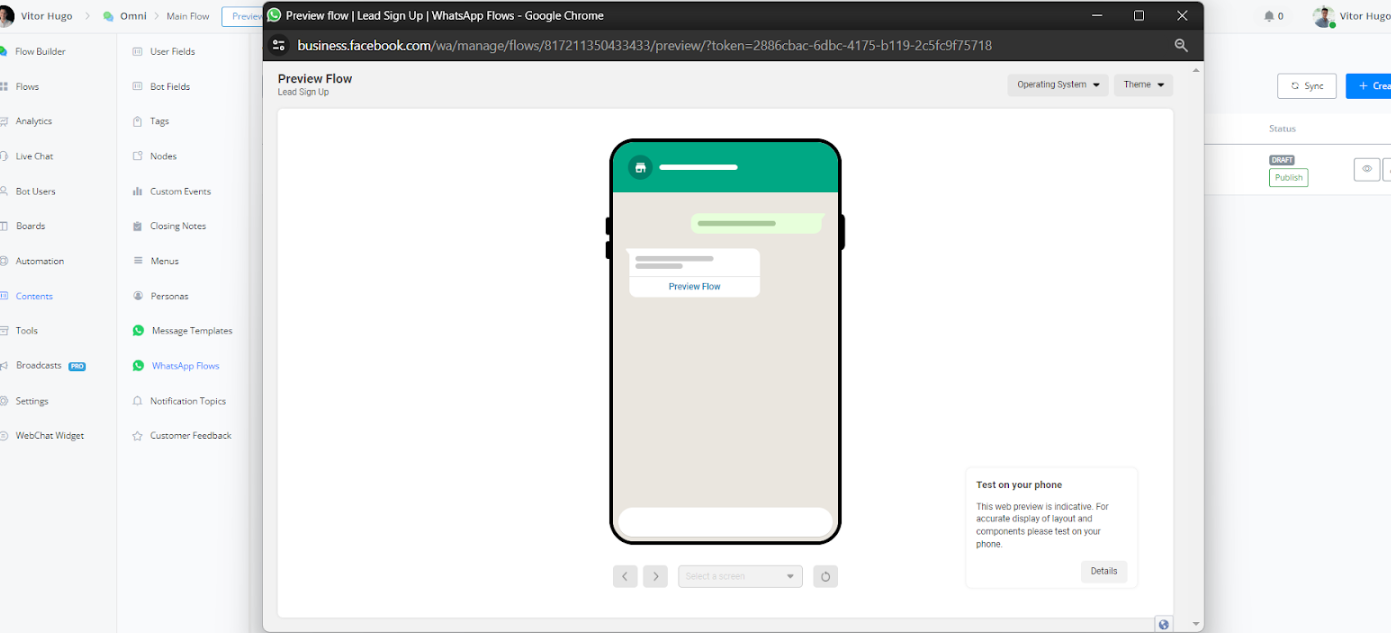
- Flow Preview: Utilize the eye icon to preview your flow’s appearance and functionality from a user’s perspective.
- Testing the Flow: Engage in a test interaction with the flow to ensure it functions as intended.
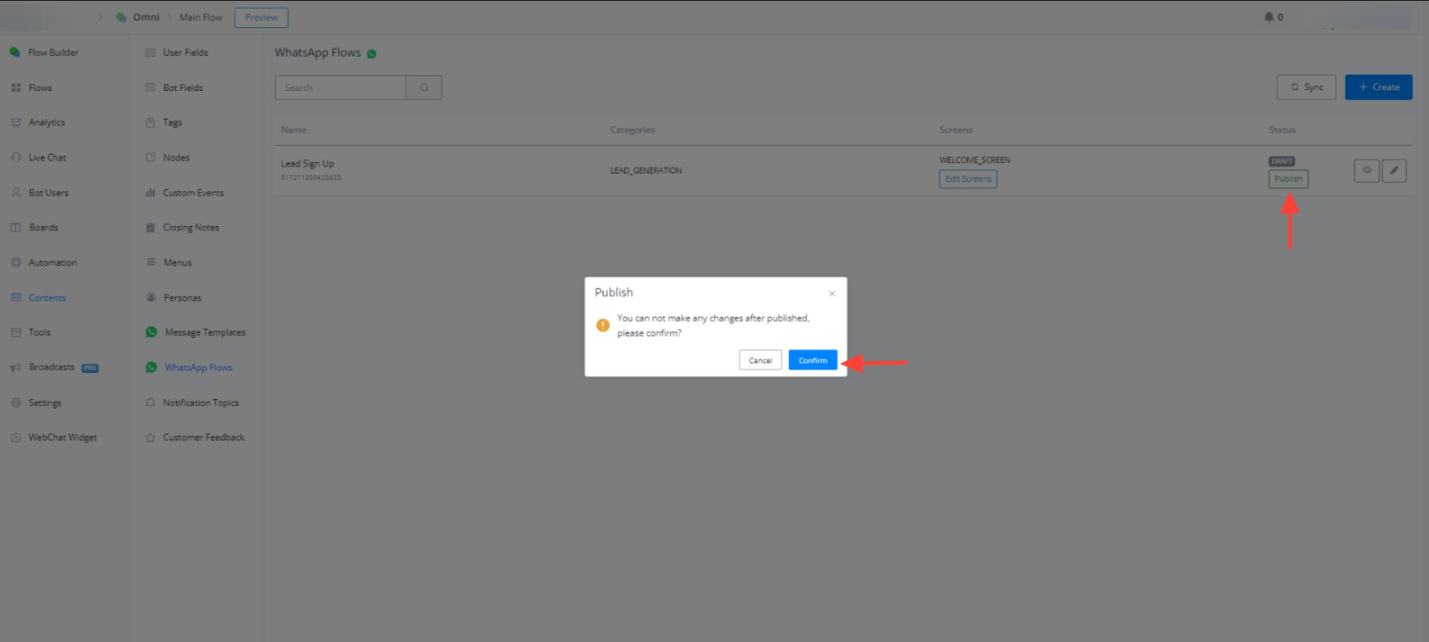
- Publishing the Flow: Click in “Publish” and “Confirm”
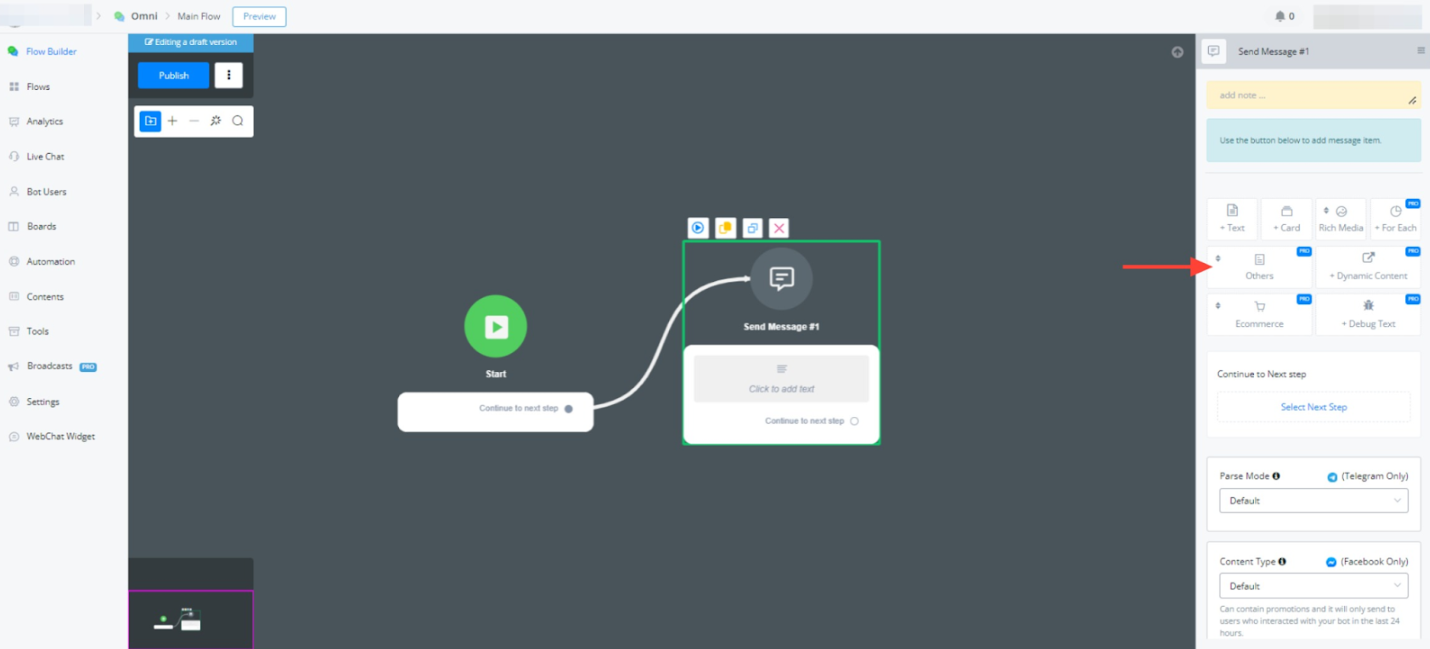
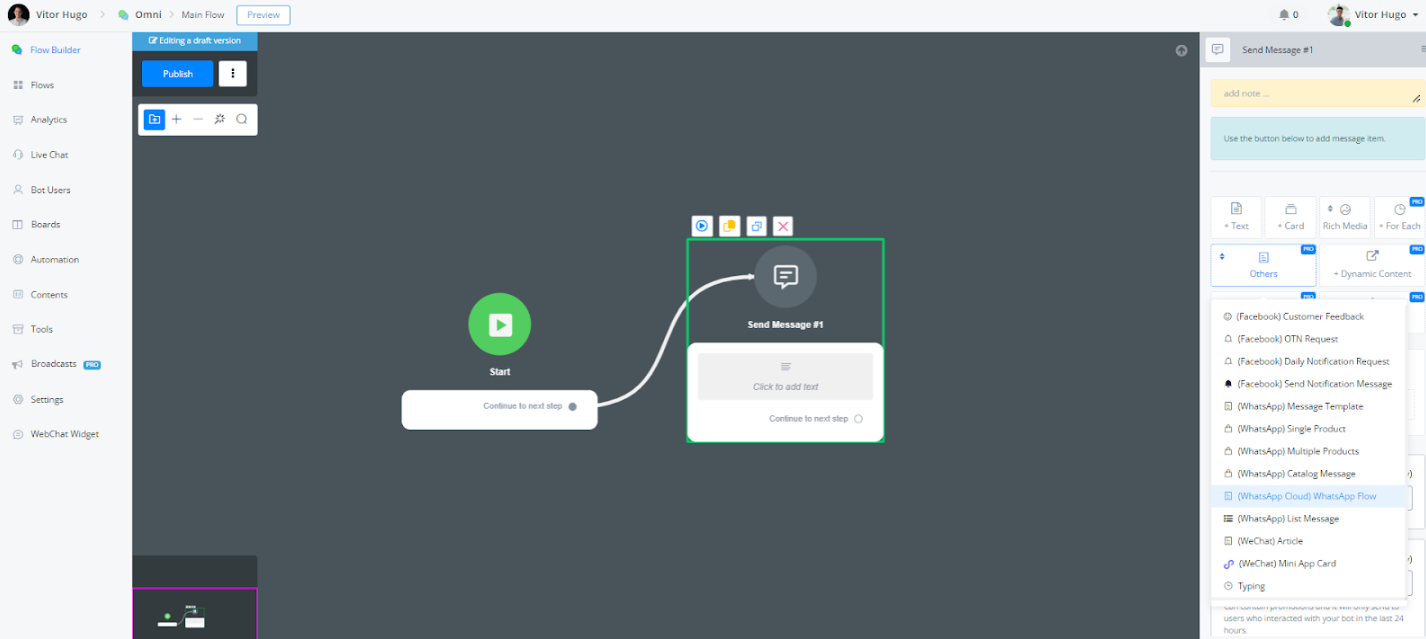
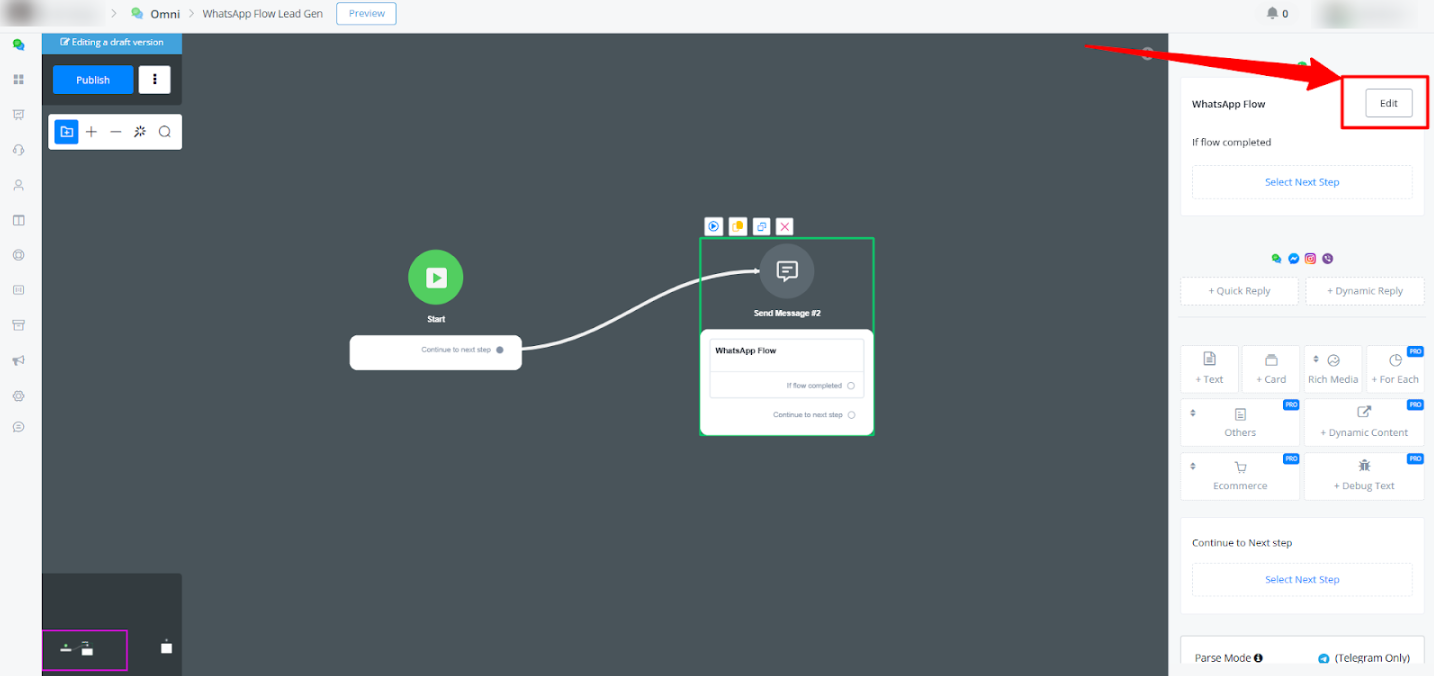
Connecting the WhatsApp Flow to Your SubFlow
- Within the Flow Builder, select “Text Note” under the “Omni Channel” section.
- Choose “WhatsApp Cloud” followed by “WhatsApp Flows” from the available options.
- Edit the message content displayed after the WhatsApp flow is completed (e.g., “Sign up today”).
- Select the desired call to action text (e.g., “Claim Access Now”).
- Associate your created WhatsApp flow (“Lead Signup” in this example) with this step.
- (Optional) Configure payload saving to a JSON field named “data” to capture user information collected during the flow.
Populating Sign-Up Forms with Custom User Fields
You can now populate sign-up forms with custom user fields directly within the flow builder. This allows for a more dynamic and personalized user experience. Follow these steps:
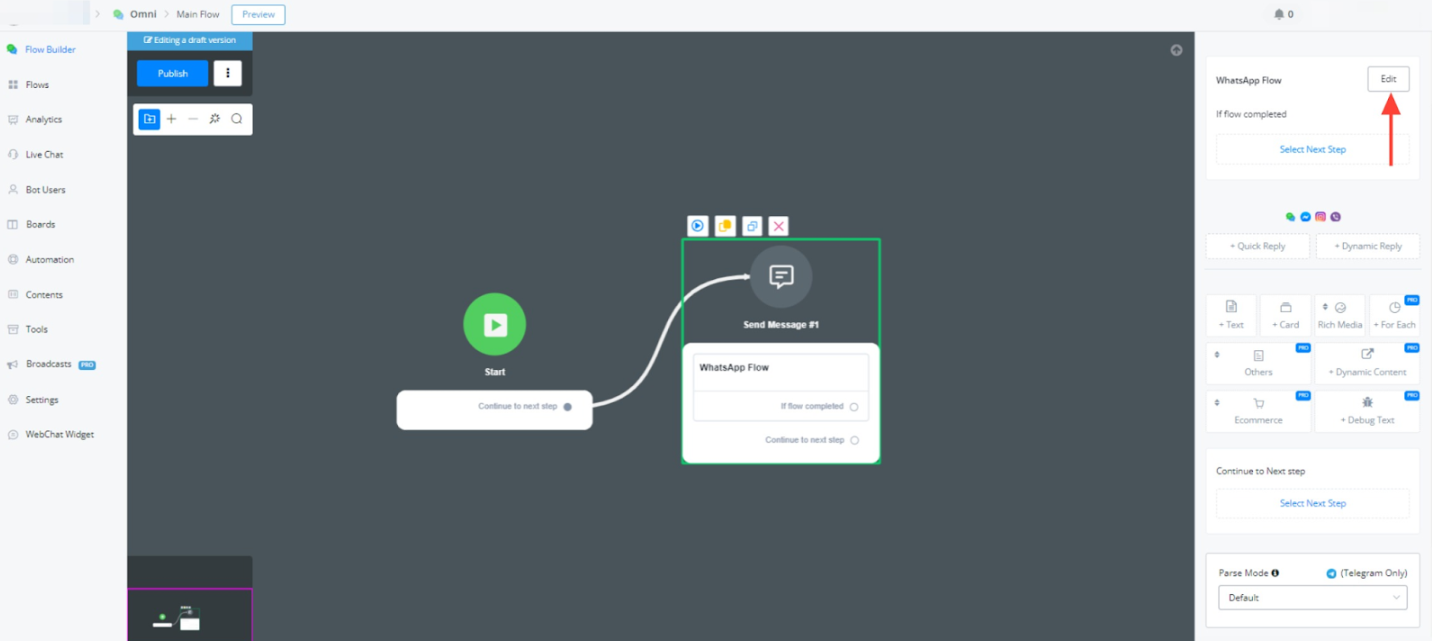
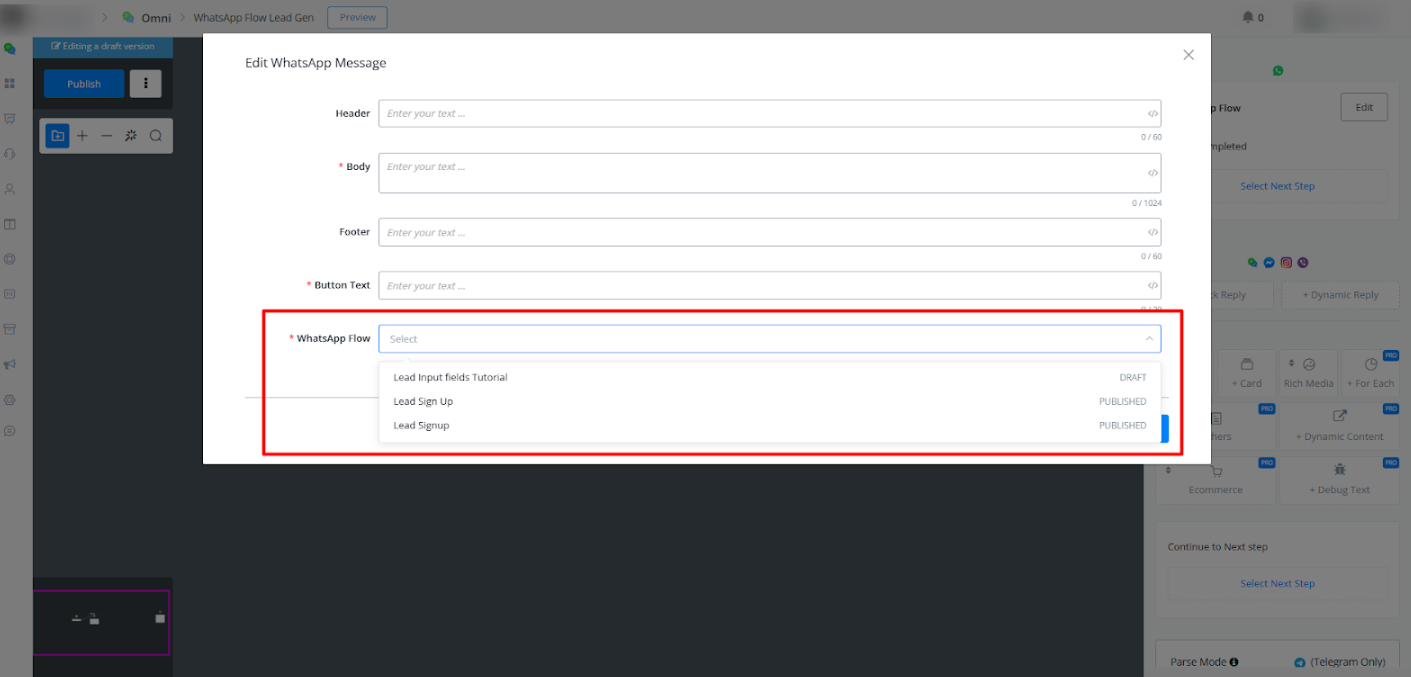
- Add a WhatsApp Flow using a Message Node:
- Within the Flow Builder, select “Send Message” -> “Others” -> “WhatsApp Flow”:

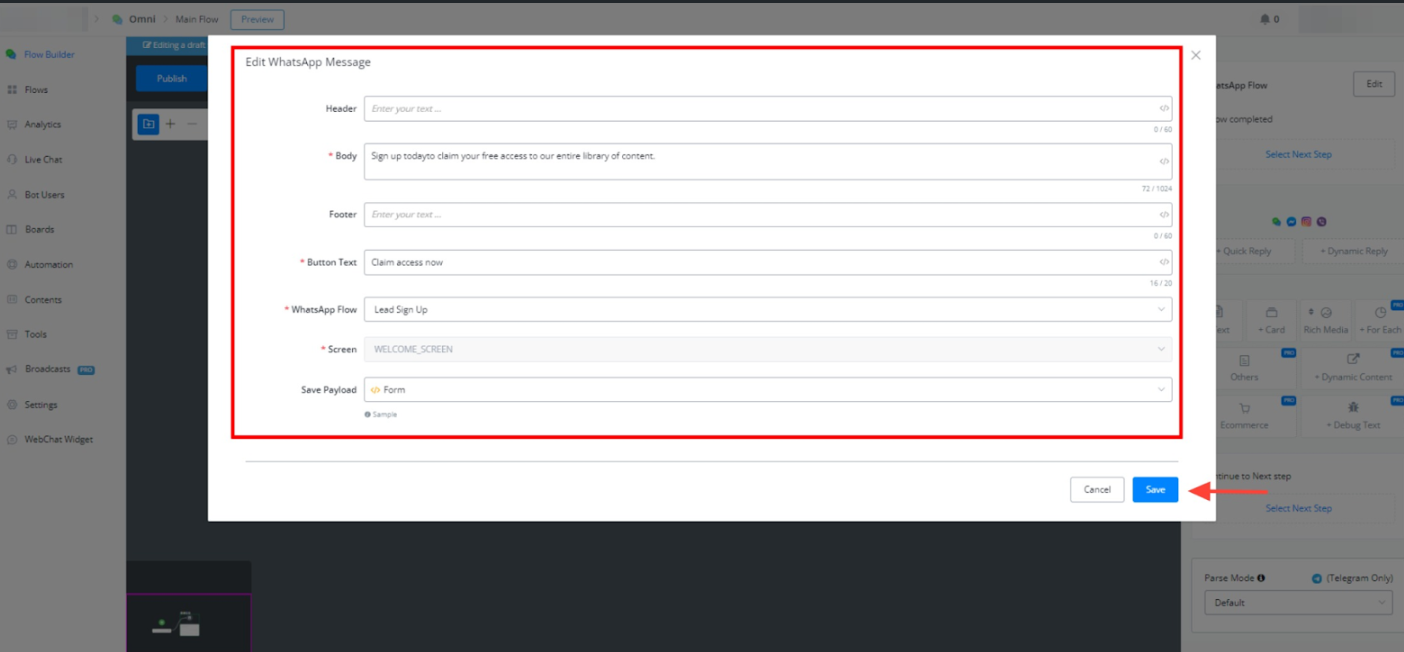
• Click “Edit” to open WhatsApp Flow settings
• On the editing pop up, enter the data such as Body, Button Text and select your WhatsApp Flow:
-
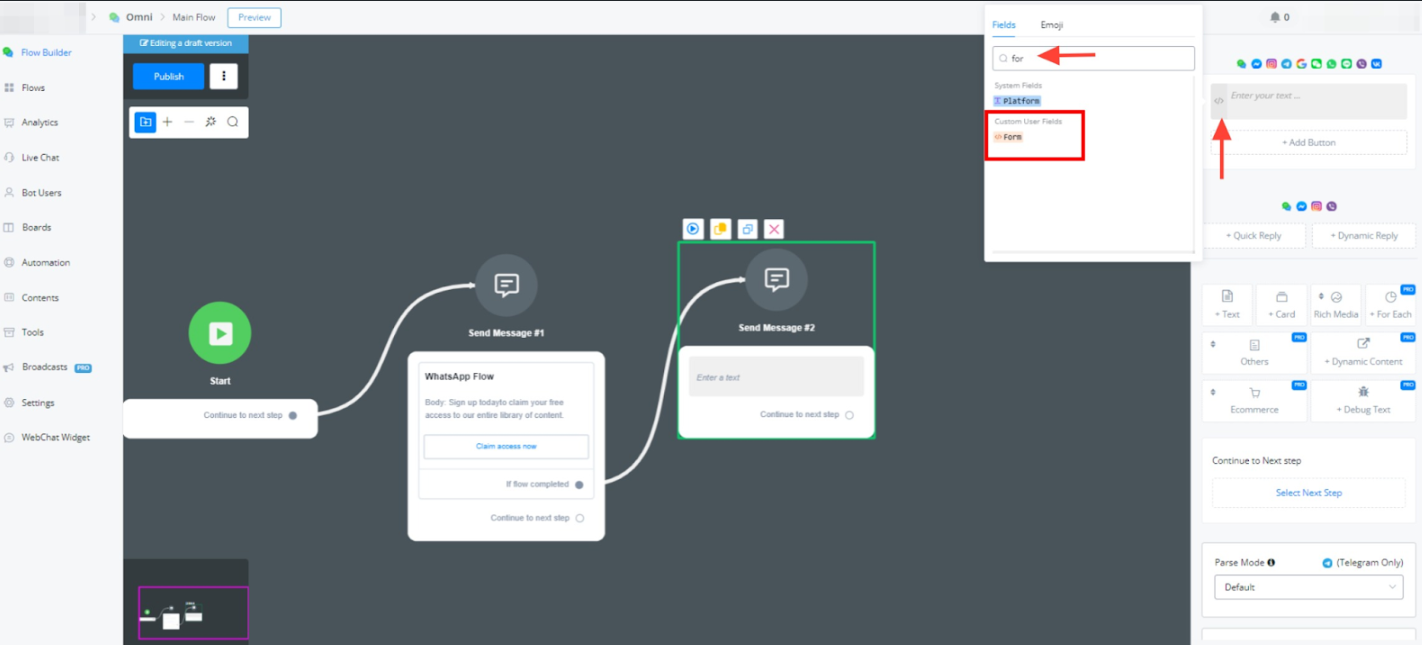
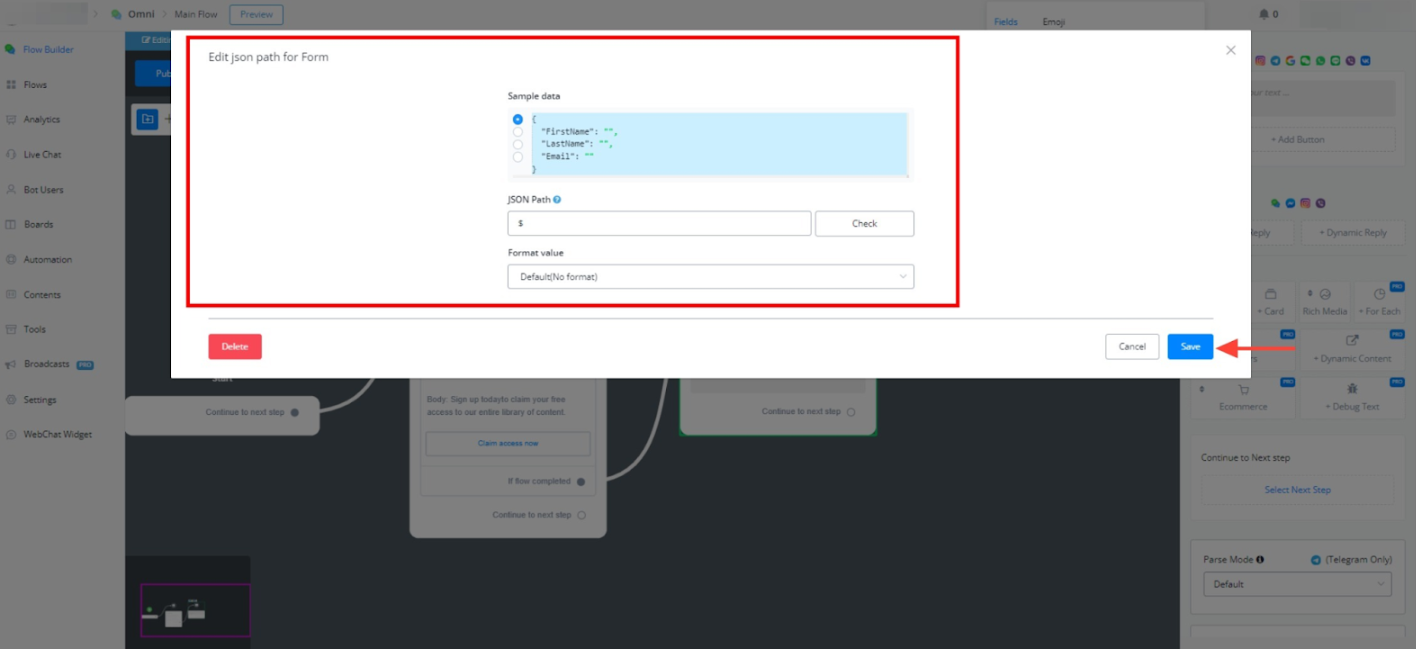
In the “Inputs” section, you will see an option to map the inputs to existing custom user fields in your Messagingme.app account.
-
For example:
- Field: Name → Map to Custom Field:
{{user_name}}. - Field: Email → Map to Custom Field:
{{user_email}}.*
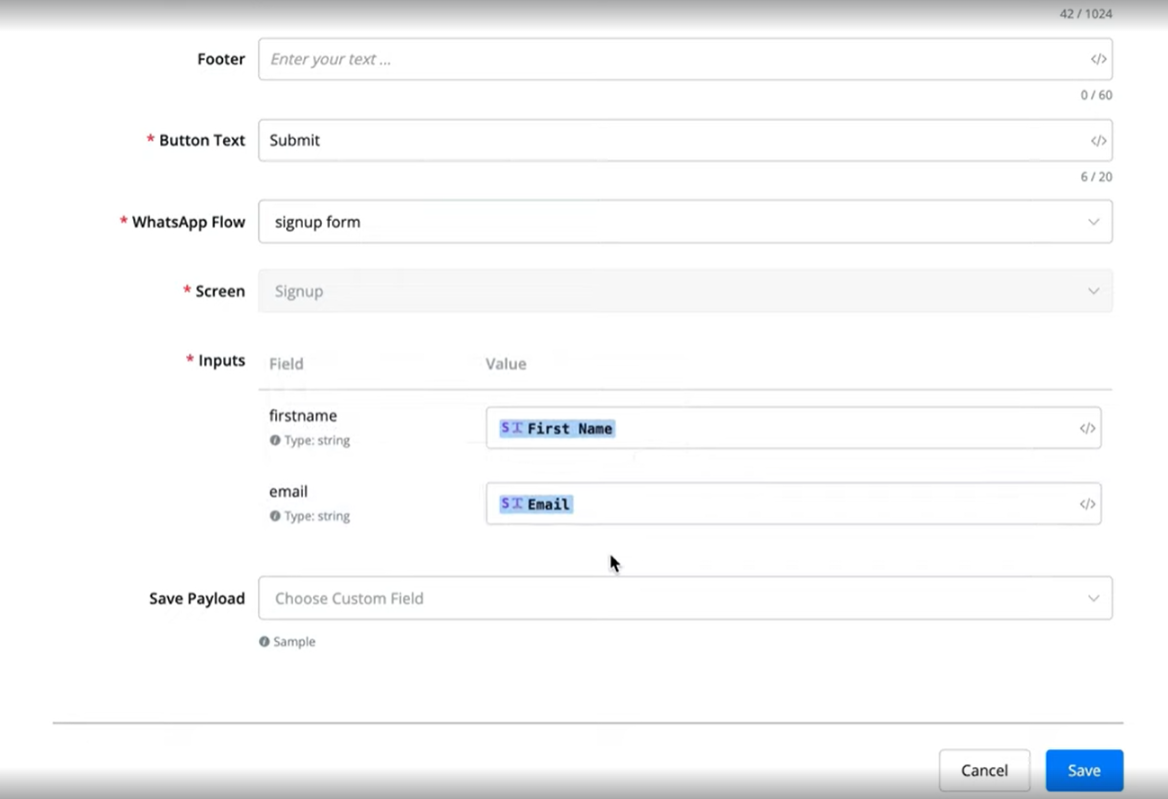
- Field: Name → Map to Custom Field:
-
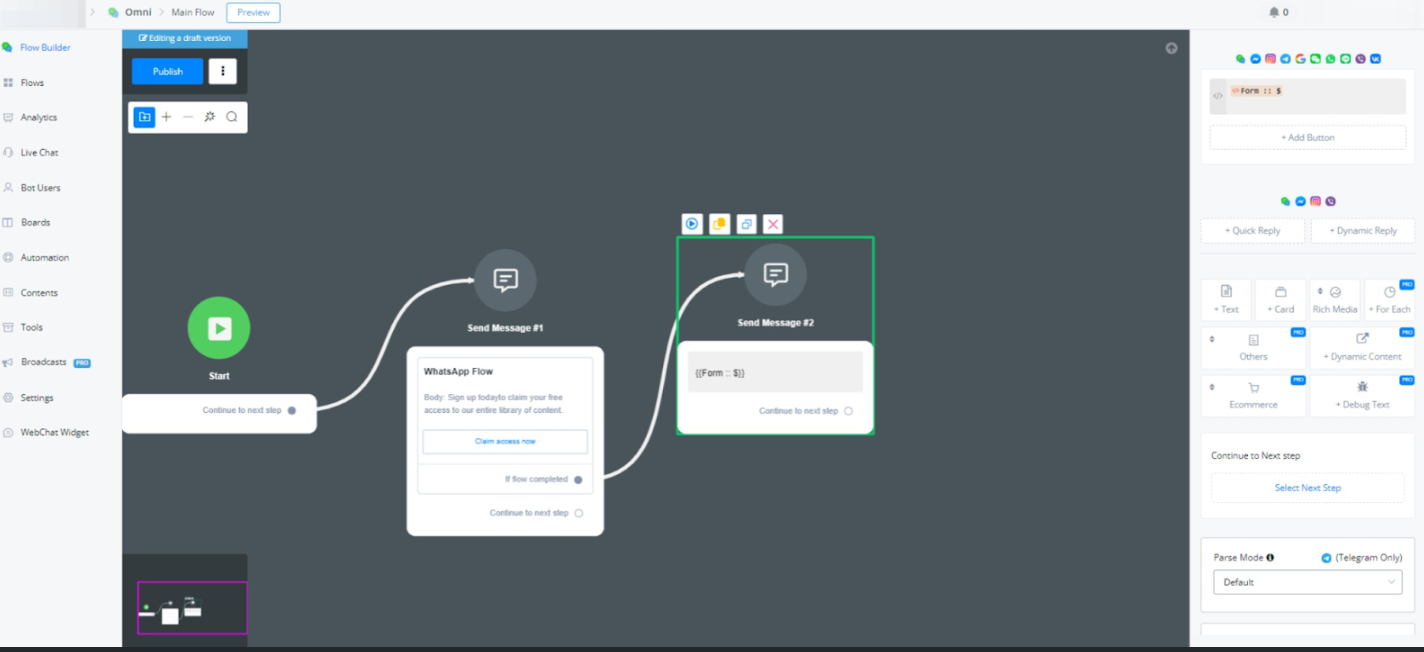
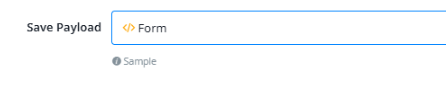
(Optional) Configure payload saving to a JSON field to capture user information collected during the flow.
- Save and Test:
- Save and test to ensure that the data entered into the user fields matches the bot user data.
Conclusion
WhatsApp Flows provides a powerful tool for designing and testing automated WhatsApp chat experiences. By following this guide and experimenting with the features, you can gain valuable insights into how to leverage this functionality to enhance your customer interactions.
Notification Topics
For meta channels (Facebook, Instagram, Whatsapp), users have a limit that they can only be contacted within 24 hours of the interaction. Afterwards you are unable to send them any more messages of automations
For this use case, Facebook has introduced notifications to be sent to users after subscribing them to it. These help you continue your automations past the 24 hour interaction limitation.
You can read more about them here:
Marketing Messages - Messenger Platform - Documentation - Meta for Developers
How to Create Notification Topics Inside Messagingme.app
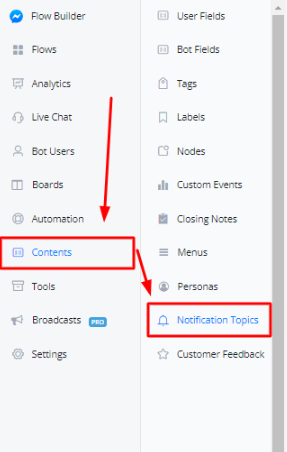
Inside your bot, click on “Content” then “Notification Topic”
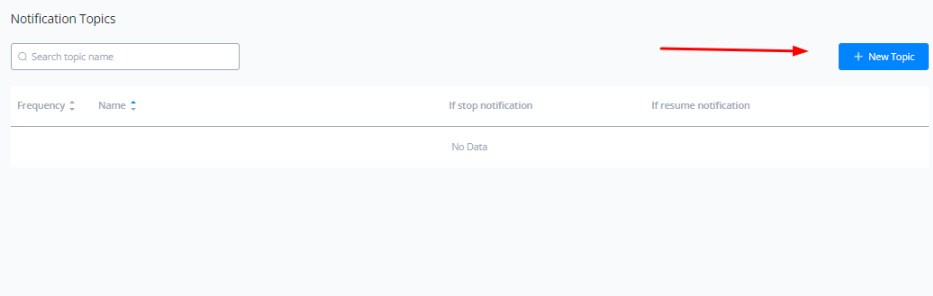
Click on “New Topic” to create a new notification topic
Types of Notification Topics
There are two types of notification topics that Facebook allows us to send to the users.
- One Time Notifications (OTN) - Can only be sent once
- Recurring Notifications - Can be sent on a recurring interval of time
Both of these notification types require the user’s consent and they will have to explicitly subscribe to these notifications before we can send it to them.
One Time Notifications (OTN)
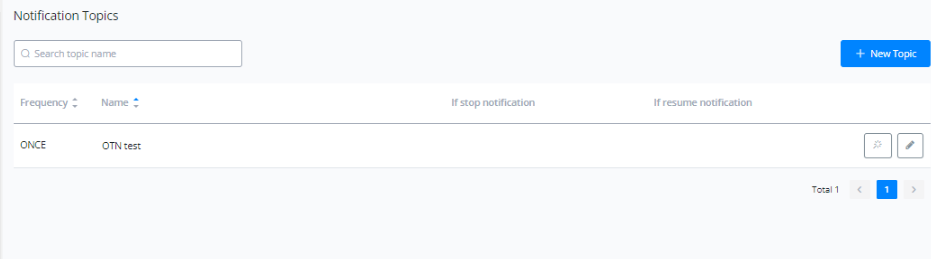
To create an OTN, click on the “New Topic” then select “ONCE” from the type.
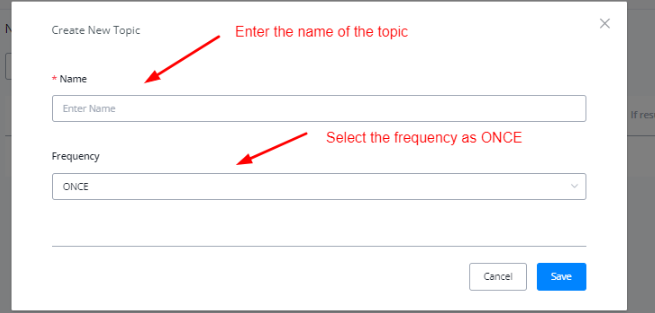
Once done, click on Save.
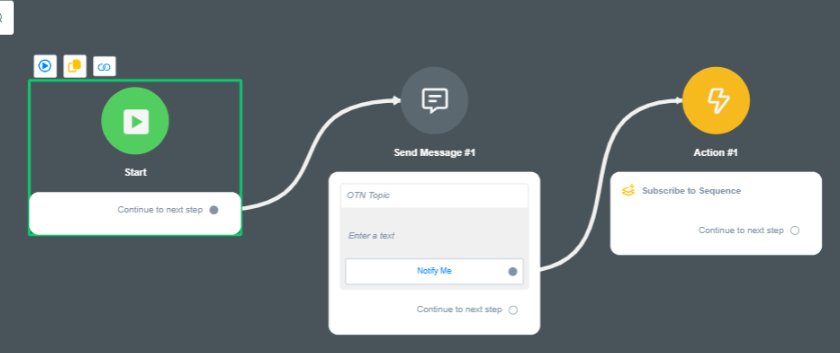
Before we can send this to a user, we first need to subscribe them to it. For subscription,
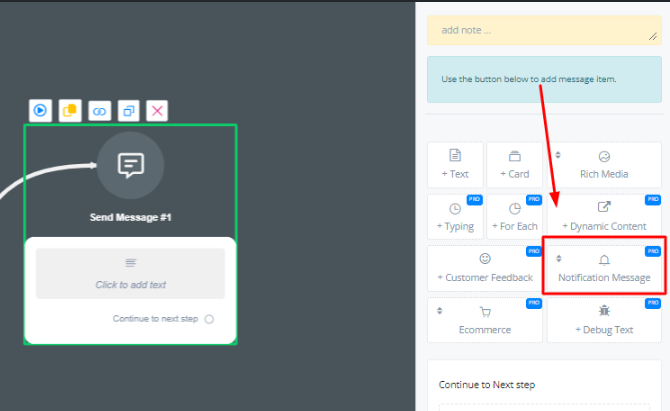
Create a “Send Message” node, then click on Notification Message. Then select “OTN Request” option.

Select the topic you want to send, add some test and then send it to the user. Once they click on “Notify Me”, you can then subscribe them to a sequence to then send them the OTN whenever the need arise.
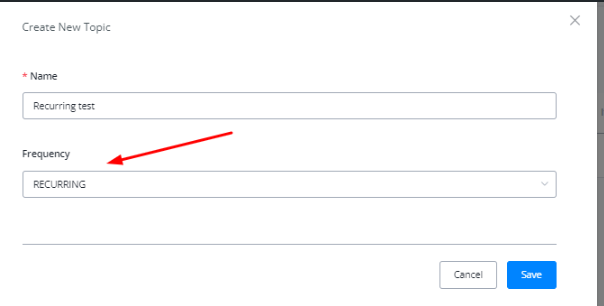
Recurring Notifications
Click on “New Topic” and select “RECURRING” option from the frequency tab.
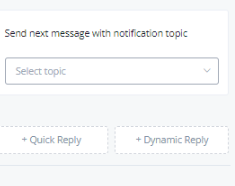
To subscribe the users to a recurring notification, create a Send Message node, then select on Notifications and then select “Daily Notification Topic”

Similarly if they click on “Get Messages” you can subscribe to a sequence that will send them the recurring messages on the interval of your choice.
How to Send Notification Messages
To send notifications (both OTN and recurring) , create a Send Message node, select Notifications and select “Send Notification Message”
Select the topic that you want to send, then once done, the message following the message above should contain the notification message. For example:
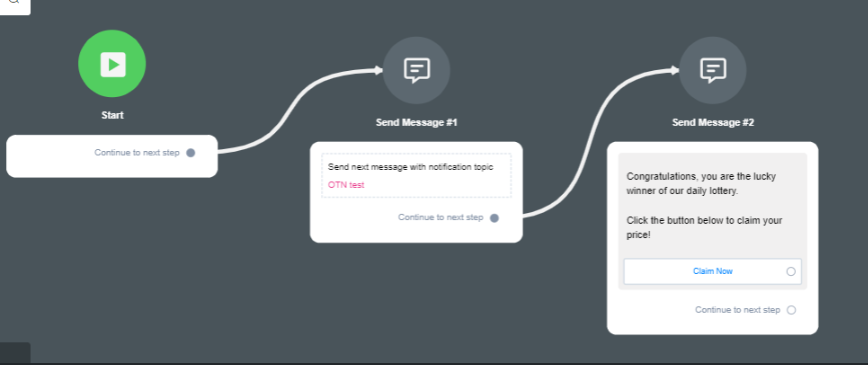
The last send message node in this flow is the content you want to send to the users while the middle node is the initiator to let Facebook know that this is a notification.
Customer Feedback (Facebook)
A fantastic way inside the chatbot to collect feedback is to use Messgaingme.app native module for this. It will allow you to gather not only feedback but also allows you to know when a user is not satisfied with the product or service you provide, which you can then proactively contact to resolve any issues there might be.
Note: This is only available inside the Messenger channel.
Creating and managing Customer Feedback Topics
To create a new customer feedback topic you can go to Contents, then select the Customer Feedback Topics tab.
From here you will see an overview of all your created topics and it allows you to manage them or create a new one.
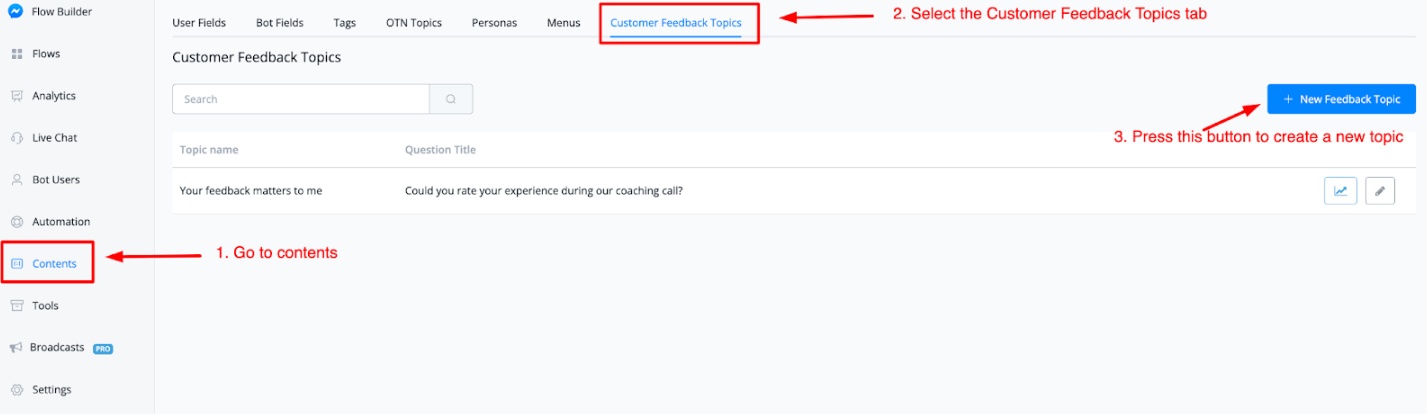
If you like to create a new topic you only have to press the top right button named + New Feedback Topic.
Once done a pop-up window will appear where you can set everything up.
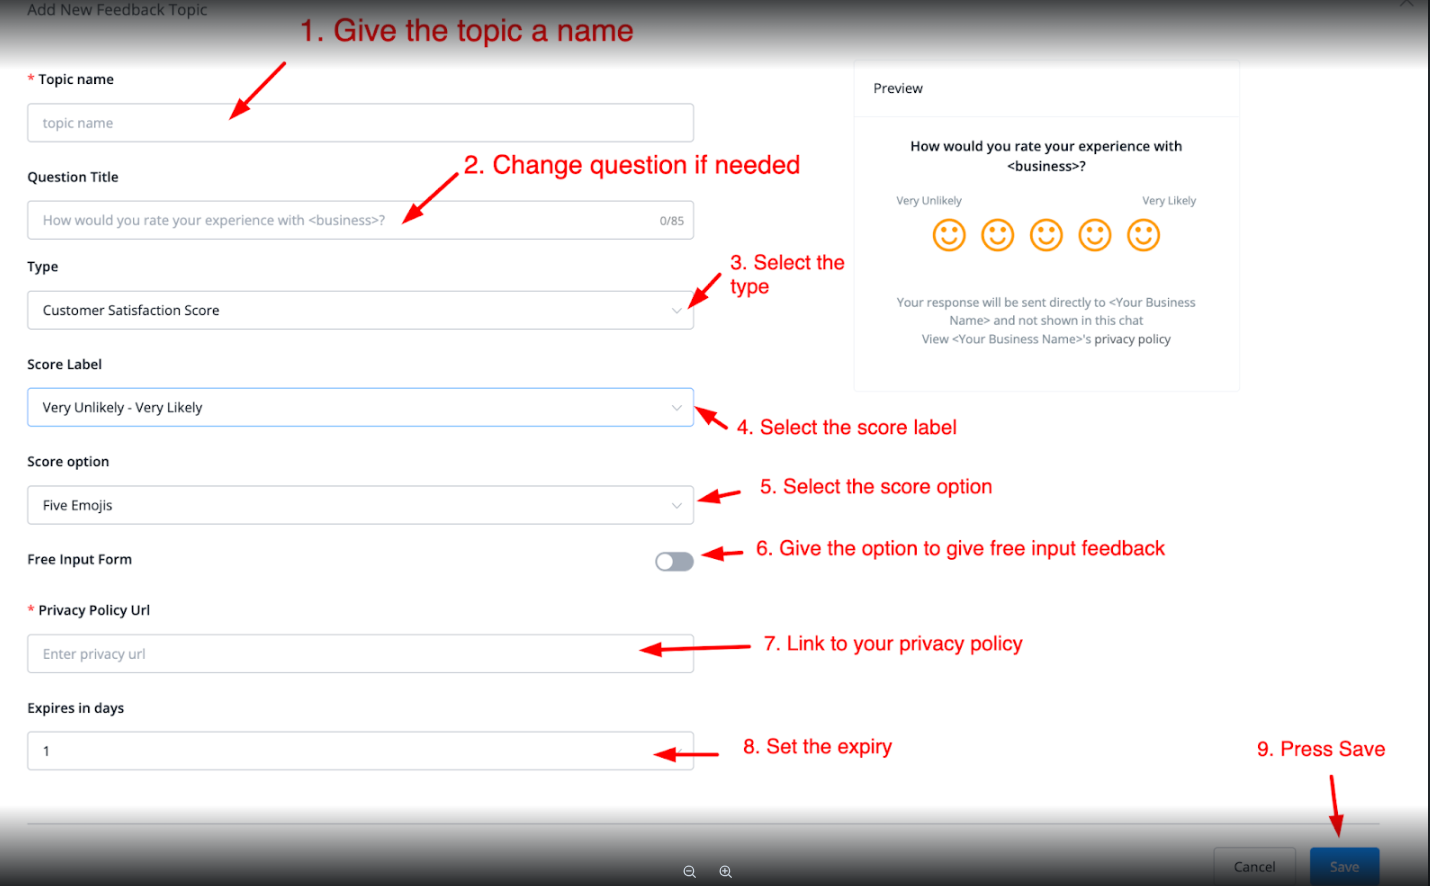
As you can see you can fully customize this to your own liking so let’s walk through the options.
With option 1 you can give the topic a name as it will appear inside the topic overview. Below that you will be able to adjust your Question title. This will show up as the question. By default, there is a question inside but you can adjust it if you like.
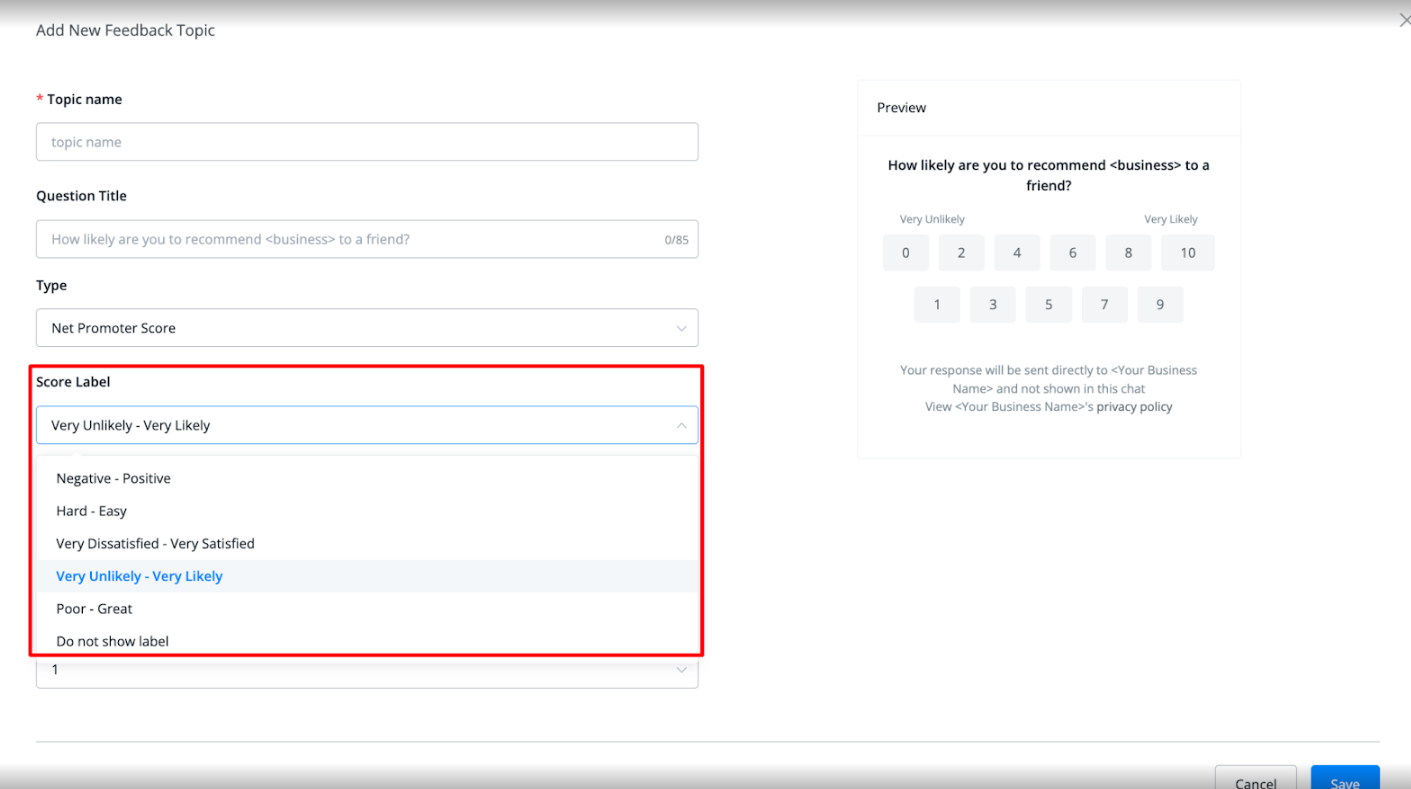
You can also set the type. You have the following choices;
- Customer satisfaction score
- Net promoter score
- Customer effort score
- Free input form
The next step is to select your score label. You will have the following options;
Next up are the score options that you will be able to choose from;
- One to five (numbers)
- Five stars
- Five emojis
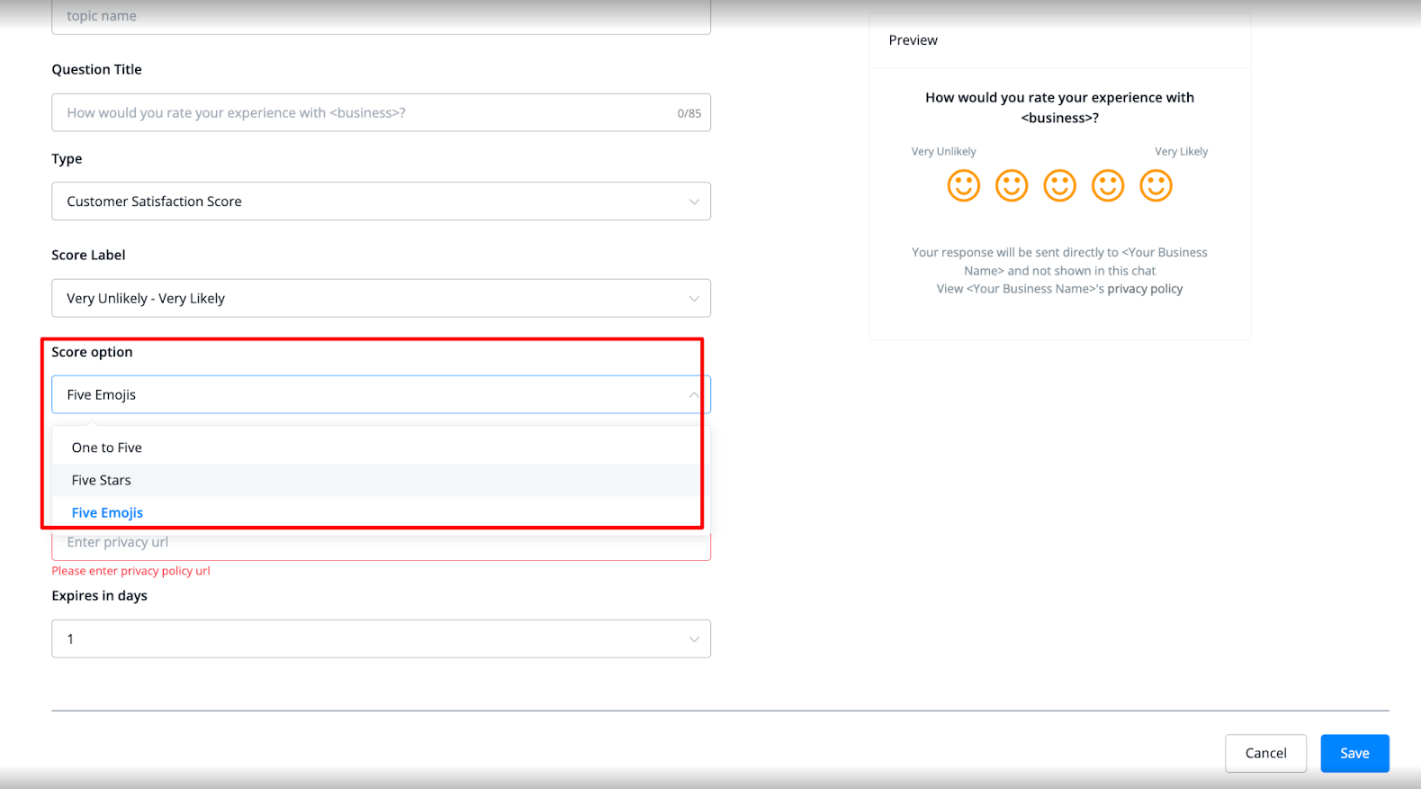
You will also be able to enable or disable free form input. Once enabled the user will be able to give additional feedback outside the rating.
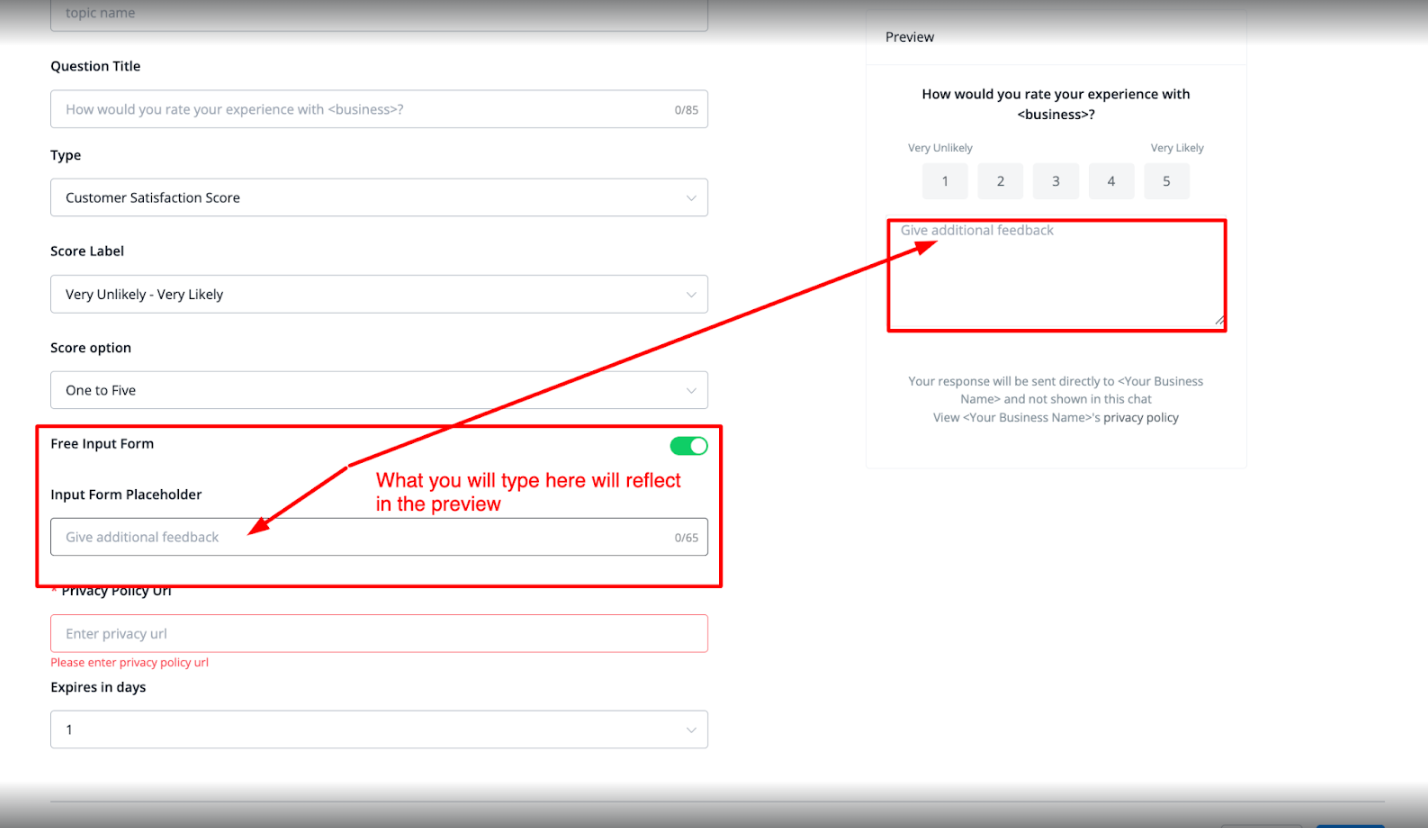
Below that you will be able to point to your privacy policy which is mandatory. And lastly, you will be able to set the customer feedback to expire anywhere between 1-7 days.
Once done you can press save. You will be taken back to the main overview and you will be able to manage the customer feedback topic you just created from there.

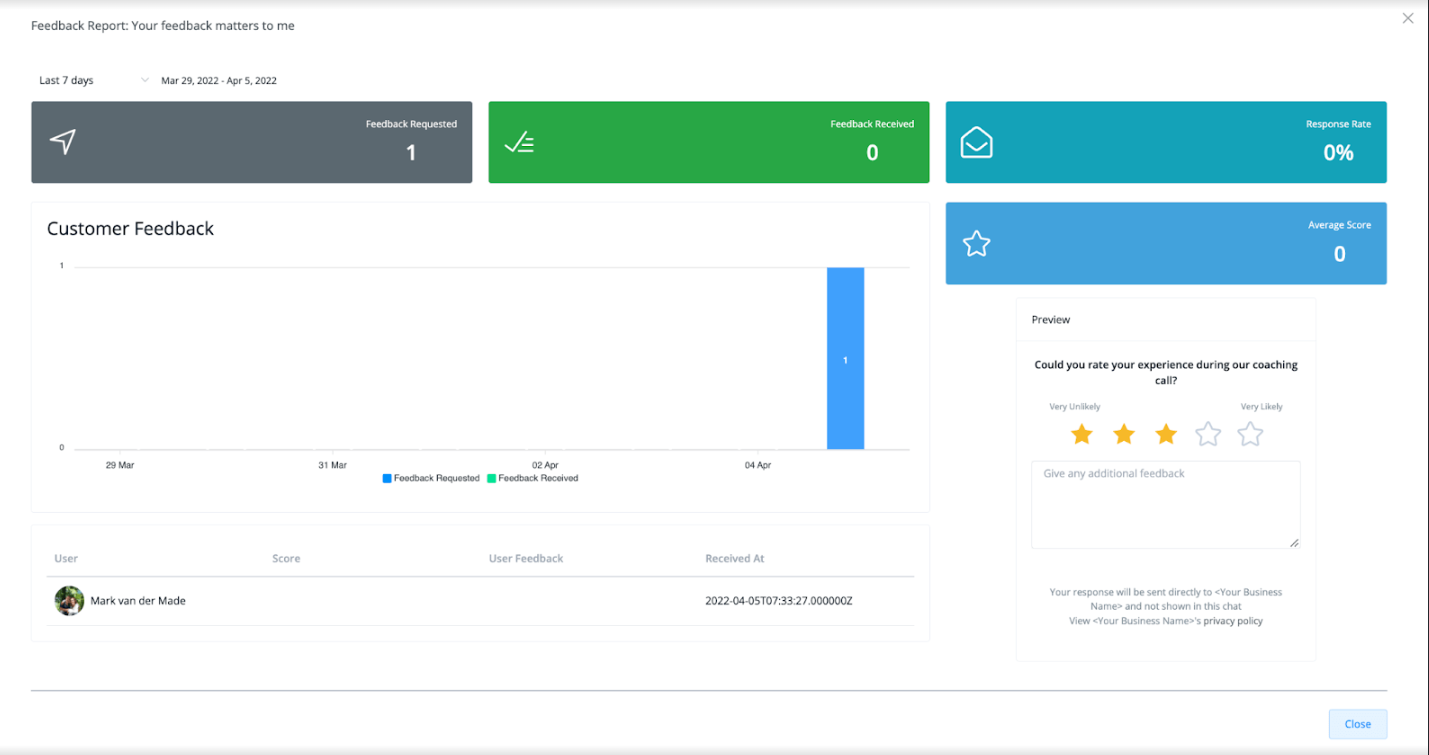
On the right you will have two icons. The first one will show you advanced analytics on the topic you selected, while the pencil icon allows you to edit it to your liking.
Below you will find an example of the analytics you can expect;
How to send a customer feedback topic
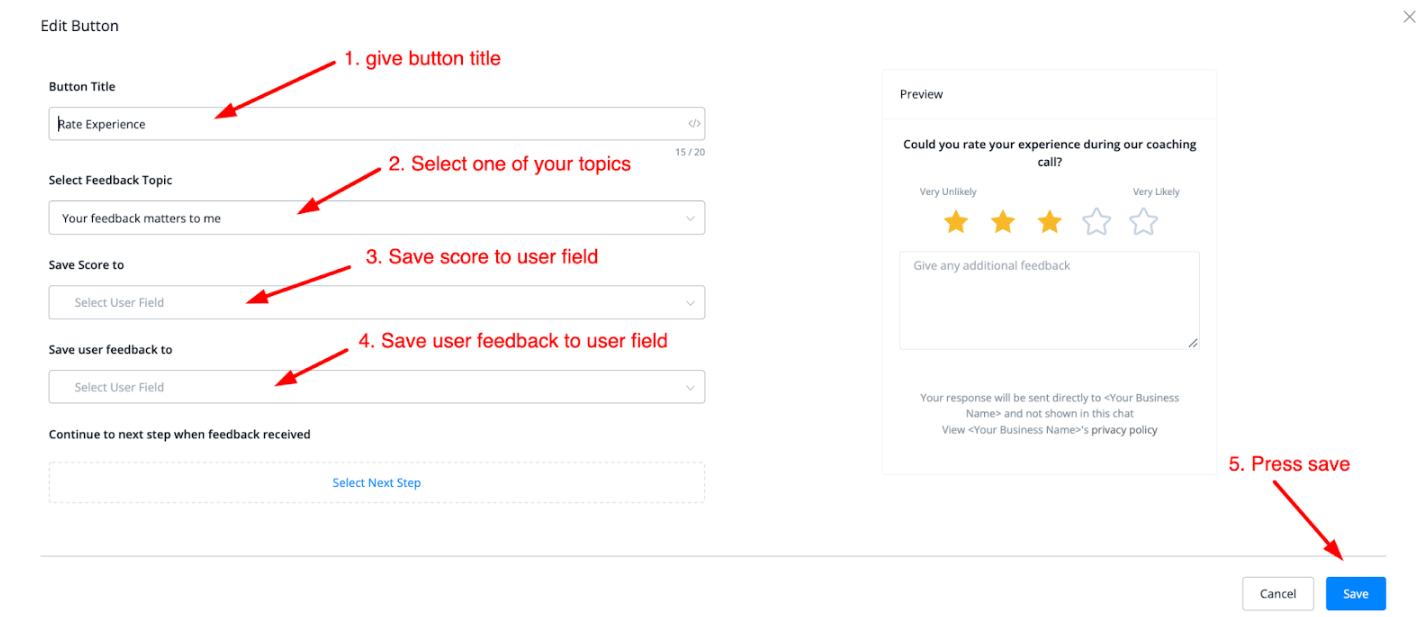
This is easily done inside of the flow builder. Just go to any flow you want to set up for this. From here create a send message block, then select Customer Feedback.
You will then be able to add a title and subtitle and press the button named rate experience.
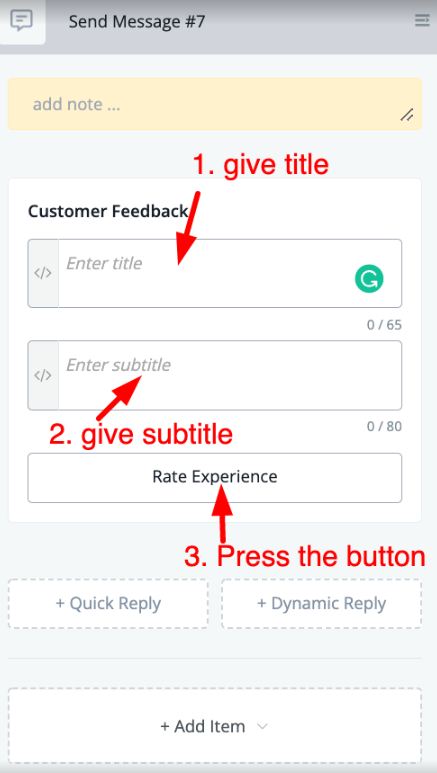
You will then be able to give the button a title, select the topic you want to use and save the responses to a user field. Once done press save you will be able to send this customer feedback to any user that enters the flow and this block.
- Save and Test:
This link will redirect you to the WhatsApp template section in WhatsApp manager, and you can create & submit template directly in WhatsApp manager, and once the template is approved, you can go to Messagingme.app to sync the template back to Messagingme.app.