Flow builder overview
This section will give you an overall idea about how to use the Messagingme.app flow builder. You can open a flow and try side by side when you learn it.
💡 IMPORTANT - 💁 Please make sure you go through every detail on this page before you start building bots.
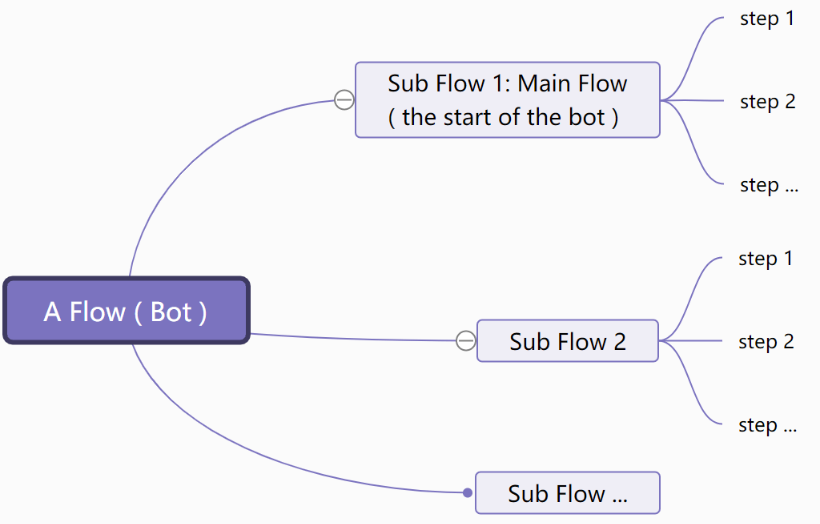
Channels, Sub Flow and Step
Channels
To begin with, you need to create a channel. Currently, Messagingme.app provides you with 17 types of channels:
Telegram
Whatsapp Cloud
Tiktok
Slack
SMS
RCS
Voice
Line
Viber
Vk
Intercom
JivoChat
ChatWoot
SubFlow type
Flow consists of sub flows. There are 3 types of sub flow:

Sub Flow Type - General flow for sending messages and other user interactions, most common type of flow used in automations
Function Flow - Used for processing repetitive tasks
Workflow - Used for processing background tasks and tasks that neccesarily dont need user interaction
Step type
Sub Flow consists of steps. There are 8 types of steps:
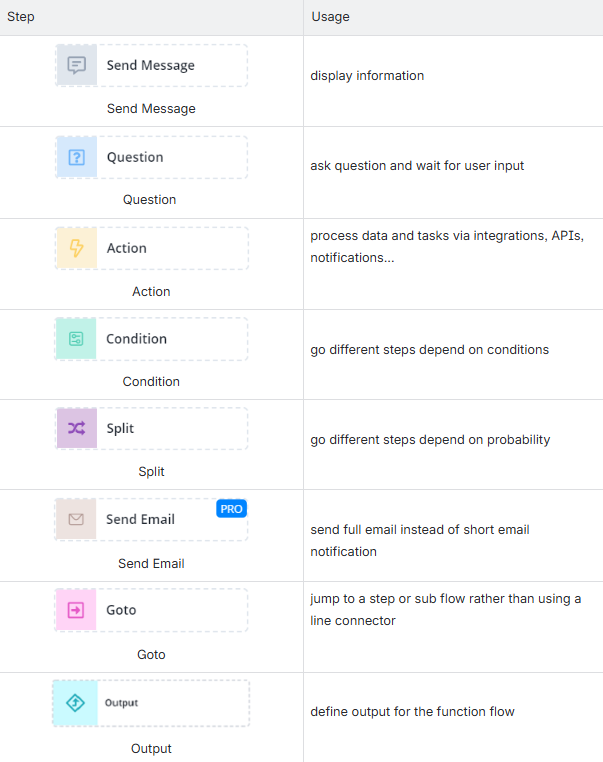
💡 The differences among different types of flow are Flow Setup, Send Message Step and Question Step. Each channel has its own limitation of message types. For example, you can display a product gallery in Facebook Messenger while the SMS channel doesn’t support that.
Flow labels
Flow Labels are designed to help users label and organize sub-flows within their Flow Builder. Each label is customizable with its own name and color, making it easier to visually distinguish different flow types.
This feature is especially useful for those managing multiple sub-flows, offering quick identification and filtering options to streamline workflow management.

Creating a Label and Assigning Color
To create a label:
- Go to the Flow Builder.
- Enter the label’s name.
- Choose a color for the label.
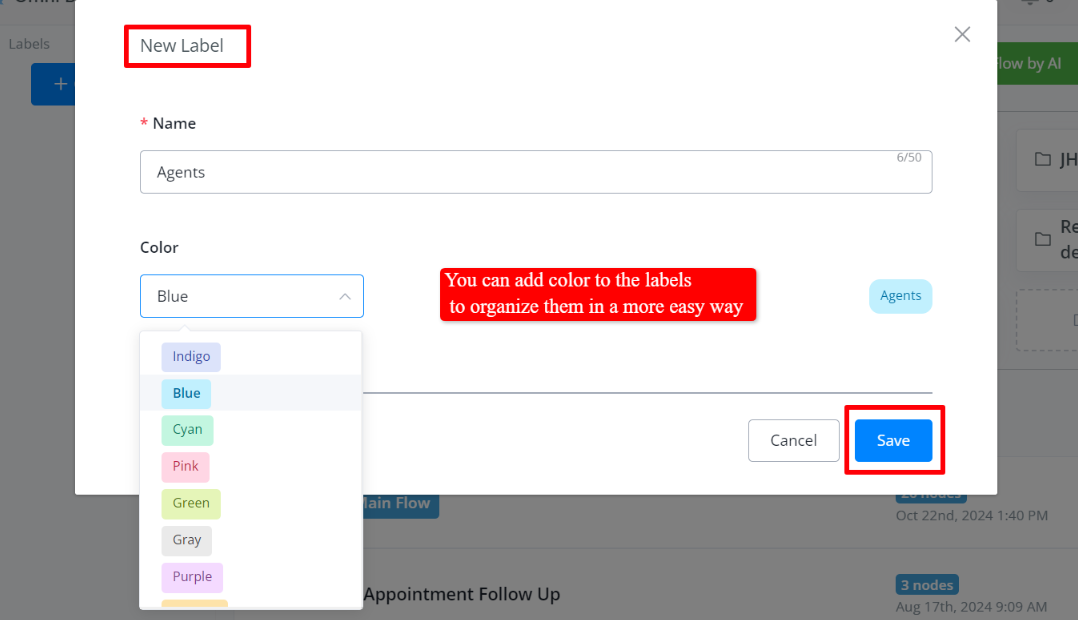
By assigning labels with different colors, organizing sub-flows becomes effortless. You can easily spot and manage them based on their assigned categories.
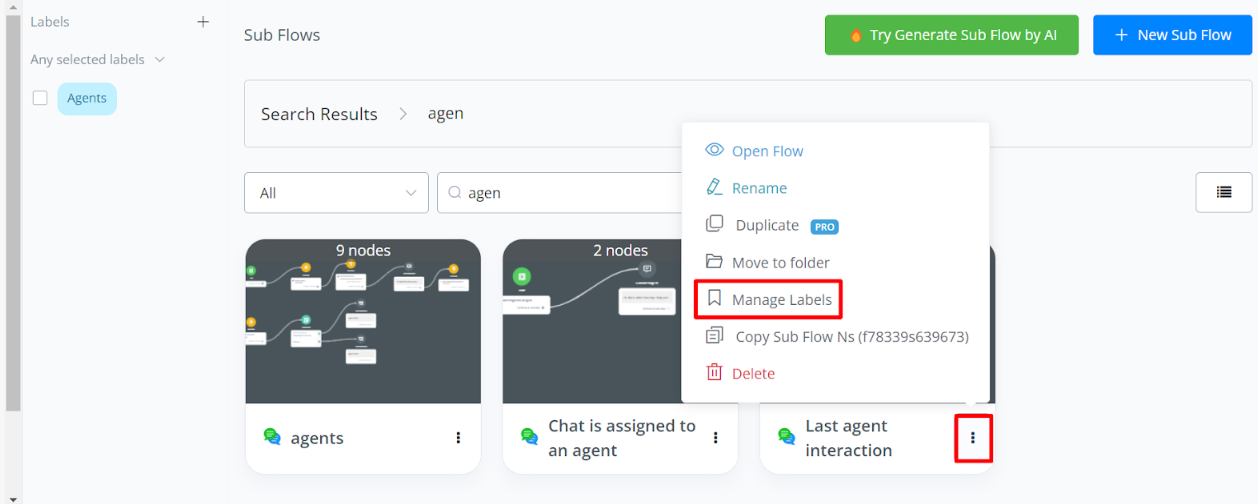
Adding a Sub-Flow to a Label
Adding a sub-flow to a label is simple:
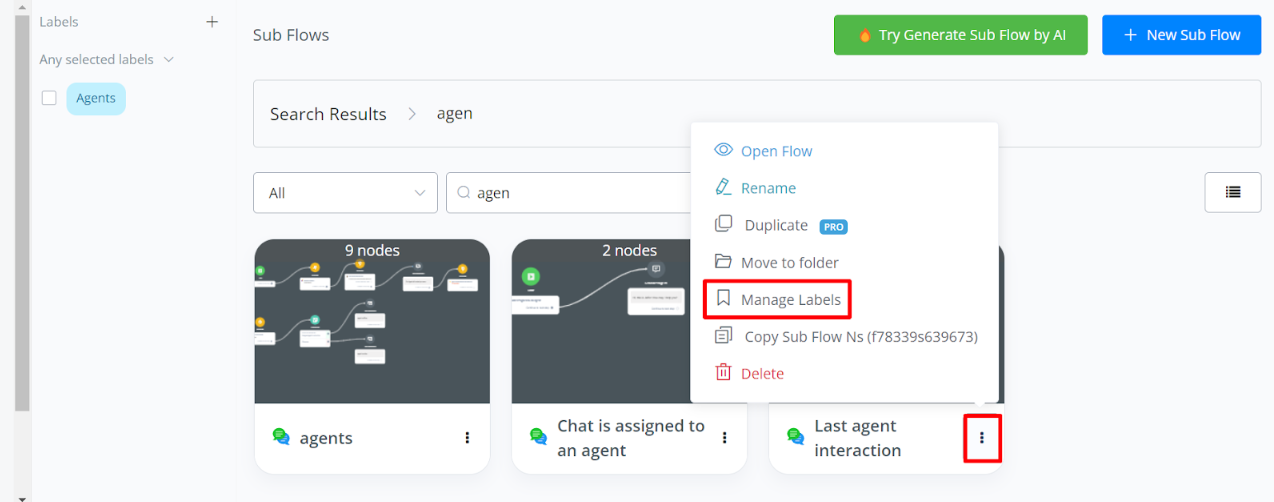
- Click on the vertical ellipsis (three dots) next to the sub-flow.
- Select Manage Labels from the dropdown menu.
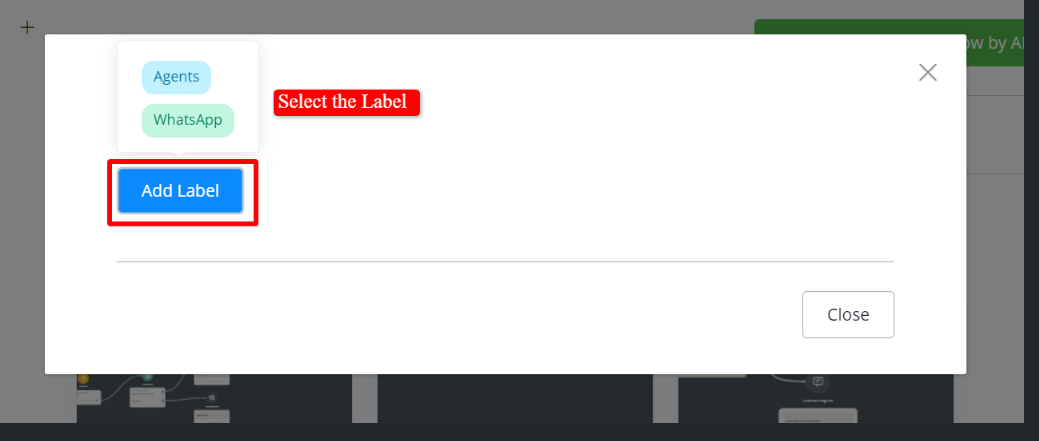
- Add the sub-flow to your desired label.
By assigning labels with different colors, organizing sub-flows becomes effortless. You can easily spot and manage them based on their assigned categories.
Adding a Sub-Flow to a Label
Adding a sub-flow to a label is simple:
- Click on the vertical ellipsis (three dots) next to the sub-flow.
- Select Manage Labels from the dropdown menu.
- Add the sub-flow to your desired label.
This process ensures that your sub-flows are neatly categorized under the appropriate labels.
Accessing Sub-Flows by Labels
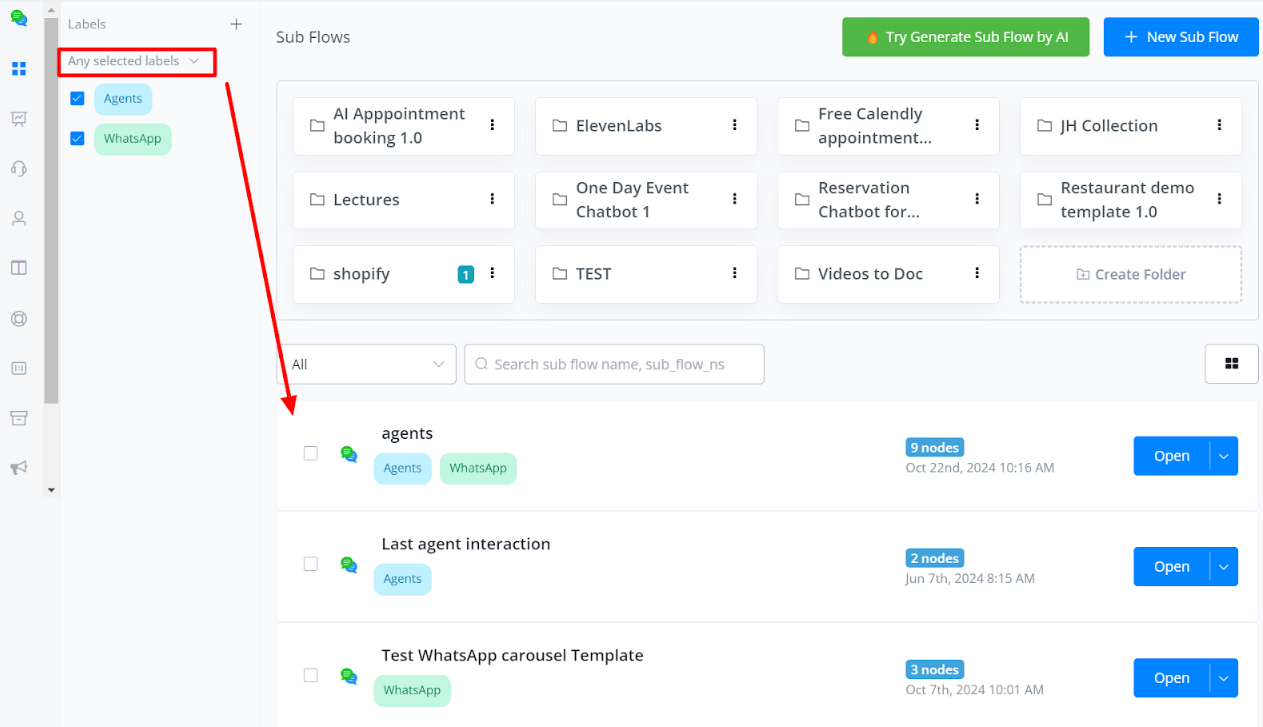
When it comes to filtering sub-flows by labels, you have two options:
- All Selected Labels: This filter will display only the sub-flows that contain all of the labels you select.

2 Any Selected Labels: This option shows all sub-flows that have at least one of the selected labels.
Managing Sub-Flows in Folders with Flow Labels
When you first access your flows, all flows are displayed, including those inside folders and the Root directory.
Once you apply a label filter:
- Only the sub-flows that match the selected labels will be visible.
- The unselected flows, both in the Root directory and inside folders, will be hidden from view.
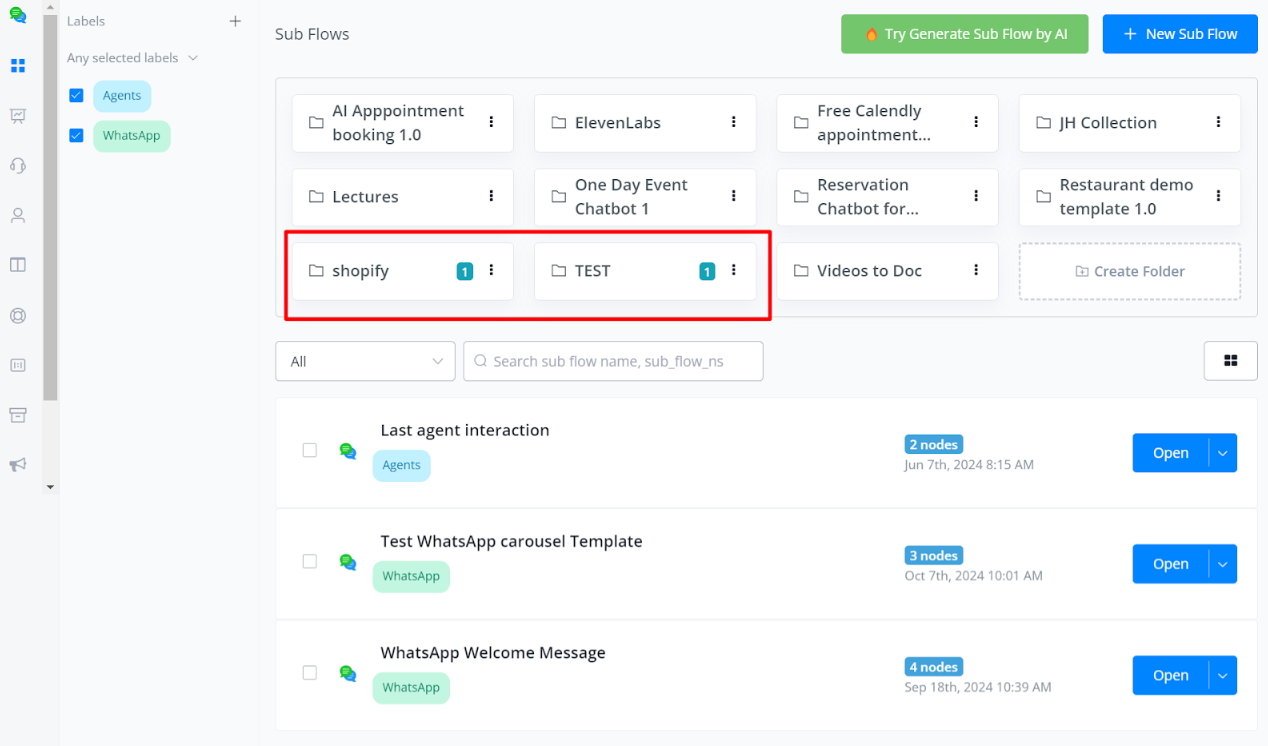
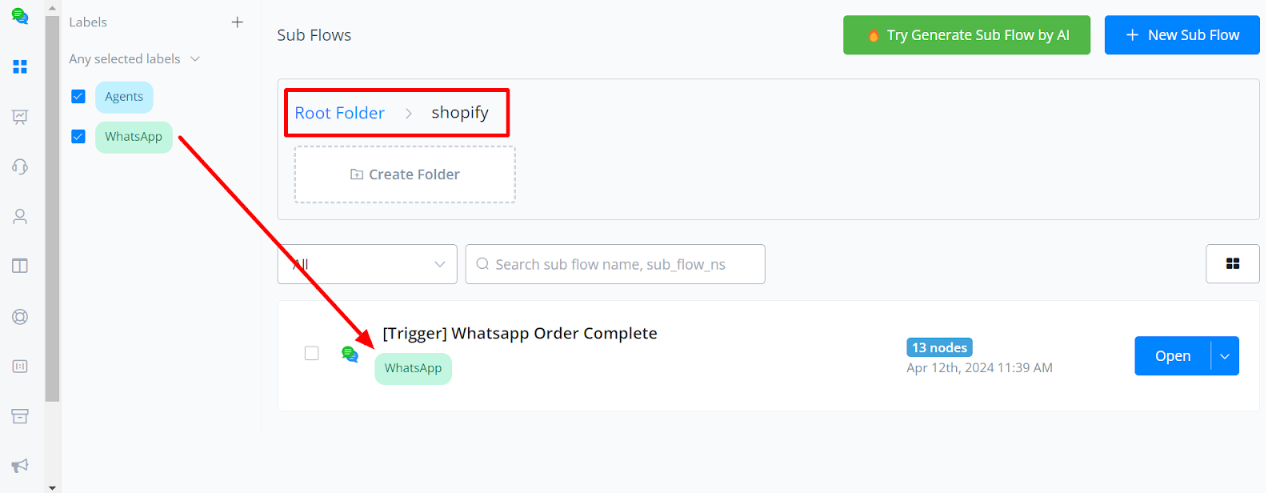
When you open a specific folder after applying a label filter:
- Only the sub-flows with the chosen labels will be visible inside that folder.
- All other sub-flows that do not match the label filter will remain hidden, even if they exist within the same folder.
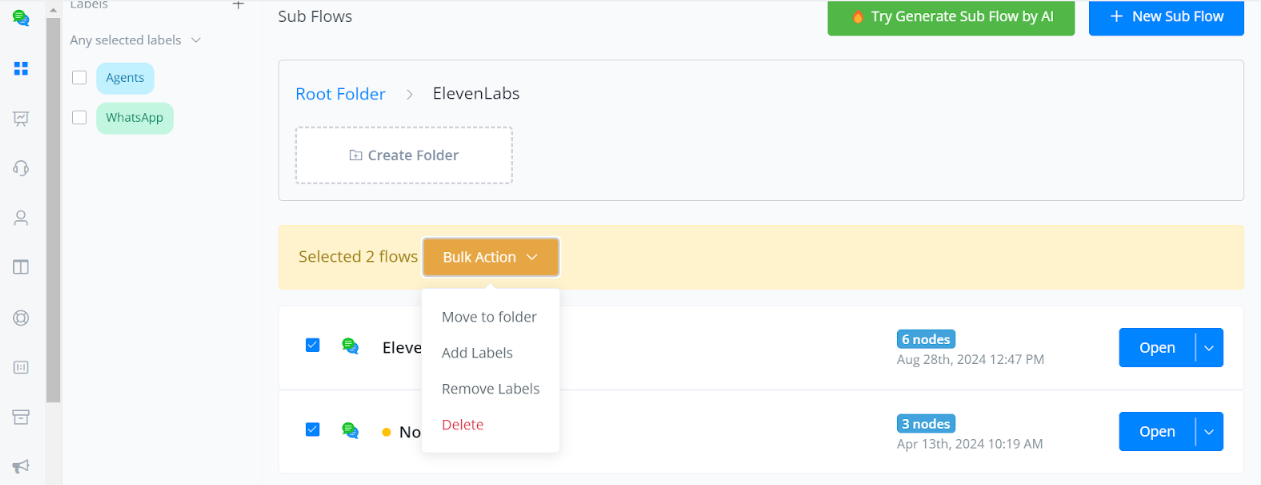
Bulk Actions for Flow Label Management
Flow Labels also offer bulk management capabilities. You can now:
- Add or remove labels from multiple sub-flows at once
- Move them into folders
- Even delete sub-flows in bulk.
Field
Field, aka variable, is a container to hold a value.
| Classification | Description |
|---|---|
| system field and custom field | system field is created by the system with pre-defined variable name and type, while custom field is defined by yourself |
| bot field and user field | bot field is shared in the whole bot, while each user has his/her own set of user fields |
| text field, number field, boolean field, date field, datetime field and JSON field | see variable type |
User field
User field belongs to users. For example, each user has their own name and email address. So “name” and “email” are user fields.
Bot field
Bot field belongs to the bot. For example, a restaurant bot holds an address and contact number of the restaurant. So “restaurant_address” and “restaurant_contact” should be created as bot fields. Because you don’t want to manage different addresses or contacts of your restaurant for every user.
System field
System field is created by the system with pre-defined variable name and variable type. There are system bot field and system user field:
| Field Name | Field Name | Field Name | Field Name | Field Name |
|---|---|---|---|---|
| User Ns | user field | text | user identification in MM | non-editable |
| User Id* | user field | text | user identification from the channel | non-editable |
| First Name | user field | text | profile info | in Question Step/Action Step |
| Last Name | user field | text | profile info | in Question Step/Action Step |
| User Name | user field | text | profile info | in Action Step |
| Gender | user field | text | profile info | in Action Step |
| user field | text | profile info | in Question Step/Action Step | |
| Phone | user field | text | profile info | in Question Step/Action Step |
| Profile Image | user field | text | profile info | in Question Step |
| Locale | user field | text | profile info | non-editable |
| Timezone | user field | text | profile info | non-editable |
| Language | user field | text | profile info | in Action Step |
| Subscribed | user field | datetime | subscribed time | non-editable |
| Last Text Input | user field | text | user’s last input | edited by system |
| Last Interaction | user field | datetime | last action time | edited by system |
| Last Button Title | user field | text | last button pressed | edited by system |
| Flow Ns | bot field | text | flow(bot) identification in MM | non-editable |
| Sub Flow Ns | bot field | text | sub flow identification in MM | non-editable |
| Page Name | bot field | text | connected Facebook page name | non-editable |
| Page Id | bot field | text | connected Facebook page id | non-editable |
| Page User Name | bot field | text | username of the page in Facebook | non-editable |
| Last FB Comment | user field | text | user’s last comment text in the Facebook page | edit by system |
| Last FB Comment Post Id | user field | text | post id of where user put the last comment | edit by system |
| Last FB Comment total tagged users | user field | number | tagged users amount in last comment | edit by system |
| Last FB Comment total new tagged users | user field | number | tagged but haven’t subscribed(to bot) users amount | edit by system |
| Last FB Comment is existing users | user field | number | before this comment, is he/she an existing user? yes=1,no=0 | edit by system |
| Live Chat Url | user field | text | (for agent) visit to talk to user in live chat | edit by system |
| NOW | user field | datetime | current time in user’s timezone* | edited by system |
| TODAY | user field | date | current date in user’s timezone* | edited by system |
| BOT_CURRENT_TIME | bot field | datetime | current datetime in workspace’s timezone | edited by system |
| ITEM | user field | array (JSON) | each item in a JSON | in “For Each” message |
| SELECT | user field | array (JSON) | selected item | in “Select” new step |
| SHOP | bot field | array (JSON) | store information | in Ecommerce Integration |
| CART | user field | array (JSON) | user shopping cart | in Action Step |
| ORDER | user field | array (JSON) | user’s last order | edited by system |
| User | user field | array (JSON) | user’s profile | edited by system according to other profile values |
| DialogFlow | user field | array (JSON) | DialogFlow response | edited by DialogFlow agent |
💡 Note - If the channel doesn’t support timezone in user’s profile, or, the channel supports but the user don’t have a timezone value, workspace timezone will be used instead.
User Id in Different Channels:
| Channel | Meaning | Example Value |
|---|---|---|
| Unique Id in your Facebook page | 6288386817841812 | |
| Unique Id in your Instagram bot | 6570462892993643 | |
| Telegram | Unique Id in your Telegram bot | 1173717756 |
| Slack | Unique Id in your Slack workspace | U017MKNENH |
| Unique Id in your WeChat account | oNzS3wpEjnA3tXmOcNxpqtAnBwWg | |
| User’s phone number without + | 61412345678 | |
| SMS | User’s phone number | +61412345678 |
| Voice | User’s phone number | +61412345678 |
| Conversation Id from Google | 8095938e-90cf-4347-ab94-9224308672b0 | |
| Line | Unique Id in your Line bot | Ub02c77c69c59c5be5597d58ce2701ebe |
| Viber | Unique Id in your Viber bot | mdY9hOWdeQC6J/Sl19Qh8A== |
| Vk | Unique Id in your Vk bot | 705862439 |
💡 Note - The unique id from the channel is only unique in your Facebook page, Telegram bot, Slack workspace or WeChat account, not the unique id in the whole Facebook, Slack, etc.
Variable Type
There are 6 types of variable in MessagingMe.app :
| Type | Storage | Example | Operations Supported |
|---|---|---|---|
| Text | letters, words, sentences… | Hi, Messagingme.app. | cutting, change case, encode, decode… |
| Number | numbers | 123.45 | + - x ÷, mod, power, log, root, round… |
| Boolean | either “1” or “0”, for true or false | 1 | assign |
| Date | date | 2021-03-30 | format, add months/weeks/days |
| DateTime | date and time | 2022-01-01T12:00:00+10:00 | format, add months/weeks/days/hours/minutes |
| JSON (array) | a series of variables | {“name”:“Jack”, “age”:“20”} | load, get, update, remove, count, sum, average, sort, shuffle, reverse… |
Boolean Value
When these values stored in the field, the boolean return false, otherwise it goes true:
- empty
- null
- ‘false’
- false
- ‘no’
- 0
Create Custom Field
Wow, now you are a master 👨🎓 of field! Let’s try it out! 😎😎
You can create variables in 2 ways:
| Place | Type Supported |
|---|---|
| in Contents section | user field & bot field |
| anywhere you need to map result to variable, e.g. Question step, Integration, etc | user field only |
Create Custom Field in Contents Section
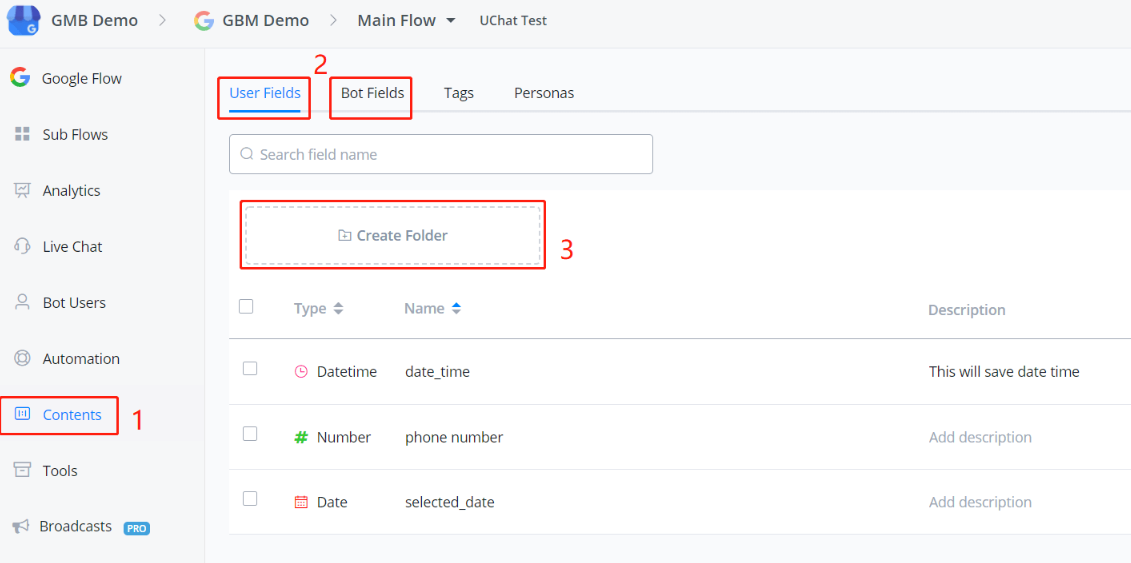
- go “Contents” from the left sidebar
- select User Fields or Bot Fields
- use folder to organize your fields if needed
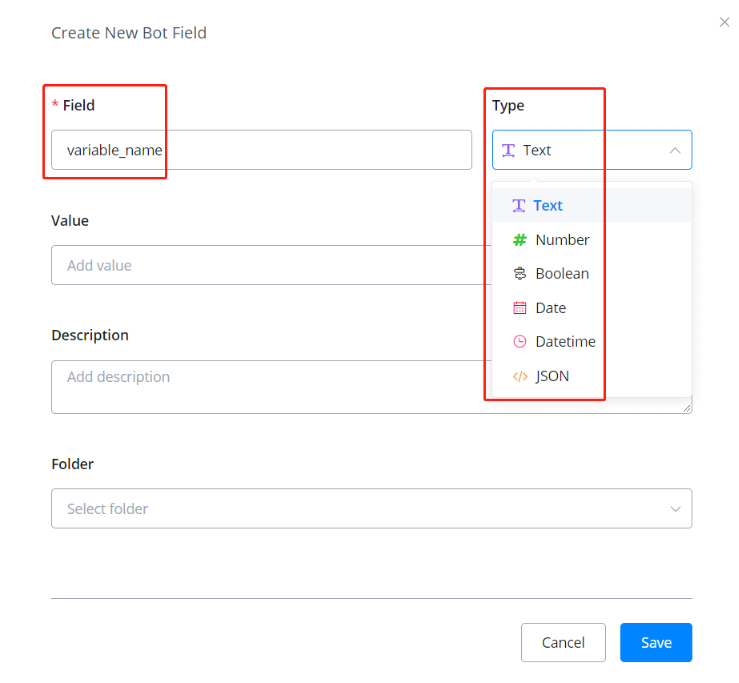
Click the blue ”+ New User/Bot Field” button on the right side to create a field. “Field Name” is a must. You can use any character to separate words like underline or space. We suggest you keep the field name as concise as possible, to avoid any possible display issue.
After that, pick a variable type. Add default value or description if needed. (default value is for bot fields only)
Folders can be used to organize variables. Trust me, you will need it when your flow goes big. 🧐
Create Custom Field in Question and Action Step
To create new fields in for example, the question step:
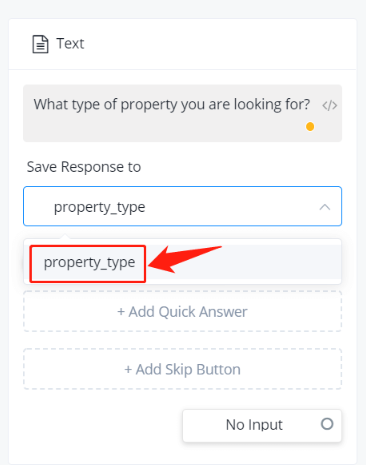
Type in a new variable name in the “Enter Field Name” box and click it in the drop-down list. Select correspond variable type and here you go.
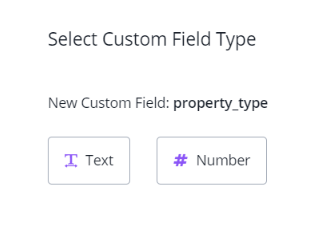
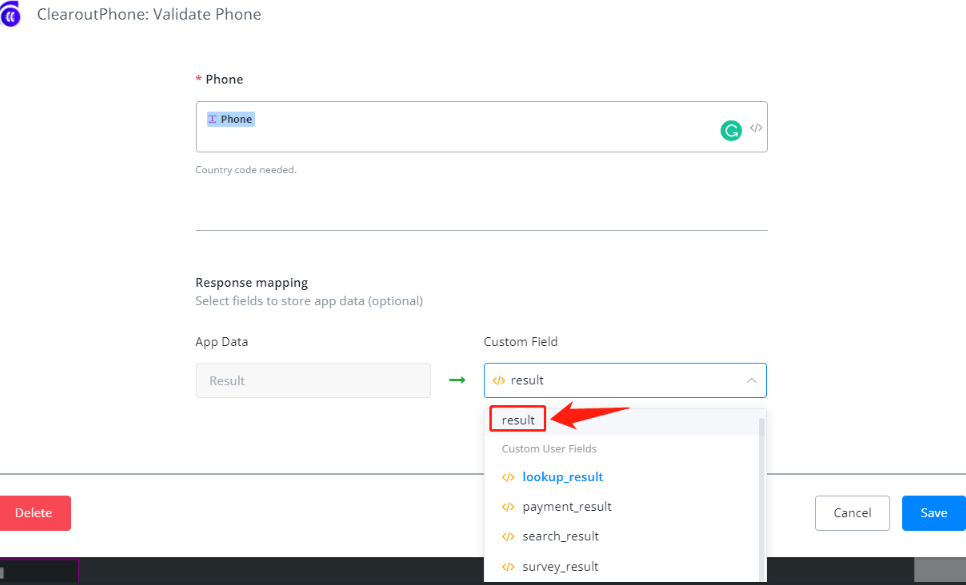
Another example, create in an integration:
Publish Version & Draft Version
In MessagingMe.app, each flow has a Publish Version and a Draft Version.
-
Publish Version
your bot talk to clients using the publish version.
-
Draft Version
any editing of steps will be saved automatically to the draft version. you can edit your flow without influencing the bot and test the draft version before you “Publish”.
From Publish Version to Draft Version, 1 way:
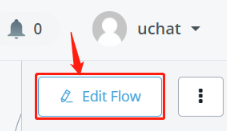
Click “Edit Flow” on the upper left/right corner of the flow to enter the draft version
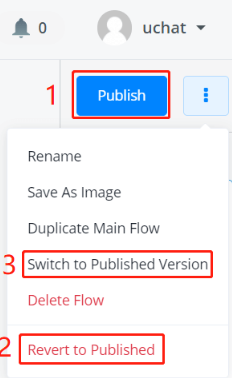
From Draft Version to Publish Version, 3 ways:
- click “Publish” to save your draft to a new Publish Version
- discard changes and revert to the newest Publish Version
- keep draft and switch to Publish Version (by doing this, you can have a look at your publish version and when you click edit and come back, your draft is still here)
💡 Don’t worry if you accidentally quit during your editing, the system will keep all your modifications in Draft Version. So when you come back, simply enter Draft Version again and you can see your modifications remain intact.
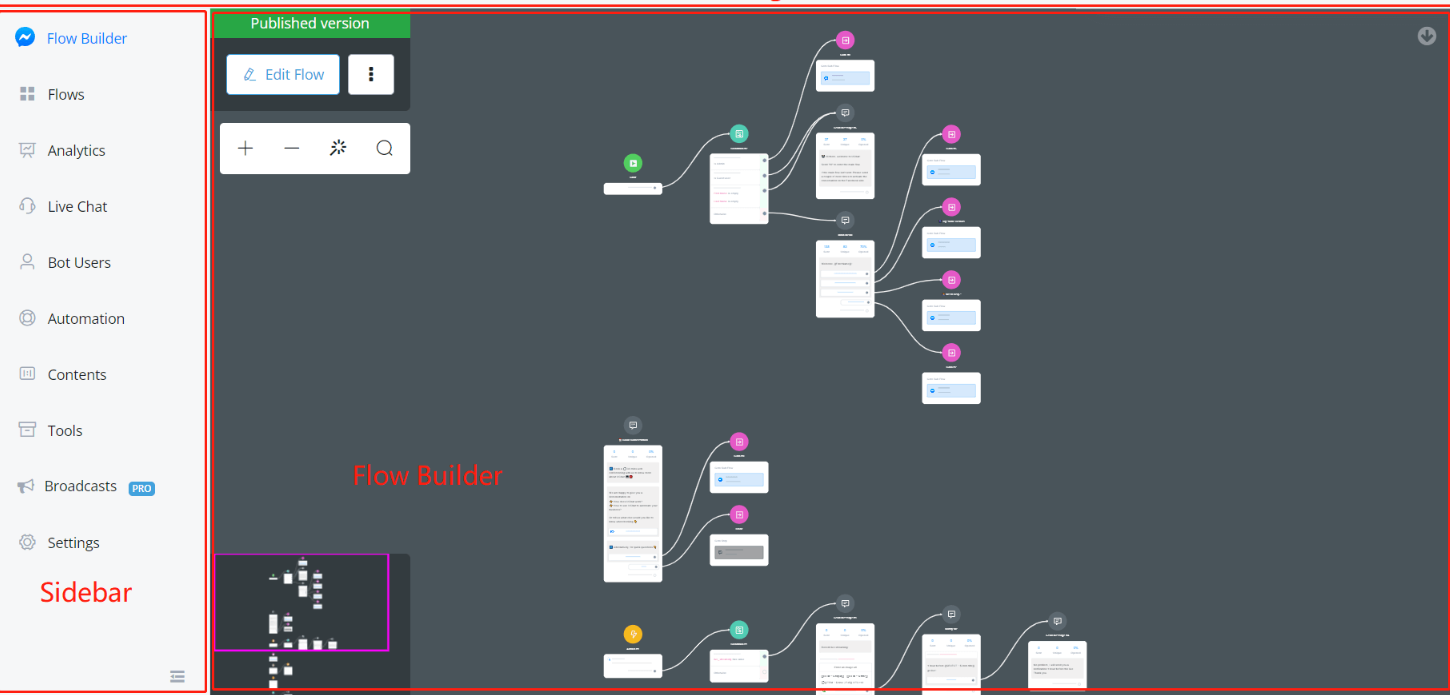
Navigation Bar, Sidebar & Flow Builder
💡 TIP - You might want to create a flow first, then open the flow side by side when you read the following instruction (Facebook flow used as an example).
After entering a flow, this is what you will see:
Navigation Bar
On the top, there is a navigation bar. From left to right there are:
| Part | Usage |
|---|---|
| ”Demo Account” | current workspace, click to go back to Messagingme.app dashboard |
| ”Support” | flow type and flow name, click to go back to “All Bots" |
| "Main Flow” | current sub flow |
| ”Preview” | preview the current subflow from the Start Step |
| ”Build a bot…“ | tutorial video widget |
| ”Joyce” | current user, click for user settings, support and logout |
💡 Preview Feature - Please note that “Preview” feature is not supported in all channels. Channels support “Preview”: Facebook, Telegram, WhatsApp, Line and Viber. For channels without Preview, search “talk to bot” in the documentation.
Sidebar
On the left-hand side, there is a sidebar. From top to bottom there are:
| Section | Usage |
|---|---|
| Flow Builder | build subflows here |
| Flows | manage all your subflows |
| Analytics | bot data analysis |
| Live Chat | inbox for all the conversations, make a human reply here |
| Bot Users | manage bot user profile. import, export, search or delete bot users |
| Automation | manage keywords, sequences, triggers and comments |
| Contents | manage custom fields, tags, OTN, personas, user menus and customer feedback |
| Tools | manage error logs, draft version tester, bot admins, widgets, multiple language and shortcuts, Facebook Ads, inbound webhooks |
| Broadcasts | send/manage broadcasts |
| Settings | (some are owner only) manage bot users limit, Facebook greeting text, chat widget customization, ice breakers and authorized websites |
💡 Note - Features in Automation, Contents, Tools and Settings can be different from channel to channel. In Settings, usually owner can see all the settings like bot user limit while admin and member only see part of them
Flow Builder
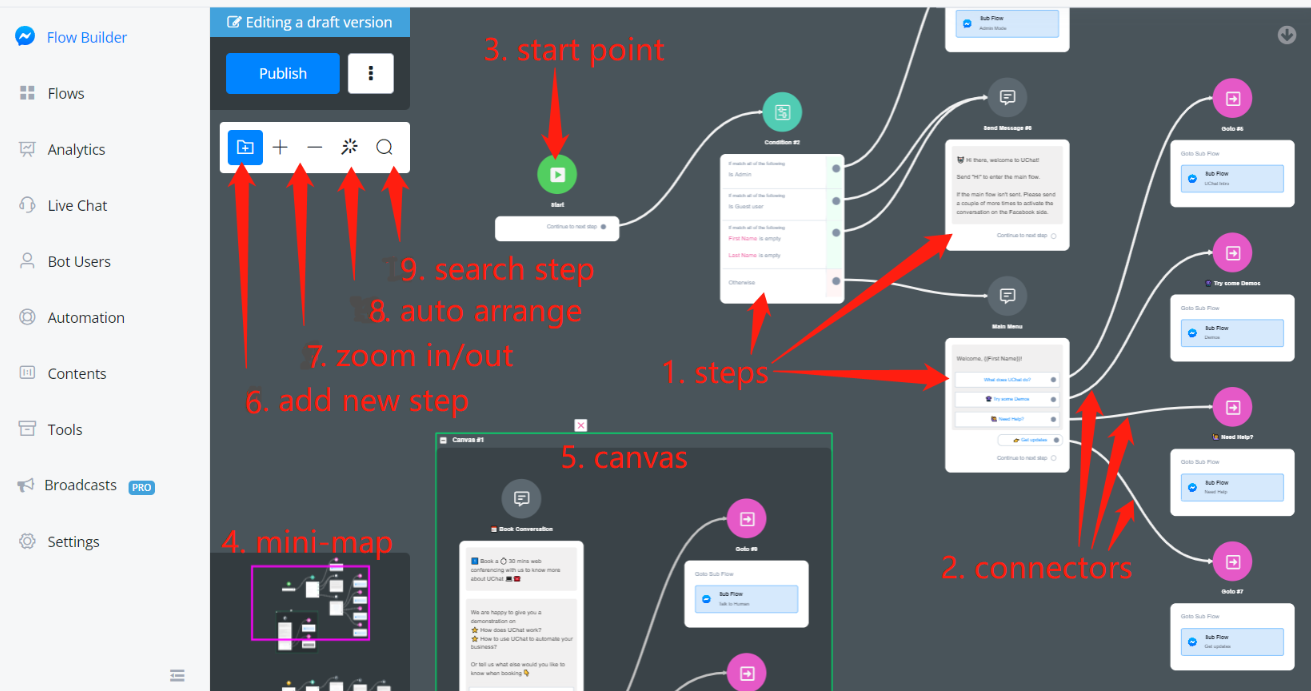
Apart from those in the above screenshot, there are a couple of more tips for using the flow builder:
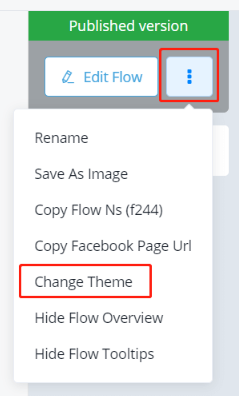
Change Themes
Before you start, you can pick your favourite theme by clicking “Change Theme”:
choose one of them and “Apply Change”.

Hide Mini-map or Tooltips
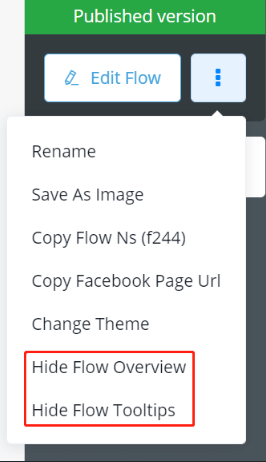
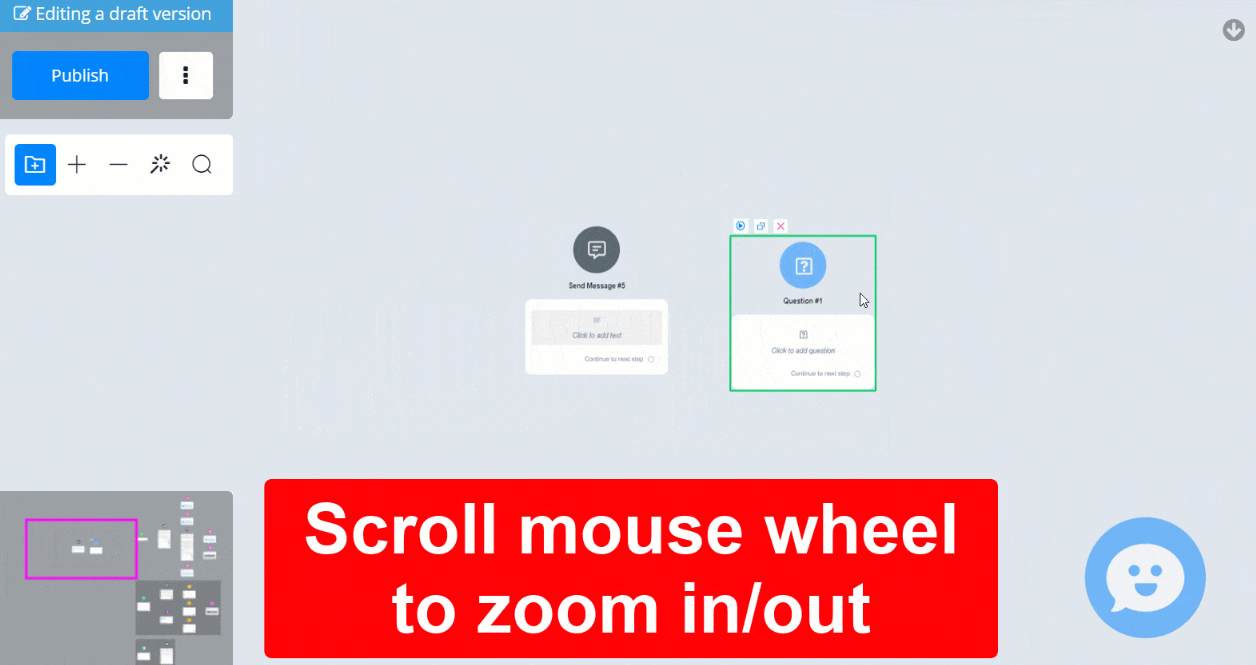
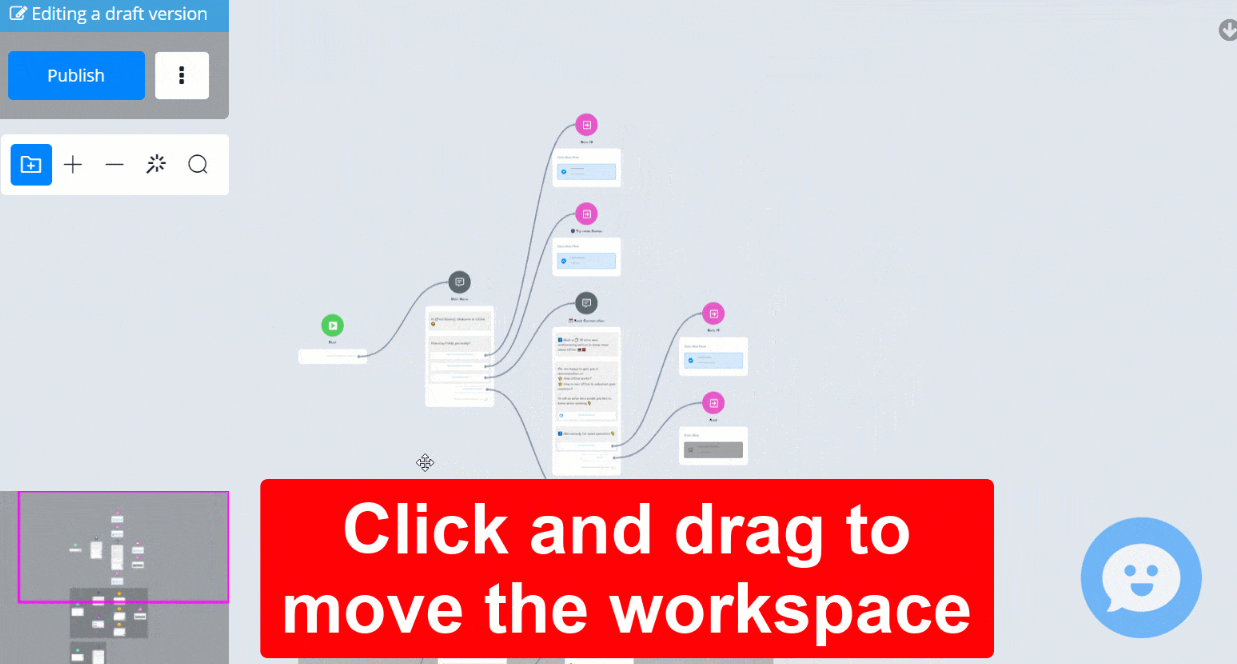
Mini-map is useful when you need to move your workspace in some situations. For example, when you click and drag inside a canvas, you are moving the canvas as a whole instead of everything in the builder:
You can hide the mini-map by clicking the “Hide Flow Overview” option.
With tooltip, you can see description for every feature you see in the flow builder like this:
The tooltip includes a title, description, image, video link and documentation link. It is friendly to new users. For users who are already familiar with the system, you can choose to disable the tooltip by clicking the “Hide Flow Tooltips” option.
Basic Operations to Build Flows
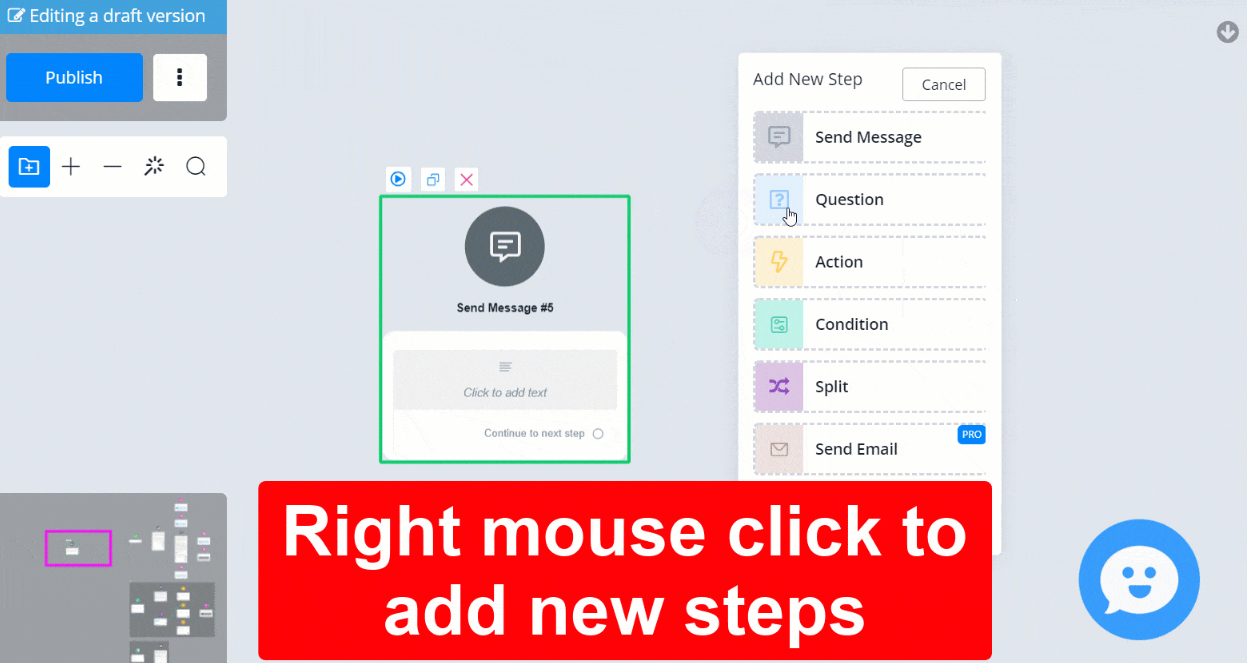
Edit step
Click on a step to edit it, “Edit Panel” will show next to the sidebar.
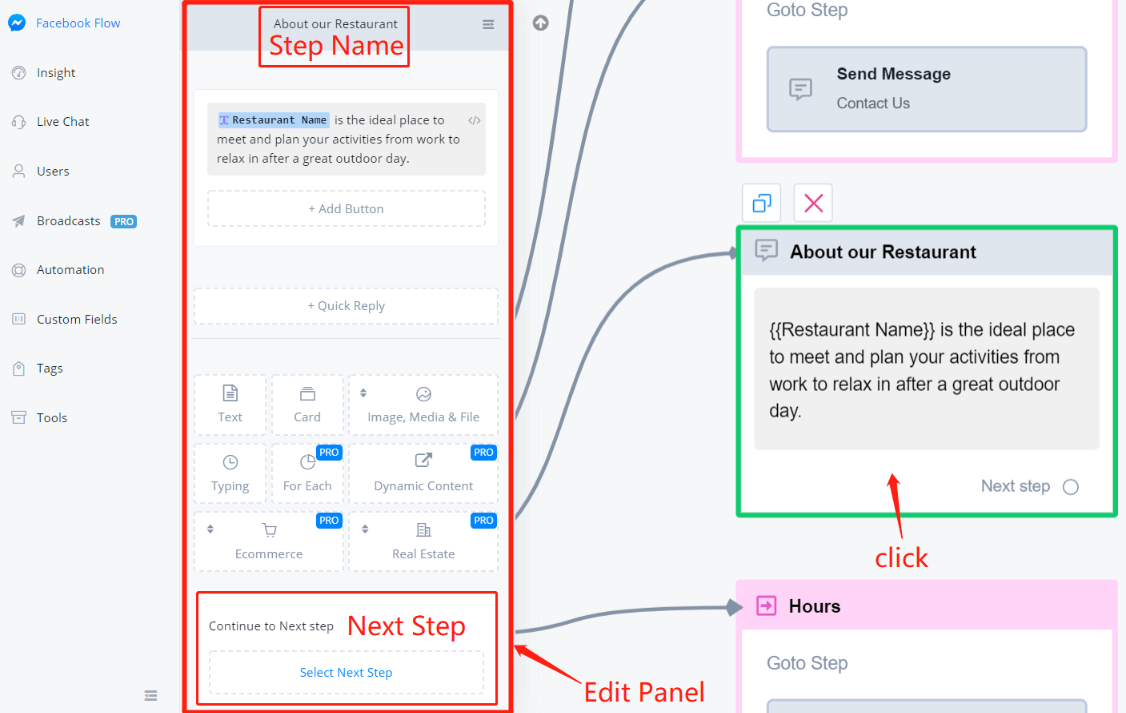
Click step name to edit it. You can choose the next step at the bottom of the edit panel or drag connectors from the circle to the tile of another step.
Connect Steps:
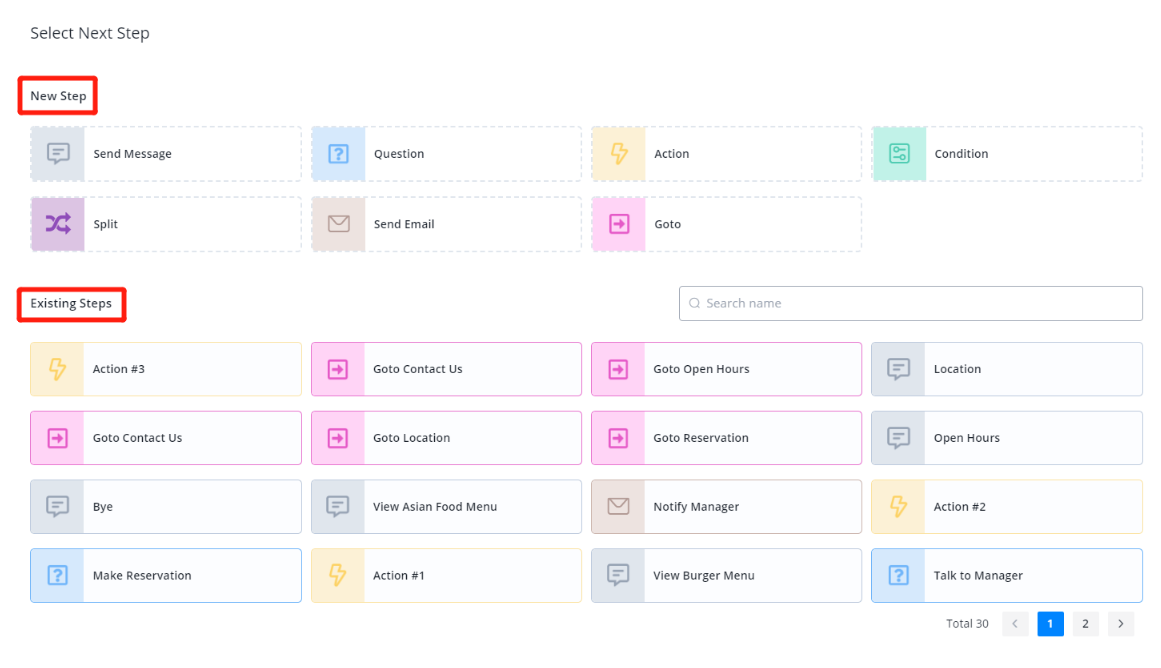
Create a new step or choose an existing one to be the next step. For dragging connectors, see below:
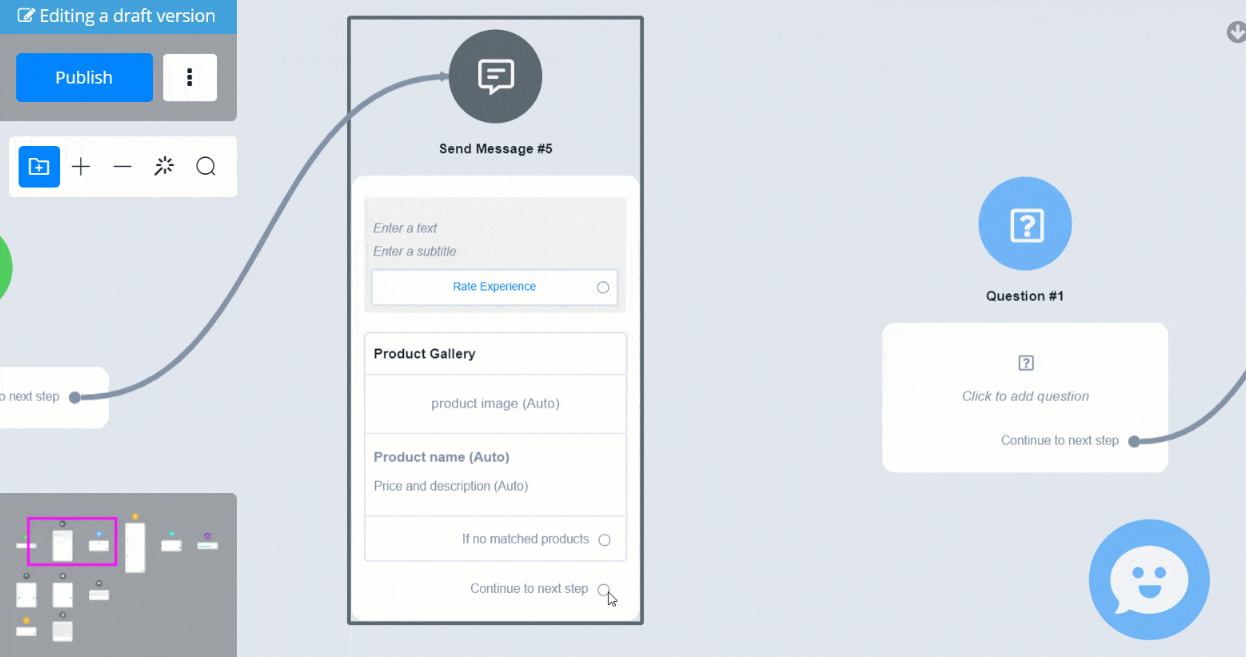
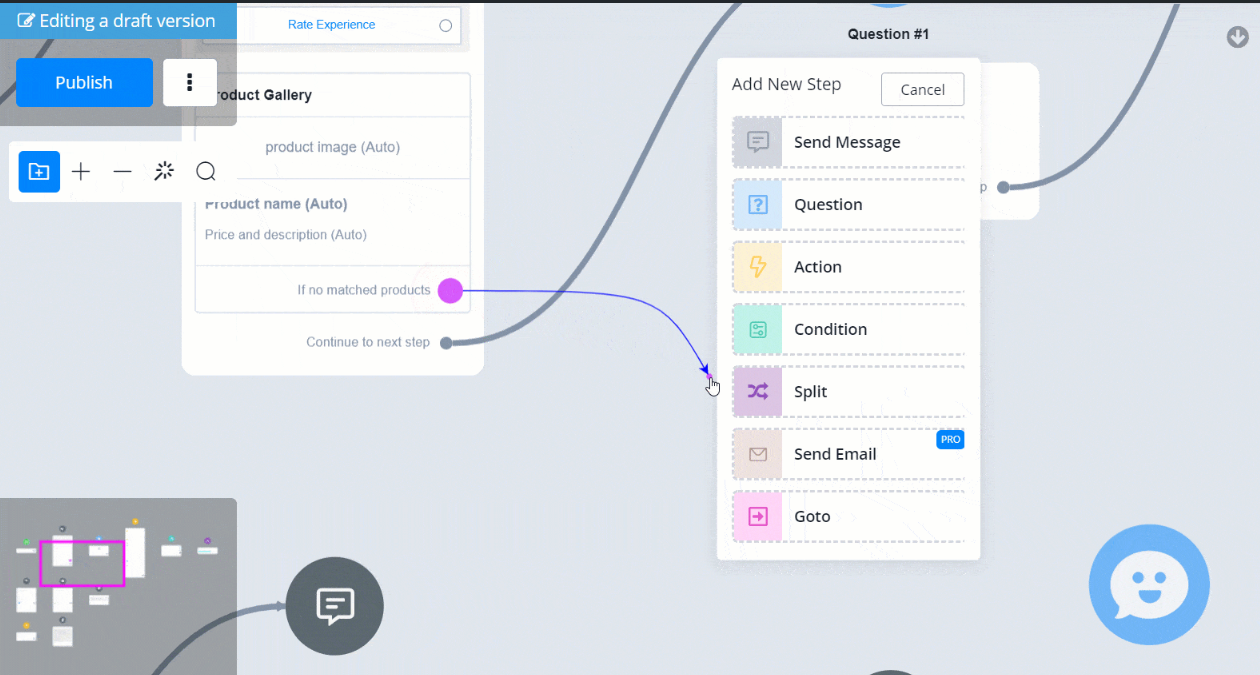
💡 When you choose an existing next step, a line will be connected from the current step to the next. Too many lines can be messy, get a Goto step to help you organize! In a Goto step, you can nominate the next step without creating a line connector.
Select Multiple Steps (Move to Canvas/Sub Flow)
We’ve just learned how to move the builder by clicking and dragging. For selecting multiple steps, it’s a bit similar. Hold the Shift key then click and drag to cover the steps you would like to select:
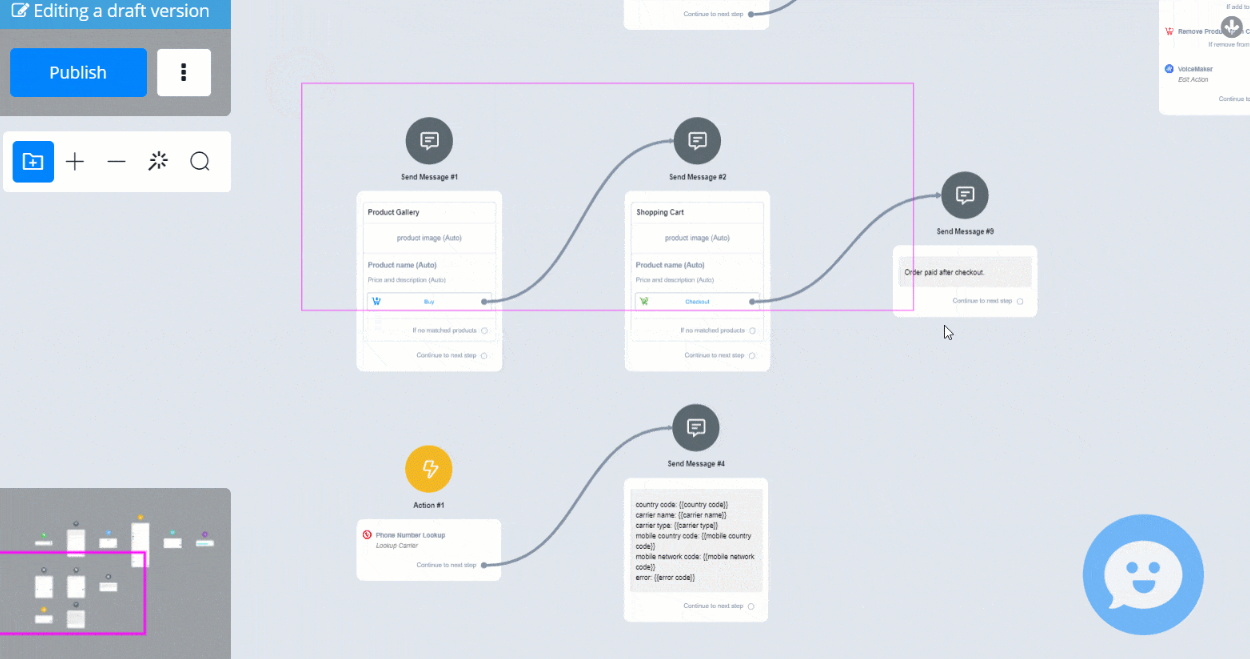
Alternatively, ctrl + click them one by one:
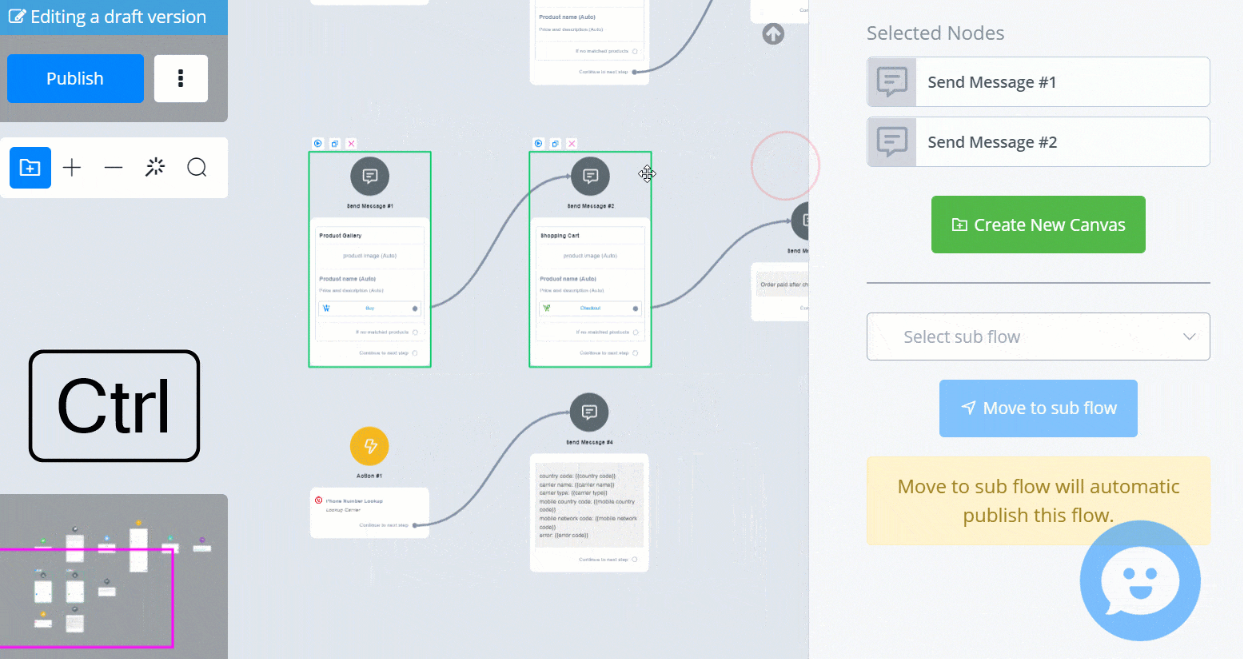
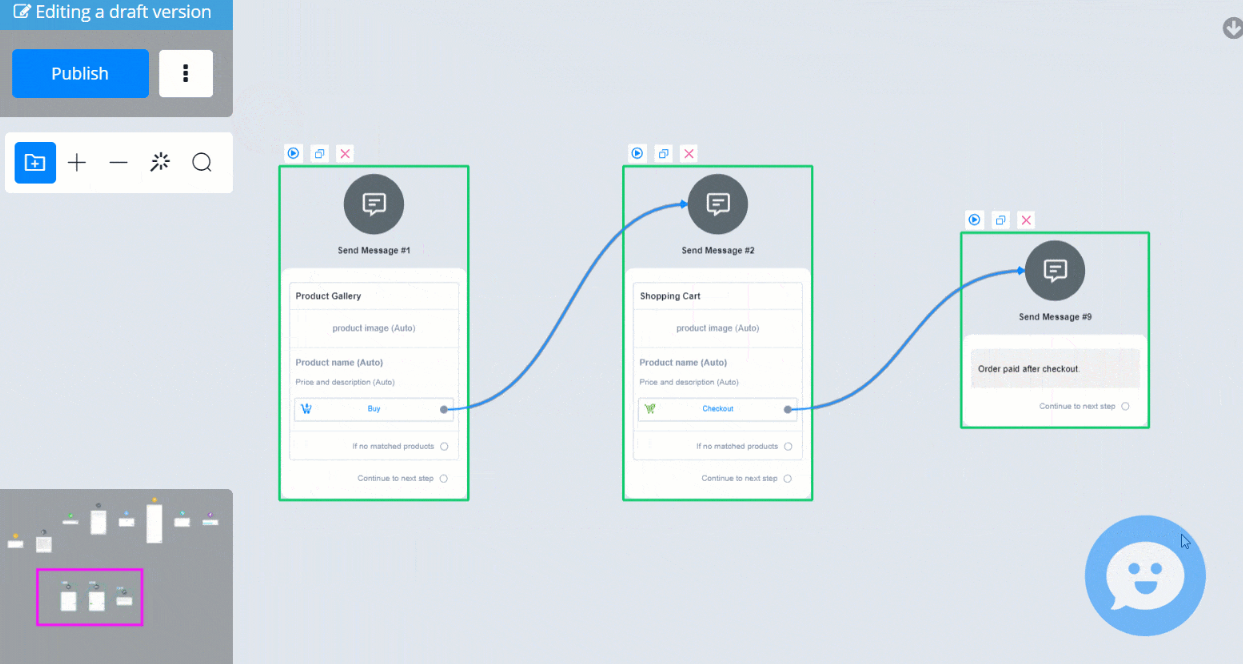
The selected step has a green border. After selecting multiple steps, click “Create New Canvas” to organize these steps in a canvas box, or move them to an existing sub flow. To delete multiple steps, hit the “delete” button on your keyboard after choosing several steps:
💡 Delete on Mac - On Mac OS computer, hold fn and hit Delete to remove steps. Or use the “Delete Selected button in the editing panel.
💡 TIP - The green start point is the entrance of a sub flow. It can’t be moved to other sub flows or deleted even you include it in a group of steps.
Copy and Paste Steps
After you select a step or multiple steps, use Ctrl + C to copy and Ctrl + V to paste it to:
- the same subflow
- different subflows in the same bot/flow
- different bots/flows but the same channels (associate custom fields will be created automatically)
- different channels (unsupported features will be removed)
💡 TIP - Please note that you can only paste ONCE. Copy again for another paste. This is to prevent bulk pasting which can quickly blow up the flow.