Live chat
Besides being able to create chatbot automation you can also follow up with your subscribers through our live chat inbox. We have one available for every channel.
You can access the live chat in two ways:
- Through the main dashboard overview
- Each individual chatbot channel
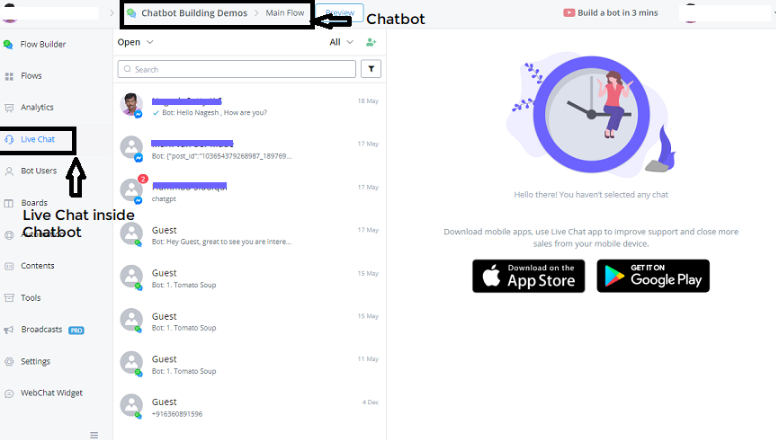
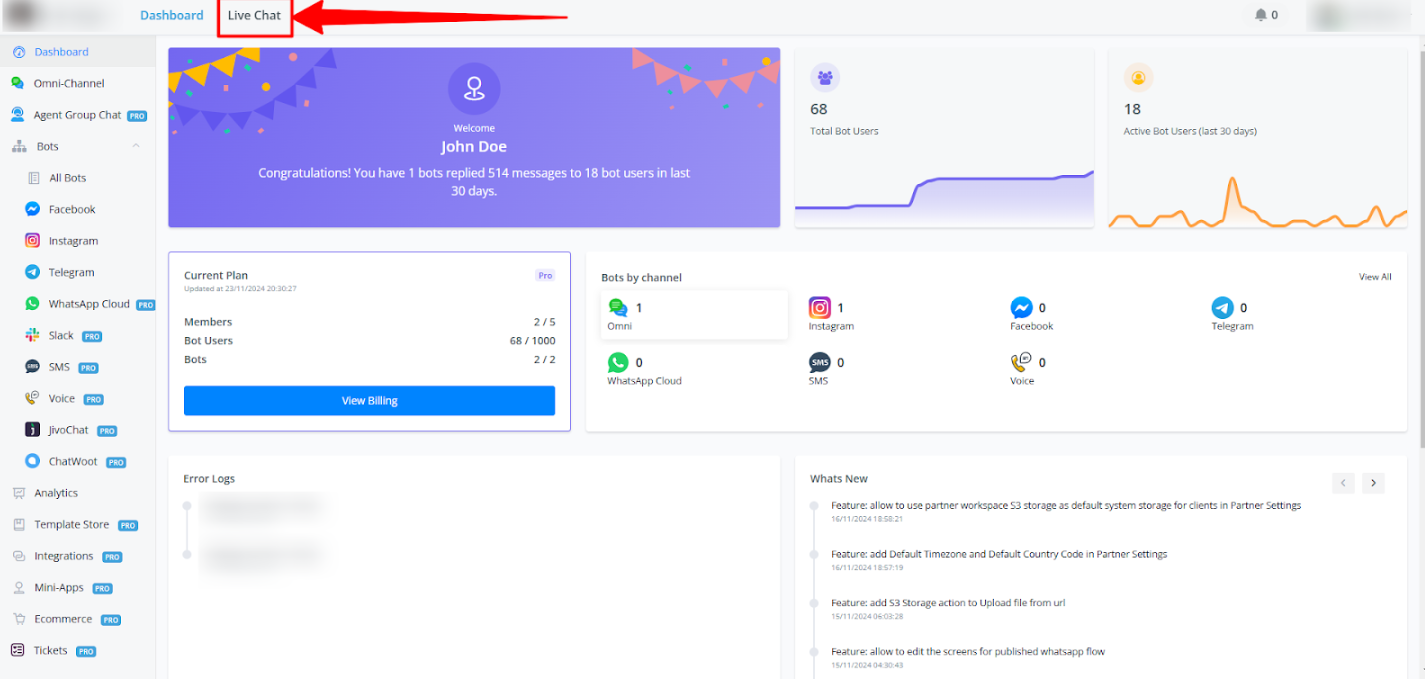
How to access live chat through the main dashboard
When at your main dashboard overview you will have a tab on the top named Live Chat.
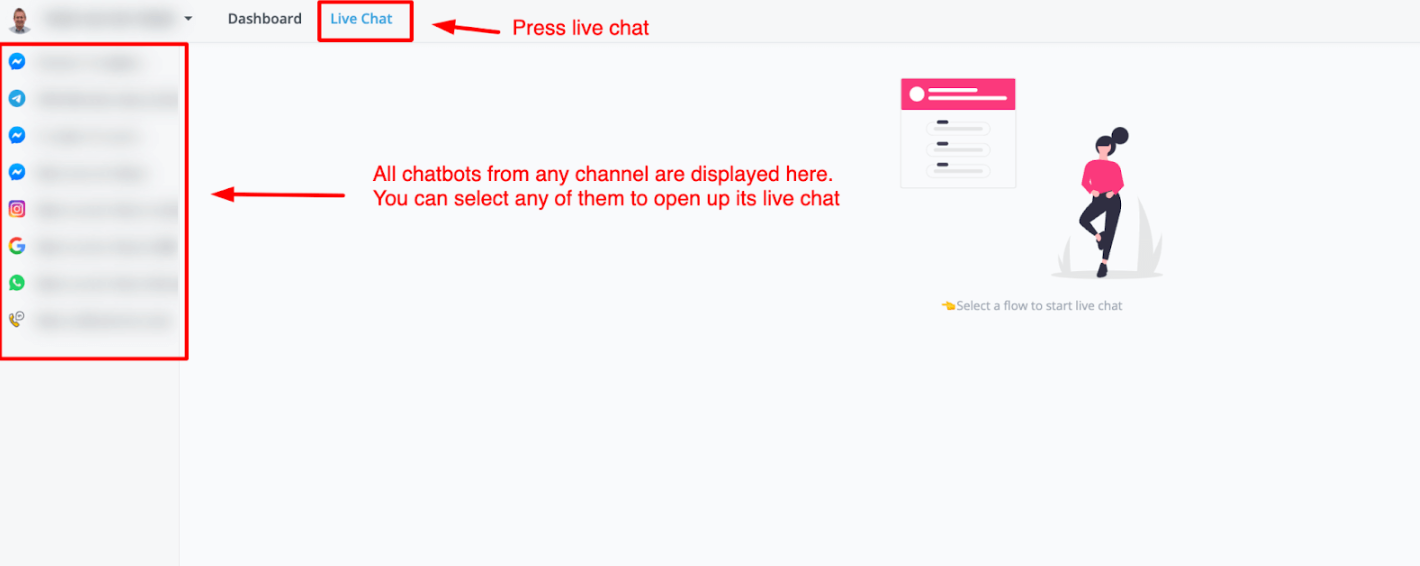
The biggest advantage of this overview is that you can see all the channels you have built chatbots on. So going to live chat from this main dashboard is very easy. Just select the chatbot and the live chat will appear.
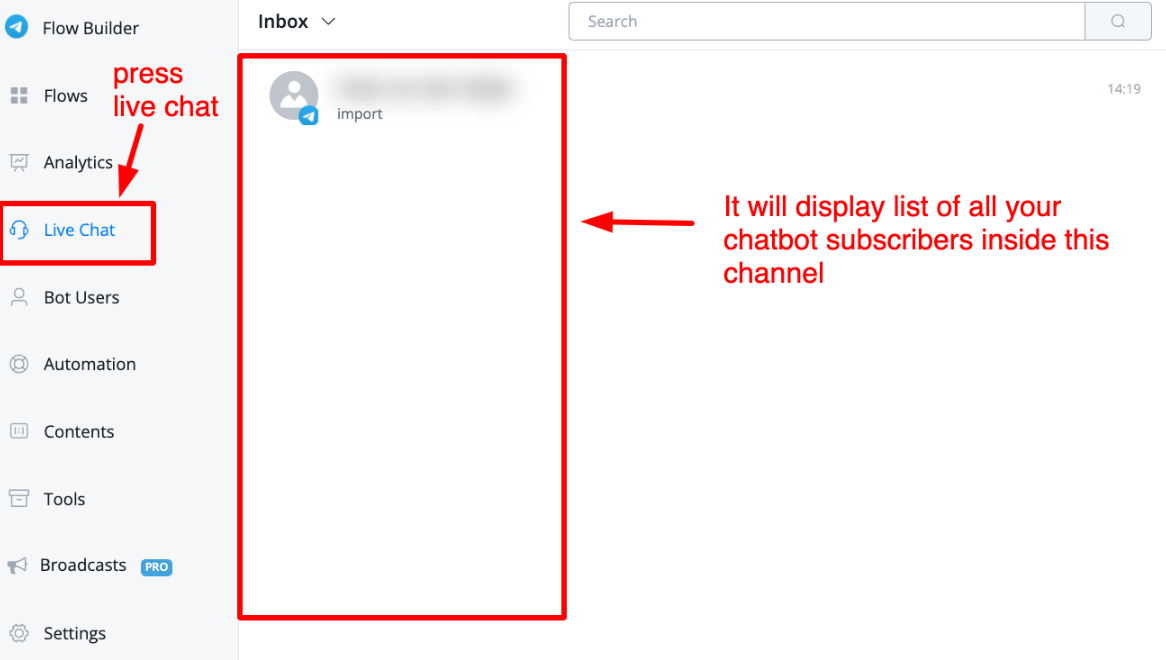
How to access live chat through a chatbot channel
If you are within any of your channels you can also access the live chat from that channel. Just choose Live Chat and the live chat will open up displaying all of your subscribers inside that chatbot channel.
The biggest advantage of this overview is that you can see all the channels you have built chatbots on. So going to live chat from this main dashboard is very easy. Just select the chatbot and the live chat will appear.
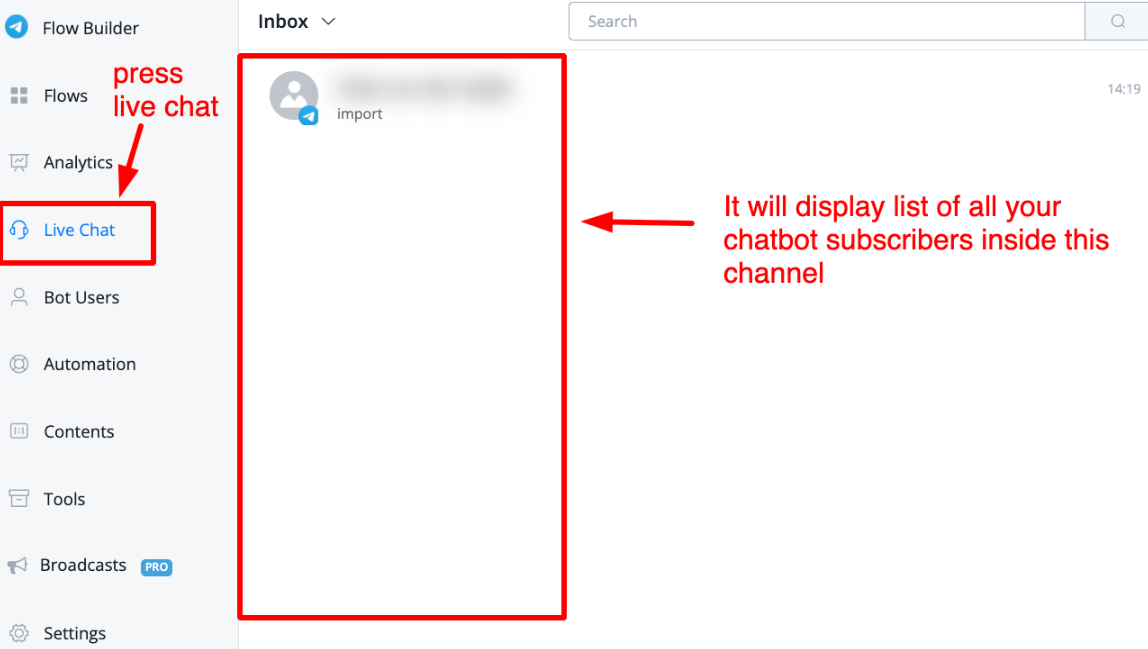
How to access live chat through a chatbot channel
If you are within any of your channels you can also access the live chat from that channel. Just choose Live Chat and the live chat will open up displaying all of your subscribers inside that chatbot channel.
How to use Live chat
Once you select any of your subscribers you will then get to see the live chat in action. Many options and information are present so let us walk you through them.
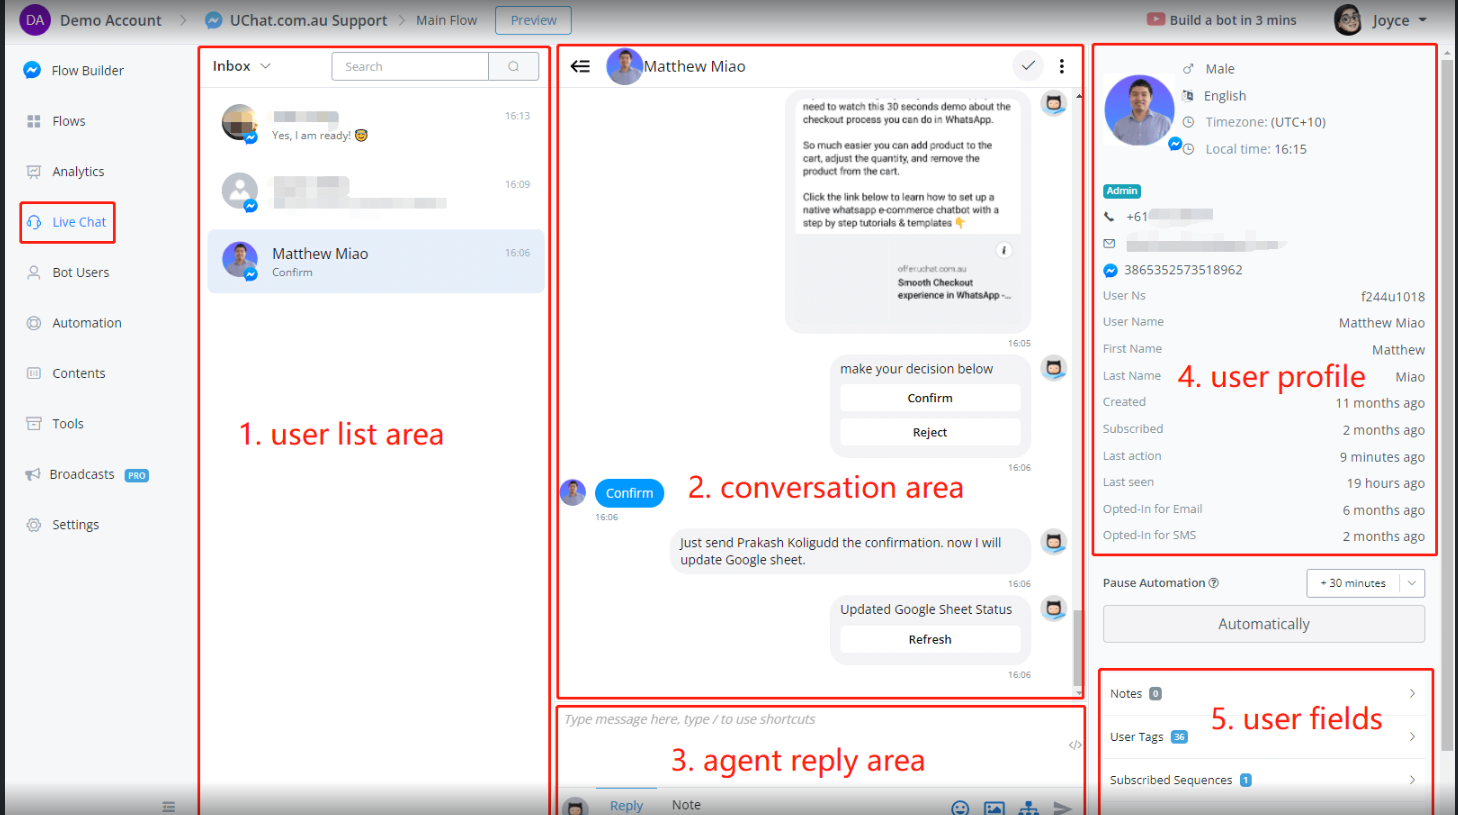
Section 1 displays subscribers(bot users) who interacted with the chatbot
- Click on Inbox to switch between Inbox and Done. When you finish a conversation, move the users to Done.
- Use the Search bar to search a conversation by user name.
- Click on a user to view conversation detail and user profile.
Section 2 shows the chat your subscriber has with your chatbot
- On the top of it, click the
<=icon to hide Section 1, the user list area. - Right next to it is the subscriber’s profile photo and full name.
- In the upper-right corner, click on the tick icon to move the subscriber to Done.
- And the 3-dots icon offers a Hide message from bot option and Manage Shortcuts option.
Hide message from bot lists messages sent only by the user and agent, helping you get a clearer look at the conversation so that agents don’t need to go through too many messages.
Shortcuts help agents make quicker responses to the user’s query. You can also manage your shortcuts in Tools - Shortcuts.
- Hover your mouse on a message sent by the bot, click on the little v icon to resend the message or jump to this step in the flow, in case you want to edit anything.
Section 3 allows agents to reply to your subscribers
- Write a reply in the blank area.
- Type a slash and keyword to search for a shortcut. Use up and down keys to go through shortcuts, hit the enter key to get the pre-written content.
- On the right side, </> icon is used to call a variable, e.g.
First Nameof the user. You might also want to call it quicker by typing to left curly braces{{and searching a field name. - On the bottom of it, the most left-hand side icon is used to change persona. The default icon refers to the default persona, the chatbot itself. Add persona via Contents - Personas.
- Switch between Reply and Note to change reply mode. When you are in Reply mode, the reply area is in white. The content will be sent to your subscriber directly. When you are in Note mode, the reply area is in yellow. The content will be displayed in the conversation area but in yellow and these notes won’t be sent to your users. They are for internal reference only.
- the final 4 icons in the bottom-right corner are for sending emoji faces, media (image, gif, audio, video & file) and subflows. The last icon is to send the message/note. You can hit the enter key instead.
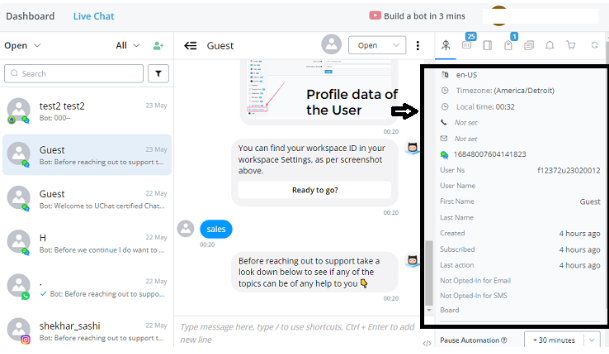
Section 4 displays the profile of the subscriber
Section 5 shows notes, tags, subscribed sequences, OTN topics and all custom user fields
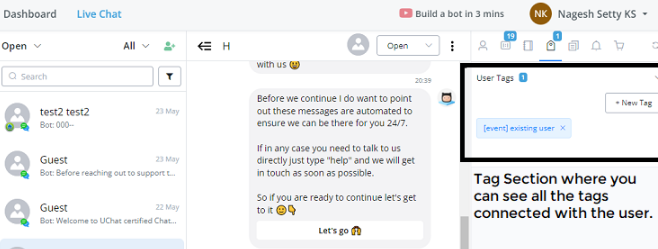
- Add or remove tags from this overview directly. Very useful when it comes to getting subscribers into lead funnels and such.
- For OTN topics and sequences you can only remove them from the user.
- The same goes for the user fields, you can view, adjust the values or delete them entirely.
Sending subflows to users
After you finished a talk with a subscriber you might want to send them to a subflow. This is easily done by pressing the icon. A popup window will then appear where you can select or search for your flow.
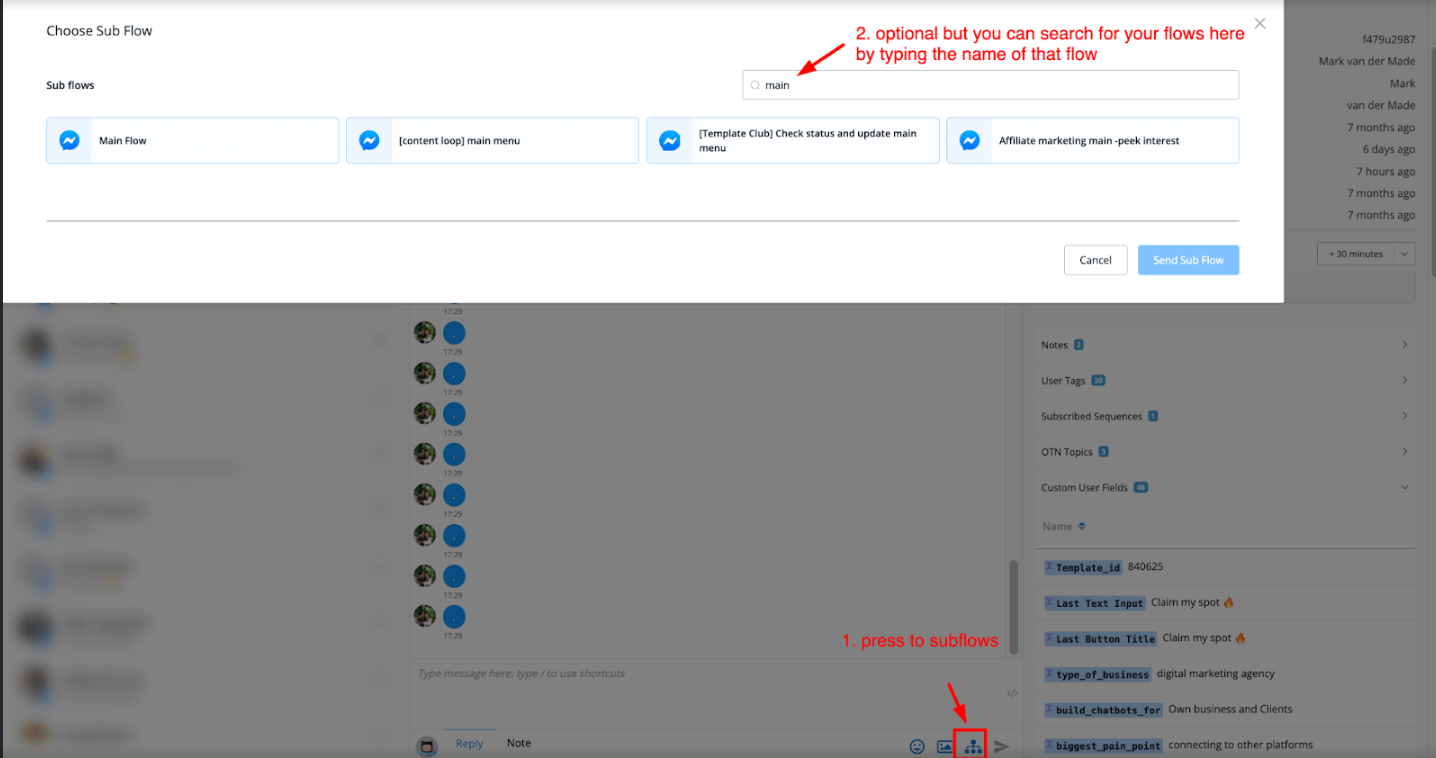
Once you select your flow press the blue button named Send Sub Flow and the flow will be sent.
NOTE: Do make sure you have disabled live chat mode before sending the subflow. Otherwise the chatbot will not be able to send the messages inside the flow.
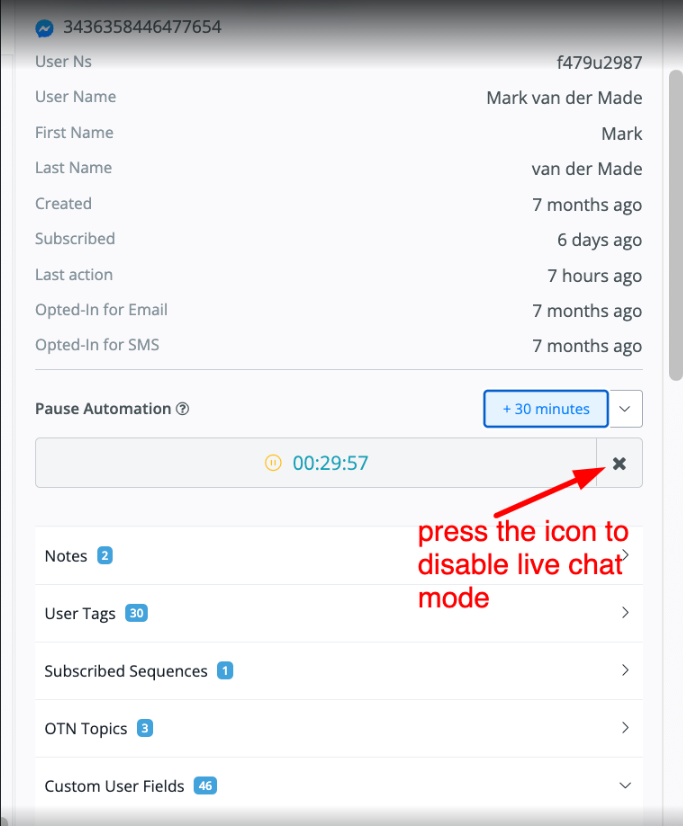
💡 TIP - Whenever agents reply in section 3, you will see the Pause Automation area automatically starts a 30 minutes count down. This means that, the chatbot will stop responding during the time. Agents can add on more time if needed. When time is up, the bot starts to reply again.
Livechat Feature : Conversation Starter Prompt
MessagingMe.app now provides even more flexibility to live-agents. We now give users the ability to choose what starts/restarts a conversation. Previously, whenever the agent marks a conversation “Done”. The conversation is moved to the done folder, however if the bot user reaches out again, the conversation automatically moves to the “Open” folder.
This causes confusion among the live-agents between chats do need human support vs chats that do not. We now let users opt-in on this behaviour of livechat.
Turning On Conversation Starter
Inside your flowbuilder’s side menu, scroll down and click on Settings tab. Click on “Live Chat” tab and scroll down till you see “Live Chat Features”

Behaviour When Option is Enabled
Whenever this option is enabled, every new reply or message by the bot user WILL open up the conversation and if the conversation is moved to the “Done” folder, and the bot user reaches out again, the conversation will automatically moved from Done folder to the Open folder.
Behaviour When Option is Disabled
Whenever this option is enabled, every new reply or message by the bot user WILL NOT open up the conversation and if the conversation is moved to the “Done” folder, and the bot user reaches out again, the conversation will remain inside the Done folder until a live agent moves it or it is moved through bot automation.
Using Bot Automations
You can still use bot automations to move the conversations from Done folder to Open folder. This also lets you build a logic flow or apply certain conditions under only which the conversation will move to Done to Open folder.
Live Chat Update: User Data Segments
Introduction
Introducing a new feature connected with Live Chat Section for the User Data.
Now the Live Chat Agent can see the User Data in a more structured method.
This feature shows lots of Data for each Individual User.
Now the User Data are divided basically into sections of different kinds of data inside.
Overview of the feature inside
Now lets jump into the Dashboard Live Chat section as shown in the below Image.
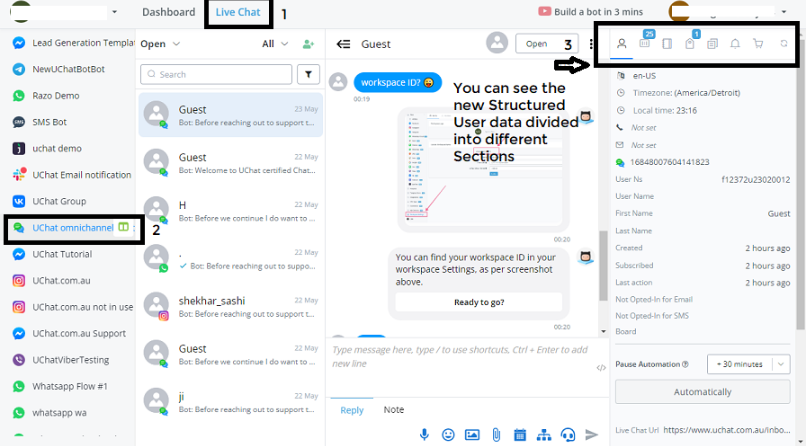
List of Use Data Sections
On right hand side, you can see the Overview Section, where you can see the User data divided into several Sections:
- Profile Data
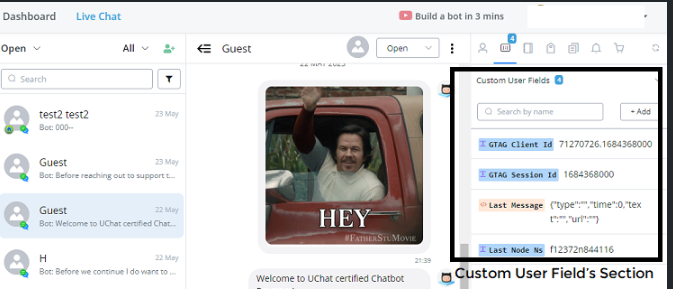
- Custom User Field’s (CUF’s)
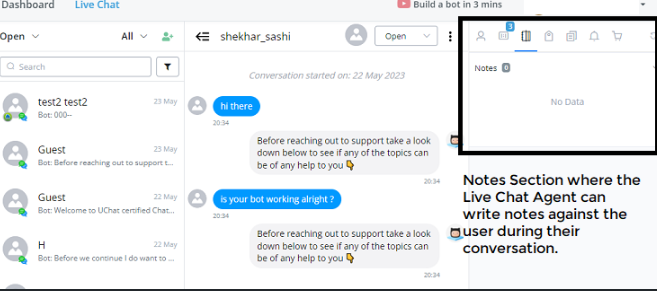
- Notes Section
- Tags
- Subscribed Sequences
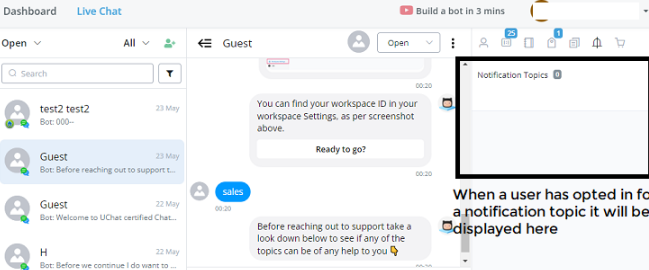
- Notification Topics
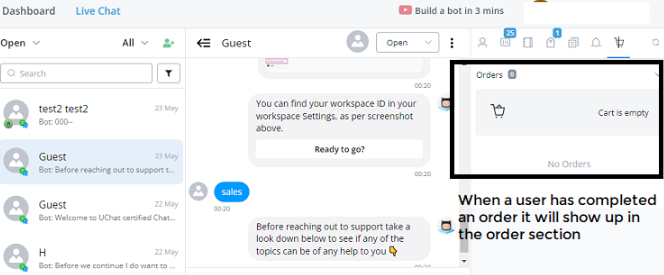
- Shop Orders
Profile Data of User
Custom User Field’s (CUF’s)
Notes Section
Tags
Subscribed Sequences
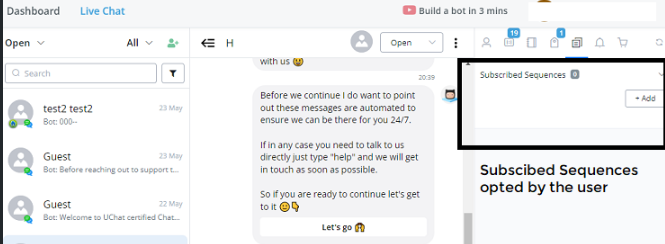
The user data showing the subscribed Sequences, the user might be in Currently.
Notification Topics
Shop Orders
This Feature allows the Live Chat Agent to be little bit more structured instead of needing to scroll down endlessly when having a lot of tags, CUF’s a user has got.
Now you can switch between these several Sections easily with just a Click under one WIndow.
Live Chat Update: Agent Groups
Introduction
We have updated the Live Chat Agent feature.
The feature name is called as Agent Group.
Where to find this New Feature
Let’s see where you can see this feature:
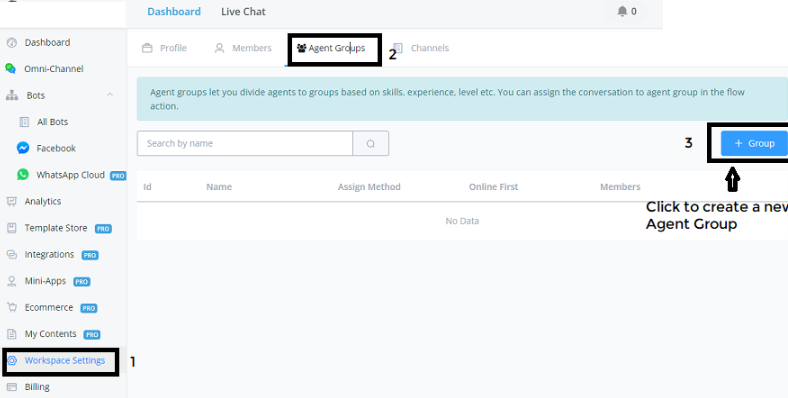
Workspace Settings -> Agent Groups (this is the additional Section, we have newly added).
Now you can click on “+ group**”** to add a new group of Agents together, combine them as per your requirement to get the best Assignment.Possible.
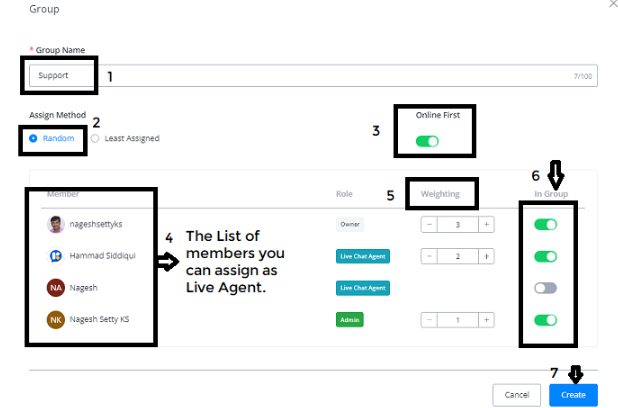
How to set the New Agent Group
- Group Name: “Support**”**
- Assign Method: “Random**”**
- Random - which will be around Robin method
- Least Assigned.- In a Live chat agent, that has not many tickets assigned.
Lets select Random assign method as many users prefer to go for Random.
Online First: “Activate**”** (very Important feature)
Soon as Agent gets assigned, then only we check if the agent is Online.
If you want to go with only Live Assignments, choose this option.
Members Overview: The members you can assign as Live Agent.
Weighting: You can also put in the weighting - If this number is high - it means that the likelihood that this Chat Agent is getting assigned will be much much greater.
In Group: You can determine which Member you want to have inside of this new group created and then set the weighting options.
Once all the above settings are done, you can click on “Create” Button.
Now this group will show in the default overview of Agent Groups.
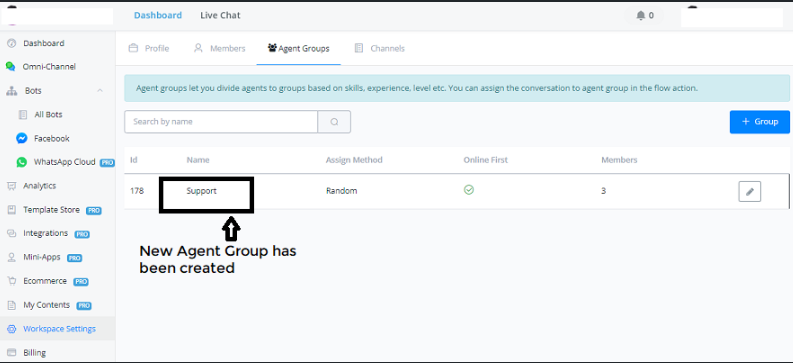
You can customise by going through the Pencil Icon or create one more new Group.
For example you have a Sales Team, a Support Team, a Developer Team, you can create all these kinds of groups .
This is the new group assignment for Agents.
Now you can segment your agents into separate groups and based on this Group, we will also be able to assign the users accordingly.
What an Online Status Verification means for Agents?
Or we can say, ” How are we going to check the agent is Online?”
This works bit different than the regular live chat platforms.

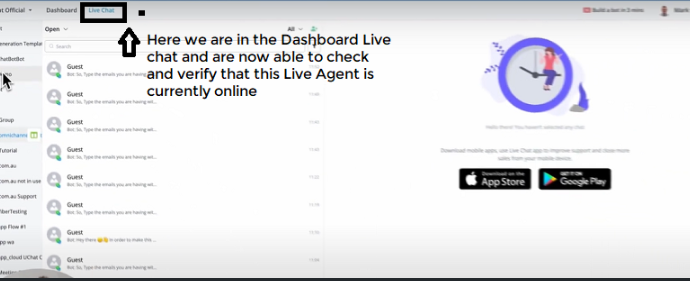
In Messagingme.app , the way we track a Live Chat Agent is Onine is if they have the Live Chat Section in Open Condition.
This means, If we go towards Live Chat for a user means we are now able to check and verify that this Live Chat Agent (Myself in this case) is currently Online.
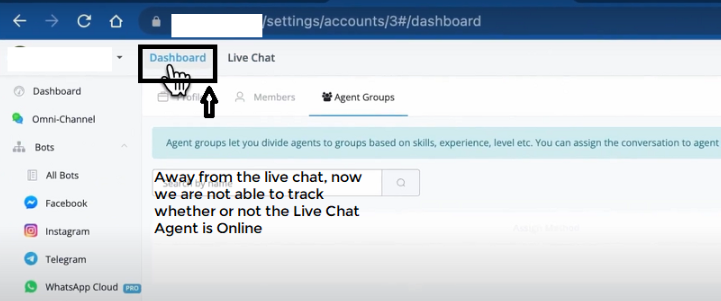
Incase you move away from this window, that means we are not able to track whether or not the Live Chat Agent is Online.
We need to make sure, that the Live Chat Agent is Online with the Live Chat Section in Open Condition and in that Tab in the browser.
Two ways to access Live Chat
Main Dashboard > Live Chat (from the top Menu next to Dashboard)
Open the Bot > Live Chat (Select from the left side Menu) This is Live Chat for individual Chatbots.
By this we can check the Agent Online status.
Keep the Chat page open on the Dashboard or inside the Bot, that does not matter, as long as the Agent is Present Online on this Specific Window.
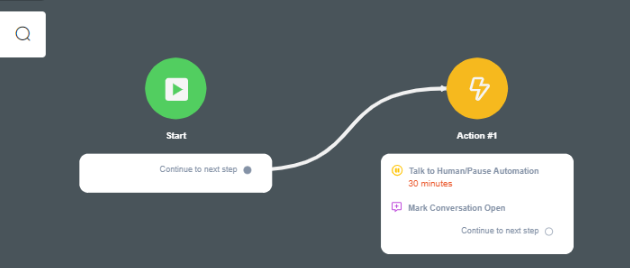
How does the Live Chat work inside a Flow Builder?
Let’s create a sample workflow:
Create a subflow in the name of ”Live Chat Agent Assignment”
Action Block -> Basic Actions ->Assign to Agent or Assign to Agent Grou
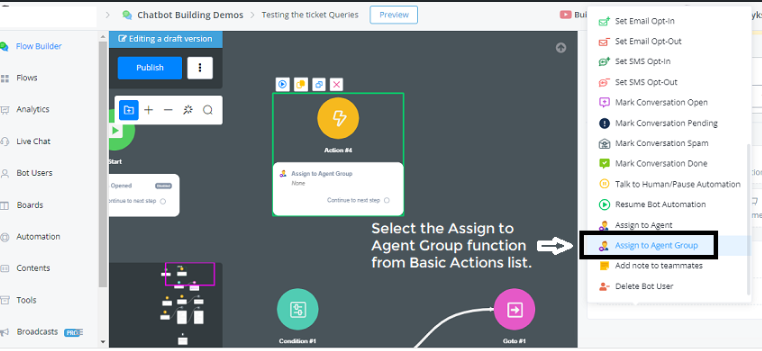
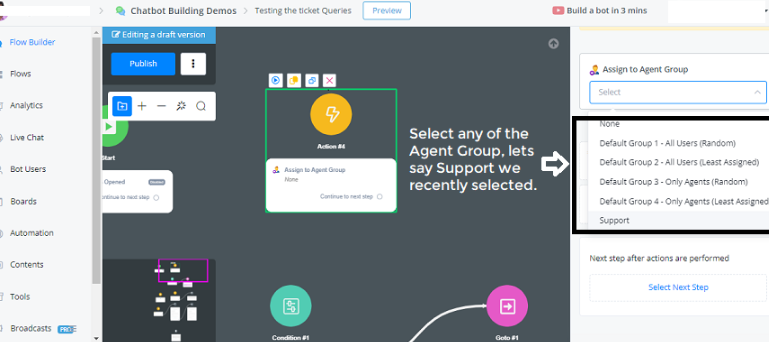
- Let’s select Agent Group.
- You can see some options over here.
- None
- Default Group 1 - All users (Random)
- Default Group 2 - All users (Least Assigned)
- Default Group 3 - Only Agents (Random)
- Default Group 4 - Only Agents (Least Assigned)
- (groups customised)
Difference between Group 1-2 and Group 3-4 are:
- Group 1 & 2 assigns to all the Users or members inside of the Workspace.
- Group 3 & 4 assigns only to the Agent Role Permision itself.
- Incase if you don’t want any of the presets you already have, eg., Support Group set up, where we already integrate all of those settings and also provide with available team members inside here.
Updates in the Condition Block
Now you can check a few extra agent settings:
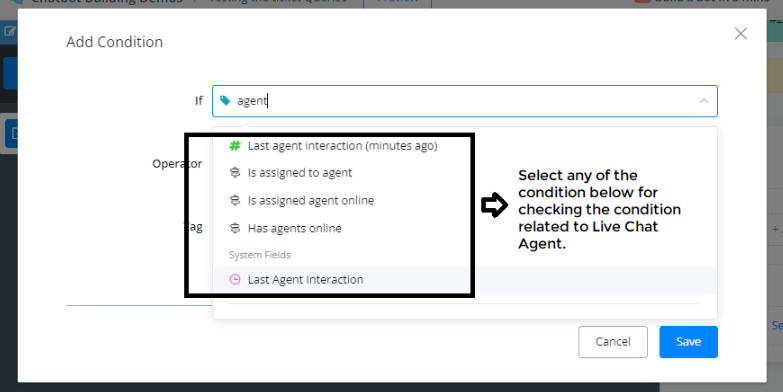
List of Conditions connected to Agent:
- Last agent interaction (minutes ago)
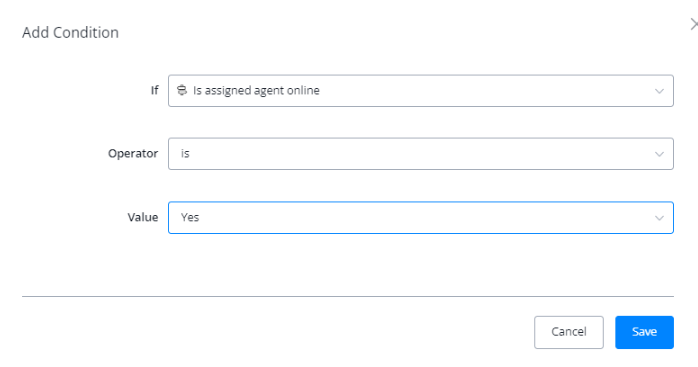
- Is assigned to agent
- Is assigned agent Online
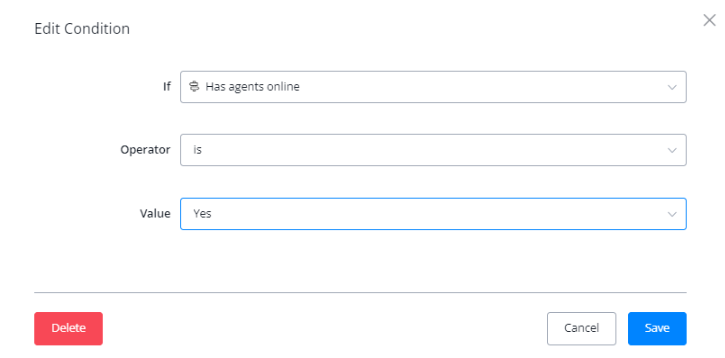
- Has agents Online
Let’s go use “is assigned agent Online” in the condition block.
Incase if the agent is not Online or is not in Live Chat, then we are able to go with this Condition block and assign a different agent.
Also we check if the chatbot has any agents available online. If no, we could say “okay, currently we don’t have live chat support, but we will get back to you in particular Business Hours.
We also have a System field called “Last Agent Interaction”, by which you can check the Last Agent Interaction between a certain time frame.
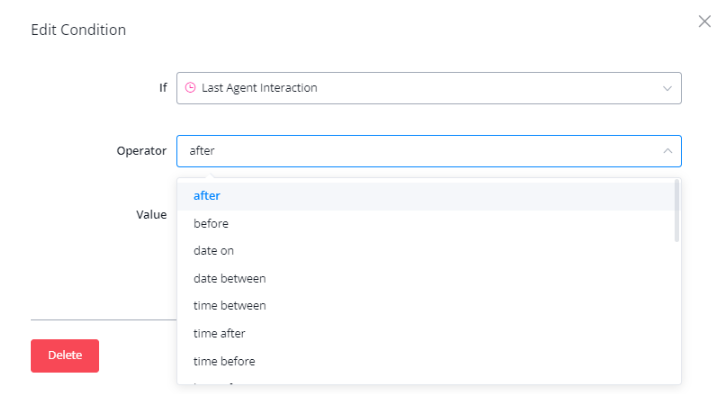
- After
- Before
- Date on
- Date between
- Time between
- Time after
- Time before
- We have a whole bunch of conditions sets.
With these updates, we have brought some really powerful and amazing features regarding the assignment of Live Chat Agents as well as checking their Online Status, and also the last interaction time of that specific Agent.
By this you are able to provide much better Customer Support Experience for your users.
Merge Bot Users
Merge Bot User
The Merge Bot User feature allows you to merge two user profiles into one, consolidating chat histories, attributes, and other relevant data. This is useful for combining duplicate users and ensuring that all information is unified under a single profile.
How to Use the Merge Bot User Feature
Steps to Merge Users:
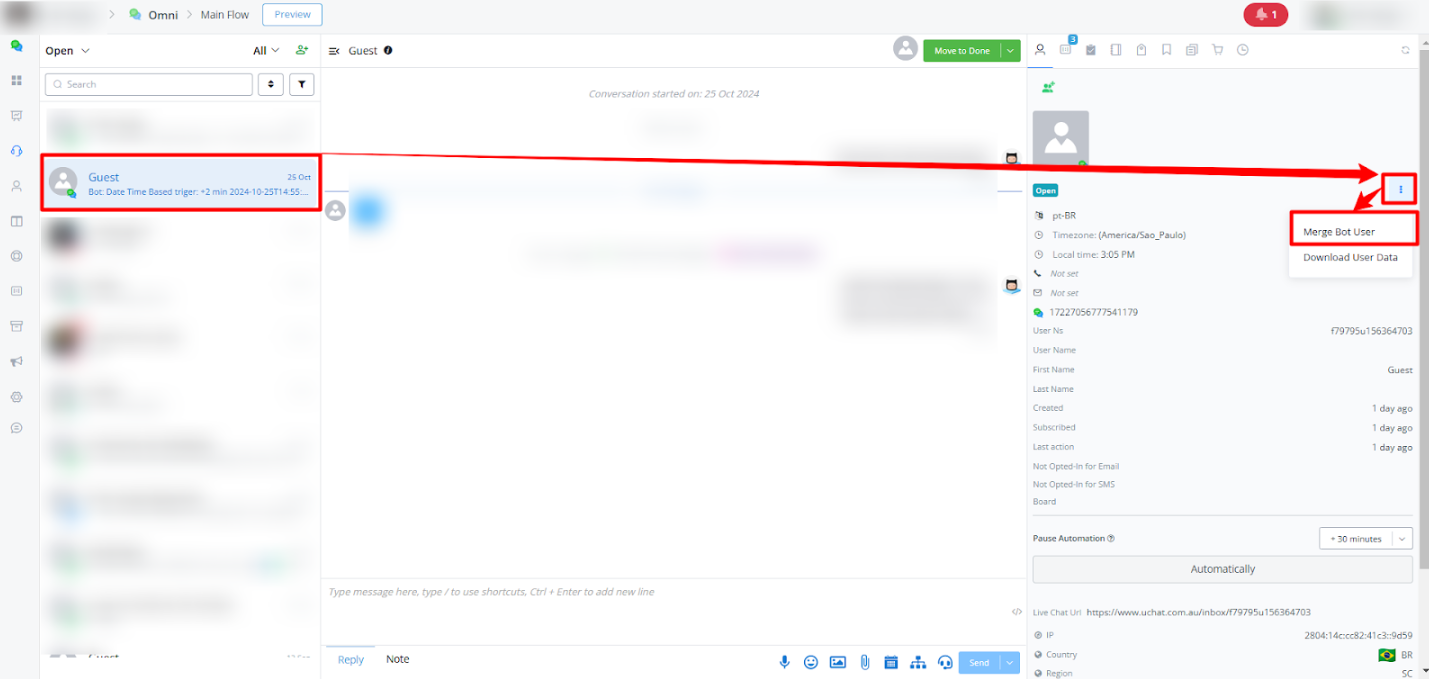
- Open the Bot User Profile
- In the Live Chat interface, locate the user you want to merge by selecting their profile from the list of conversations in live chat.
- Click on the user’s name to open their profile.
- Access the Merge Option
- In the user profile panel, find the three-dot menu (⋮) in the top-right corner.
- Click on Merge Bot User from the dropdown menu.
- Select the Secondary User
- In the Merge Bot User dialog box, you’ll see the selected profile automatically designated as the Primary User on the left.
- Use the Choose User dropdown under Secondary User to select the user you want to merge with the primary one. This secondary user’s data will be combined into the primary profile.
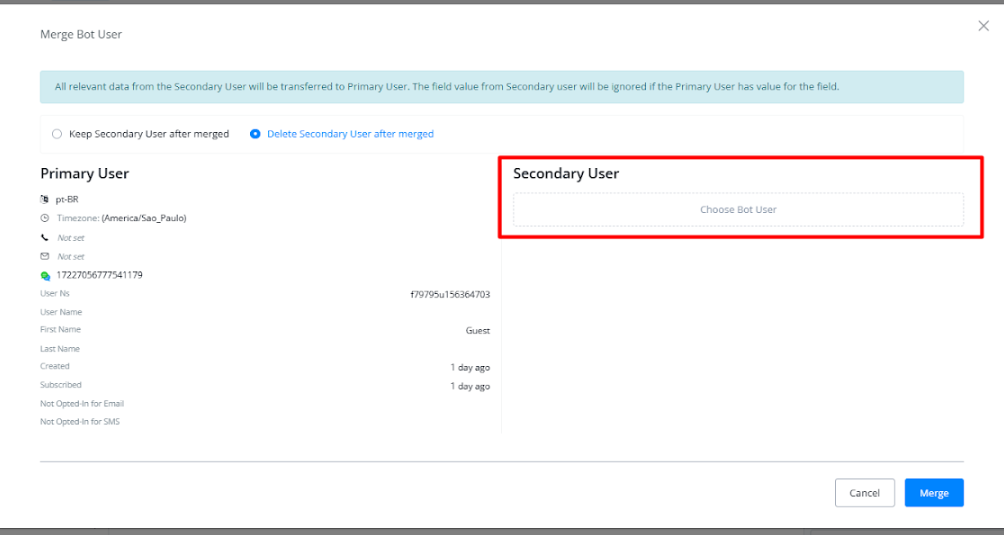
- Review Details Before Merging
- Before confirming the merge, you can choose whether to delete or keep the Secondary User profile after merge.
- Ensure all details are correct, as the merging process is irreversible.
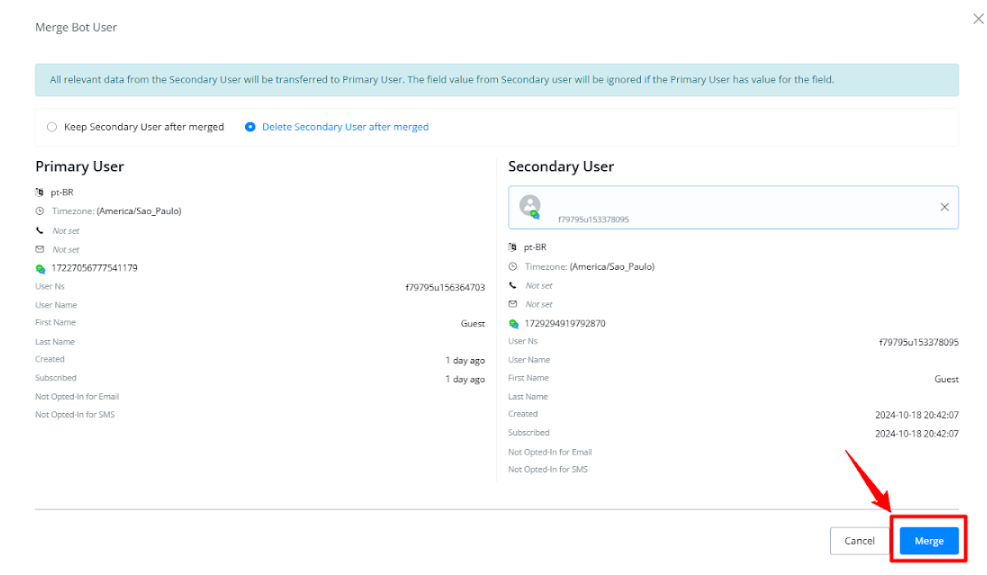
- The dialog box will display both users’ data for comparison, allowing you to verify which profiles are being merged.
- Complete the Merge
- Once reviewed, click in the Merge button at the bottom right of the dialog box.
- A confirmation light box will appear with the message: “All relevant data from the Secondary User will be transferred to the Primary User.” You can then choose to Cancel or Confirm the merge.
Automating the Merge using Bot User API Action Node
You can set up an automated flow to merge duplicate bot users using the Bot User API action node in your flow. This allows you to automatically identify and merge duplicate users based on specific conditions, such as matching email addresses or phone numbers.
Steps to Set Up the Automation:
- Create a New Flow
- In the UChat platform, create a new flow or open an existing one where you want to implement the merge action.
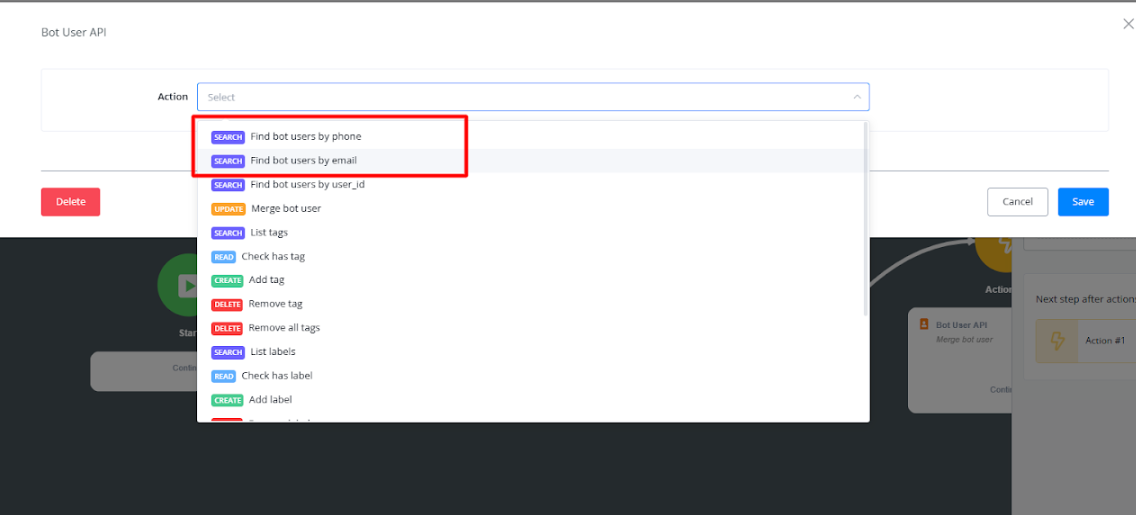
- Add the Bot User API Action Node
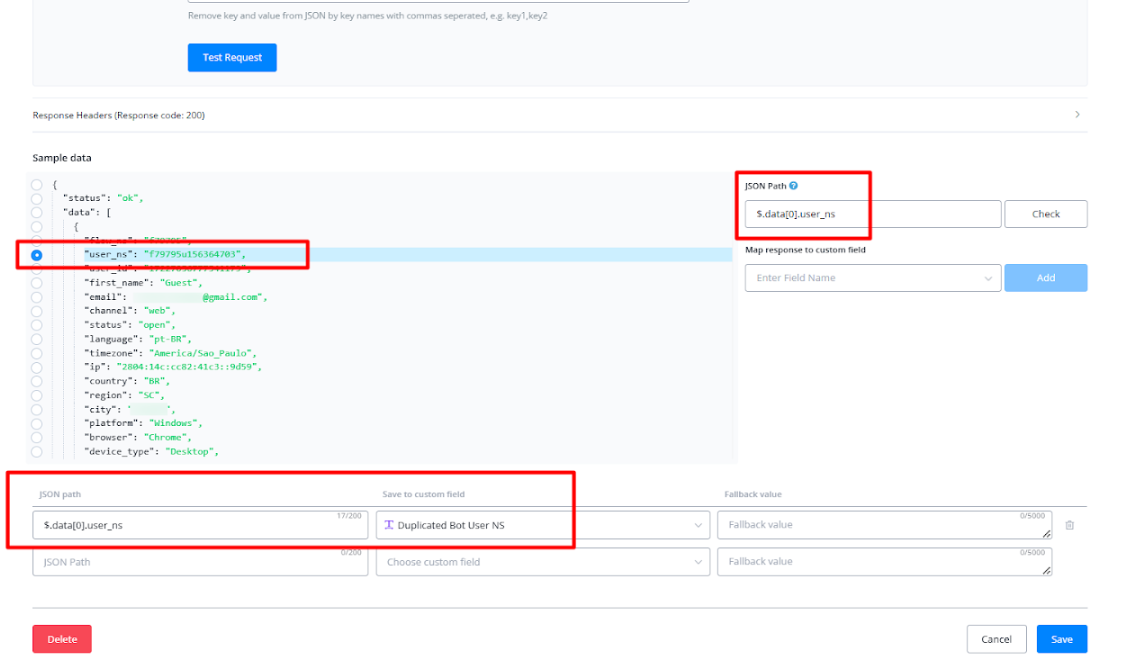
- Before of the Condition node, add an Action node and select Bot User API as the action type to search bot users duplicated.
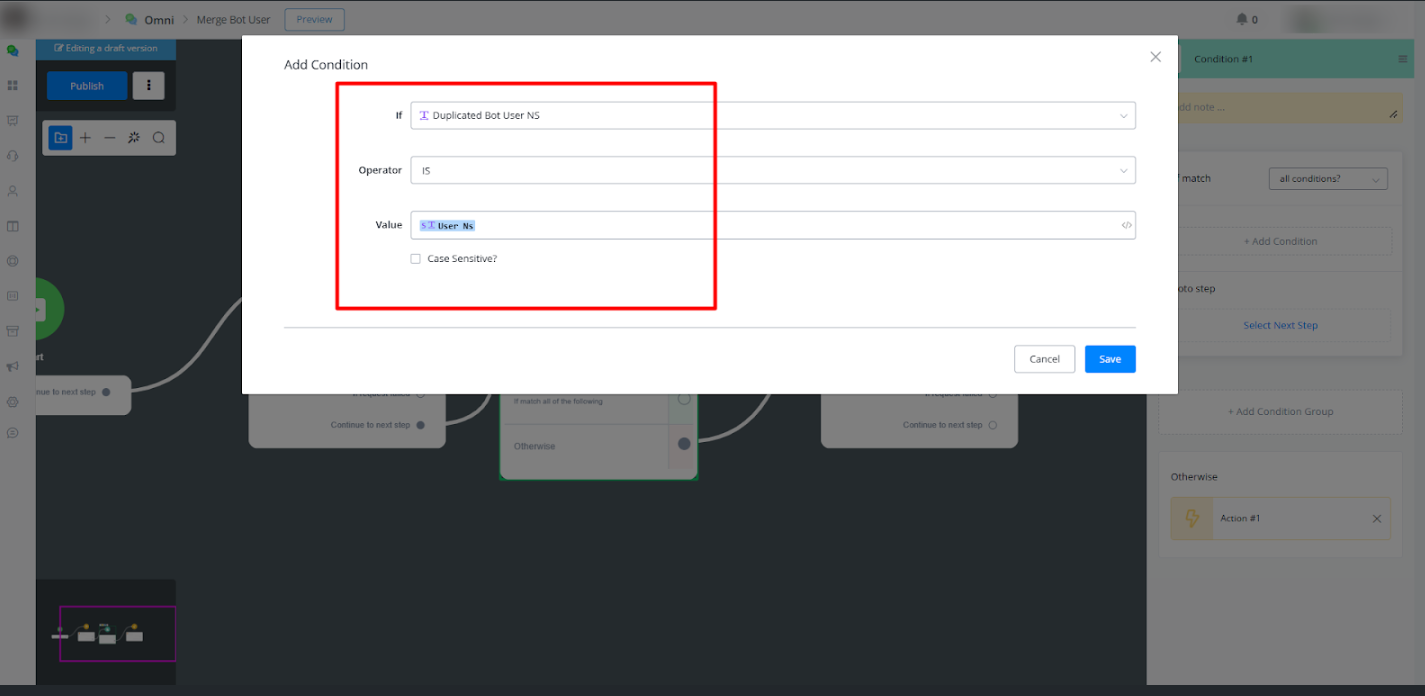
Add a Condition Node
- Insert a **Condition** node to check for duplicate users. This can involve comparing values such as email or phone number between the current user and other users in the system.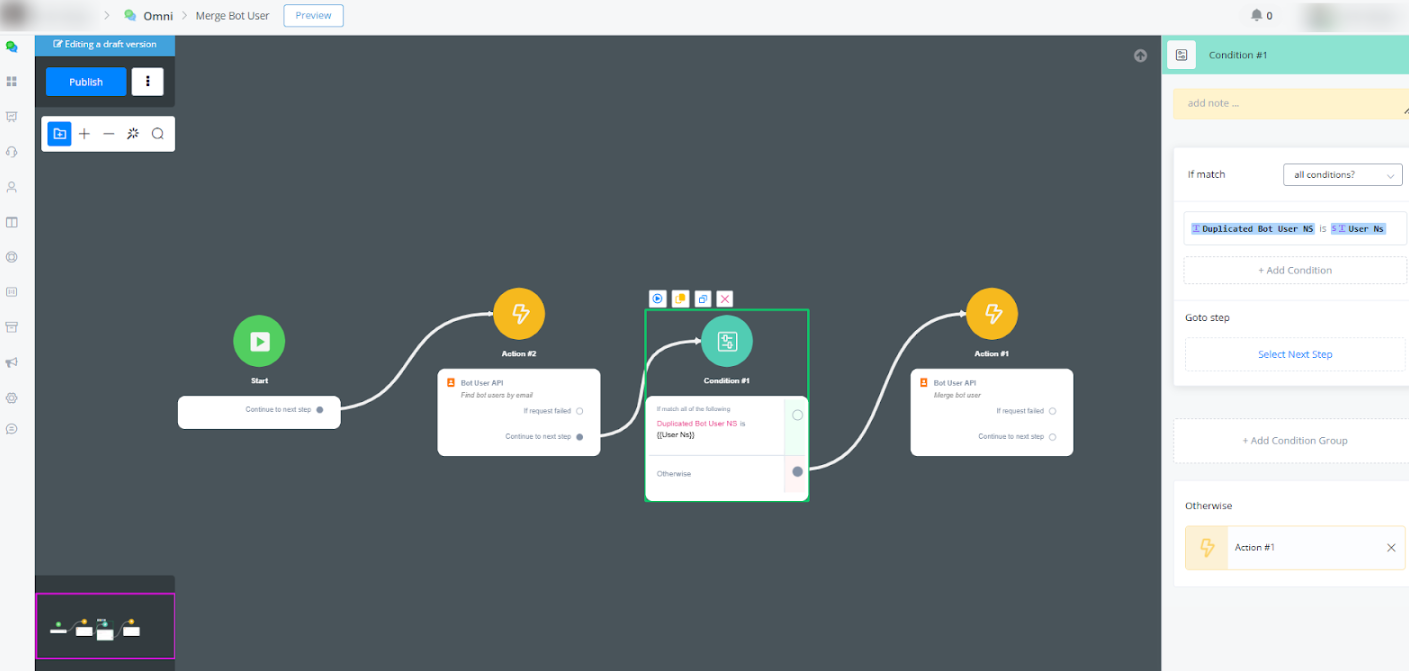
Add the Bot User API Action Node
- After the Condition node, add an **Action** node and select **Bot User API** as the action type.- Set the **Action** to "Merge Bot User."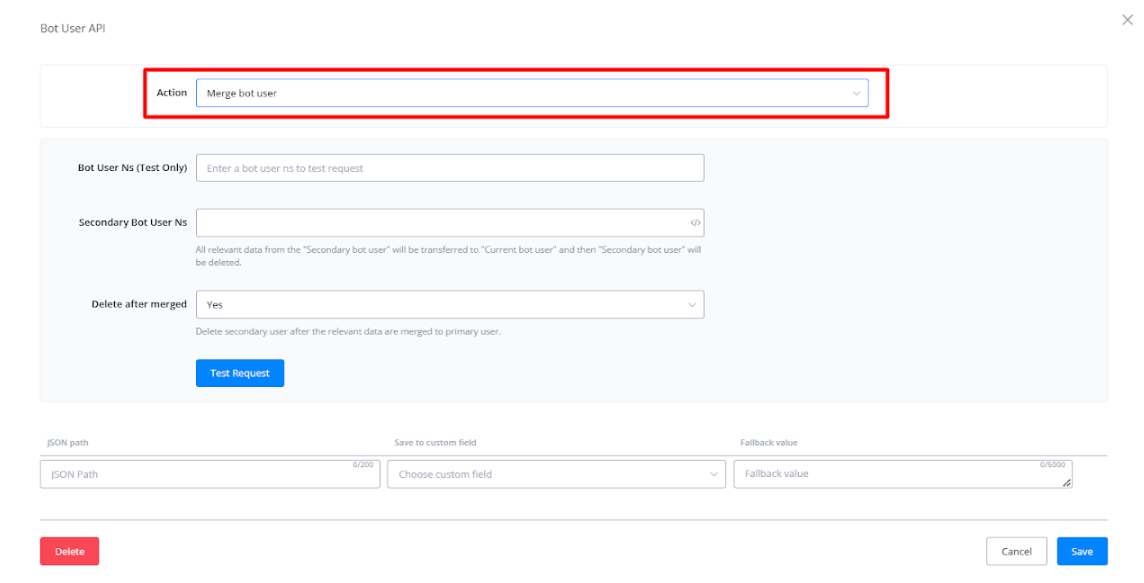
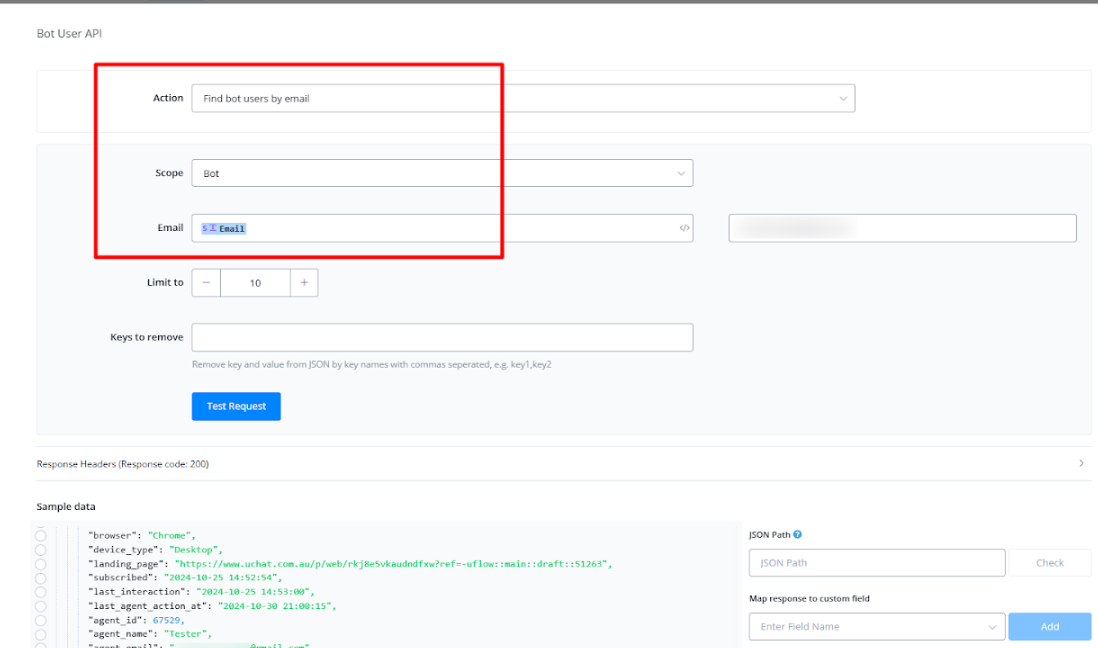
Configure the Merge Bot User Settings
- In the Bot User API action node settings: - Provide the **Secondary Bot User Ns** (the duplicate user profile to be merged). - Choose whether to **Delete after merged** to automatically delete the secondary user after merging.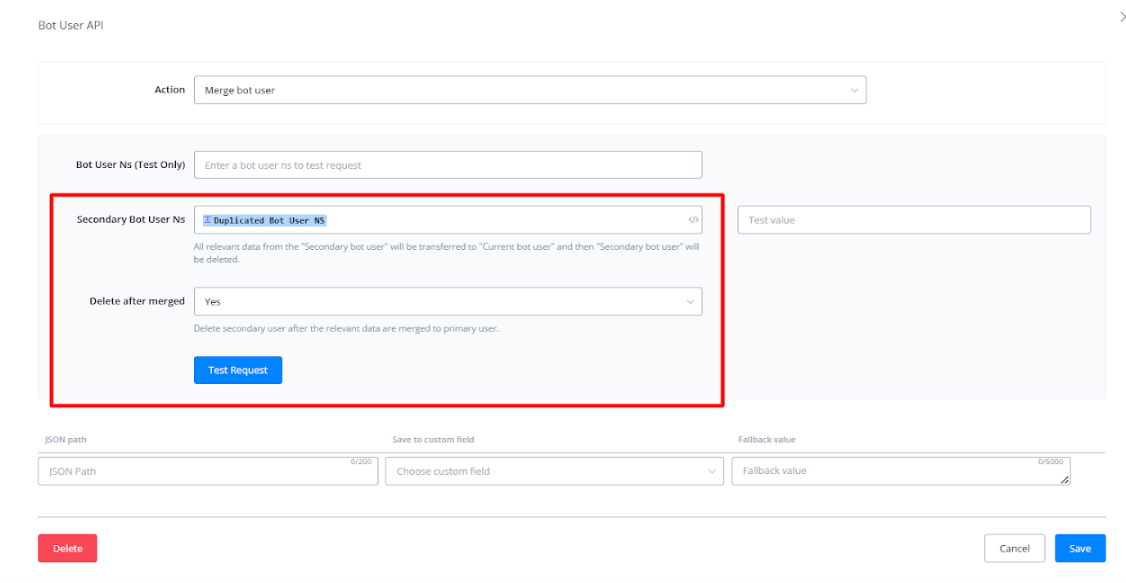
Publish the Flow
- Once configured, publish the flow. You can set up this flow in a trigger by your choice to enable automatic merging of duplicate bot users whenever the specified conditions are met, ensuring a streamlined and unified user database.Important Notes:
- Merging is Irreversible: Once merged, you cannot undo this action. Ensure that both profiles are verified duplicates before proceeding.
Scheduled Messages in Live Chat
This feature enhances efficiency by enabling agents to plan follow-up messages or send time-sensitive communications without needing to be live. To use, simply type your message, click the schedule icon, select the desired time, and you’re all set.
How to Use Scheduled Messages
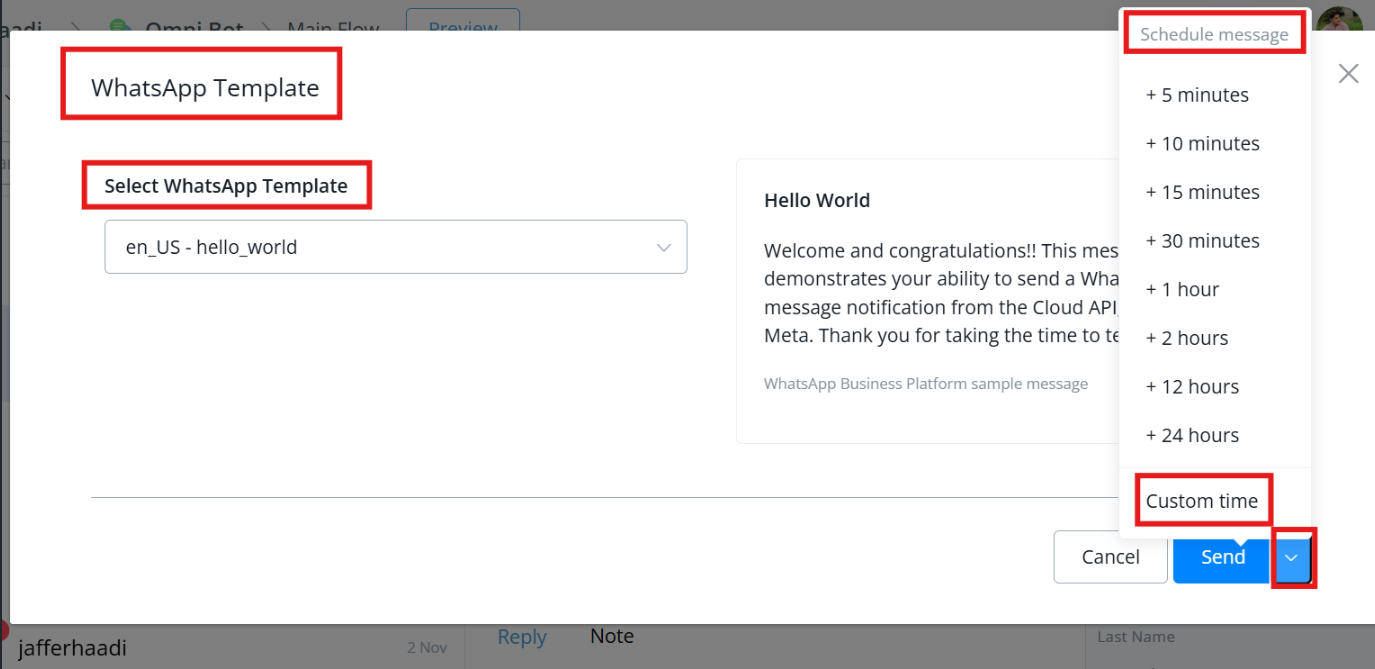
In the live chat interface, type your message, then click the schedule icon to pick the desired time for it to be sent. Choose from preset times, like 5 minutes, 10 minutes, 1 hour, or up to 24 hours later. A custom time option is also available, offering complete flexibility.
Types of Scheduled Messages
-
Scheduled Reply Message
You can schedule a reply message directly within the chat. Adjust the time to fit your needs, and view a list of all your scheduled messages for easy management.
-
Scheduled Whatsapp Template Message
Schedule WhatsApp template messages effortlessly by selecting the specific template and preferred send time, ensuring seamless communication for WhatsApp users.
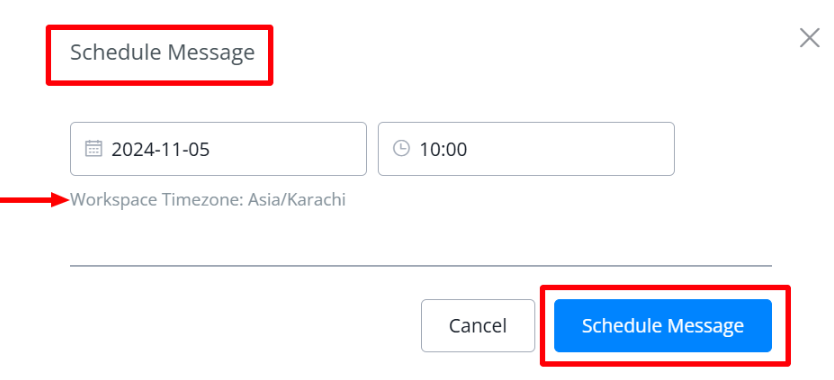
Setting a Custom Time
For custom timing, the custom time option lets you schedule messages based on your workspace’s time zone. This ensures messages reach recipients at exactly the right moment.
💡 Note for WhatsApp Channel:
When selecting a custom time that exceeds 24 hours, it’s required to use a WhatsApp template message. Regular messages are only supported for time frames within 24 hours, so for any scheduled message beyond that limit, please choose an approved WhatsApp template to ensure successful delivery.
Managing Scheduled Messages in Live Chat
You can manage scheduled messages in live chat if needed. Although content changes aren’t allowed, you have options to send the message immediately or cancel the scheduled delivery.
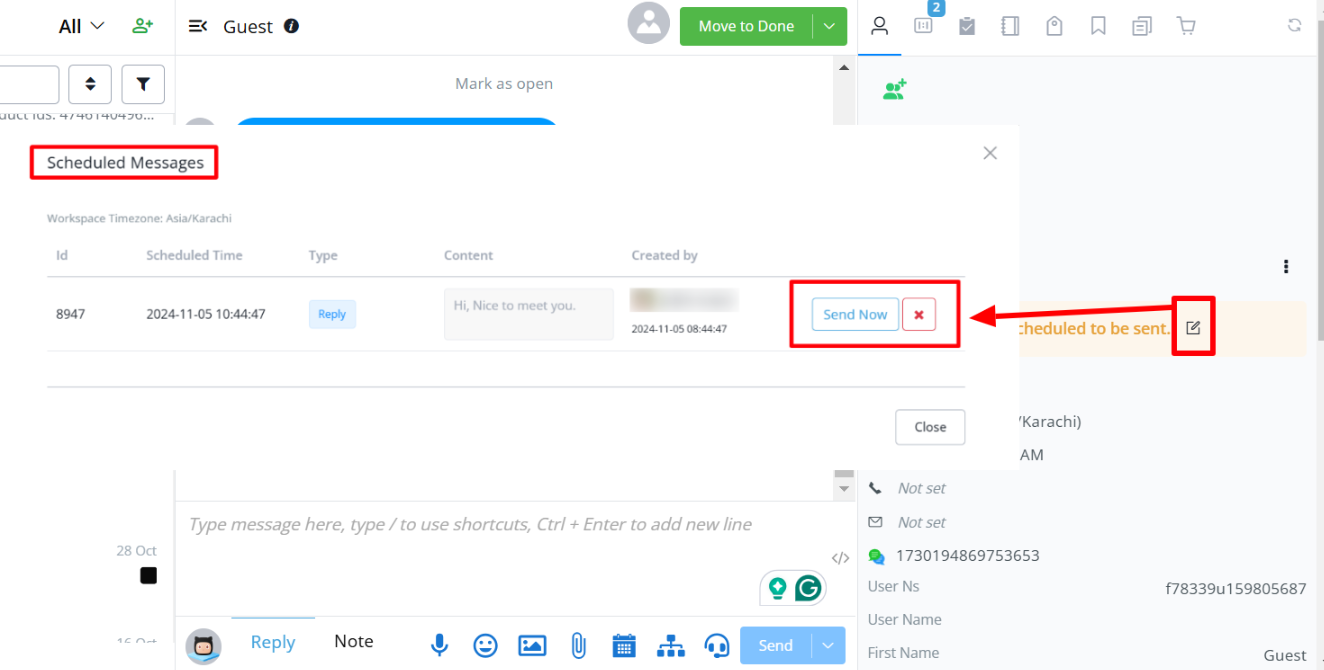
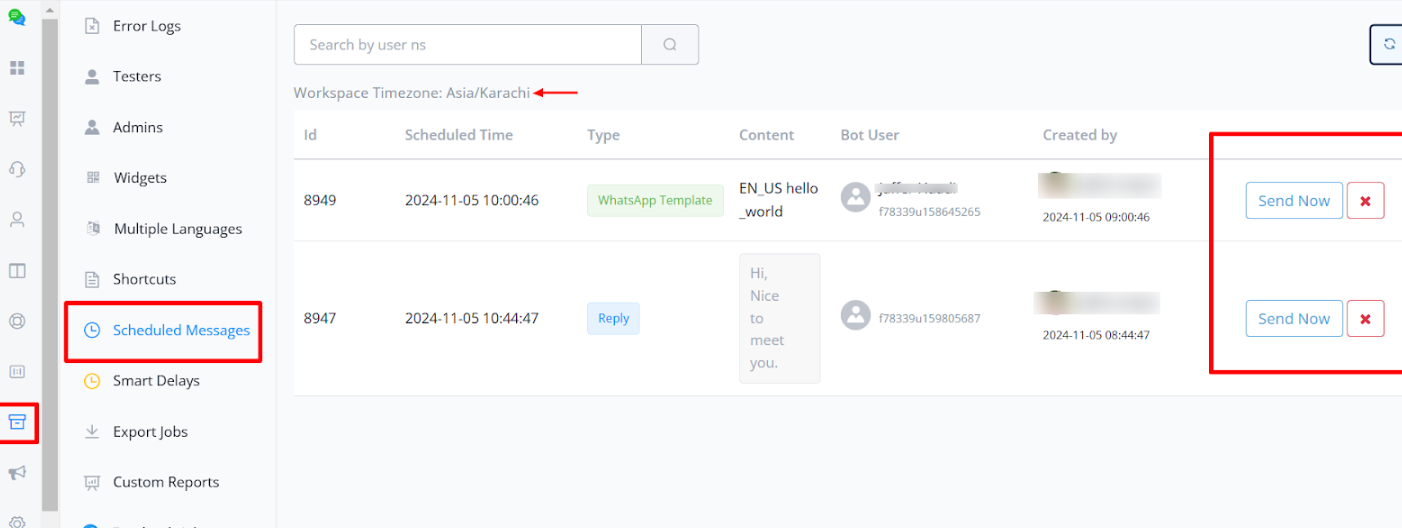
Accessing and Managing All Scheduled Messages
To view or manage all scheduled messages, navigate to Tools -> Scheduled Messages. Here, you’ll find an organised list displaying:
- Scheduled time
- Message type
- Message content or template
- Bot user
- Created by
For each scheduled message, you can either send it now or delete it.
Sortable Options for Live Chat
Sortable Options for Live Chat
We have enhanced the Live Chat experience by introducing new sorting options to help agents organize and prioritize conversations more efficiently. Agents can now sort chat conversations based on different criteria, making it easier to track and manage ongoing interactions.
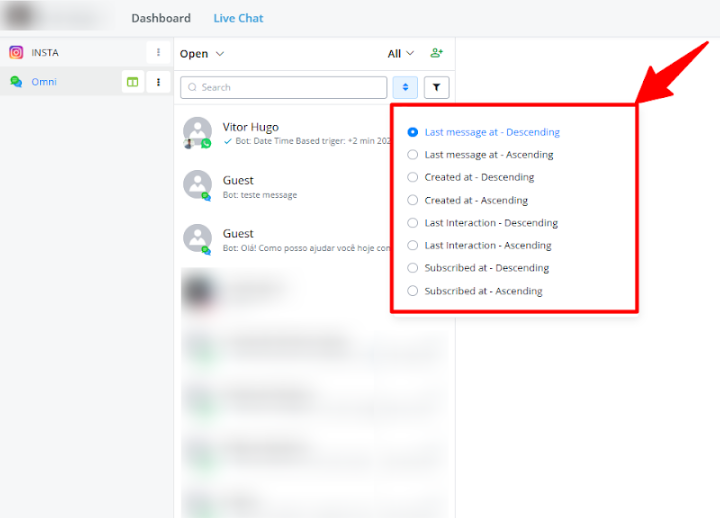
Sorting Options Available
Agents can sort conversations in the following ways:
- Last Message
- Ascending (Oldest to Newest)
- Descending (Newest to Oldest)
- Created At
- Ascending (Oldest to Newest)
- Descending (Newest to Oldest)
- Last Interaction
- Ascending (Oldest to Newest)
- Descending (Newest to Oldest)
- Subscribed At
- Ascending (Oldest to Newest)
- Descending (Newest to Oldest)
💡 Last Interaction is based on the last User Interaction. Last message is the last message send from agent or from bot automation.
How to Use Sortable Options
-
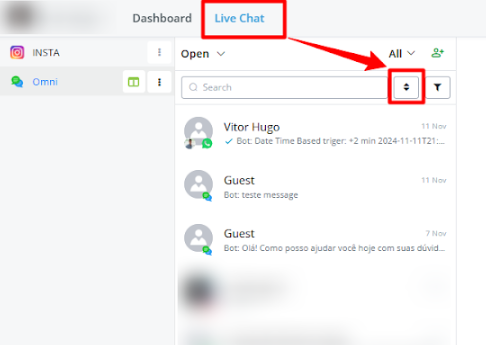
Accessing Sorting Options
In the Live Chat inbox, navigate to the top of the subscriber list. You’ll see the sorting menu that lets you select your preferred sorting criteria.
-
Choosing a Sorting Order
Click on any of the sorting criteria to toggle between ascending and descending order. The selected sorting option will reorganize the conversation list immediately.
-
Benefits of Sorting
Sorting conversations by specific criteria allows agents to quickly identify recent interactions, prioritize new subscribers, or focus on conversations that require immediate follow-up.
This update enhances the usability of the Live Chat interface by providing flexibility in conversation management, ensuring that agents can work more efficiently based on their preferences and the needs of their workflow.
Colaborators
We introduce Collaborators, a feature designed to enhance teamwork, improve response time, and provide more efficient customer support.
Why Use the Collaborator Feature?
This game-changing feature allows you to:
- Up to 5 users can now work on the same conversation simultaneously
- Boost teamwork by enabling multiple agents to collaborate.
- Improve response time for customer queries.
- Provide efficient customer support, especially when team input is necessary to resolve issues.
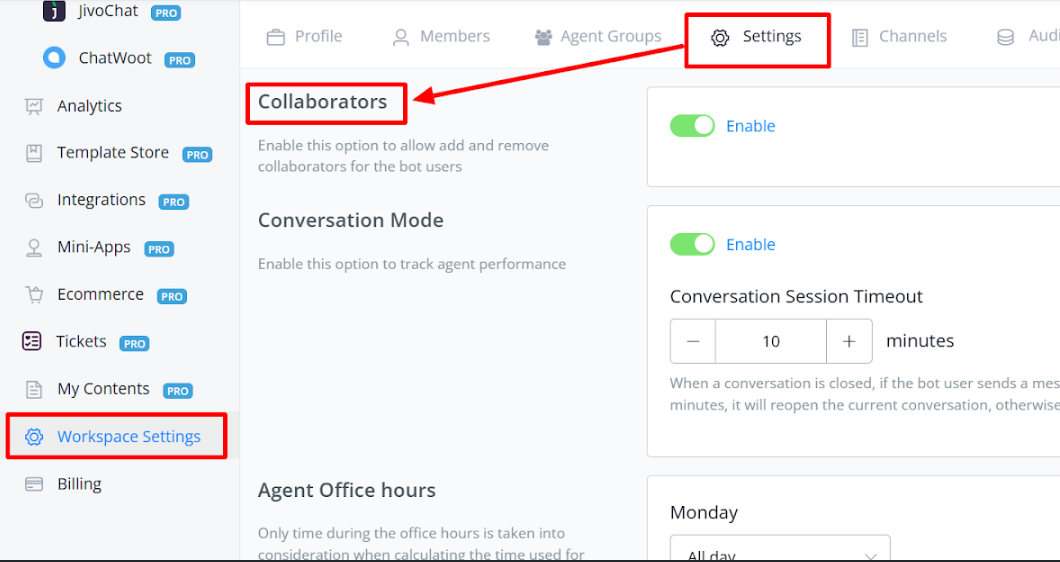
How to Enable the Collaborator Feature
- Navigate to Workspace Settings.
- Scroll down to find the Collaborator Settings and toggle it ON.
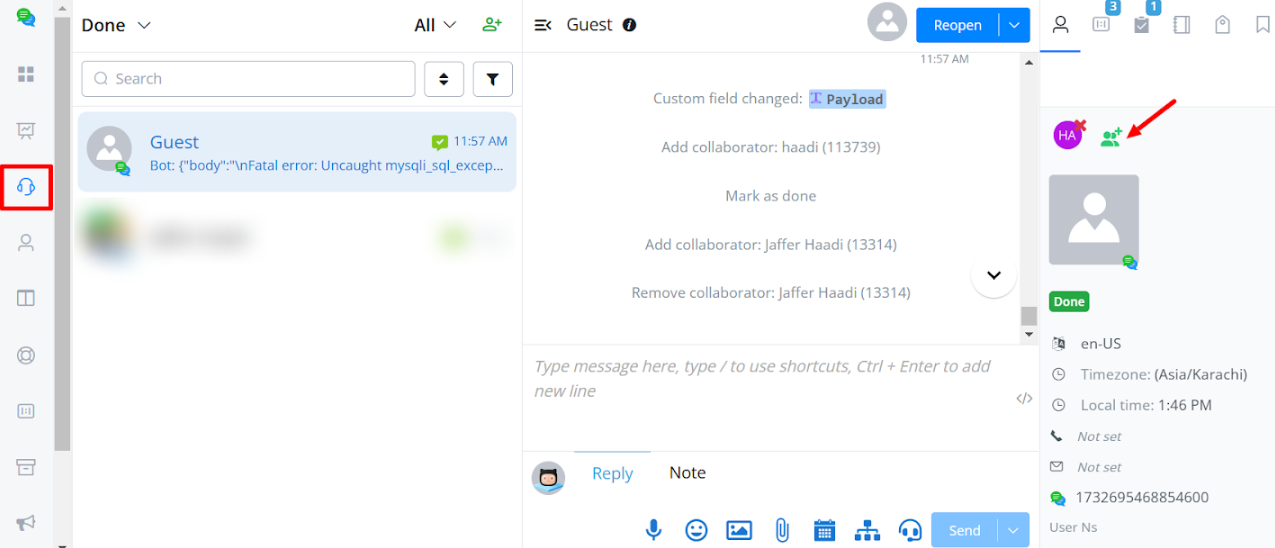
How to Use the Collaborator Feature
- Open any chat or conversation.
- On the right sidebar, just above the user profile, click the “Add Collaborators” button.
- Add the agents who need to collaborate on the conversation.
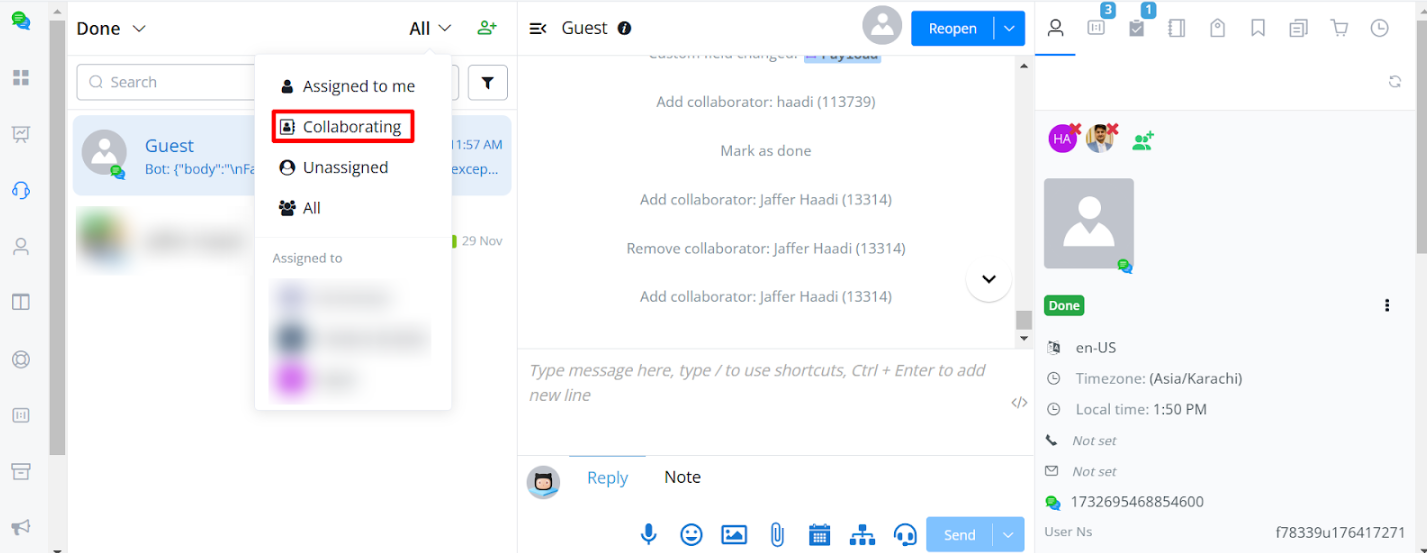
New Filters for Collaborative Conversations
Previously, Messagingme.app offered filters like “All Conversations” and “Assigned to Me” Now, there’s a new filter specifically for collaborative conversations: “Collaborating”
- Select this filter to view conversations where you’re a collaborator but not necessarily the primary owner.
- This helps team members quickly identify and manage shared conversations.
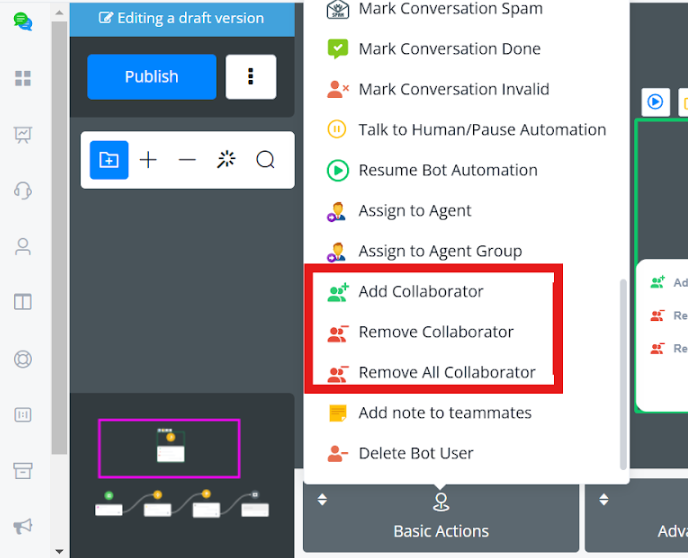
Collaborator Management Actions
Navigate to Basic Actions to:
- Add a Collaborator
- Remove a Collaborator
- Remove All Collaborators
Chat Assistant Integration in Live Chat
The Chat Assistant is an AI-powered integration within the Live Chat feature of UChat. It helps users quickly generate intelligent responses for ongoing conversations, improving efficiency and support quality. Follow the steps below to set up and use the Chat Assistant.
Step 1: Open the Live Chat Window
- Navigate to the Live Chat section of your UChat platform.
- Select a conversation from the list on the left-hand side.
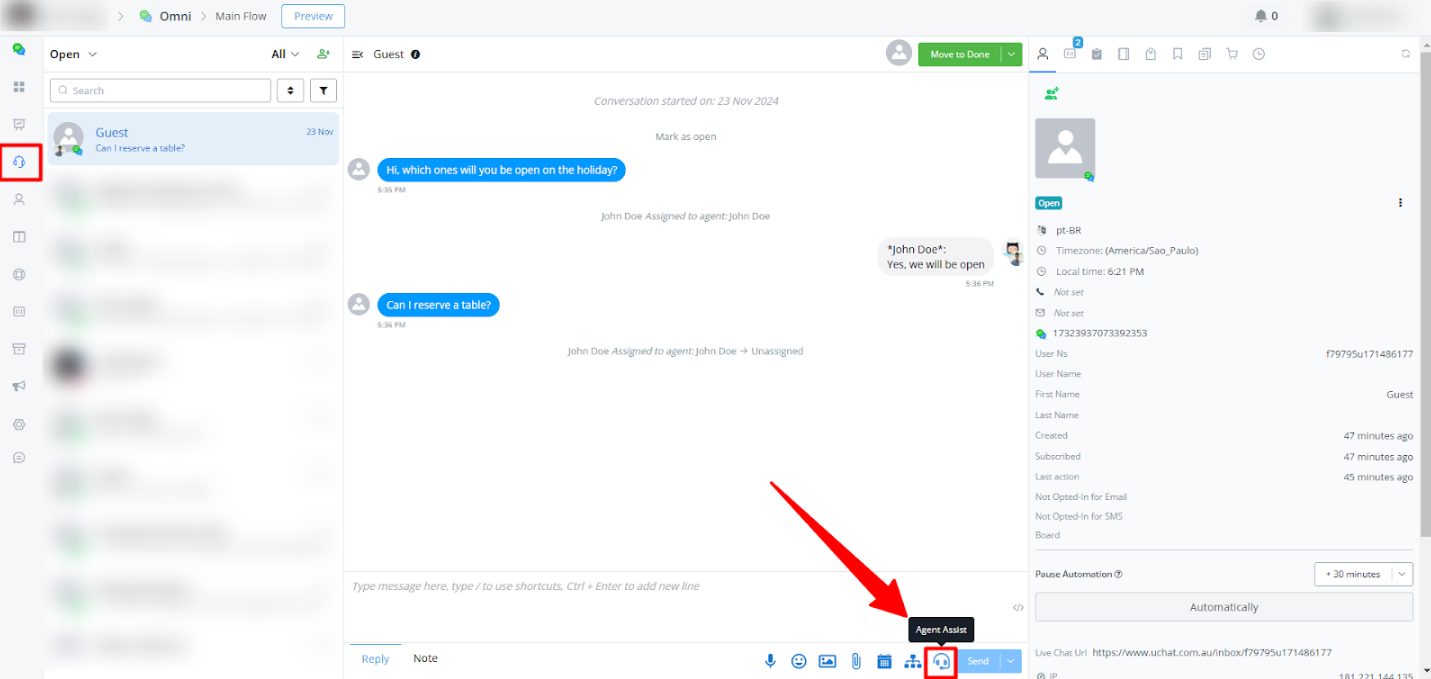
Step 2: Access the Chat Assistant
- In the chat interface, locate the Assistant button below the message input box (marked with a robot icon).
- Click on the Assistant button to open the Chat Assistant panel.
Step 3: Use Custom Prompts
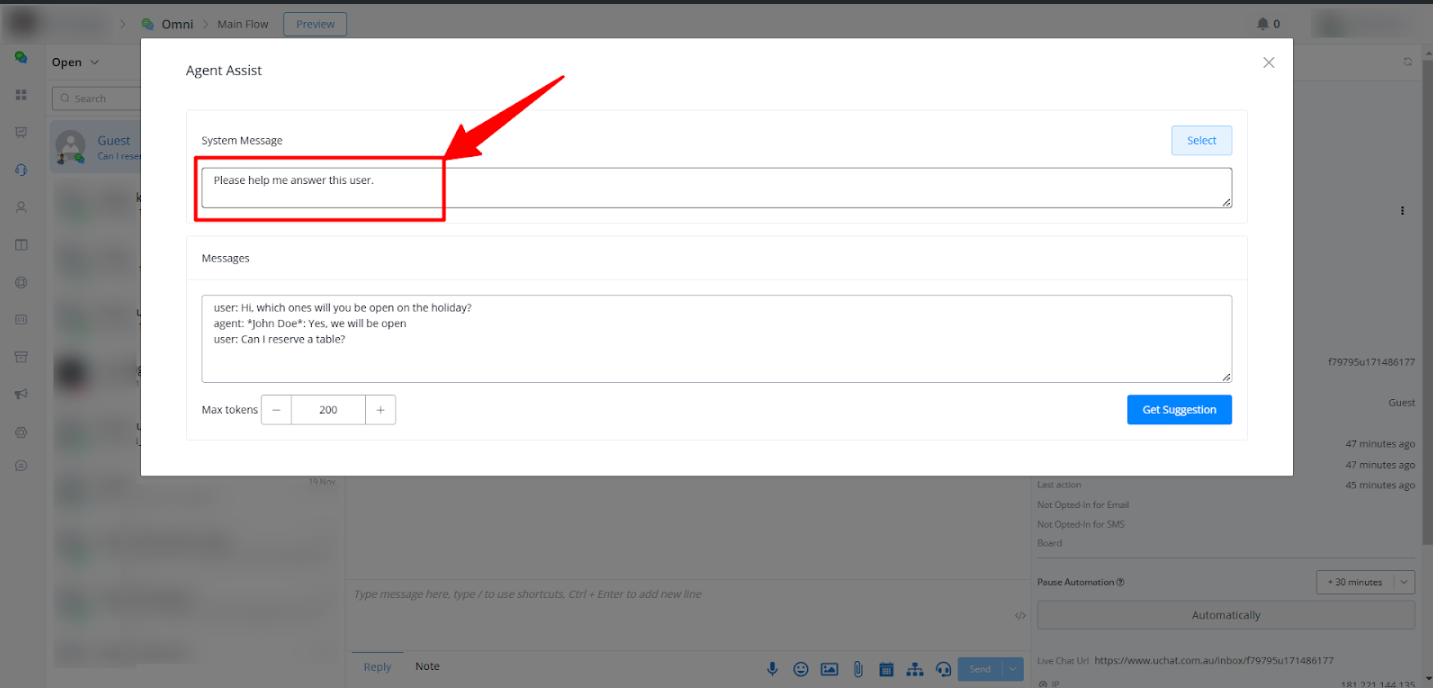
A. Enter a Custom Prompt
- In the Chat Assistant window, you’ll find an editable field for the prompt.
- Enter detailed instructions or context for the AI to generate the response. Examples:
- “Write a polite message apologizing for the delay in resolving the user’s issue.”
- “Explain the refund policy in simple terms.”
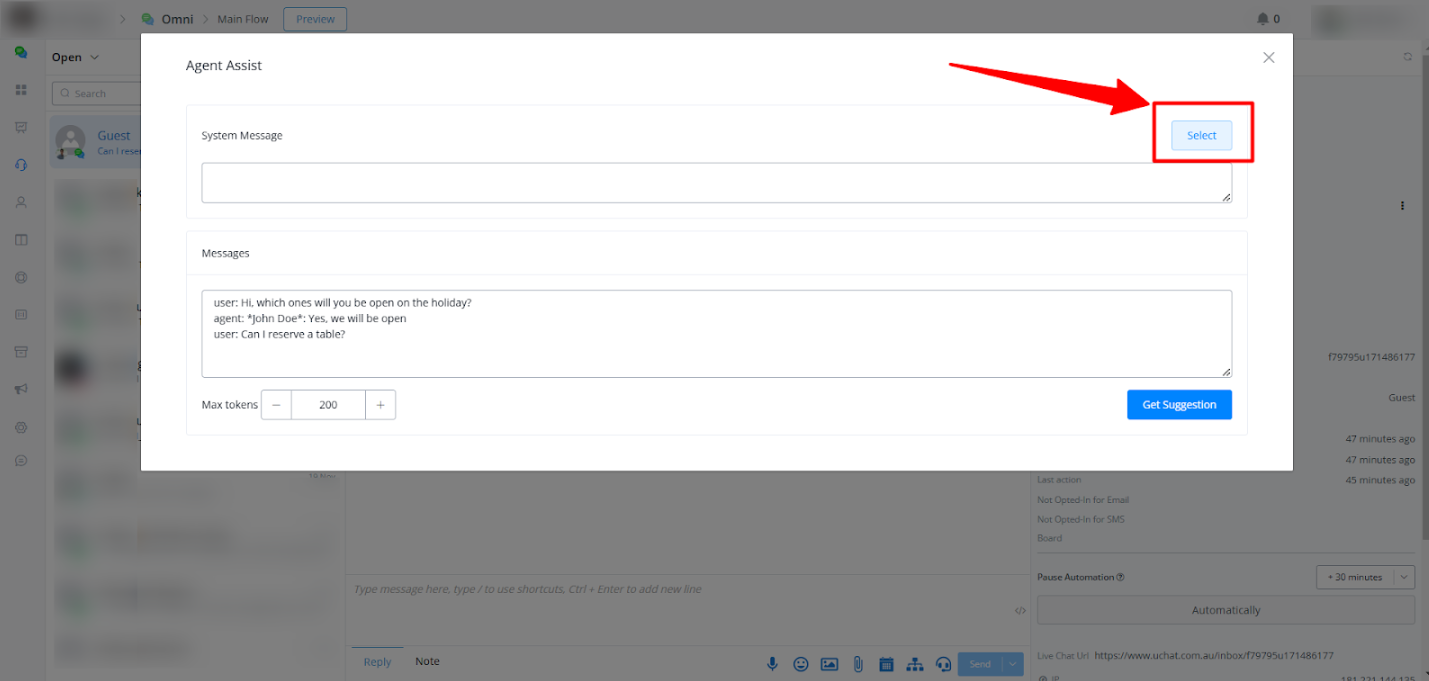
B. Select a Predefined Prompt
If you have set up predefined prompts, you can select one directly from the corner button labeled Select.
- For example, you might create options like:
- Apology for Delayed Response
- Order Status Update
- Refund Policy Explanation
- After selecting a title, the corresponding prompt will automatically populate the text field “System Message”.
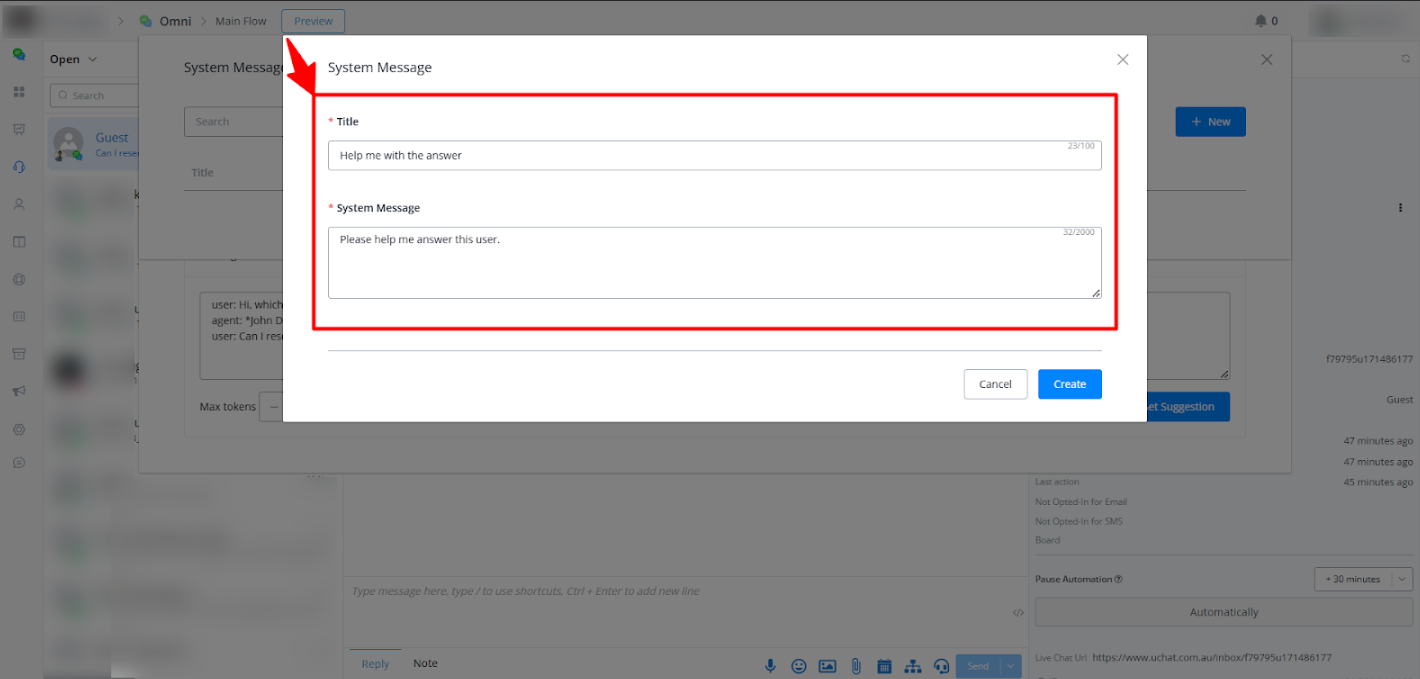
Step 4: Create New Predefined Prompts (Optional)
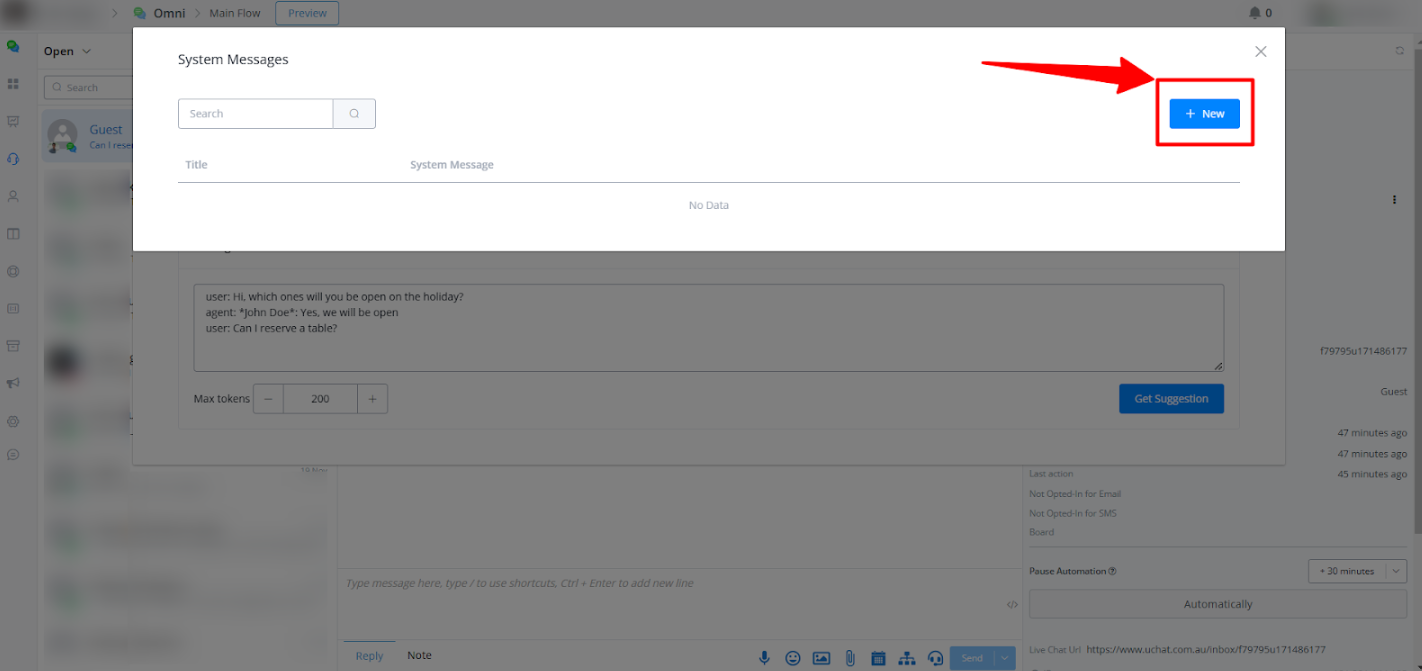
To further streamline your workflow, you can create custom predefined prompts directly in the Chat Assistant:
- In the Chat Assistant window, click the “+ New” button.
2 Enter the following:
- Title: A short and clear name for the prompt (e.g., “Delivery Delay Apology”).
- Prompt Content: A detailed instruction for the AI (e.g., “Apologize for the delivery delay and assure the customer it will arrive soon.”).
- Click Save to store the predefined prompt for future use.
The new prompt will now appear in the list under “Select” lightbox.

Step 5: Review the AI-Generated Message
- The generated message will appear in the text box.
- Review the content to ensure it aligns with your intended tone and context.
- If needed, make adjustments to the message directly in the input box.
- Alternatively, you can click Regenerate to have the AI create a new response.
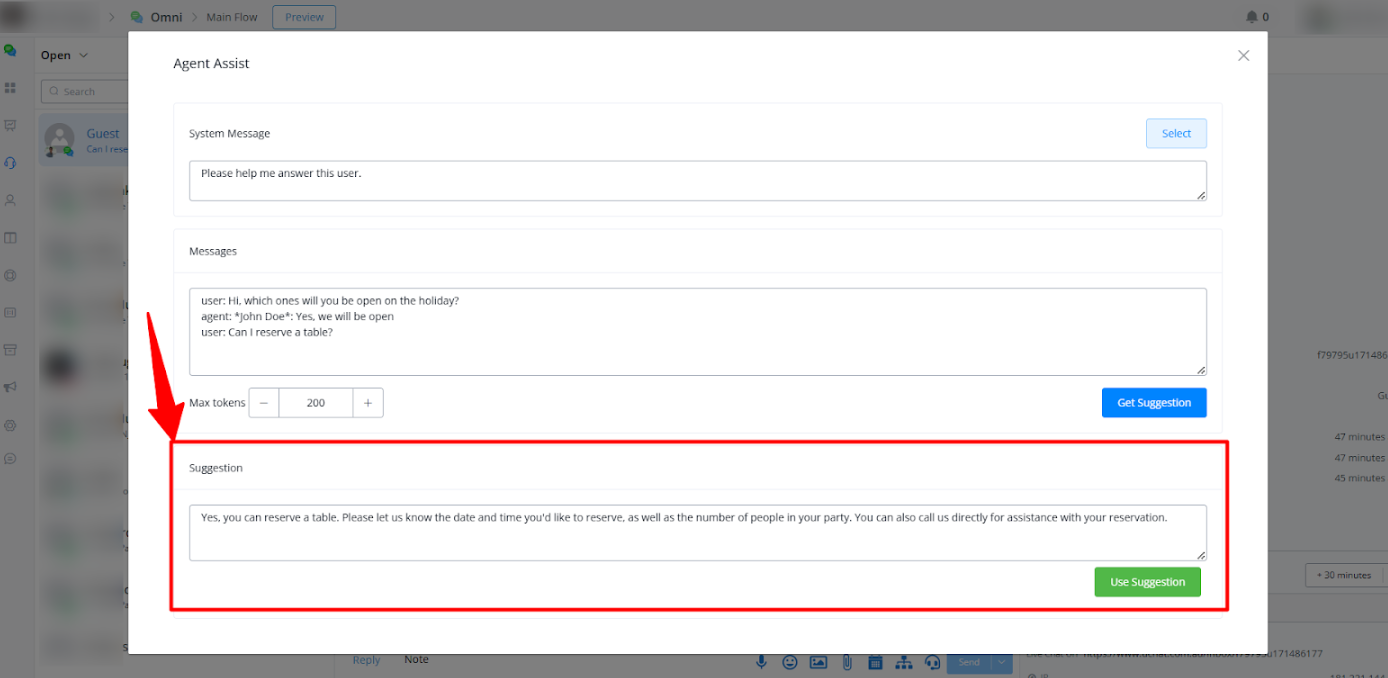
Once satisfied with the message, click the “Use Suggestion” button.
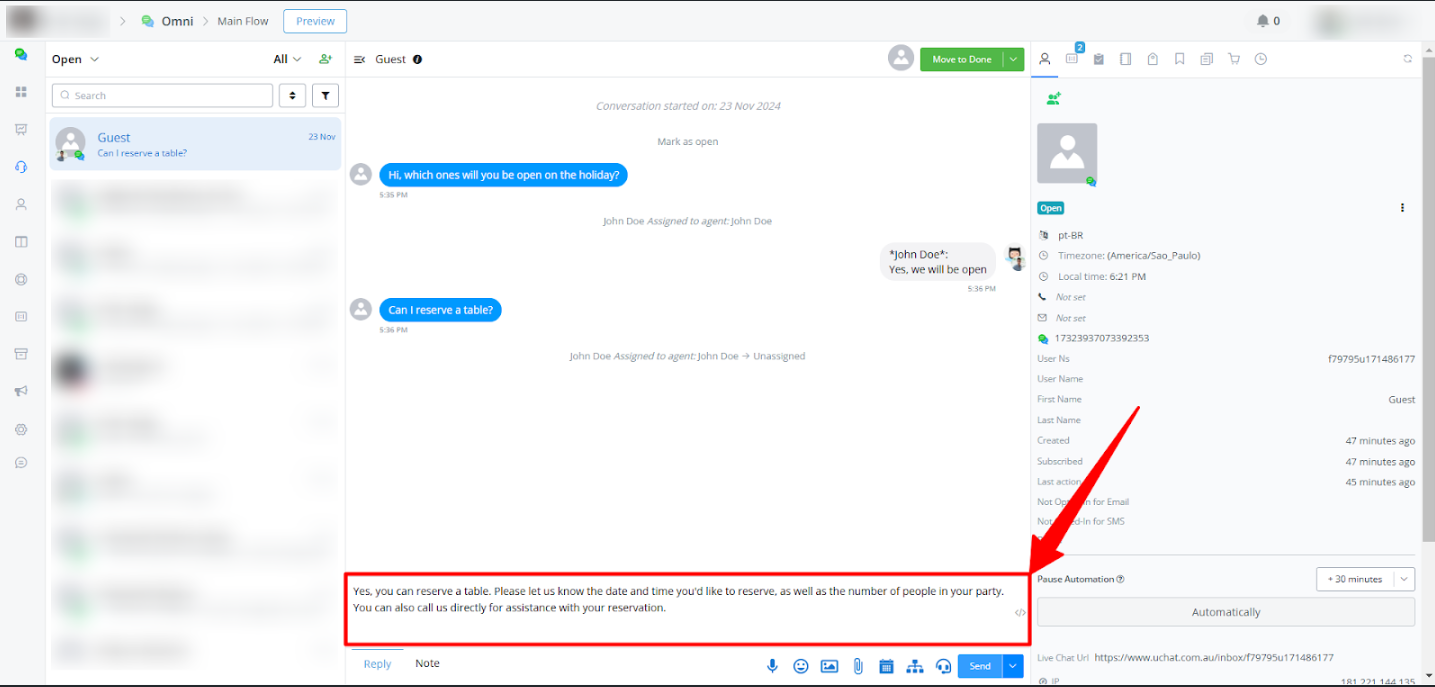
Step 7: Send the Response
- Now you will back to live chat window and you can click the Send button to deliver the response to the user in the chat.
Additional Tips
- Customize Prompts for Specific Scenarios:
Use detailed prompts to guide the AI for better results, such as “Explain the solution step-by-step” or “Write a message thanking the user for their patience.”
- Stay Consistent with Brand Tone:
While the AI generates the response, always ensure it aligns with your company’s communication style.
By following these steps, you can effectively use the Chat Assistant to enhance your live chat interactions and provide faster, smarter, and more personalized support to your customers.