Settings
General Settings
How to Access the General Settings Panel
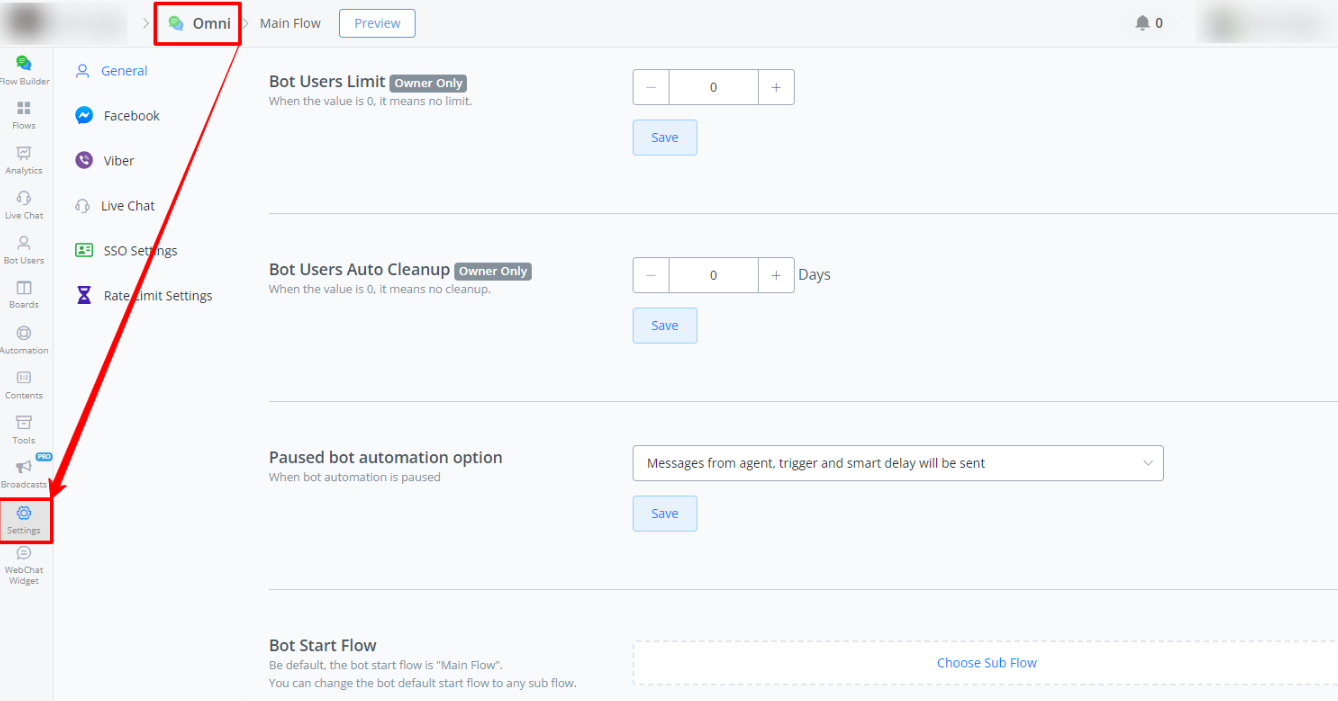
To access the General Settings panel in Messagingme.app, follow these steps:
- Enter Your Bot: Navigate to the specific bot you want to configure.
- Go to “Settings”: In the left sidebar menu, click on “Settings”.
- Select “General”: Within “Settings”, click on the “General” option.
Note: Only the workspace owner can configure this setting.
See the image below for visual guidance:
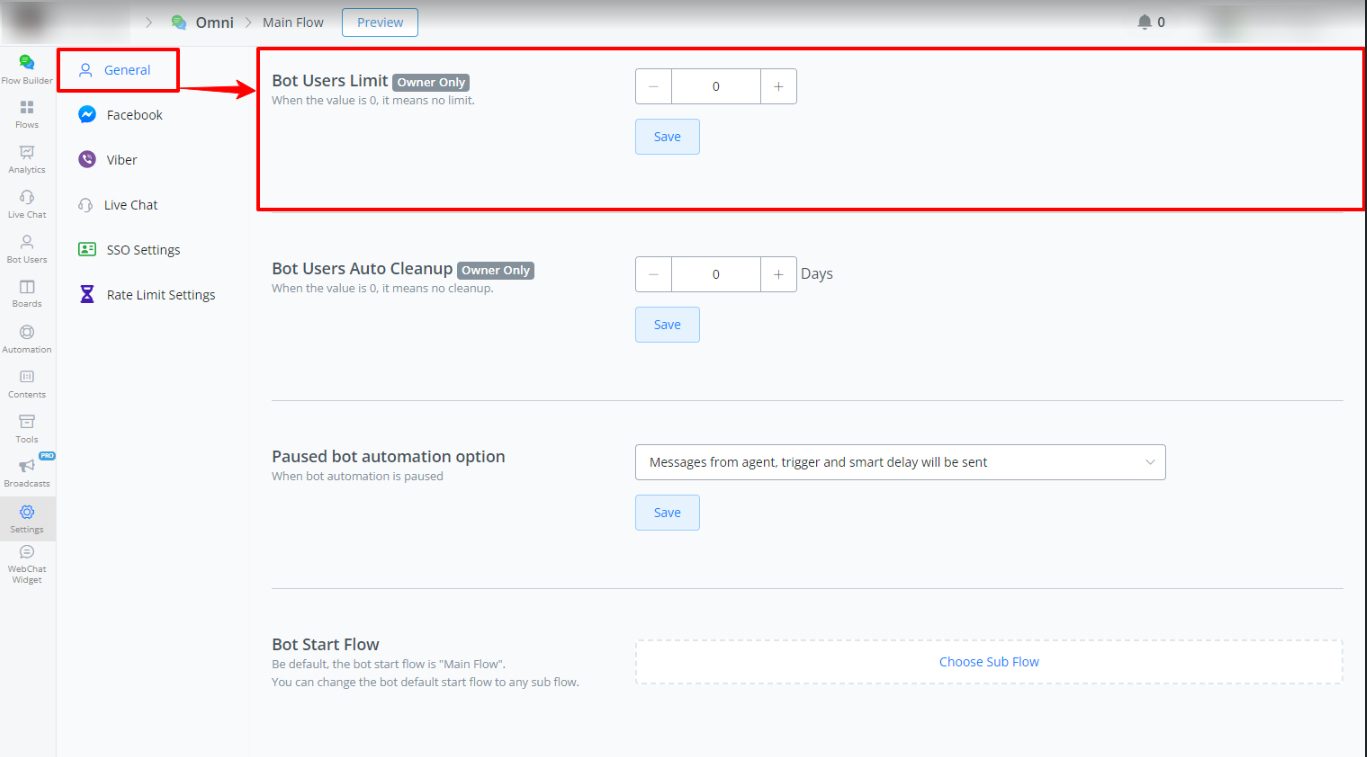
Bot Users Limit
- Description: Sets the maximum limit of bot users. If the value is 0, there is no limit.
- Access: Only the workspace owner can configure this setting. If a user does not see this setting, it means they are not the workspace owner.
- How to Configure:
- Navigate to the “Bot Users Limit” section.
- Use the ”+” and ”-” buttons to adjust the user limit.
- Click “Save” to save the changes.
Bot Users Auto Cleanup
- Description: Automatically removes bot users who have not interacted within a specified period. If the value is 0, there is no cleanup.
- How to Configure:
- Navigate to the “Bot Users Auto Cleanup” section.
- Set the number of days after which inactive users will be removed.
- Add specific conditions if needed (e.g., delete users with certain tags).
- Click “Save” to save the changes.
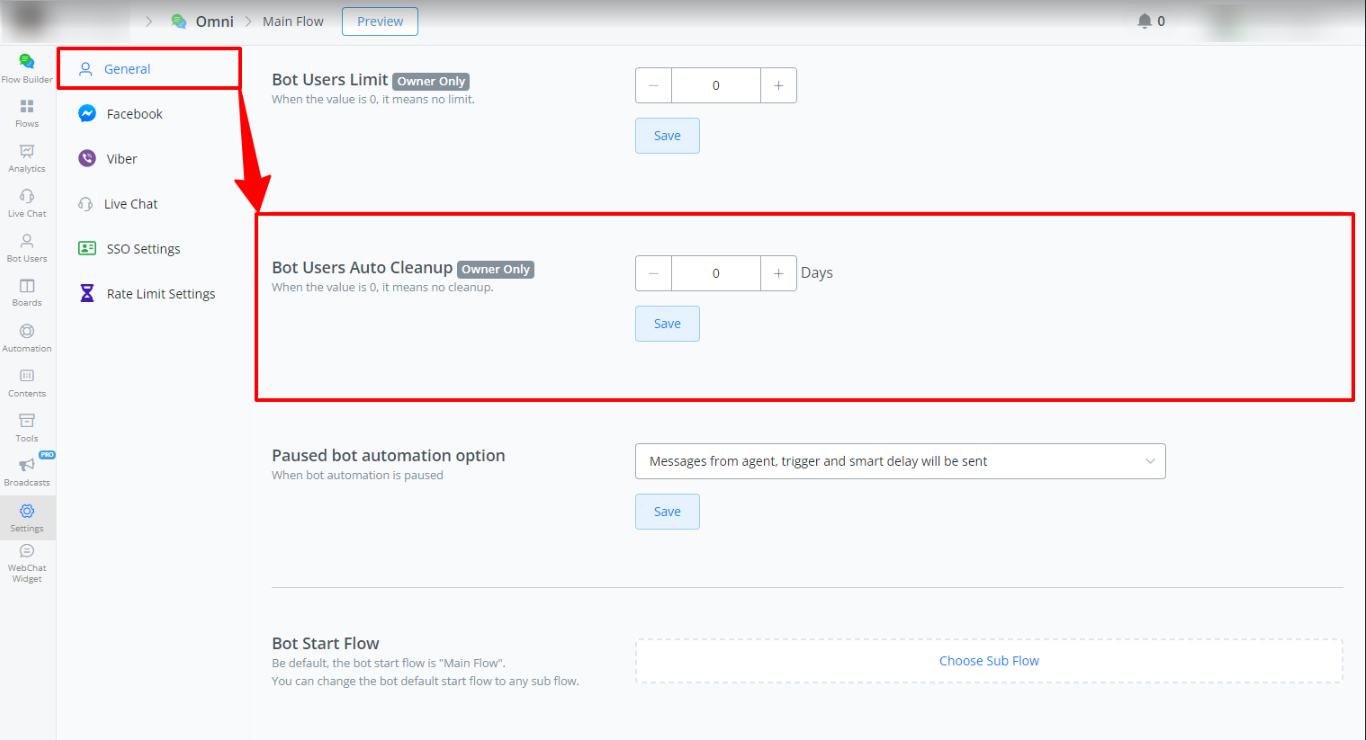
Notes:
- If no specific conditions are set, users will be removed based on the last interaction time.
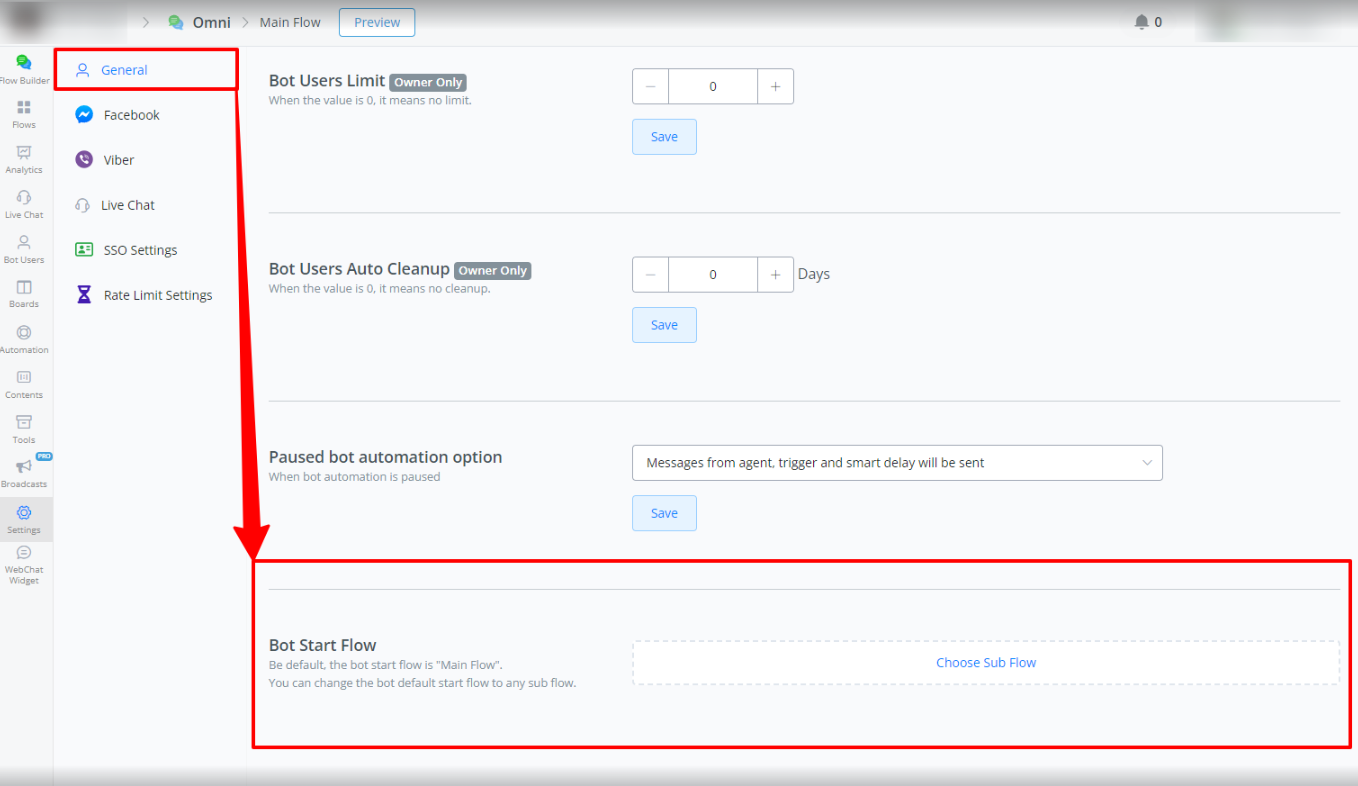
Paused Bot Automation Option
- Description: Defines the behavior of automations and messages during the conversation pause.
- How to Configure:
- Navigate to the “Paused bot automation option” section.
- Select one of the options:
- Messages from agent, trigger and smart delay will be sent: During the pause, smart delay and triggers will continue to be working.
- Only messages from agent will be sent: During the pause, only messages sent by the agent will be sent; all automations, triggers and smart delays will be stopped.
- Click “Save” to save the changes.
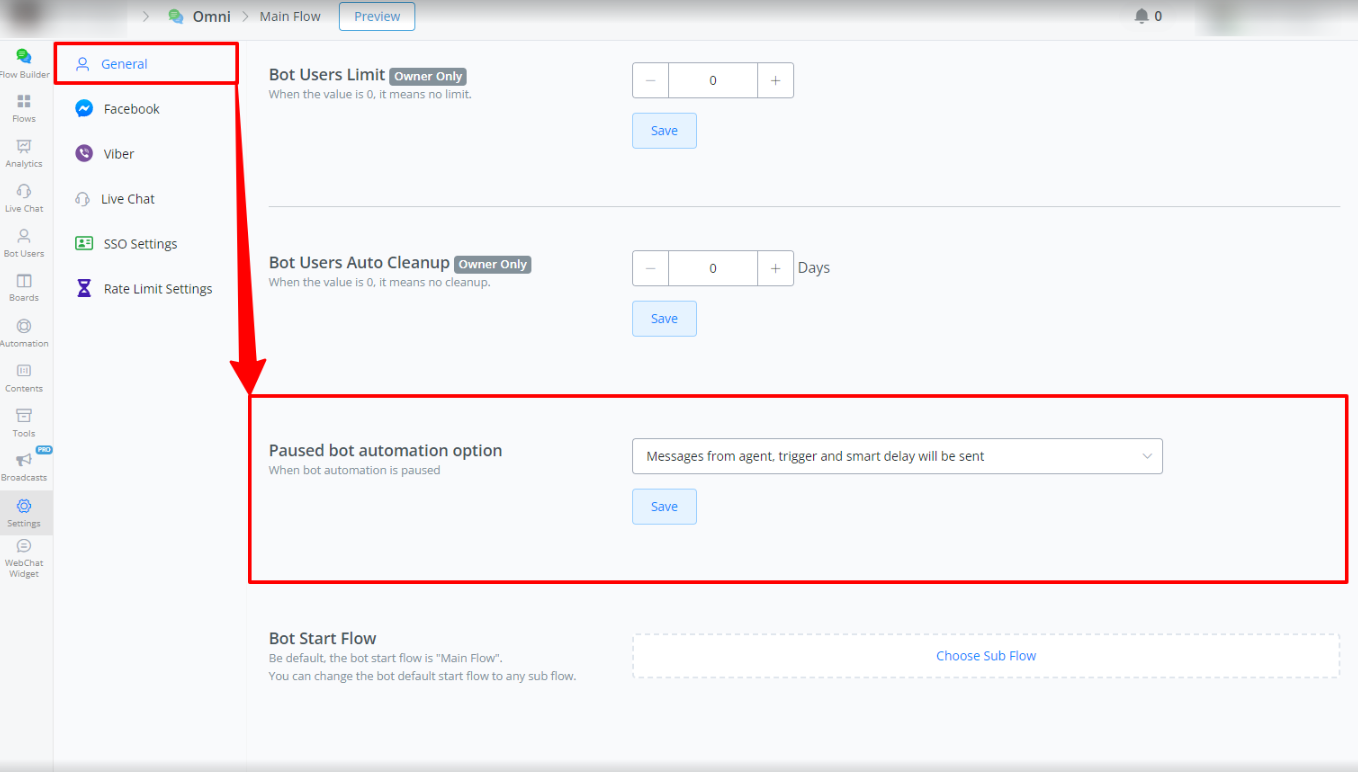
Bot Start Flow
- Description: Sets the default start flow of the bot.
- How to Configure:
- Navigate to the “Bot Start Flow” section.
- Select the desired default flow (default is “Main Flow”).
- Click “Save” to save the changes.
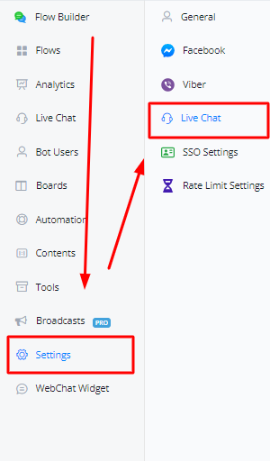
Live Chat Settings
Livechat settings can be accessed by clicking on the settings tab inside the bot, then clicking on the live chat.
Overview
Here you will find all the settings related to livechat. You will also find settings for closing notes as well as agent notifications.
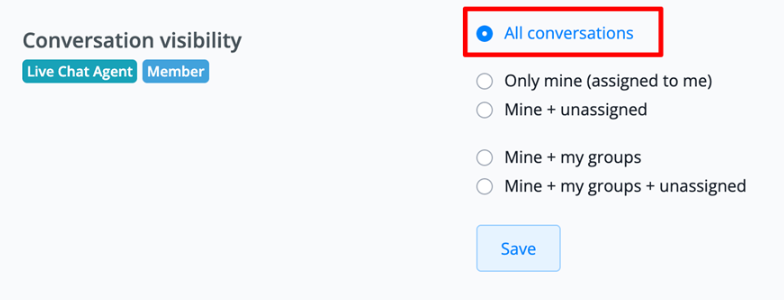
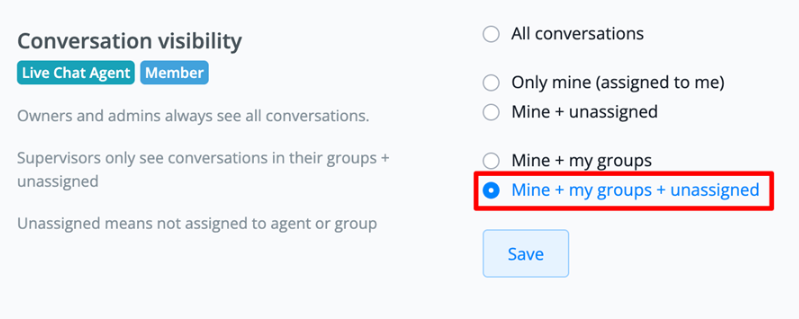
Conversation Visibility
The Conversation Visibility feature allows you to control which conversations live chat agents and members can view in the system. This setting is essential for managing access and work distribution among your team.
How to Access
To configure conversation visibility:
- Go to Settings in the chatbot main menu
- Navigate to Live Chat
- Locate the Conversation Visibility section
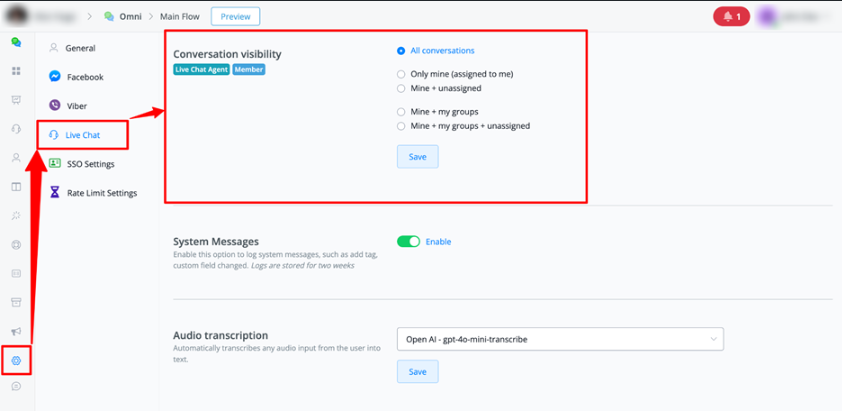
Visibility Options
1. All Conversations (Default)
- Description: All agents have access to all available conversations
- Who can see:
- Owners and Admins: Always see all conversations
- Supervisors: See all conversations
- Agents: See all conversations
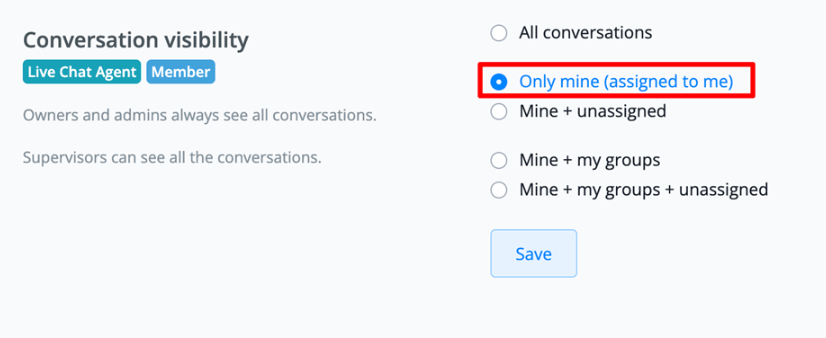
2. Only Mine (Assigned to Me)
- Description: Agents only see conversations assigned directly to them
- Who can see:
- Owners and Admins: Always see all conversations
- Supervisors: See all conversations
- Agents: Only conversations assigned to them individually
3. Mine + Unassigned
- Description: Agents see their conversations and those without assignment
- Who can see:
- Owners and Admins: Always see all conversations
- Supervisors: See all conversations
- Agents: Conversations assigned to them + unassigned conversations*
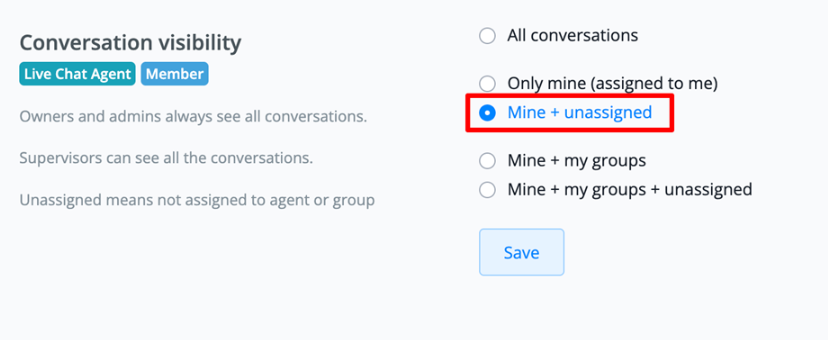
- Unassigned conversations are those not designated to any specific agent or agent group.
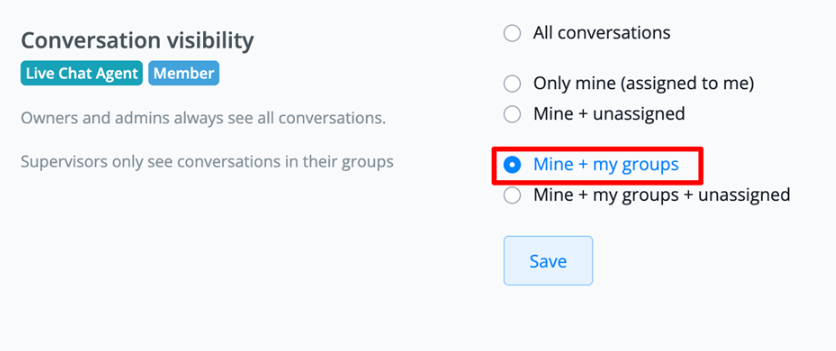
4. Mine + My Groups
- Description: Agents see conversations assigned to them and to groups they belong to
- Who can see:
- Owners and Admins: Always see all conversations
- Supervisors: Only conversations from groups they belong to
- Agents: Conversations assigned to them + conversations from their groups
5. Mine + My Groups + Unassigned
- Description: Combination of previous options
- Who can see:
- Owners and Admins: Always see all conversations
- Supervisors: Conversations from their groups + unassigned conversations
- Agents: Conversations assigned to them + conversations from their groups + unassigned
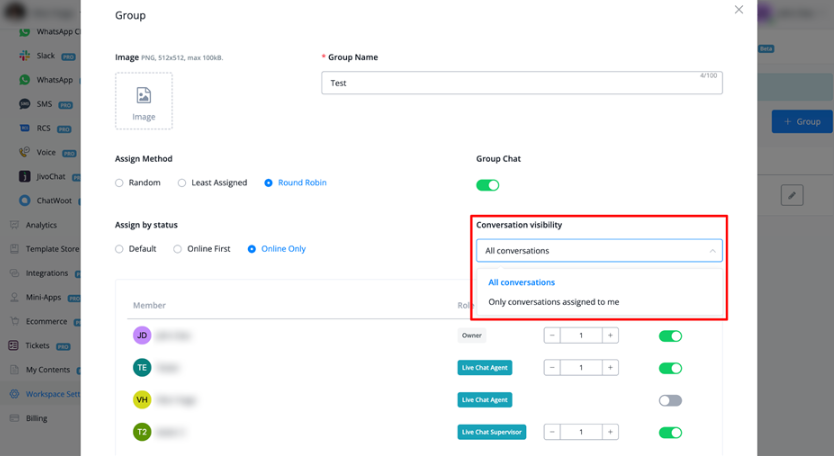
Additional Group Settings
Visibility Within Agent Groups
When configuring an agent group (in Workspace Settings > Agent Groups), you can set additional visibility:
- All Conversations: Agents see all conversations assigned to the group
- Only Conversations Assigned to Me: Agents see only group conversations specifically assigned to them
Supervisor Settings
Supervised Agents
For supervisors, there is an additional setting:
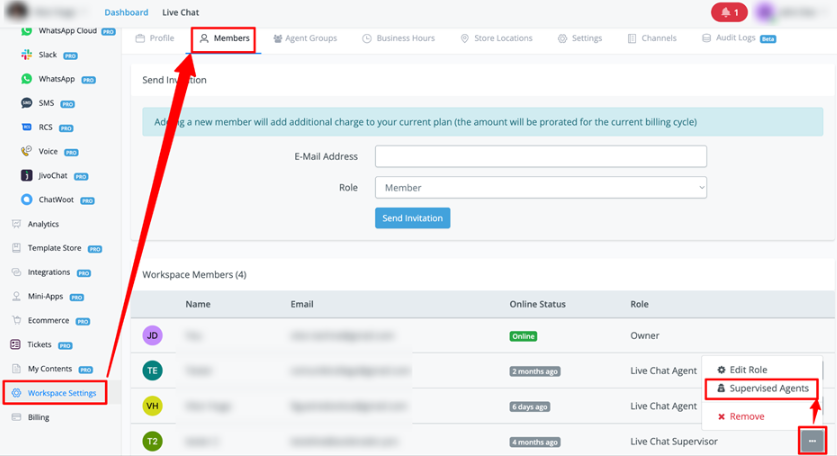
- Access the three-dot menu next to the supervisor
- Select Supervised Agents
- Choose which agents will be supervised
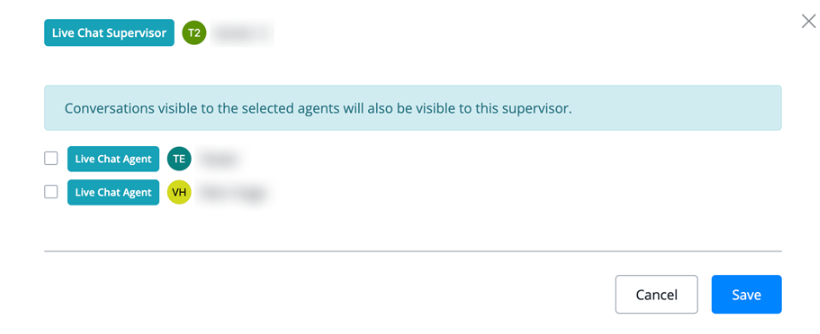
Result: The supervisor will see all conversations from selected agents, enabling targeted monitoring and support.
Permission Hierarchy
| Role | Access |
|---|---|
| Owner | Always sees all conversations, regardless of settings |
| Admin | Always sees all conversations, regardless of settings |
| Supervisor | Access varies according to selected configuration |
| Live Agent | Limited access according to visibility configuration |
| Member | Same restrictions as agents |
Important Notes
- Changes to visibility settings require a page refresh to be applied
- Owners and Admins always maintain full access, regardless of settings
- Group settings take priority over general settings when applicable
- Unassigned conversations include those without a specific agent or group designated
This documentation reflects all the visibility features in the live chat system.
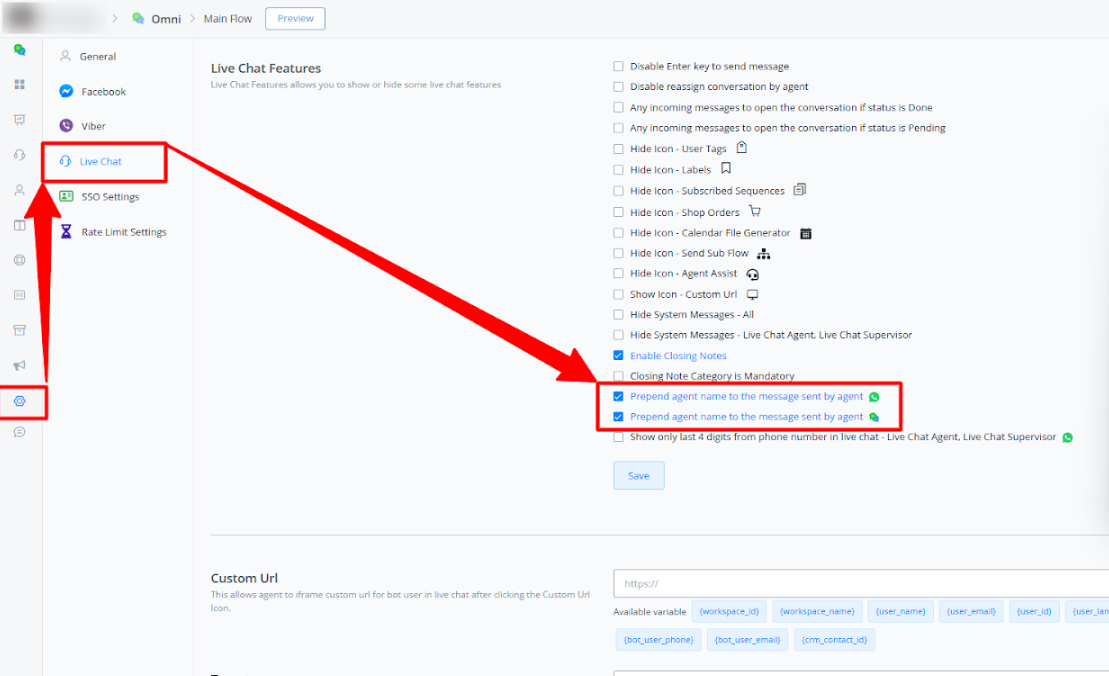
Live Chat Features
Following options can be accessed under these:
| Settings | Explanation |
|---|---|
| Disable Enter Key to send message | By default pressing Enter Key sends a message inside livechat. You can disable this to let Enter key change the cursor to a new line |
| Disable Reassign conversation by agent | Enabling this setting will stop agents from re-assigning a conversation from them to another agent and vice versa |
| Any incoming messages reopen the conversation if status is Done or Pending | Enabling this will allow any reply coming from the user to move into Open status regardless if it’s Pending or Done. |
| Hide Icon - User Tags | Hide User Tags from live chat bot user overlay |
| Hide Icon - Labels | Hide Labels from live chat bot user overlay |
| Hide Icon - Subscribed Sequences | Hide Subscribed Sequences from livechat bot user overlay |
| Hide Icon - Shop Orders | Hide Orders from live chat bot user overlay |
| Hide Icon - Calendar File Generator | Disable generating Calendar file from live chat icon tray |
| Hide Icon - Send Subflow | Disable sending subflows from live chat icon tray |
| Hide Icon - Agent Assist | Disable Agent Assist from live chat icon tray |
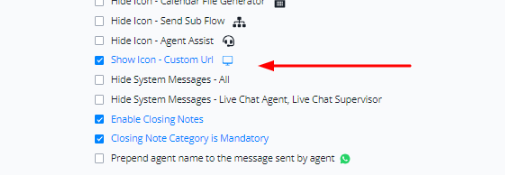
| Show Icon - Custom URL | Enables Custom URL feature on live chat icon tray |
| Hide System Message - All | Hides System Messages from Live Chat for all workspaces members |
| Hide System Message - Live Chat Agent, Live Chat Supervisor | Hide System Messages from agents and supervisors only |
| Enable Closing Notes | Enable closing notes for agents |
| Closing Note Category Is Mandatory | Mandates agents to enter closing note category when moving to Done |
| Prepend Agent Name To The Message Send By Agent (Whatsapp) | On Whatsapp, Name of agent is prepended when a messages sent from agent |
| Show only last 4 digits from phone number in livechat - Livechat agent, Livechat supervisor | Masks the phone number of users with *s with only last 4 digits visible. This filter applies to agents and supervisors only. Main usage is privacy from agents |
Prepend Agent Name for Web Chat and WhatsApp
Overview
The Prepend Agent Name setting in Live Chat allows agents’ names to appear before each message they send when taking over the chat. This helps customers easily identify which agent they are speaking with, creating a more personalized and transparent communication experience.
Purpose
When agents take over a live chat, it can sometimes be unclear to customers which agent is responding. By enabling this setting, the agent’s name will automatically appear at the beginning of each message, helping customers recognize who they are interacting with during the conversation. This feature improves customer trust and enhances clarity.
Steps to Enable “Prepend Agent Name” Setting
- Access Live Chat Settings:
- First you must access the bot that you let enable this feature within Messagingme.app.
- Locate the Live Chat Settings:
- Navigate to Live Chat Settings under the Settings menu.
- Look for the option titled Prepend Agent Name.
- Enable the Setting:
- Toggle the switch to enable the Prepend Agent Name option.
- Once enabled, all messages from agents in a live chat will display the agent’s name at the start of each message.
- Save Changes:
- After enabling, make sure to save the changes for them to take effect in active web chat sessions.
Example
Here’s how the messages will look when the Prepend Agent Name option is enabled:
- Without Agent Name Prepending:
- Message: “Hello, how can I assist you today?”
- With Agent Name Prepending:
- Message: “John Doe: Hello, how can I assist you today?”
In the second example, the agent’s name “John Doe” appears before the message, clearly indicating to the customer who is responding.
Additional Notes
- Availability: This setting is only available for web chat and WhatsApp.
- Use Case: This feature is especially useful in environments where multiple agents may take over a single chat session, ensuring customers can follow who is assisting them.
Custom URL
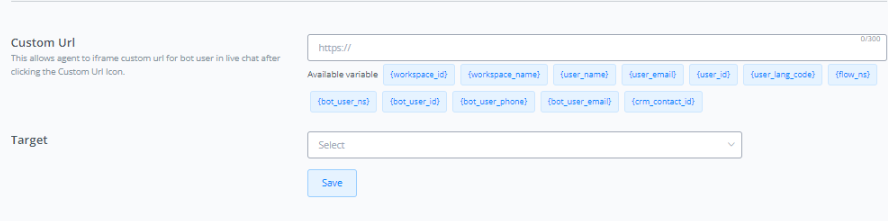
Here you can set a custom url for the bot user, that when clicked will open a certain third-party platform with that bot user’s details.
This feature is heavily used with CRMs, and enables agents to open their CRM from within Messagingme.app in an iframe and edit bot user’s information directly inside their CRM from one screen without having to leave Messagingme.app.
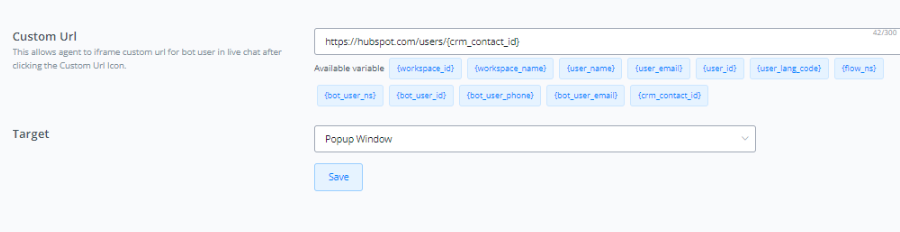
The URL is entered as well and a system variable can be selected from the given options below. You can also choose the desired window size of iframe from the Target Drop down.
Make sure that the Custom URL Icon is enabled in the icon tray.
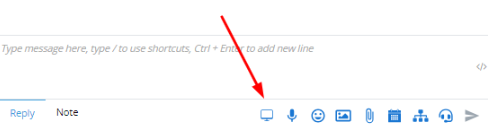
Go to livechat, click on a conversation and you will see the custom URL icon. Clicking on it should open popup.
Note: Make sure your CRM allows iframe or popup modals, otherwise the feature may not work
Live Chat Integration

Here you can select the platform where you want to transfer the livechat once the bot automation is paused. Following platforms are supported

Note: Make sure the platform of your choice is already integrated with Messagingme.app inside the integrations section of the workspace
Live Chat Auto Pause Minutes
This feature allows you to set the minutes for auto pause whenever an agent takes from automation.
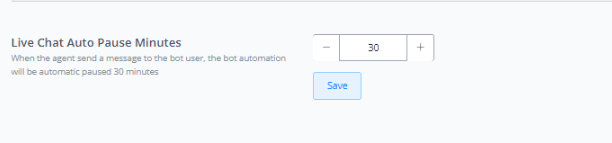
This is the timer that runs during which the bot automation is paused.
Live Chat SMS Sender

This feature allows you to select the phone number from which you want to send SMS to bot users from livechat. The numbers must be connected in your Twillio/Telenyx account inside the integrations section of the workspace.
Live Chat Email Profile

This feature allows you to select the email profile from which you can send emails directly from Livechat. The email must be connected under the SMTP section of integrations of the workspace.
Live Chat Desktop Notifications
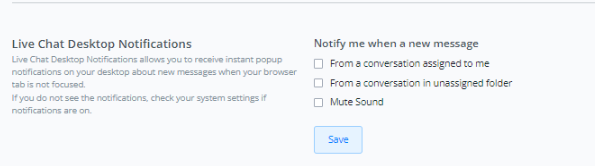
This feature allows you toggle the configuration for notifications. You can choose when to get notified. This is only confined to the Web app desktop notifications when using a browser.
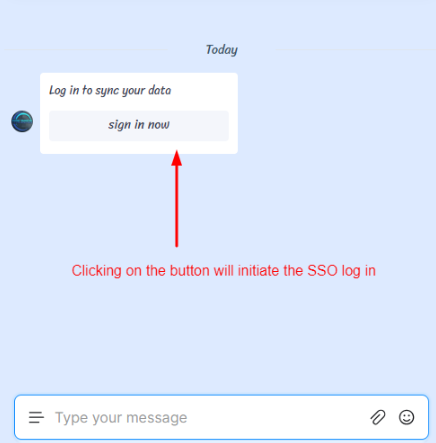
Single Sign-On (SSO)
Single Sign-On (or SSO) provides us the ability to have one master bot user, which syncs the data between all of your bot users in different channels. This helps vastly in syncing data and identifying bot users when multiple channels are involved.
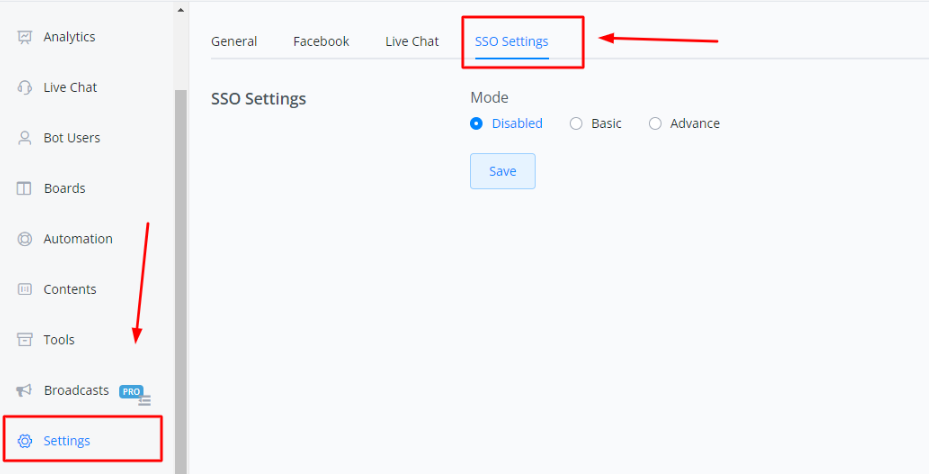
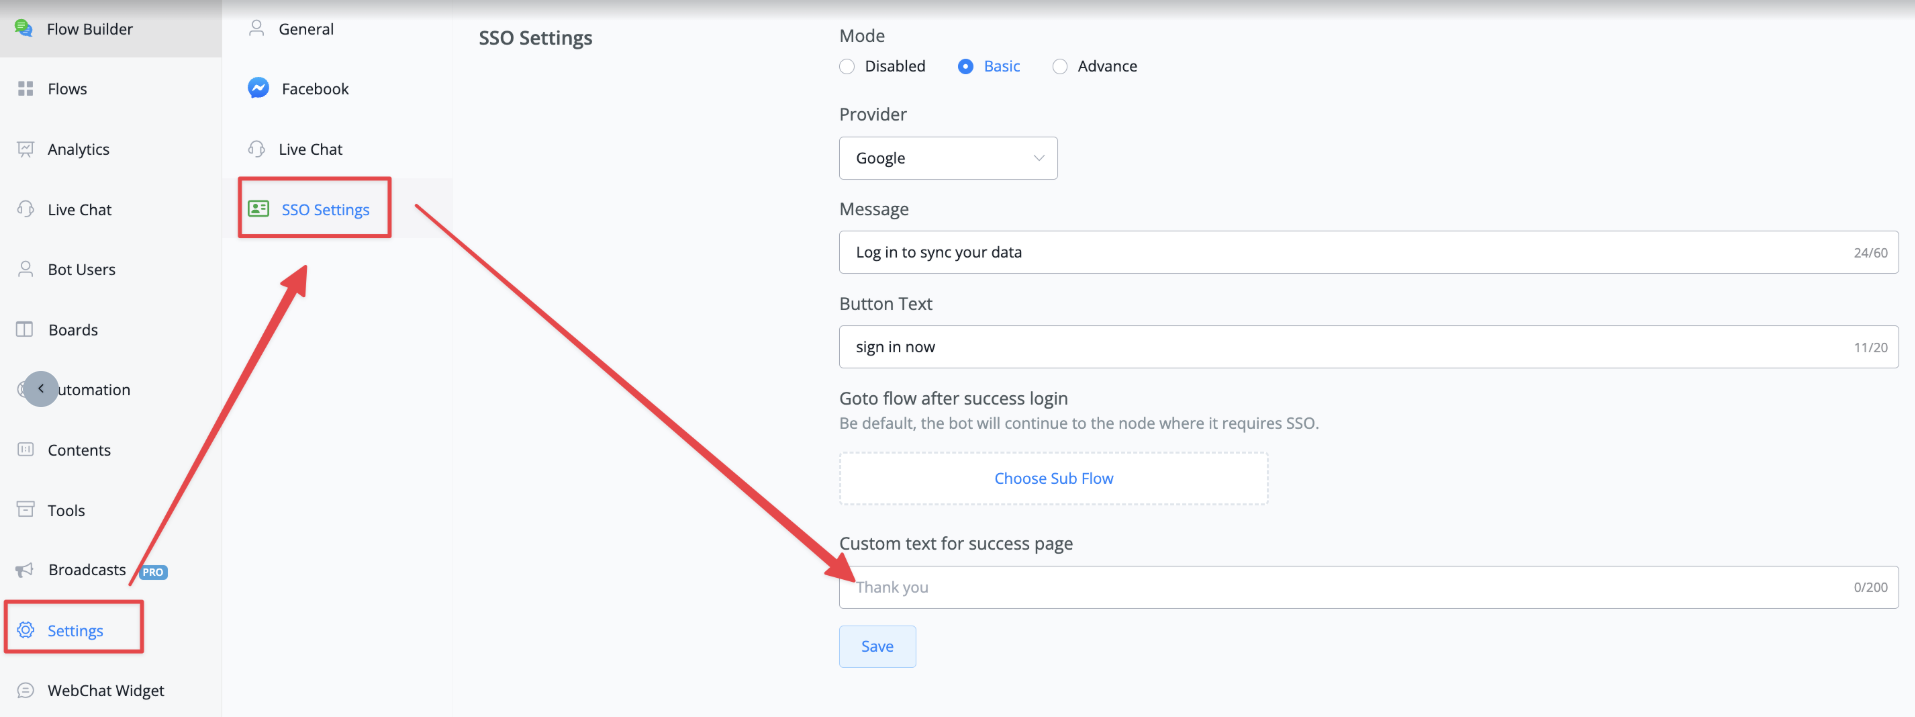
Enable SSO Login Inside Messagingme.app
You can enable SSO by going inside the “Settings” tab on the bottom-left of your Flow builder side menu. Then clicking on the “SSO Settings” option.
Setting Up SSO Login Flow
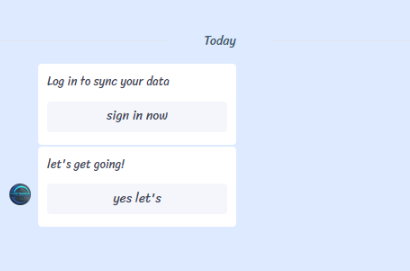
Click on the “Basic” tab and fill in the required details.
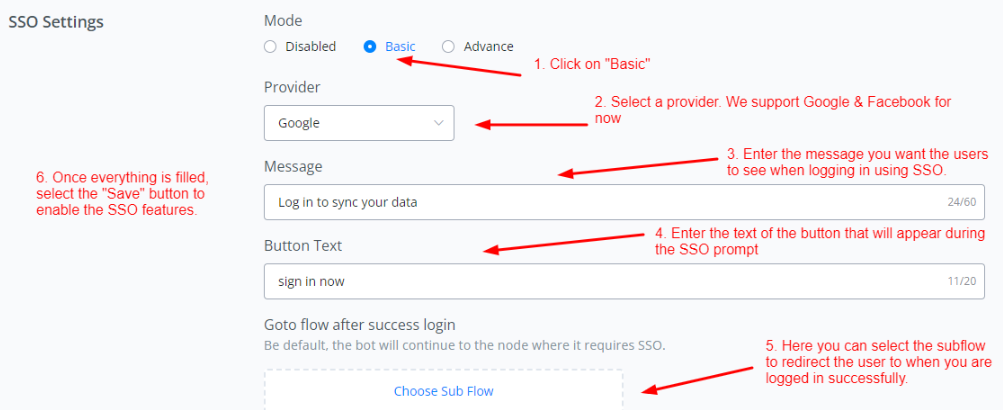
Once done, Create a new sub-flow. Here we will set up the SSO logic.
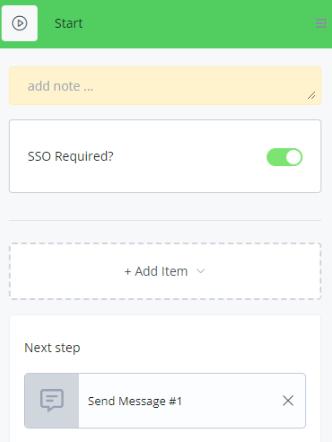
Once SSO is enabled, you will start seeing “SSO Required” in the Start nodes of the sub-flows. Enabling this option will direct the user toward the SSO login and then redirects the user to the sub-flow you selected inside the settings upon successful login.
Once successful, the “Thankyou” screen will persist for 5 seconds and then the user will be redirected to the follow-up subflow, or you can manually exit the page as well.
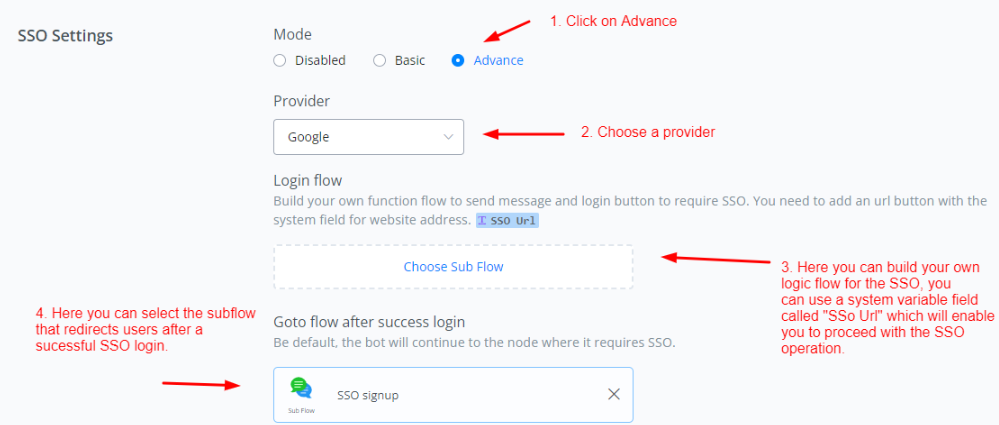
Advanced Settings For SSO
Advanced options enable you to set up your own logic flows for SSO. This enables the user to setup the SSO in channels where buttons with links are not properly populated by using a system variable field called “SSO Url”
Syncing Of Data Between Users
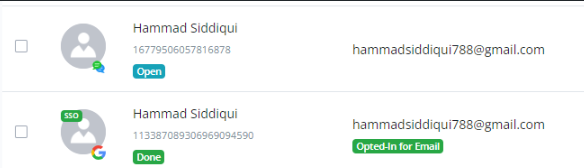
The bot user with the SSO tag is the master user which syncs the data between the same bot user in different channels.
If you add a tag or change the value of a variable for the SSO user, the change is also done for bot users in other channels.
If you add a tag or change the value of a variable for the bot user in other channels, the change is also done for the SSO user.
This allows users to sync data between multiple channels across bot users and gives more flexibility when working over multiple channels.
💡 The bot users are still counted separately. SSO only functions to sync the data between bot users, it does not accumulate the bot users into one bot user.
Customizable Thank You Page
You can now customize the text on the thank you page as per your desire. The default text will be “thank you”. This feature is available in both Basic and Advance SSO modes.
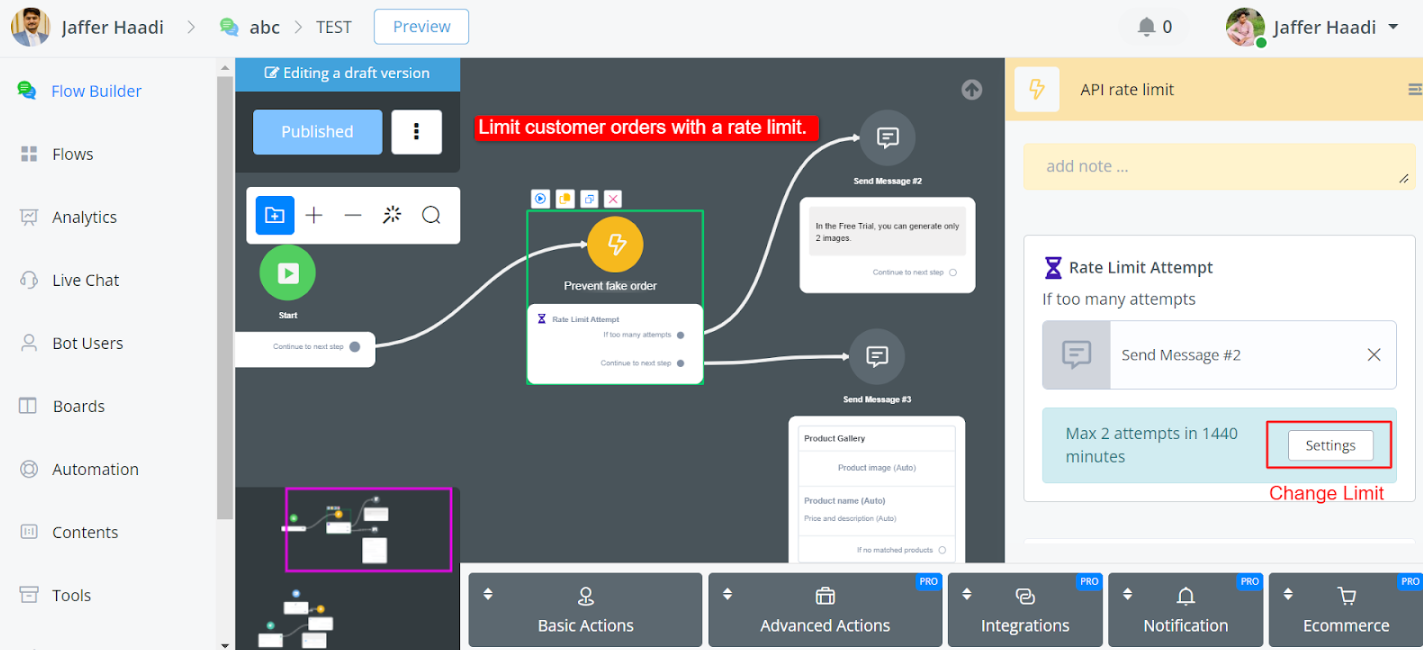
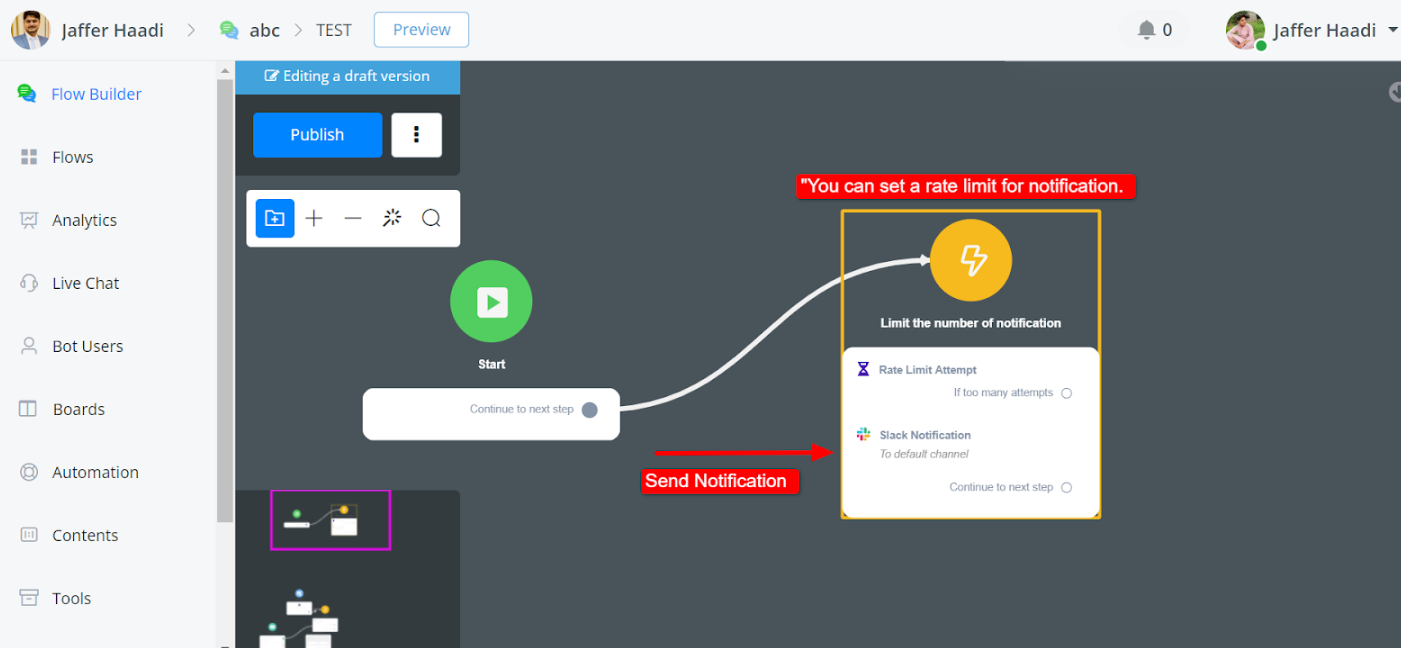
Rate limit Setting
Rate Limit is a valuable addition to the chatbot system, providing administrators with a streamlined approach to managing user interactions.
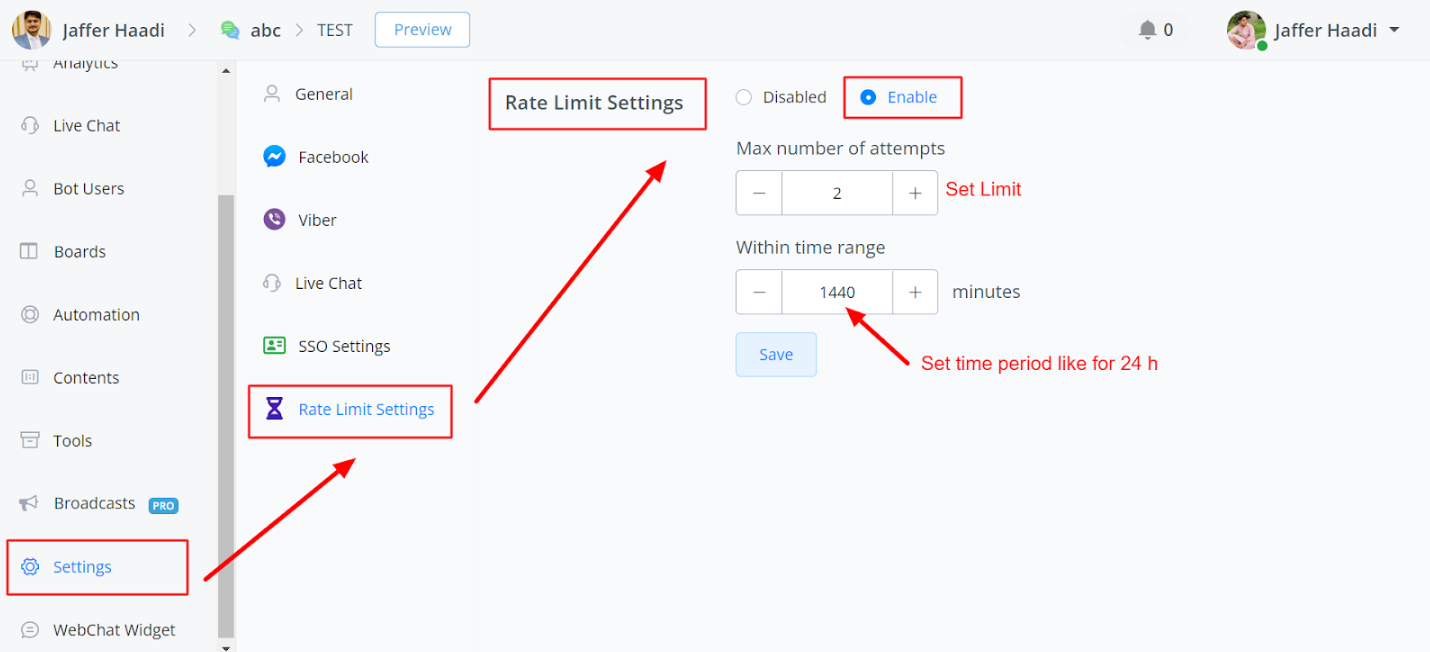
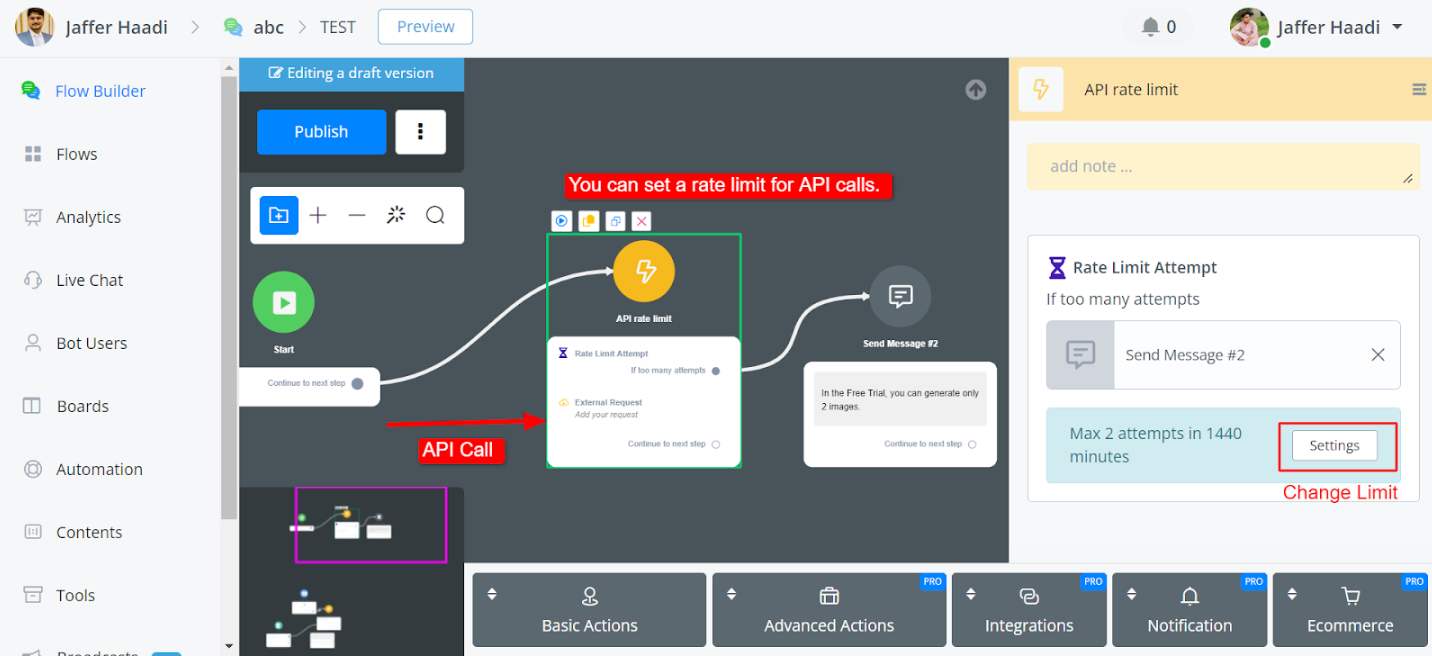
You can find in flow, goto action node -> Advance Actions -> Rate Limit Attempt
Use Cases for Rate Limit
Limiting API Calls:
Ensures compliance with third-party platform restrictions.
Controls the number of API calls per user within a specified time frame.
Preventing Fake Orders
Helps to mitigate fraudulent orders in e-commerce settings.
Restricts the number of orders a user can place within a specific time frame.
Controlling Notifications
Manages the frequency of notifications sent to users.
Ensures users are not overwhelmed with excessive notifications, particularly in e-commerce order updates.
In summary, Rate Limit is a valuable addition to the chatbot system, providing administrators with a streamlined approach to managing user interactions while ensuring compliance with external platform restrictions and preventing abuse of system resources.