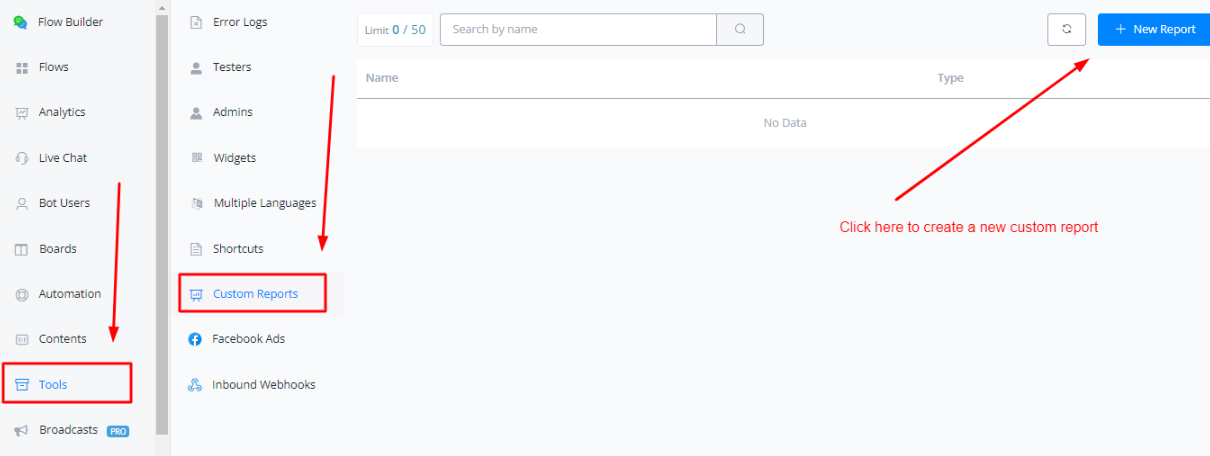
Tools
Error Logs
Error logs can help you troubleshoot bugs that can happen inside your chatbot. It can save you a lot of time trying to figure this out yourself otherwise.
To access the error log you can go to Tools from the left-hand menu, then select the first tab called Error logs.
From here you will have a complete overview of all errors that have happened in the chatbot.
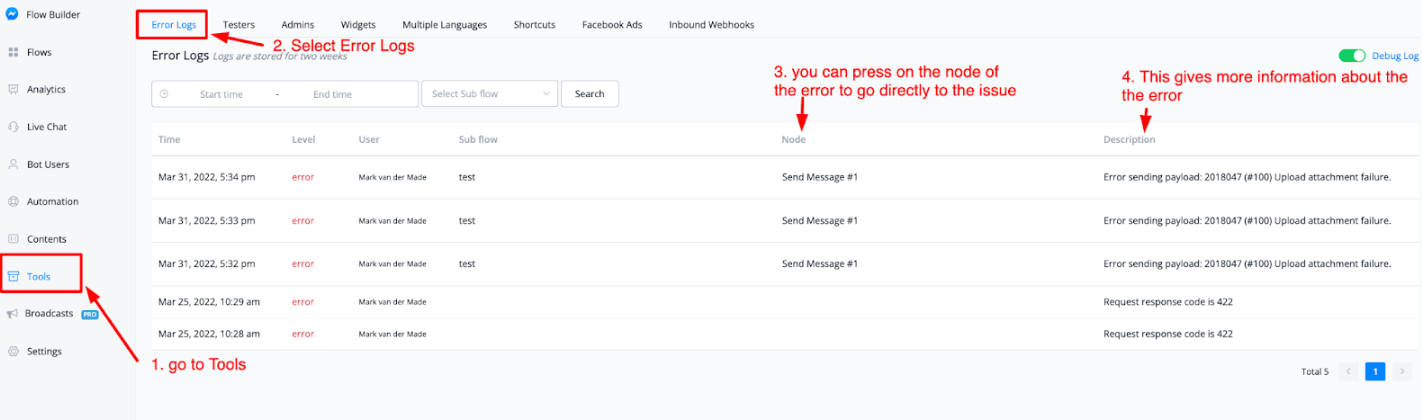
From here you can see the date of the error, the kind of error, which user it affected, which sub flow it happened in along with the node that has the error, and more information.
If you press on the node of the error message it will take you directly to the point where the issue was registered at.
This will speed up troubleshooting immensely and save you hours you otherwise would waste in trying to find the bug.
Error log trigger
You can find the “Error log trigger” under Automation → Triggers.
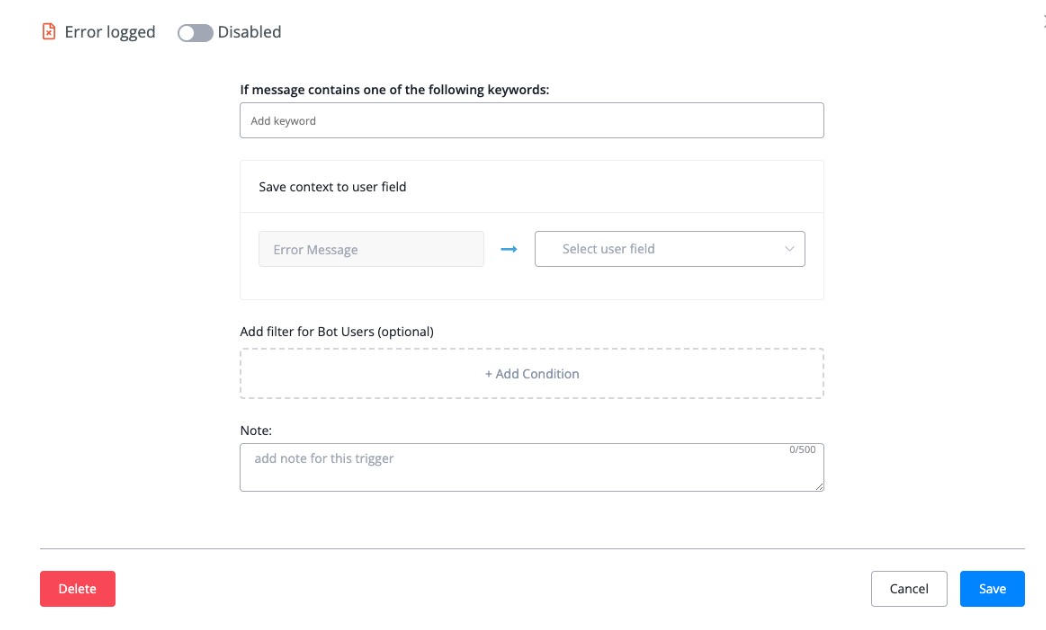
You can also narrow down the message content in the errors.
💡 Error log only trigger once in 24 hours for each user.
Testers
To help you with testing your flows before they go live you can invite testers inside your chatbot. This will help you troubleshoot any potential problems that are happening in your flows.
So to clarify a tester can view a flow that is not yet published.
Assume you have a published onboarding flow that is accessible to the public, but you made changes in the backend which are not yet published. You will be able to let testers preview those flows.
To invite a tester they will need to be a subscriber to your chatbot.
Invite and manage testers
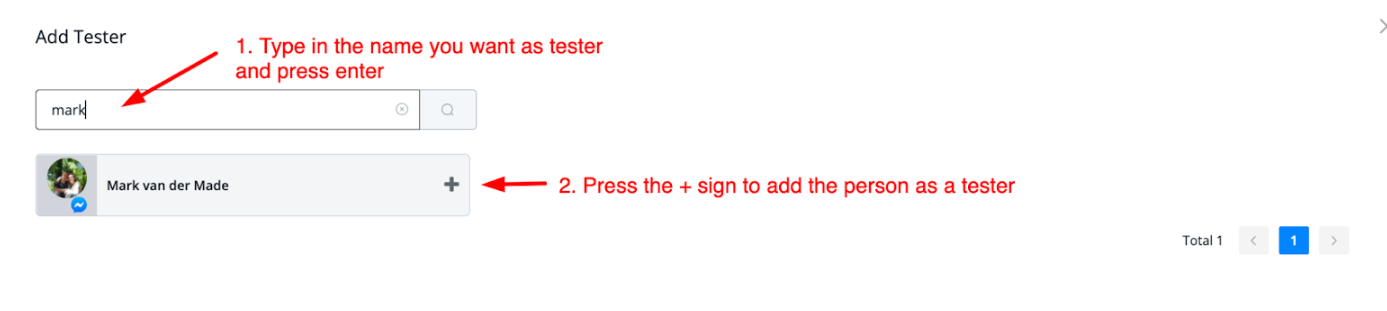
To invite a tester to your chatbot just go to Tools from your left-hand menu, then select the Testers tab.

To create a new tester just press the button in the top right corner named + New Tester. From here you will be able to type in the name of the person you would like to be a tester inside your chatbot.
Again do note that this person you want to appoint as a tester needs to be an active subscriber of that chatbot.
Once done you will return to the main overview for the testers where you can also manage them from.
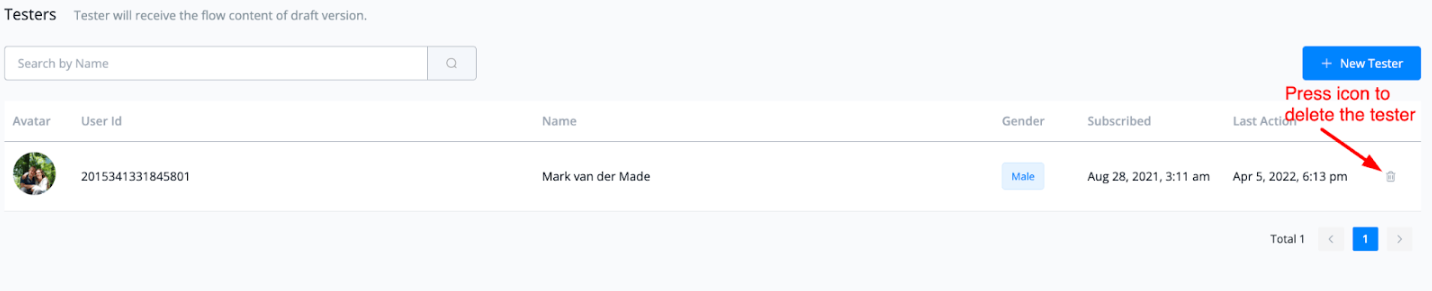
You will see the users who are invited by you as a tester and if you want to delete them you can press the trashbin icon to the right of each user to do so.
How to send testers flows
To send testers the flows in the draft version you can do so in a few ways.
You can share a link to the particular flow, or let them type a keyword that will trigger the flow.
Another way to let testers view content regular users cannot is by using the condition inside the flow builder for it.
Just go to any flow and insert a condition block. From here search for the condition named is tester.
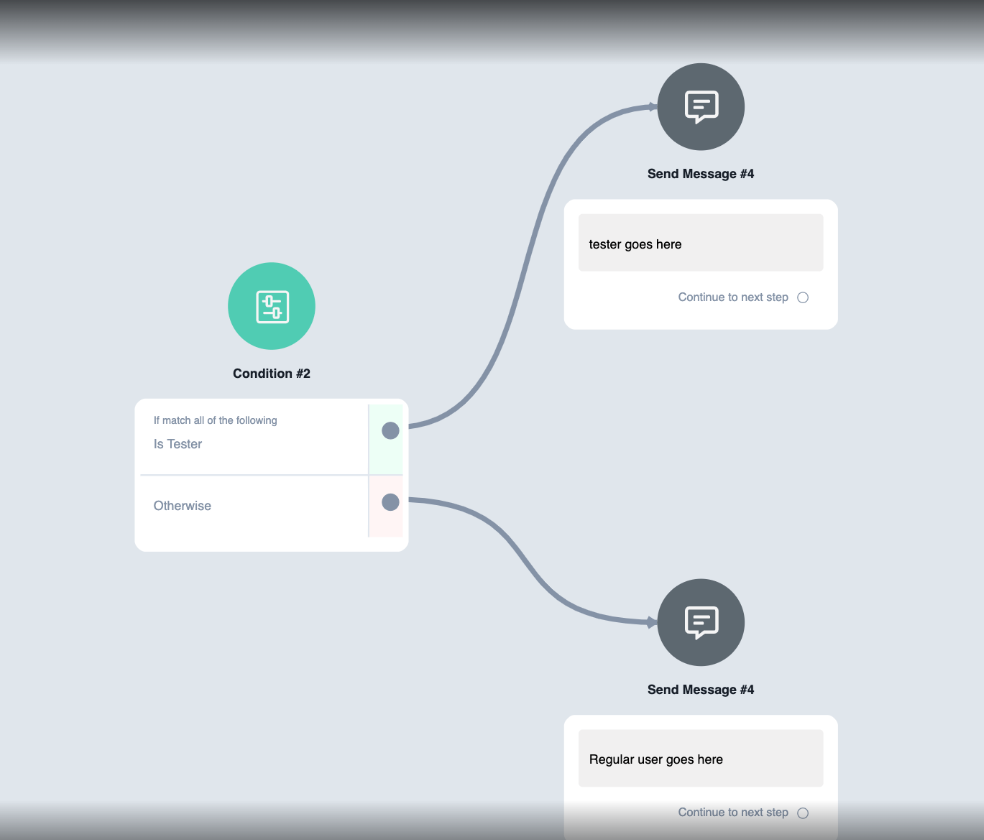
This way you will be able to send a tester to one part of the flow you want to be tested and a regular user can just follow the flow already fully published.
Debug with test users
If the user is a test users, and then every flow the user go through will show up in the tools → error logs. This is the full debug mode.
It is really helpful if you want to figure out the exact flow the user have taken, and help to debug the potential issues.
Don’t forget to remove the test users once the debug is done.
Admins
Besides the regular members, you can invite to your workspace you can also invite admins to your chatbot only.
With a condition you can set up admin menus for them they can access like getting a report or wanting to get some insights into the chatbot.
Invite and manage admins
To invite an admin go to Tools from the left-hand menu and select the Admins tab on top.
From here you will get to the main overview.
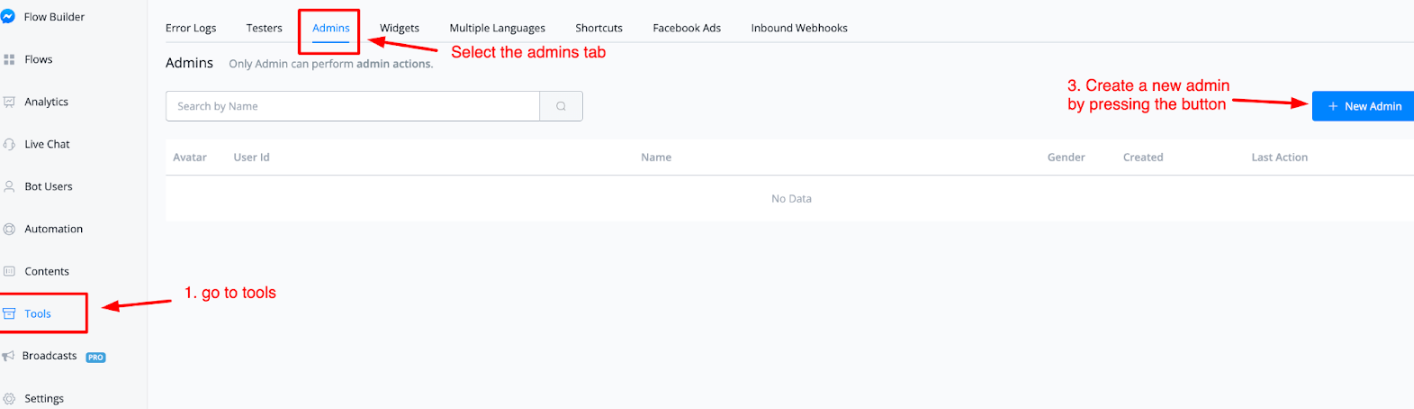
To add a new admin the user you want to invite needs to be a subscriber to your chatbot. If they are then press the button on the top-right corner named + New Admin.
From here a pop-up window will appear where you can search for and add a new admin.
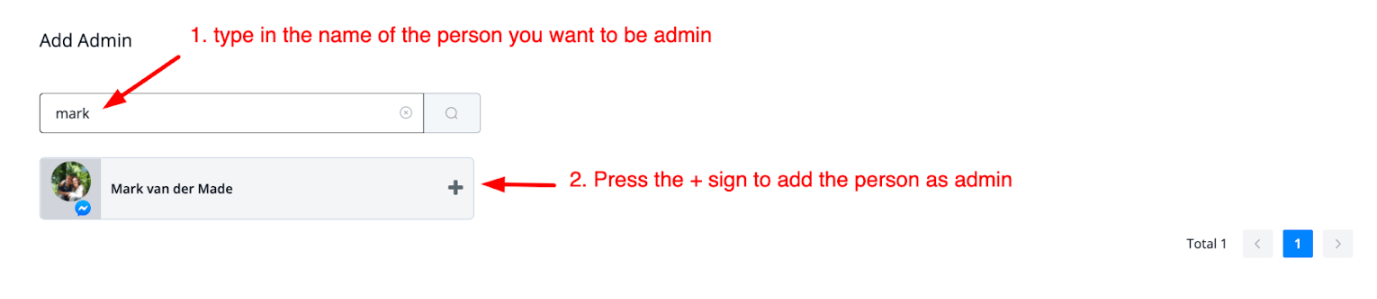
Just type in the name of the person you want to have as an admin and press the plus sign to have them added as an admin. Once you press the plus sign you will return to the main menu where you can manage all admins.
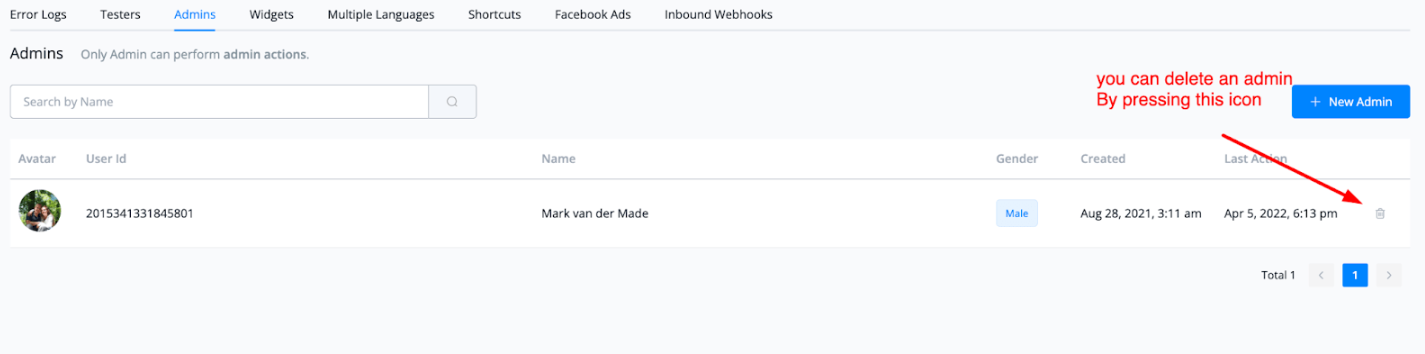
At the right of each admin, you have the option to delete them if you like.
How to set up an admin flow
Now that you have appointed an admin you can set up admin specific flows for them. This is ideal if you want to give a business owner some insights as to what is going on inside the chatbot but don’t want to give access to the backend of that chatbot.
Just go to any flow you like and insert a condition block. From here search for the condition Is Admin.
If the condition is set to yes you can send the admin to the admin mode where you can set up access to whatever you like.
An example could be;
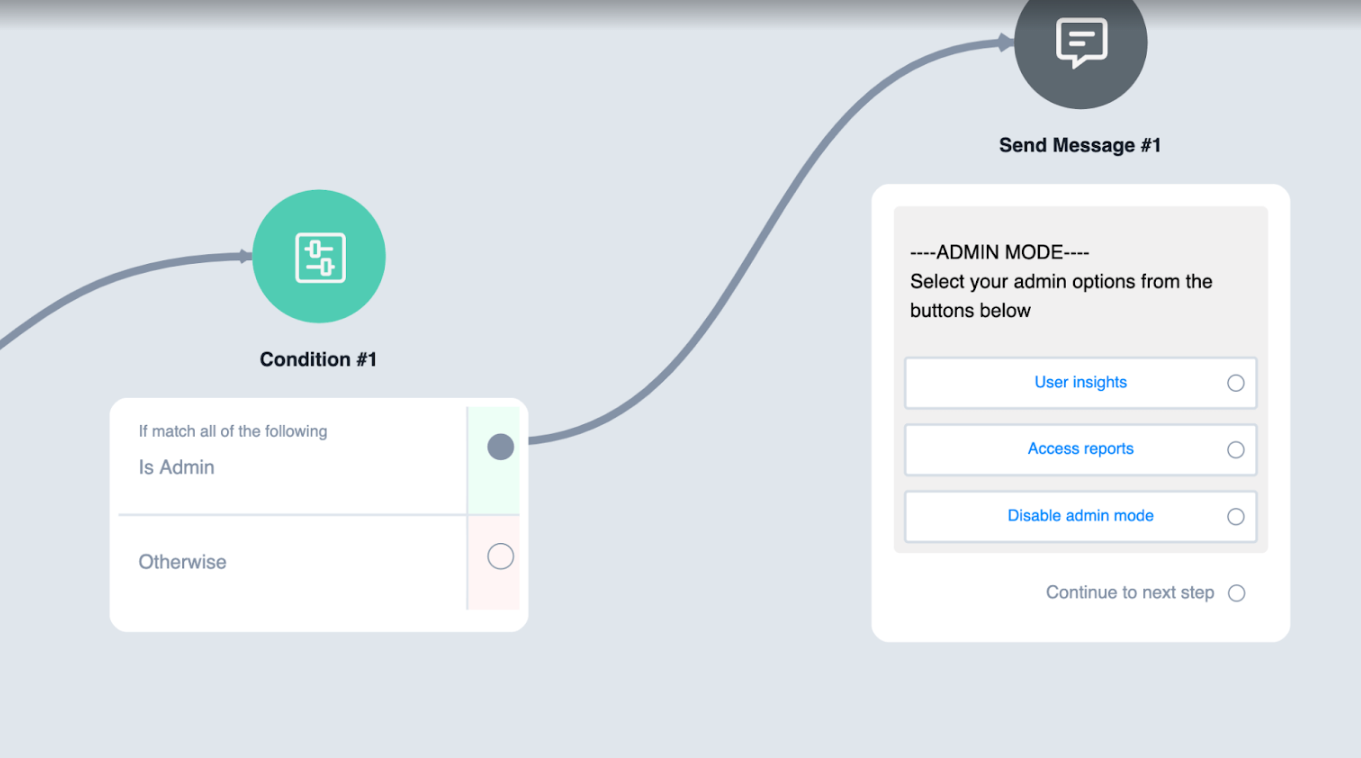
It is a great way for business owners to get access to certain features on the front end while not having to worry about them having access in the backend.
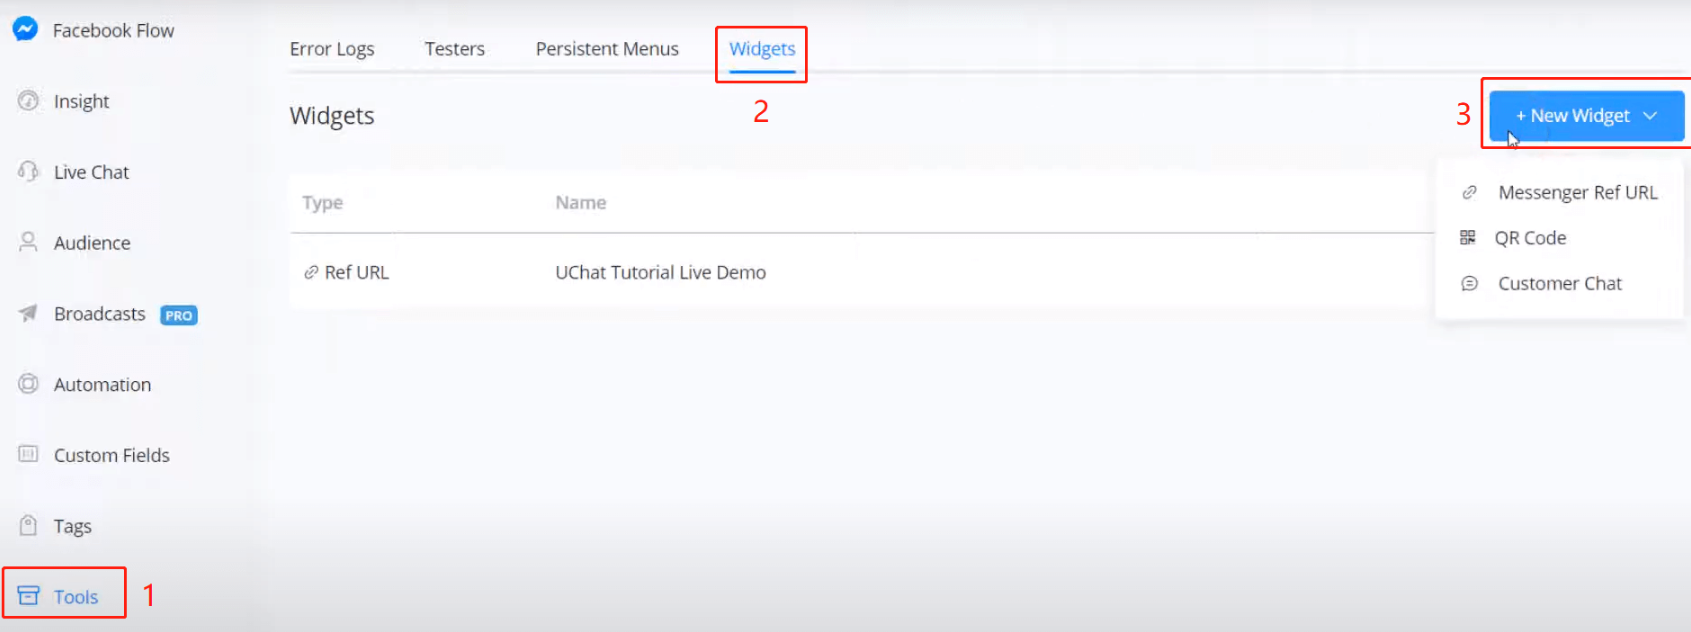
Widgets
For Facebook bots, you can set some widgets to quickly start talking to the bot. To setup:
- go “Tools” from the left sidebar
- click “Widgets”
- ”+ New Widget”
Messenger Ref URL Widget
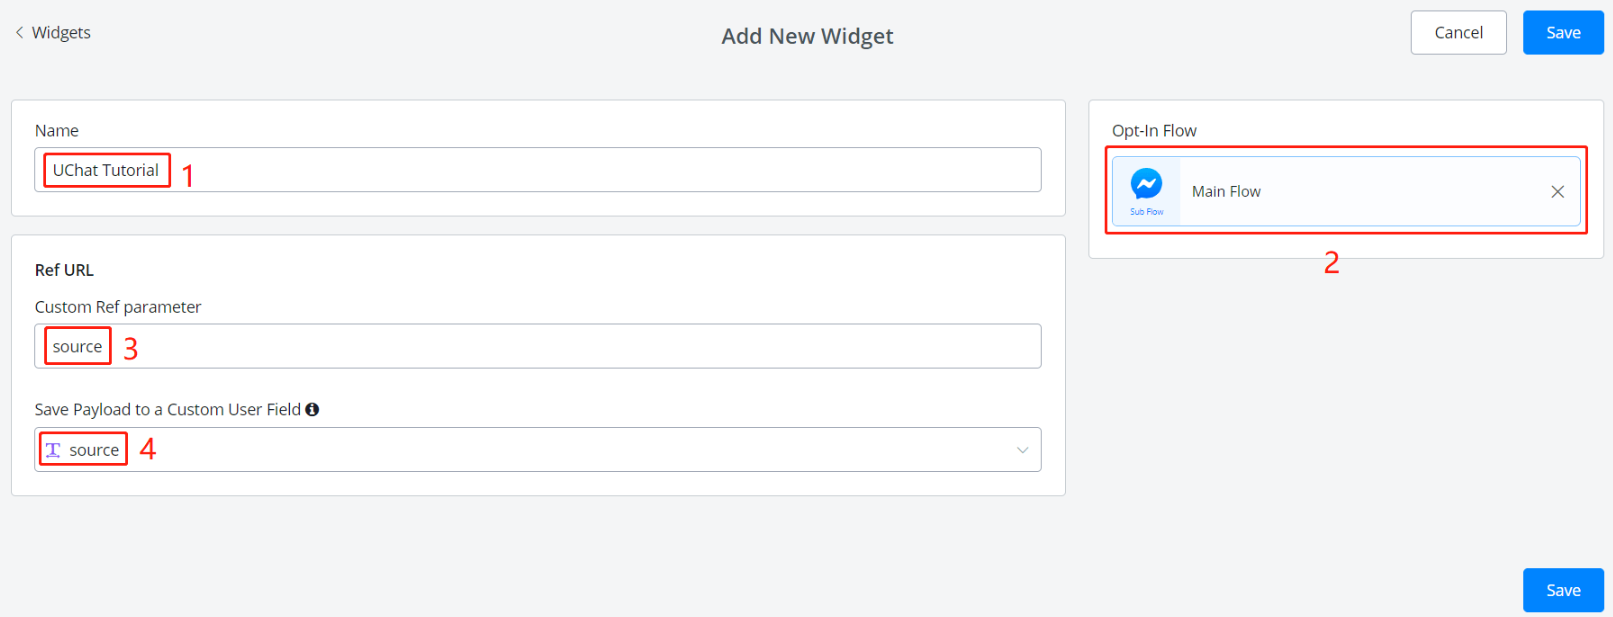
- put a widget name
- choose a sub flow the link goes to
(leave 3 and 4 blank if no reference is needed)
- put a parameter name
- assign a custom user field
What does the Ref parameter do?
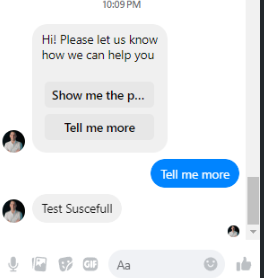
For instance, you make a messenger ref URL to your main flow, so that by visiting this URL, your users can start talking to your bot.
However, you would like to gather more information from the link, like where did your users get the link? In this case, you can put “source” in area 3 and a variable to store the source at area 4 in the above picture.
Later, add a source name in your link according to where do you put it. This is how you get extra information from the link.
After filling in all the information, click “Save” and click the pencil to edit this widget, you will see a unique URL generated for this widget:
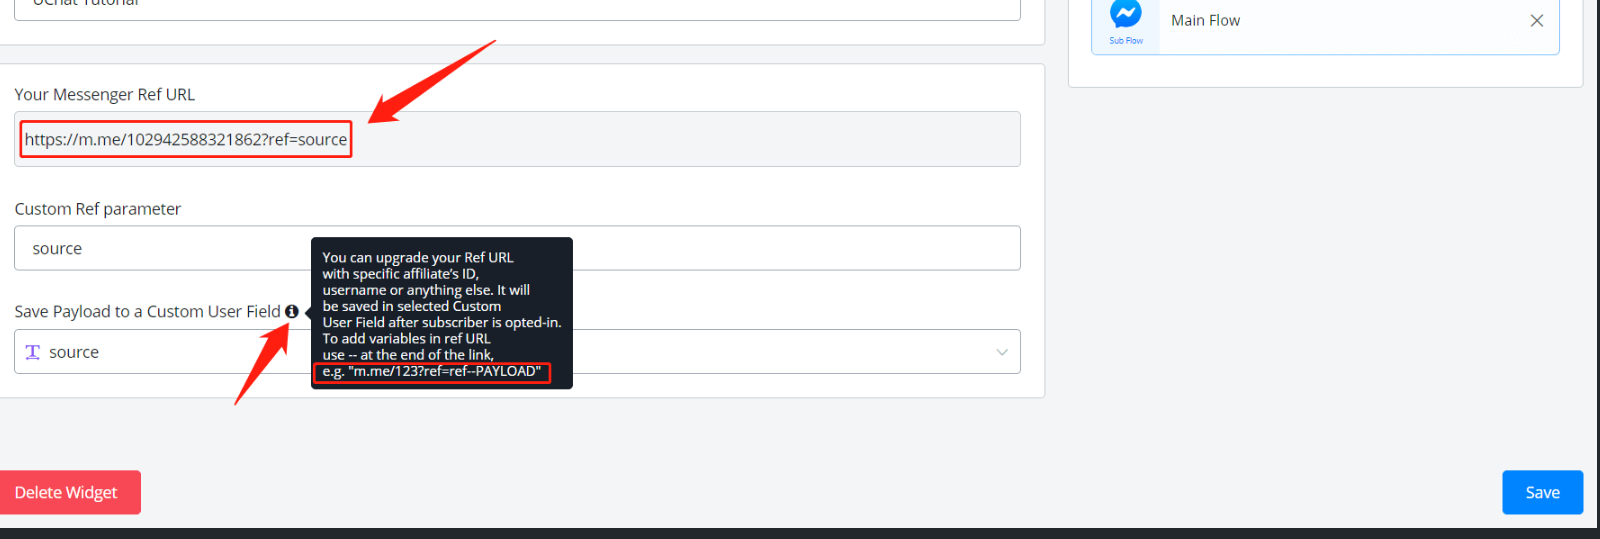
So here, by visiting any of the following links, your users can start talking to your bot:
| example link | value in variable “source” |
|---|---|
| https://m.me/102942588321862?ref=source | |
| https://m.me/102942588321862?ref=source—advertisement | advertisement |
| https://m.me/102942588321862?ref=source—shared_by_users | shared_by_users |
| https://m.me/102942588321862?ref=source—promoted_by_sales | promoted_by_sales |
Yes, you might notice that by adding “—xxx” after the link, the value “xxx” will be transferred to the bot.
QR Code Widget
URL links are convenient to click via electronic way while QR codes are more suitable for on-site use. By scanning a QR code, your users can start talking to your bot.
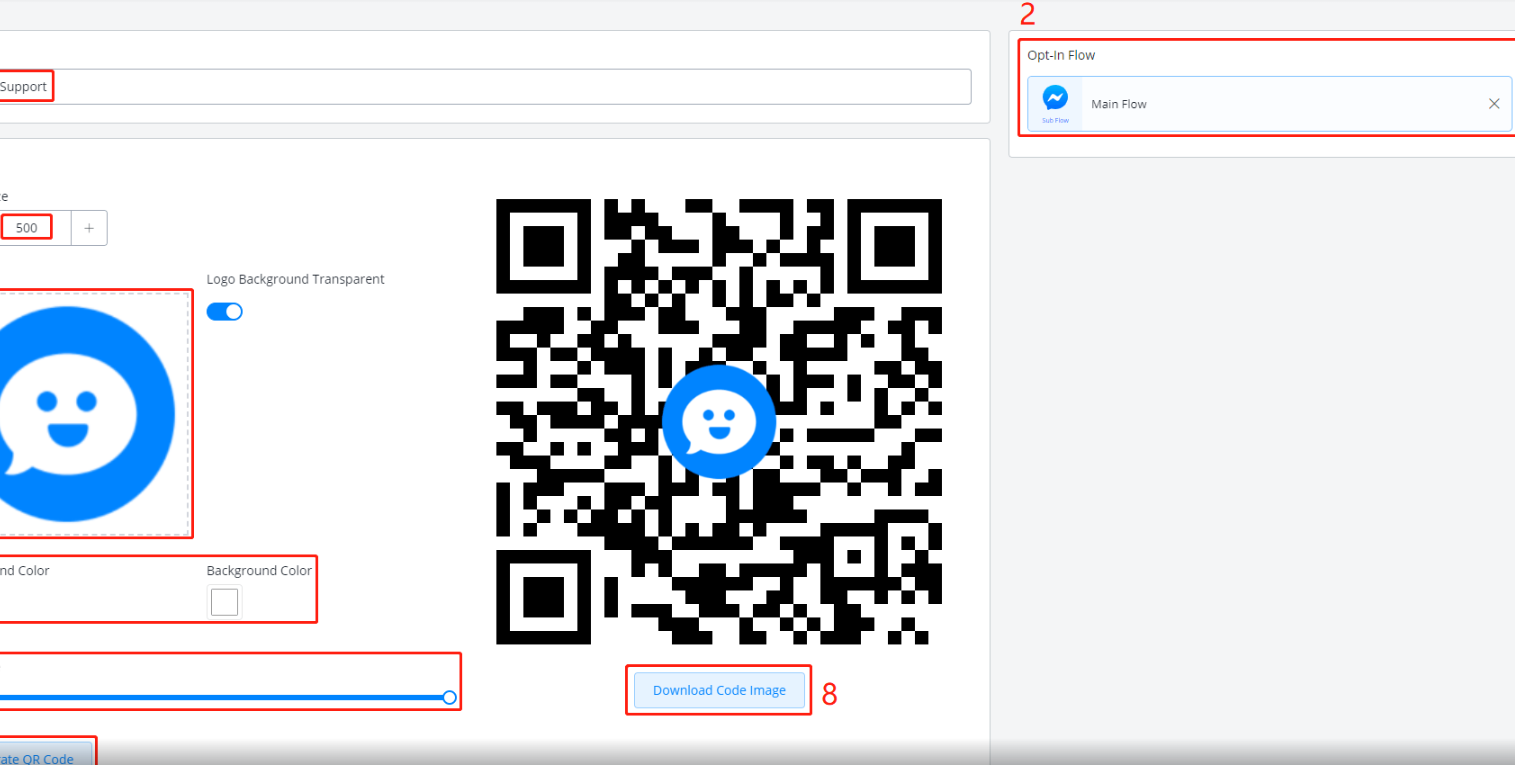
To setup:
- give a widget name
- select a sub flow
- upload your logo image
- adjust image size if needed
- adjust color if needed
- adjust dot scale if needed
- click “Generate” to get an image on the right. Repeat step 4, 5 and 6 to get a final image
- download your QR code, print it and put it in your store, restaurant, office, etc
Customer Chat Widget
To setup:
- give a widget name
- select a sub flow
- adjust theme color if needed
- adjust greeting message which will be shown above the “Continue as xx” button (see in the previous picture).
- select a display type
- adjust the delay if the second or the third display type is selected
Click “Save” after finishing all the settings, again, click the pencil to edit this widget and you will see this button:
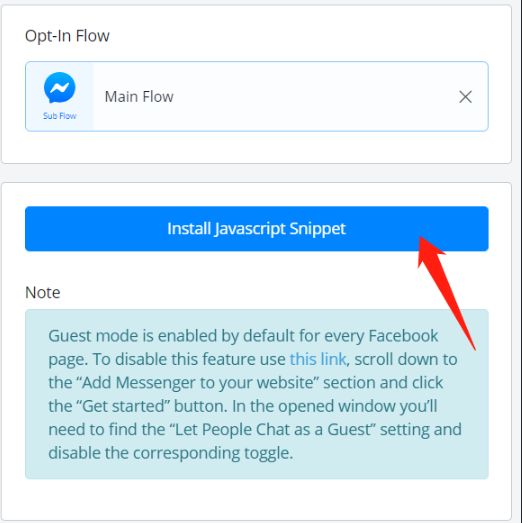
Click it.
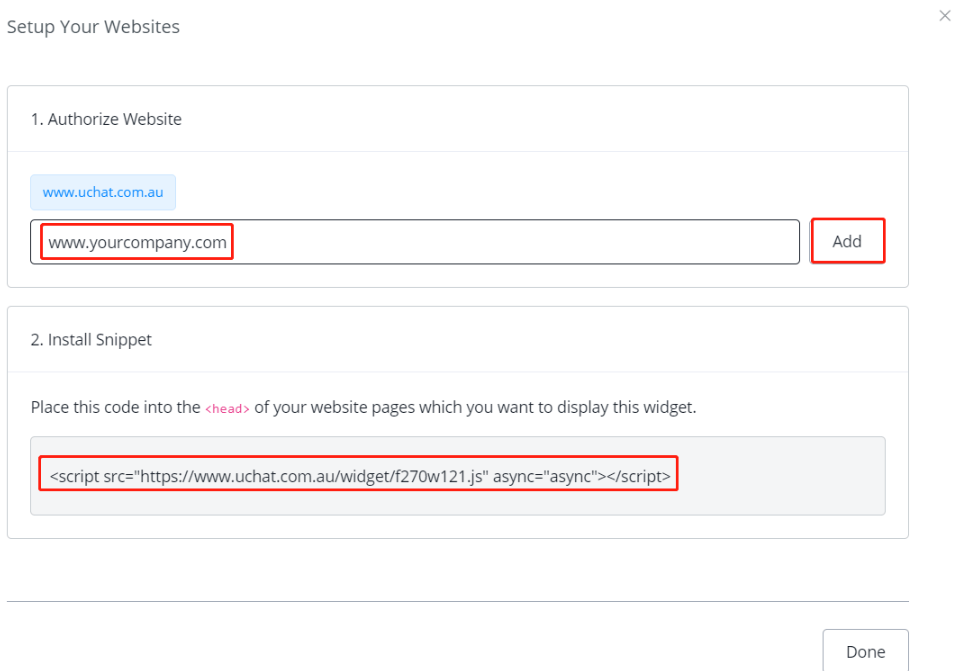
Add the websites that you want to put this bot at. Then install the snippet by copying and pasting the code.
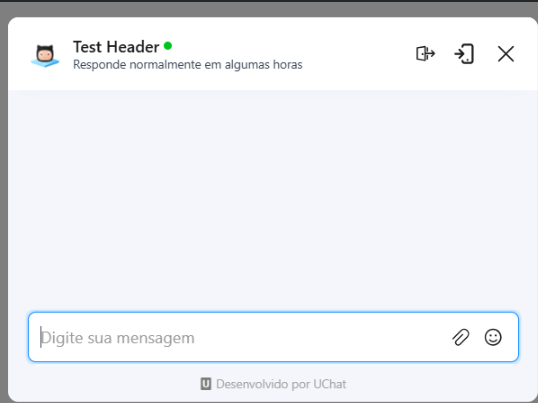
Perfect! 😎 You got a bot on your website now.
Chat Buttons
Configuring the “Powered By” Feature on Messgaingme.app Chat Button Widget
Here are the steps to add a custom “Powered By” text and URL link to your chat widget on Messgaingme.app . This feature allows you to include a custom signature or link in the footer of the chat widget.
Please note: This feature only applies to the Button Widget and does not work with the WebChat Widget.
Key Differences:
- Button Widget: Redirects users to a specific channel of communication when clicked. The “Powered By” text in the Button Widget can be customized starting from the Business Plan. For example:

• WebChat Widget: Functions as a complete chat channel where users can interact directly without redirection. Customization of the “Powered By” text in the WebChat Widget is only available for Partner Plan clients. For example:
Step-by-Step Guide
- Access the Widgets Menu
- In the Messagingme.app dashboard, go to the left sidebar and select Widgets.
- Create a New Widget
- Click on + New Widget in the top right corner.
- Choose the Chat button option from the dropdown menu.
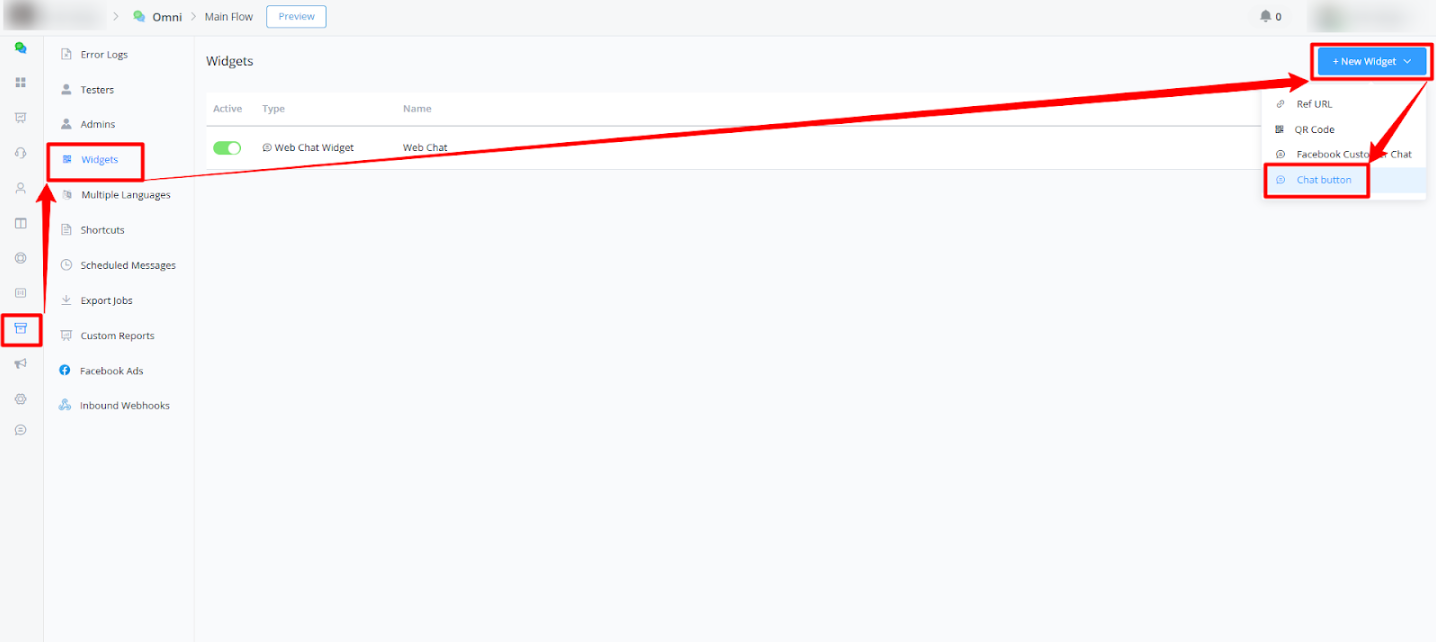
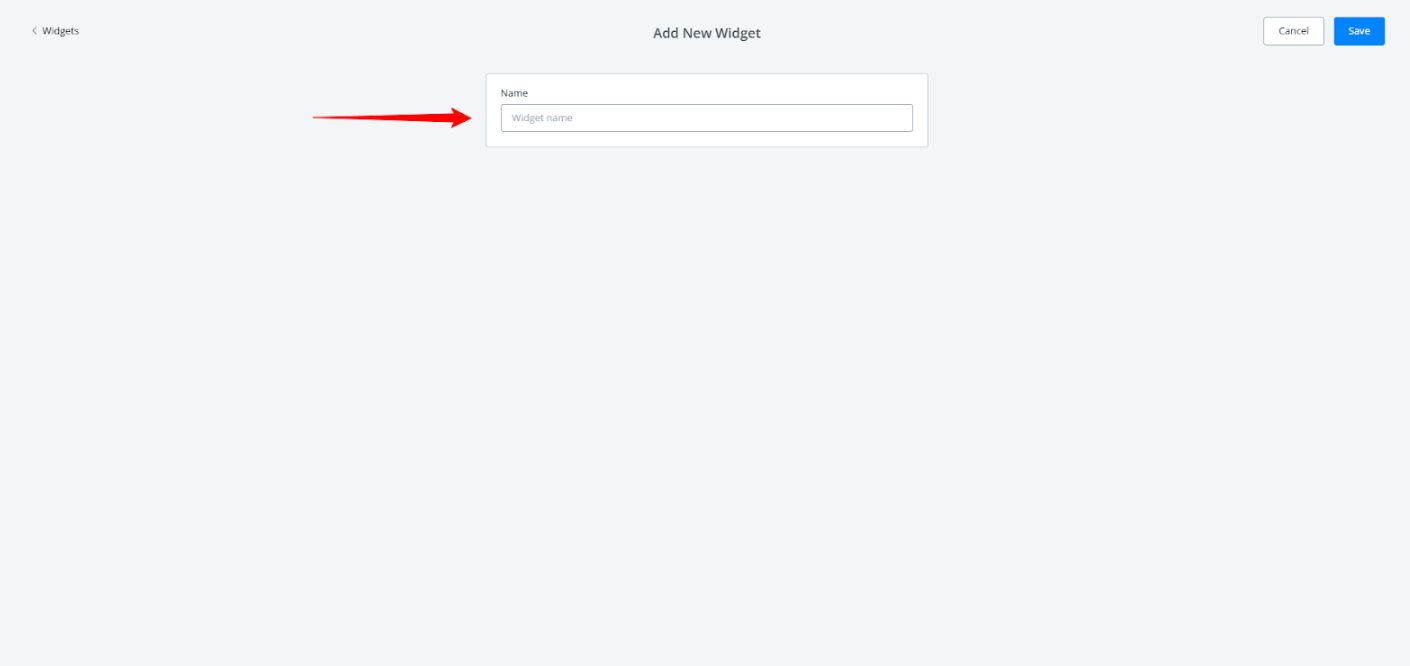
- Name the Widget
- In the Add New Widget screen, enter a name for your widget in the Name field, then click Save.
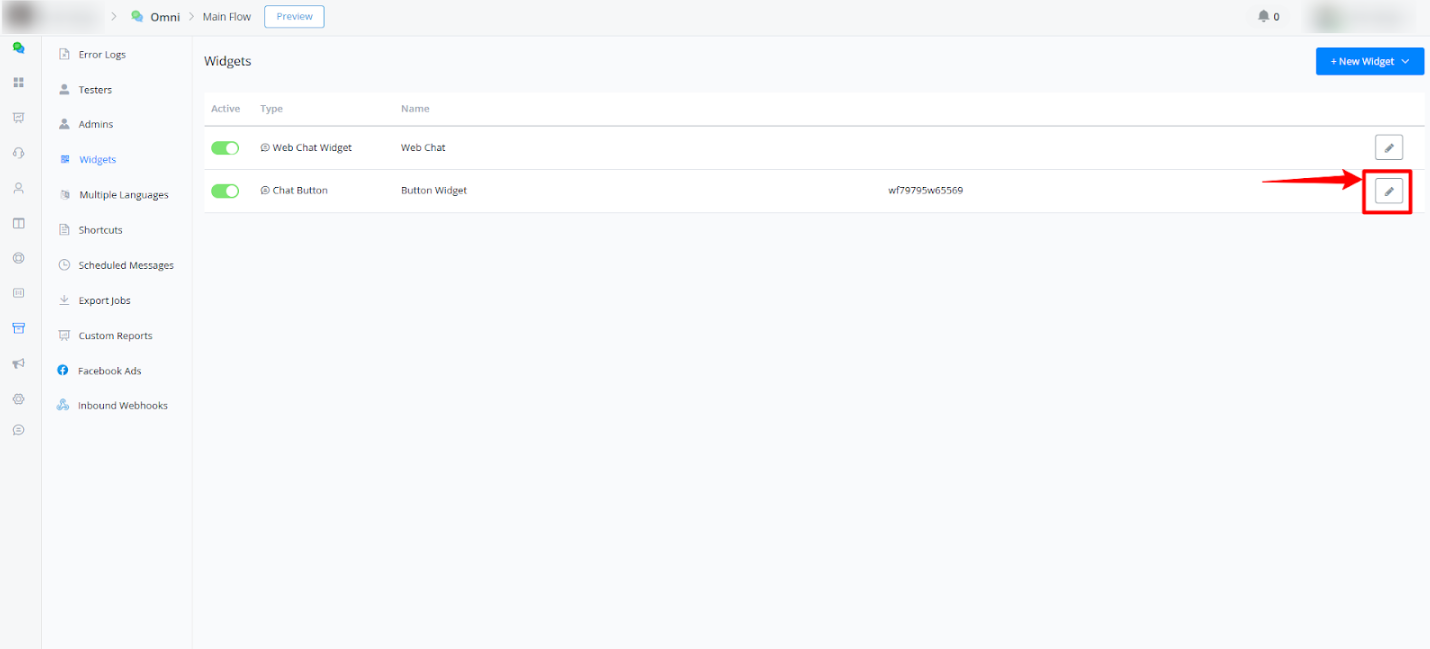
- Edit the Widget
- After creating the widget, locate it in the widget list and click on the Edit icon (pencil icon) next to the widget you want to configure.
- Set Up “Powered By”
- In the widget settings editor, you will see customization options.
- Find the fields labeled Powered By and Powered By URL:
- Powered By: Enter the text you want to display as “Powered By.” This text will appear at the bottom of the chat widget.
- Powered By URL: Enter the link to which the user will be directed when they click on the “Powered By” text. This link can lead to your website, a contact page, or any URL of your choice.
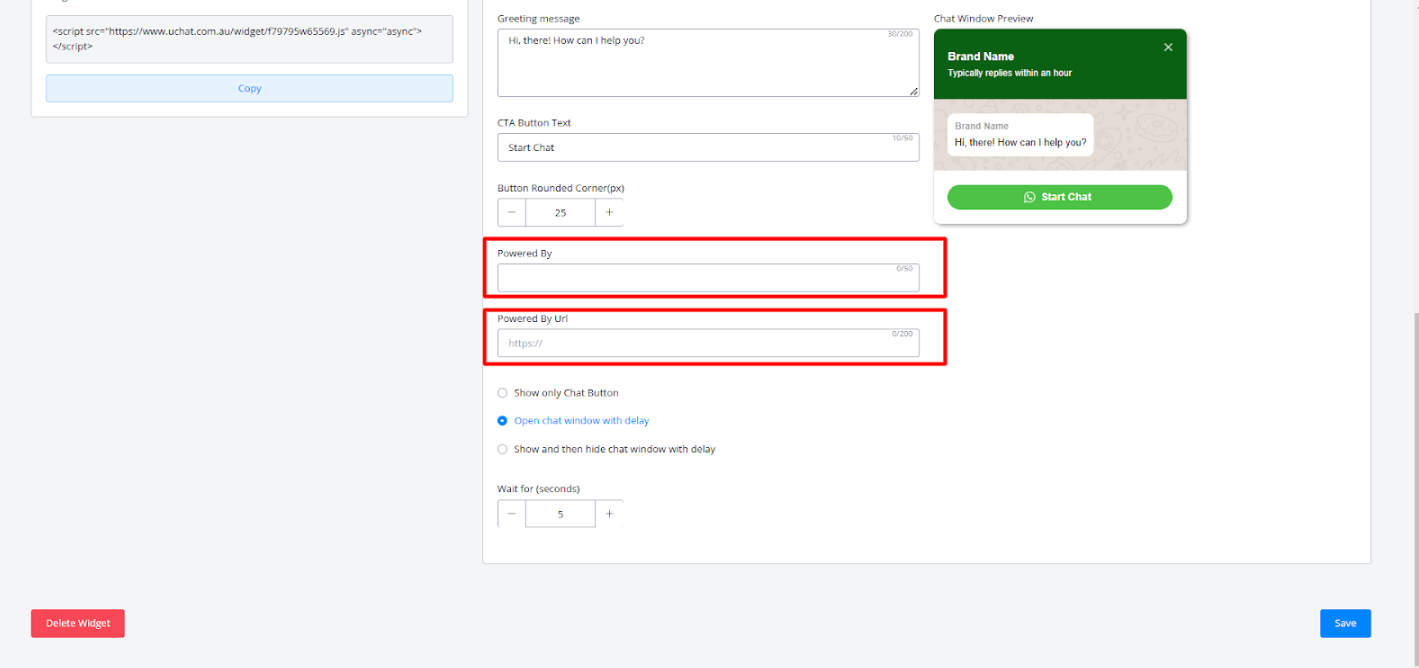
- Save Settings
- After configuring the “Powered By” text and URL, click Save to apply the changes to the chat widget.
These steps will set up the “Powered By” text with a link in your widget, providing a personalized experience for users interacting with the chat on your site.
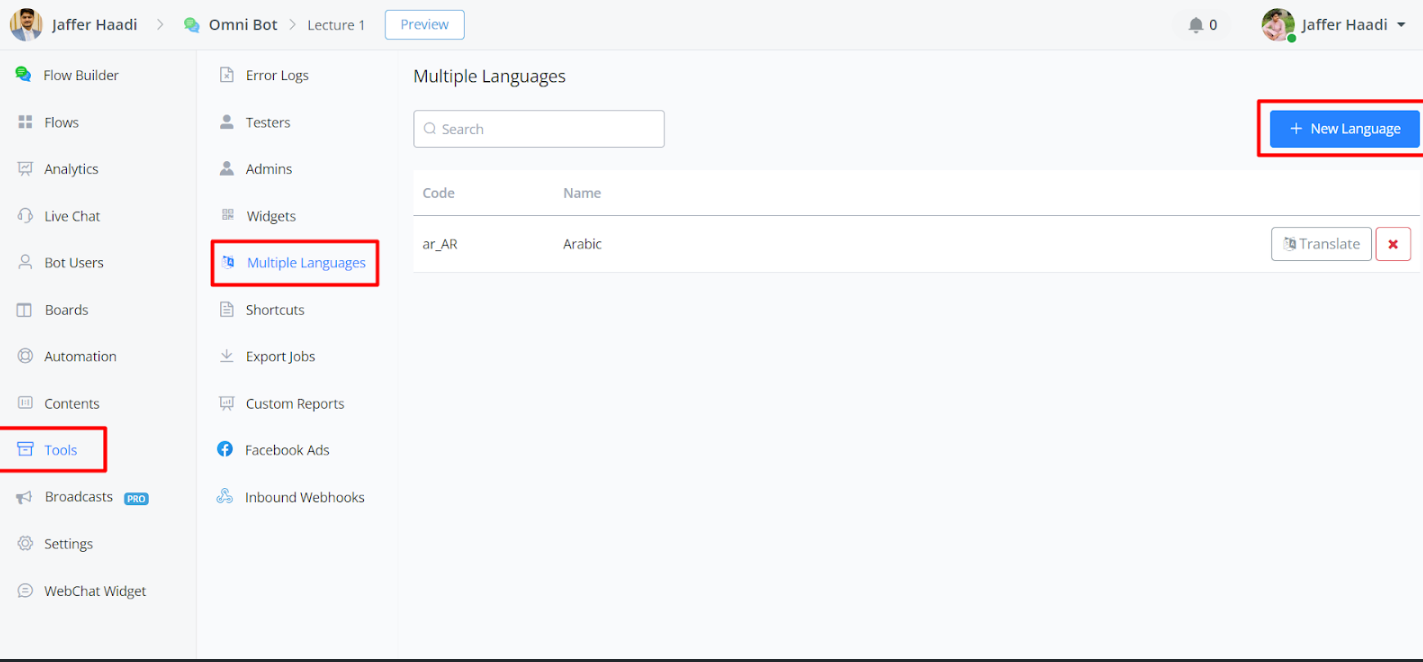
Multiple Languages
With Messagingme.app you have the ability to provide a multiple language chatbot experience. It is very easy to set up as well.
How to Select the Language
- Navigate to the Multi-Language Settings
- Go to Tools in the left-hand menu.
- Select Multiple Languages from the dropdown.
- Click on New Language.
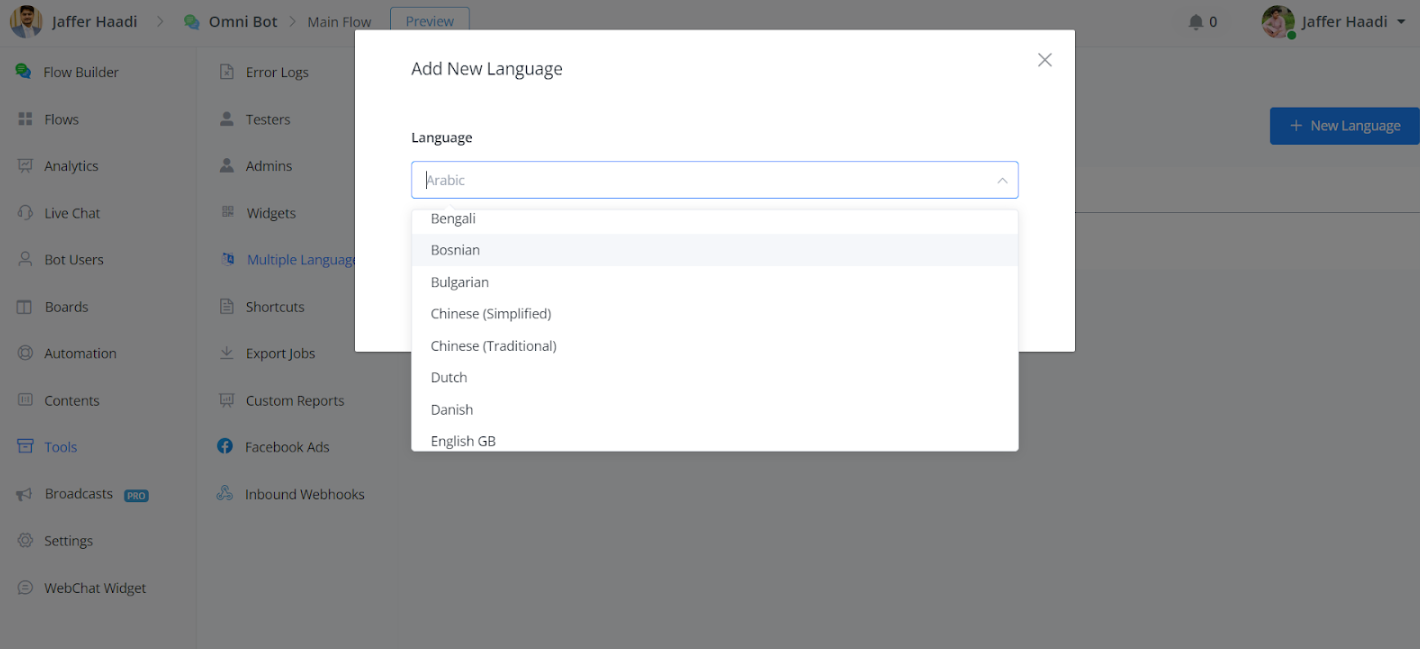
- Choose Your Preferred Language
- You will see a list of available languages.
- Select your preferred language from the list.
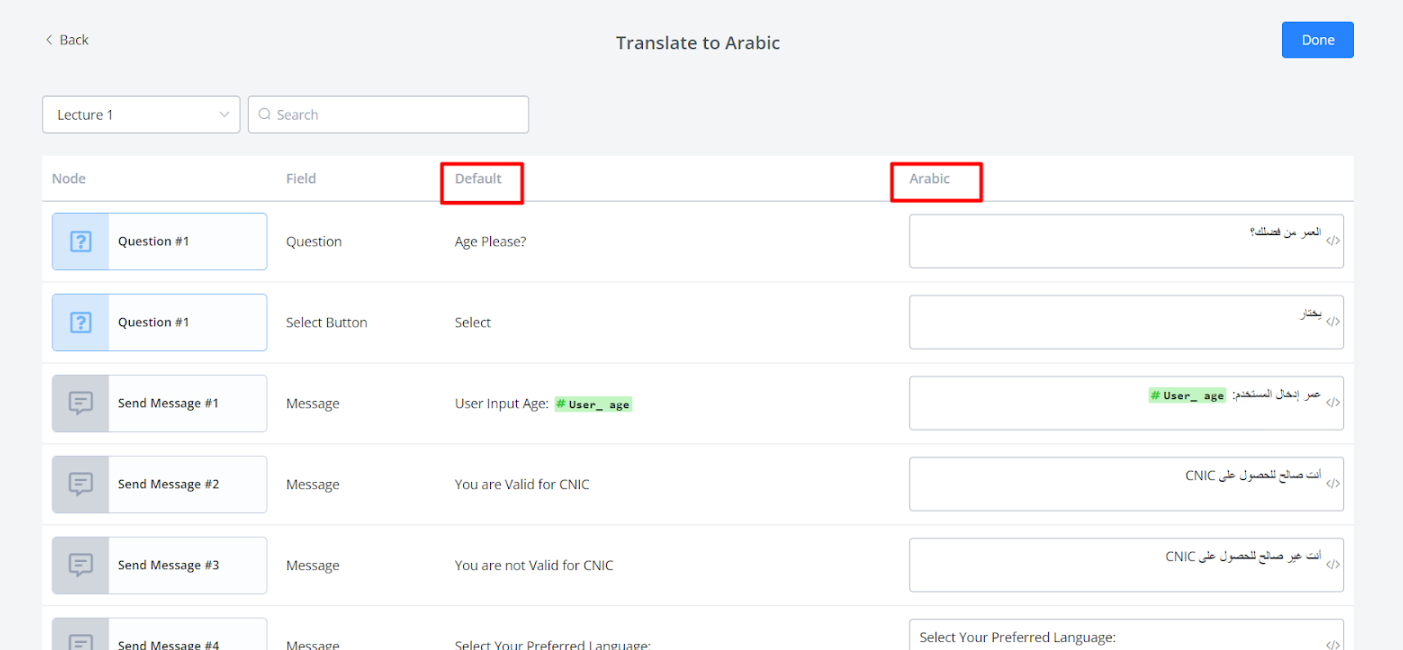
- Translate Your Flows
- Click on Translate.
- Select the flow you want to translate.
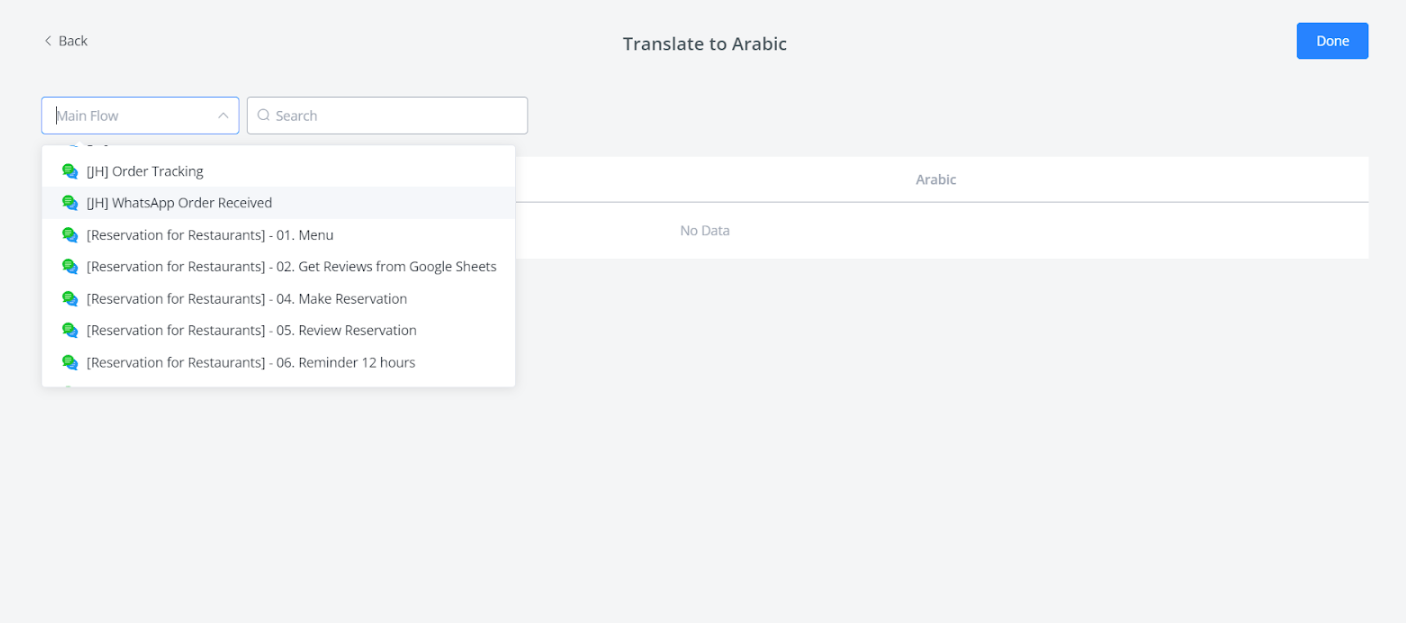
• Translate each node in the flow into your preferred language.
Setting Up Language Selection in Your Flow
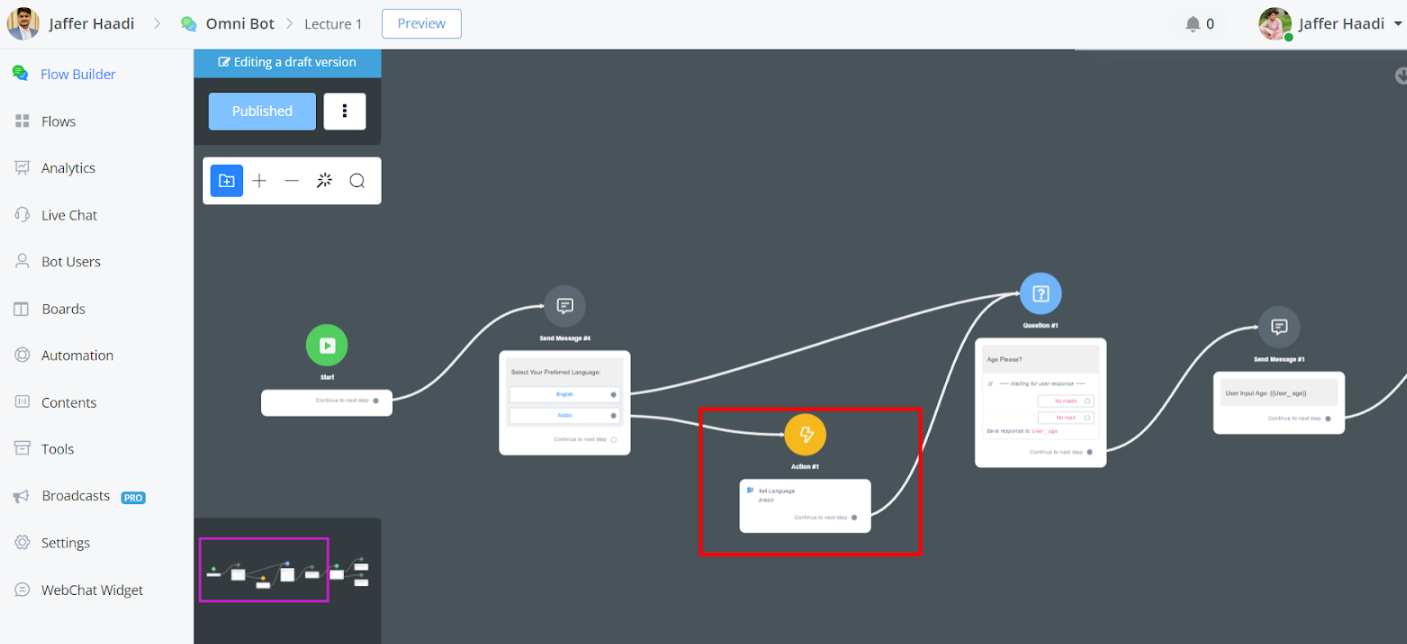
Add a Language Selection Option
- Go to your flow in the Flow Builder.
- Add an Action node where you want the user to select their language.
- In the Action node, select Advance Actions and then Set Language.
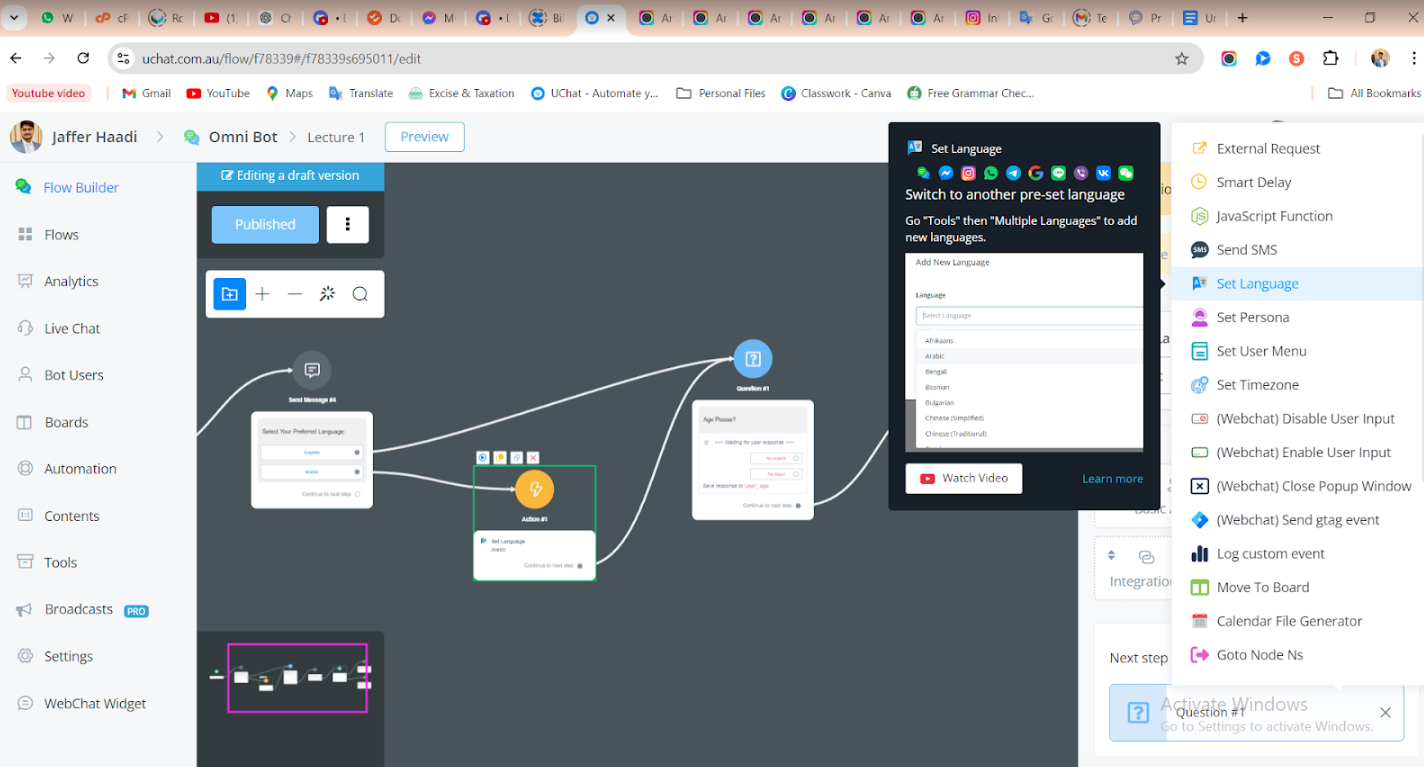
Visual Example
Here is how the flow setup will look:
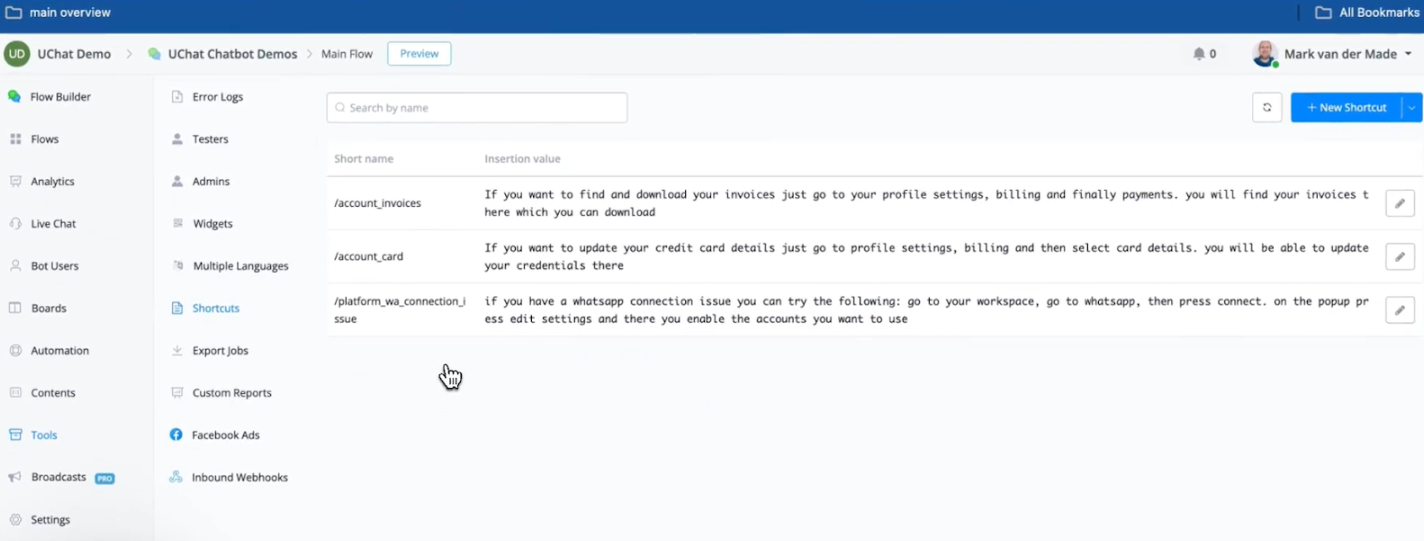
Shortcuts
This document explains the new import feature for Live Chat shortcuts, allowing you to save time by importing them in bulk.
What are Live Chat Shortcuts?
Live Chat shortcuts are pre-defined snippets of text that you can insert into chat conversations quickly and easily. They are ideal for frequently used information or responses, saving you time and effort.
Benefits of Importing Shortcuts
- Save Time: Importing shortcuts eliminates the need to create them individually within the Messagingme.app platform, especially if you have a large amount of existing content.
- Improved Efficiency: Importing shortcuts streamlines your workflow by providing a faster way to populate your shortcut library.
- Reduced Errors: Importing from a well-organized CSV file minimizes the risk of typos or inconsistencies that might occur during manual creation.
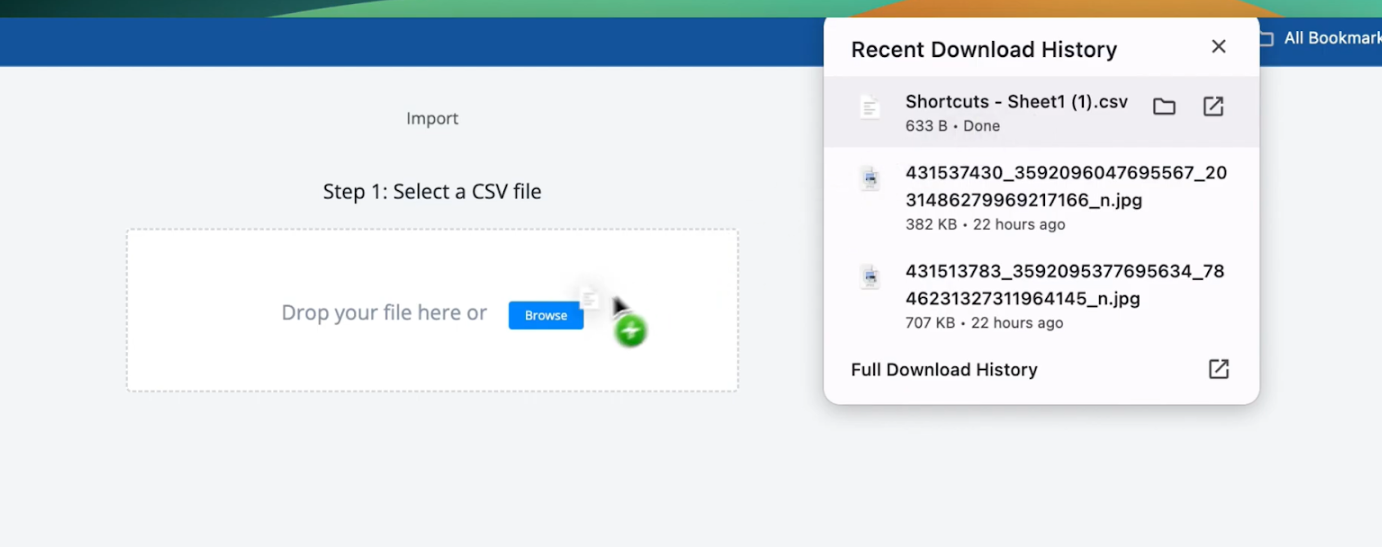
How to Import Live Chat Shortcuts
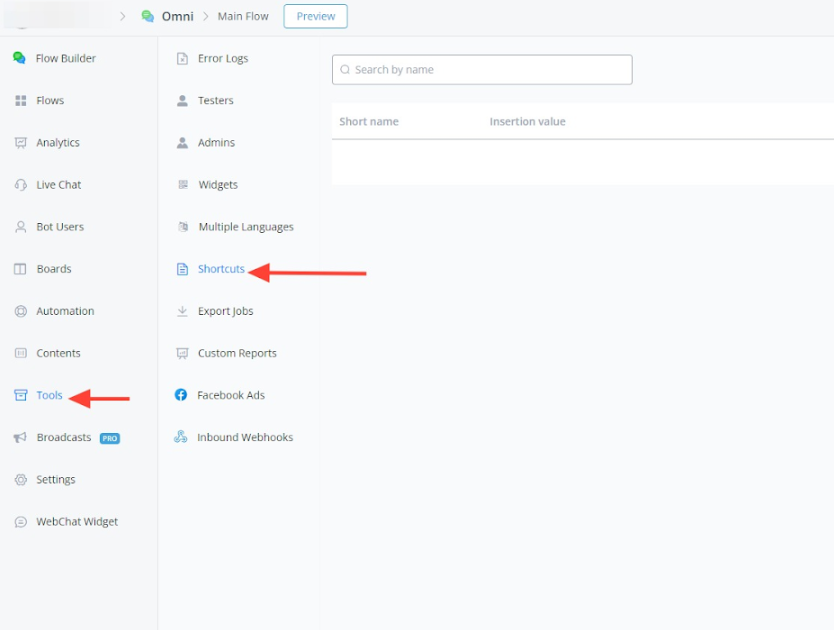
- Access the Shortcuts Section:
- In your bot navigate to the “Tools” section within the Messagingme.app platform.
- Select “Shortcuts” from the available options.
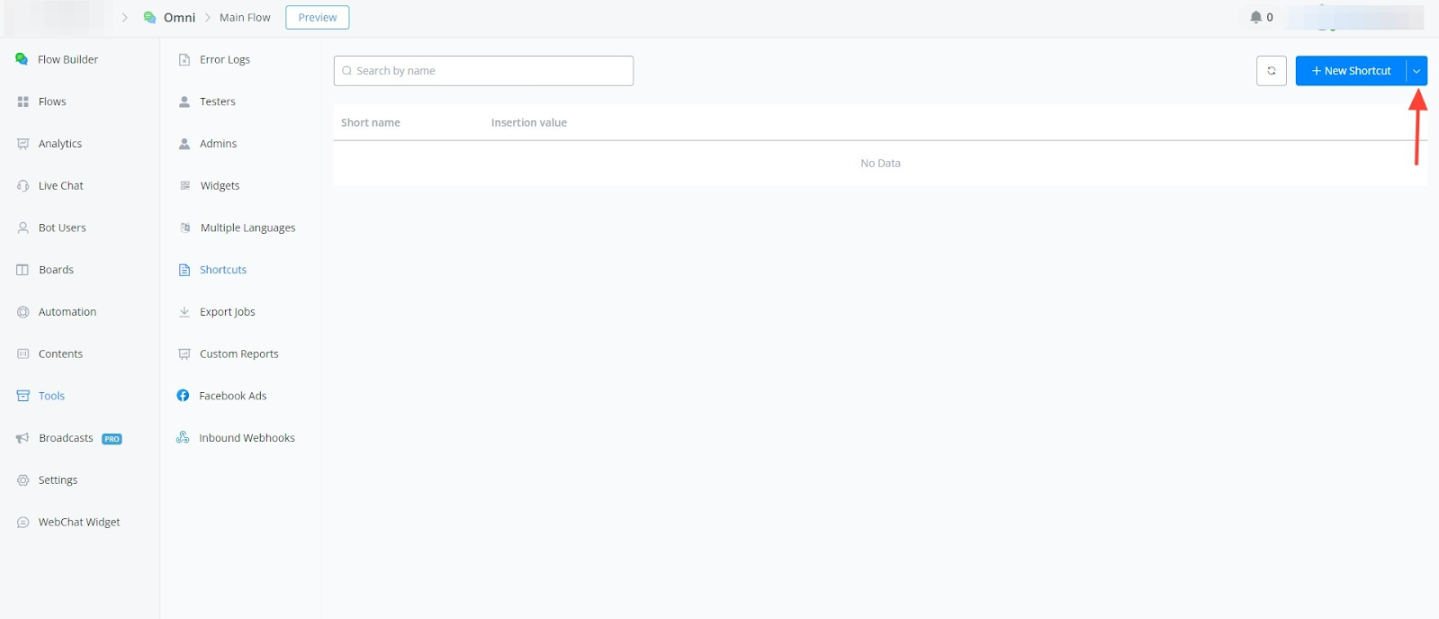
- Locate the Import Feature:
- Click on the dropdown arrow in the top right corner.
- Choose “Import” from the menu.
Prepare Your CSV File:
- Use a spreadsheet tool like Google Sheets to create a CSV file.
- The CSV file must have two columns:
- Shortcut Name: This column will contain the names you assign to each shortcut.
- Description: This column will hold the actual text content of each shortcut.

Export the CSV File
- Click “Download” to save a copy of the formatted CSV file.
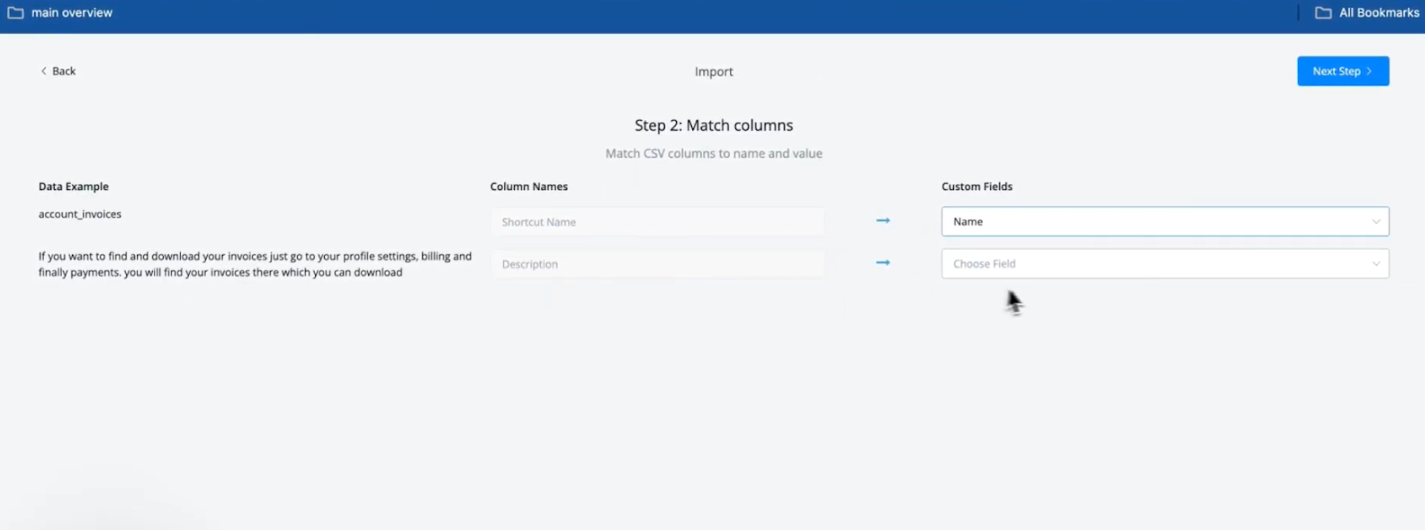
Import and Map CSV Columns to Shortcut Fields
- Drag and drop the downloaded CSV file onto the import section in the Messagingme.app platform.
- Verify that the “Shortcut Name” column is mapped to the “Name” field and the “Description” column is mapped to the “Value” field.
Confirm Import:
- Click “Confirm Import” to initiate the import process.
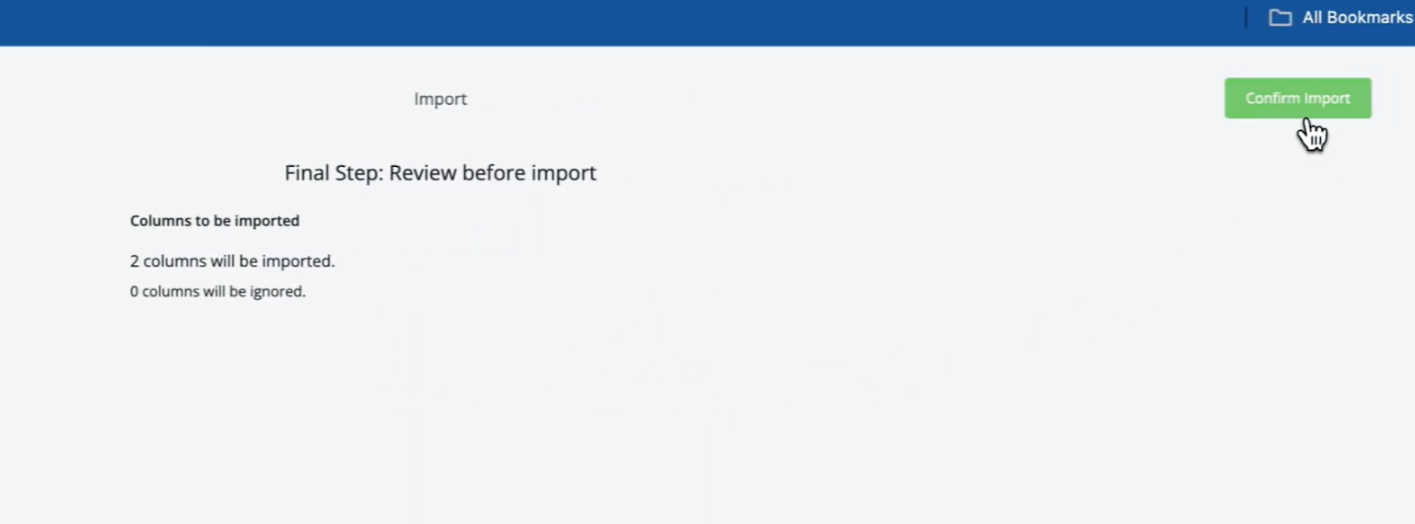
Verify Imported Shortcuts:
- The platform will display the number of successfully imported shortcuts.
- You can now access these shortcuts within your Live Chat conversations.
Using Live Chat Shortcuts
- Access a Live Chat Conversation:
- Open any ongoing or new Live Chat conversation.
- Insert a Shortcut:
- Type a slash “/” symbol within the chat window.
- A list of your available shortcuts will appear.
- Select the desired shortcut from the list.
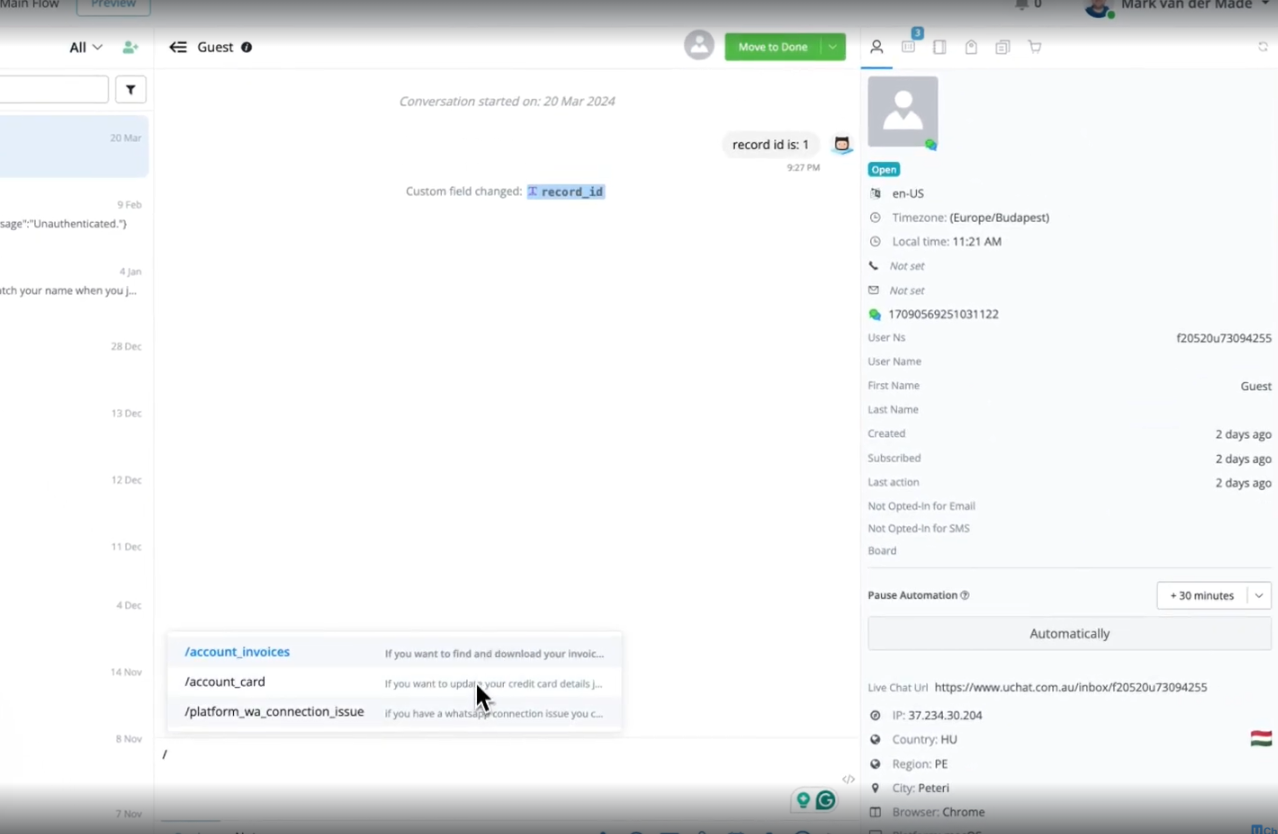
- Send the Shortcut:
- The content of the selected shortcut will be automatically inserted into the chat window.
- Press “Enter” to send the message to the customer.
Conclusion
The import feature for Live Chat shortcuts is a valuable tool that enhances efficiency and saves you time when managing frequently used information within your customer interactions. By following these steps and utilizing the import functionality, you can easily populate your shortcut library and streamline your Live Chat communication.
Export Jobs
Messagingme.app now allows its users to export all bot users (or filtered bot users) into a csv file and download it directly.
Previously we sent the CSV file via email but due to SMTP issues for partners and other email-related issues, we changed the feature to now support in-platform download option.
Accessing Export Job
Go into your flow builder and click on the bot user’s tab. Apply a filter on bot users (or if you want all bot users) and click the download icon button at the top right.

A prompt will appear stating to export the selected bot users.
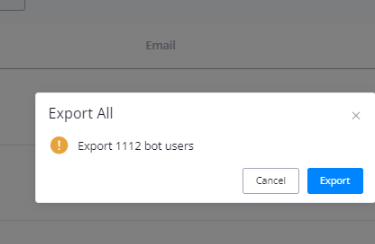
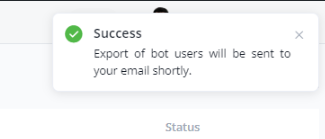
Another prompt will appear, ignore the wording that the exported csv will be sent to your email, instead go into tools section
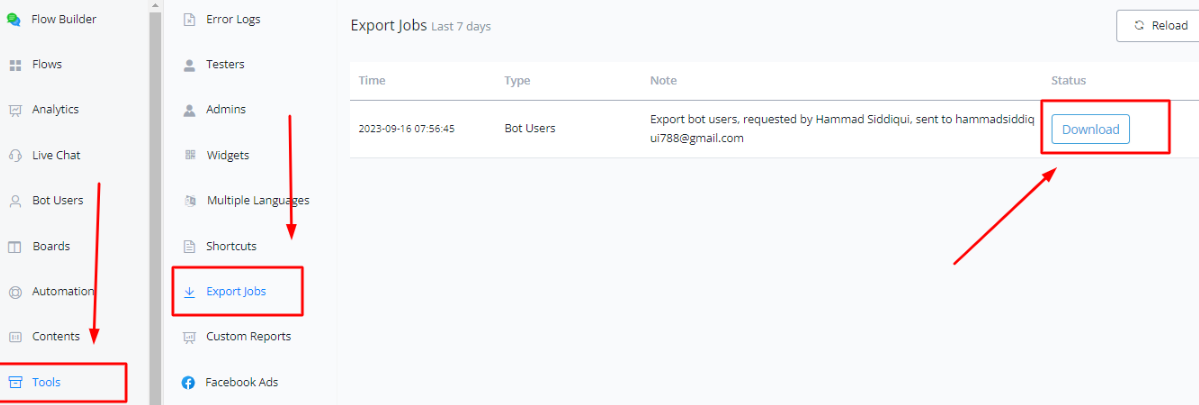
Clicking on the download button will save the CSV file to your device
💡 If you are importing contacts into the bot users, the import progress & status will also show up in this section.
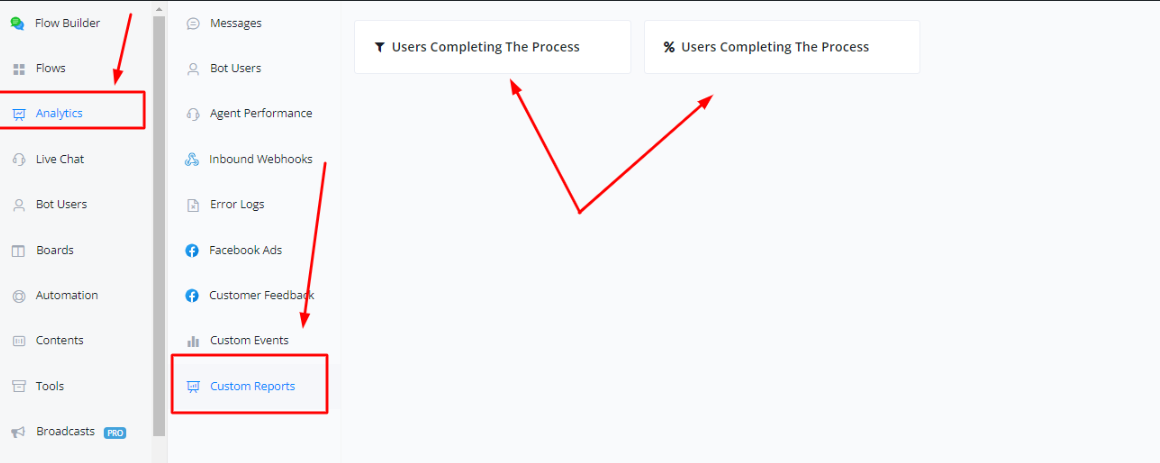
Custom Reports
Creating and Using Custom Reports In Messagingme.app
In order to create a custom report, click on the tools tab and select custom reporting.
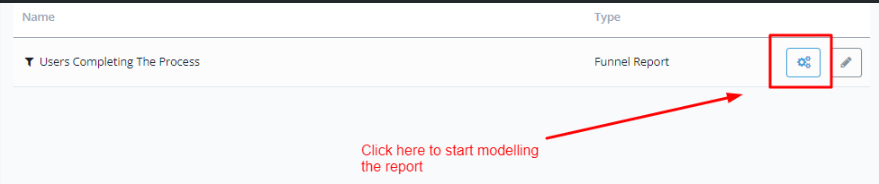
Enter the name of the report and the type of the report.
Click on the gear icon to start modelling your reports.
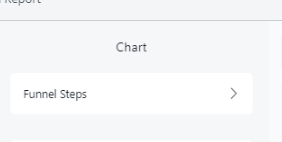
Modelling Funnel Report
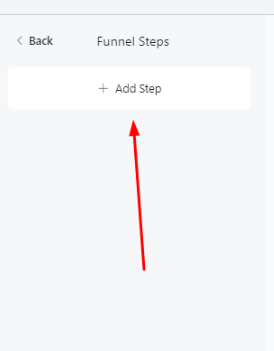
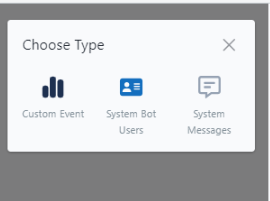
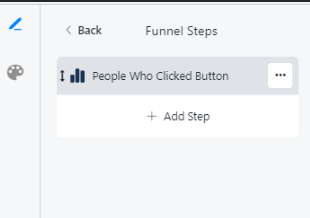
Click on the “Funnel Steps” to start adding custom events to your report
Click on “Add step”
Select which type of event do you want to track
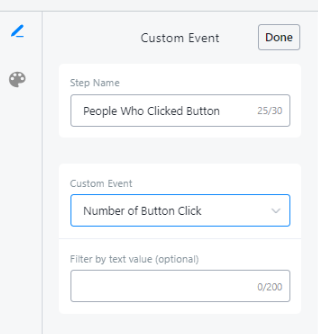
After adding the event, click on the three dots icon to start customizing it.
Set up the proper events you want to track in this event. Click on the Done button
You can add more steps to your funnel report, if you want to build a collaborative report or comparison report on multiple events and track the performance on multiple fronts.
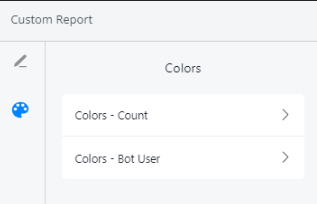
If you want to change the colors of the trendline graphs and bar charts, click on the palette icon on the tope left corner and then choose the chart you want to change the color of.
You can also edit the graphs and charts themselves, changing their labels, axes, enabling or disabling them to show on the report itself or not
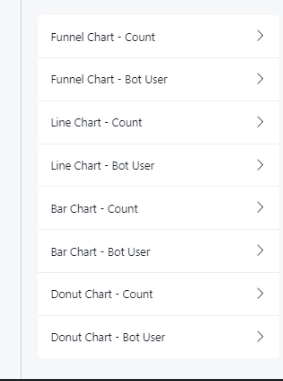
Modelling Percentage Report
In percentage reports, you can compare two events and find out how they perform w.r.t to each other.
In order to add the events, click on Field A and Field B.
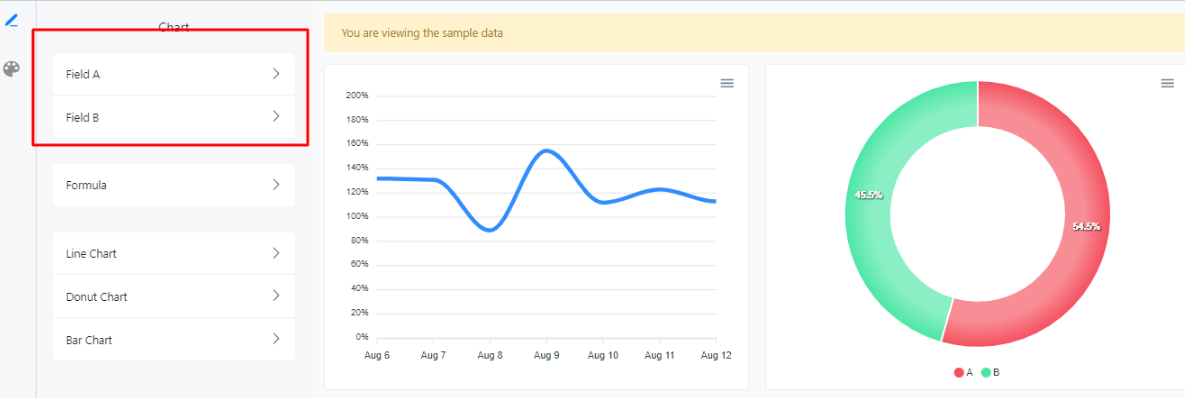
In order to edit the charts and graphs, click here to modify them as per your needs.
Formulae
Percentage reports allow you to add formulae to calculate the percentage and proper event.
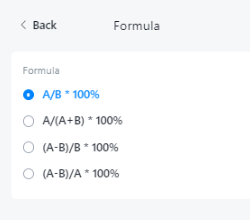
Formula #1
This formula compares the two fields and calculate the relative percentage between them. For example
- Field A can be No of students in Class A and Field B can be the total number of students in a school, this formula will help you calculate the percentage of students of Class A compared with total student population of the school
- Field A can be can be the no of sales of product A and field B can be the total number of sales, this formula will help you calculate the percentage of sales of product A.
Formula #2
This formula compares the two fields and just like the formula 1 give the relative percentage. Here Field A and Field B can be the two parts. The denominator here gives the sum of the constituents.
Field A can be the no of users passing through Flow A. Field B can be the no of users passing through Flow B. This formula will gives us how many people passed through which flow, This is import for A/B testing
Formula #3 & 4
This formulae compares the two fields and give a value which is not directly derived. For example consider a marketing SMS campaign. We can track the total number of the people targetted and the people replied to be put in DNC or Do not Contact list. Using this formula we can derive the actual number of people that responded back to the campaign or the actual response rate.
Visualizing Analytics For Custom Reports
In order to visualize the custom reports, you can click on the analytics tab and select custom reports
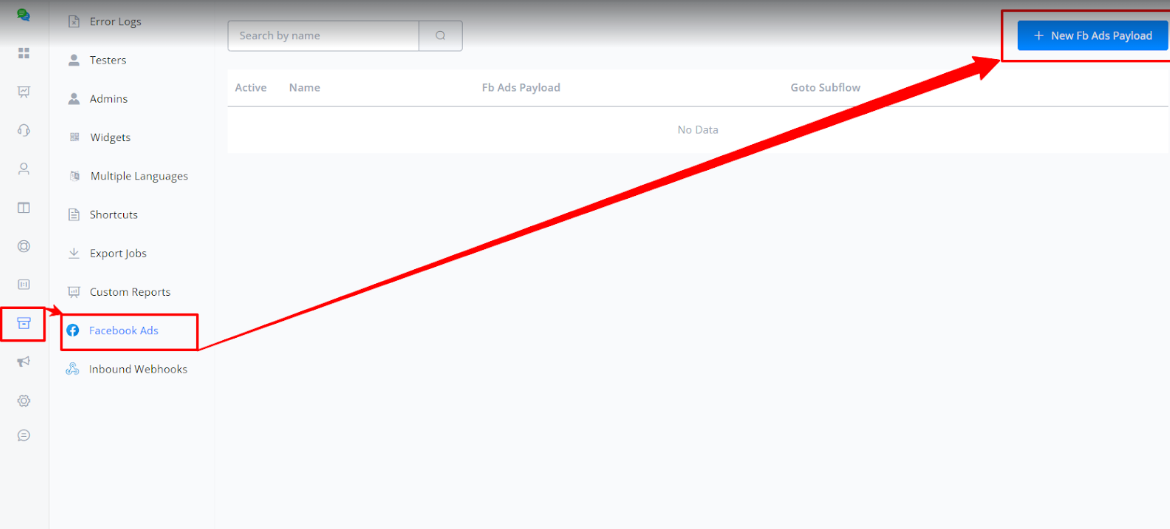
Facebook Ads
Messagingme.app Facebook Ads Payload Documentation
This document explains how to connect your Messagingme.app chatbot flow with buttons triggered by Facebook Messenger Ads.
Prerequisites
- You need to have a Facebook Page connected to your Messagingme.app account.
- Your Messagingme.app account needs to be connected to the Facebook Messenger platform.
Steps
- Obtaining the Payload
- Go to your Messagingme.app OmniChannel or Facebook Bot.
- Navigate to “Tools” and then “Facebook Ads.”
- Click “Create New Facebook Ads Payload.”
- You can choose the subflow you want to connect to the user.
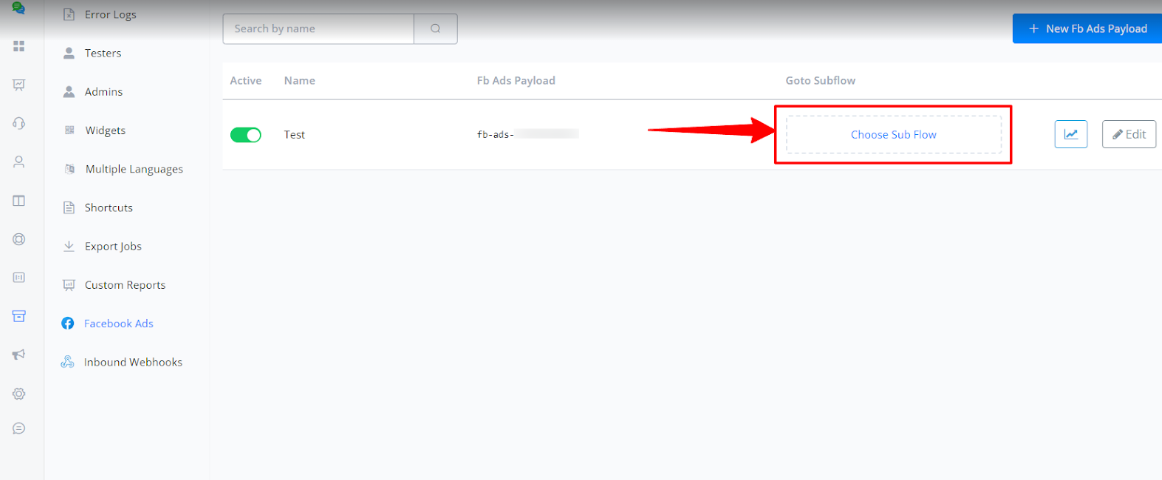
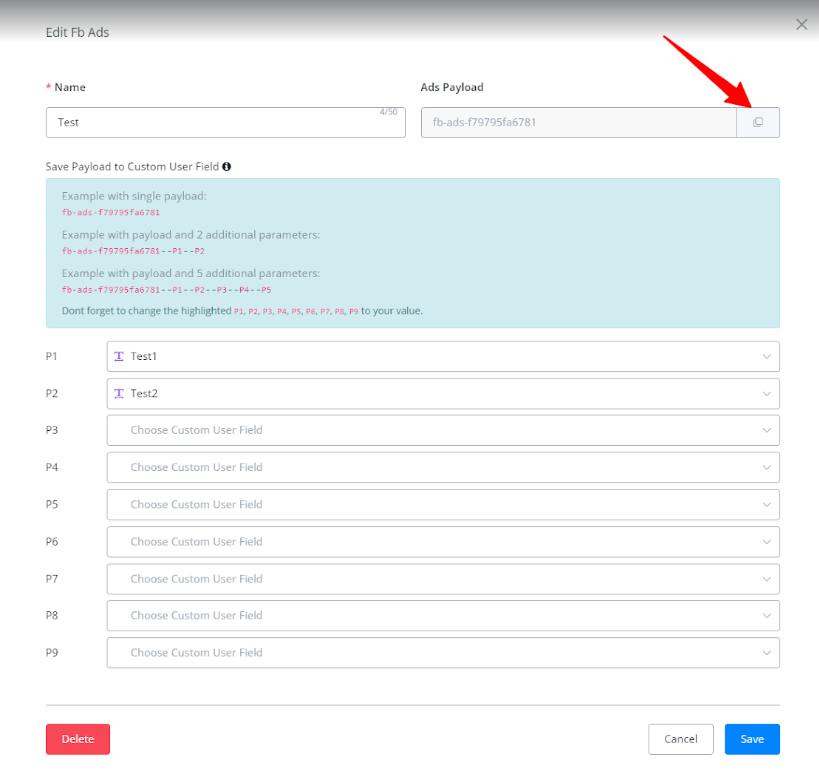
- Click in “Edit” and copy the Payload displayed.
Additional Features
- UTM Parameters: You can add up to nine UTM parameters to the Payload in Messagingme.app to track your Facebook Ads traffic and save automatically this information in Custom User Fields.

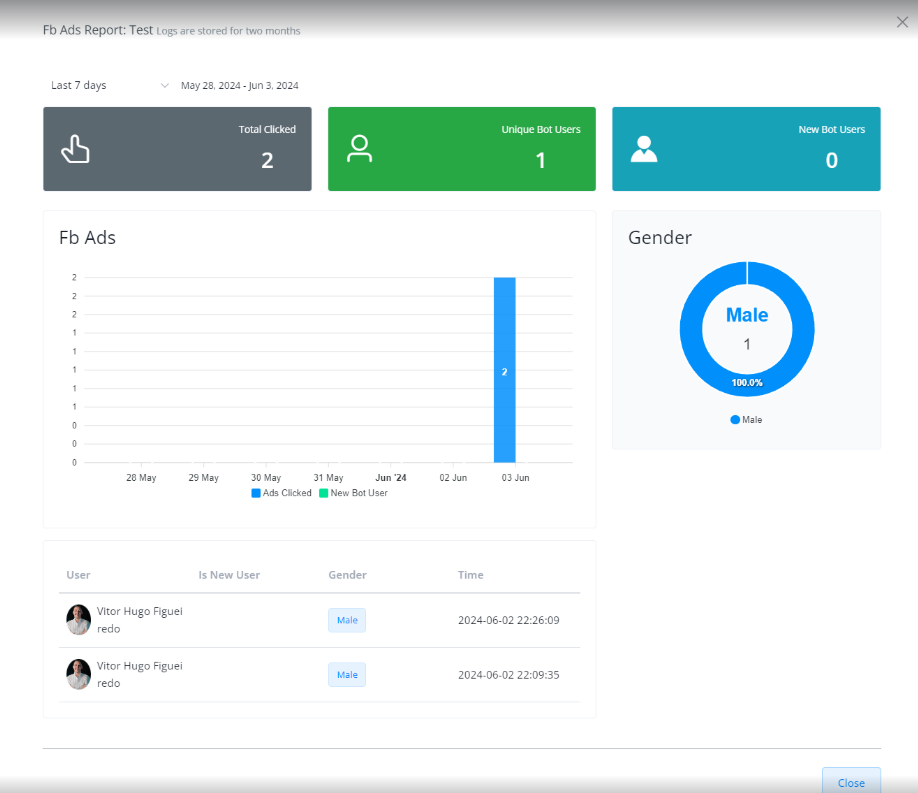
• Analytics: Messagingme.app provides a mini-dashboard to analyze data like clicks and user demographics from your Facebook Ads.
- Create a Facebook Messenger Ads Campaign:
- In Facebook Ads Manager, create a new campaign and select “Click to message” as the objective.
- Choose Messenger as the message app and select the Facebook Page connected to your Messagingme.app account.
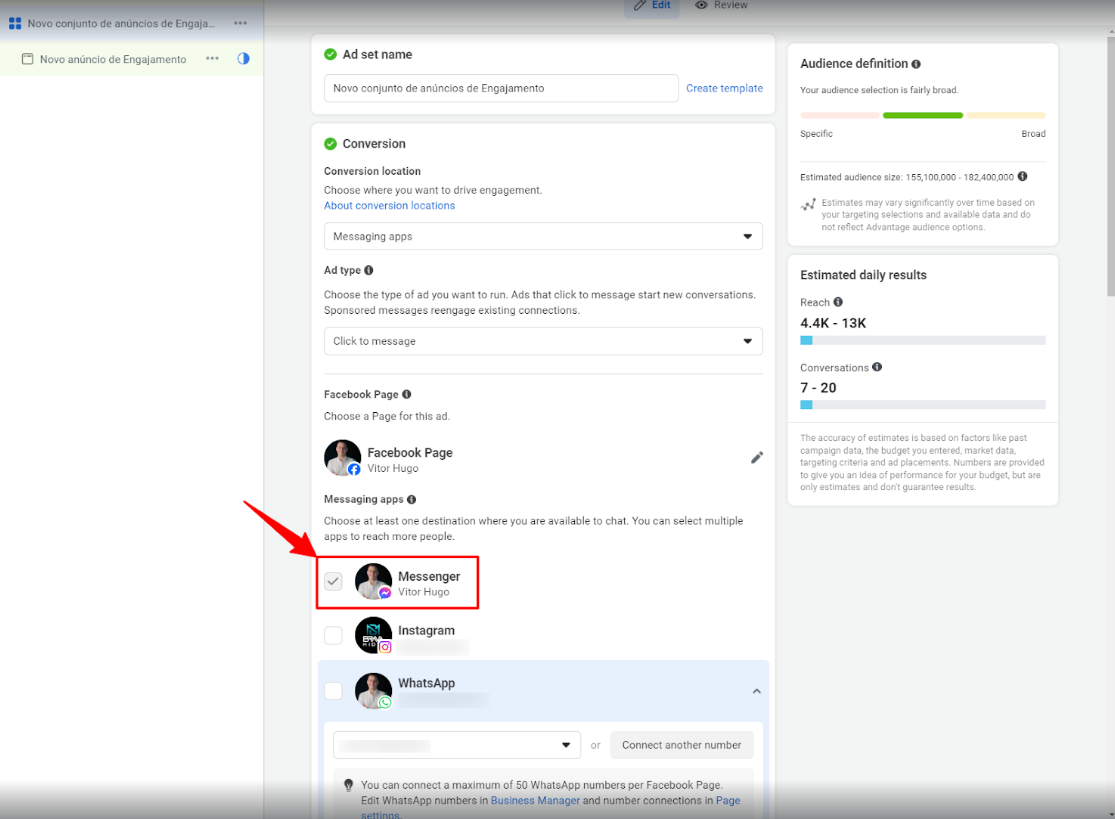
- Set up your ad creatives (text, headlines, images) and choose “Send message” as the call to action.
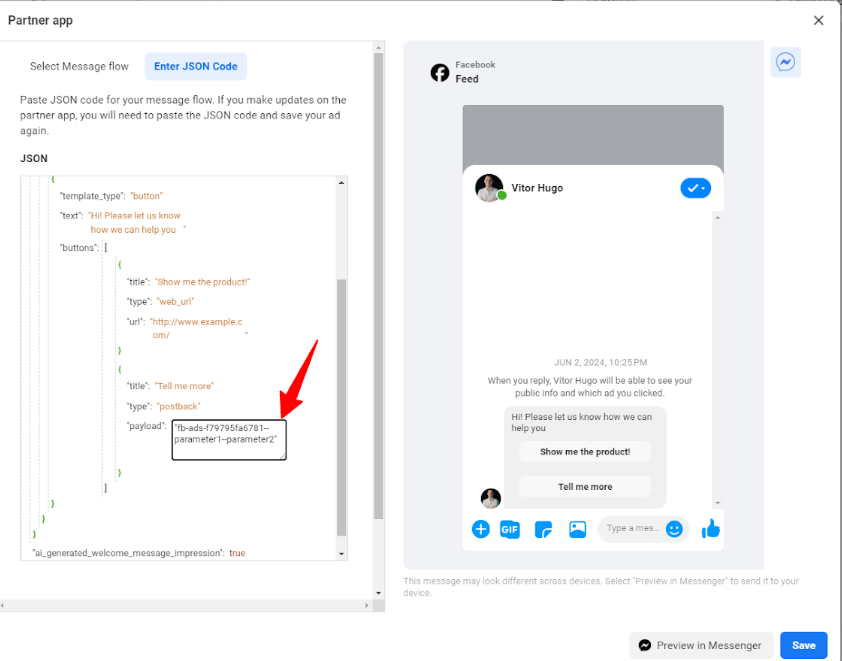
- Configure Message Template:
- In the Message Template section, select “Partner App” and “Select Flow”
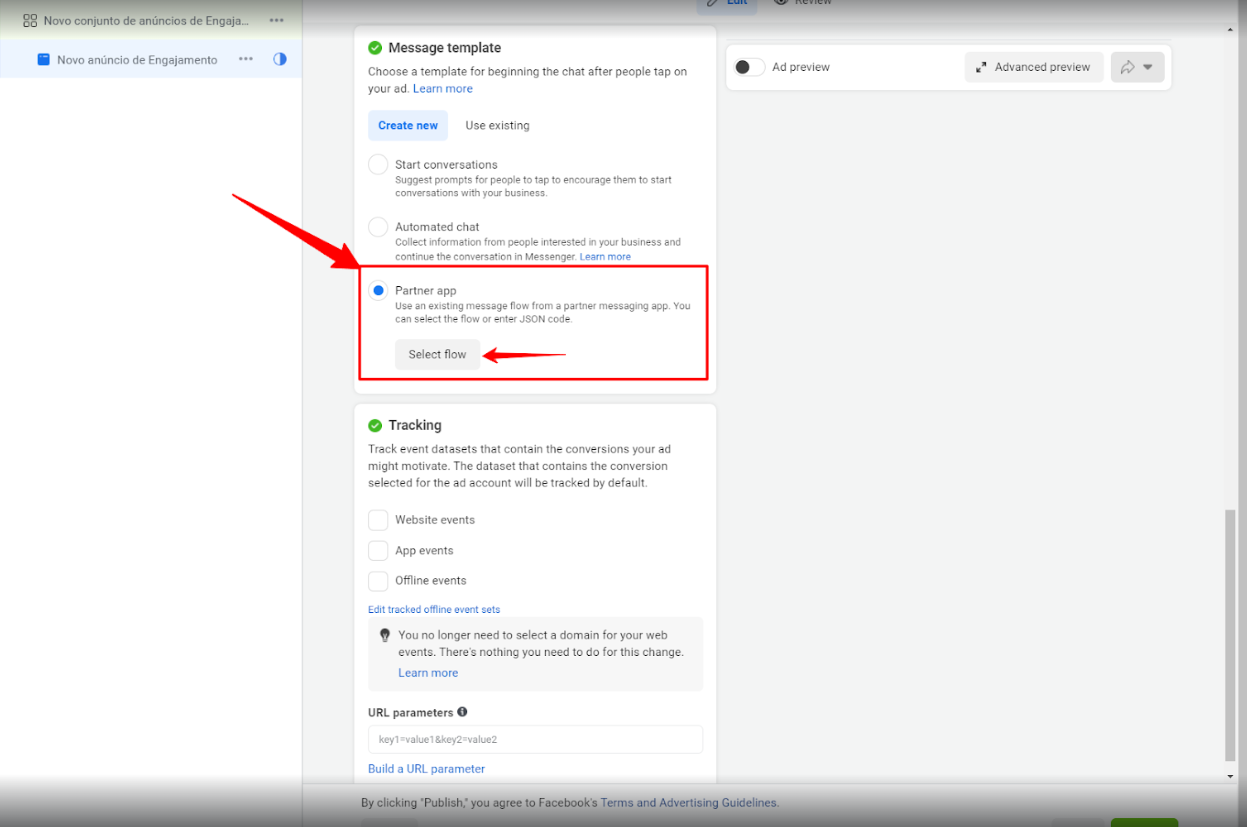
• Now you can select “Enter JSON Code”.
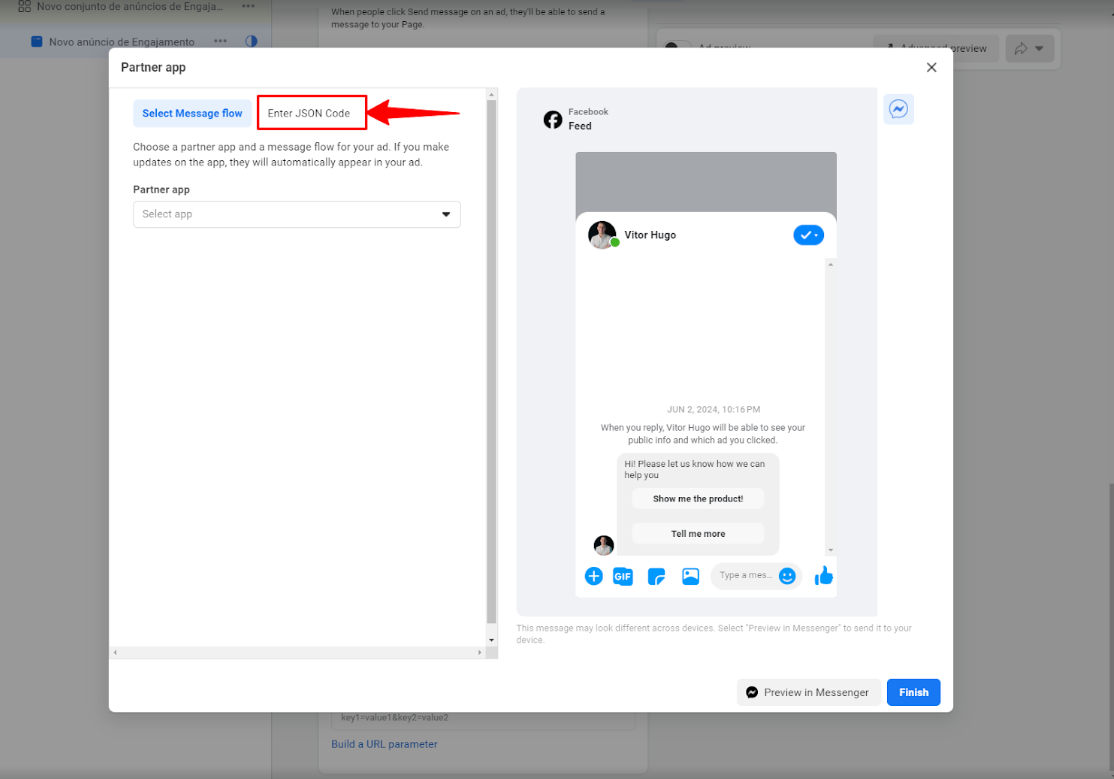
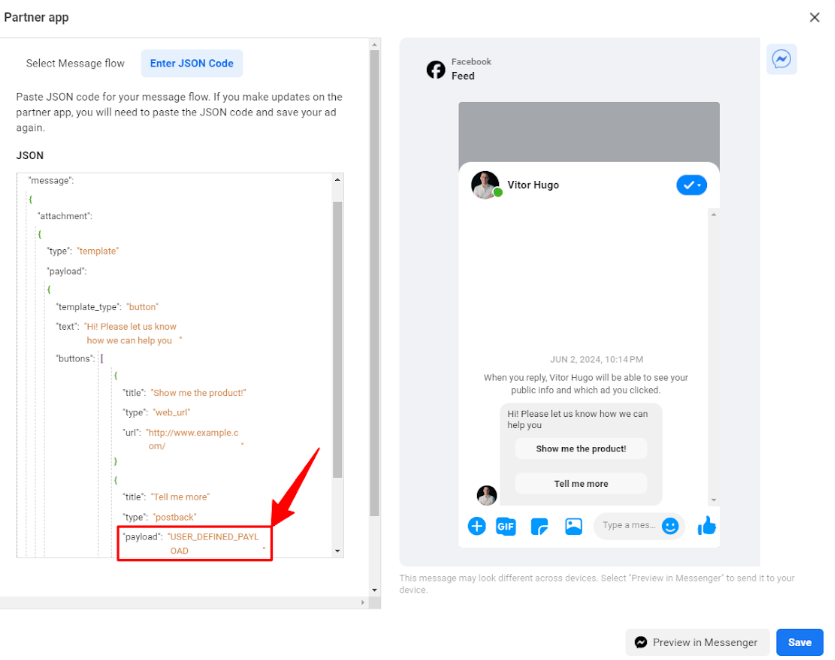
• Now you can paste your Messagingme.app Payload with your parameter if you have in “USER_DEFINED_PAYLOAD” and customize your template message.
Note
- Ensure your Facebook Page and Messagingme.app account are connected.
- Choose “Start conversation” in the Messenger Template.
- Use “Partner App” and the Payload to link your Messagingme.app flow with buttons or quick replies.
Inbound Webhooks
Inbound webhook is a powerful tool to receive data from anywhere to the chatbot through a POST request.
With inbound webhooks, your bot can even start a conversation with a bot user who never talked to it before.
For example, when a client fills in their contact information on your website, you send the data to an inbound webhook of a chatbot, say an SMS bot. The SMS bot can then send a confirmation message to the client’s phone number.
If that webhook is built in a Voice bot, the bot can even call the client right away!
💡 Limitation - Each bot has up to 5 inbound webhooks, the rate limits is 500 request per 24 hours. Reset works as following:
24 hours after the first request. there is a timestamp in the response headers you can check.The limit is per 24 hours, not per day, so it is not reset on fixed time
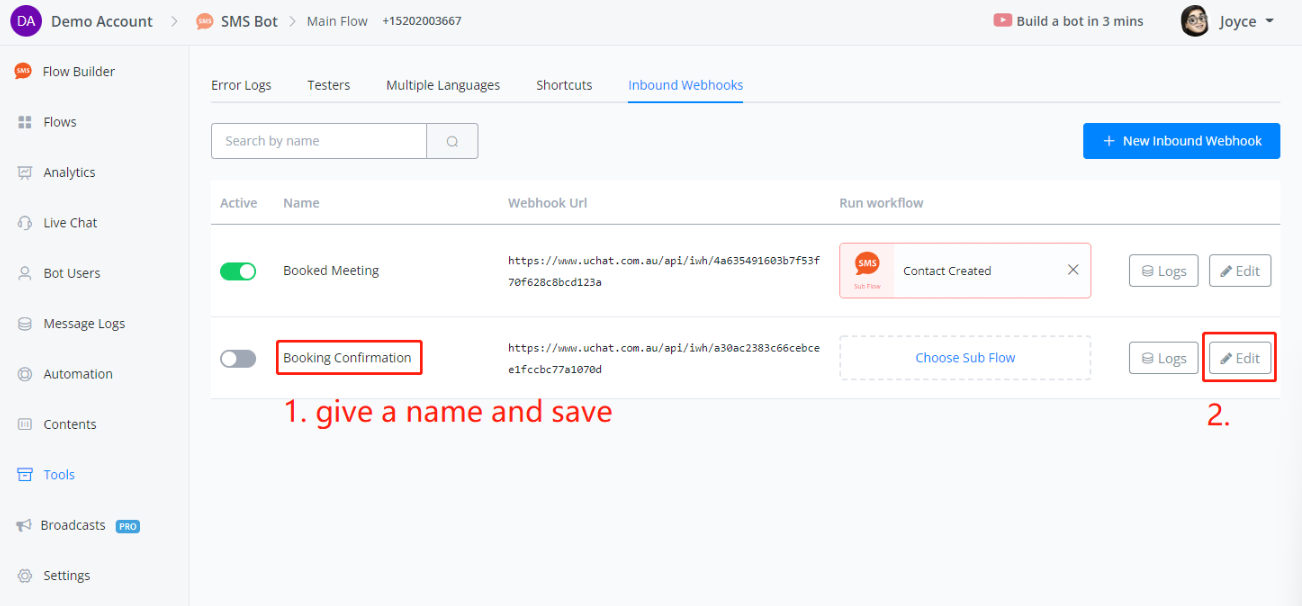
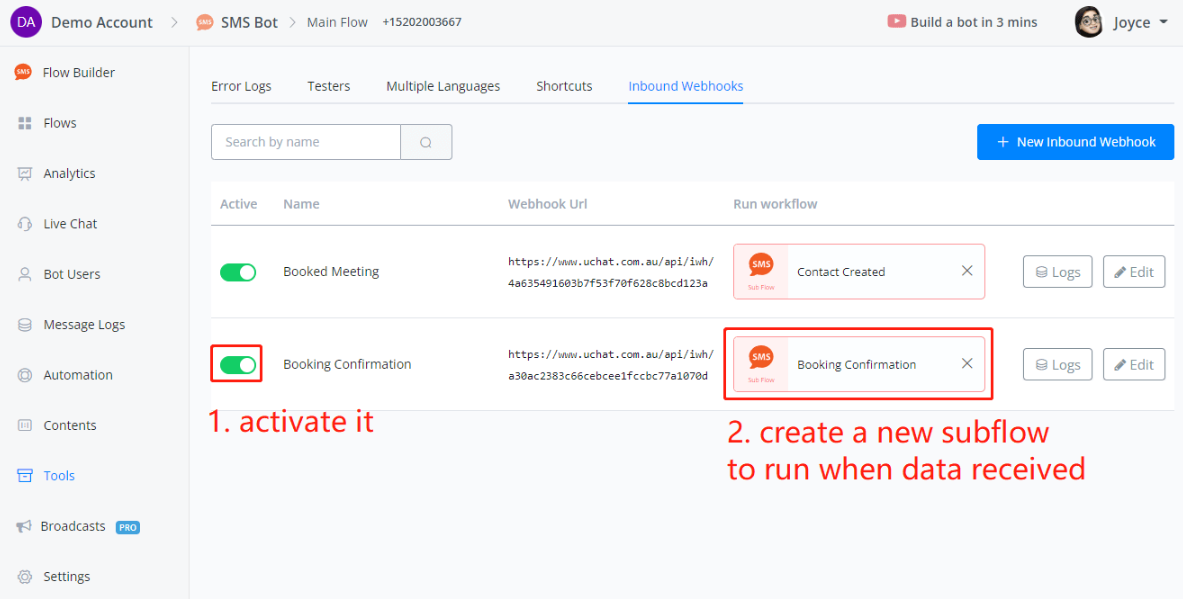
Create Inbound Webhook
It’s available in almost all channels, in your flow builder, go Tools - Inbound Webhooks:
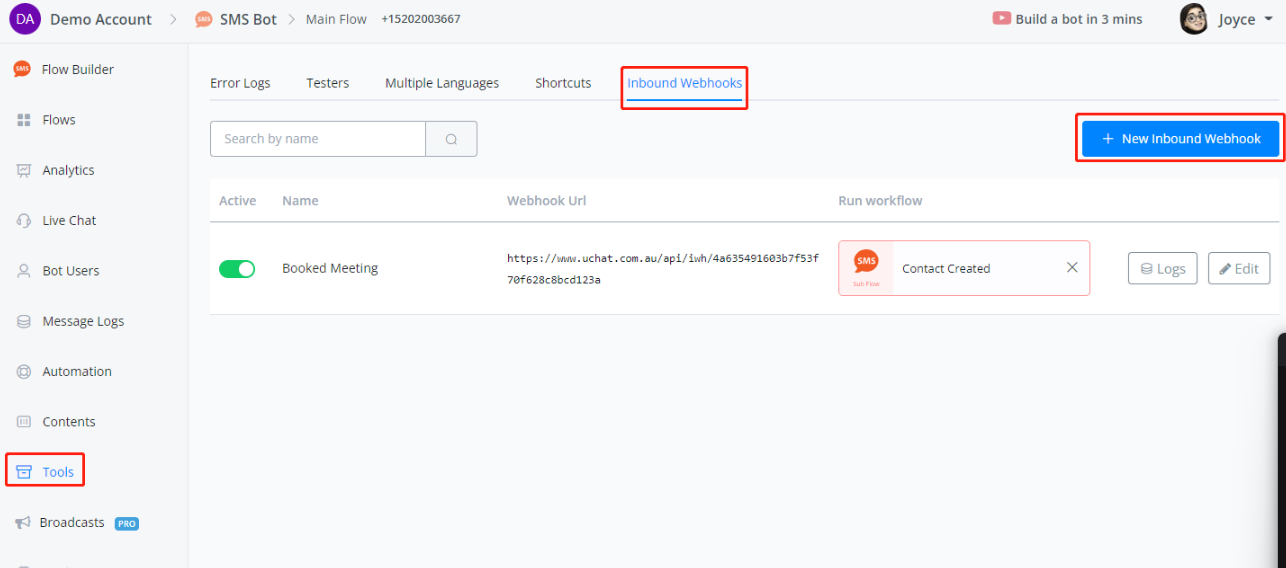
Click on New Inbound Webhook, give a name and click Save:
You will see the editing interface like this:
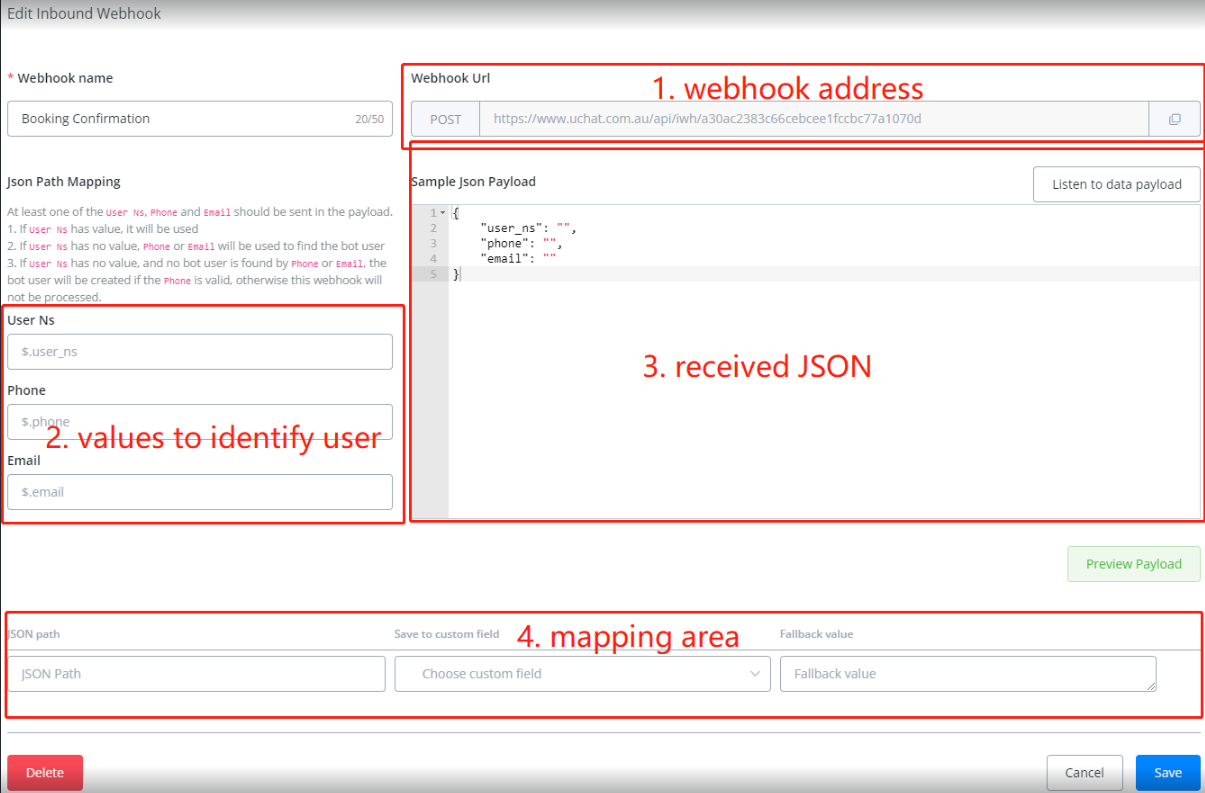
Webhook Address
This area shows you where to send the data and the method, which is POST. Each inbound webhook has a unique URL in the whole Messagingme.app system.
Example of Received JSON
This area shows an example JSON for reference. It describes the structure of the data in the JSON we received later. We need it to find the values for both **user identification ** and data to save.
There are 2 ways to get an example JSON:
- manually type/paste it here
- listen to a real-time data from a live test
Values to Identify a User
Whenever the webhook receives data, it first checks the paths you specify here to see whether it can find an existing user in the chatbot.
If the user is not in the system, the chatbot will create a new profile. That’s how the chatbot initiates a conversation without talking to the user before.
However, some channels don’t allow the chatbot to start the conversation first due to privacy and spam issues.
For example, your SMS bot can send messages as long as you have the recipient’s phone number, while your Facebook Messenger chatbot cannot send messages to a Facebook user who never talked to your bot before.
Process for User Identification
This is the process of how the system identifies a user:
- check
user_ns- if there is a valid
user_ns, user found. - if not, next step
- if there is a valid
- check
phone/email- if we can find a user by the
phoneoremail, user found. - if not, next step
- if we can find a user by the
- verify
phone- no user matched in the system, is the
phonea valid number? - if yes, user profile created.
- if not, webhook won’t be processed
- no user matched in the system, is the
Mapping Area
The mapping list shows which value should be stored in which custom field. When you get a sample JSON in the above area, click on Preview Payload to get a mapping tool.
Webhook Logs
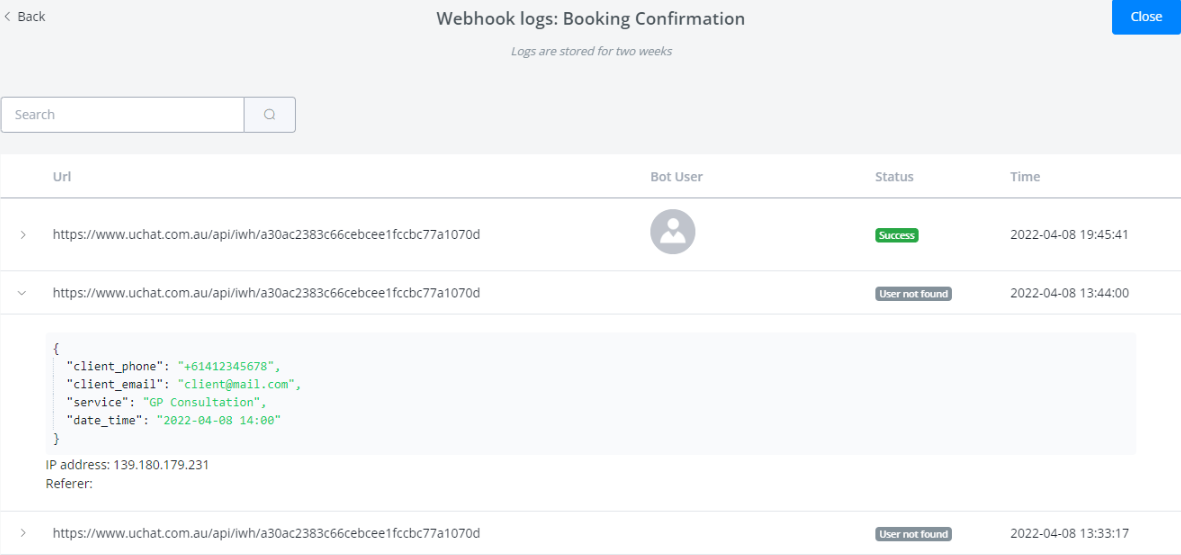
Every single request is saved in Logs. Click on a record to see the received JSON data.
Inbound Webhook Limitation
By default, inbound webhook request limits is 500 request per 24 hours. You can see the limits from the screenshot below:
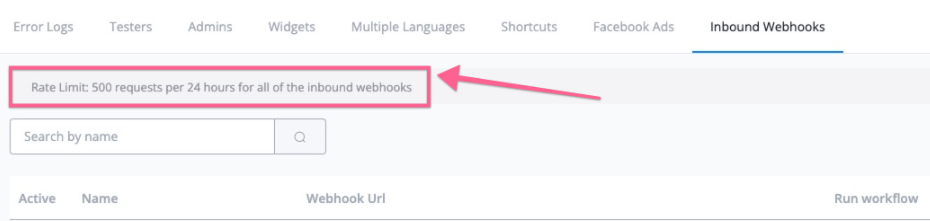
If you have exceed the limits, you do have the option to upgrade to more request per day, ask us to suscribe for more
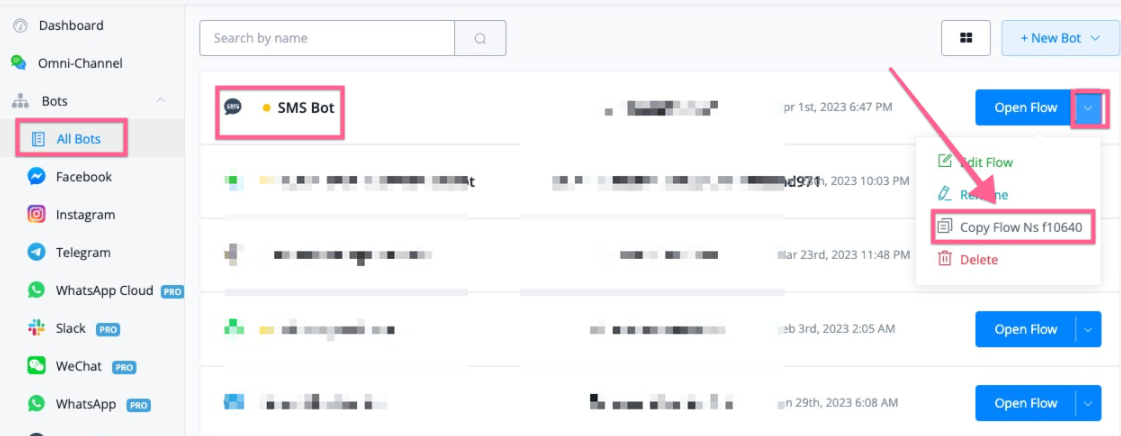
Here is how you can find your flowNS,
Go to “All bots” in Messagingme.app dashboard, and then find the bot you want to increase the inbound webhook request limits, and then click the dropdown, you will find the flowNS.
How to debug inbound webhook max request error
First of all, if you are not receiving the data in the inbound webhook, or you can’t find the data in the logs, it’s highly possible that you reached the max daily request limits.
Here is how you can test it.
You can send the request to the inbound webhook from Postman or Messagingme.app external request, and then you can find the below information in the header:
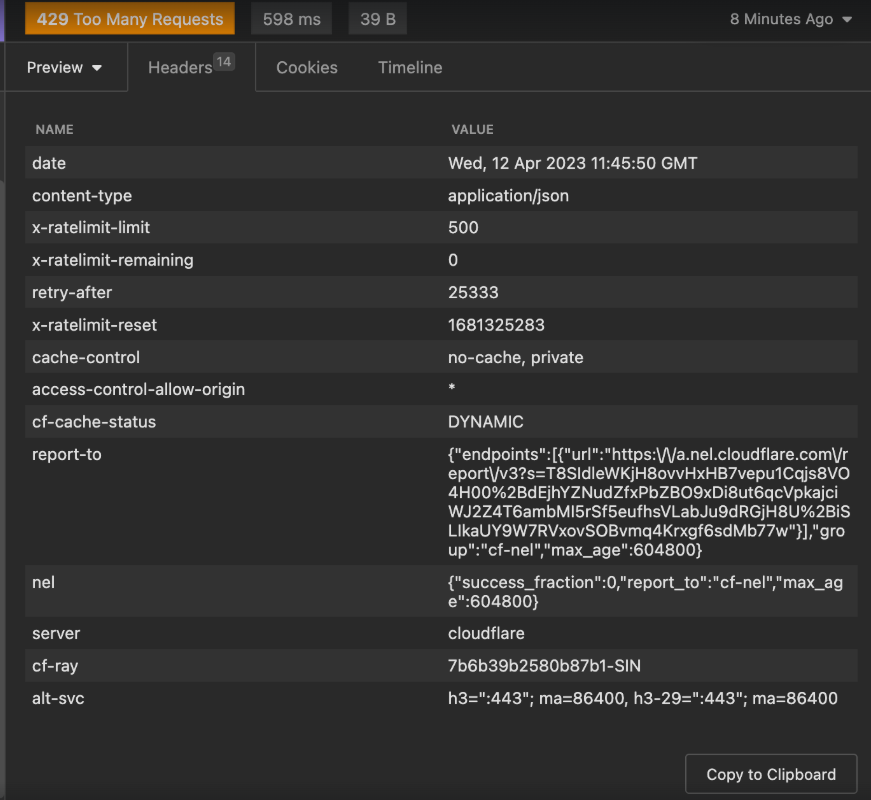
As you can see, there is rate-limit-remaining, if it’s 0, that means you already reached the rate limits, you should upgrade for more limits.
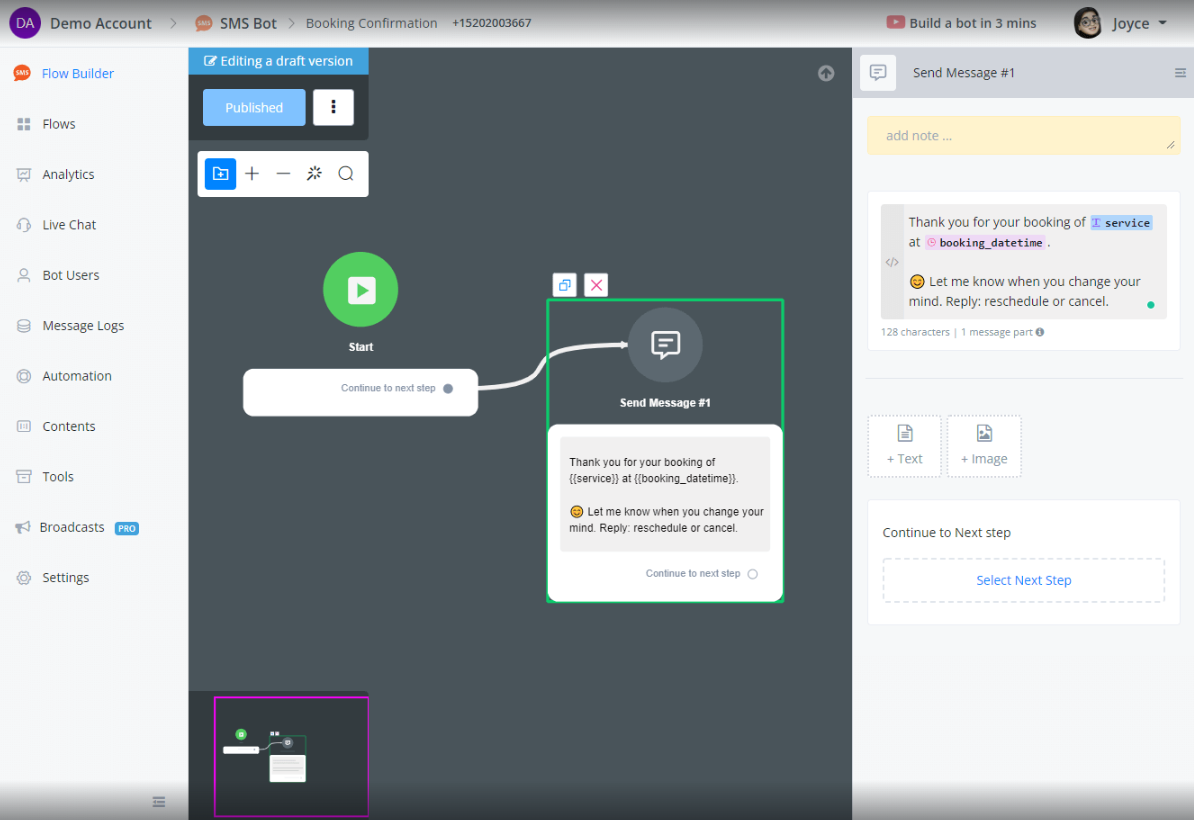
Demo: Booking Confirmation
A perfect tool to test your inbound webhook is already built-in everywhere! Simple get a chatbot (whatever channel), test it in an Action Step.
Open another Messagingme.app webpage side by side, keep the inbound webhook editing on Page 1 and select an external request on Page 2:
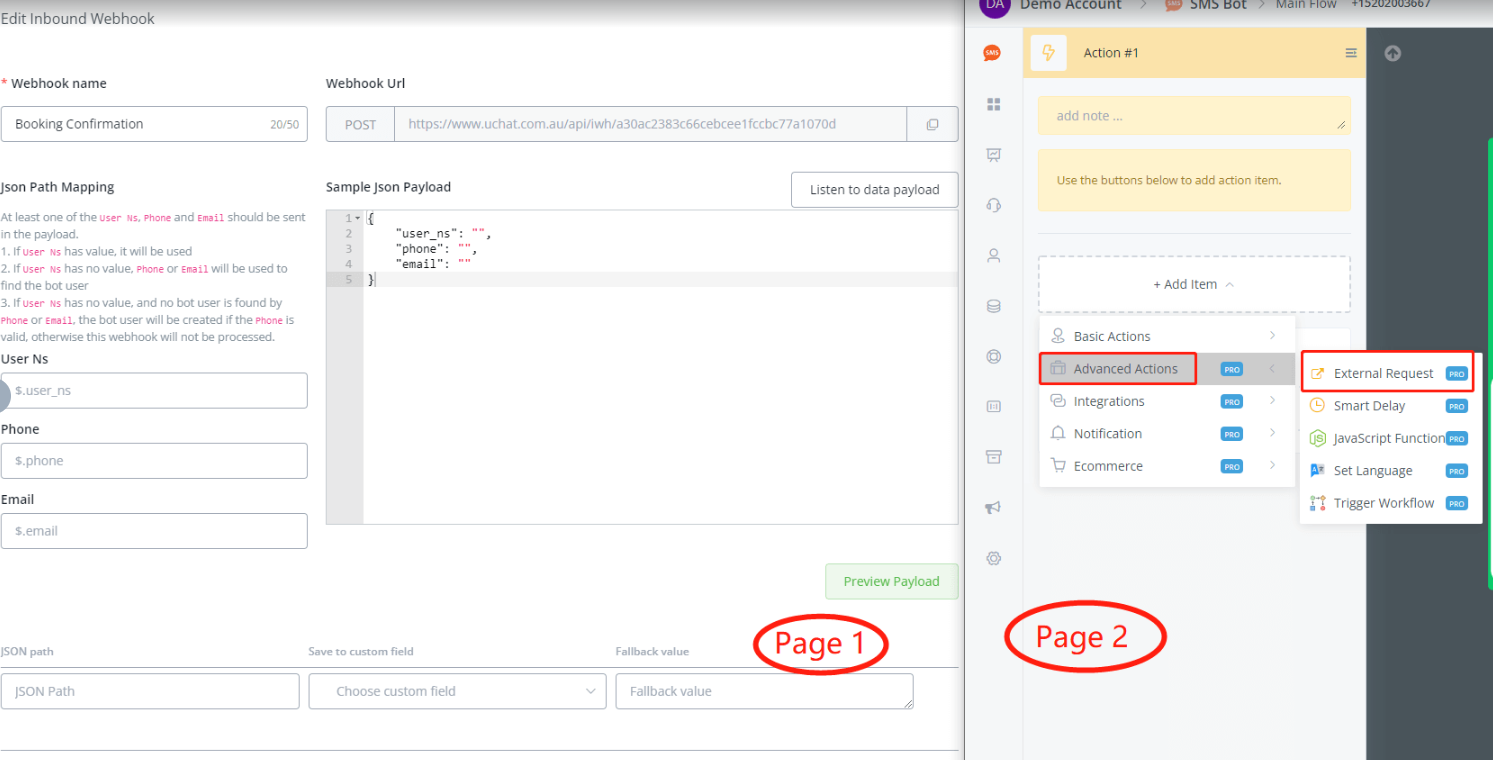
Follow steps 1 to 8 in the following screenshot:
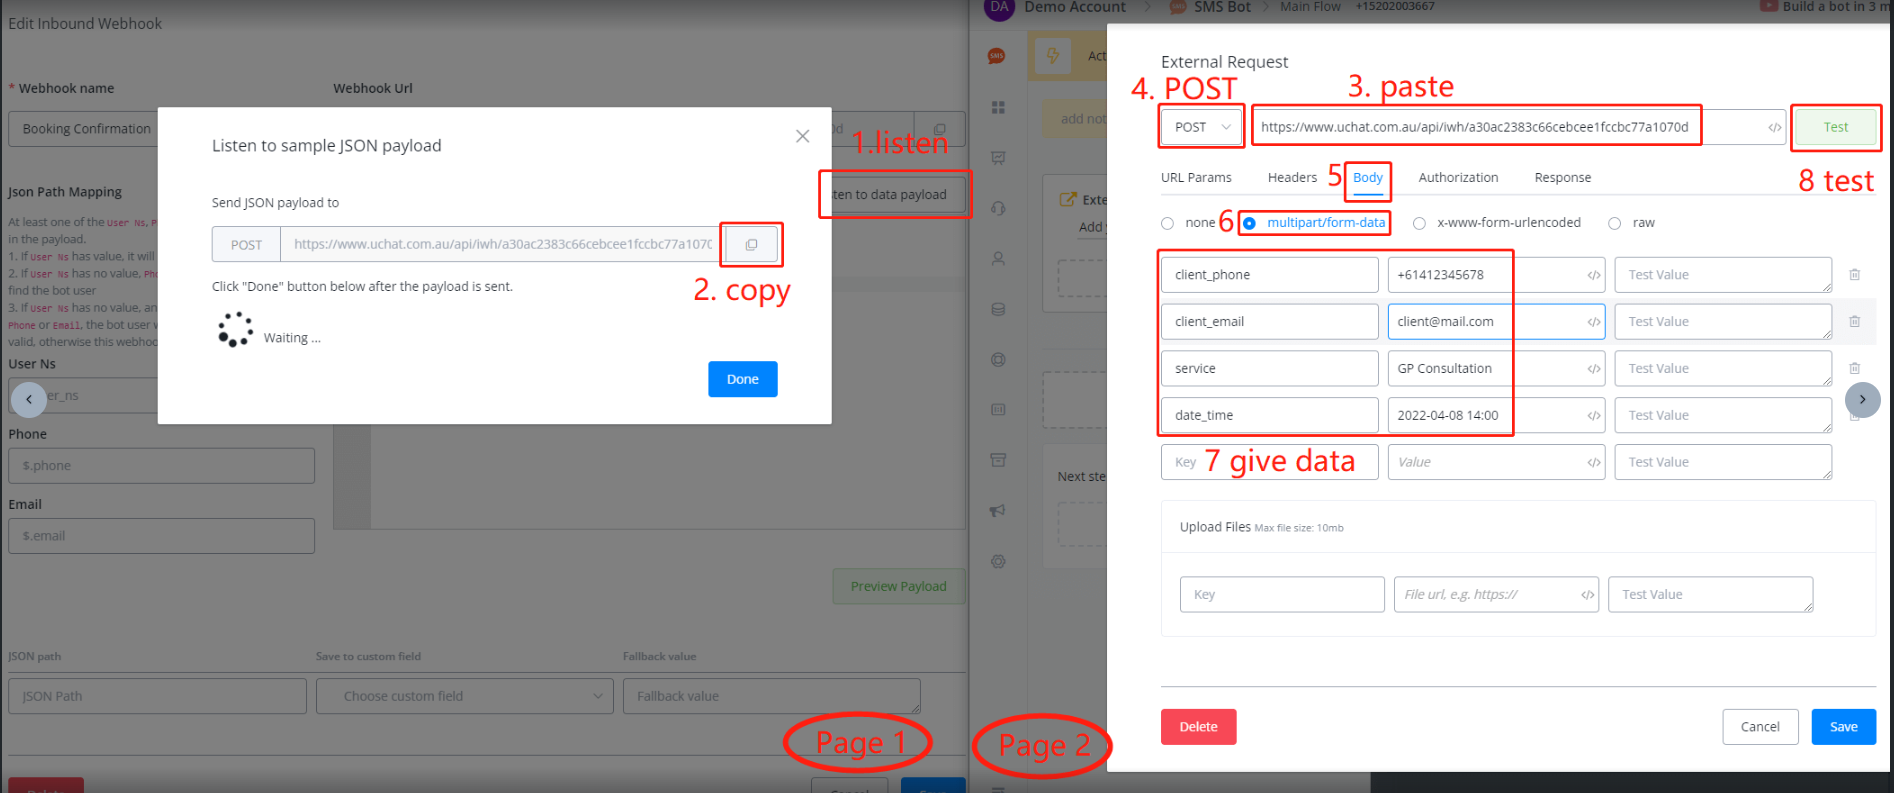
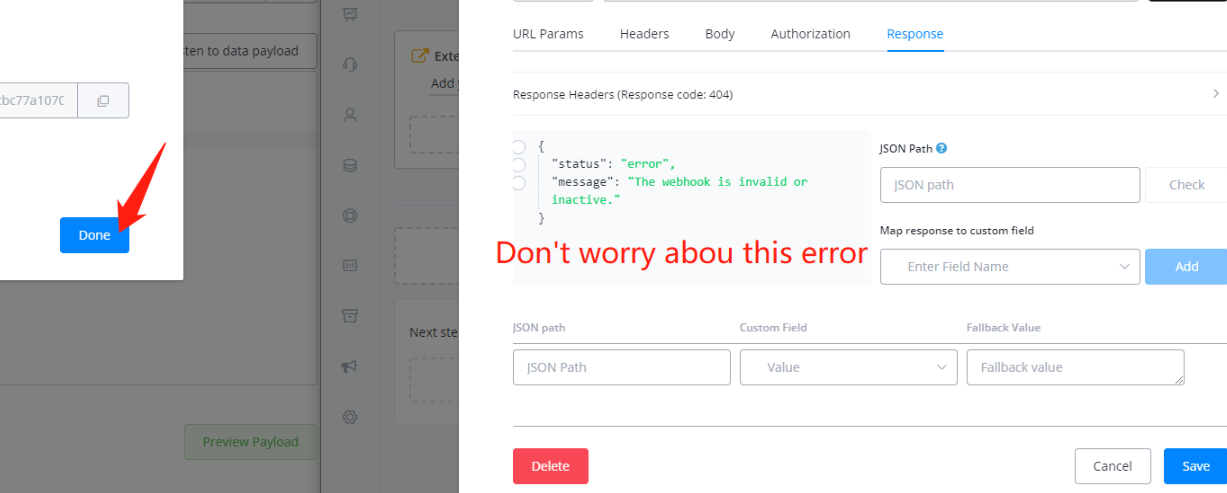
Provide the data that need to be sent to the chatbot and click Test, you must get a “webhook inactive” error since we haven’t activated it yet. It’s fine, click on Done on Page 1, and you will see the data saved:
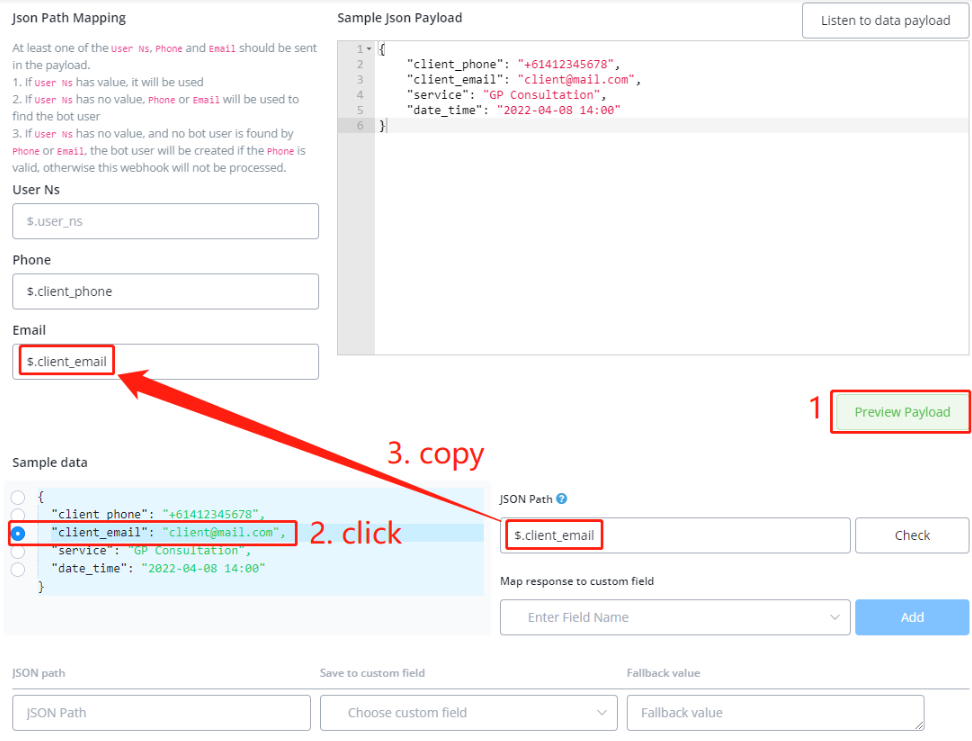
Scroll down a bit, follow steps 1, 2, 3 to tell the system, where is the phone and email values in the JSON:
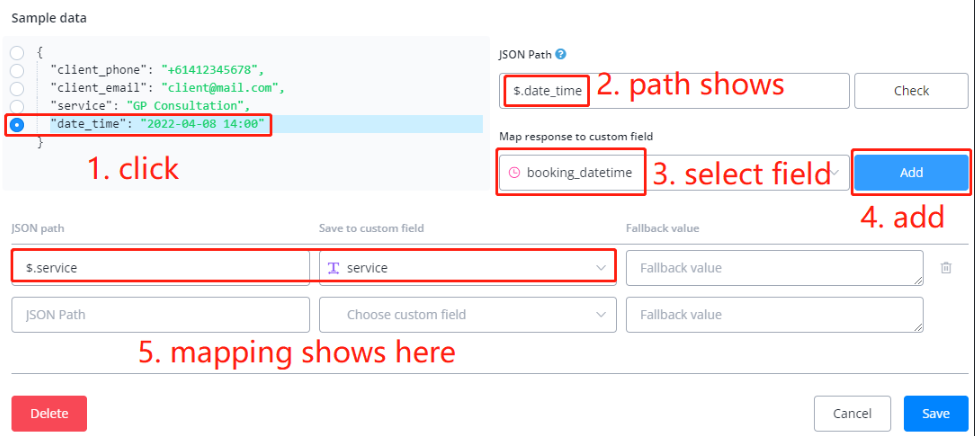
Finally, map the rest data to the chatbot:
Save your inbound webhook editing:
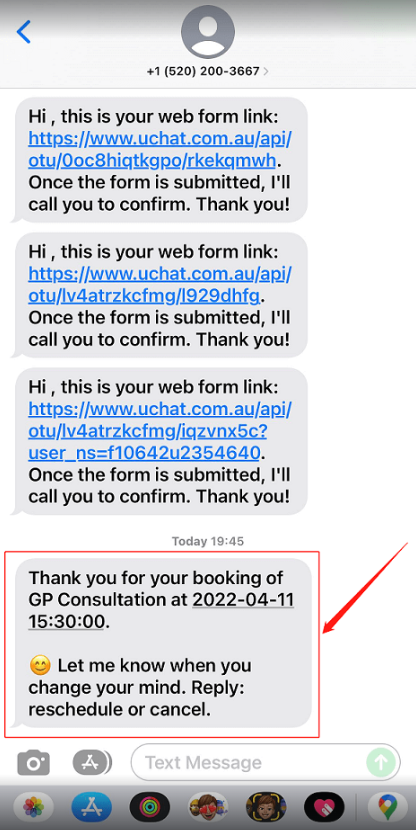
Enter the subflow, let’s send a message to the bot user:
Publish the flow and let’s do a live test in the external request again:
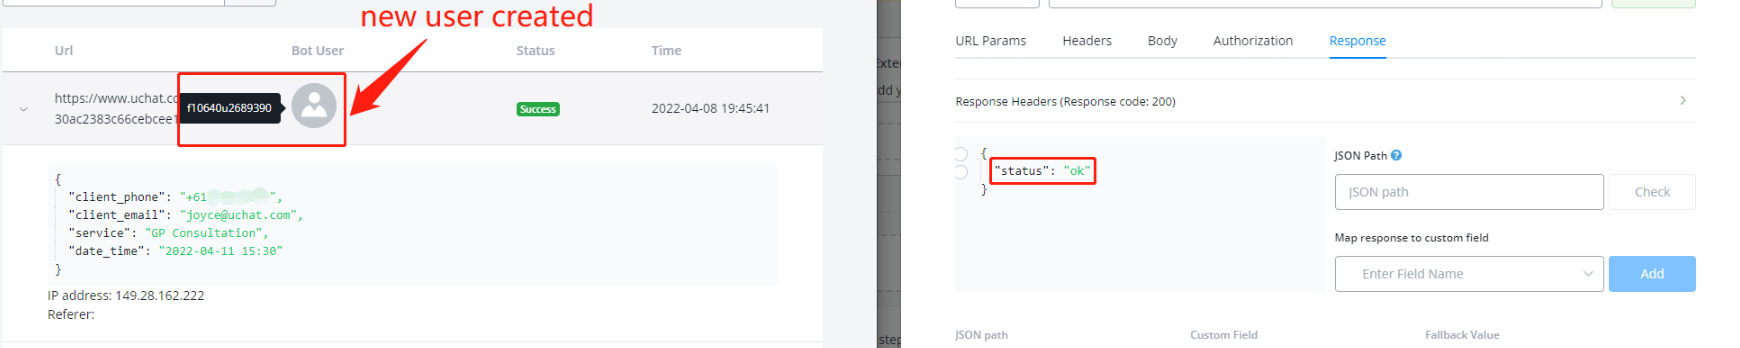
We can see that this time it run without error because we activated the webhook and used a real phone number. Go to Logs and we can see a new user profile is created successfully.
On the user side:
FAQ
Inbound webhook don’t works on your partner custom domain?
In cases where the inbound webhooks under your Partner custom domain stop working, while under Messagingme.app domain they are working correctly.
The issue could be inside your cloudflare settings.
Sometimes Cloudflare automatically detects requests to your domain and term them as attacks from bots. This blocks the requests coming to these inbound webhooks for a certain interval of time.
In order to avoid this, Go to your settings inside your Cloudflare dashboard, under the security tab, turn off “Bot Fight Mode”.
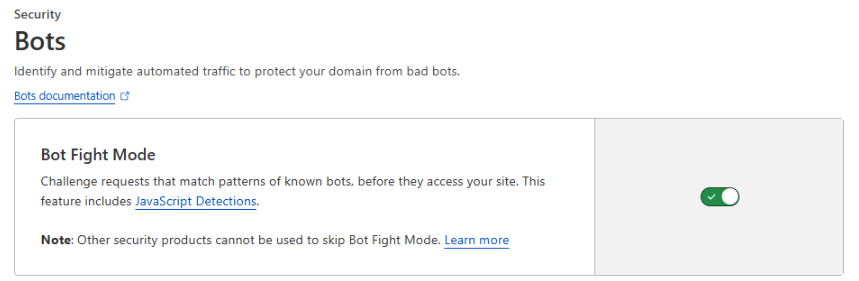
This will help you stop classifying requests made to your webhooks as bot attacks and your inbound webhooks will start working again
Note: Another reason webhooks can stop working is hitting their daily threshold. So always check to make sure the limits arent being maxed out
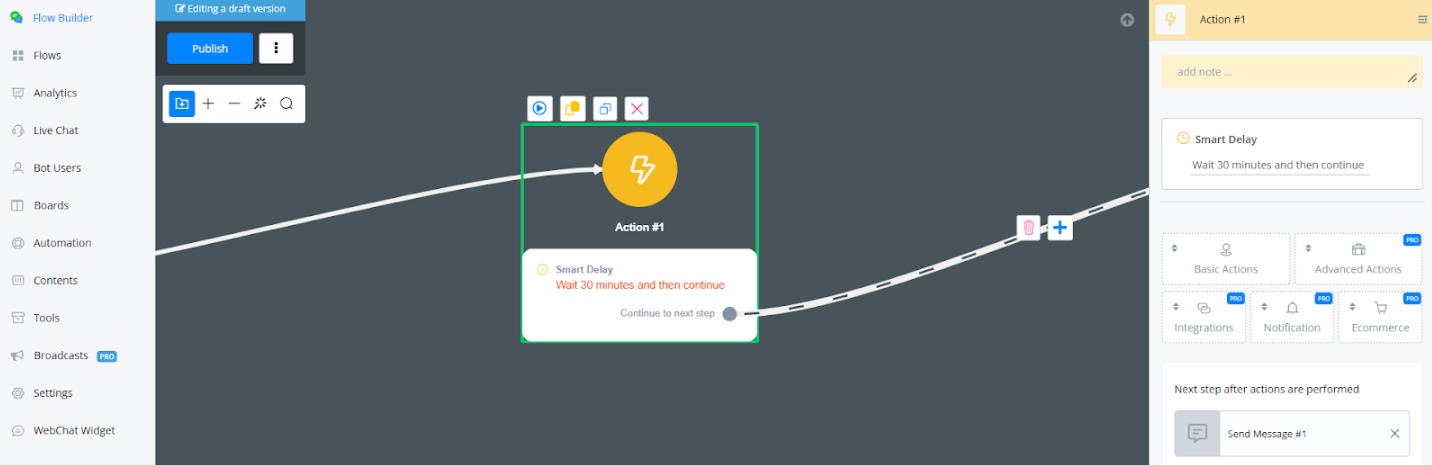
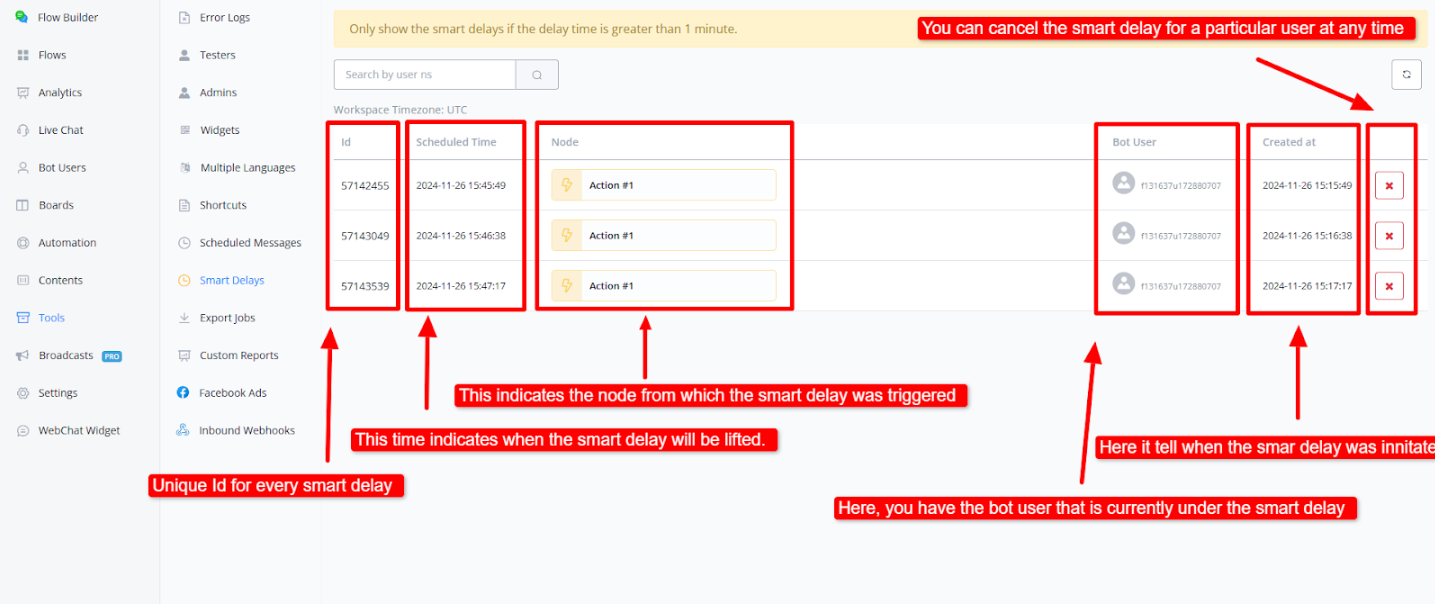
Smart Delays
Description
A new window has been added to the Tools section for Smart Delays. This feature allows you to view all users who are currently in a Smart Delay state. With this window, you can easily monitor and manage users paused in the flow, ensuring better visibility and control over active delays.
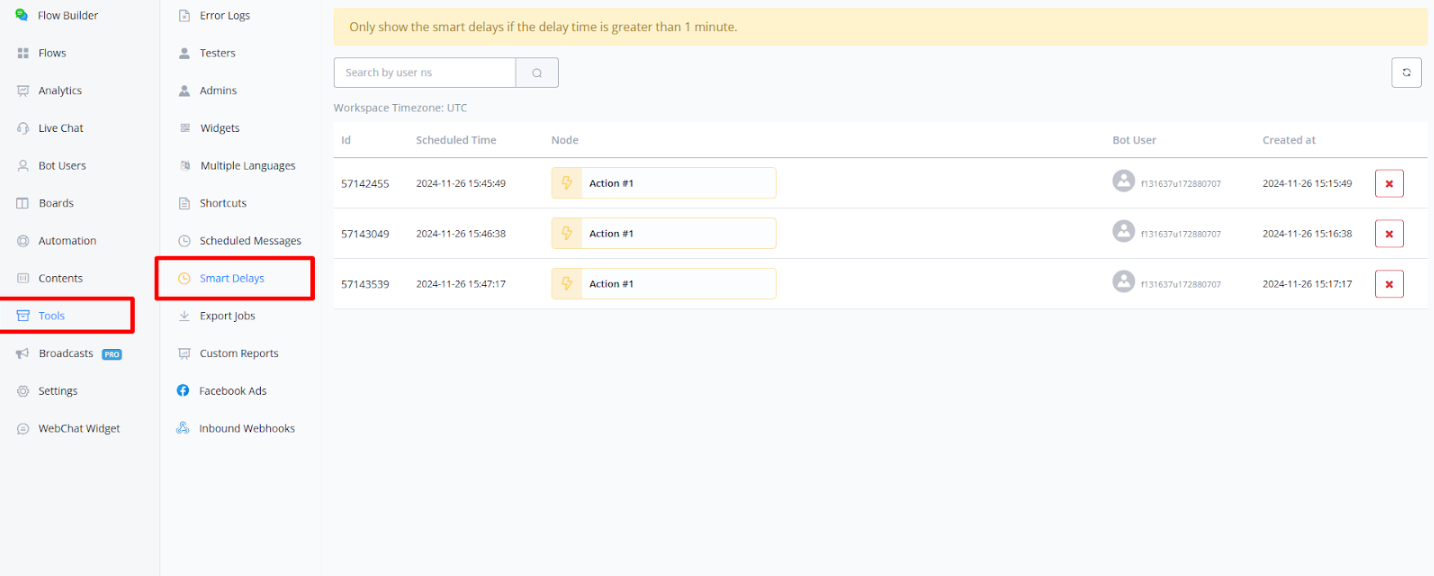
💡 Smart Delays will only be shown if the delay time is greater than 1 minute
How It Functions
Once a user passes through the Smart Delay action, their details will be displayed in the Tools section under Smart Delays. This allows you to easily monitor users who are currently under a delay and manage their status.
What we have in the Smart Delays:
Each Smart Delay has an ID assigned to it for easy identification and management.
- Schedule Time: This field indicates when the Smart Delay will be lifted, showing the exact time when the delay will end and the bot will resume interaction.
- Node: This indicates the node from which the Smart Delay was triggered, giving you context on where the delay originated in the flow.
- Bot User: Here, you can see the bot user who is currently under the Smart Delay. This helps identify which users are affected by the delay at any given time.
- Created At: This field shows when the Smart Delay was initiated, giving you insight into how long the user has been on delay.
You have the ability to cancel the Smart Delay for a particular user at any time, giving you full control to manage user delays as needed.
Use Cases
- Follow-Up Messaging: You can use Smart Delays to send follow-up messages to users who showed interest in a product but left without completing the purchase. Trigger Smart Delays to send 3-4 messages over the course of hours or days, gently reminding them about the product, offering discounts, or suggesting related items.
- Event Reminders: For users who have shown interest in an upcoming event (webinar, sale, product launch) but haven’t completed their registration or sign-up, Smart Delays can be used to send timely reminders. Messages can be sent before 10 hours 5 hours or an hour before the event to encourage participation.
Smart Delays are a great way to keep users engaged without overwhelming them. By using them strategically, you can send follow-up messages, reminders, and even re-engagement prompts at just the right time. Whether it’s reminding someone about an abandoned cart, following up after a purchase, or encouraging users to return after a while, Smart Delays help keep your interactions timely and relevant.
Important Note:
Smart delays work in a que based format when the delay is set higher than 1 minute. Queues are exectued once per minute so depending on when the smart delay has been triggered it could mean there will be an additional 1-2 minutes of delay added to the set total on the smart delay node itself
///////