Data storage
Google Spreadsheet
With Google Spreadsheet, you can add, update and look up your data in a spreadsheet as well as process the data with various built-in tools with Google.
Introduction
With recent updates to Google Integrations, the process for connecting Google Sheets has changed slightly. Here’s a step-by-step guide to ensure a seamless connection to Google Sheets from your dashboard.
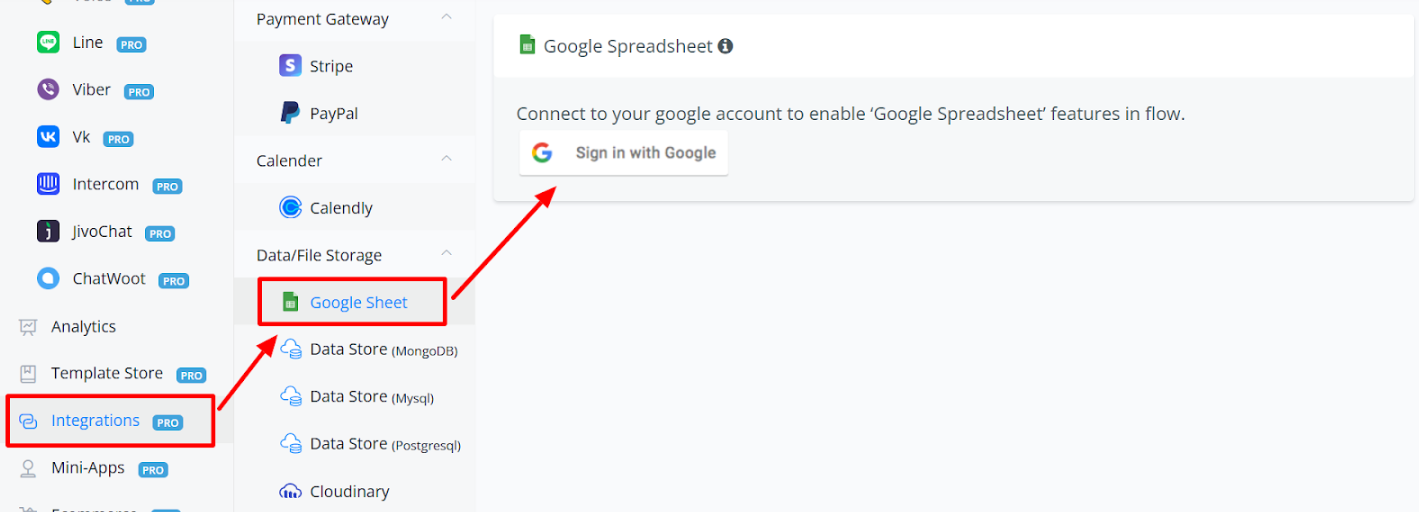
Step 1: Navigate to the Integrations Section
- From your Dashboard Overview, locate the left-hand menu.
- Click on Integrations.
- Select Google Sheet from the list of available integrations.
Step 2: Disconnect (If Already Connected)
- If you’re already connected to Google Sheets, click Disconnect to remove the existing integration.
- This ensures a fresh setup.
Step 3: Sign in with Google
- Click on the Sign In with Google button.
- Choose the Google account you’d like to connect.
- Complete the sign-in process.
You’ll be redirected back to the integration setup.
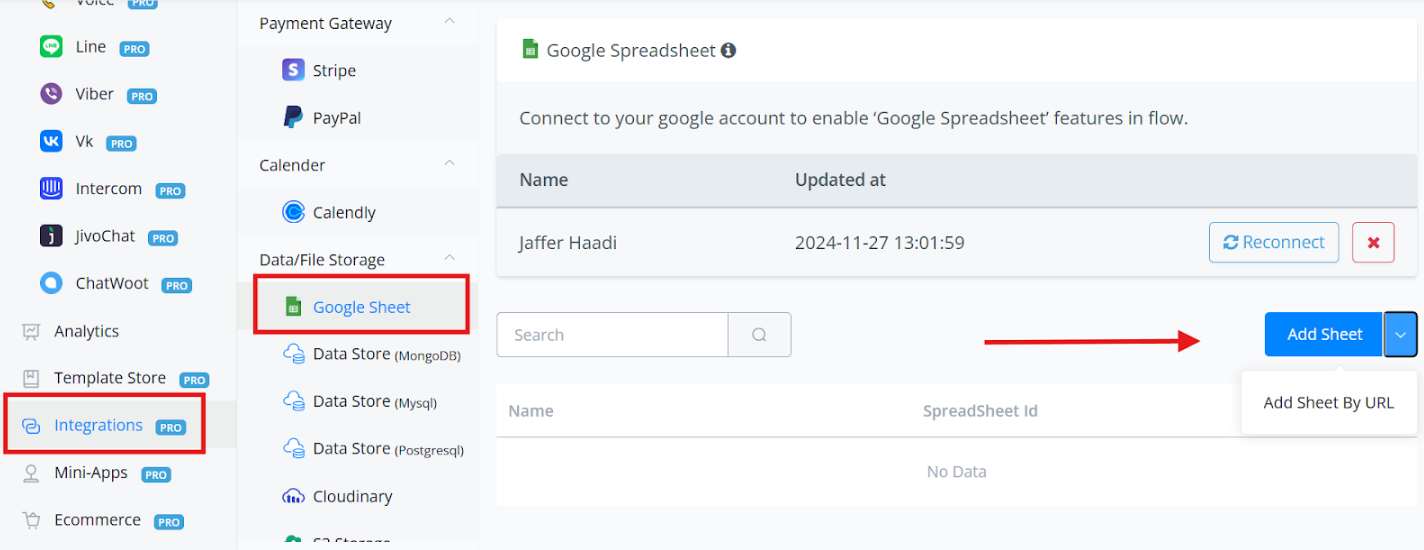
Step 4: Add Your Google Sheets
Previously, sheets were added directly inside workflows. Now, you’ll need to link them at this stage.
- Add Sheet by URL:
- Paste the URL of the Google Sheet you wish to connect.
- Assign a name for easy identification.
- Add Sheet Directly:
- Click Add Sheet and browse your available Google Sheets.
- Select the sheet you want to connect.
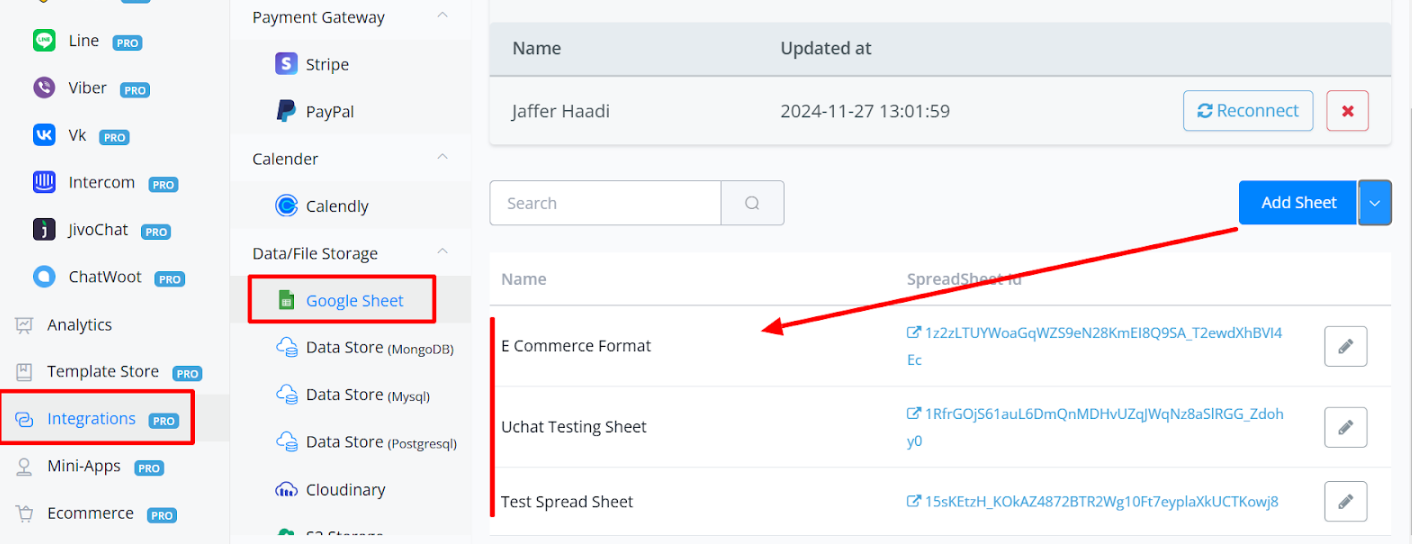
The selected sheet will now be available for use in your flow automations.
Once Sheets are added, you can see them here and also access them in the flow builder.
Manage Spreadsheet in Action Step
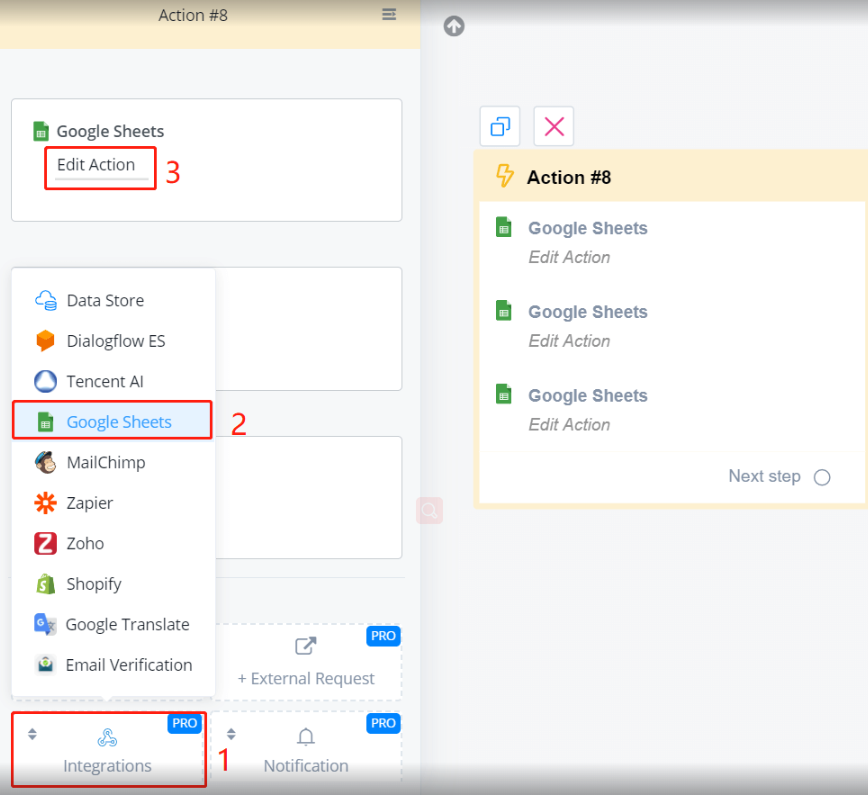
In an Action step, follow steps 1 to 3 in the above picture. Then you will see a list of functions.

Insert Row
Get Row by Value
Get Multiple Rows
Update Row
Simple Storage Service (S3)
Simple Storage Service or S3 is a data-storage service provided by many cloud companies such as AWS (known as S3 buckets). S3 stores varied types of data and is famous for its simple integration and auto data management features which saves you from the hassle of managing your database on your own.
Integration With Messagingme.app
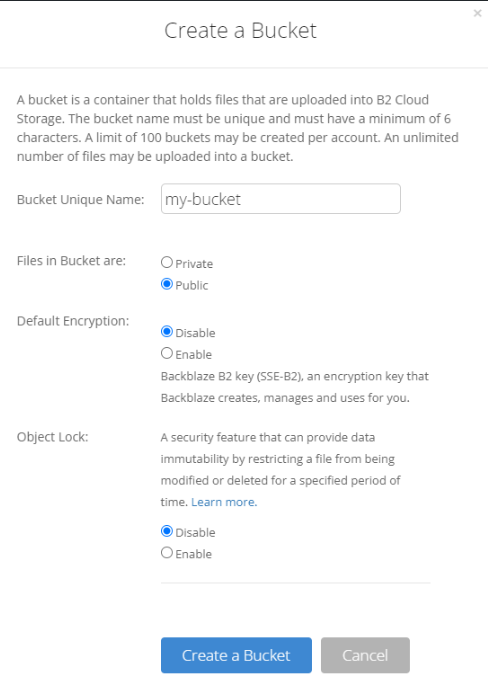
Open your S3 dashboard and create a new bucket.
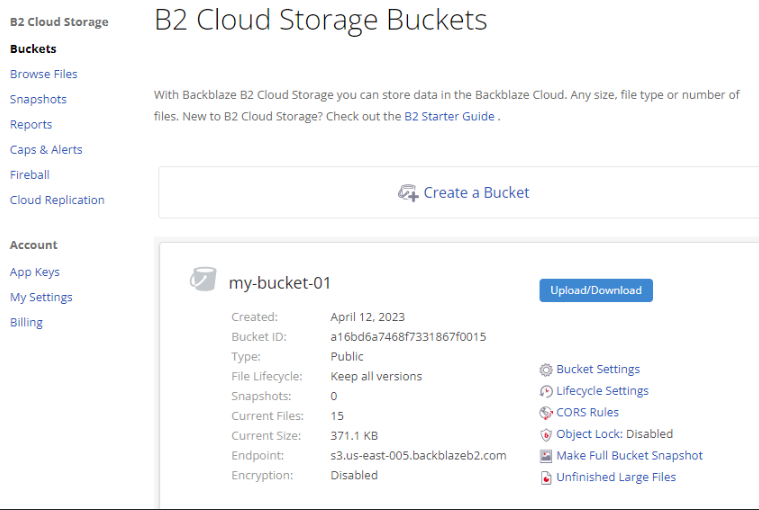
Make sure when you are creating the bucket that it has read/write permissions and is a public bucket
From the side menu “App Keys”, you can add new application key, you need to have the permission read and write.
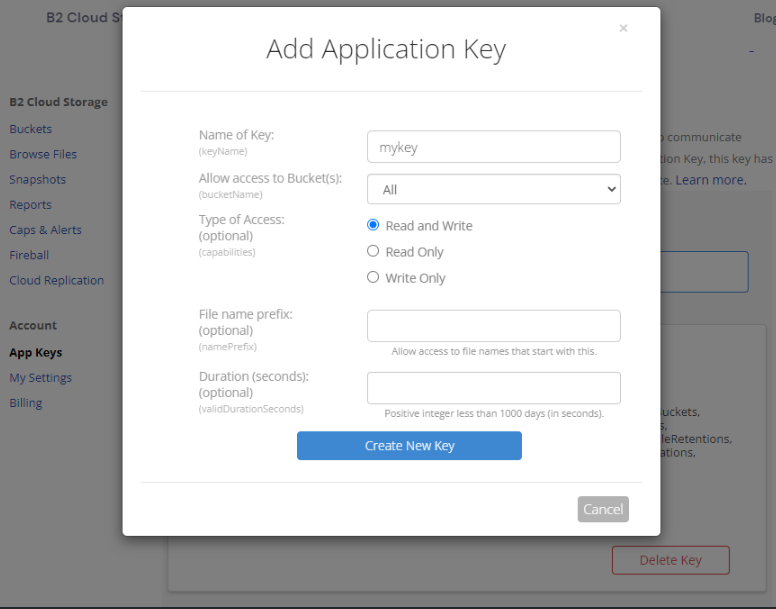
After creating the key, save or copy the details.

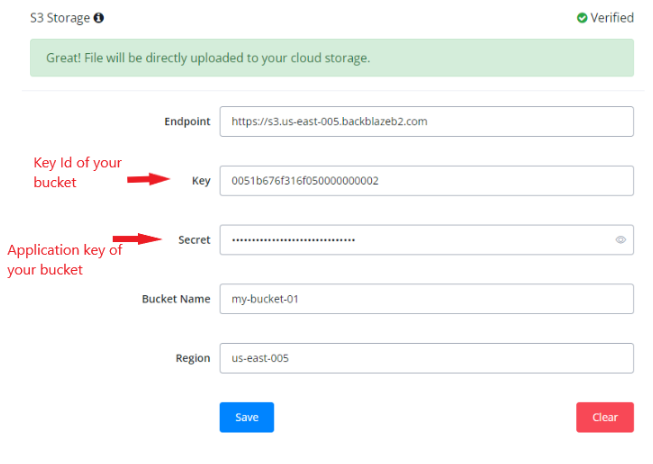
Inside Messagingme.app’s dashboard, click on Integration and then S3 storage option.
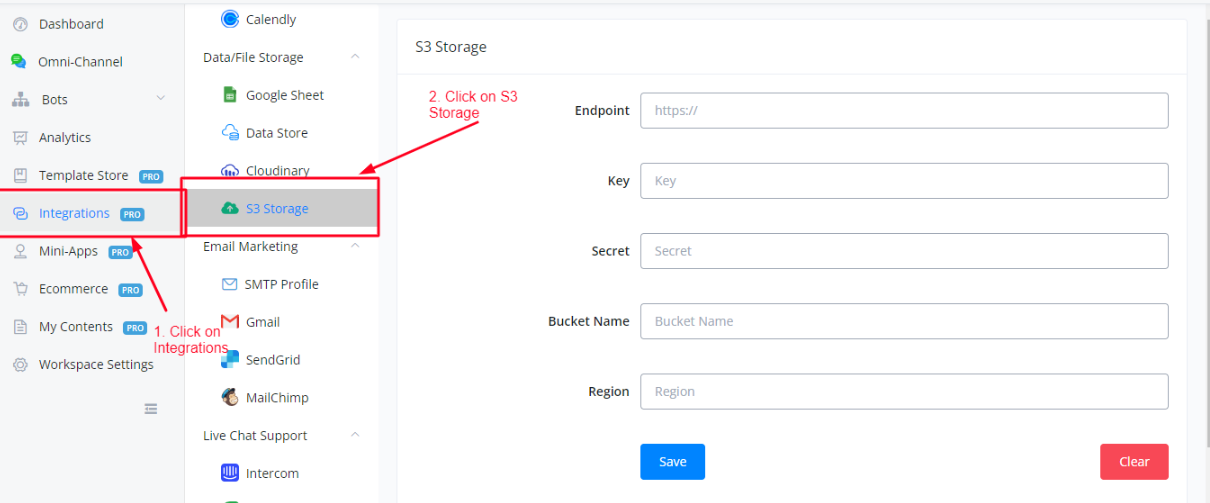
Enter the details with respect to your bucket in the fields and click on save and your S3 storage has been integrated with Messagingme.app to use.
Implementation Of S3 Inside Messagingme.app
S3 storage replaces the default Messagingme.app storage server, hence every file (picture, video, pdf, media files etc) you will upload will be uploaded directly to your S3 bucket instead of Messgaingme.app’s server.
This helps keeping your data saved in case Messagingme.app faces an outage and ensures your flows are kept running properly.
An example of implementation will be to make a Send Message node, and upload an image using the Rich Media feature.
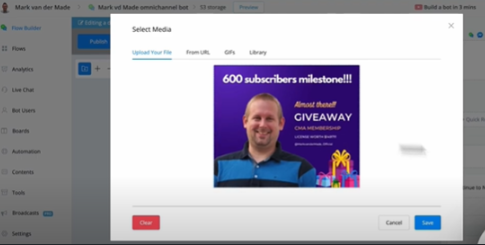
After the upload is completed, save the flow and publish it.
Click on the node again and observe the image URL you just uploaded.
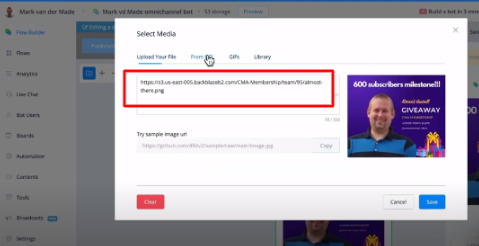
The URL of the image has been changed from Messagingme.app default server uri to your S3’s bucket URL.
In this way, after integration, all your files will be uploaded directly to your bucket.
How to Connect Your Google Cloud S3 Storage
This guide will walk you through connecting your Google Cloud S3 storage to Messagingme.app . This allows you to directly upload files from your Messagingme.app flows to your Google Cloud storage buckets.
Prerequisites
- A Messagingme.app account
- A Google Cloud project with an S3 storage bucket
Steps
- Locate the S3 Storage Integration in Messagingme.app
- Navigate to the left-hand side menu in Messagingme.app.
- Click on “Integrations.”
- Select “Data File Storage.”
- Choose “S3 Storage” from the list of integrations.
- Gather S3 Storage Credentials
- The overview page will display several parameters required for connection:
- Endpoint: This is a generic URL and remains constant ( https://storage.googleapis.com ).
- Bucket Name: The name you assigned to your S3 bucket.
- Region: The geographical location where your bucket resides (e.g., Europe for GDPR compliance).
- Access Key: A unique identifier used for API access (to be created in Google Cloud).
- Secret Key: A confidential key used for API access (to be created in Google Cloud).
- Create a Google Cloud Storage Bucket (if needed)
- Access your Google Cloud project.
- Click on the hamburger menu (navigation menu) in the top left corner.
- Search for “Cloud Storage” and select “Buckets.”
- Click the “Create Bucket” button.
- Assign a name to your bucket (e.g., “Messagingme.app-demo”).
- Choose a region (e.g., Europe for GDPR compliance).
- Select “Fine Grain” access control for now.
- Choose “Object Versioning” for data protection (optional).
- Select “Google Managed Encryption Key” for data encryption.
- Uncheck “Enforced Public Access prevention on this bucket” (required for Messagingme.app access).
- Confirm the bucket creation.
- Generate Access Key and Secret Key
- Click on the hamburger menu (navigation menu) in the top left corner.
- Navigate to the “IAM & Admin” and “Service Accounts”.
- Select the service account you want to use for Messagingme.app access.
- Ensure the following permissions are enabled for the service account:
- Storage Object Admin
- Storage Object Creator
- Storage Object User
- If you cannot manage permissions, access them through “IAM” ->This means the permissions are inherited from the connected admin user. If you navigate to Identity and Access Management (IAM), you should be able to set up the required permissions. Go to “Edit Principal” and then “Add another Rule.” Search for “Storage Object Admin”, “Storage Object Creator”, “Storage Object User” to find the specific storage permissions you need.
- Go to “Cloud Storage Settings” -> “Interoperability.”
- Create a new key and copy the “Access Key” and “Secret Key.”
- Return to the S3 Storage integration page in Messgaingme.app.
- Paste the copied endpoint URL ( https://storage.googleapis.com ).
- Enter your bucket name.
- Select the appropriate region from the dropdown menu.
- Paste the copied access key and secret key into their respective fields.
- Click “Save.”
A “Verified” status should appear if the connection is successful.
You can now utilize your Google Cloud S3 storage within your Messagingme.app flows. Files uploaded through your flows will be saved directly to the designated S3 bucket.