EMail marketing
SMTP Integration
SMTP Profile Setup
Let’s take Hotmail as an example.
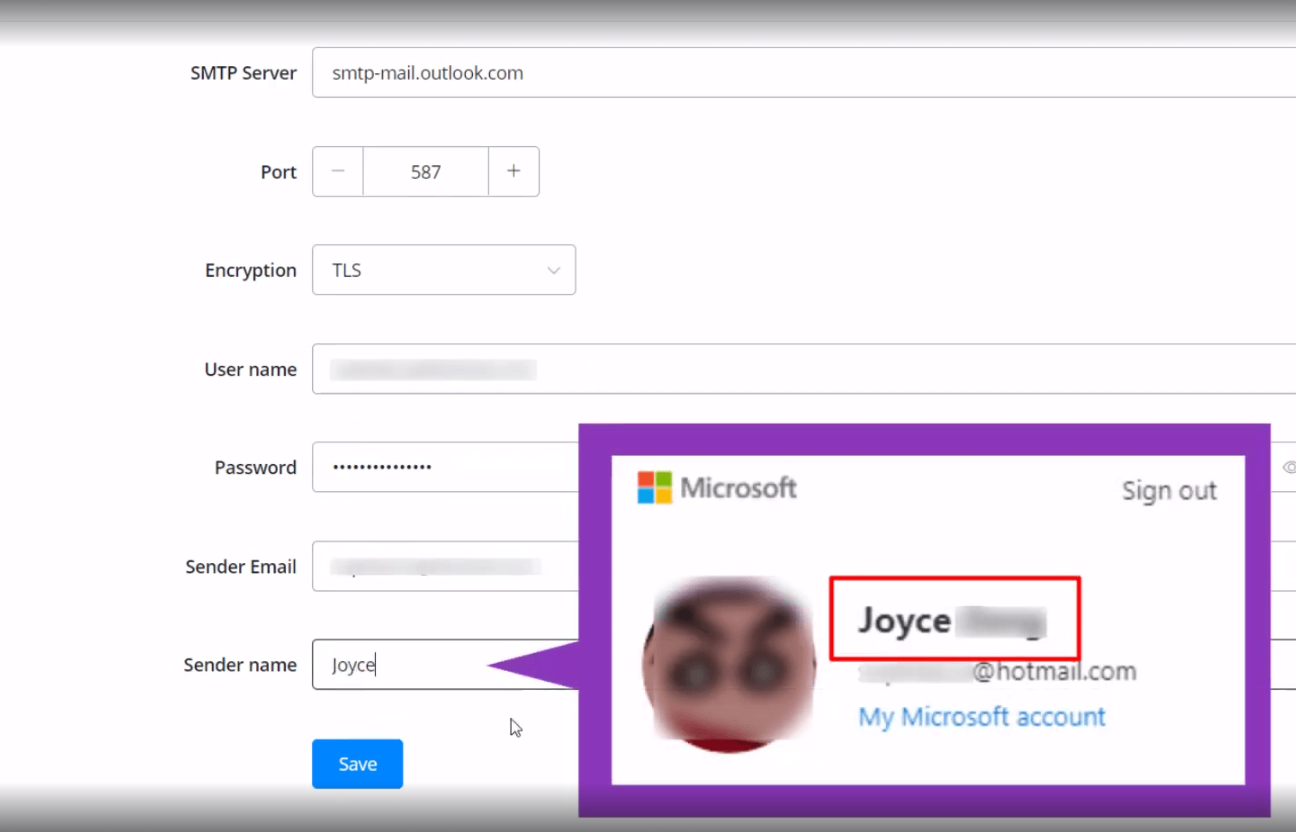
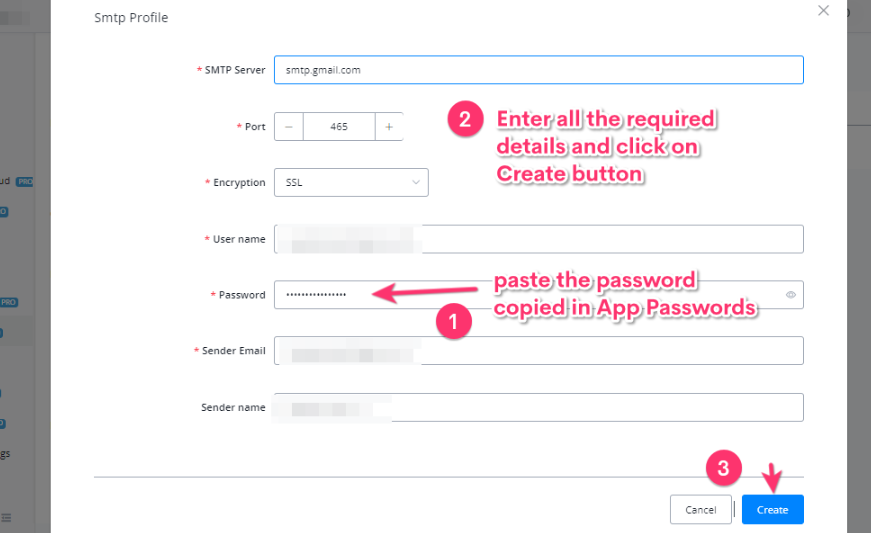
Fill in the fields as shown in the picture. Note that you can find your “Sender name” in your account detail. Once done, click “Save”. The sign at the upper right corner will tell you whether you succeed or not, either “Failed” or “Verified” like this:
You will receive a test email if your email address gets verified.
How to Connect your Gmail Account by SMTP
Purpose of connecting Gmail Account through SMTP Profile
Sometimes we will need to connect a Gmail Account through SMTP Profile because, In some use cases, like connecting the Client’s Gmail account to the Messagingme.app Platform, where we don’t have access towards their Google Account.
Here we need to enable few things on the Google Account as below stated:
- Enable two-factor authentication
- Generate a app-specific password which will allow an external app to get access towards this SMTP profile.
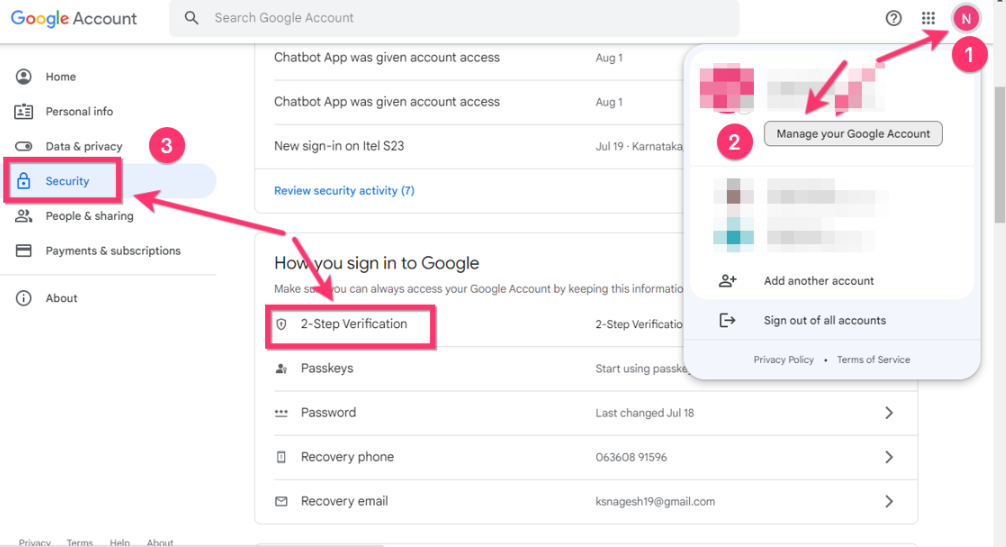
First let’s us enable the two-factor authentication.
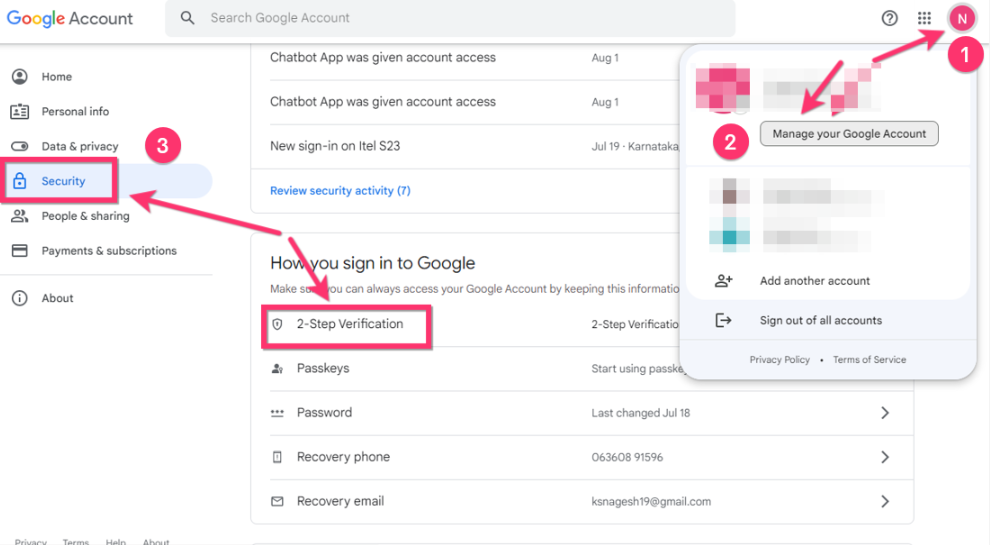
Goto Google Profile > Manage your Google Account > Security > 2-Step Verification
Once we are done with the 2-step verification, let’s go and generate the App Specific Passwords.
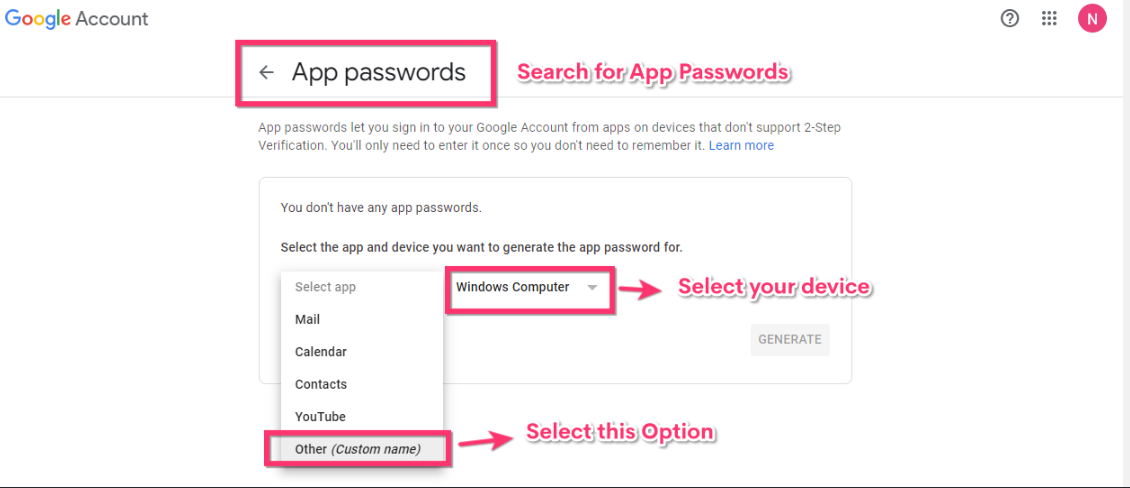
Search for the “App Passwords” > select the Device > Select Other (Custom name),
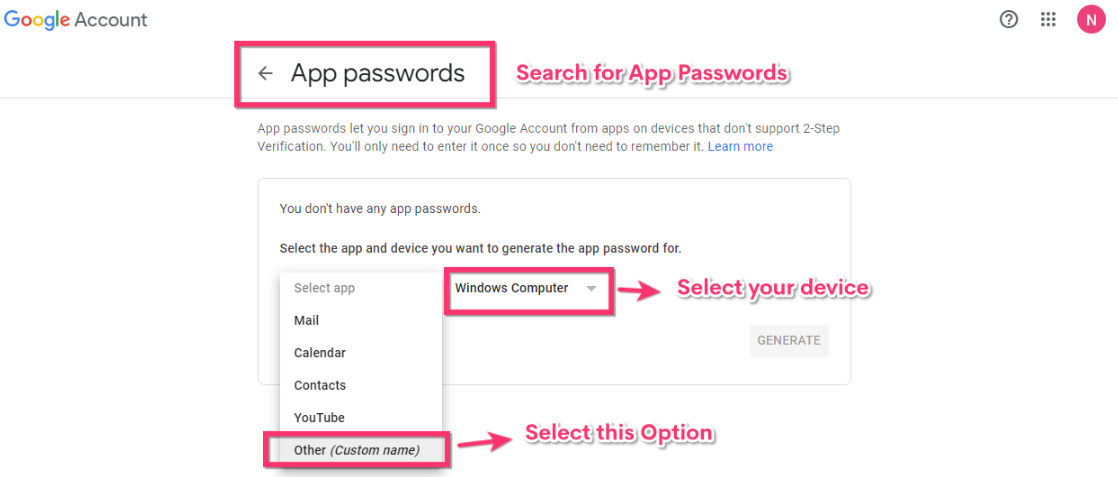
and example type “MessagingMe” and click on Generate button.
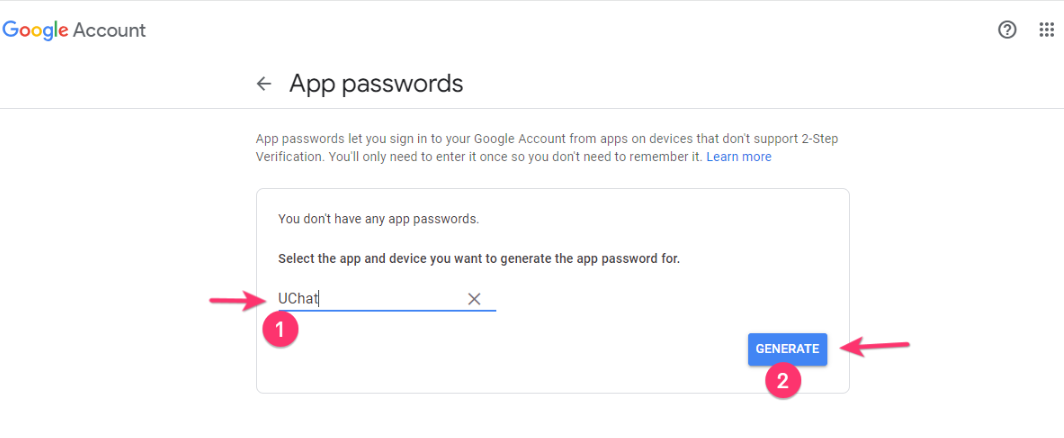
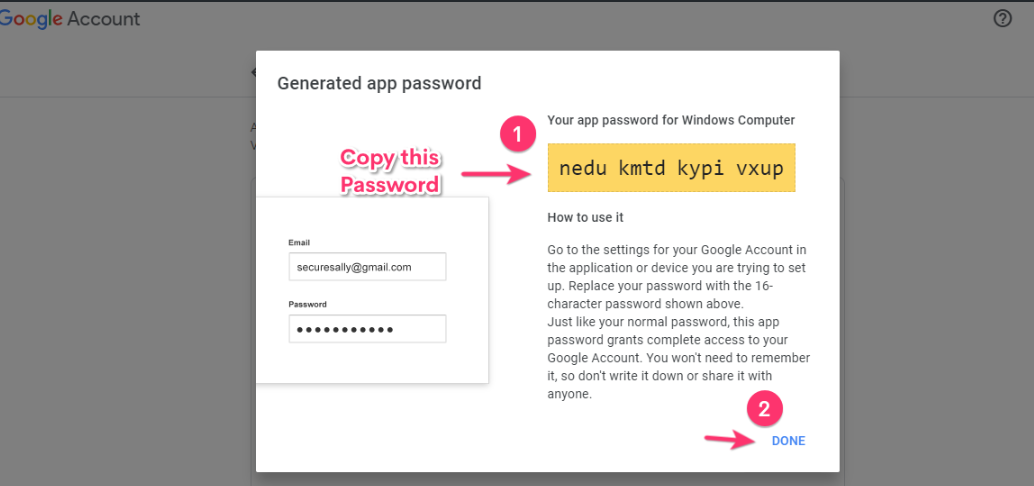
Now Generate your Password by clicking on the Generate button. Next Copy the Password and click on “Done” button
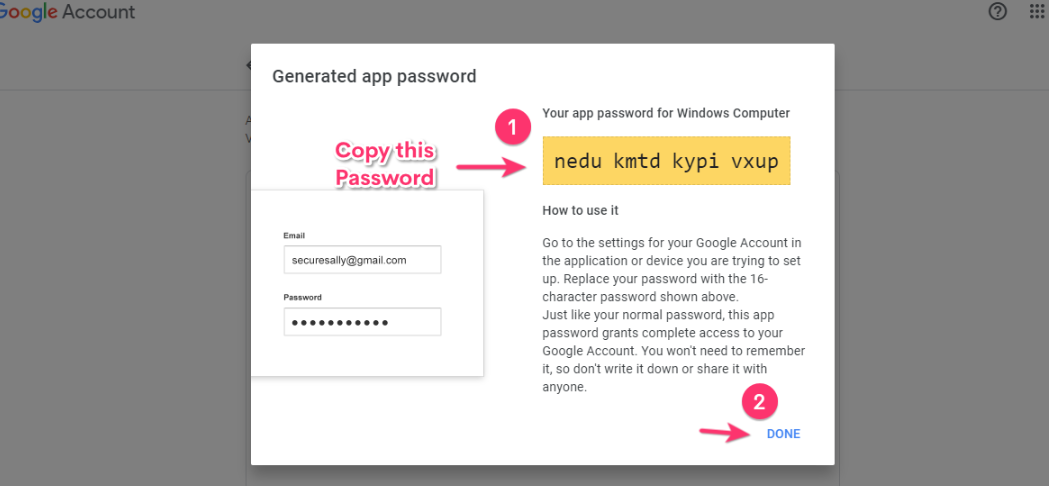
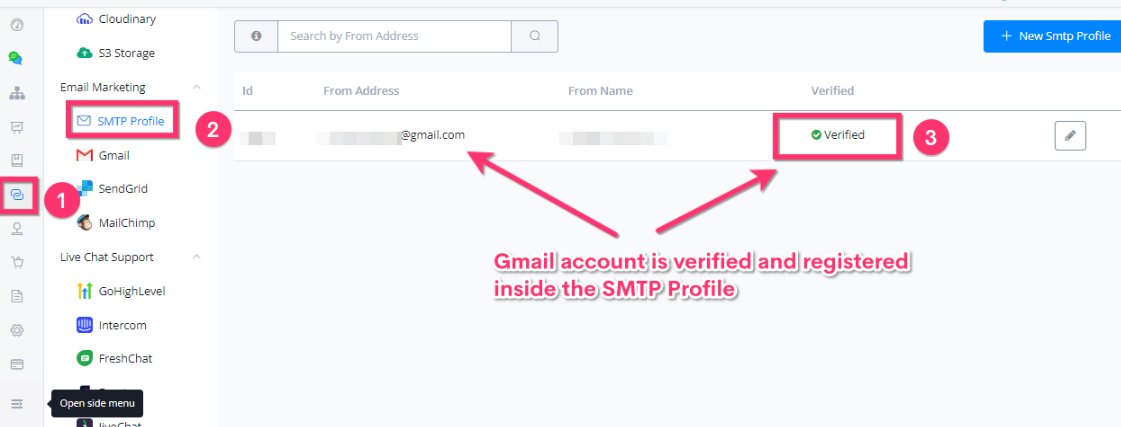
Copy the Password, Open the SMTP Profile inside the Integrations section in the workspace and paste this password and fill all the required details as necessary.
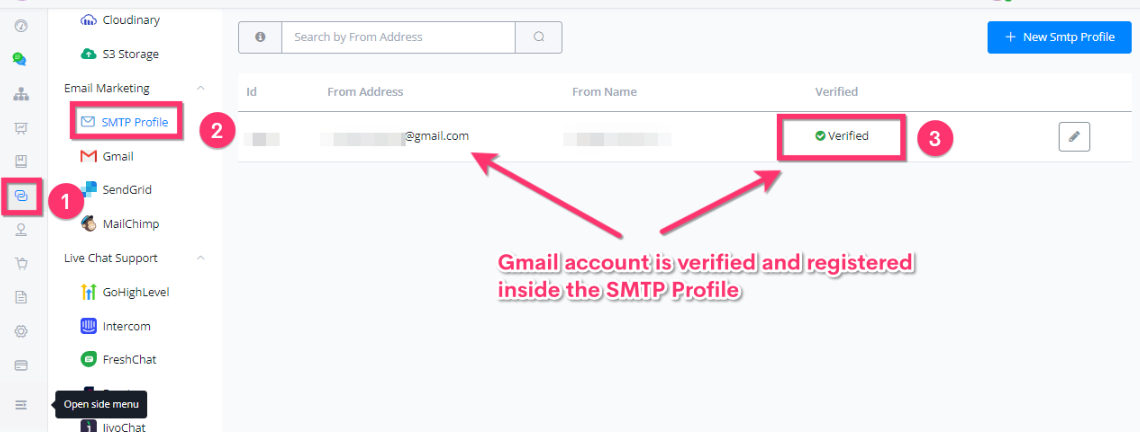
Finally you can see your Gmail account is registered using the SMTP Profile.
Office365 SMTP Integration with Messagingme.app
Make sure the SMTP Client Authentication is enabled. More details here:
Enable or disable SMTP AUTH in Exchange Online
Office365 account:
To integrate the Office365 into the SMPT profile inside the Messagingme.app, you need to
-
Create App based Password.
-
Configure SMTP inside Messagingme.app Platform.
Create App based Password
- Login Office 365 User account (https://myaccount.microsoft.com)/)
- go to “Security info” (left panel)
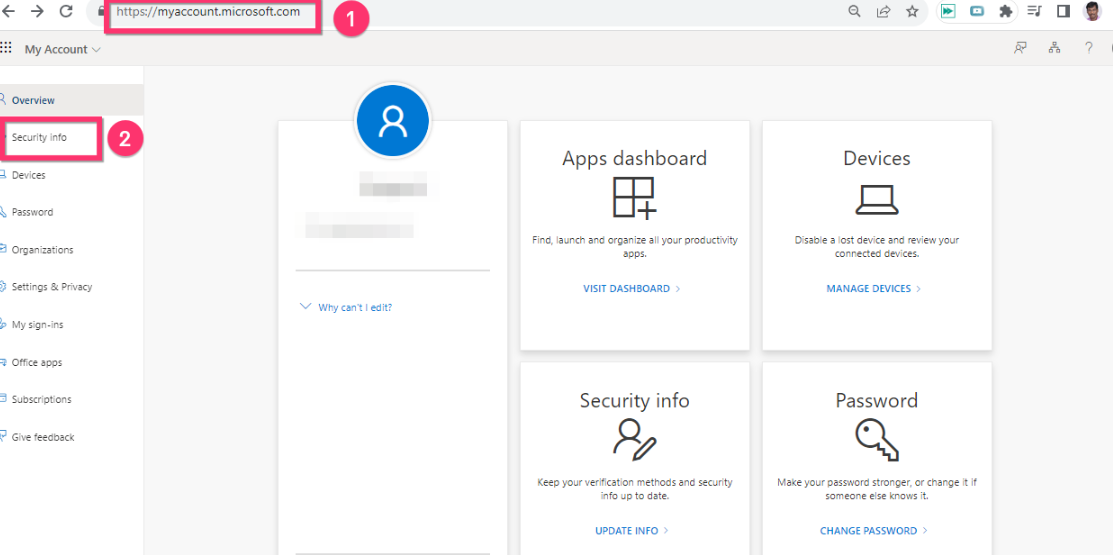
- Click on “Add Sign-in method”
- Select “App Password” and follow the course to create app password. Save the password, eg., on a notepad, as it will not be visible anymore once created.
Configuration of SMTP Profile in Messagingme.app
Following the above steps, create the password and store the password for example in a Notepad.
Now go to the Messagingme.app SMTP integrations and complete the integrations as below:
- SMTP Server : smtp.office365.com
- Port : 587
- Encryption: TLS
- User name:
- Password:
Once all the above details are filled and you click on the Create Button, you should be able to get connected with your verified.Office365 Email account.
Now in the flow builder, when you are sending the emails, you can select this SMTP profile from the drop down and use in anywhere and in any channel we support.
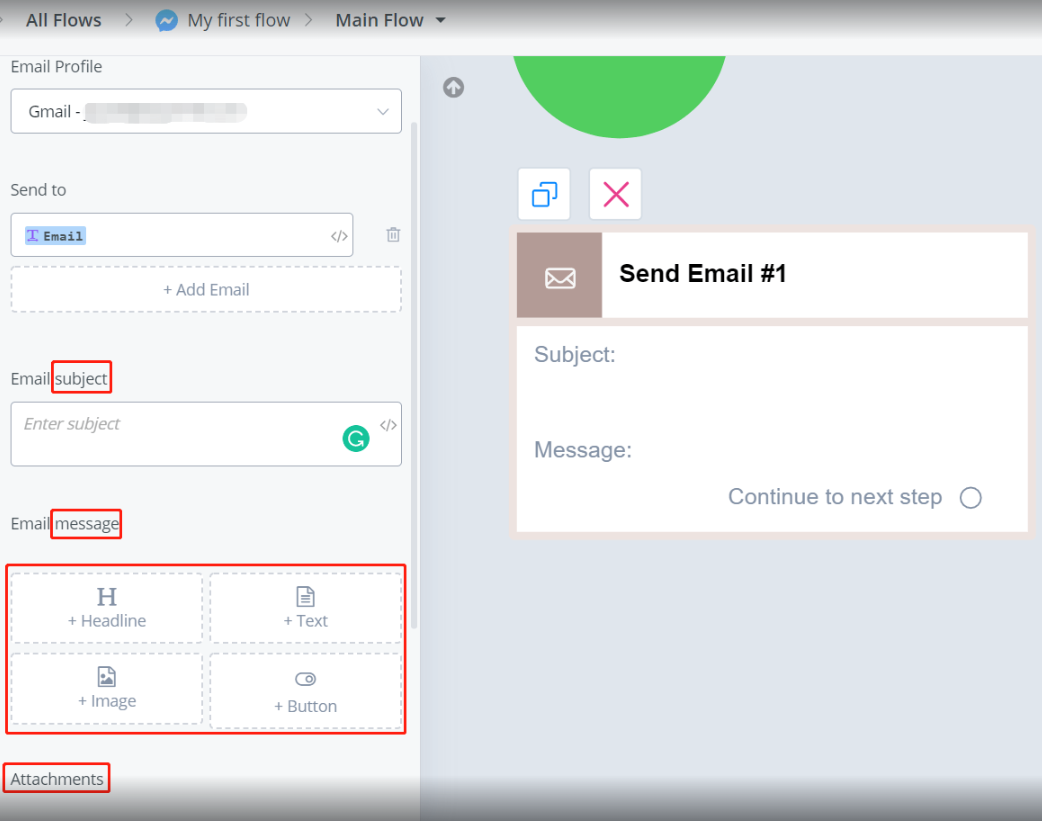
Send Email Notification
After setup your email integration, you can select it as a sender in your “Email Profile” list. Check how to send email notification
Send Email Step
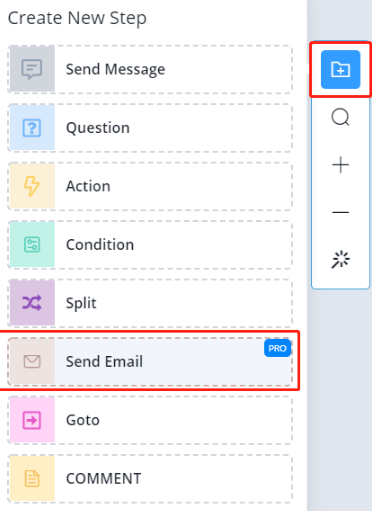
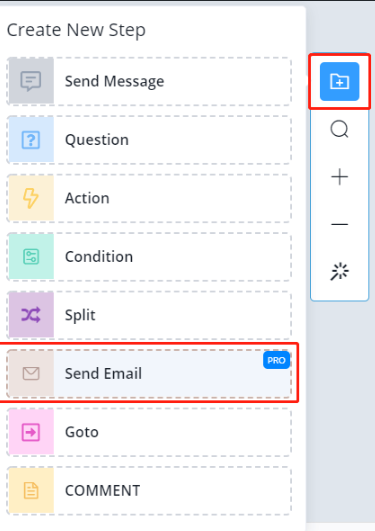
Add a Send Email step by right-clicking in your workspace or from the “Add new step” button:
This is how a Send Email step looks like:
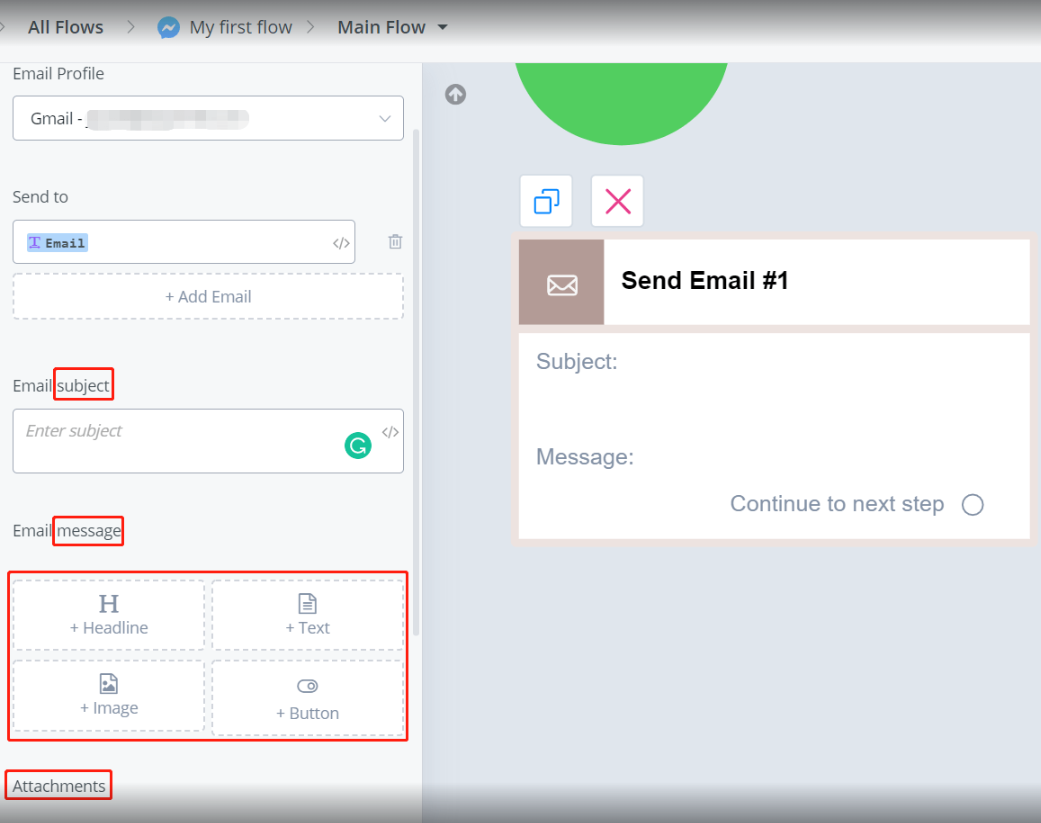
Name a sender and receiver. There are 3 blocks of information, subject, message and attachment. Feel free to add what you need.
Free online SMTP Tools
Here is the free online tools for you to debug and figure out how to reach out to seek support.
Free SMTP Test Tool — Check SMTP Server Connectivity & Deliverability
If you set up your SMTP setting in the link above, and it can send out email, and the same setting don’t work inside of Messagingme.app SMTP profile, then it’s a issue from Messagingme.app side.
You can provide the login details to Messgaingme.app support, we will test and fix it from our side.
If you set up the SMTP credentials, and it still can’t send out email from that online tools, and then it’s the issue from the provider you are using or the wrong credentials. you will need to contact the provider you are using and get the correct login details.
Gmail
Gmail Setup
Click “Connect Google Account” after you choose “Gmail”.
Select one of your Gmail and “Allow” Messagingme.app to connect.
Once done, it looks like this:

How to Connect your Gmail Account by SMTP
Purpose of connecting Gmail Account through SMTP Profile
Sometimes we will need to connect a Gmail Account through SMTP Profile because, In some use cases, like connecting the Client’s Gmail account to the Messagingme.app Platform, where we don’t have access towards their Google Account.
Here we need to enable few things on the Google Account as below stated:
- Enable two-factor authentication
- Generate a app-specific password which will allow an external app to get access towards this SMTP profile.
First let’s us enable the two-factor authentication.
Goto Google Profile > Manage your Google Account > Security > 2-Step Verification
Once we are done with the 2-step verification, let’s go and generate the App Specific Passwords.
Search for the “App Passwords” > select the Device > Select Other (Custom name),
and example type “Messagingme.app” and click on Generate button.
Now Generate your Password by clicking on the Generate button. Next Copy the Password and click on “Done” button
Copy the Password, Open the SMTP Profile inside the Integrations section in the workspace and paste this password and fill all the required details as necessary.

Finally you can see your Gmail account is registered using the SMTP Profile.
Send Email Notification
After setup your email integration, you can select it as a sender in your “Email Profile” list.
Send Email Step
Add a Send Email step by right-clicking in your workspace or from the “Add new step” button:
This is how a Send Email step looks like:
Name a sender and receiver. There are 3 blocks of information, subject, message and attachment. Feel free to add what you need.
MailChimp
Setup
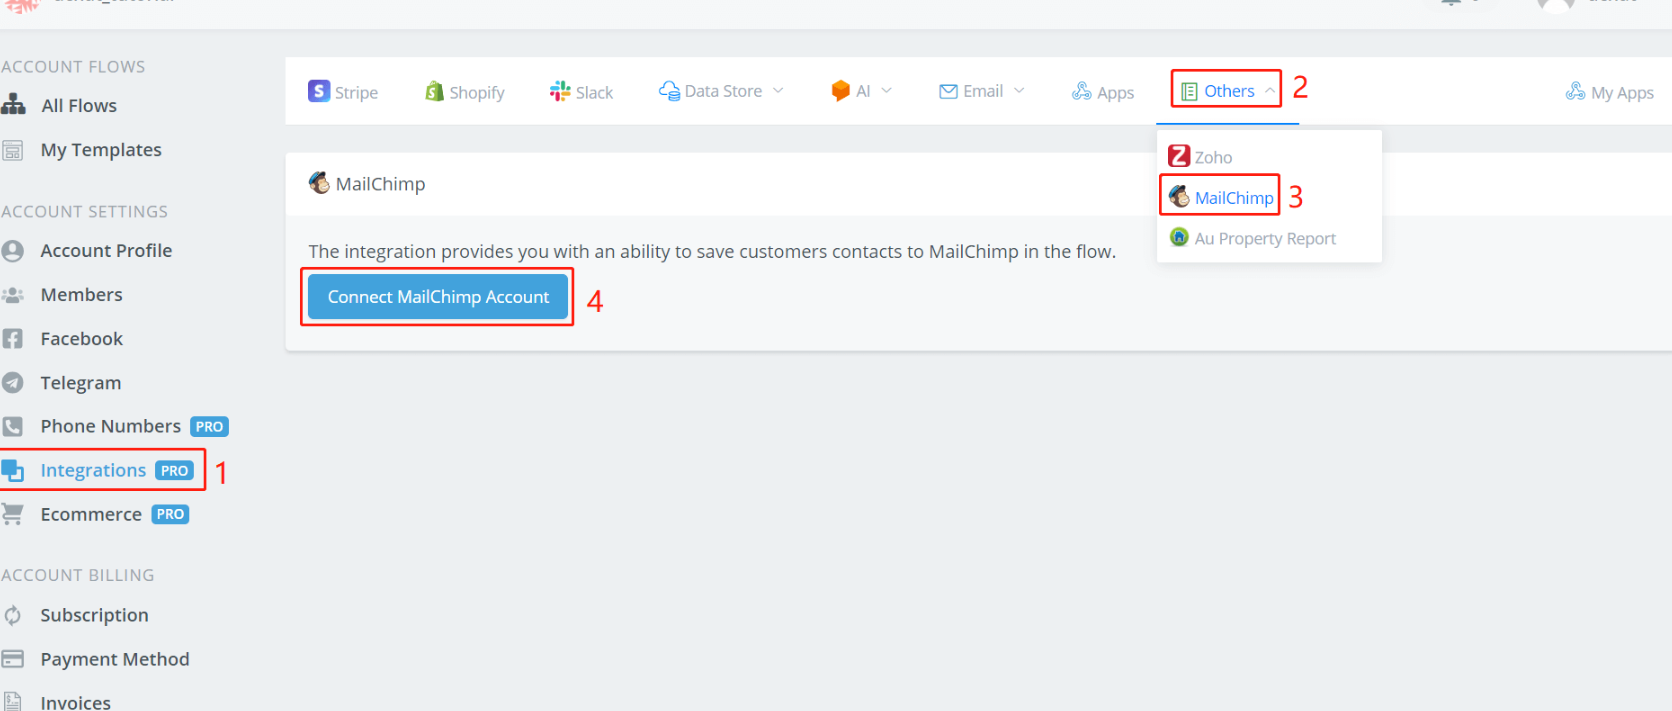
Follow step 1 to 4 in the above picture, open MailChimp’s website.
Log in yourself and authorize Messagingme.app.
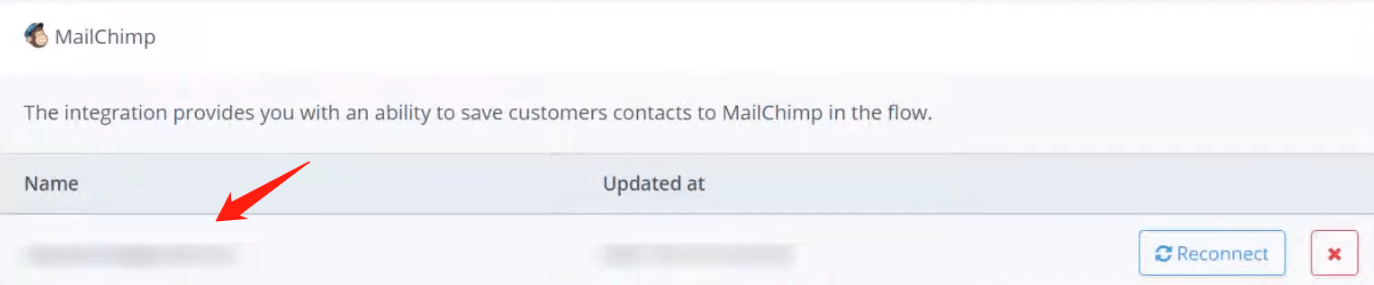
The page will then bring you back to Messagingme.app. You can see your account name now.
Use MailChimp in Action Step
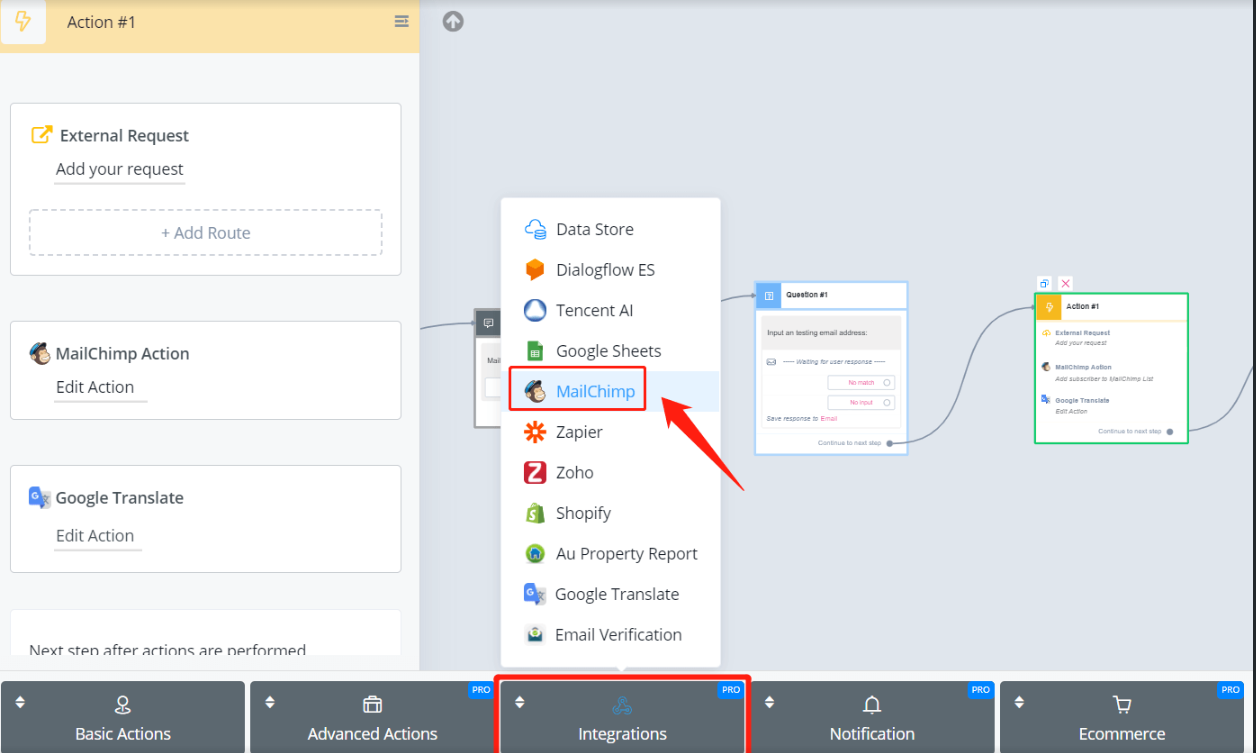
In your Action step, find “MailChimp” in the “Integrations” list.
Simply put this Action after a Question step. Pick a MailChimp list and put users’ email address. That’s all about it! Messagingme.app
Let’s see what happen in MailChimp:
In your MailChimp dashboard, click area 1 and 2 from the left sidebar. Then you will see the audience added from the source Messagingme.app.
💡 Note that - only a valid email address can be added to your MailChimp. If nothing happens after the Action step, the email address from the user might be incorrect.
TIP - So you might want to add one more action to check whether the input email from the user is correct or not. There are various third-party APIs for verifying email, like mailboxlayer (opens new window). You can call these APIs from external request or an easier way mini app