Whatsapp Channel
Whatsapp Channel
Connect with the Whatsapp cloud API
Prerequisites
Before you can start using WhatsApp Business API, you’ll need the following:
- A Facebook account.
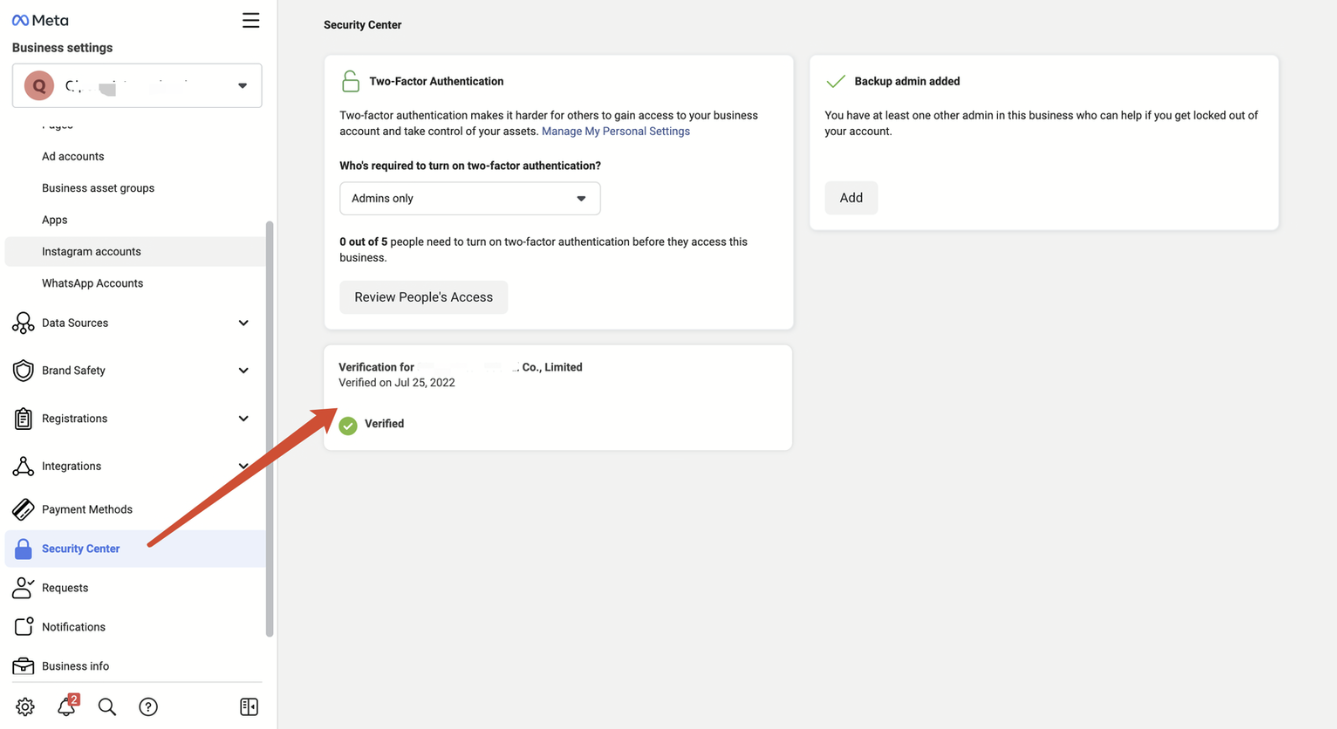
- Administrator access to your Meta Business Manager account. If you don’t have a Meta Business Manager account, you can create one during the embedded signup process. also the meta business account must not be blocked (here you can see if there are any restrictions on your META business account)
- Credit Card (Mastercard / Visa → No American Express!)
- A phone number that can be registered as a sender. This number must not be connected to any WhatsApp account (private or WhatsApp Business API). You’ll need access to this number to receive an SMS or a voice call for verification. If you have an existing account, you can find instructions on how to delete it here.
Step 1: Sign in with Facebook
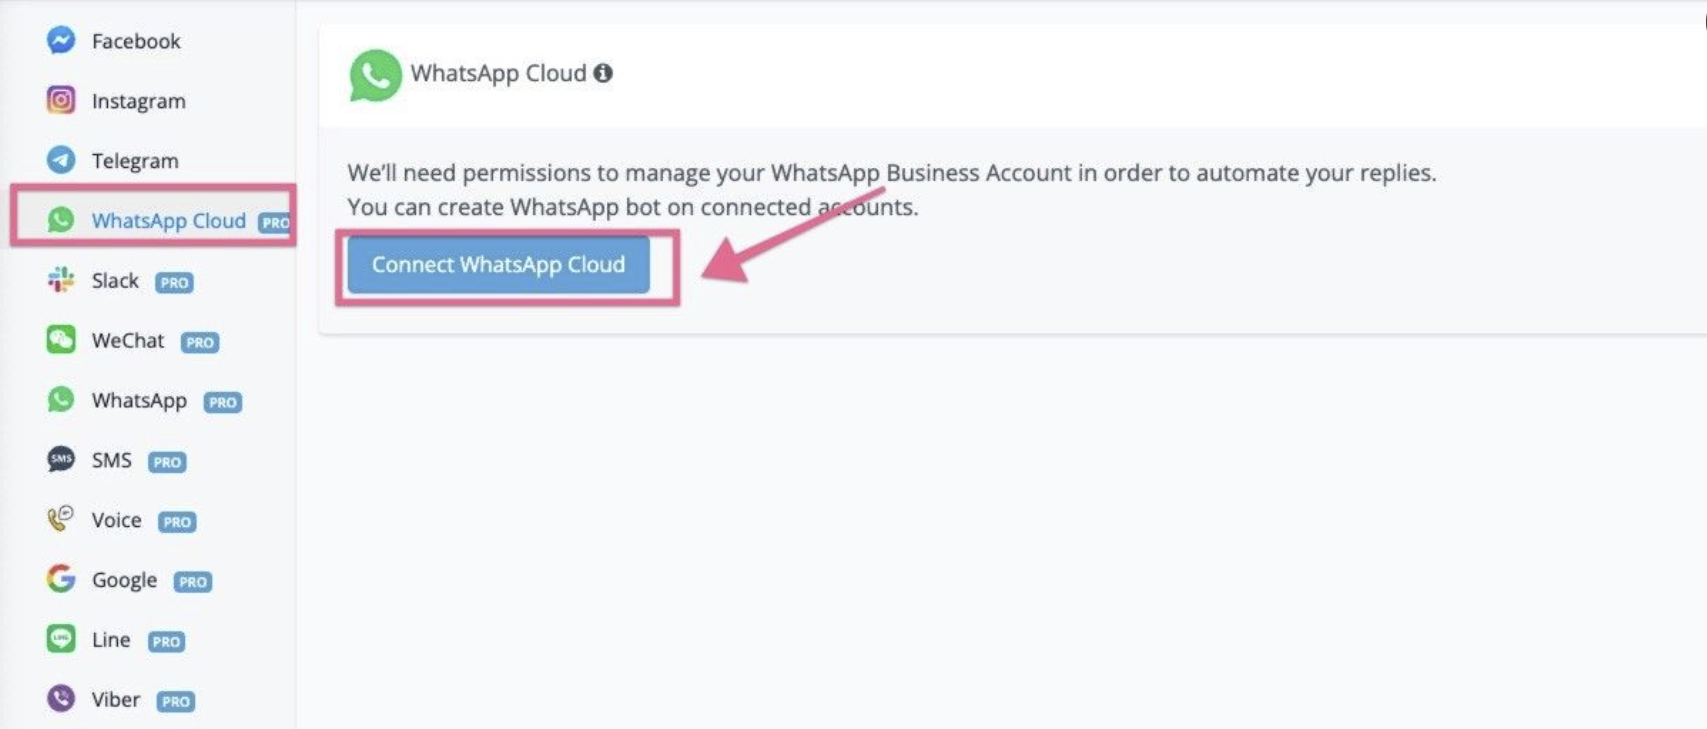
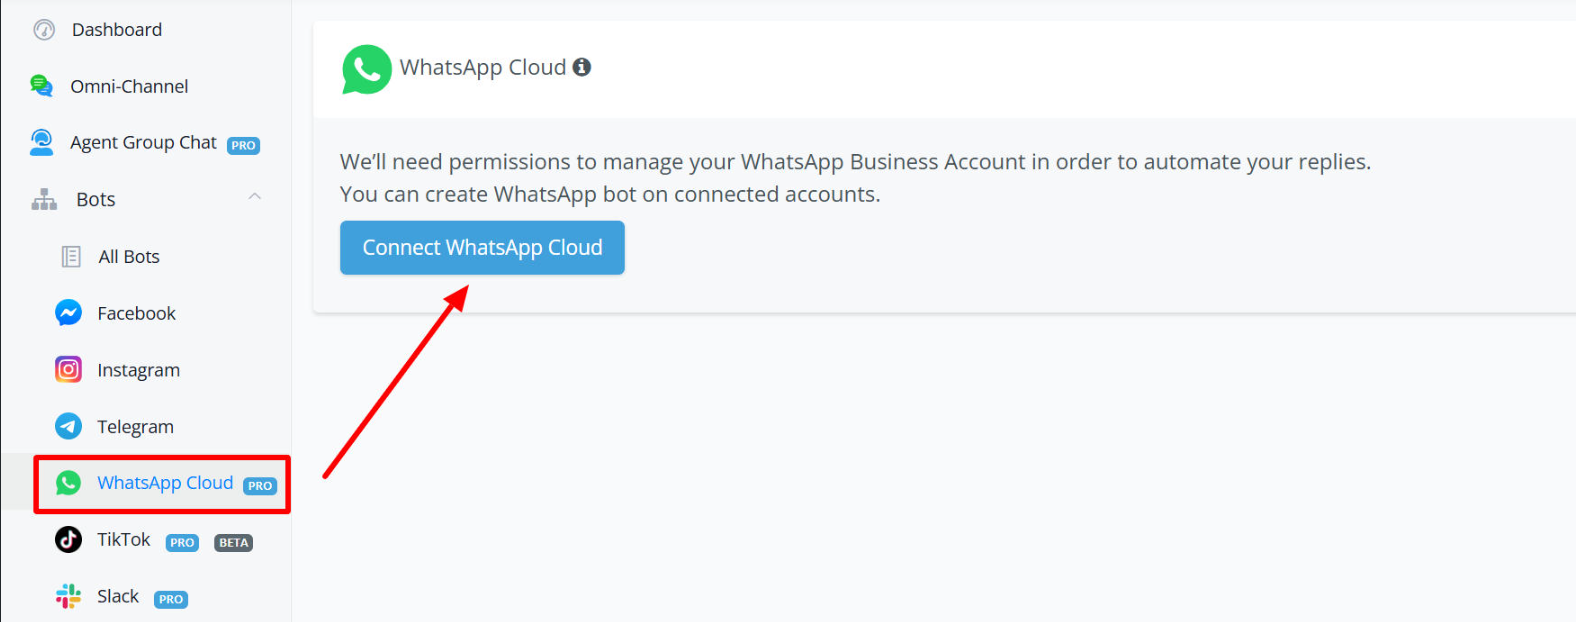
To start the process, log into the Messagingme.app platform, and navigate to the “dashboard” and click “WhatsApp Cloud” from the left sidebar, and click “ Connect WhatsApp Cloud” Button:
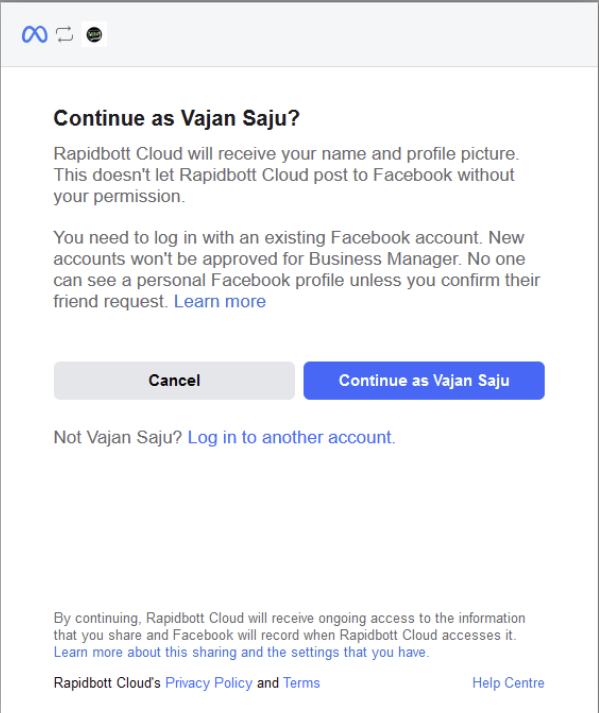
In the popup window, login your facebook account or select the account that you already login in your browser.
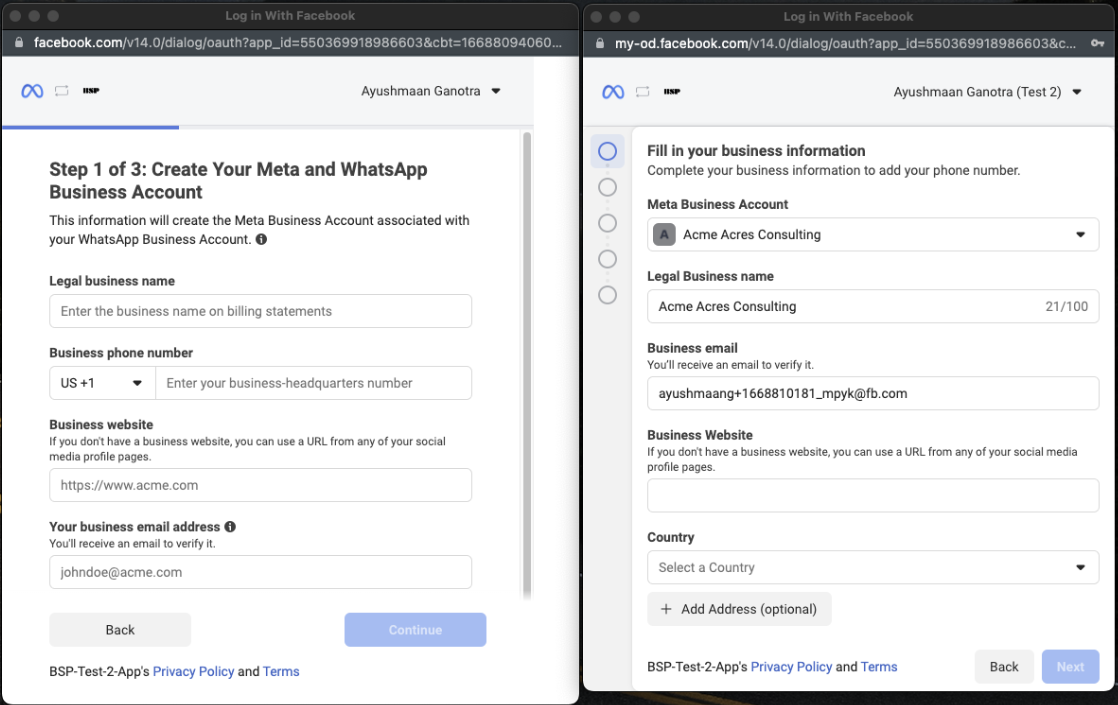
Step 2: Create or Select a Meta Business Manager account
You can either select an existing Meta Business Manager account on which you have administrator permissions or create a new Meta Business Manager account. To create a new account, you will need to prepare the following information:
- Legal business name
- Business phone number
- Business website
- Business email address
- Country
- Corporate address
- City
- State/province/region
Please note that the new created meta business manager will be “unverified”, you will be recommended to verify your meta business manager as soon as possible. You can follow the instruction here
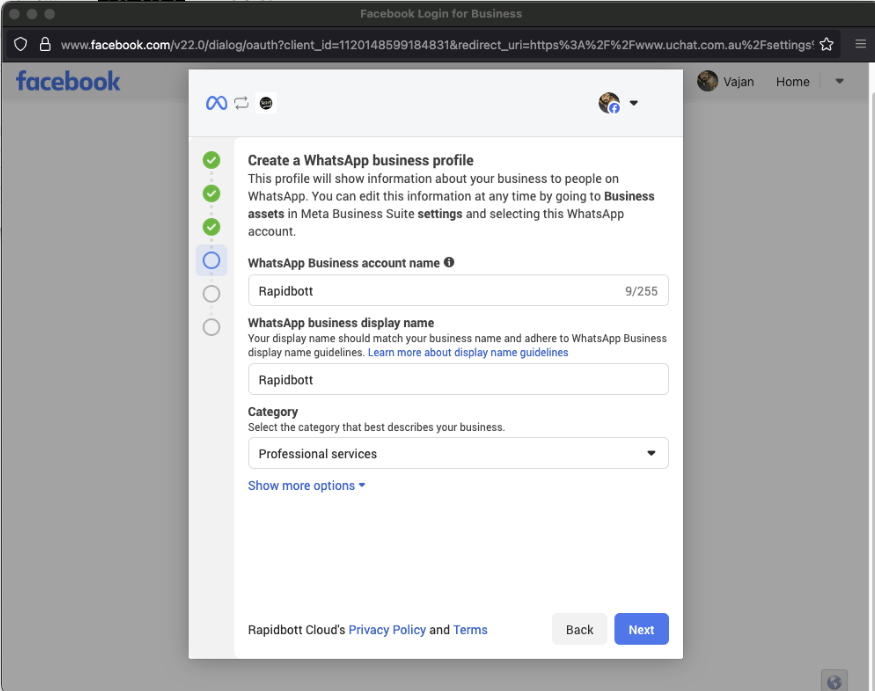
### **Step 3: Create WhatsApp Business Profile**
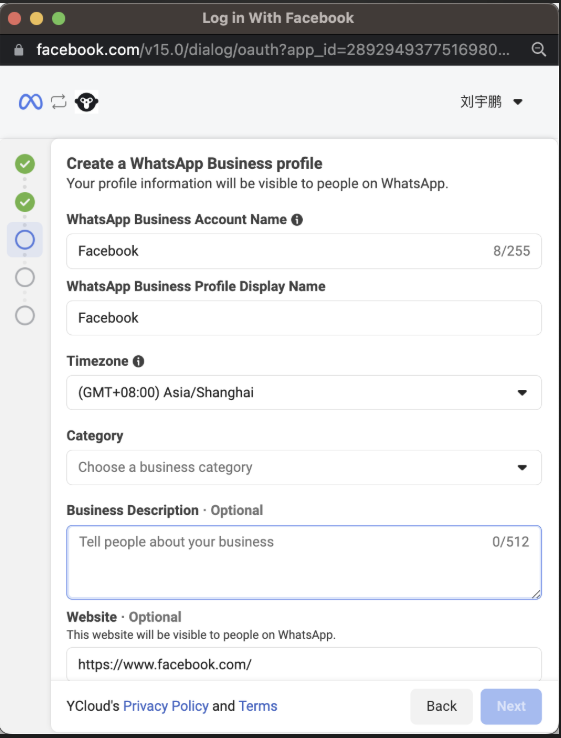
**1.Enter the name of your WhatsApp Business Account (WABA)**
Your audience will not see this information on your WhatsApp profile.
**2.Enter the name of your WhatsApp Business Profile Display Name**
**3.Choose a business category from the list**
**4.Enter a description for your business**
You can edit the description at any time, including after sender verification.
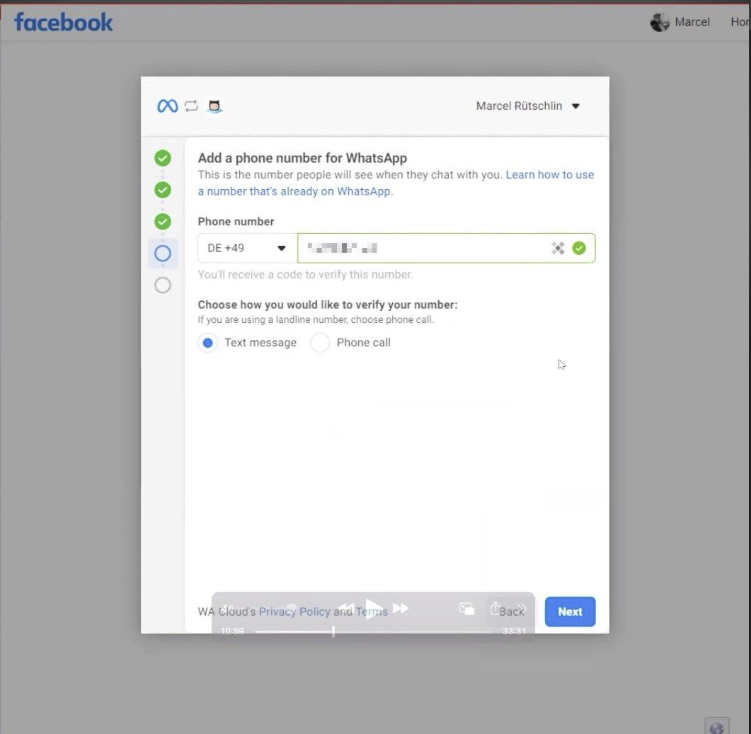
### **Step 4: Verify WhatsApp Business Number**
1. Enter the phone number that you want to use as your WhatsApp business number. **Please note this phone number can’t use any WhatsApp services.**2. Choose one of the following verification methods:- SMS- Voice call
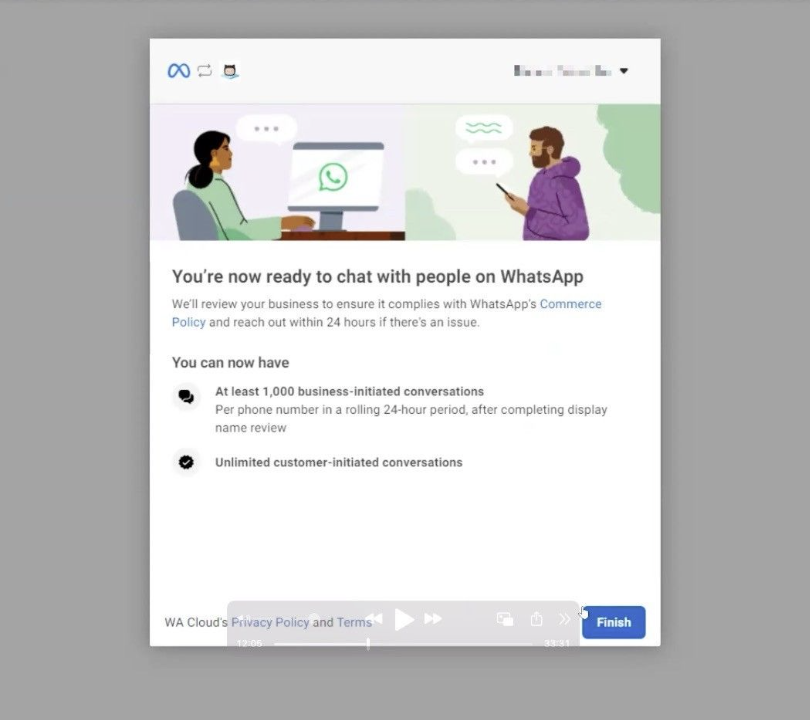
Once your number is verified,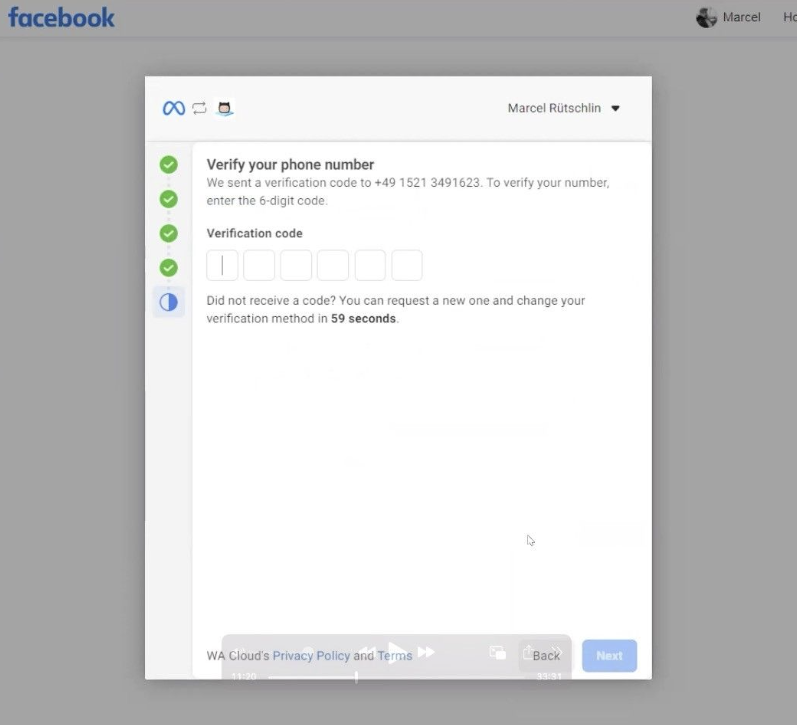
you will be redirect to the screen below, and click “finish” button, you will be redirect back to MessagingMe platform.
Step 5: Complete registration your number
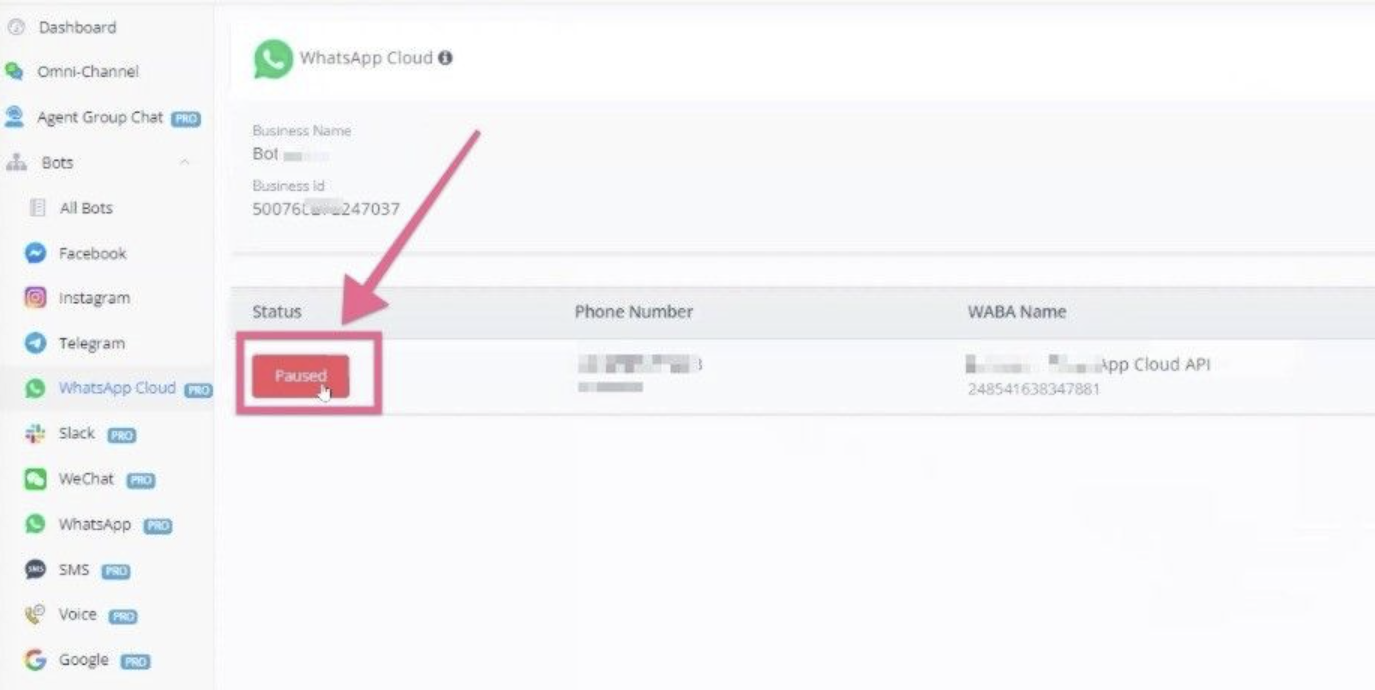
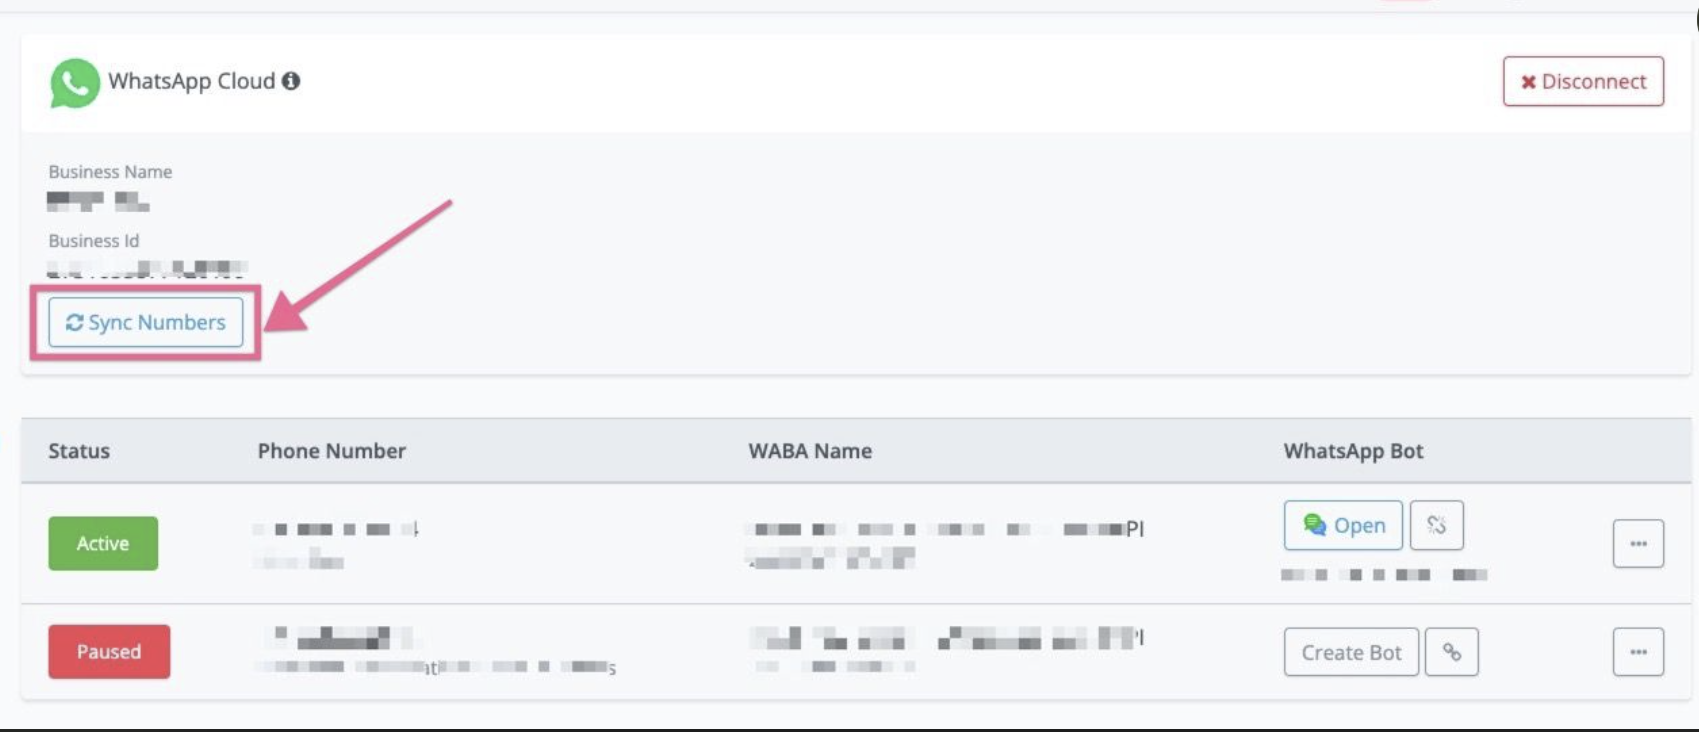
Once you’re redirected to Messagingme.app platform, you will see the screen below, and click “Sync Numbers” button:
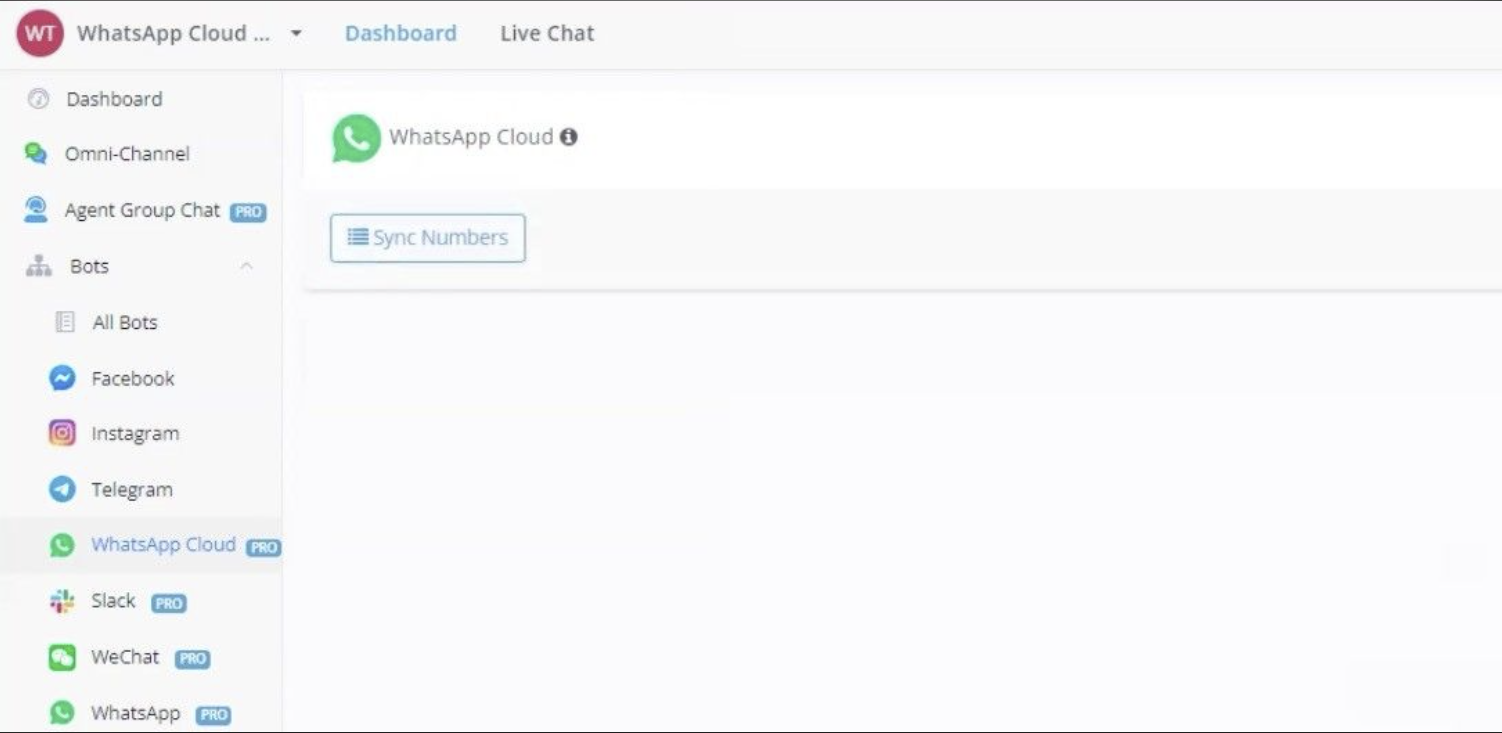
and you will see the numbers you just registrated inside of Messagingme.app platform. By default, the status is “Paused”, you need to switch the status to “Active”.
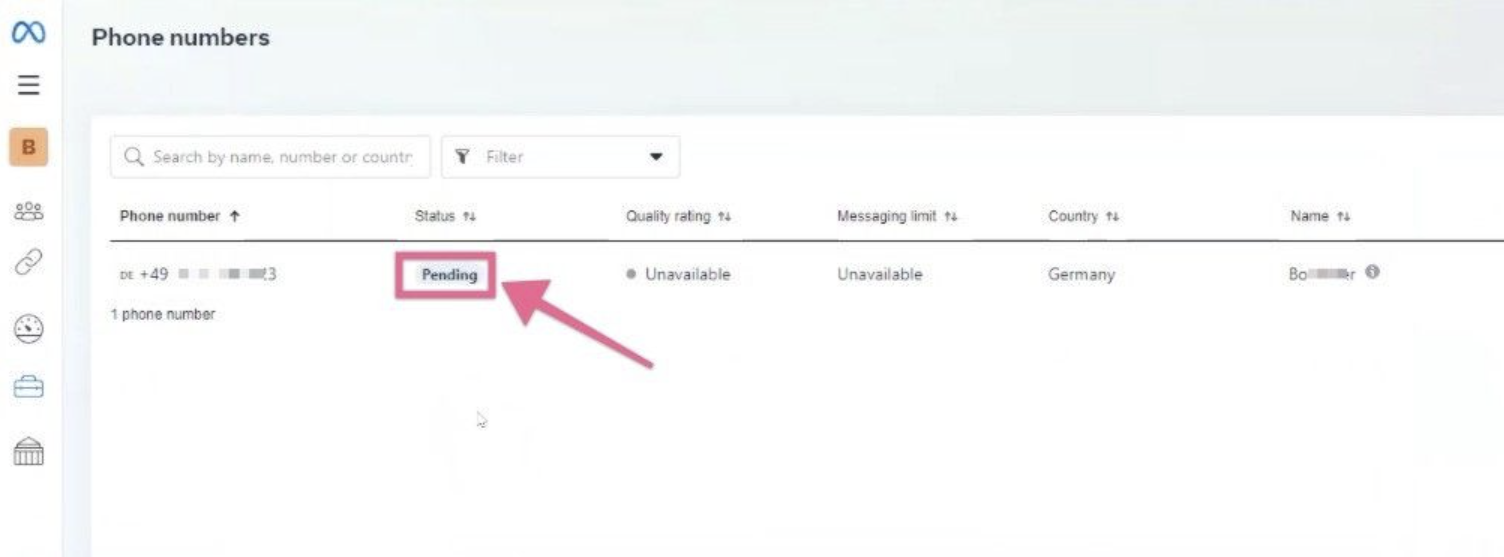
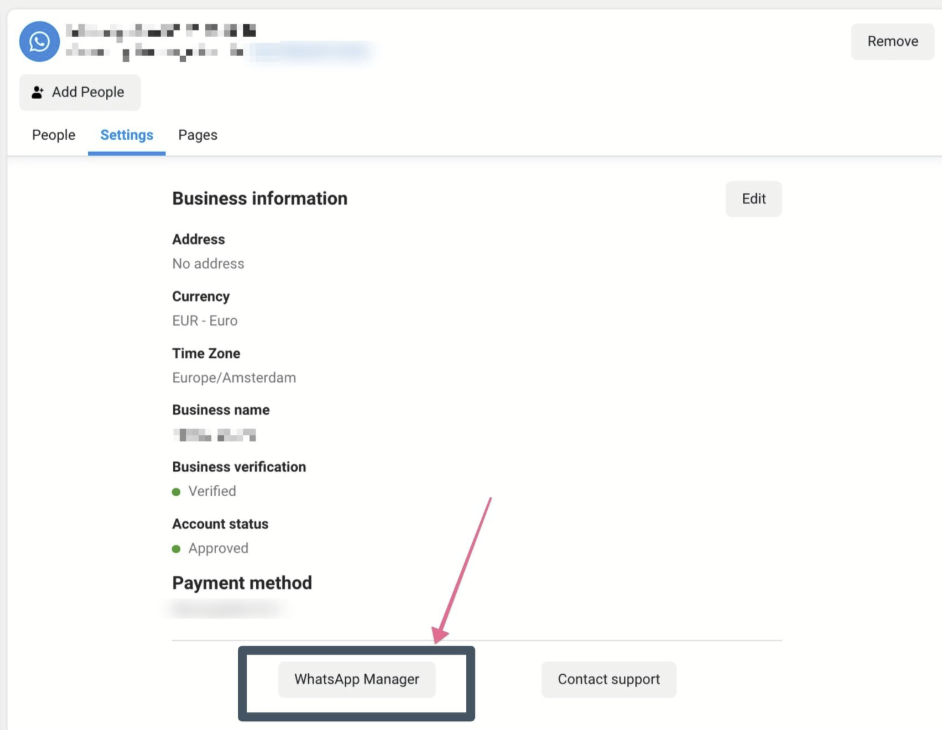
By default, if you go to “WhatsApp manager”, and then go to “Phone numbers”, you will notice the status is “Pending” as per the screenshot below:
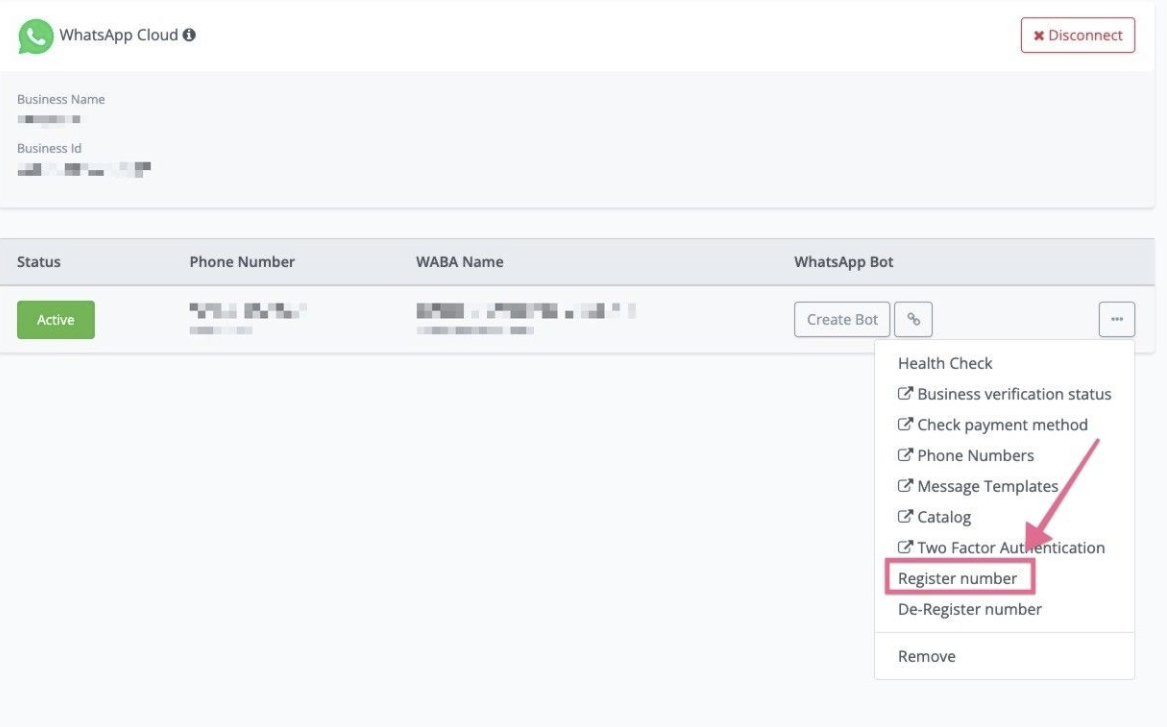
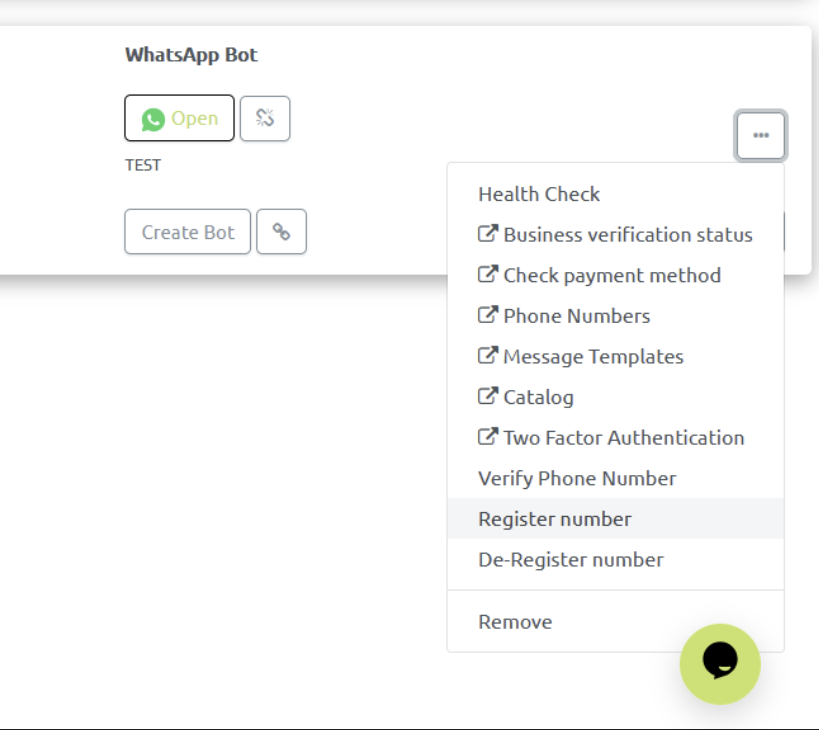
Now, if you go back to Rapidbott, and click the “settings” as per the screenshot below, and click “Register number”, and register your number:
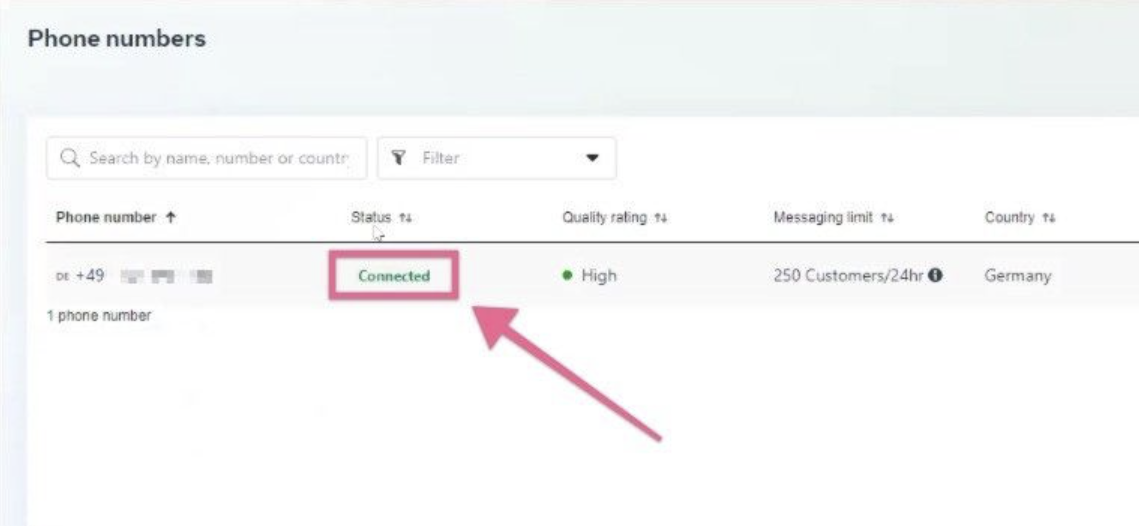
And once your complete the registration, and then you will see your phone number status is “Connected” now.
And now your bot is ready to test!
But before you start testing, it’s very important to set up your billings & verified your meta business manager(it’s not mandatory, but it’s highly recommended to do)
💡 Before you send any template message to test or push your chatbot to live, connect your valid credit card to the billing section in WhatsApp Manager.
Also, It’s risky to get your number/meta business manager account restricted if you don’t have a verified meta business manager account.
Step 6: Do a quick connection check
Once the WhatsApp number is connected, you can click “Create flow” and create a simple flow in your main flow.

Click the “Publish” button to publish the flow, and then send any message from your personal whatsapp number to this WhatsApp Cloud API number.
You should get the text message back. If you see the message, then the connection is all good. Your bot is repsonsive & working well.
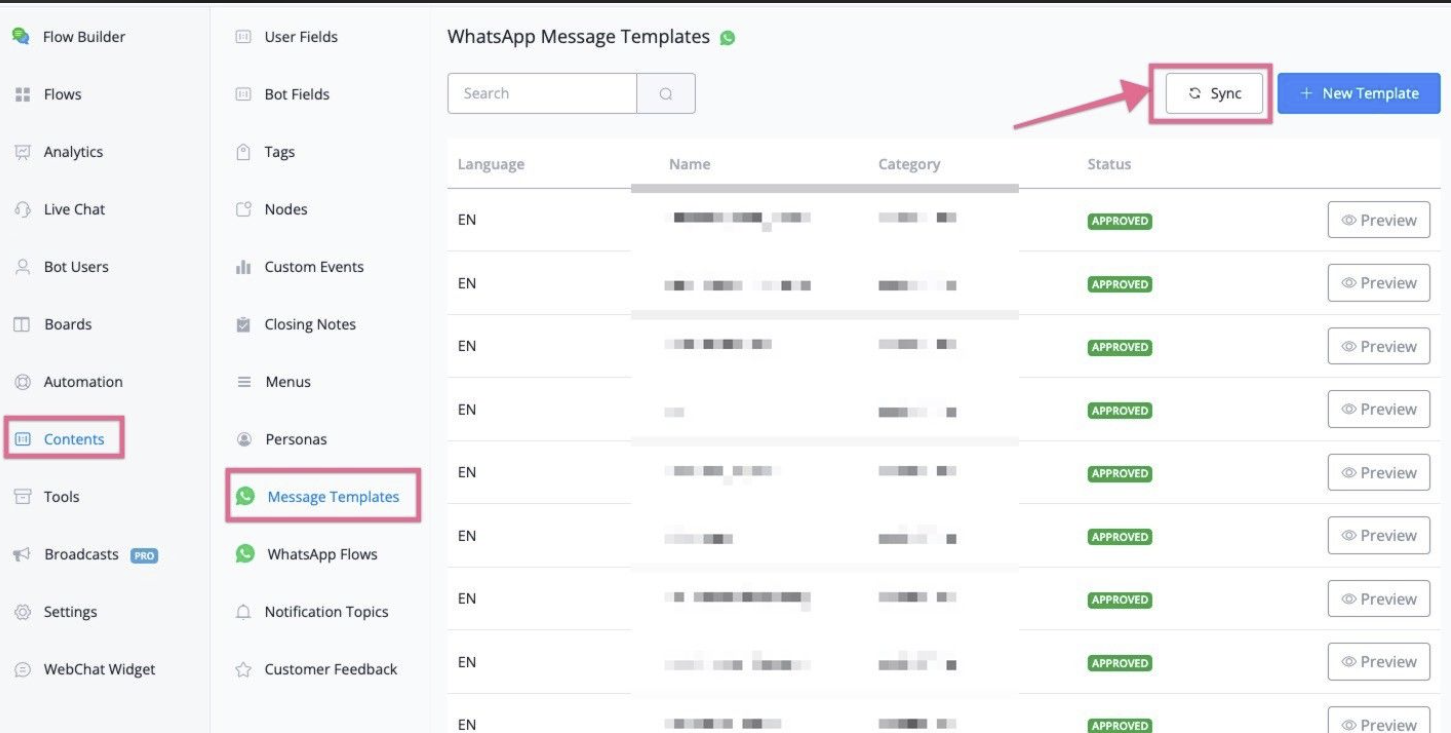
Now, you can go to “content”, “Message Templates”, and click “Sync” button, If you don’t see any error message, then the WhatsApp template message is working as well.
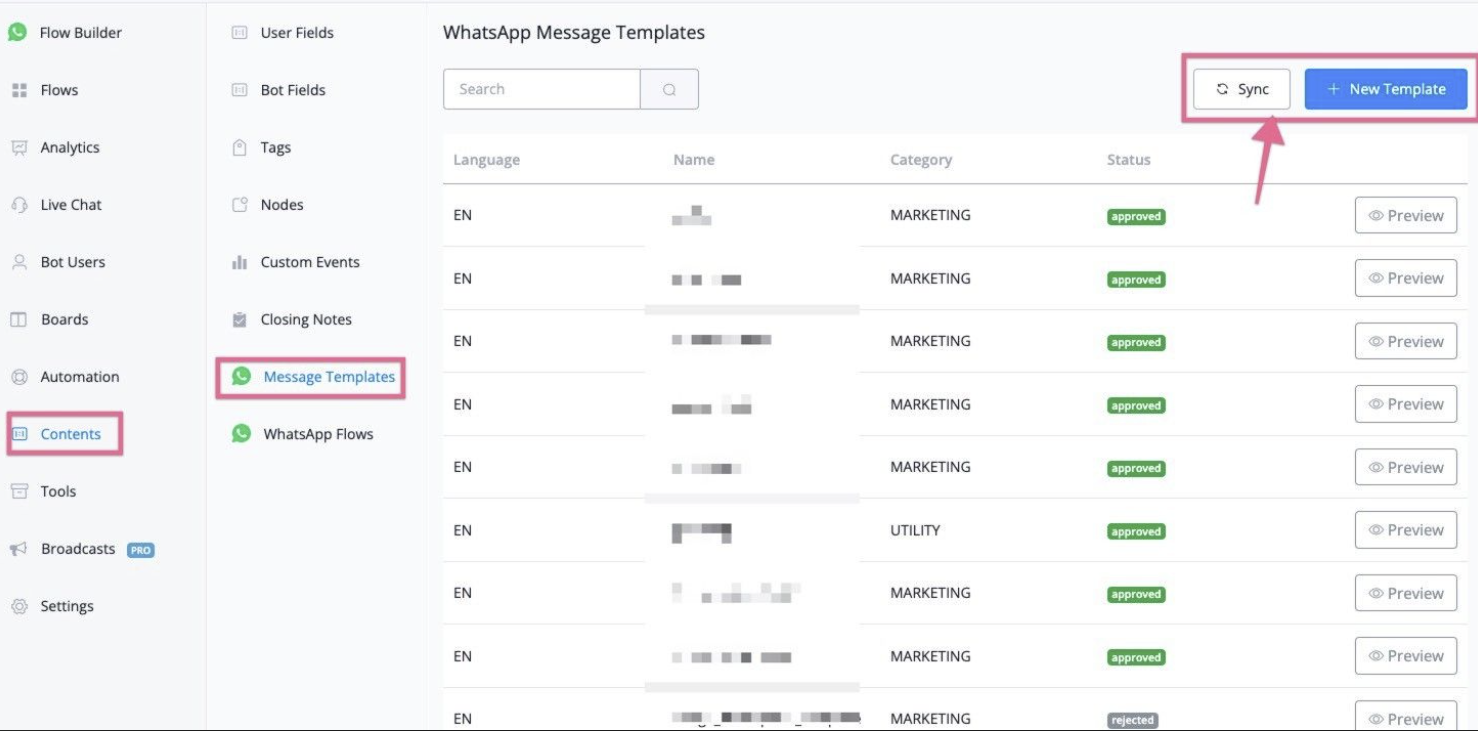
Please note, there isn’t any template message will actually sync back to Messagingme.app when you just started. You can also click “ + New Template” and create a new WhatsApp template message right from Rapidbott.
Last, you can go to “WhatsApp manager” in your meta business manager, and connect a valid credit card to the billing, and then you can test to send a WhatsApp template message to a whatsApp user.
If your billing method is valid, the template message should delivered without any issue.
If you done all the test, then your WhatsApp Cloud API is corrected connected.
WhatsApp Cloud Settings
Main settings
Messagingme.app offer a few settings that can help you manage your WhatsApp API easily, if you click the 3 dots in the WhatsApp Cloud, and you will find the settings below:
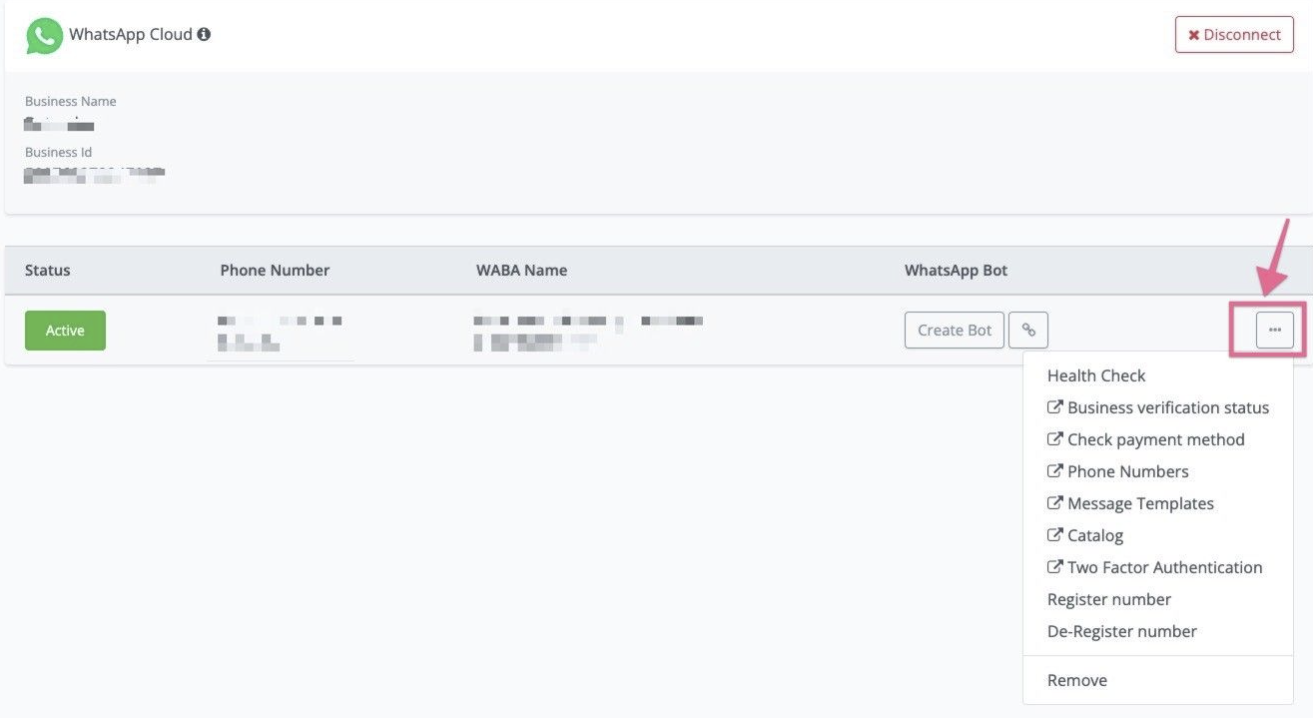
- Health Check
- Business Verification Status
- Check payment method
- Phone numbers
- Message Templates
- Catalog
- Two Factor Authentication
- De-Register number
Business verification process of BM(Optional)
If you have not completed the Business Verification process, you will be limited to associating with only two phone numbers and can have a maximum of 250 conversations per day.
If this limit is exceeded, the account will be automatically canceled after 15 days.
However, during this period, you can still test the service. Once your business has been verified, you can associate WABA with up to 20 phone numbers and the conversation limit will increase to 1000 per day.
Check payment method
The first thing when you you do is to connect a valid credit card to your WABA numbers. If you haven’t connect to a valid card, and start sending WhatsApp template message, you will see the error below:
[ { “error_code”: 141006, “error_description”: “There is an error with the payment method.”, “possible_solution”: “There was an error with your payment method. Please add a new payment method to the account.” } ]
Just just need to connect a valid credit card with your waba numbers.
Health check
If you click the health check, you will see the screenshot below:
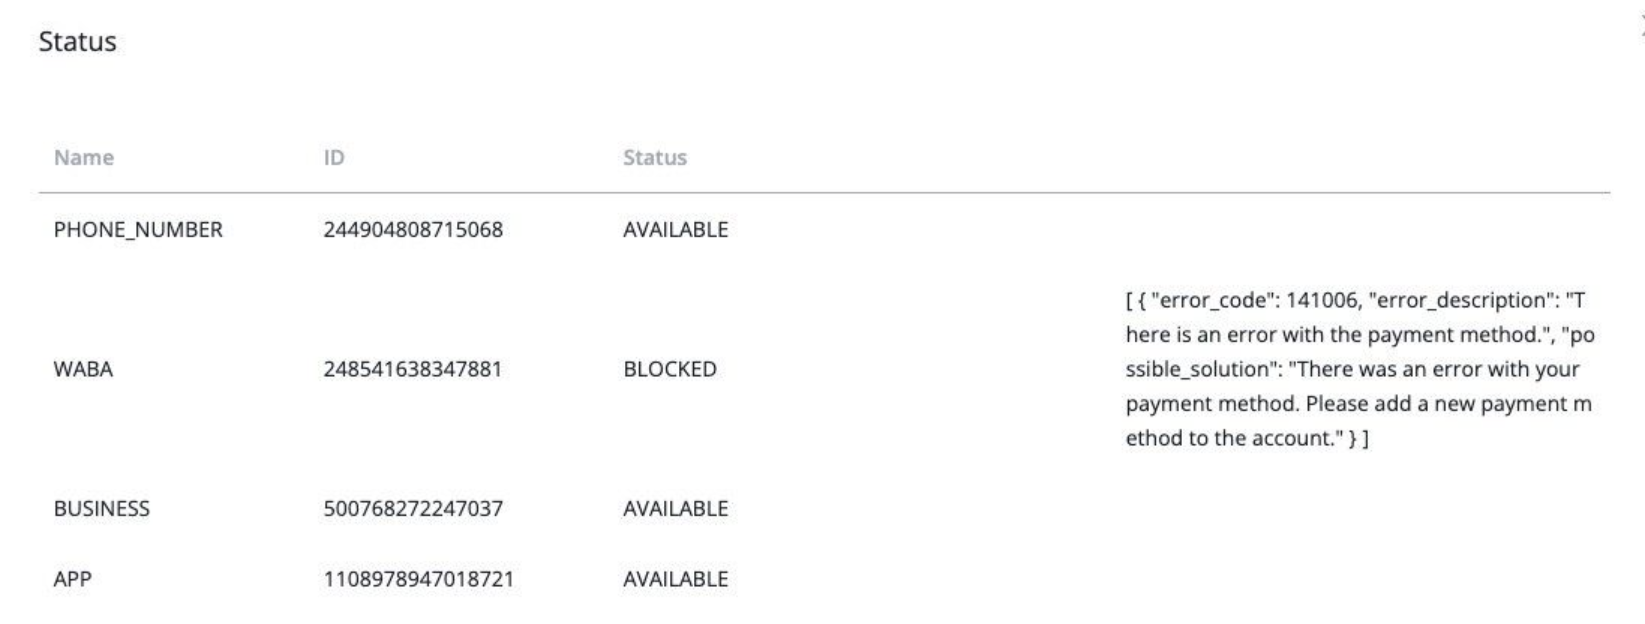
This will give you an overview of your phone number status, WABA status, Meta Business account status.
Phone numbers
A WhatsApp Business Account (WABA) needs a valid phone number that is dedicated to using the WhatsApp Business Platform.
This guide introduces how to choose phone numbers, add them to your account, and related sending limitations.
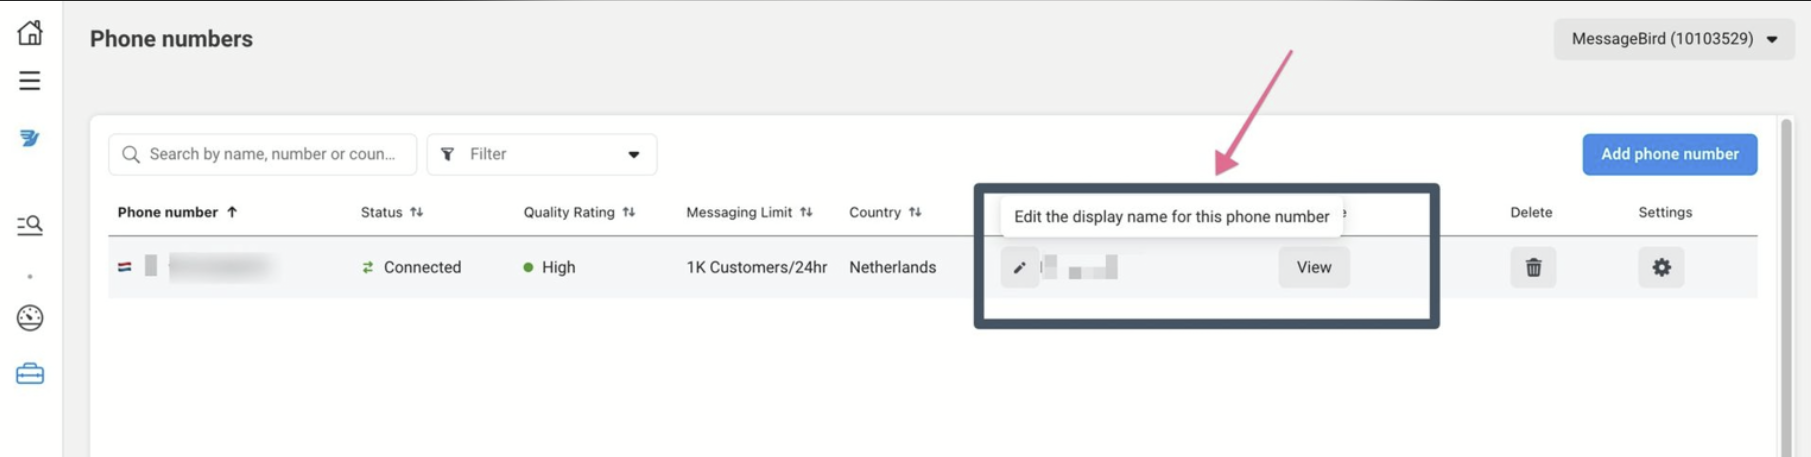
Once you click this option, you will be redirect to “phone numbers” in your WhatsApp manager, and the status of your phone number will falls into below categories:
Status is classified as follows:
- Connected: Sender functions normally.
- Flagged: This status occurs when the sender quality rating reaches a low (red) state. During this state, you cannot upgrade the messaging limit tier. If the quality rating improves to either a medium or high state within 7 days from the day the sender status was moved to Flagged, the status changes to Connected. If the quality rating does not improve, the sender status returns to Connected, but the messaging limit decreases to the next lower tier. The lowest tier for verified businesses is Tier 1.
- Restricted: This status occurs when the sender reaches the messaging limit. During the Restricted phase, you cannot send any outbound (notification) messages until the 24-hour window is reset. You can only respond to messages that end users initiate.
- Pending: You can click “registrate numbers” to connect your phone numbers.
Add a phone number to a WABA
Currently, each Verified Meta Business Manager can have up to 20 phone numbers, regardless of the number of WABAs.
If you would like to add a new number, please add it through the embedded signup process.
Change display name
Each phone number has its display name, and this name should be related to your company name or brand name. The display name will be reviewed by Meta. You can go to Meta to change the name.
Delete phone number from a WABA
For complete removal, please follow the steps below:
- In the Business Manager, go to your Business Settings page.
- Go to Settings > Business Settings > WhatsApp Accounts > WhatsApp Manager > Phone Numbers.
- From the WhatsApp Manager, find the phone number that you wish to delete. Click on the trash icon under Delete in the upper right.

💡 - Only a business admin for the WhatsApp Business Account can delete a phone number.
A number can not be deleted if the business has sent paid messages within the last 30 days using that number.
Once a number has been deleted from the WhatsApp Business Platform, it can be used again in the WhatsApp app, or may be registered again in the WhatsApp Business Platform. Note that different rules apply to deleted phones that had been banned by the WhatsApp Business Platform.
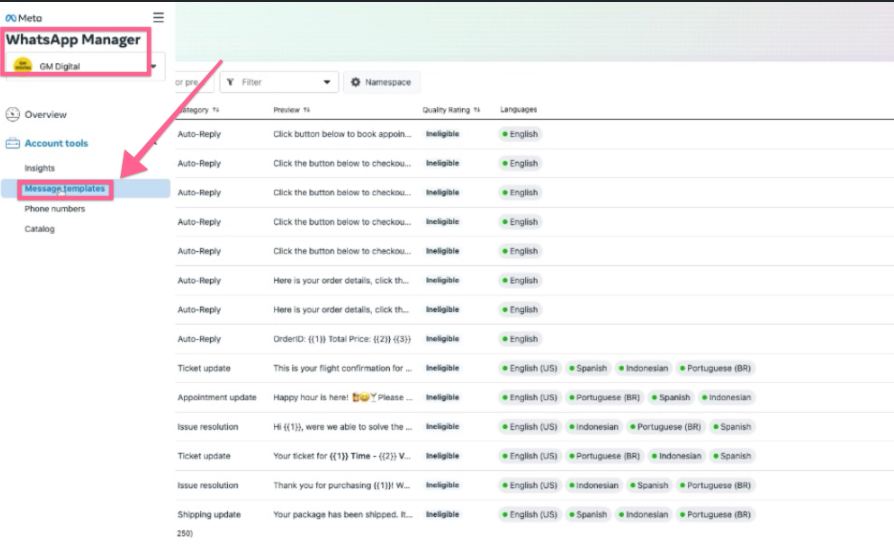
Message templates
This link will redirect you to the WhatsApp template section in WhatsApp manager, and you can create & submit template directly in WhatsApp manager, and once the template is approved, you can go to Messagingme.app to sync the template back to Messagingme.app.
You can also click “New Template” button in Messagingme.app, and then you can directly create and submit template right inside of Messagingme.app.
Catalog
Businesses can enable Catalogs to share products with customers using Multi and Single-Product messages or showcase their products and services to their customers in the WhatsApp App, allowing them to browse through and add items to their cart without leaving the conversation, providing a seamless and convenient shopping experience.
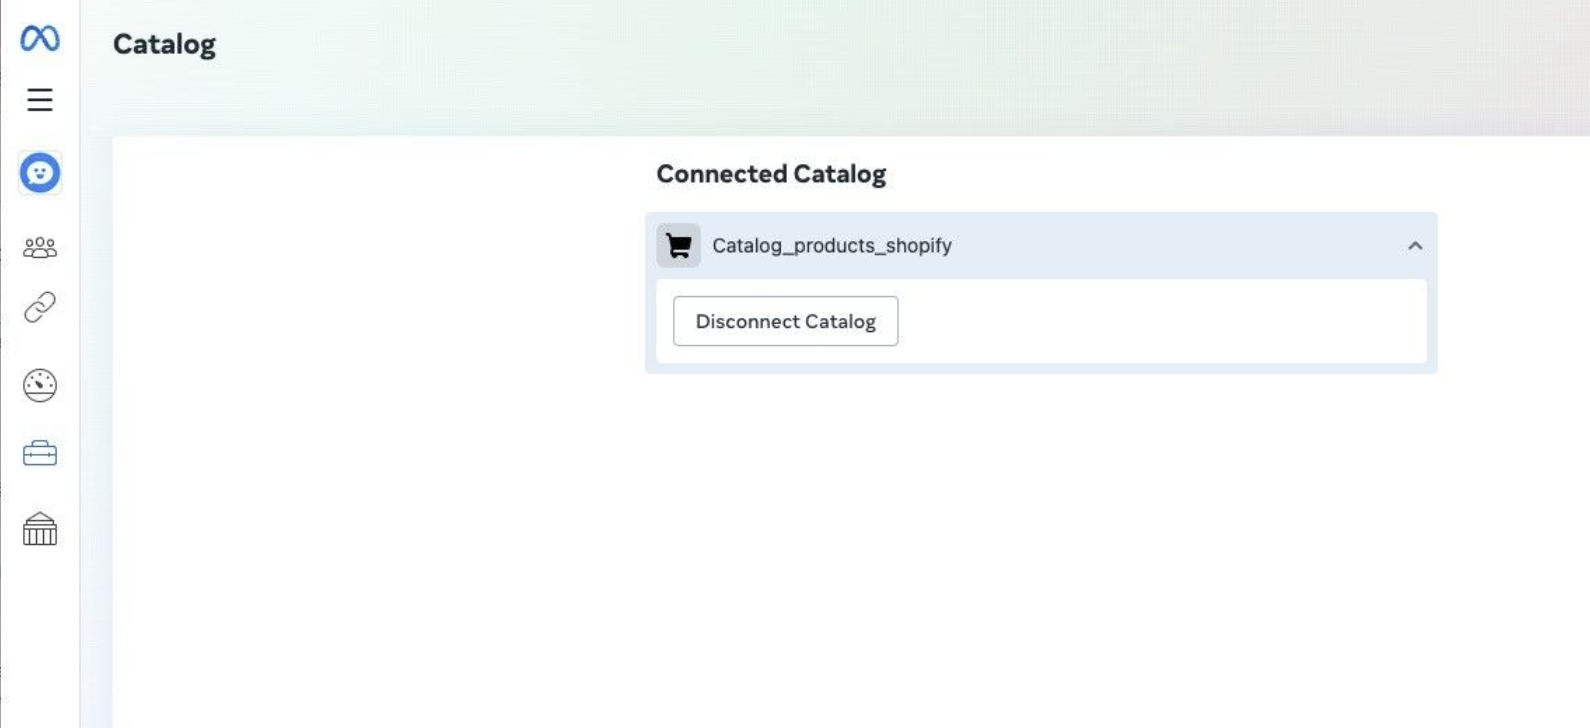
If you click the “Catalog” link, you will be redirect to WhatsApp Manager, and click “Catalog”, and click “Choose a Catalog”, from the drop down menu, select the catalog that you want to connect.
Click “View catalog” if you want to view or manage the catalog, Click “Connect Catalog”, and then this WABA numbers will connect to the catalog.
If you want to sync the product catalog from Facebook to Messagingme.app native ecommerce, you can go to “Integrations”, and then go to “E-commerce” category, and then click “Facebook Business”, and login your Facebook account.
After you login your Facebook account, you will be redirect back to Messagingme.app, and then click “List Business Catalogs” button.
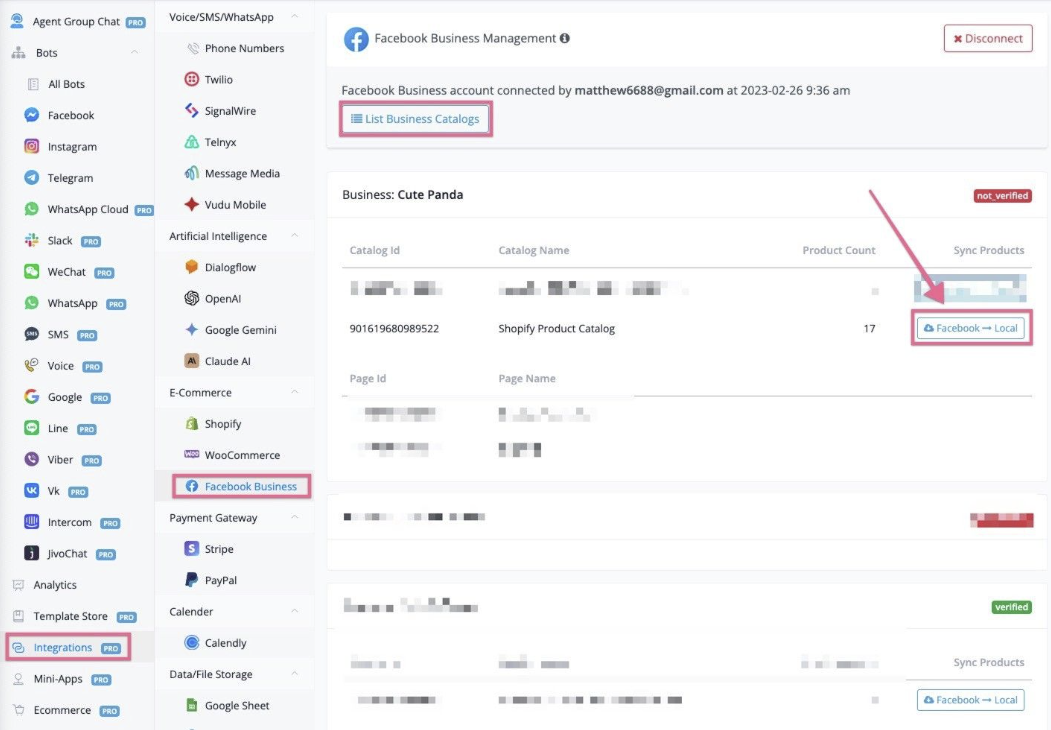
Find the catalog that is linked to your WABA numbers, and click the “Facebook → Local” button, and then your catalog products will sync back to Rapidbott Ecommerce → Products.
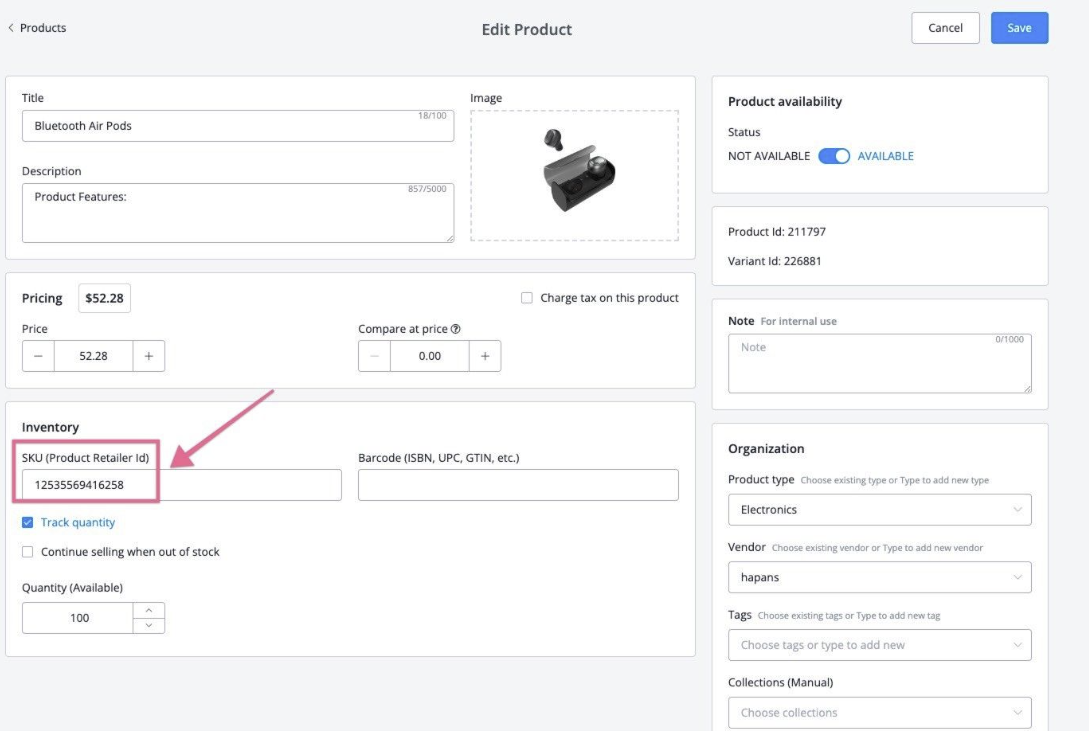
If you open any products that is synced to Rapidbott Ecommerce → products, all the product title, description, images, prices are in sync with Facebook Catalog messages.
You will need retailID to send WhatsApp product catalog message, you can find the retailID synced to SKU in the product section.
Check more information how to build a native WhatsApp ecommerce shopping experience here.
Update WhatsApp Display name
Your business can change the display names up to 4 times in a 30-day period. Once the 30-day period is up, a new 30-day period begins and your businesses can again change the display names up to 4 times in this new 30-day period.
If you want to update your WhatsApp display name, you need to go to meta business manager, and go to WhatsApp manager
Click the blue link and Select the phone number you wish to update the display name. and then click the “Edit” icon as per screenshot below
In the Edit Display Name section, enter a new display name. Display names should have a relationship with your business and use branding consistent with external sources (e.g. your website).
Your display name will need to be approved by WhatsApp before an updated certificate becomes available. After this is approved, please re-register your number, and then your display name will be active.
How to add extra phone numbers in Messagingme.app
You will need first to add the new phone numbers in your WhatsApp manager account from meta business manager.
💡 Meta have phone number limitations for WhatsApp manager. If you have reached the limits, you will need to contact meta to increase the limits.
Once the new phone number is added into your WhatsApp manager account, you can go to Rapidbott, and click “Sync numbers”
Then you will see the new number added into Rapidbott.
In the settings, you will first need to “Verify the phone number” and then “Register the number”
You can click “Verify the phone number” first.
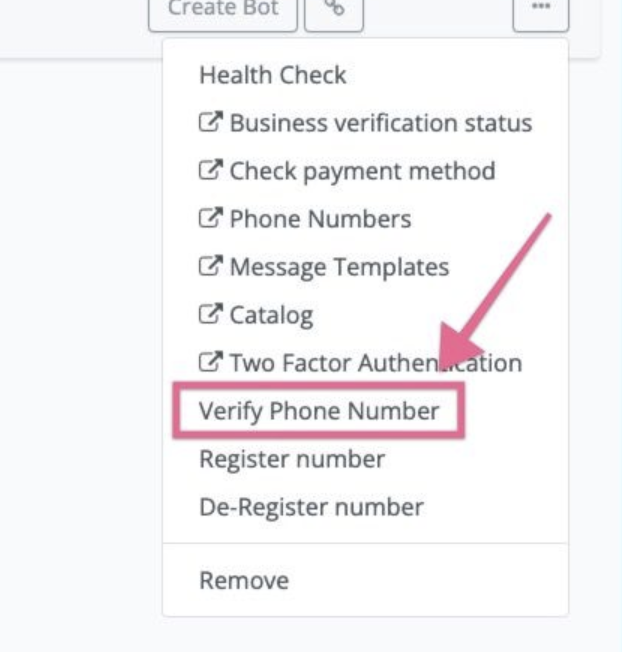
This option is only available for the new embed sign up. The old private app connection method don’t have such option.
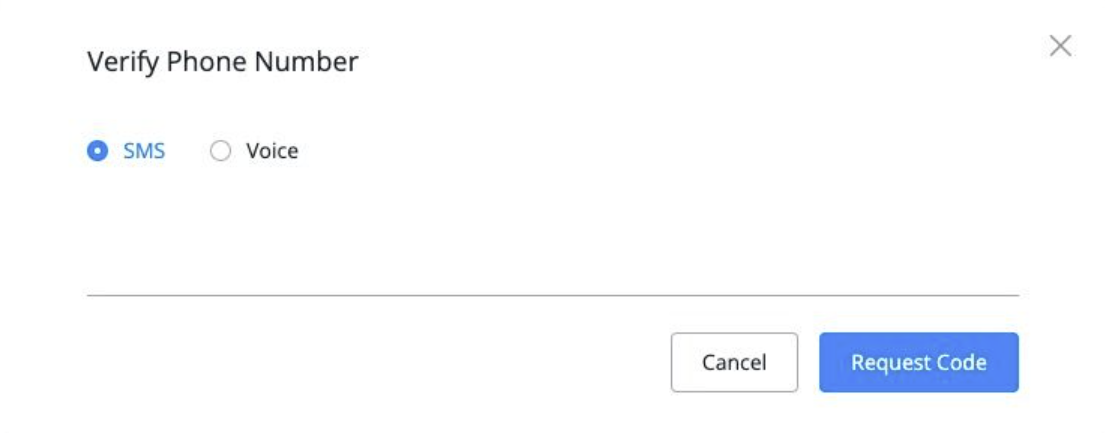
Then you can choose SMS or Voice to verify the phone number.
After the phone number is verified, then you can proceed the steps to register the number.
What are possible common errors in embedded sign up flow?
Business Manager Account Creation Errors
An error occurred while processing this request. Please try again later.
This is most unclear error that need further assistance. Business account creation could have failed due to various reasons.
==> If you got such error, please use an active Facebook account or contact Support for resolution.
You have reached the limit for the number of Businesses you can create at this time.
There is a limit to the number of Business Accounts that you can create.
==> Please use an existing Business Account or delete/close unused Business Accounts
Your Facebook account is too new to create a business account. Try again in an hour.
New Facebook accounts have to wait for some time to create a Business Manager account.
=> Please use an existing active Facebook account or wait for a few hours before using your new account. The new Facebook account can be actively used during the wait period.
We limit how often you can post, comment or do other things in a given amount of time in order to help protect the community from spam. You can try again later.
Your Facebook account was flagged because of suspicious behavior.
==> You need to use an existing, active Facebook account with no prior issues.
You’re no longer allowed to use Facebook Products to advertise. You can’t run ads, manage advertising assets or create new ad or business accounts.
You are unable to create new Business Manager accounts due to previous suspicious behavior.
==> Please use an existing, active Facebook account with no prior issues.
Your payment account is disabled
Your payment account was disabled due to previous suspicious behavior.
==> Please contact Facebook to assist at here
A User Can Only Create One Business User At One Time
You can only create a single Business Account within a given time period.
==> Please use an existing Business Account to onboard.
The name you chose for your business isn’t valid. Consider using xxx.
==> Please add a valid name that matches the name of your business.
WhatsApp Business Account Creation Errors
User does not have permission to create WhatsApp Business Accounts.
You do not have the Admin level permission needed to create WhatsApp Accounts under the Business Account you selected.
==> Get Admin access to the Business Account to proceed or select an account you have Admin permissions for.
You can only create a limited number WhatsApp Business Accounts before your business and WhatsApp account verification is complete. You can create additional accounts after you are verified.
You tried to create multiple WhatsApp Business Accounts under an unverified business.
==> You can create additional WhatsApp Business Accounts only when Business Verification and WhatsApp account checks are complete. Start Business Verification for the account by visiting Business Manager.
We can’t verify the Facebook Business Account that you selected. Go back to the previous screen to select a different account, or go to Facebook Business Manager for support.
The Facebook Business Account selected doesn’t comply by our policies to use WhatsApp Business API and couldn’t be verified.
==> Visit your Business Manager account to get more information about this Facebook Business Account. If your Business Verification submission is rejected, you should have received an email notification with the detailed reasons. You could try resubmitting your Business Verification if you think this was an error or create a WhatsApp Business Account using a Facebook Business Account that has already been verified.
Something has gone wrong. You will need to contact support and try again.
This could be an intermittent issue on WhatsApp.
==> You can retry the flow in a few minutes.
Phone Set up Errors
This phone number already exists in your list of phone numbers.
You are trying to add a phone number that already exists in your WhatsApp Business Account.
==> Go back into the flow or restart the flow to select the existing phone number.
This number is registered to an existing WhatsApp account. To use this number, disconnect it from the existing account. Then, return to this page and re-enter the number. Note: It may take up to 3 minutes for the number to become available.
The phone number was already registered on our platform (i.e., WhatsApp Messenger, WhatsApp Business App or Whatsapp Business API).
==> Go to “WhatsApp Cloud” settings, and De-register the number if you want to use it. or register a new number.
Your verified name violates WhatsApp guidelines. Please edit your verified name and try again.
The name used for the phone number’s business profile does not meet our guidelines.
==> Please reference the Display Name guidelines and try again.
Something has gone wrong. You will need to contact support and try again.
There was a problem in creating the phone number’s Business Profile.
==> Re-enter the correct Business Profile name according to the guidelines and other details.
Phone Verification Errors
Phone number ownership is already verified.
==> This phone number has already been verified. You can try refresh the page to see the change applied.
Your phone number doesn’t appear to be valid. Please double check it, or try again after 5 minutes.
An incorrect phone number was entered or we do not support numbers of this format.
==> Make sure the number is operational and verified by a telecom provider. We do not currently support Interactive Voice Response (IVR) numbers.
You have guessed too many times.
To block spam, the system only allows a limited number of verification attempts.
==> You have to wait for about 12 hours before retrying. After this waiting period, come back to the flow and select existing accounts and phone numbers to verify again.
There was an error verifying this phone number. Please try again later.
There was a problem with the verification code.
==> Please retry again later.
You have requested your code too many times.
To block spam, the system only allows a limited number of verification tries.
==> We limit the number or times you can request a code within a certain time frame. Come back to the flow after the specified time and select existing accounts and phone numbers to request a code again.
Using a phone number already in use with WhatsApp App
💡 Access to the WhatsApp Business API with Coexistence is only available to businesses actively using the WhatsApp Business App. Eligibility is determined by Meta based on account tenure and messaging quality history.
🚀 Use Your Existing WhatsApp Number with Cloud API – No Need to Delete Your App! 📱💬
About Coexistence Onboarding
You can create a WABA with a phone number that is already registered in the WhatsApp Business App (Android or iPhone) without deleting the existing account.
Once onboarded, you can send messages at scale using the WhatsApp Business API while maintaining one-on-one messaging in the WhatsApp Business App. Messages send and received via API will be available in the App and vice-versa.
Key benefits
- Message at scale via the API while retaining one-to-one messaging in the app.
- Simplifies migration for businesses already using WhatsApp Business App.
- Maintain access to the WhatsApp Business App while using the WhatsApp Business API.
💡 Important: Do not uninstall the WhatsApp Business App after onboarding. This will disconnect the number from the platform.
Limitations & Restrictions
- Coexistence is not compatible with APIs that are not officially supported. So, if that’s your use case, please know that those will be deactivated and 360Dialog cannot offer support for unofficial products.
- WhatsApp Business account phone numbers with country codes from the following locations are not Supported:
- Australia
- Japan
- Nigeria
- European Economic Area
- Philippines
- European Union
- Russia
- United Kingdom
- South Korea
- South Africa
- Turkey
Linked devices
Businesses can link up to four “companion” devices to their WhatsApp Business App (described as “linked devices” in Meta Help Center).
However, after onboarding to Cloud API, all companion apps will be unlinked, you can re-link only supported devices after onboarding.
- WhatsApp for Windows and WhatsApp for WearOS are not supported.
- Messages from unsupported companion devices will not trigger webhooks, so the business won’t be able to mirror the message through the API. You can still use the App to respond to this message.
Feature comparison
The following table describes features available to business customers who have been onboarded to Cloud API, as well as any changes to WhatsApp Business app functionality post-onboarding.
FAQs
Eligibility for whatsapp business API access
While the WhatsApp Business API is now accessible for App numbers, it is intended for businesses that are already actively using the WhatsApp Business App and looking to scale their messaging capabilities. Businesses with newly created Business App accounts are not immediately eligible for API access.
Eligibility is determined based on factors such as account tenure and messaging quality to ensure a reliable and effective messaging experience. Meta recommends businesses to use Coexistence only if they are already using the WhatsApp Business App consistently and can benefit from advanced API tools to scale operations.
Can a business use their Whatsapp API number to register on the Whatsapp Business App ?
No, this process only works for numbers registered in the App. If the number is connected to the WhatsApp API, this CoExistence Onboarding won’t work.
Is this solution applicable to larger entreprise
The primary use case is to assist SMBs that have not previously onboarded to the WhatsApp Business API. The solution is not specifically designed for larger enterprises.
Will businesses with Meta Verified blue badges on Whatsapp business App maintain their verification when connecting to the Whatsapp Business API ?
Currently, the blue badge verification does not transfer between the WhatsApp Business App and Cloud API. You will need to go through the OBA process.
Are marketing messages sent from the [Messagingme.app](https://messagingme.app/) platform via cloud API supported on the Whatsapp Business App ?
Yes, both the WhatsApp Business App and Cloud API support the same types of messages, including Marketing, Utility, Service, and Authentication messages.
Getting Started: Account Creation
Step by step Coexistence Onboarding
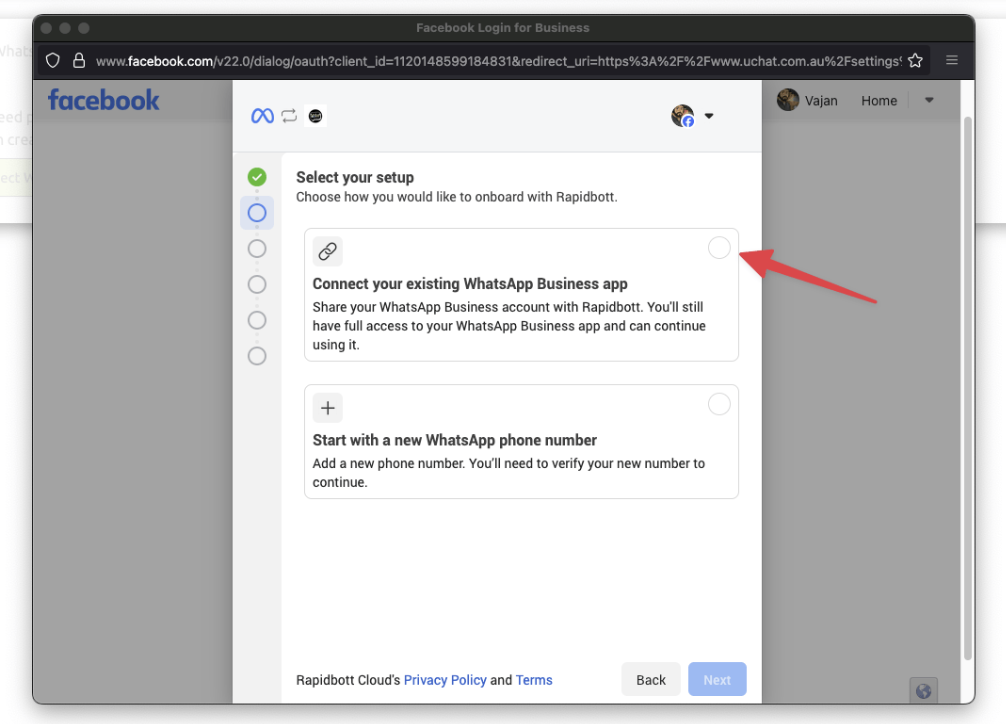
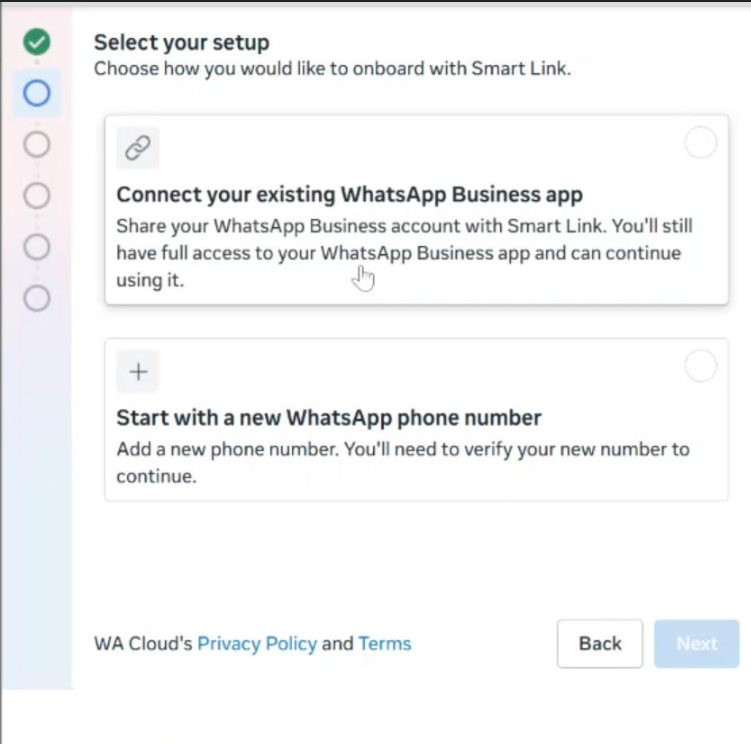
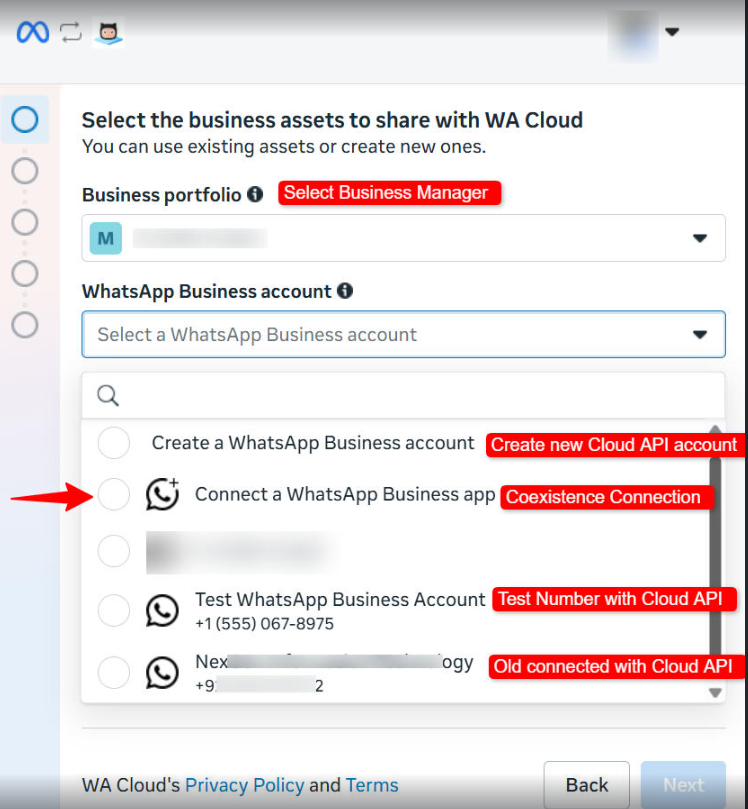
Step 1: Choose the option to connect your existing WhatsApp Business App
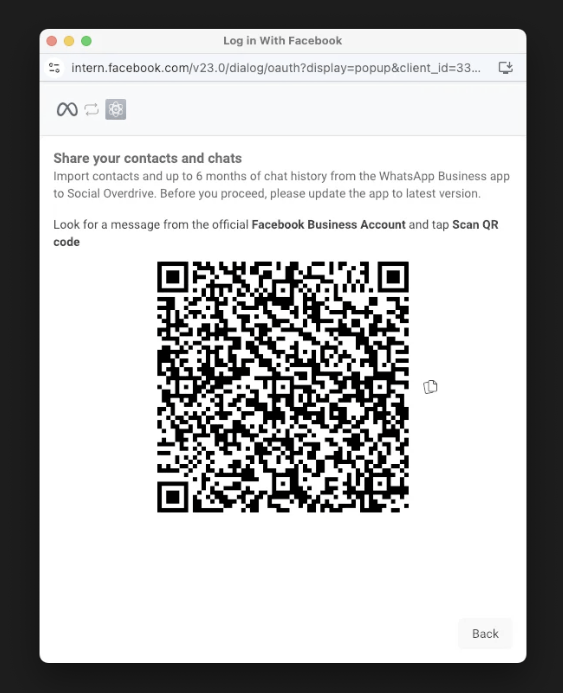
Step 2: Once the Business App number has been shared, a QR code with instructions to share contact and chat history.
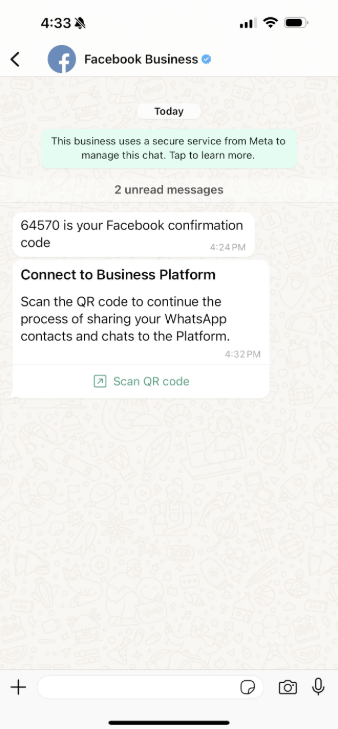
Step 3: A message is sent on the WhatsApp Business App with a confirmation code and a click to scan the QR code option.
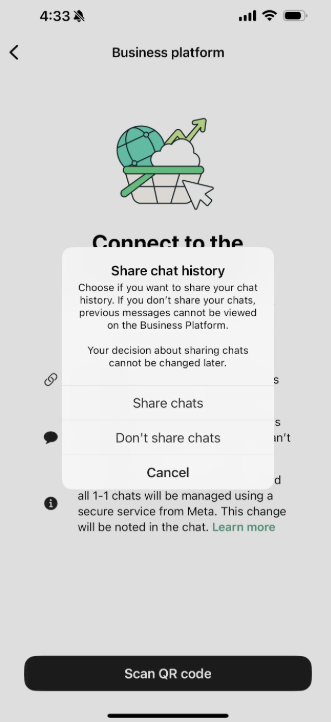
Step 4: Tapping the Scan QR code provides an option to share their WhatsApp Business app messaging history with you:

Step 5: Tapping the Scan QR code opens a page asking you to give the business permission to share its chat history with you.
Step 6: Once the Business App is connected with the Cloud API, the standard WhatsApp API flow takes over to complete the registration
Conclusion
The addition of coexistence can be a real game-changer for businesses that can leverage advanced features of the cloud API, such as Shared Chat Inboxes, Broadcast messaging, Chatbots, Automated Lead Assignment, AI settings, etc. This would be ideal for businesses looking for more automated and high-scale operations. They can also connect their CRM with the WhatsApp Business API (Cloud API) to connect their WhatsApp Sales funnel with other channels.
Business App users who prefer to use the business app can continue to operate without much change in its core feature capability. This gives them the flexibility to operate in an omnichannel fashion as per preference.
Messagingme.app WhatsApp, an Official WhatsApp Tech Provider can help you with many of the capabilities for WhatsApp Business App users desire in their Cloud API solution. Shared Chat Inbox, Automated Chat Assignment, Messaging Flow Sequences, Chatbot, AI Conversations, expansive CRM, and more.
Supported message types
Regular massage type
ou can use WhatsApp to send the following free-form message types:
- Text
- Media
- Location
- Contacts
- Interactive
- Address Messages
Messagingme.app supports you to send regular text, text+buttons, files, audio, images, and also cards in this WhatsApp channel.
Template message
Template messages must be submitted for Facebook’s approval before they are available to use. It is Facebook that reviews each template to avoid spam and to check that each message complies with their WhatsApp API guidelines.
When to use templates for WhatsApp messaging?
A template message needs to be sent whenever it is outside of a Customer Service Window, which means, whenever it has been more than 24 hours since the customer sent their last message to that business phone number.
You regularly use the message template to send notifications.
Templates use placeholder values that can be replaced with dynamic content inside double curly braces when the message is sent. Think of template messages as a conversation starter in a two-way conversation.
For more information about WhatsApp Template Messaging, review the Official Facebook Documentation for the WhatsApp Business API
Cost of Whatsapp conversations
You can find more about cost pricing information below:
https://developers.facebook.com/docs/whatsapp/pricing/conversationpricing
Charges for conversations are based on the user’s phone number. Rates for business-initiated conversations and user-initiated conversations vary by market (country or region). See Rates for specific pricing information.
Best practice to get your template message approved
Here are some tips to get your templates through the review process:
Clarity: be specific and clear. The reviewers may not know a customer’s business and need more clarity. Avoid promotion: upselling, cold-call messaging, sending a poll to collect data, and including certain phrases that sound promotional are all considered promotional.
Spelling: check for spelling and grammatical errors and use appropriate formatting (e.g., double curly brackets for parameters).
Name: make your message template name clear. Instead of using a name like template_014, use bus_ticket_details. Remember that someone from Facebook will be reviewing your templates. Providing more clarity gives reviewers context around how the template will be used.
Create context: if you need to write a message template to re-open the 24-hour window, we would suggest starting with some mention of the previous conversation thread.
Choose an appropriate category: don’t forget to use the correct message template type. Choosing the correct one will increase the chances of getting your templates approved and will provide more information to WhatsApp during the approval process.
The categories you can choose are listed below.
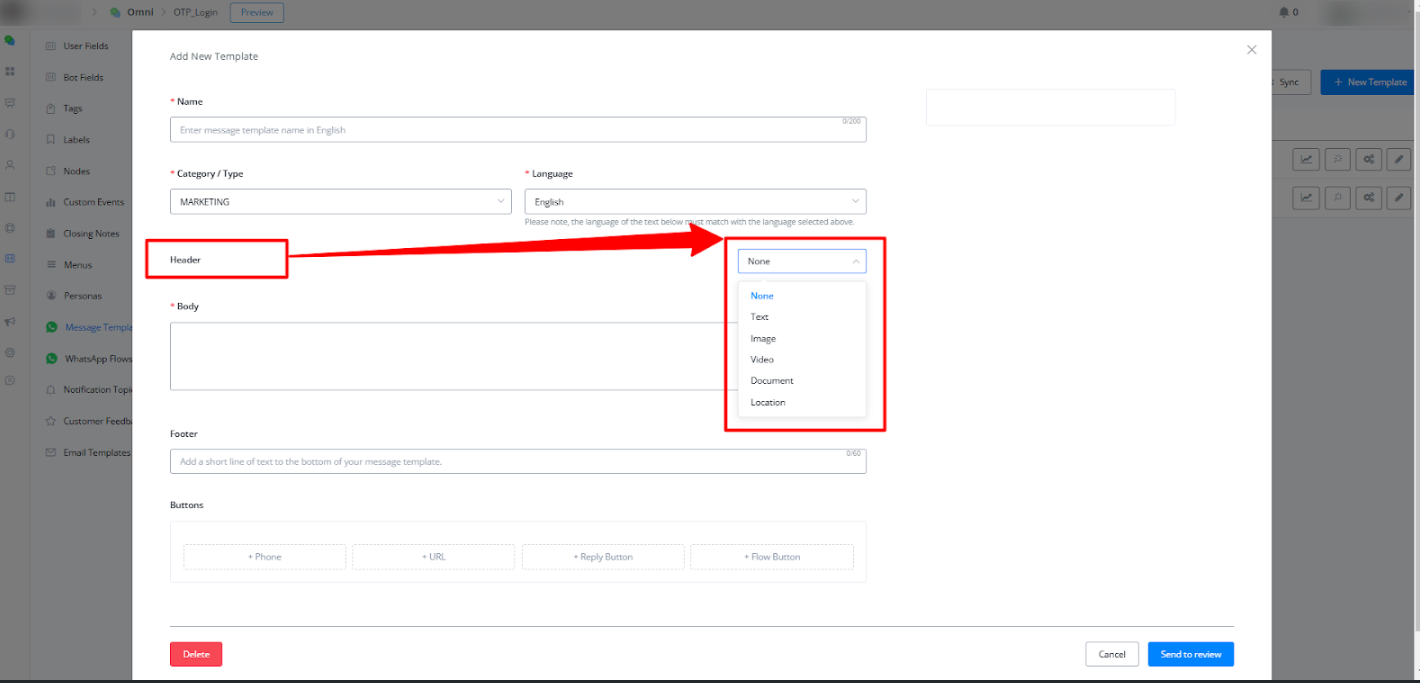
Header (optional): you can add a title or choose which type of media you’ll use for this header. Image, PDF and Video are supported.
Different categories of the message template
Account update:
Let customers know about updates or changes to their accounts. You can use this to notify the message recipient of a change to their account settings.
- Preferences are updated
- Settings have changed
- Membership has expired
- Profile has changed
Alert update:
Send important updates or news to customers.
Appointment update:
Send confirmations, reminders or other updates to customers about their appointments. For example:
- Appointment time changes
- Appointment location changes
- Appointment is canceled
Auto-Reply:
Send auto-replies to customers when your business isn’t online or available to respond right away.
Issue resolution:
Respond to questions, concerns or feedback from customers about your business. For example:
-
Issue is resolved
-
Issue status is updated
-
Issue requires a request for additional information
-
Notify the message recipient of something informational like Business
hours/hours of availability
One-Time Password:
Send auto-generated verification codes so customers can securely access their accounts.
Payment update:
Send a message to customers about their payment. For example:
- Send an out-of-stock notification
- Notify an auction has ended
- Status on a payment transaction has changed
- Send a receipt
Personal Finance update:
Send a message to customers about their personal finances. For example:
- Bill-pay reminders
- Scheduled payment reminder
- Payment receipt notification
- Funds transfer confirmation or update
- Other transactional activities in financial services
Reservation update:
Send confirmations, reminders or other updates to customers about their reservations. For example:
- Location changes
- Cancellation is confirmed
- Hotel booking is canceled
- Car rental pick-up time changes
- Room upgrade is confirmed
- Itinerary changes
Shipping update:
Send shipping updates to customers about their orders. For example:
- Product is shipped
- Status changes to in-transit
- Product is delivered
- Shipment is delayed
Ticket update:
Send shipping updates to customers about their orders. For example:
- Concert start time changes
- Event location changes
- Show is canceled
- A refund opportunity is made available
Transportation update:
Send shipping updates to customers about their orders. For example:
- Flight status changes
- Ride is canceled
- Trip is started
- Ferry has arrived
Building blocks of template message
The media templates have more building blocks and features, it consists of the following building blocks:
-
Header:
The header is optional and serves as the title or header of your template. It supports the following: text, image, document & video
-
Body:
The body should contain the most important text of your template. Only text is supported
-
Footer:
The footer only supports text and can be used to provide less relevant information in your template message
-
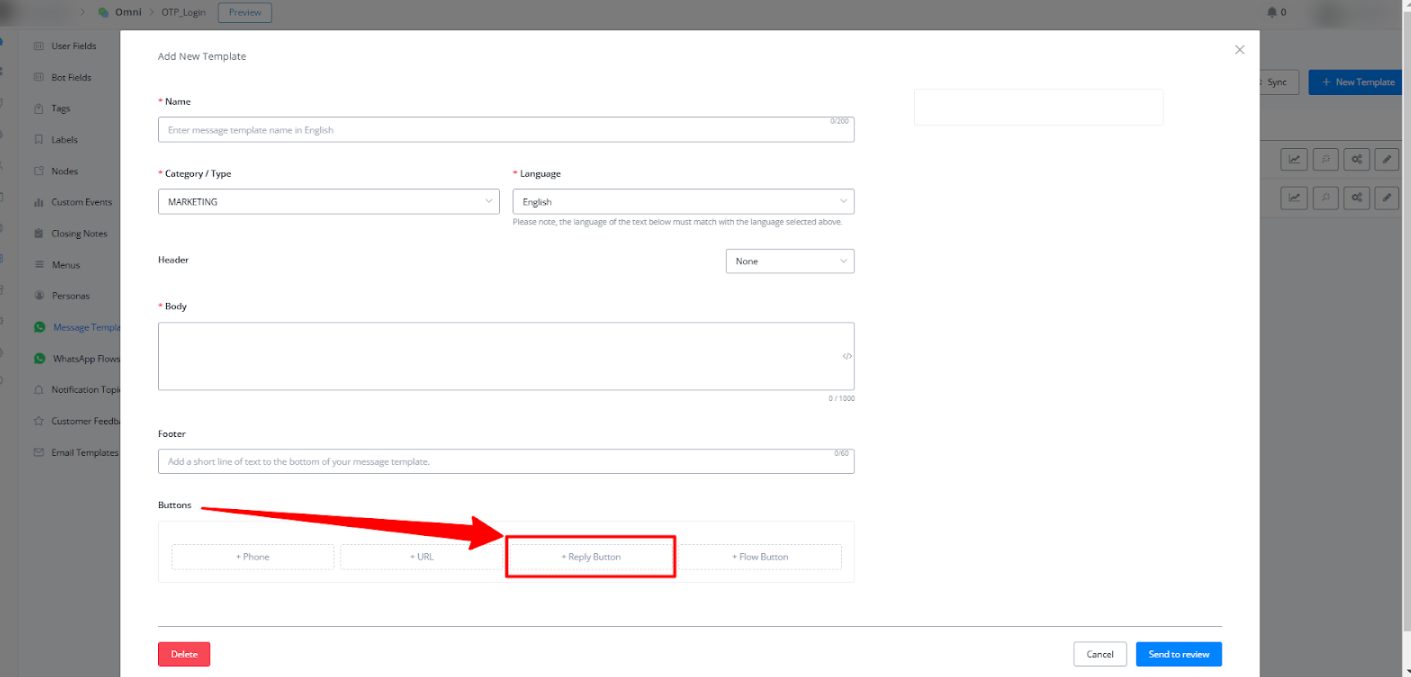
Button:
The button adds interactivity to your templates. There are two main types.
-
Quick reply button:
Used for getting quick answers from your client, Max 3 Quick reply buttons per template
-
Call to Action button:
Max one URL and phone number per template.
-
Please note:
- All templates require a body, header, footer and buttons are optional.
- All media examples must be URLs that point to a valid media file.
Create template message
In this section, you will need to log in to your WhatsApp business manager account. Select the business manager account from the drop-down if there is any, and then select “template message”
Please note: Test WhatsApp number doesn’t support creating template messages, you need to use a new real phone number to create a new template message.
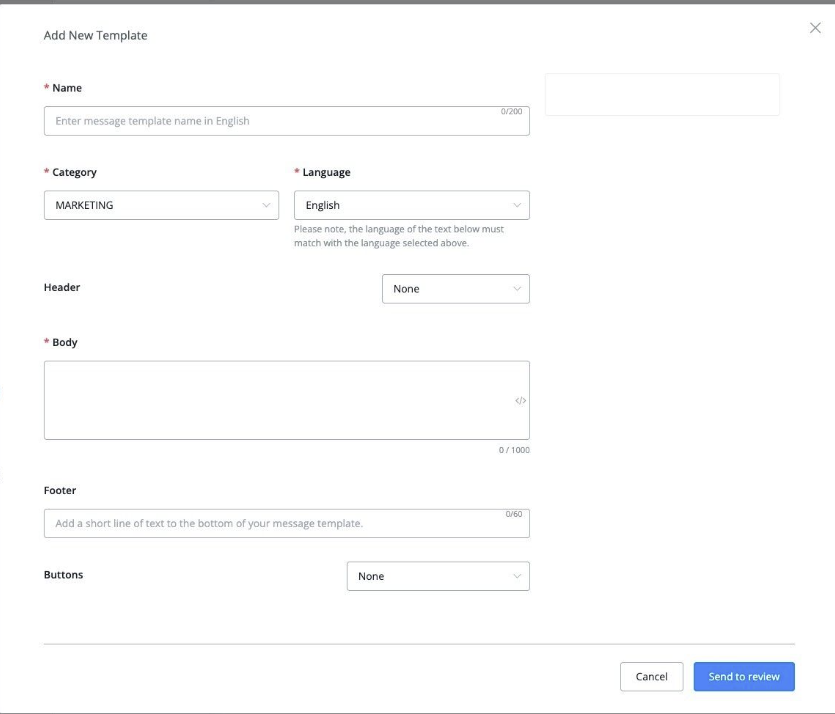
And after you clicked the “Create message template” from the top right corner of the dashboard.
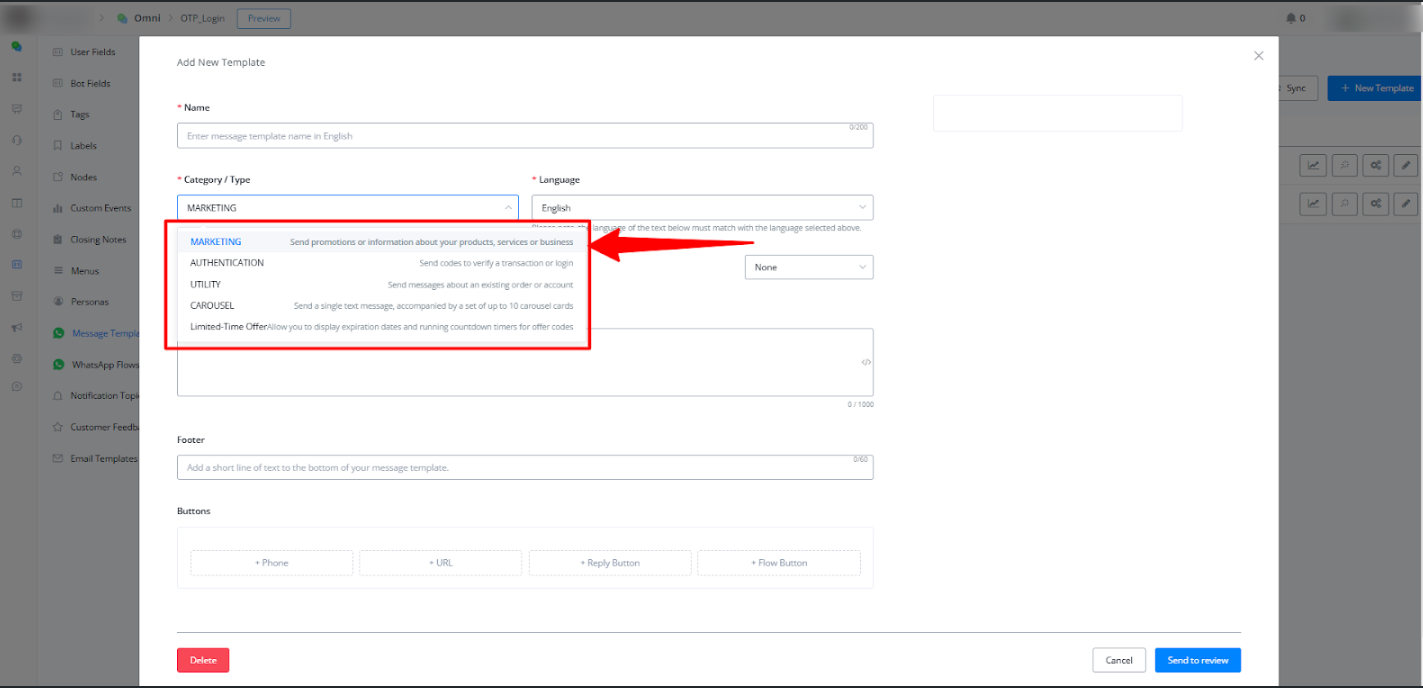
You need to fill up the template name and select the message category and languages.
Create standard(text only) templates:
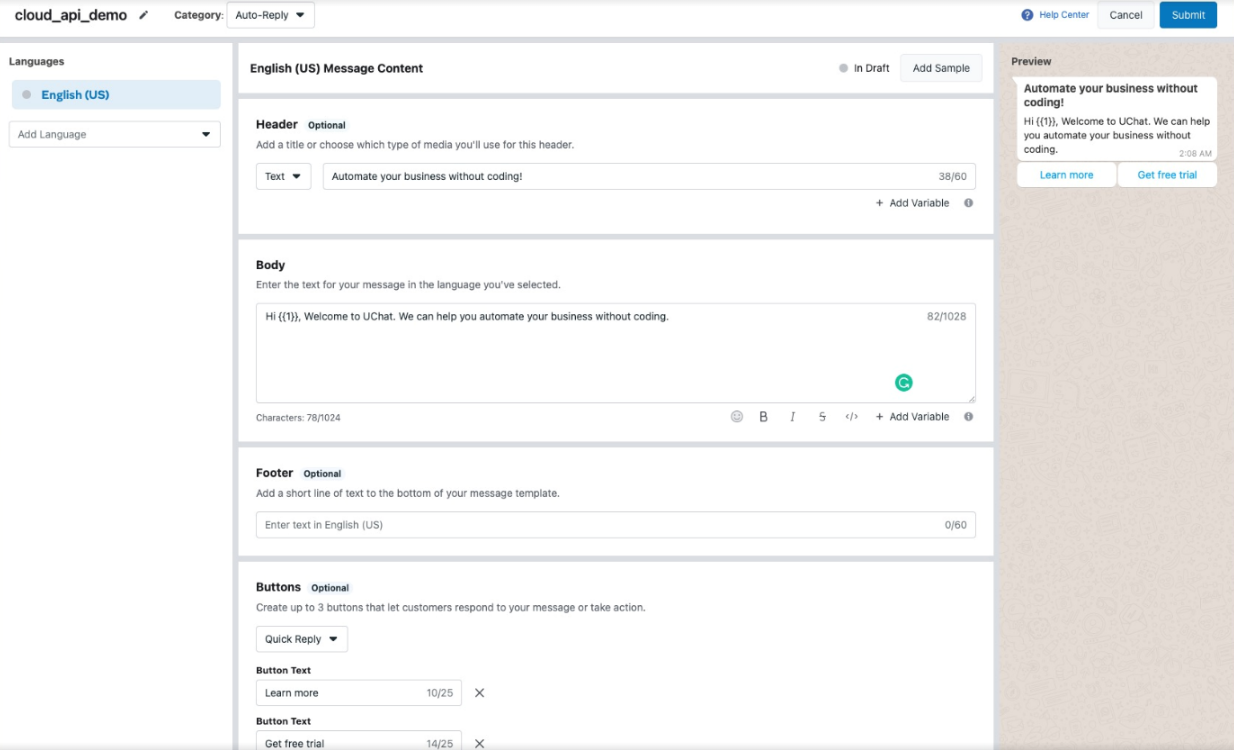
Below is the template message we created, and after you create the template, submit it to Facebook for review.
If you follow the best practice, your template will get approved very soon.
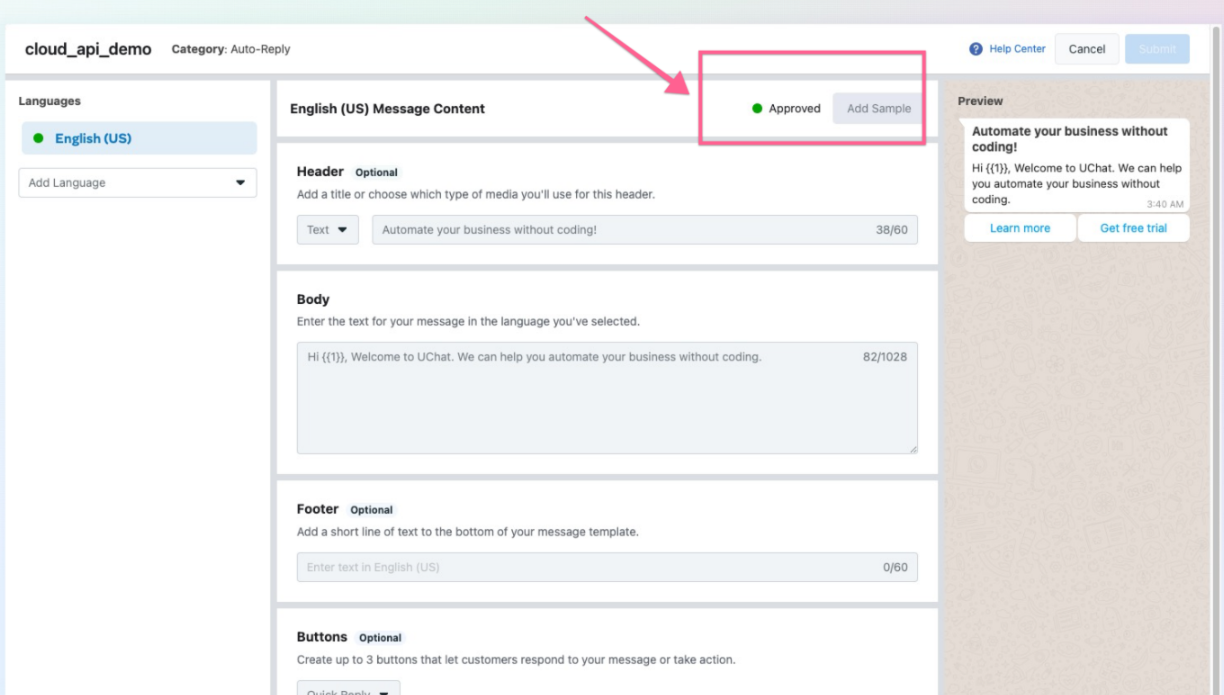
Once the template message gets approved, you will see the approved icon below.
Now you can go back to Messagingme.app, and go to the WhatsApp channel,
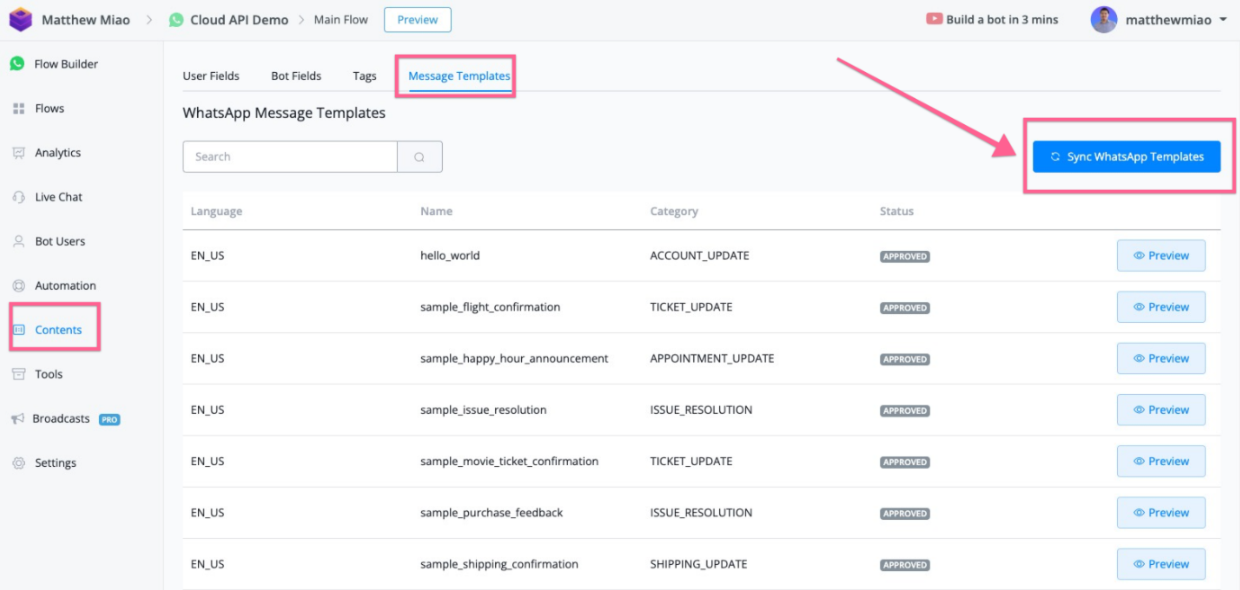
Once you go to the content, and message templates, and click “Sync WhatsApp Template”, you should be able to see that all the approved templates will be sync back to Messagingme.app to use.
Creating Discount Campaigns with Limited-Time Offers in WhatsApp
WhatsApp’s new message template feature is a game-changer for creating limited-time offers! We will guide you through creating effective discount campaigns designed to engage users even beyond the standard 24-hour window.
Let’s explore the steps to set up and optimize your limited-time offer template in Messagingme.app.
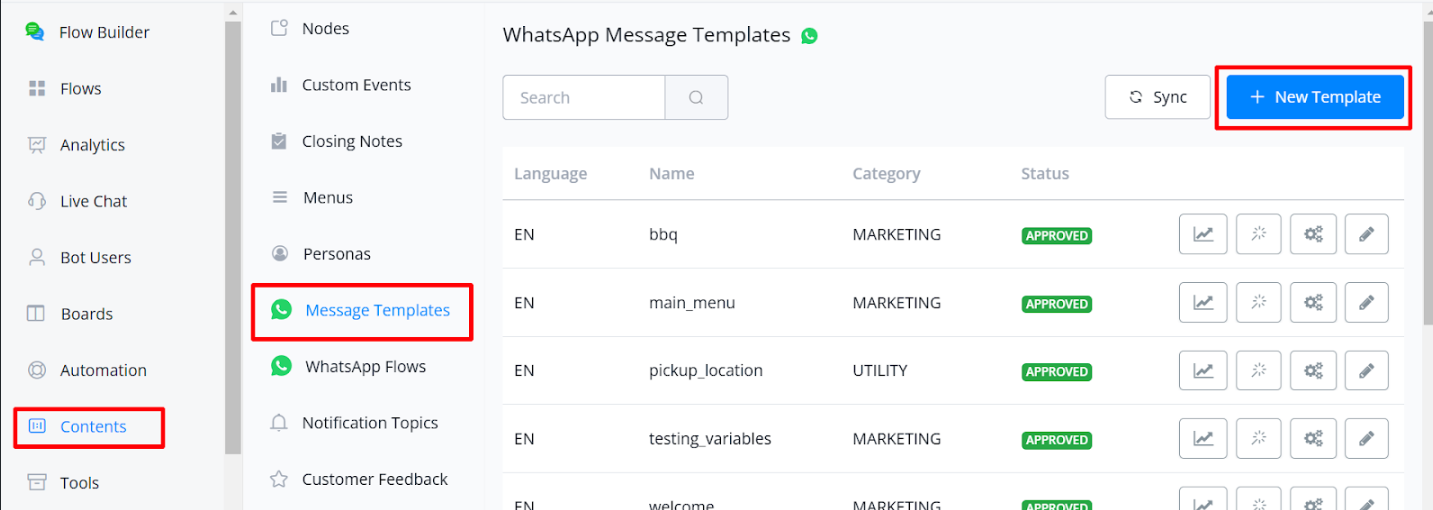
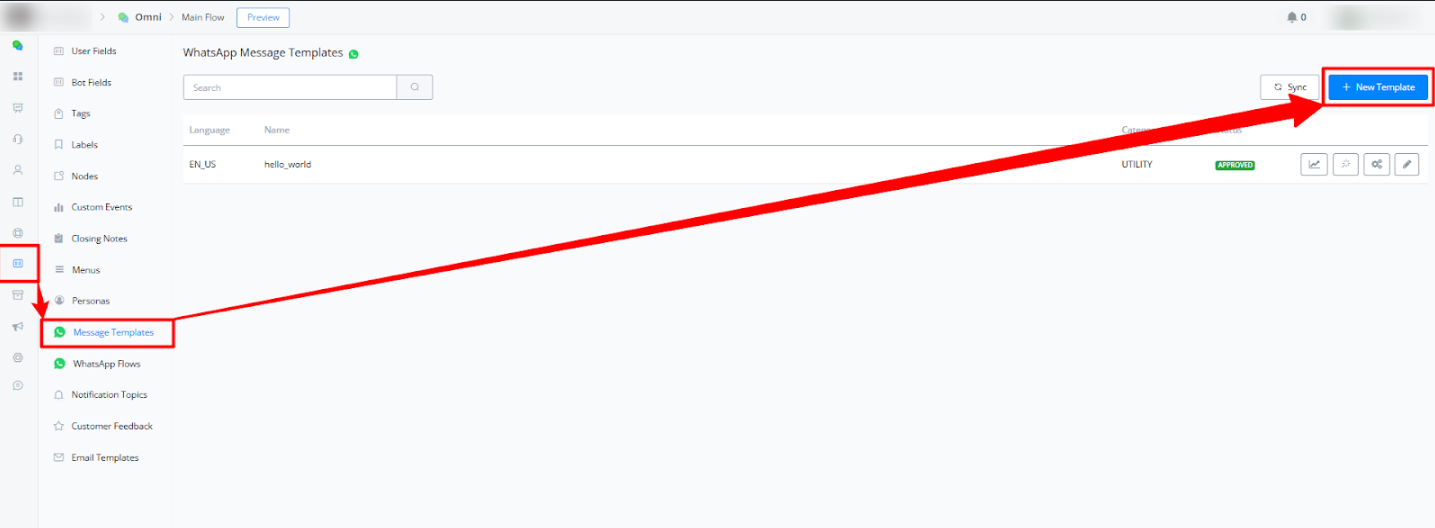
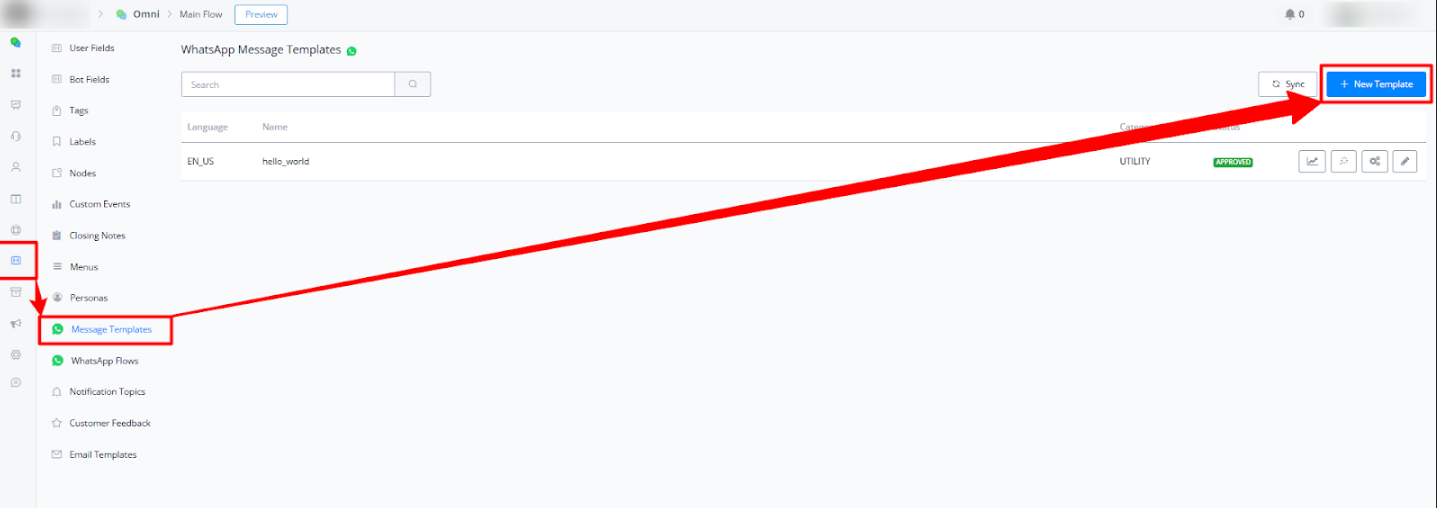
Navigate to Message Templates
Go to Content → Message Templates.
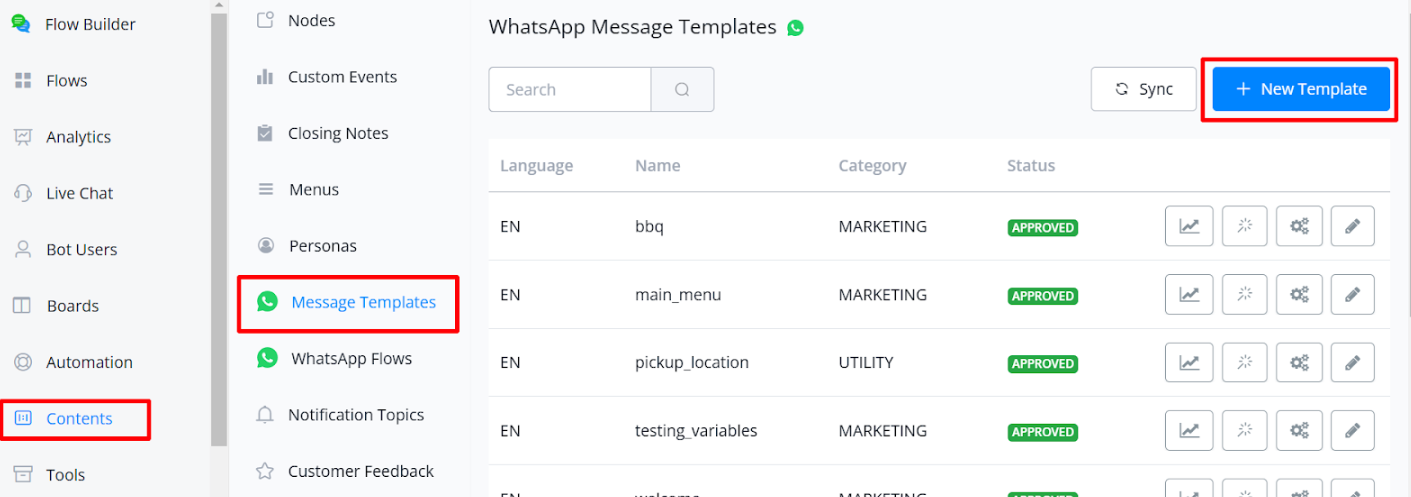
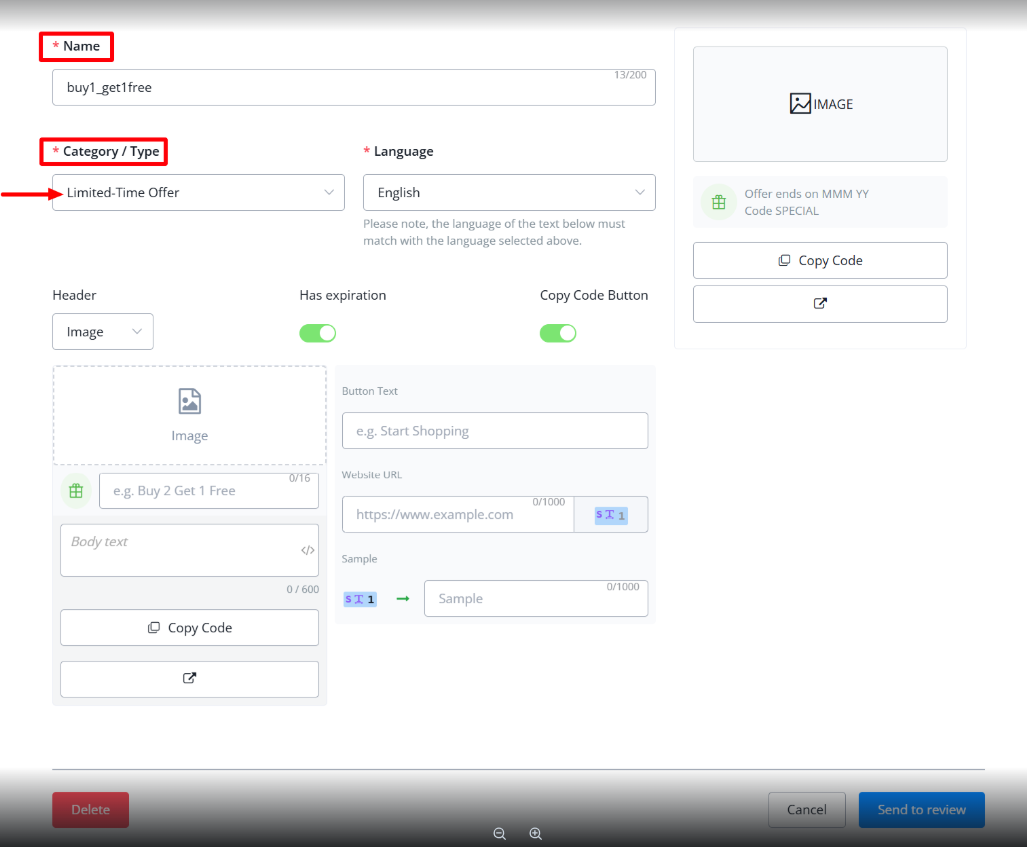
Click on New Template and name it. Choose the Limited Time Offer category, which comes with various options tailored to time-sensitive promotions.
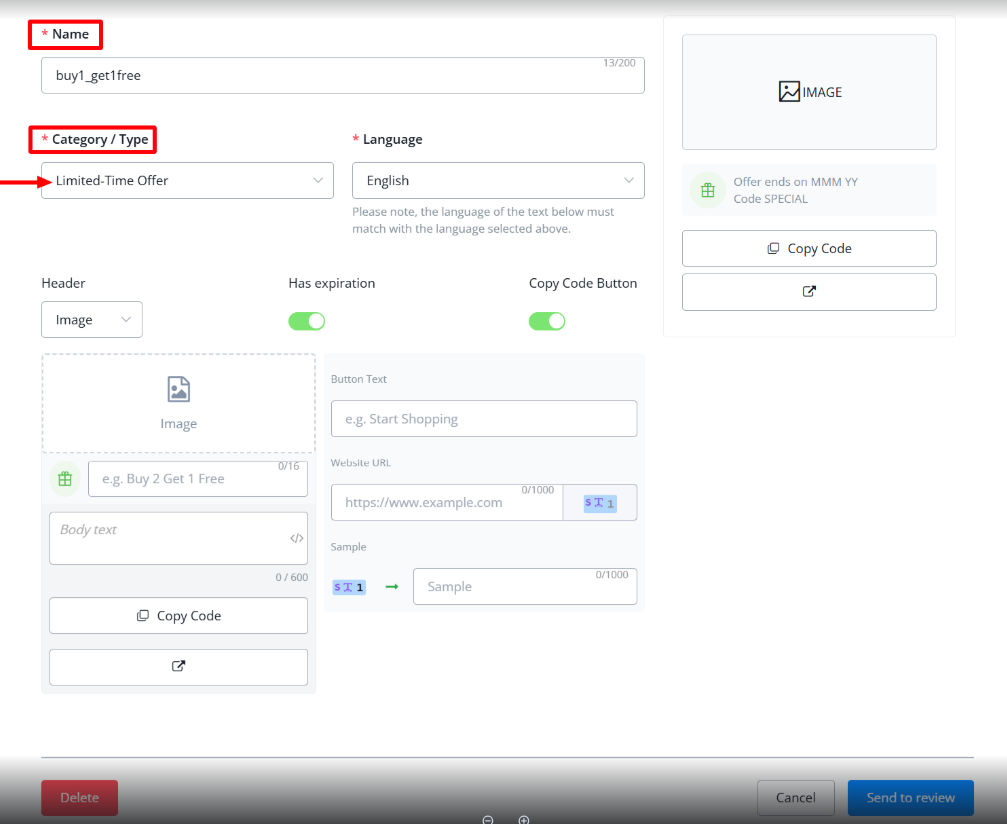
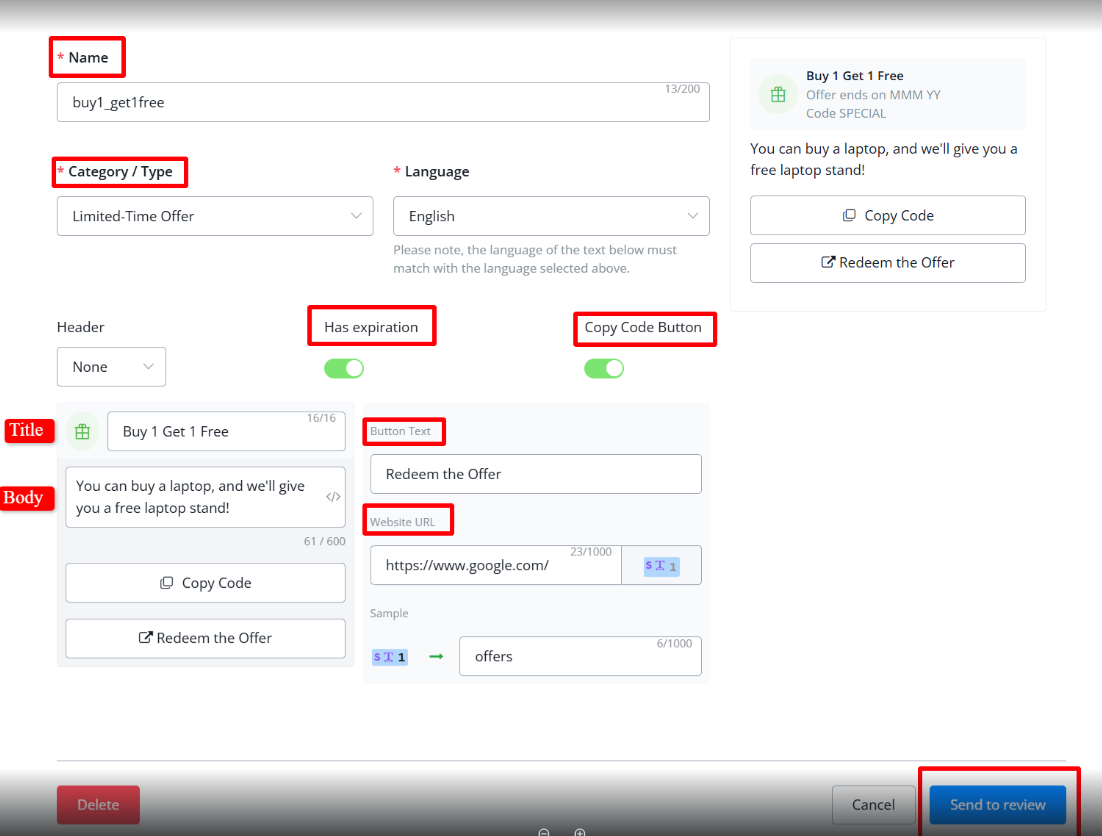
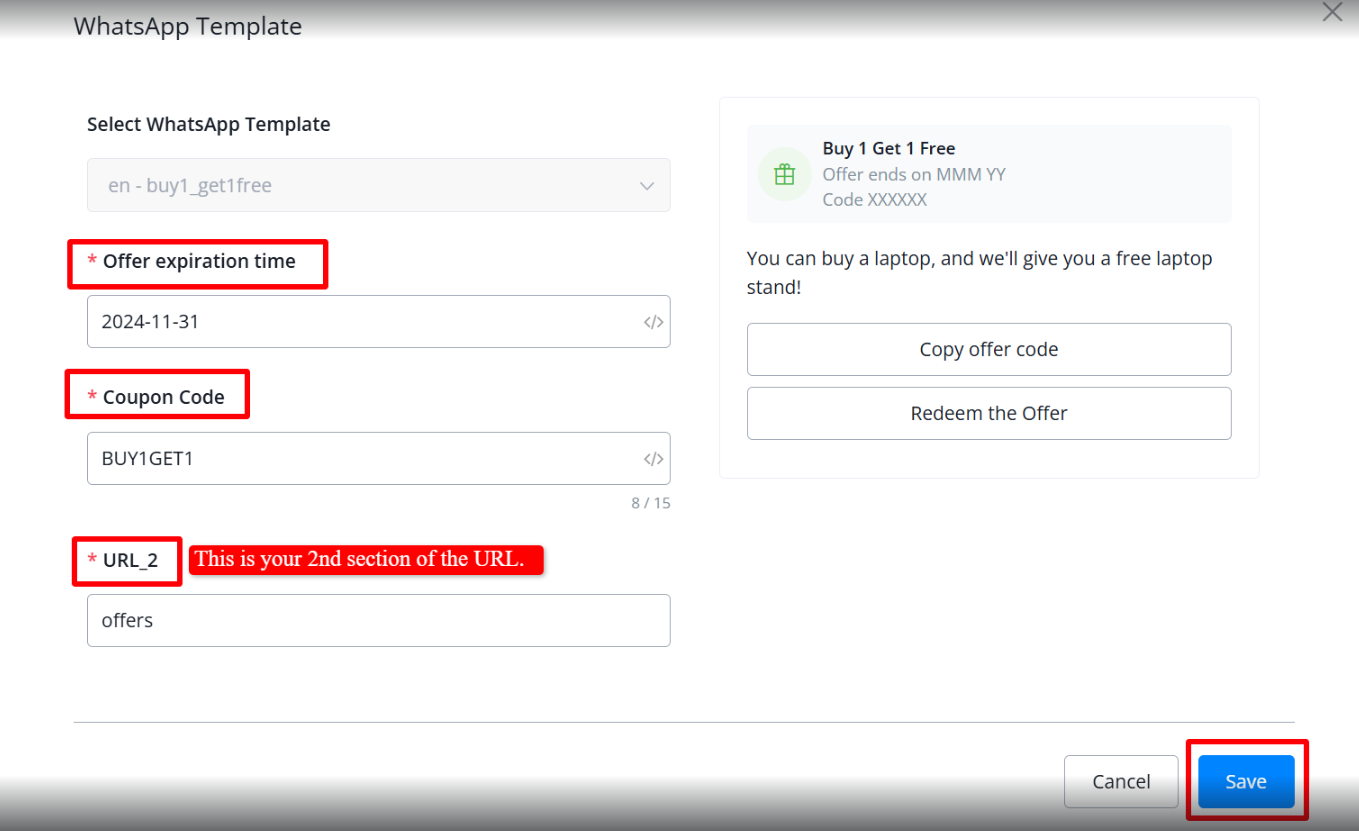
Customize the Offer
You can Customize the template according to your preference, add an image or video to the header, set the expiration date, and set the copy code option. Fill out all the details buttons, including the title and your website URL where this offer is available, and send this template to review.
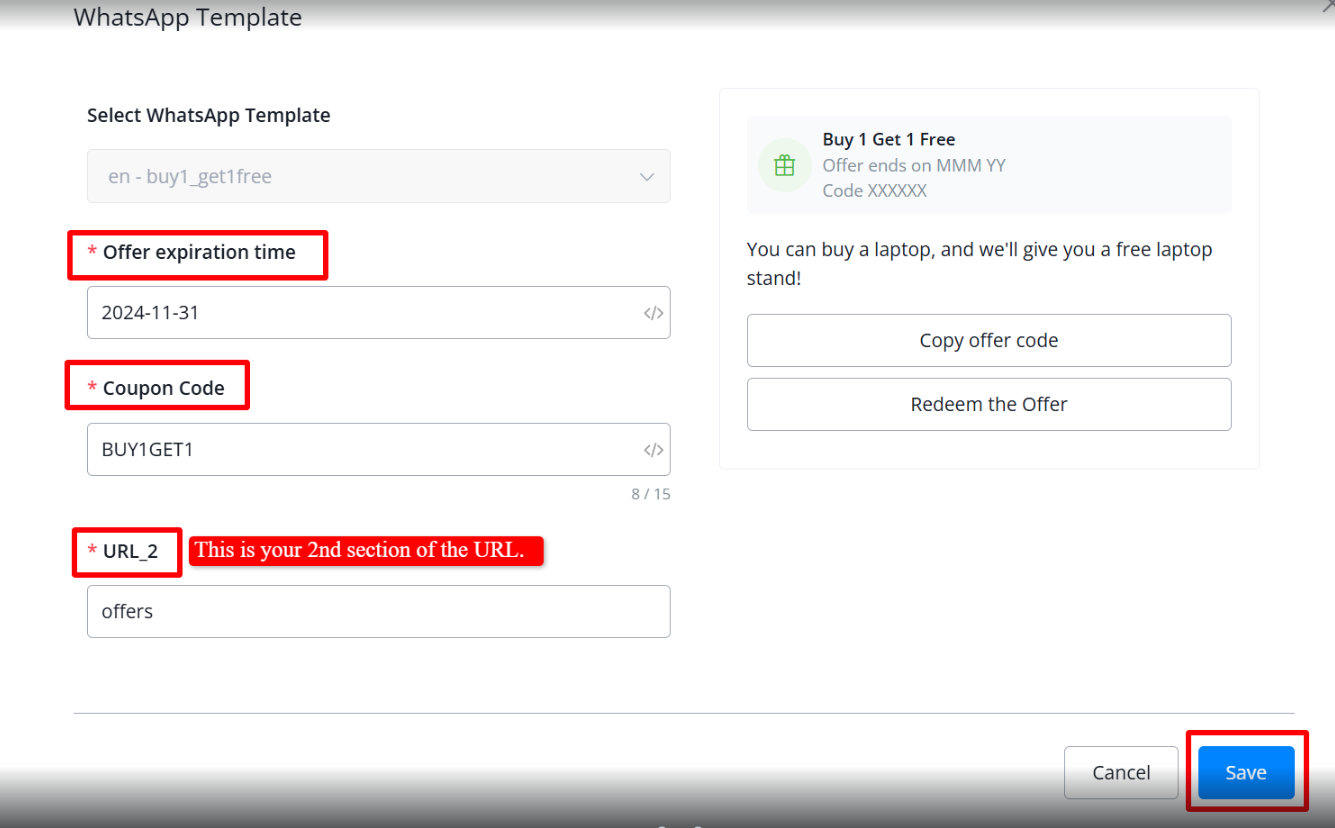
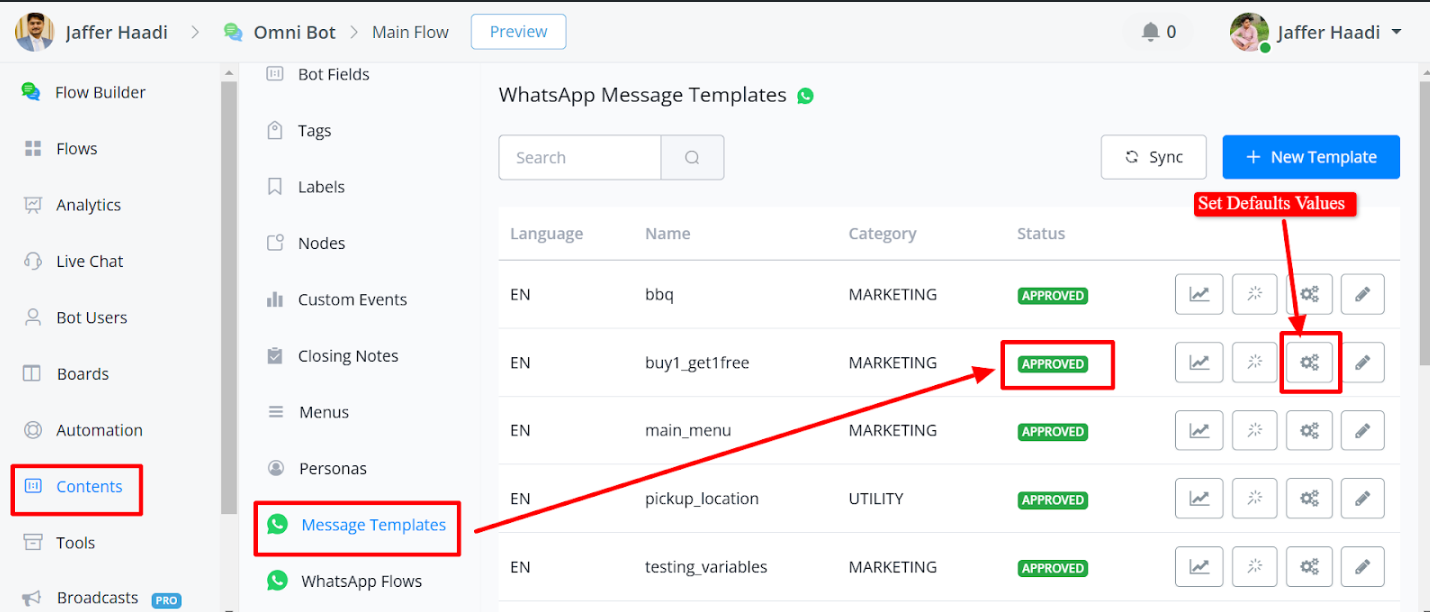
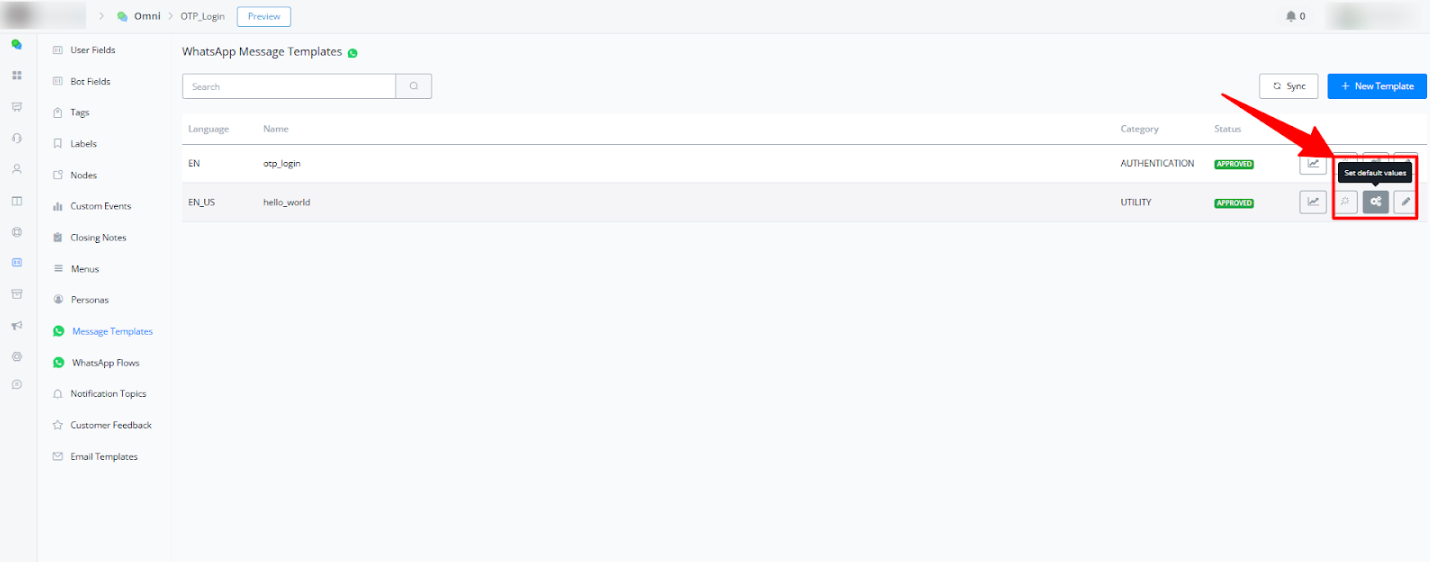
Set Default Values
Once Meta approves the template, you will have the option to set the default values.
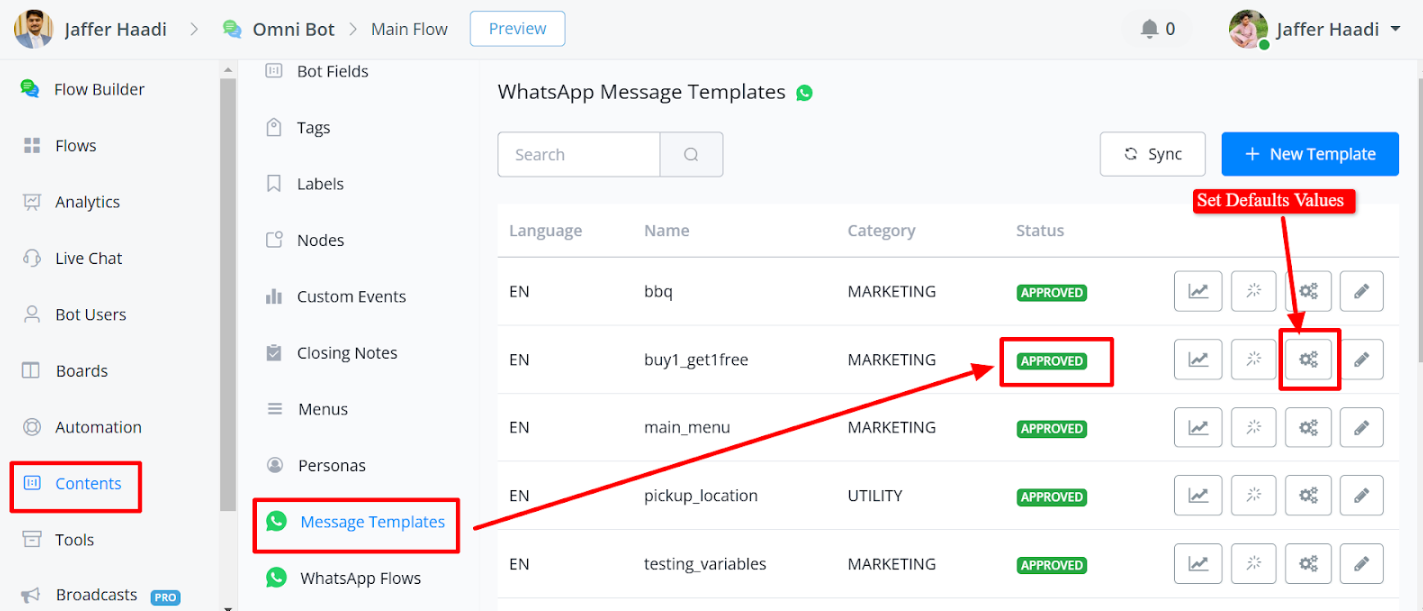
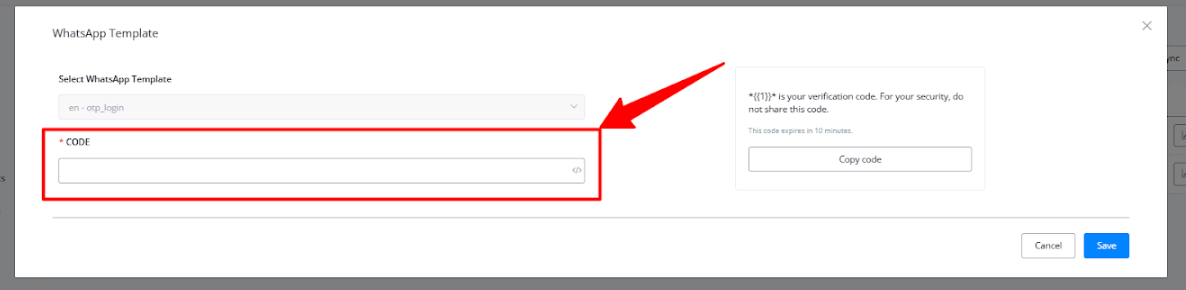
In the default values, set the expiration date upon enabling, enter the coupon code, and specify the website’s offer page URL.
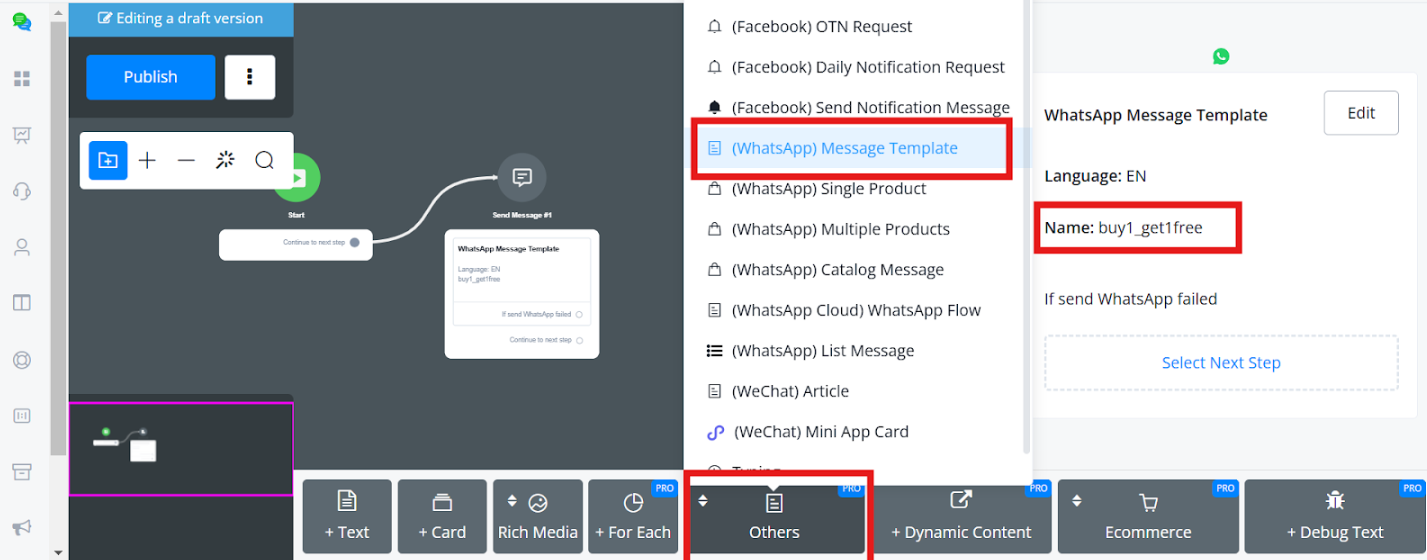
Send this offer through a subflow
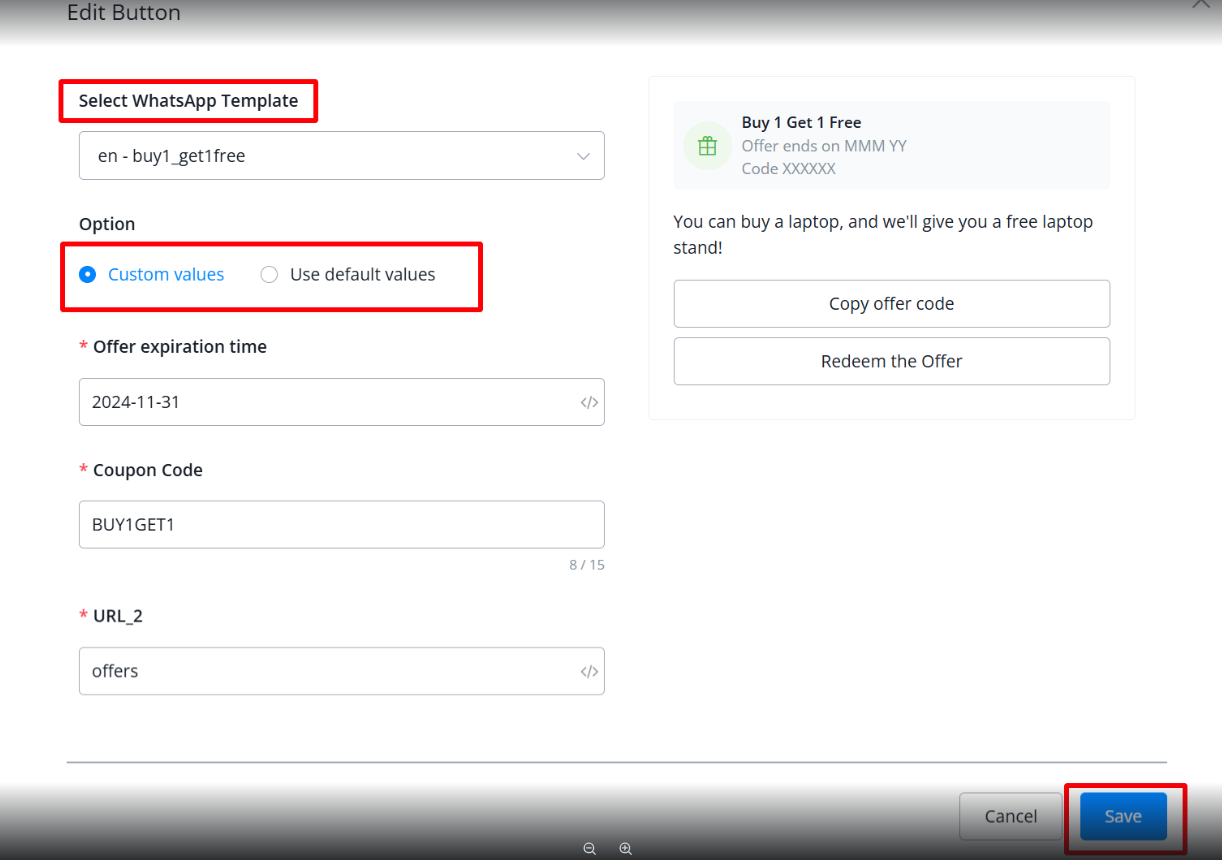
In your flow builder, use the Message Node → Others → WhatsApp Template Message, and select the relevant template.
While selecting the template message, you have the option to input custom values or go with default values.
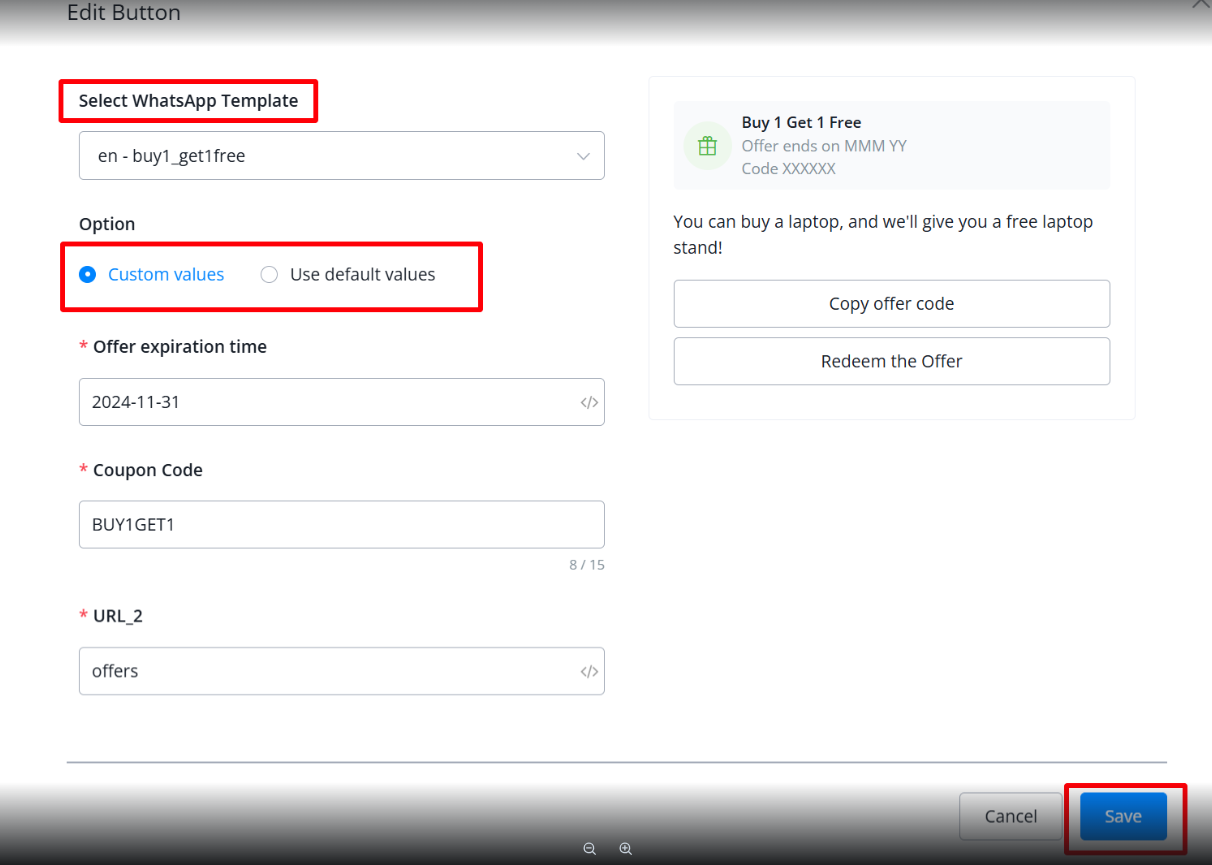
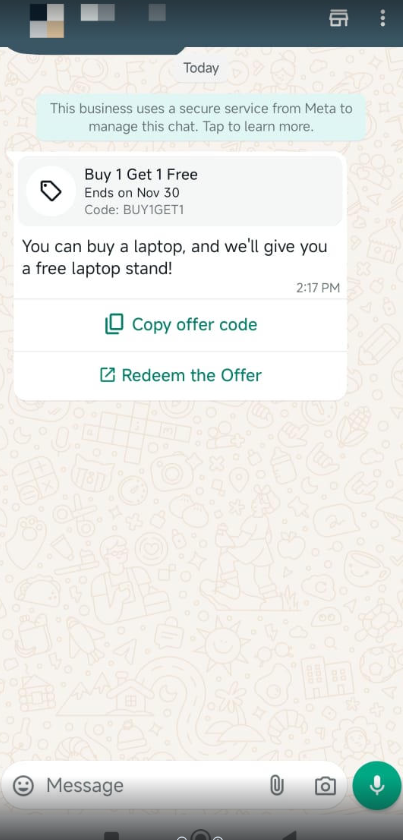
This is how it will received on your mobile device
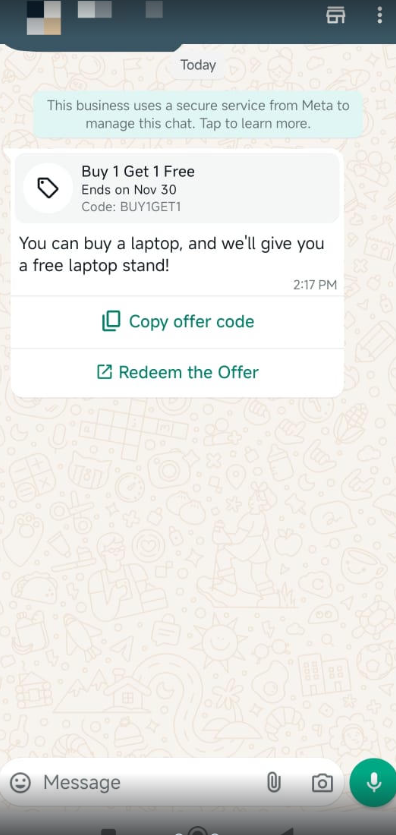
How to use Template message
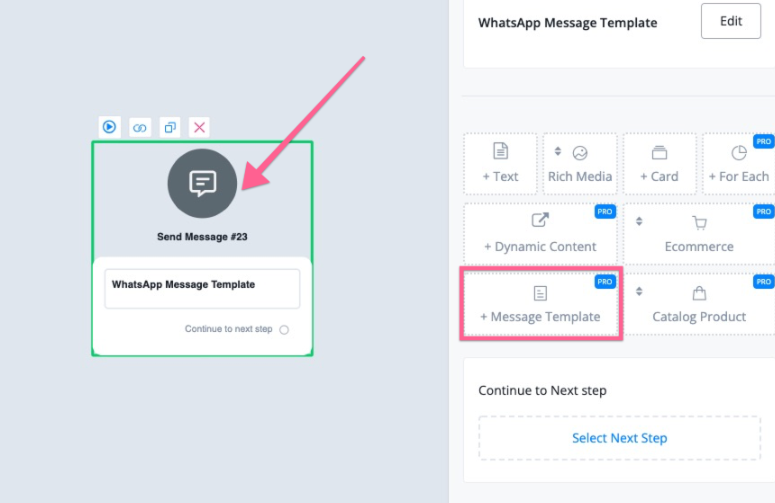
Use in the flow builder
Template messages offer more features, like the buttons(which can link to external URLs) & phone call button.
You can send the template message right in the flow builder. It’s free to send if it’s within a 24-hour engagement window.
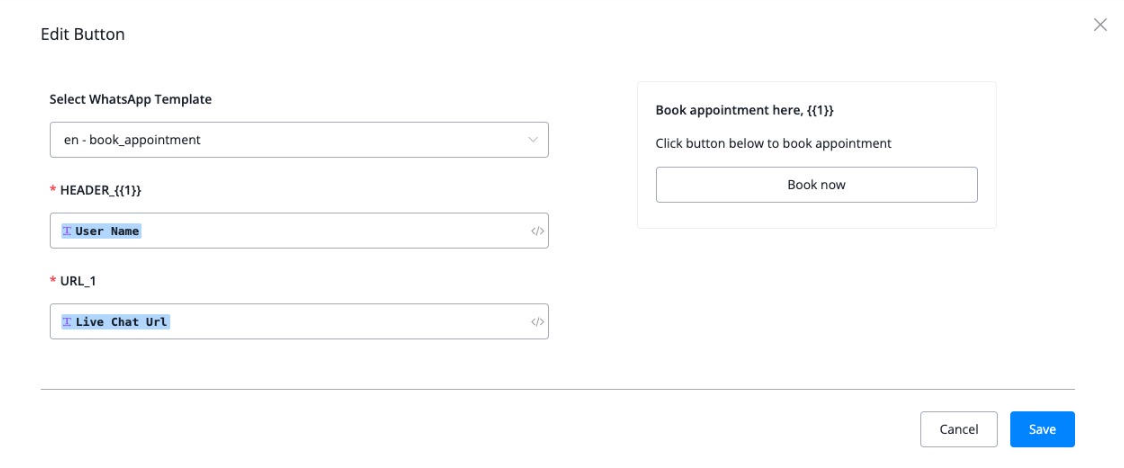
In the send message mode, select “Message template”, and if you have a variable in the template message, you can select the custom field in the Messagingme.app.
Use in the broadcast
You can also use template messages in the broadcast of Messagingme.app.
Let’s first build out the flow you want to send the broadcast. You can use a simple conditional check to decide if you want to use a template message or not.
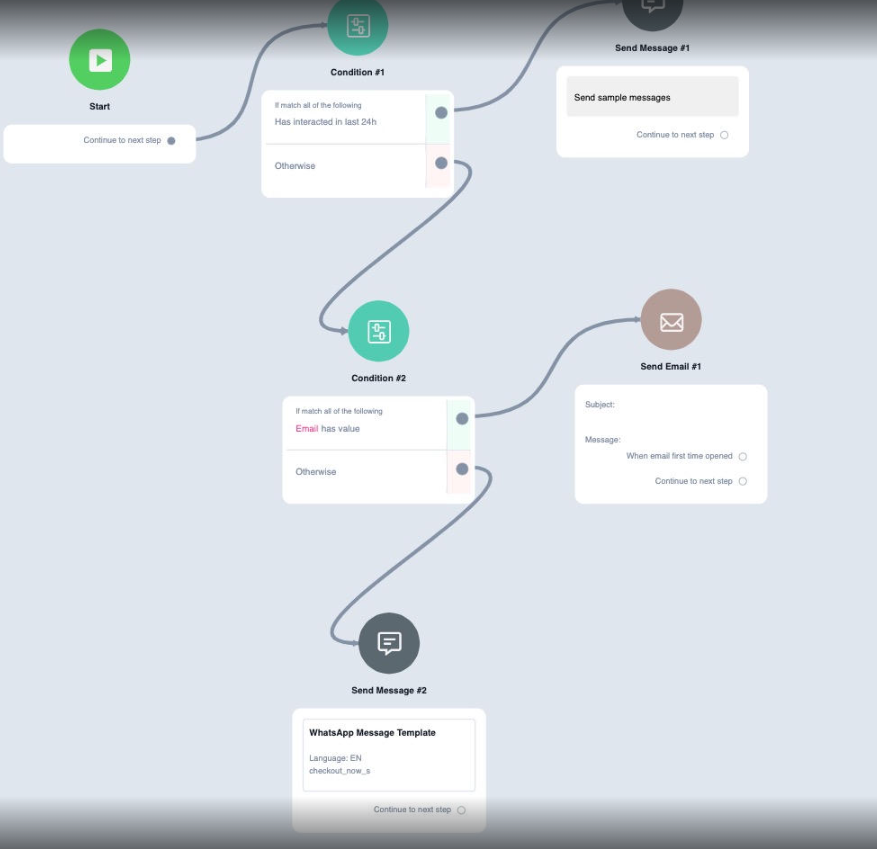
In the sample flow above, we first use conditions to check if the user is still within the 24-hour window, if they are, then you can reach out to them for free.
And then you can also select to send them an email if you have their email address.
At last, you can select to send a template to the user.
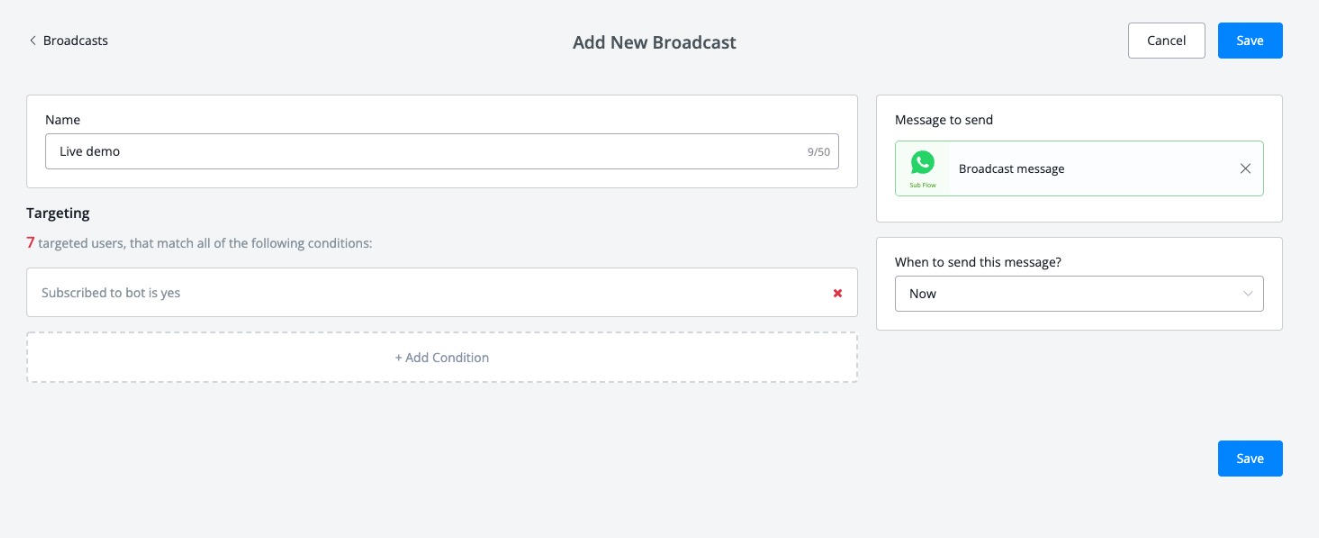
After you set up the flow to use in the broadcast, you can now go to the broadcast and select the audience you want, and then send the flow you just built.
Use in the live Chat
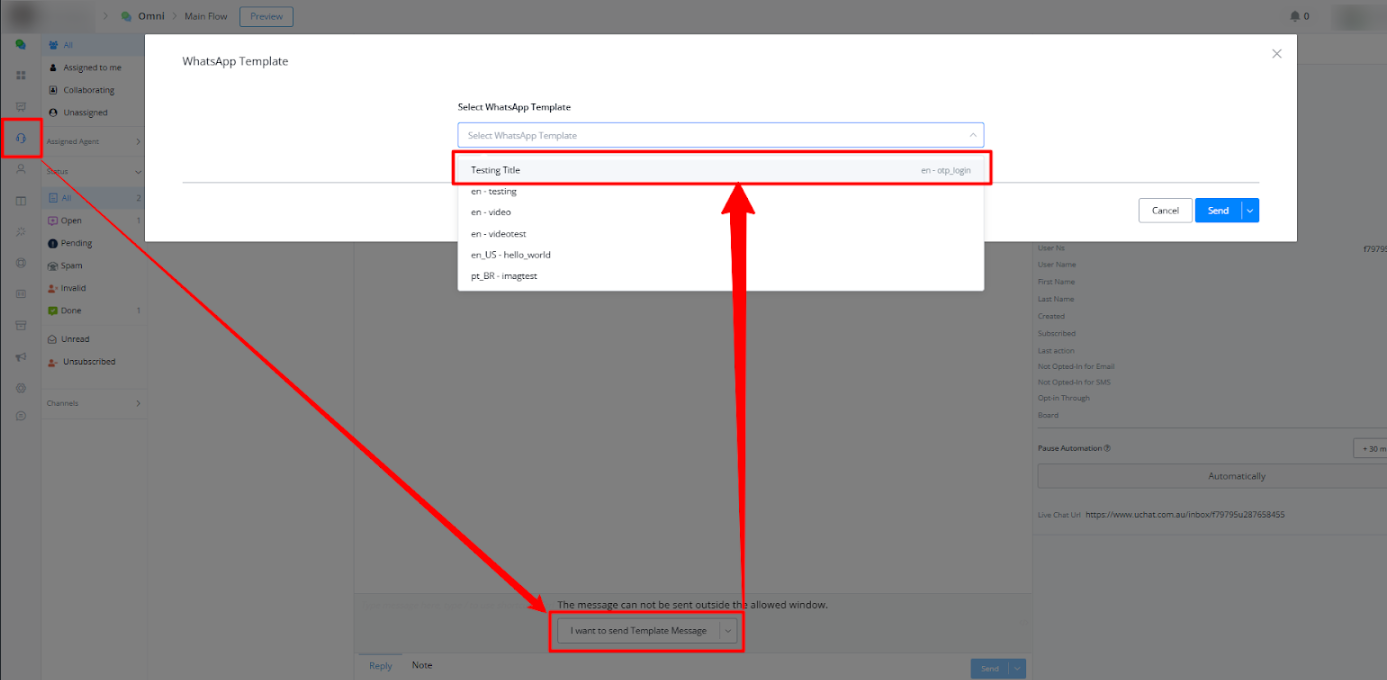
In the live chat, if the user is out of the 24-hour window, you can only reach them through the template message.
If you go to the live chat window, you will see the option of “I want to send template message”
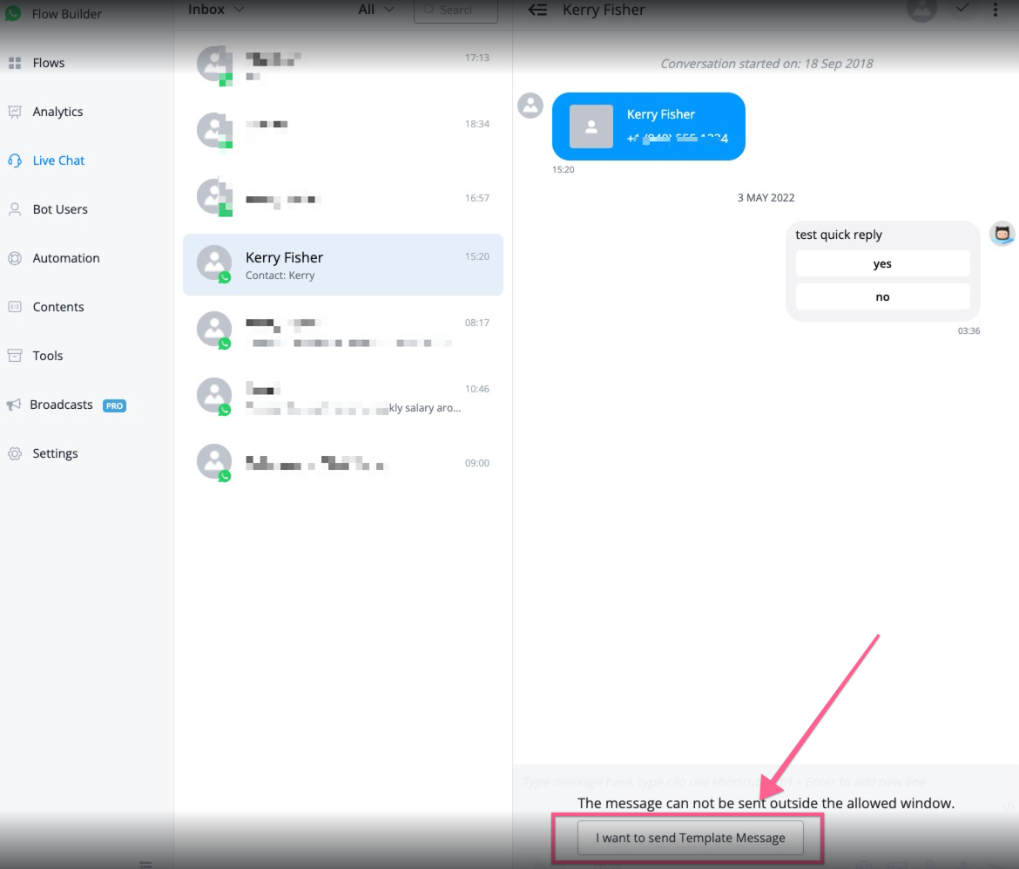
Please note that the template will be sent only if it’s the first message in the subflow.
Then you can pick up the subflow that starts with the template message.
Use in Messagingme.app mobile apps
Once you start using WhatsApp business API, you won’t get to use the number in your WhatsApp business app or personal WhatsApp app.
Messagingme.app offers options that you can install our mobile app to handle the live chat conversations.
WhatsApp Authenticate Template Message
WhatsApp’s new message template feature is a game-changer for creating limited-time offers! We will guide you through creating effective discount campaigns designed to engage users even beyond the standard 24-hour window.
Let’s explore the steps to set up and optimize your limited-time offer template in Messagingme.app.
Navigate to Message Templates
Go to Content → Message Templates.
Click on New Template and name it. Choose the Limited Time Offer category, which comes with various options tailored to time-sensitive promotions.

Customize the Offer
You can Customize the template according to your preference, add an image or video to the header, set the expiration date, and set the copy code option. Fill out all the details buttons, including the title and your website URL where this offer is available, and send this template to review.
Set Default Values
Once Meta approves the template, you will have the option to set the default values.
In the default values, set the expiration date upon enabling, enter the coupon code, and specify the website’s offer page URL.
Send this offer through a subflow
In your flow builder, use the Message Node → Others → WhatsApp Template Message, and select the relevant template.

While selecting the template message, you have the option to input custom values or go with default values.
This is how it will received on your mobile device
How to use OTP Template message in WhatsApp
This guide explains how to set up OTP Authentication using WhatsApp message templates in Messagingme.app. Follow the detailed steps below, with visuals included, to successfully implement OTP Authentication.
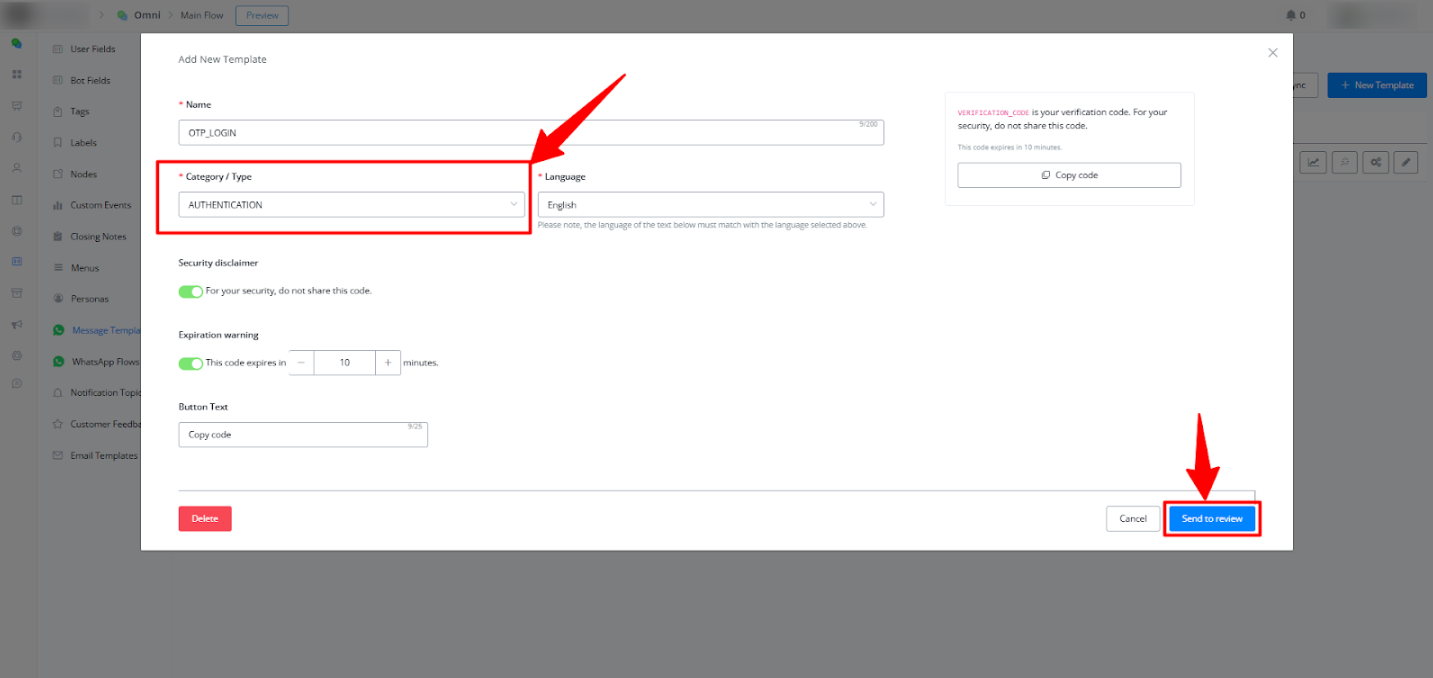
1. Creating the WhatsApp Message Template
- Navigate to Content > Message Template.
- Click on New Template.
- Template Details:
- Name: Enter a name for your template, e.g., “OTP Login”.
- Category: Select Authentication.
- Message Content:
- Customize the message, e.g., “Your verification code is {{1}}. For your security, do not share this code.”.
- Optional fields:
- Add a Security Disclaimer (recommended).
- Mention the Code Expiry Duration, e.g., “This code will expire in 3 minutes.”
- Preview your message to ensure it meets your requirements.
- Submit the template for approval. Once approved, it will be ready for use.
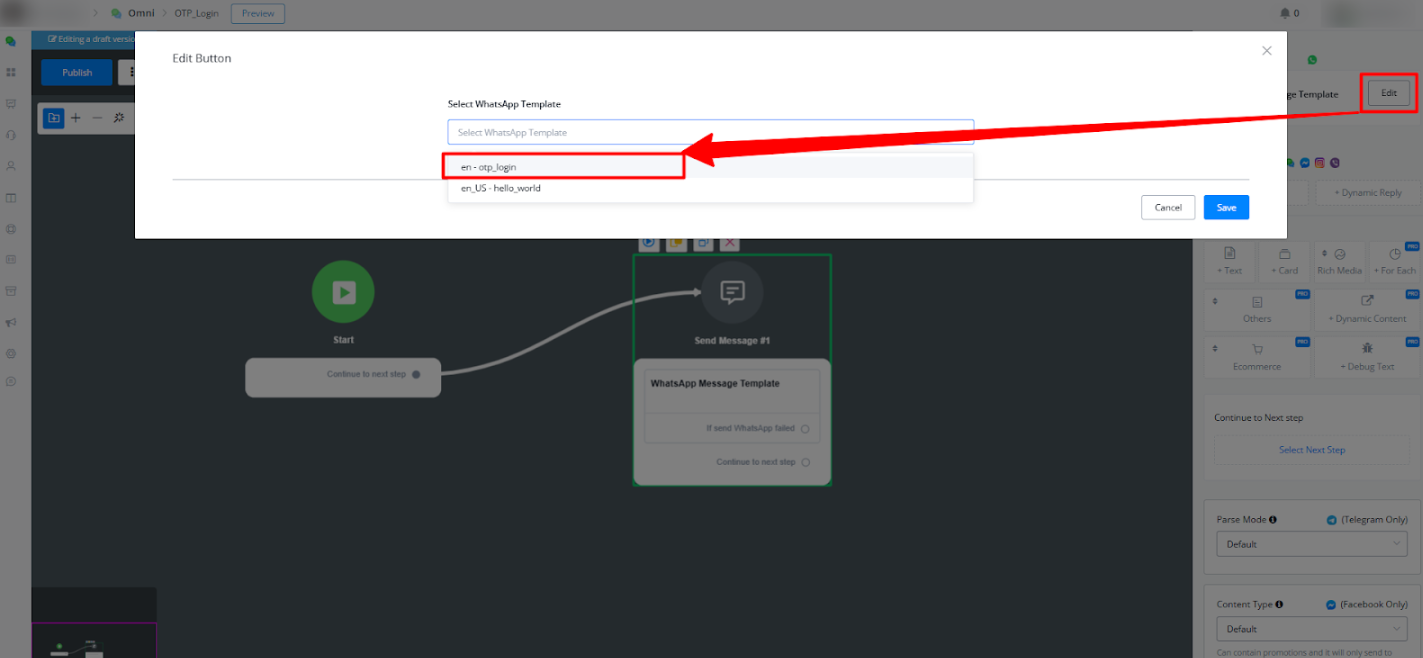
2. Setting Up the Flow to Use the Message Template
- Create a new flow or edit an existing one.
- Add a Send Message block.
- Select Message Template under the “Other” category.

• Choose your OTP message template from the list.
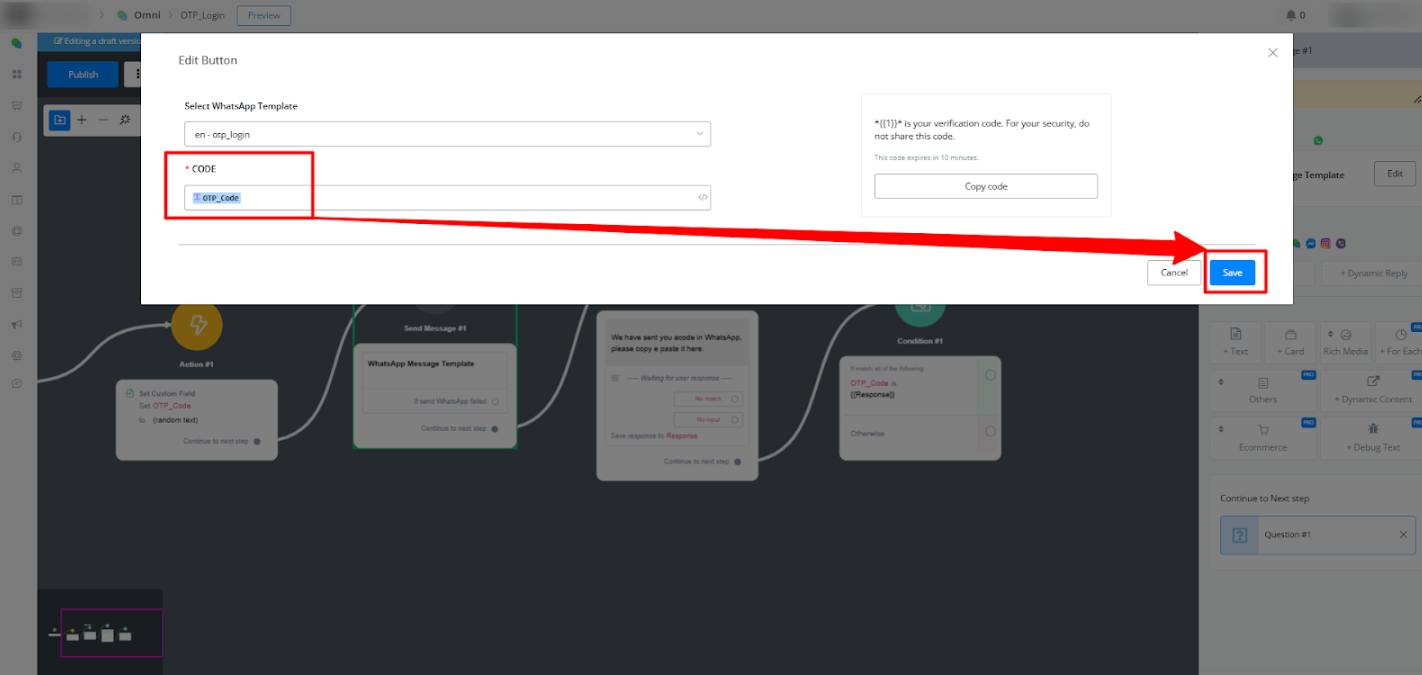
- Insert Variables:
- Add the dynamic custom field for the OTP code, e.g.,
{{OTP_Code}}.
- Add the dynamic custom field for the OTP code, e.g.,
3. Generating the OTP Code
- Before sending the message, generate a unique OTP code:
- Add an Action Block to the flow.
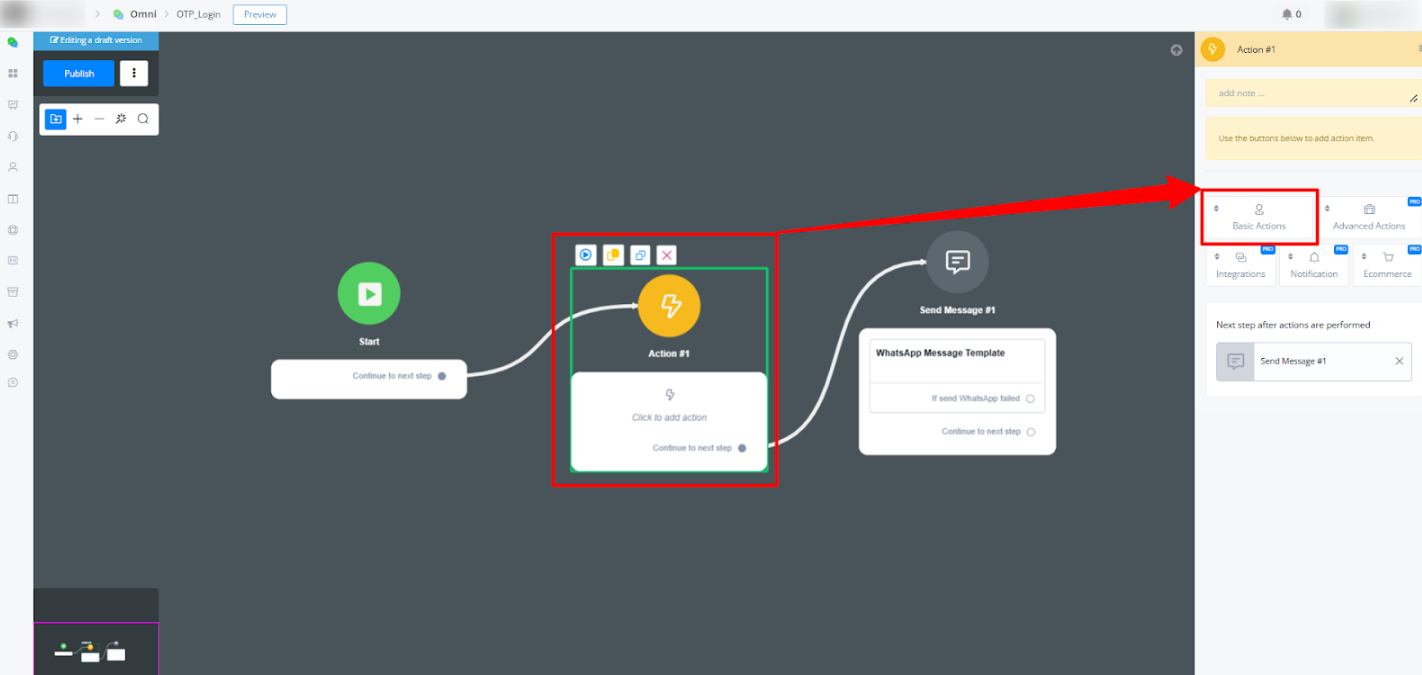
- Select Set Variable Value.
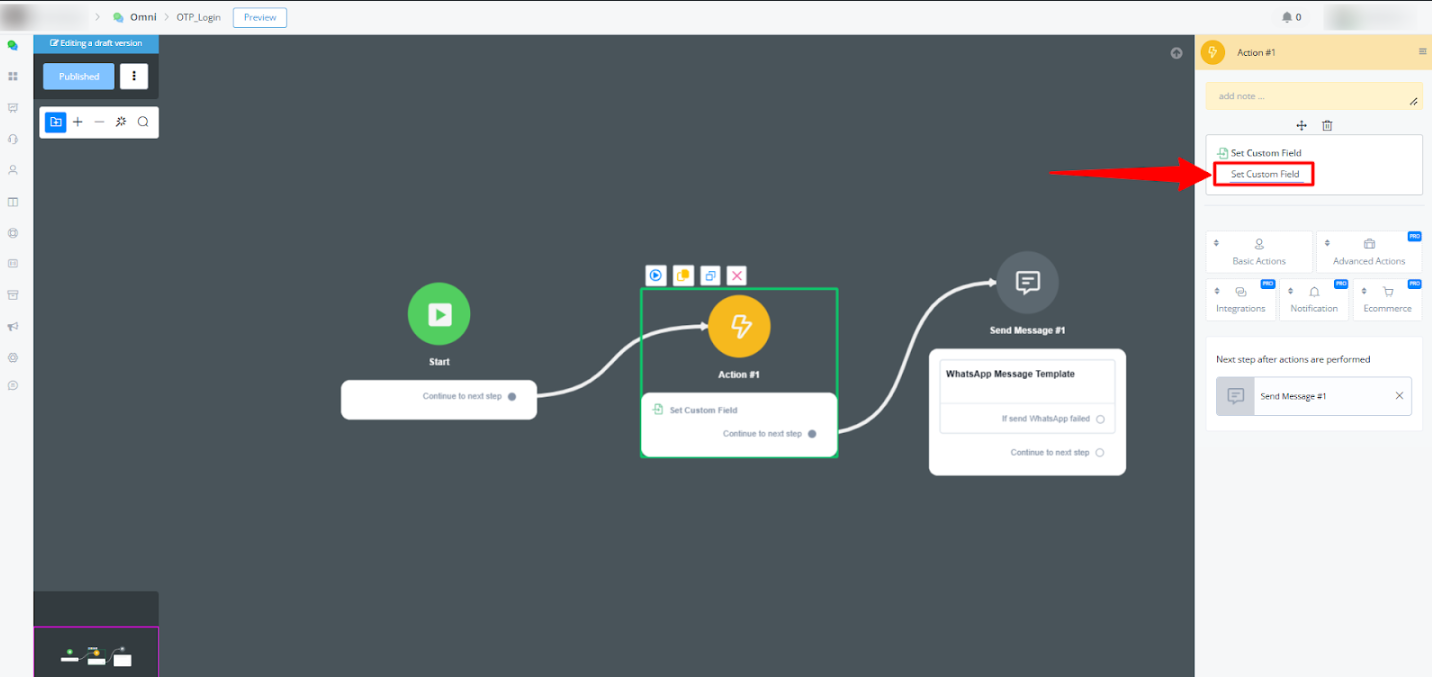
- Configuration:
- Set the Variable Name to
OTP_Code. - Under Operation, choose Generate Random Text.
- Use the format
####for a 4-digit code.
- Set the Variable Name to
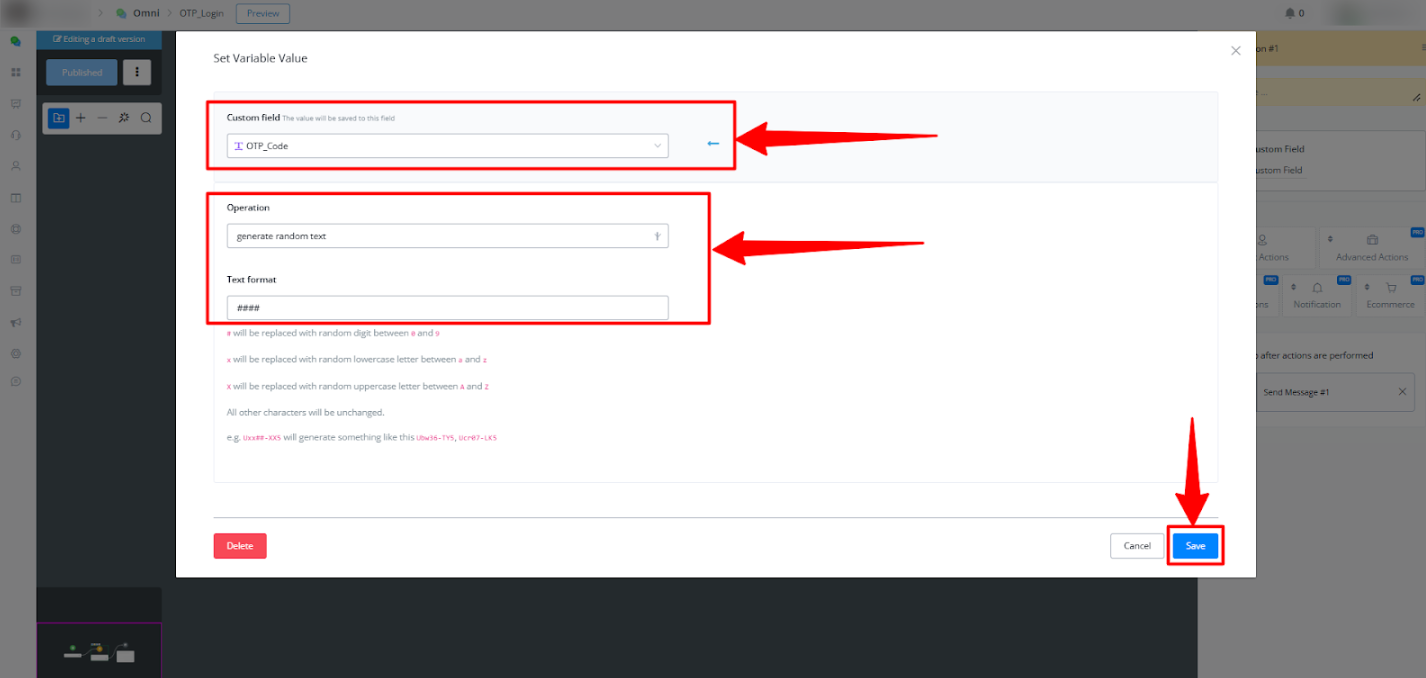
- Save the action node setup.
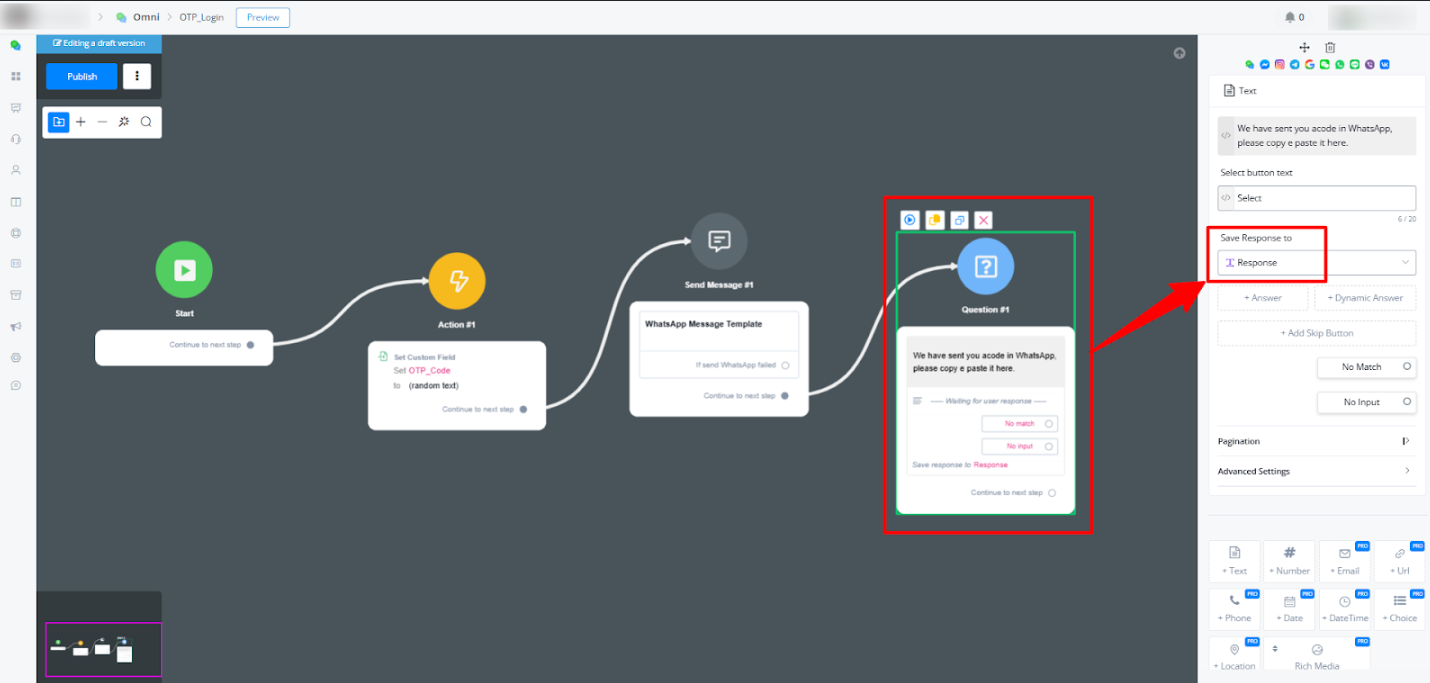
4. Prompting the User to Enter the OTP
- Add a Question Block to ask the user for the OTP:
- Message: “We’ve sent you a code on WhatsApp. Please copy and paste it here.”
- Save the user’s input to a custom field, e.g.,
Response.
5. Validating the OTP
- Add a Condition Block to compare the OTP:
- Condition: Check if
OTP_Code(generated) matchesResponse(user input).
- Condition: Check if
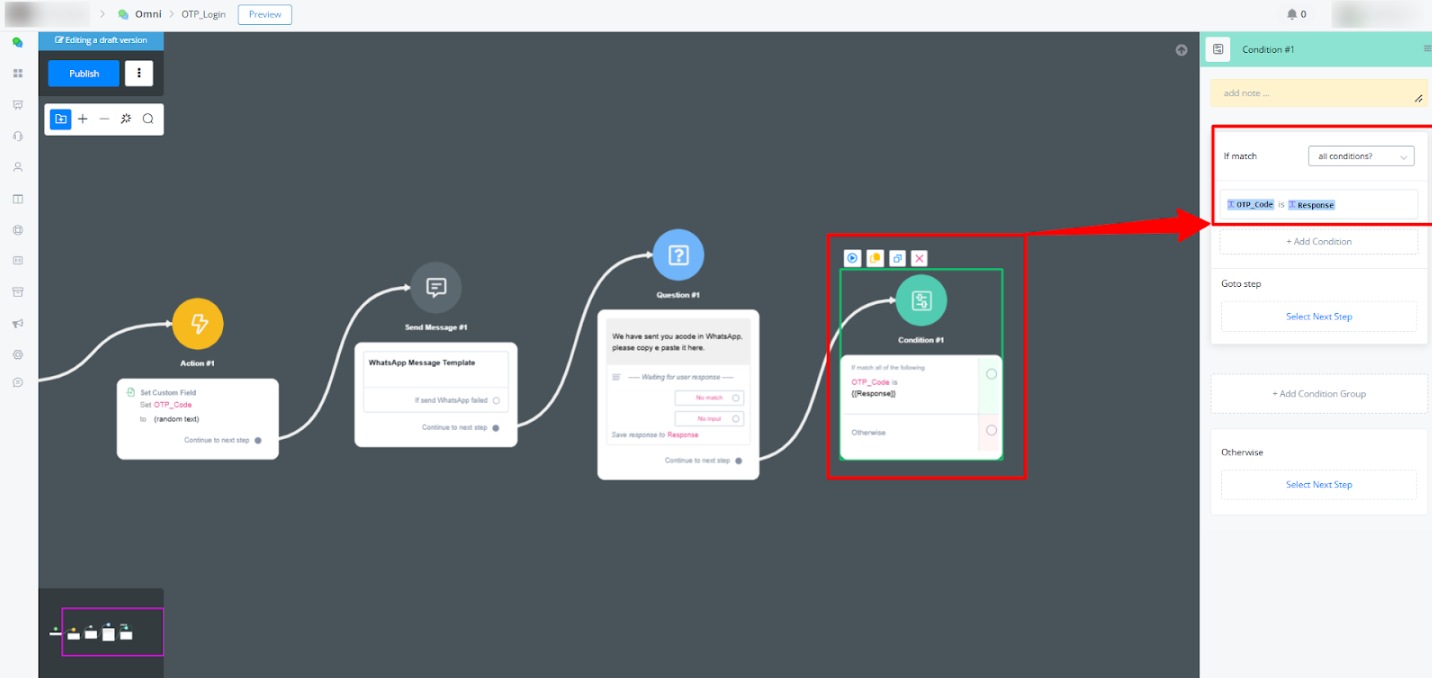
- Outcomes:
- If Yes: Proceed to the next step, e.g., “User Verified.”
- If No: Display an error message, e.g., “Invalid Code. Please try again.”.
- Retry Mechanism
- Allow users to retry if the OTP is incorrect:
- Add a Button Block with options to restart the OTP flow.
Key Notes:
- Ensure the WhatsApp template is approved before use.
- Customize messages and variables to suit your brand’s tone.
- Test the flow thoroughly before deployment.
Templates Sync & Channel Updates
Messagingme.app allows its users to create and synchronize WhatsApp templates directly from the platform. These are the main functionalities:
-
Template Creation:
Navigate to Content > Messenger Templates to create templates within Messagingme.app .
- Categories Supported:
- Marketing: Send promotions or information about your products, services or business
- Authetication: Send codes to verify a transaction or login
- Utility: Send messages about an existing order or account
- Carousel: Send a single text message, accompanied by a set of up to 10 carousel cards
- Limited-Time Offer: Allow you to display expiration dates and running countdown timers for offer codes
-
Media Attachments:
You can include images, documents, locations, phone numbers, URLs, and reply buttons in your templates.
• Reply Button Update: Previously, up to 3 buttons were supported. Now, up to 10 reply buttons can be added.
2. New Features
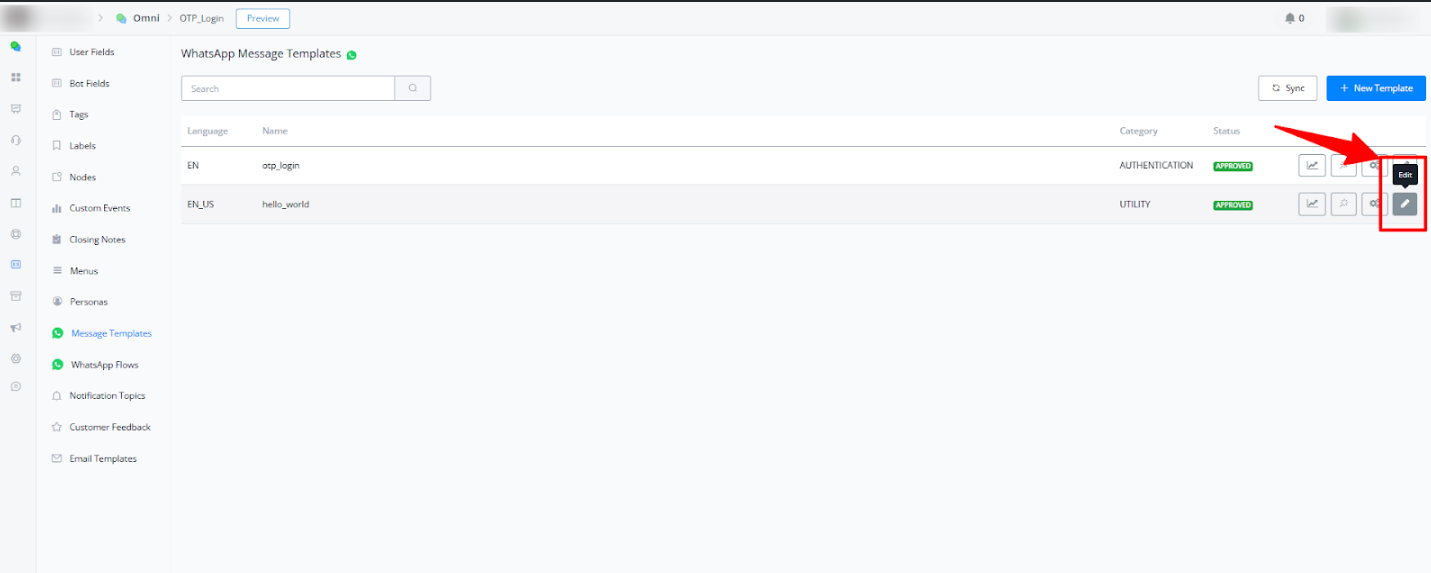
2.1 Edit WhatsApp Templates
- Previously, templates could only be created but not edited. Now, you can:
- Edit existing templates.
- Submit changes for review directly from Messagingme.app.
- Approved changes will automatically update templates used in the Flow Builder.
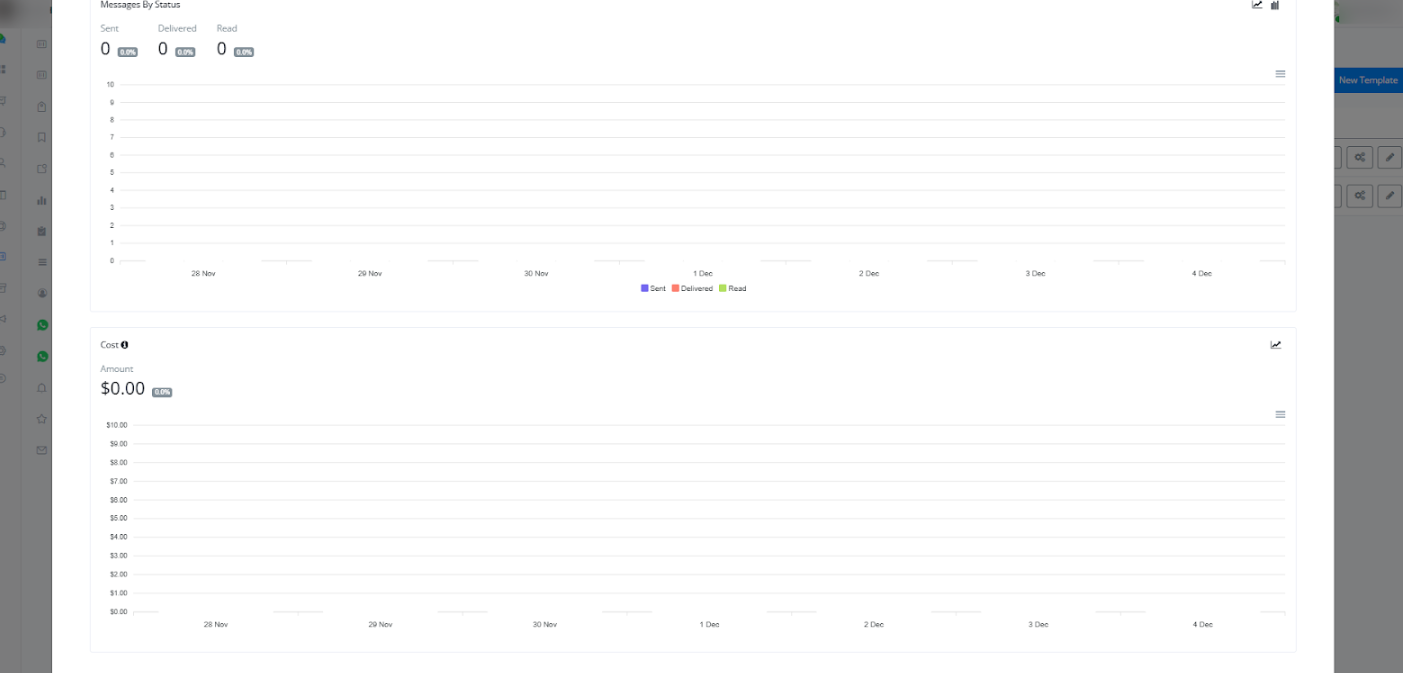
2.2 Template Analytics
-
A new Template Message Analytics feature provides insights into:
- Number of messages sent, delivered, and viewed.
- Conversation costs for WhatsApp template messages.
-
How to Access:
Navigate to Messagingme.app and click the Template Message Analytics icon.
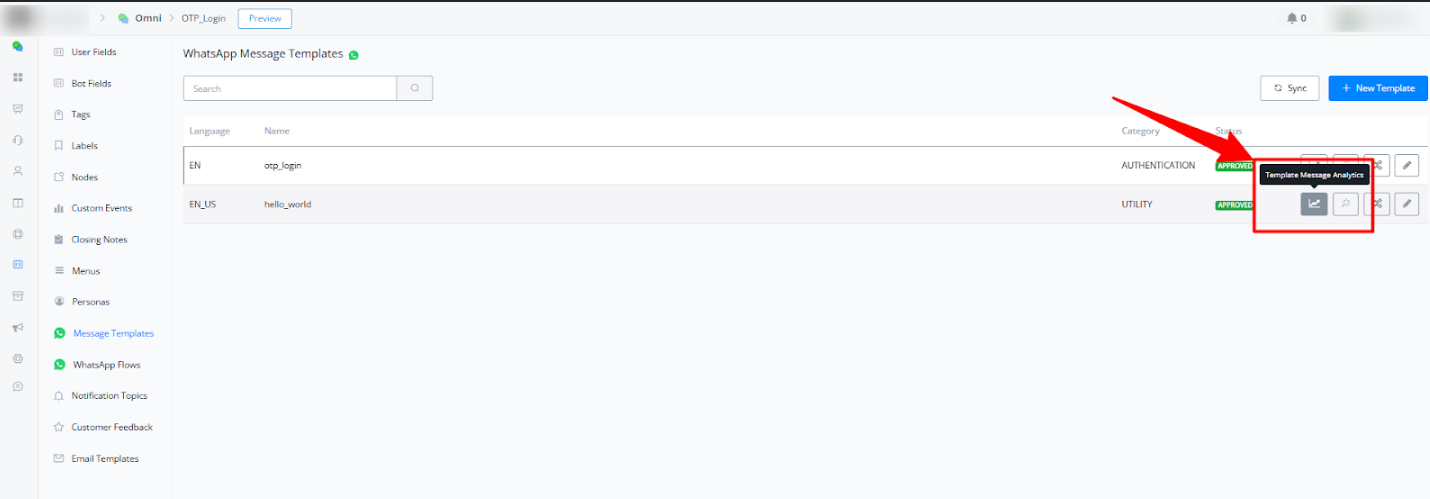
- Metrics are displayed in UTC time zone (not the workspace time zone).
- These insights are useful for tracking message performance and cost efficiency.
2.3 Check-in Use
- Feature: Easily track where templates are being used within flows.
- How It Works:
- Click the Check-in Use button on a template to view all flows using it.

• Use filters to locate specific flows or message types.
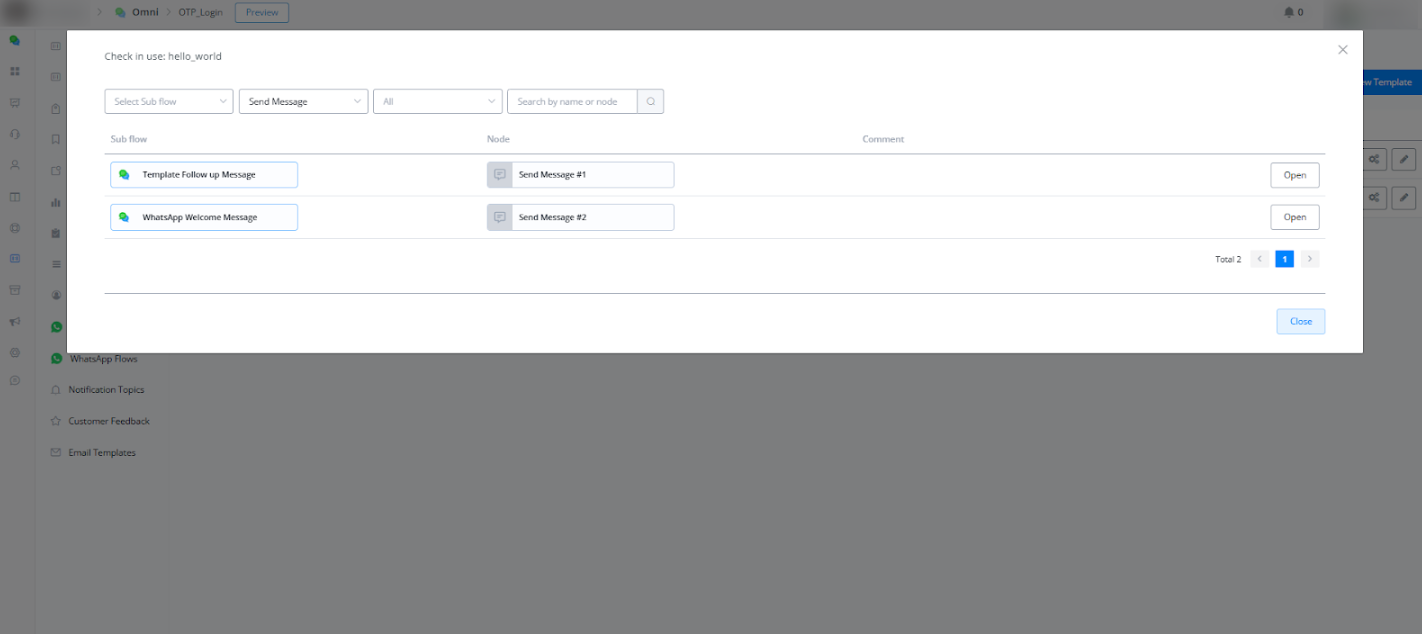
• This feature centralizes template management, allowing quick modifications to multiple flows simultaneously.
2.4 Default Values
- Purpose: Reduce manual input when sending template messages.
- How It Works:
- Set default values for variables (e.g., custom fields, URLs) in templates.
- Default values are automatically applied when sending messages but can still be modified if needed.
- Setup:
- Go to Message Templates, click the edit icon, and configure default values.
2.5 Enhanced Bot Template Installations
- Objective: Simplify the process of building comprehensive chatbot solutions on the WhatsApp channel.
- Key Updates:
- When building chatbot templates:
- All template messages used in a flow will be packaged with the chatbot template.
- Default values for these templates are included.
- Upon installing the chatbot template:
- Messagingme.app will automatically create and synchronize all templates with their default values.
- When building chatbot templates:
- Important Notes:
- Only WhatsApp Cloud is supported for this functionality.
- Ensure the WhatsApp number is connected to the account before installing templates.
These updates enhance the usability, flexibility, and analytics of WhatsApp templates within Messagingme.app. With these improvements, users can now:
- Edit and manage templates more efficiently.
- Gain insights into template performance.
- Streamline the process of building WhatsApp-based chatbot solutions.
Titles for WhatsApp Message Templates
Messagingme.app has introduced a new feature that allows administrators to assign titles to WhatsApp Message Templates. This enhancement improves usability by allowing Live Chat agents to easily identify and select templates based on assigned titles. Additionally, there is a new configuration option that allows admins to restrict which templates are available to agents in the Live Chat interface.
Step-by-Step Guide
1. Assigning a Title to a Template
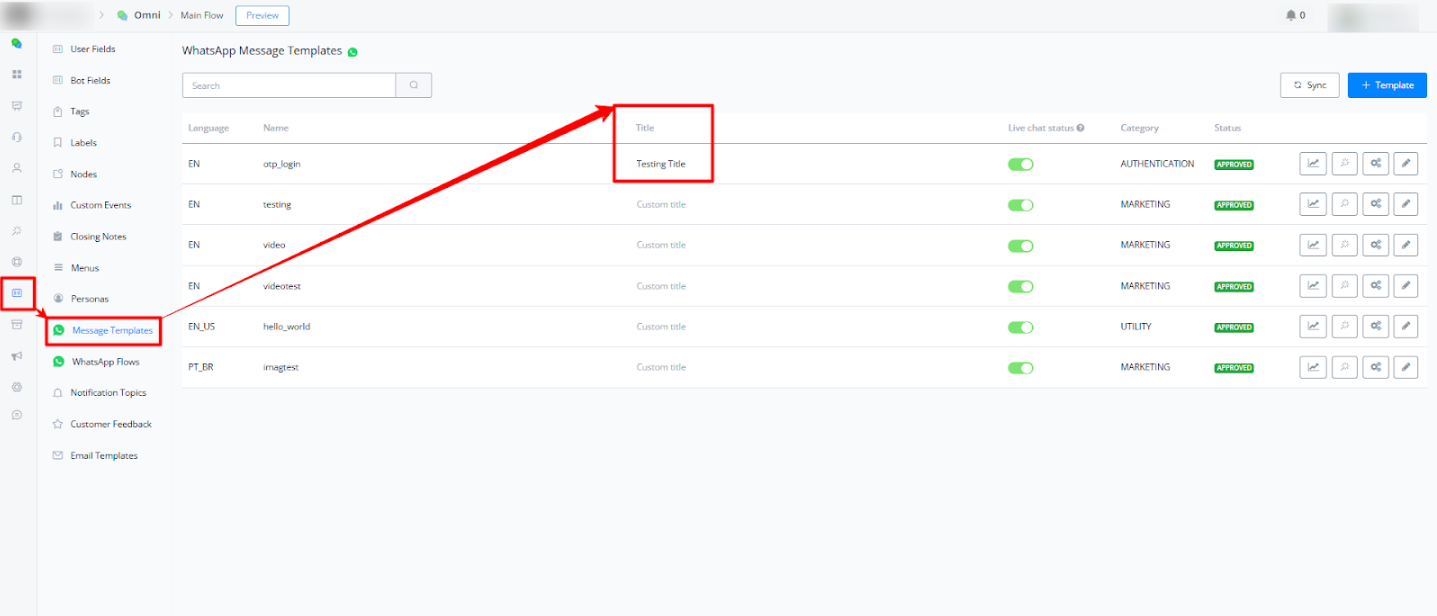
Navigate to the Message Templates section under the Omni tab in the bot menu. In this view, each template now has a Title column. To assign a title, select a template and enter a custom title in the corresponding field. This title will be used in the Live Chat interface for easier identification.
(This image shows how to assign a title to a template and where the title will appear.)
2. Managing Template Visibility for Live Chat Agents
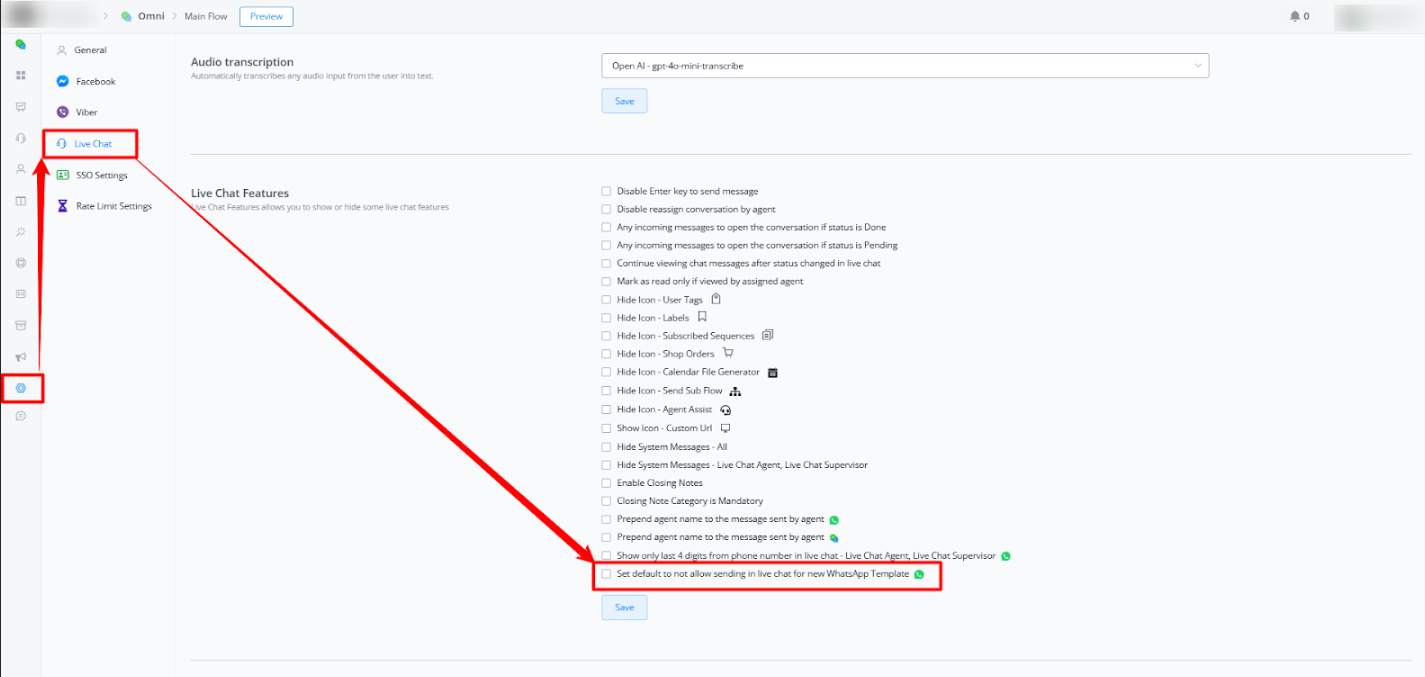
To control whether Live Chat agents are allowed to use WhatsApp templates, go to Settings > Live Chat > Live Chat Settings. Locate the following option at the bottom of the settings list:
Set default to not allow sending in the chat for new WhatsApp Templates
When enabled, this option prevents newly created templates from appearing in the chat interface by default. Only templates that are explicitly allowed will be available to agents. This setting helps maintain control over the communication content used by your team.
(This image highlights the location of the new checkbox within the Live Chat settings.)
3. Using Titled Templates in Live Chat
When a Live Chat agent initiates a WhatsApp conversation, they will be able to select from the templates that have been permitted for use. The selection interface will now display the title assigned to each template, simplifying the process of finding the correct message.
(This image shows the template selection process from the agent’s chat interface, using the assigned titles.)
Summary
- Titles can now be assigned to WhatsApp Message Templates to help identify them easily.
- A new setting allows administrators to restrict visibility of templates in Live Chat.
- Only templates with titles that are permitted will appear for agents in the chat interface.
This feature is already live and available for use. Please test it and provide feedback as needed.
Y
Click to Whatsapp ads
Introduction to Click To WhatsApp Ads
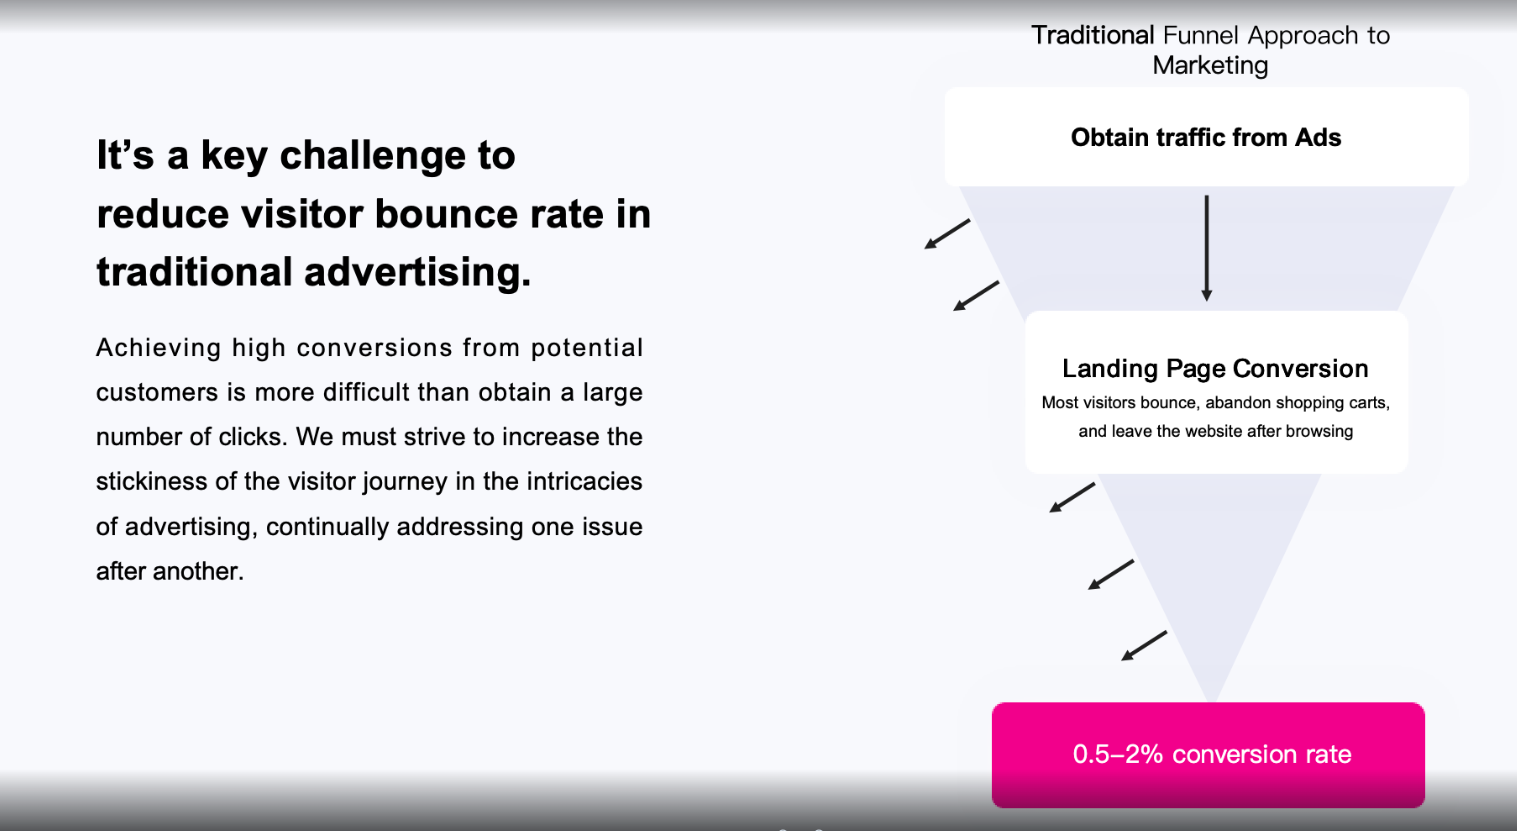
In the current landscape, direct-to-consumer brands are grappling with a common challenge: rising customer acquisition costs on social media platforms like Facebook and Instagram, without a corresponding increase in conversion efficiency.
Enter Click to WhatsApp Advertising (CTWA) – a transformative solution for optimizing your Facebook and Instagram advertising spend and acquiring new customers more effectively.
Click to WhatsApp Advertising (CTWA) is a great tool for acquiring new customers nowadays, helping you to maximize your ad spend on Facebook and Instagram!
Understanding Click to WhatsApp Ads (CTWA)
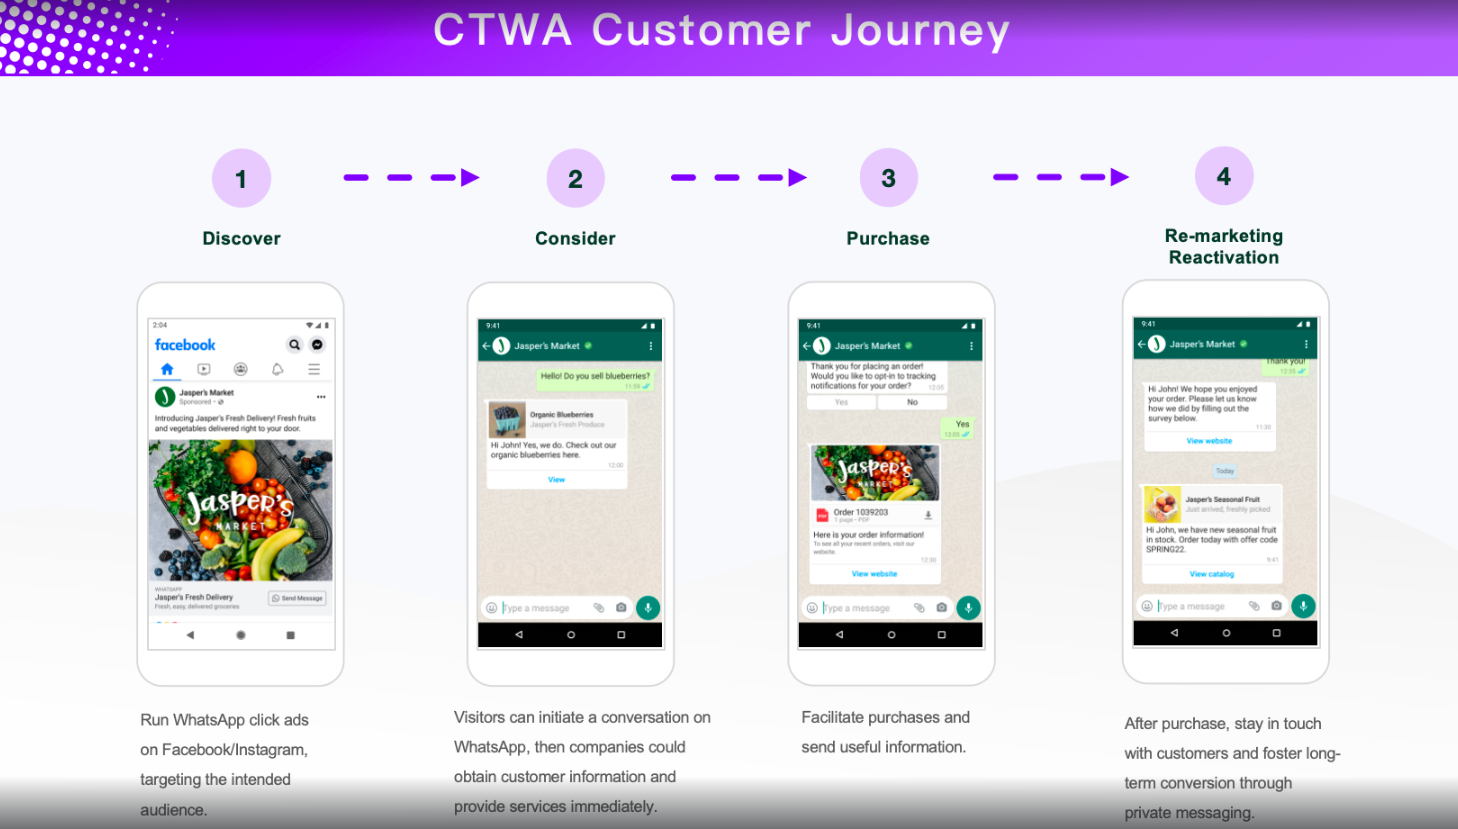
CTWA, or Click-to-WhatsApp Ads, is an innovative advertising model on Facebook and Instagram. It allows your audience to start a WhatsApp conversation directly from an ad viewed on these platforms. Clicking the ad opens up a dialogue between the user and your brand on WhatsApp. This interaction can be managed either through the Messagingme.app WhatsApp Bot for full automation or escalated to live agents via Messagingme.app’s agent takeover feature.
This approach is revolutionizing marketing strategies, moving away from traditional high-converting landing pages. Now, marketers can offer immediate, tailored conversational experiences directly, simplifying the marketing process and enhancing user engagement.
Why Choose Click to WhatsApp Ads?
- Expand Customer Reach: Capture attention on popular social platforms like Facebook and Instagram, especially in regions like Indonesia and Malaysia where these platforms are heavily used for news, celebrity updates, and social interaction.
- Drive Conversions and Sales: Use Messagingme.app’s comprehensive WhatsApp solutions to foster long-term customer relationships and propel business growth through ongoing communication.
- Streamline Lead Collection: By eliminating the need for landing pages, you can immediately capture users’ WhatsApp numbers as soon as they engage with the CTWA button.
- Optimize Return on Investment: Soon, you’ll be able to integrate with Meta’s Conversions API, enhancing ad targeting based on conversions and reducing cost per action.
- Reduce Costs: WhatsApp categorizes conversations initiated from Click-to-WhatsApp ads as user-initiated. This means that conversations started within 72 hours of the user’s ad interaction are free from WhatsApp charges.
Create Click to WhatsApp Ads
Step 1: Create WhatsApp Business API account in Messagingme.app**.**
You cannot interact with the advertising audience using a personal WhatsApp number. Before creating Click-to-WhatsApp ads in the Ad Manager, please ensure you have created a whatsapp business api account through Messagingme.app.
Step 2: Connect WhatsApp Business API account to your Facebook page
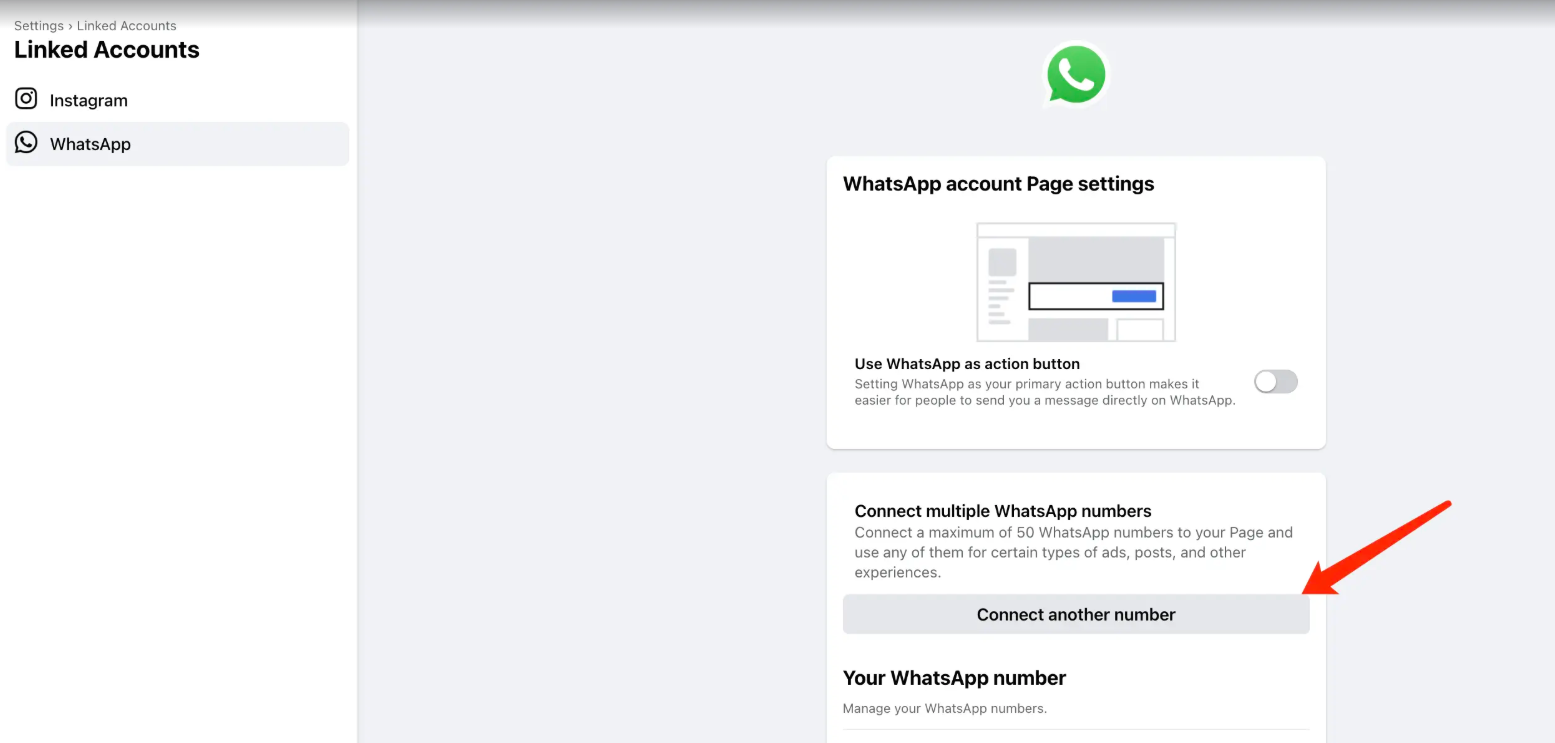
Meta requires the association of a WhatsApp Business account with a Facebook Page before creating Click-to-WhatsApp ads. Here are the steps:
- Ensure that you have admin privileges for the Facebook Page.
- Navigate to your Facebook Page > Click on “Settings” (top right corner) > Select “WhatsApp.”
- Enter your WhatsApp Business phone number and click “Continue.”
- Enter the verification code to complete the binding.
Furthermore, if you wish to run advertising campaigns on Instagram, you should also link your Instagram account to your Facebook Page.
Once you have completed the above steps, you can proceed to set up your first Click-to-WhatsApp ad.
Step 3: Setting Click to WhatsApp ads in Facebook Ads Manager
3.1 Open Facebook Ads Manager
Log in to your Facebook Ads Manager and click “Create”
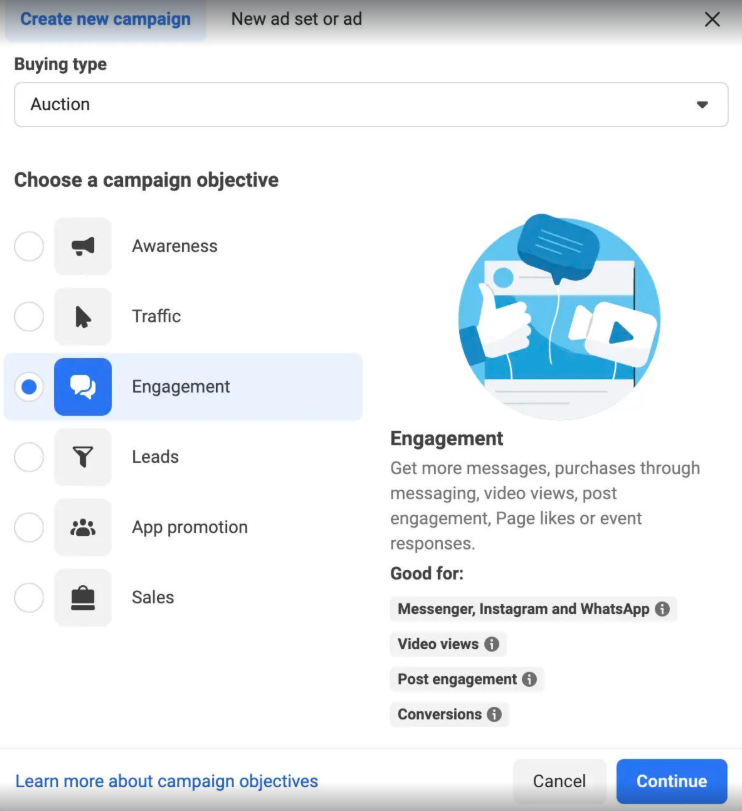
3.2 Choose a campaign objective
To use with WhatsApp, you can choose “Traffic”, “Engagement”, or “Sales”. In this case, we choose “Engagement” as an example.
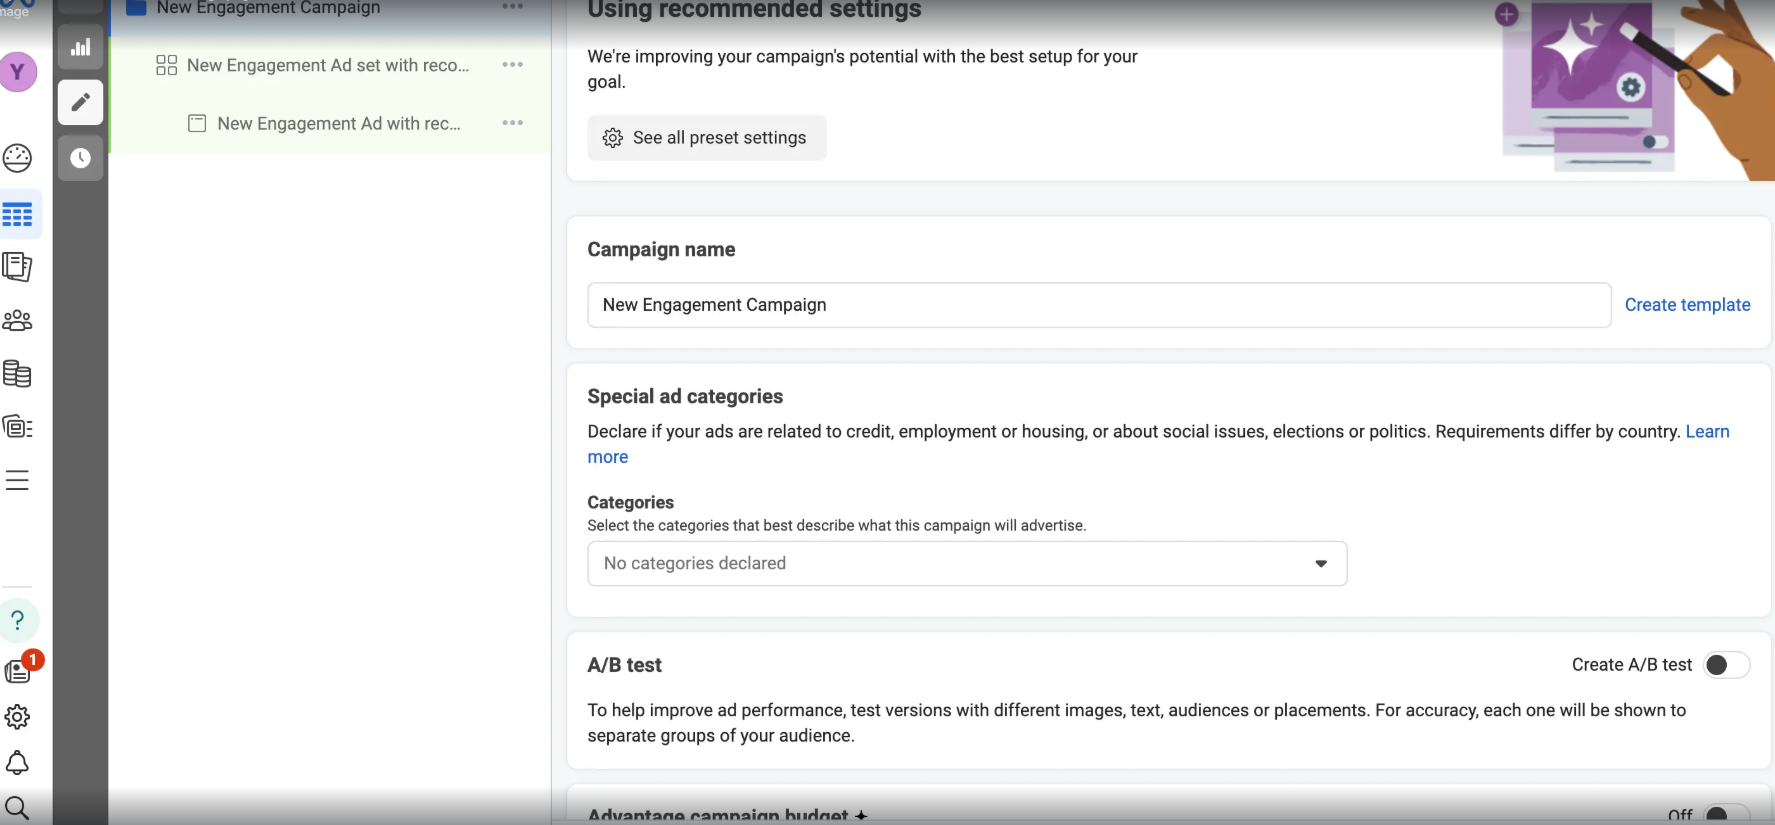
3.3 Fill in the information to create your campaign. This includes:
- Campaign Name
- Declare if you have special ad categories (i.e.: Employment, credit and housing)
- Define that if you need to create A/B test for your ads
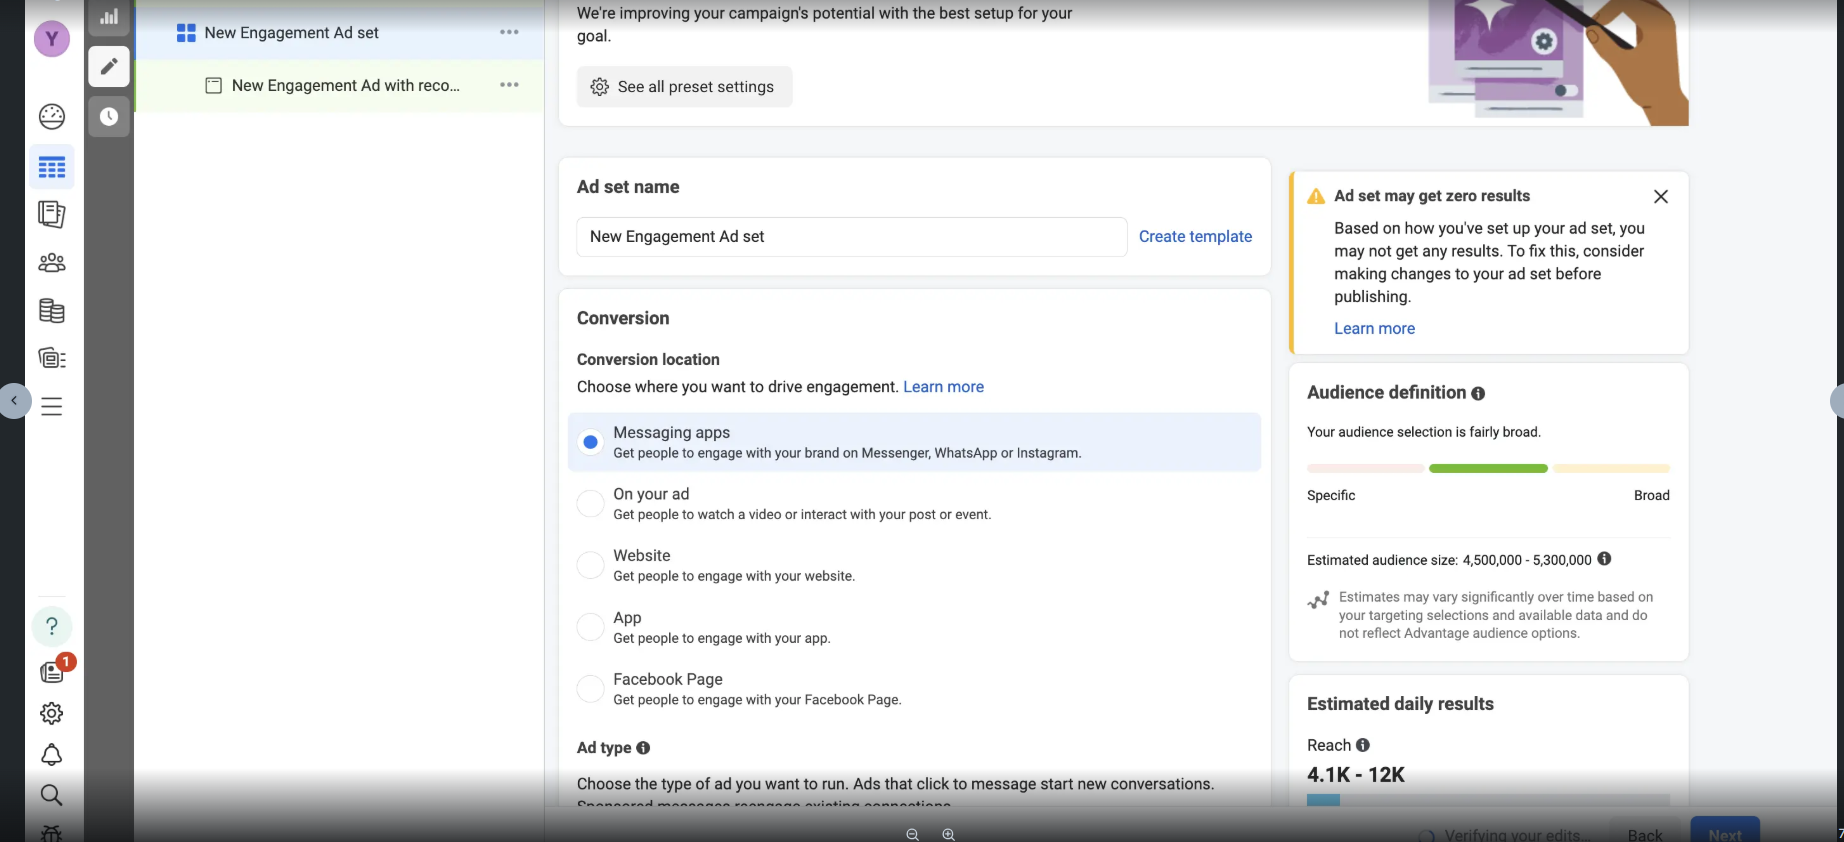
3.4 Configure Ad Set Details
- Conversion location:Select “Messaging apps”
- Ad type: Select “Click to message”
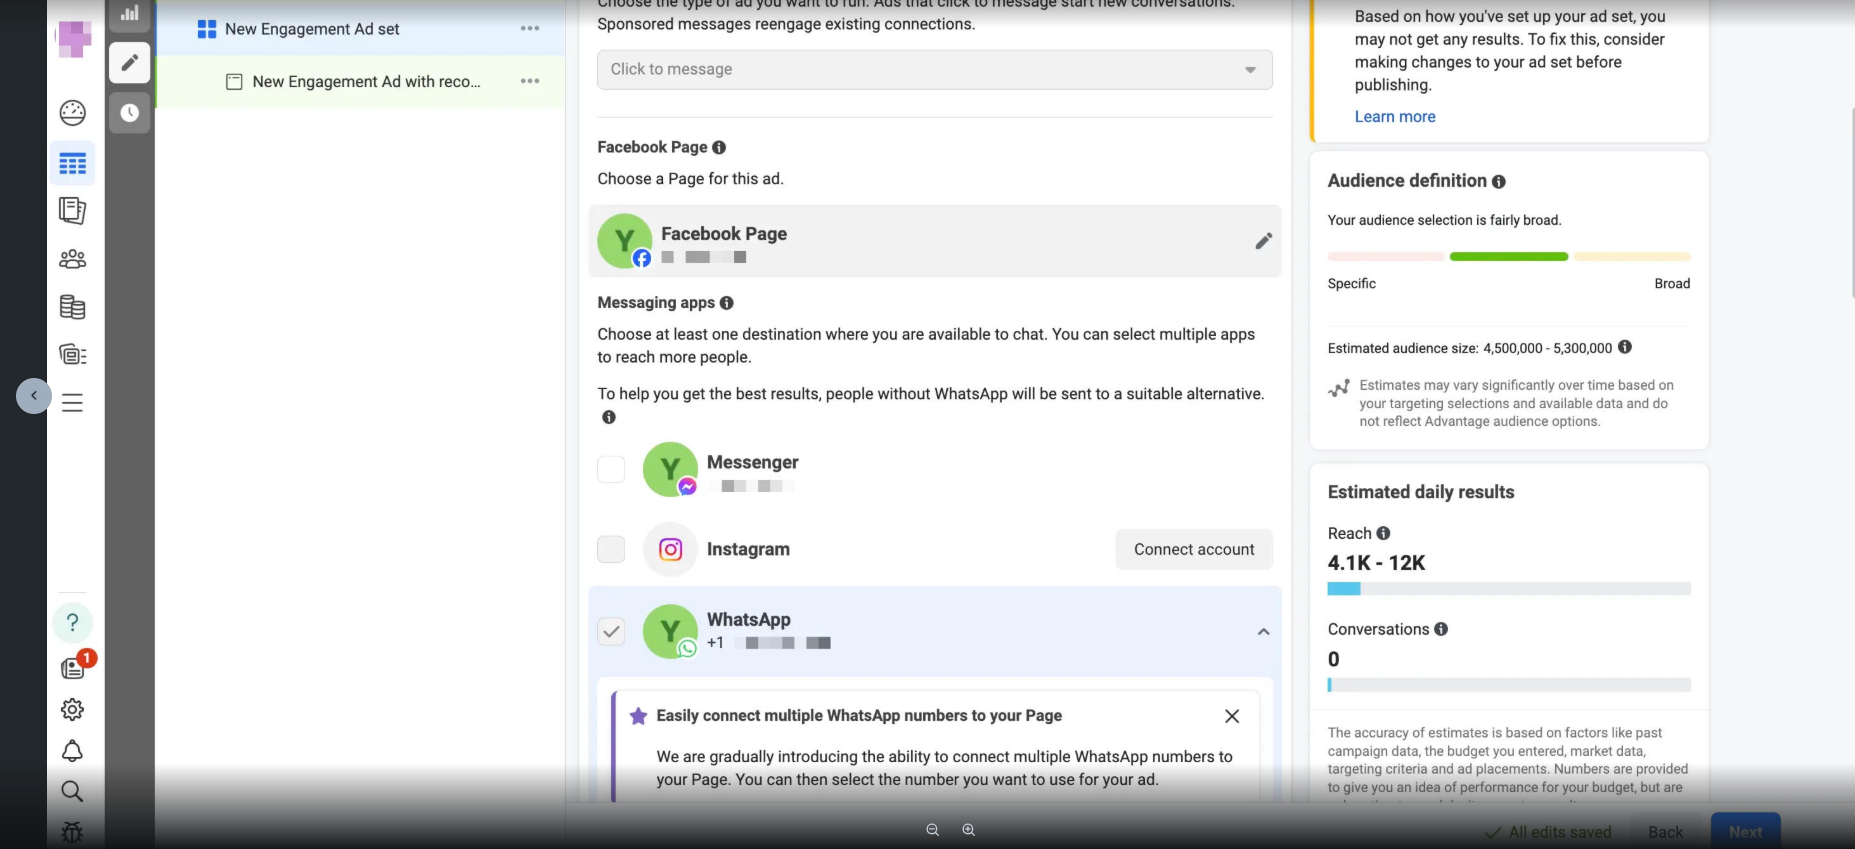
- Facebook Page: Select “Facebook Page”
- Messaging Apps: Select “WhatsApp”
Note: You will only see a WhatsApp number if you have completed Step 2: Connect WhatsApp Business API account to your Facebook page above.
3.5 Select your audience, ad format, budget and schedule
Please refer to the Facebook Ads Manager for a comprehensive understanding of bidding strategies
Now that you have successfully chosen the objective and budget for your ad campaign, please click “Next” and proceed to define the ad sets for this campaign.
3.6 Set up creative ads
Edit specific ad placements on Facebook and Instagram to adjust image dimensions. You can also convert a set of images into a video slideshow to enhance click-through rates.
Add primary text and headlines for your Click-to-WhatsApp ads on Facebook and Instagram. You can add up to five primary text options and headlines.
Include descriptions in your ads for additional information and context.
Choose a Call to Action (CTA) button for your WhatsApp ads. You can select from various available CTAs.
Preview the ads in the advanced preview to see how they will appear in different placements, such as the Facebook and Instagram feeds.
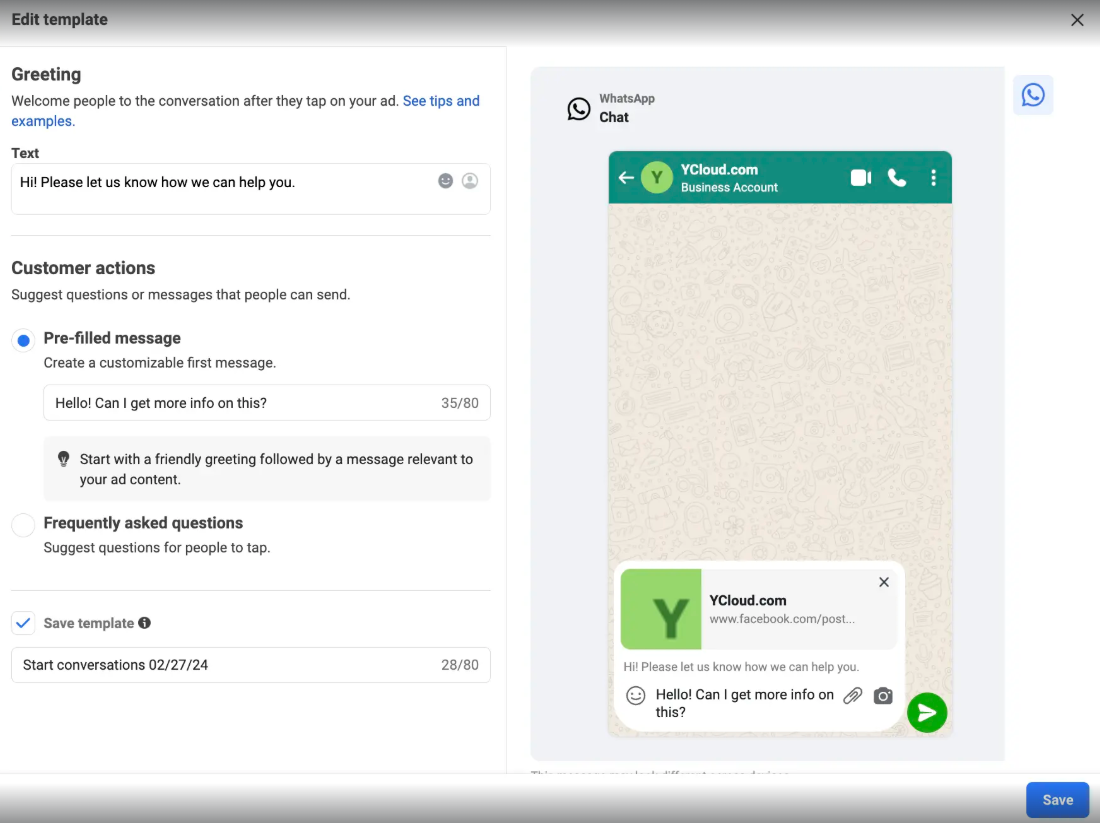
3.7 Create and preview message template
Click “Create” and generate a welcome message template for quick chat interactions once people click on your ads.
3.8 Publish your ads
Facebook will review your ad. Once approved, it will go live based on your targeting.
Create Automation in Messagingme.app
Whatsapp Ad Referral Trigger
WhatsApp Ad Referral Trigger is a new feature that allows you to release ads on Facebook and trigger specific automations in your WhatsApp chatbot when users click on the ads
Here we will cover two important aspects of this feature:
- triggering different flows for different ads
- handling duplicate messages.
Triggering Different Flows for Different Ads
When running multiple ads for different products or services, it is essential to ensure that each ad triggers the appropriate automation flow. To achieve this, you can set up conditions to determine which ad the user is coming from.
To begin, create a new flow, which we’ll call the “WhatsApp Ads Router.” This flow will serve as a router for all ads, redirecting users to different flows based on the ad they clicked.
Creating a Trigger
Automations -> Triggers -> +New Trigger -> WhatsApp Ad Referral
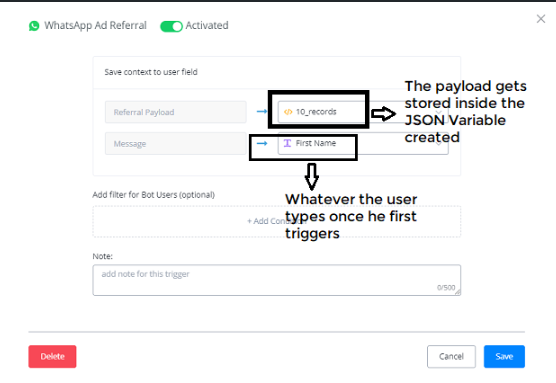
Let’s see how the JSON CUF data looks like:

Source_id -> it is relevant to which ads you are running.
Source_url -> you can use.
These two are unique identifiers for the ads you are running, which is shown by Source_type -> which tells it is ads.
Create the sub-flow to redirect to specific flows
Using the Condition Nodes and with the use of Source_id, we can trigger respective different flows.
Let’s create a new Sub-flow called “Whatsapp_Ads_Router” Every ads will be directed to this flow and based on the Source Id of the Ad, it will redirected to different sub-flow.
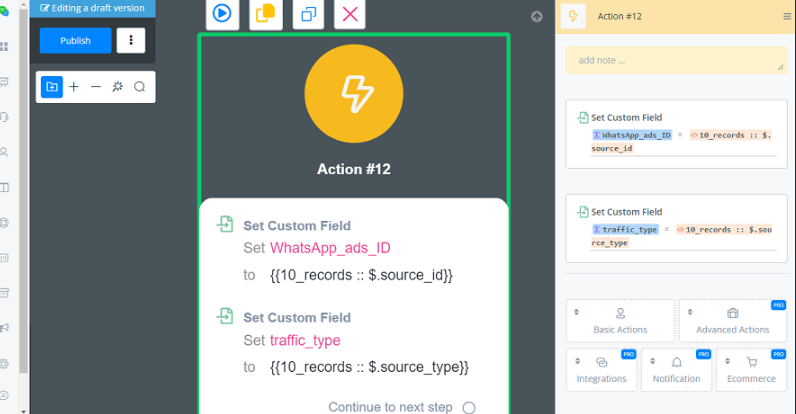
First create Action Node -> Set Variable Value -> Whatsapp_ads_ID (CUF created) and assign the value of JSON path.
To know how to create a JSON Path, use the following application called JSONPath Online Evaluator with url -> JSON Path Finder
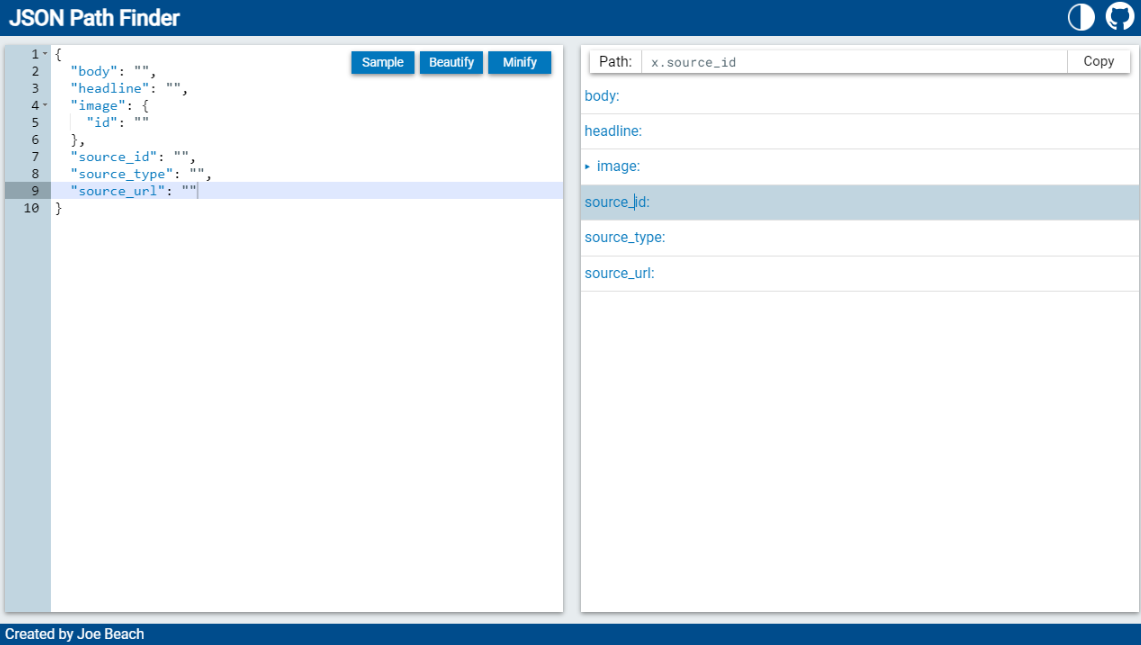
Now using these JSON Paths, let’s set up the CUF values.
Source_id -> $.source_id
Source_type -> $.source_type
Creating a Condition Node, where checking the WhatsApp_ads_ID is having a certain Number (collecting the data from the </> 10_records JSON CUF variable). By this source_id number you know the source of coming of which product and service the ad is. In this way, you can trigger different flow connected to different ads.
How to Handle the default reply or Main flow to avoid “sending duplicate messages”
If the default reply is active -> Condition Control of the flow triggered
If the default reply is NOT active -> Condition Control of the Main flow.
We need to add the Condition Node at the beginning of the Flow, which is triggered.
If the default reply is NOT active, it will trigger the Main-flow. So you need to add the condition node at the start of the Flow.
Let’s show you in the automations for Case 1 where Default reply is Active:
Automations -> keywords -> Default Reply -> Active -> Choose the sub-flow example (Default Reply).
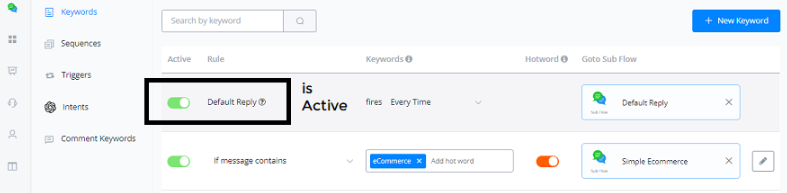
When the new user is coming into the Bot, this sub-flow will trigger always.
In this Default Reply sub-flow you need to add a Condition Node, if the Traffic_type contains ad, you are not sending them anything because you already have a subflow that is handling this automation.
💡 It’s also highly recommend that you can use the Last Message JSON system field instead of the WhatsApp referral Payload.

You have already designed the flow WhatsApp Ads Router to handle the traffic coming from the Ads.
Incase if the Default reply is not active,
Automations -> keywords -> Default Reply -> Not Active -> we are triggering the Main flow.
You need to go the main flow, and add the Condition Node, checking for the traffic_type is ad, if yes, you are not sending them anything.
As already automations are handled by the WhatsApp_ads_Router.
This will ensure the user receives only messages from One Automation, that you are setting inside the WhatsApp_ads_Router.
For the regular user that is coming Organically from your ref url or your website widget, they still can trigger the main flow.
By this the user coming from the Ads will not get duplicate messages.
FAQ and common errors for Whatsapp bot
FAQ
You might see the error message below:
[{"code":131053,"title":"Media upload error","message":"Media upload error","error_data":{"details":"Sticker file could not be processed. Please choose a different file."}}]The reason is:
This might be the url you are using in the message or template message isn’t publicly available to access.
Also, this can be the file format you are using are not supported by WhatsApp.
Solution:
We were unable to upload the media for one or more reasons, such as an unsupported media type. Refer to the error.error_data.details value for more information about why we were unable to upload the media.
You can check the URL you are using, and make sure the file url starts with https, and ends with the file format at the end of URL, and also this media file should be always publicly accessible.
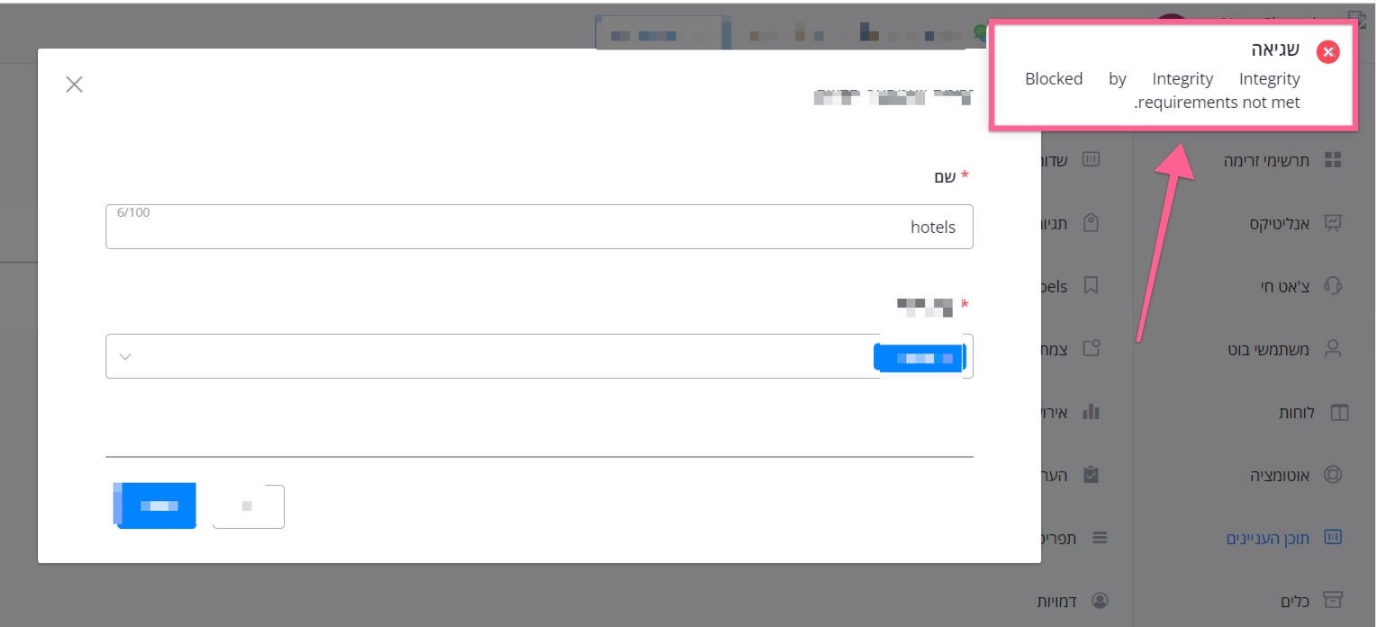
Blocked by Integrity. Integrity requirements not met
If you see this error message, this message can be triggered if you are trying to use “WhatsApp Flow” feature, you will need to check if your meta business manager is verified or not.
For certain feature like WhatsApp Flow, meta requires verified business manager to get access.
Error: “Sending payload: 2018062 (#100)”
The request included one or more unsupported or misspelled parameters.
You might see error message like this:
Error sending payload: 2018047 (#100) อัพโหลดไฟล์แนบไม่สำเร็จ
Error sending payload: 2018062 (#100) O URL fornecido não está na lista de liberação de extensões do Messenger
It’s possible that you are using a few user custom field variables, but some of the variables don’t have the value populated.
You can add a conditional check about all the variables you are about to use, and notify the admin if there are any errors.
You can also go to the error logs, and locate the user, and check the value of the variable used in the message, and confirm if all of them have the correct value.
Learn more information here:
https://developers.facebook.com/docs/whatsapp/cloud-api/support/error-codes
Error: “Message failed to send because there are restrictions on how many messages can be sent from this phone number”
You might see the error message like this:
[{"code":131048,"title":"Message failed to send because there are restrictions on how many messages can be sent from this phone number.This may be because too many previous messages were blocked or flagged as spam.","href":"https:\/\/developers.facebook.com\/docs\/whatsapp\/cloud-api\/support\/error-codes\/"}]This may be because too many previous messages were blocked or flagged as spam
It’s because you have sent many messages to other users, but many messages were blocked or flagged as spam.
So meta has placed some limitations on your number. You need to maintain a healthy account quality, otherwise, your account or WABA number might get blocked.
Error: “The message could not be sent. You do not have enough funds on your conversation prepaid balance to engage in any paid conversation”
You might see the error message like this:
The message could not be sent. You do not have enough funds on your conversation prepaid balance to engage in any paid conversation. Please proceed to http://hub.360dialog.com -> ‘Insights & Billing’ in order to top up your balance and optionally enable auto-renewal, which will prevent you from running out of funds in the future.
The reason is that you don’t have enough funds to your 360dialog account, you will need to purchase more credit from 360dialog. please go to your 360dialog account, insights & billings and add more credits.
Error: “(#200) Permissions error”
If you see this error, the reason is: Permission is either not granted or has been removed.
When you connect your WhatsApp account, you need to select all the permission required. Here is a video to explain in details:
https://www.youtube.com/watch?v=m9ZQa9cE_Wc
Error 28: Resolving timed out after 10000 milliseconds
So when we call meta API to send the message through their API, it takes longer then 10 seconds. That’s the default timeout settings from meta.
In this scenerio, it might be meta server is slow to respond or Messagingme.app server is having issues. You can check meta API status page first, if there isn’t any outage, reach out to Messagingme.app support.
Meta API status page:
Check Status and Outages of Meta Business Products
Error: “Required parameter is missing - Error code 131008”
You might see the error code:
(#131008) Required parameter is missing Parameter of type text is missing text value
Reason:
The request is missing a required parameter.
Solution:
It’s possible that you are using a few user custom field variables, but some of the variables don’t have the value populated.
You can add a conditional check about all the variables you are about to use, and notify the admin if there are any errors.
You can also go to the error logs, and locate the user, and check the value of the variable used in the message, and confirm if all of them have the correct value.
Learn more information here:
https://developers.facebook.com/docs/whatsapp/cloud-api/support/error-codes
Error: “WhatsApp Message Template not found”
This means that you have used a WhatsApp template message, but we can’t find this template message from your WhatsApp account.
This might be the user changing the message template or deleted it from the WhatsApp business manager and the changes have not been synced back into the Messagingme.app Chatbot
Error: “Business account has been locked”
It looks like your whatsapp business account has been locked by meta. you need to contact meta to get support.
Also, you can go to your WhatsApp manager in the meta business manager for any notifications related to this error.
You might see the error message like this:
[{"code":130472,"title":"Failed to send message because this user's phone number is part of an experiment","href":"https:\/\/developers.facebook.com\/docs\/whatsapp\/cloud-api\/support\/error-codes\/"}]Message was not sent as part of an experiment. See Marketing Message Experiment.
Learn more here:
https://developers.facebook.com/docs/whatsapp/cloud-api/support/error-codes
Error: “Message failed to send because more than 24 hours have passed since the customer last replied to this number”
You might see the error message like this:
[{“code”:131047,“title”:“Re-engagement message”,“message”:“Re-engagement message”,“error_data”:{“details”:“Message failed to send because more than 24 hours have passed since the customer last replied to this number.”},“href”:“https://developers.facebook.com/docs/whatsapp/cloud-api/support/error-codes/”}]
[{“code”:470,“href”:“https://developers.facebook.com/docs/whatsapp/api/errors/”,“title”:“Message failed to send because more than 24 hours have passed since the customer last replied to this number”}]
This is because it has been more than 24 hours since you last received a user initiated message - the session is closed and you can no longer use free-form messages. Please find a way to restrict message sending if there was no incoming message for the given user/phone number within 24h. Alternatively, you can contact the user using a Template Message.
Error: “Business Account and Consumer Account pair rate limit hit”
You might see the error like this:
(#131056) (Business Account, Consumer Account) pair rate limit hit
The reason for this error:
Too many messages sent from the sender phone number to the same recipient phone number in a short period of time.
Solution:
Wait and retry the operation, if you intend to send messages to the same phone number. You can still send messages to a different phone number without waiting
https://developers.facebook.com/docs/whatsapp/cloud-api/support/error-codes/
Error: “Error validating access token”
You might see the error message like this:
Error validating access token: The session has been invalidated because the user changed their password or Facebook has changed the session for security reasons.
Users who connected to WhatsApp have changed their password on their Facebook account. As a security measure Meta logs out all third-party platforms so reconnect once to establish the connection again will resolve the issue
The solution is to reconnect the channel. Because the user might have changed their password, so the previous token is not valid anymore.
Error: “Spam Rate limit hit”
You might see the error like this:
[{"code":131048,"title":"Spam Rate limit hit","message":"Spam Rate limit hit","error_data":{"details":"Message failed to send because there are restrictions on how many messages can be sent from this phone number.This may be because too many previous messages were blocked or flagged as spam."},"href":"https:\/\/developers.facebook.com\/docs\/whatsapp\/cloud-api\/support\/error-codes\/"}]Reason:
Message failed to send because there are restrictions on how many messages can be sent from this phone number. This may be because too many previous messages were blocked or flagged as spam.
Solution:
Check your quality status in the WhatsApp Manager and see the Quality-Based Rate Limits documentation for more information.
Error: “Receiver is incapable of receiving this message”
You will usually see the error message like this:
[{“code”:131026,“title”:“Receiver is incapable of receiving this message”,“message”:“Receiver is incapable of receiving this message”,“error_data”:{“details”:“Message Undeliverable.”}}]
Possible reasons:
Unable to deliver a message. Reasons can include:
· The recipient phone number is not a WhatsApp phone number.
· Recipient has not accepted our new Terms of Service and Privacy Policy.
· Recipient using an old WhatsApp version; must use the following WhatsApp version or greater:
o Android: 2.21.15.15
o SMBA: 2.21.15.15
o iOS: 2.21.170.4
o SMBI: 2.21.170.4
o KaiOS: 2.2130.10
Solution:
Confirm with the recipient that they agree to be contacted by you over WhatsApp and are using the latest version of WhatsApp.
Learn more information:
https://developers.facebook.com/docs/whatsapp/cloud-api/support/error-codes
Error: “#200 permission error - WhatsApp Cloud API”
Error: “Message not sent because outside 24 hours”
You can’t reach them directly. For WhatsApp, you will need to send a template message, for Messenger, you will need to send recurring notification or one time notification.
Connect Your Existing WhatsApp Business app (Coexistence Mode)
Coexistence allows you to use your WhatsApp Business App on a phone and connect the same number to the WhatsApp Cloud API at the same time.
Prerequisites
Before connecting, make sure the following requirements are met:
- WhatsApp Business App: You must be using the WhatsApp Business application (separate from the standard WhatsApp Messenger).
- Latest Version Installed: Ensure the WhatsApp Business app is updated to the latest version from the official app store.
- Meta Business Manager: An active Meta Business Manager account is required.
- Compliance: The phone number’s country code and your business type must comply with WhatsApp Business and Commerce Policies.
How to Connect
Navigate to WhatsApp Cloud in your platform and press the button:
“Connect WhatsApp Cloud.”
Choose your Business Manager. Select the connection type: “Connect the WhatsApp Business App.”
You will see two types of onboarding screens:
Note on Existing Linked Numbers
If you already have a number connected to the Cloud API and you want to add another number using Coexistence:
-
Simply connect the new WhatsApp Business App number.
-
After connecting, both numbers will appear in your dashboard automatically.
No additional setup is required.
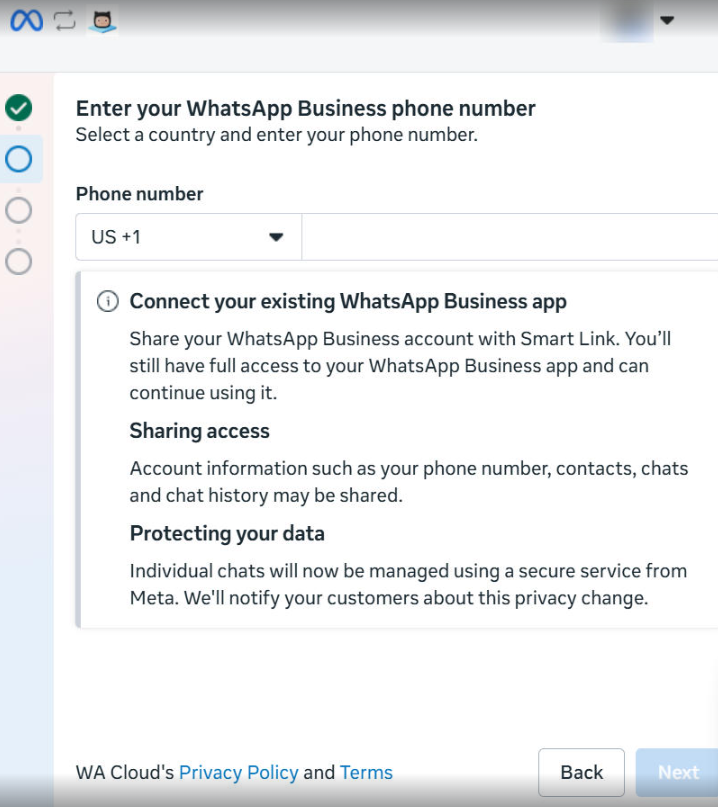
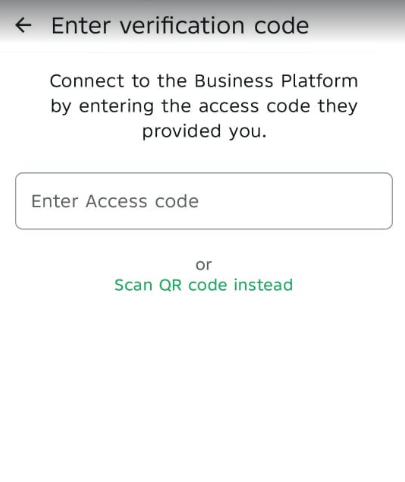
Enter your WhatsApp Business App phone number. A verification code will be sent inside the WhatsApp Business app from the Facebook Business Account.
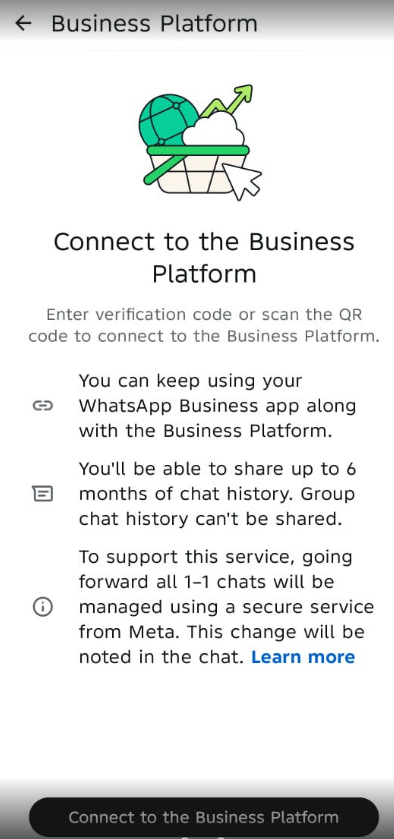
After verification, now scan the QR code or enter the code. You will receive both messages on your WhatsApp.

Tap the Connect to the Business Platform button to continue the onboarding process.
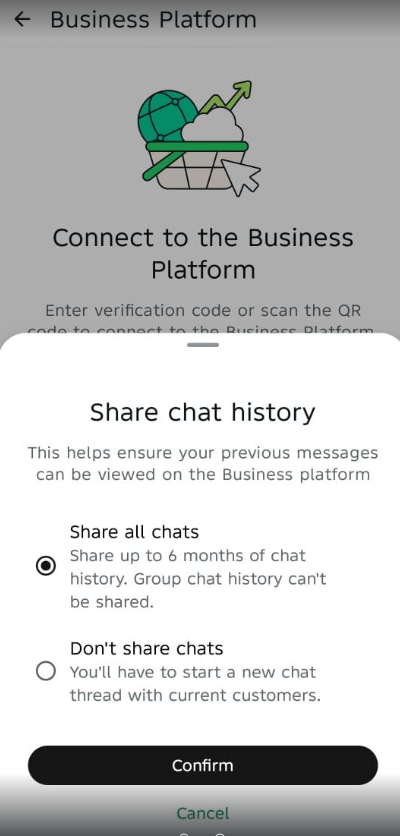
Tap the Confirm button in the app to give the business the option to share their chat history with you
Scan the QR code or paste the verification code
Once that’s done, the connection will be complete. Next, just add your payment method and link your number to the bot. After that, everything will be ready to go
Important Note
💡 The WhatsApp Business App on your phone must remain active. Do NOT delete or uninstall the WhatsApp Business App account.